Golf 2015 ➤ , Golf Variant 2015 ➤ Engine Mechanical, Fuel Injection and Ignition - Edition 04.2015 6 - Vibration Damper ❑ With ribbed belt pulley ❑ Removing and installing. Refer to ⇒ “1.4 Vibration Damper, Removing and Installing”, page 47 . ❑ Vibration Damper Sealing Ring, Replacing. Refer to ⇒ “2.3 Vibration Damper Sealing Ring, Replacing”, page 112 . 7 - Auxiliary Components Bracket ❑ With oil filter and engine oil cooler ❑ Accessory assembly bracket, removing and installing. Refer to ⇒ “1.5 Auxiliary Components Bracket, Removing and Installing”, page 53 . ❑ Removing and installing the engine oil cooler. Refer to ⇒ “2.2 Engine Oil Cooler, Removing and Installing”, page 192 . 8 - Seal ❑ Replace after removing 9 - Bolt ❑ Replace after removing ❑ Tightening specification and sequence. Refer to ⇒ Fig. ““Accessory Assembly Bracket - Tightening Specifications and Tightening Sequence”“ , page 45 . 10 - Bolt ❑ Tightening specification. Refer to ⇒ Electrical Equipment; Rep. Gr. 27 ; Generator; Overview - Gener‐ ator . 11 - Generator ❑ Overview. Refer to ⇒ Electrical Equipment; Rep. Gr. 27 ; Generator; Overview - Generator . 12 - Alignment Sleeves ❑ For A/C compressor 13 - Air Conditioning (A/C) Compressor AG. Volkswagen AG d ❑ Do not remove or disconnect refrigerant lines agen oes ksw not l o gu yV arCompressor; ❑ Assembly overview. Refer to ⇒ Heating, Ventilation eand d b Air Conditioning; Rep. Gr. 87 ; A/C an s i tee r Overview - A/C Compressor Power Unit . ho t au
or a
rrectness of i t to the co nform spec a t i h re o n in wit thi s
es, in part or in w l purpos hole ercia , is n m ot com
pe rm itte d
un le
ility ab y li an pt ce
c ss 14 - Bolt ❑ Tightening specifications. Refer to ⇒ Heating, Ventilation and Air Conditioning; Rep. Gr. 87 ; A/C Com‐ pressor; Overview - A/C Compressor Power Unit .
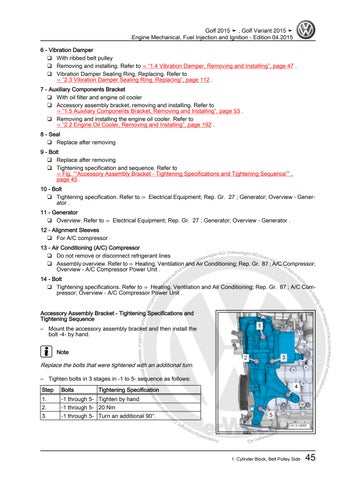
Accessory Assembly Bracket - Tightening Specifications and Tightening Sequence – Mount the accessory assembly bracket and then install the bolt -4- by hand. Note
Replace the bolts that were tightened with an additional turn. – Tighten bolts in 3 stages in -1 to 5- sequence as follows: 1. 2. 3.
-1 through 5- Tighten by hand -1 through 5- 20 Nm -1 through 5- Turn an additional 90°.
r te o iva r rp fo g n
Tightening Specification
ht rig py Co t.
Bolts
agen lksw Vo by
AG.
1. Cylinder Block, Belt Pulley Side
do c um en
Step
45
Prote cted by c o p yri gh t. C op yi


