3 minute read
o2.3 Vibration Damper Sealing Ring, Replacing


Golf 2015 ➤ , Golf Variant 2015 ➤ Engine Mechanical, Fuel Injection and Ignition - Edition 04.2015
2 Timing Chain Cover
⇒ “2.1 Overview - Timing Chain Cover”, page 104 ⇒ “2.2 Timing Chain Cover, Removing and Installing”, page 106 ⇒ “2.3 Vibration Damper Sealing Ring, Replacing”, page 112 2.1 Overview - Timing Chain Cover
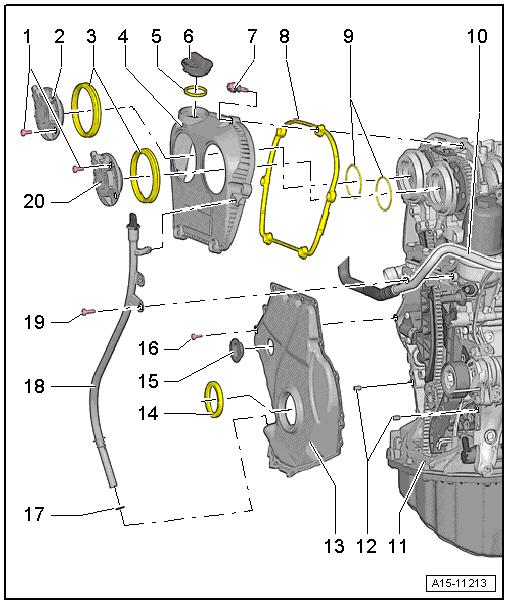
1 - Bolt ❑ 4 Nm + 45° ❑ Replace after removing 2 - Exhaust Camshaft Adjust‐ment Valve 1 - N318-
3 - Seals ❑ To replace the cover must be removed.
4 - Timing Chain Cover Upper Section ❑ Removing and instal‐ling. Refer to ⇒ “2.2.1 Upper Timing Chain Cover, Removing and Installing”, page 106 . 5 - Seal ❑ Replace if damaged 6 - Cover
7 - Bolt ❑ Tightening sequence. Refer to ⇒ Fig. ““Timing Chain Guard Upper Cover Tightening Sequence”“ , page 105 8 - Seal ❑ Replace if damaged 9 - O-Ring ❑ Replace after removing ❑ Coat with engine oil 10 - Not Installed
Protected by copyright . Copying fo pivate or commerci al pur po s e s , i n p a r t r o r in w ho le, is not permitted unless authorised by Volkswagen AG. Volkswagen AG does notguarantee or accept any liabilit y wi th res pect t o t h e c o r r e c t n e ss o f in format ion in this document. Copyright by Volkswagen AG. r 11 - Engine 12 - Alignment Pins ❑ Centering the cover 13 - Lower Timing Chain Cover ❑ With seal ❑ Replace after removing. Refer to ⇒ “2.2.2 Lower Timing Chain Cover, Removing and Installing”, page 108 . 14 - Shaft Seal ❑ For the vibration damper ❑ Replacing. Refer to ⇒ “2.3 Vibration Damper Sealing Ring, Replacing”, page 112 .
Golf 2015 ➤ , Golf Variant 2015 ➤ Engine Mechanical, Fuel Injection and Ignition - Edition 04.2015
ht . Copying for pi ate or commerci al pur po s e s , i Protected by copyri
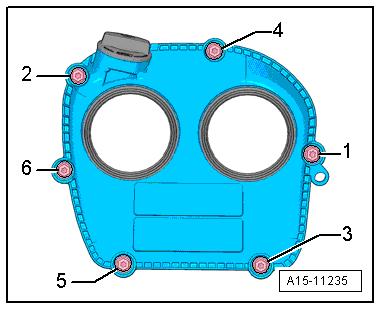
15 - Plug ❑ Replace after removing 16 - Bolt ❑ Replace after removing ❑ Tightening sequence with 15 bolts. Refer to ⇒ Fig. ““Lower Cover for Timing Chain - Tightening Sequence for 15 Bolts”“ , page 106 ❑ Tightening sequence with 8 bolts. Refer to ⇒ Fig. ““Lower Cover For Timing Chain - Tightening Sequence for Eight Bolts”“ , page 105 17 - O-Ring ❑ Replace after removing ❑ Coat with oil before installing 18 - Oil Dipstick Tube p a r t o r in w ho le, is not permitted unless authorised by Volkswagen AG. Volkswagen AG does notguarantee or accept any liabilit y wi th res pect t o t h e c o r r e c t n e ss o f 19 - Bolt ❑ 9 Nm 20 - Camshaft Adjustment Valve 1 - N205❑ Removing and installing. Refer to ⇒ “4.4 Camshaft Adjustment Valve 1 N205 and Exhaust Camshaft Adjustment Valve 1 N318 , Removing and Installing”, page 161 . n Timing Chain Guard Upper Cover - Tightening Sequence – Tighten the bolts -1 through 6- in the sequence shown: 1 - Bolts -1 through 6- Install by hand all the way 2 - Bolts -1 through 6- 9 Nm rv Lower Cover For Timing Chain - Tightening Sequence for Eight Bolts g Tighten the Steel Bolts -1 through 8- in Three Stages in the Se‐quence Shown: 1 - Bolts -1 through 8- 8 Nm 2 - Bolts -2 to 3 and 5 to 8- 45° additional turn in format ion in this document. Copyright by Volkswagen AG. 3 - Bolts -1 and 4- After installing the vibration damper tighten with an additional turn.
Tighten the Aluminum Bolts -1 through 8- in Three Stages in the Sequence Shown: 1 - Bolts -1 through 8- 4 Nm 2 - Bolts -2 to 3 and 5 to 8- 45° additional turn
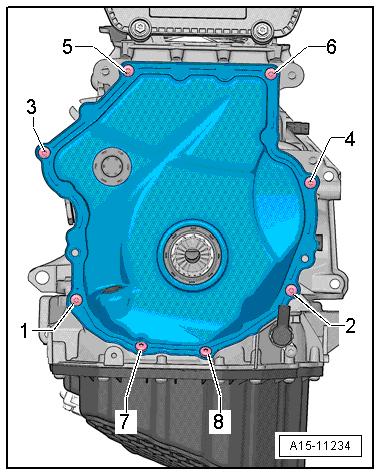
3 - Bolts -1 and 4- After installing the vibration damper tighten with an additional turn.


