
3 minute read
2.3 Sealing Flange, Removing and Installing, Transmission Side


Golf 2015 ➤ , Golf Variant 2015 ➤ Engine Mechanical, Fuel Injection and Ignition - Edition 04.2015
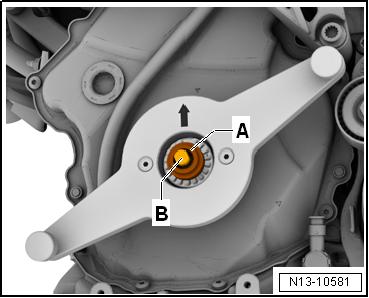
Install Vibration Damper – If necessary remove the Collar Nut -B- and the Assembly Tool - Turning Over Tool -A- from the tensioning pins.
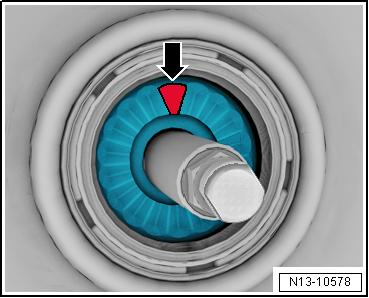
– Secure the vibration damper in TDC, while doing this pay at‐tention to the tooth contour of the chain sprocket -arrow-.


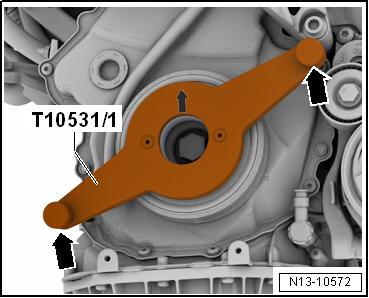
Protected by copyright . Copying for pivate or commerci al p r po s e s , i n p a r t r o r in w ho le, is not permitted unless authorised by Volkswagen AG. Volkswagen AG does notguarantee or accept any liabilit y wi th res pect t o t h e c o r r e c t n e ss o f in format ion in this document. Copyright by Volkswagen AG. – Place the Assembly Tool - Turning Over Tool -A- on the ten‐sioning pins the at the same time the hex fitting points to the vibration damper. – Install the Collar Nut -B-, while doing this move the vibration damper slightly back and forth, to check in the vibration damp‐er is correctly in the tooth contour. Tighten the collar nut, until the vibration damper can no longer be turned. u – Place the Counterhold Tool - T10531/1- as shown on the vi‐bration damper and tighten hand-tight using the knurled bolt -arrows-.
Golf 2015 ➤ , Golf Variant 2015 ➤ Engine Mechanical, Fuel Injection and Ignition - Edition 04.2015
– Remove the Collar Nut -A- and loosen the tensioning bolt -B-.
– Remove the Tensioning Pins and remove with Assembly Tool - Turning Over Tool .

Protected by copyright . Copying for pivate or co merci al pur po s e s , i n p a r t r o r in w ho le, is not permitted unless authorised by Volkswagen AG. Volkswagen AG does notguarantee or accept any liabilit y wi th res pect t o t h e c o r r e c t n e ss o f in format ion in this document. Copyright by Volkswagen AG. – Install a new vibration damper bolt with oiled O-ring -1- handtight. m – Remove the knurled bolt -arrows- and remove the Counter‐hold Tool - T10531/1- .
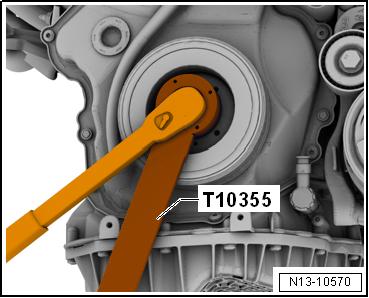
– Tighten vibration damper bolt using the Counterhold - Vibra‐tion Damper - T10355- . – Install new bolts -arrows-.
Golf 2015 ➤ , Golf Variant 2015 ➤ Engine Mechanical, Fuel Injection and Ignition - Edition 04.2015

i al pur po s e s , i d by copyright . Copying fo pivate or commer Protect
Assemble in reverse order of disassembly. Tightening Specifications ♦ Refer to p a r t o r in w ho le, is not permitted unless authorised by Volkswagen AG. Volkswagen AG does notguarantee or accept any liabilit y wi th res pect t o t h e c o r r e c t n e ss o f ⇒ “1.1 Overview - Cylinder Block, Belt Pulley Side”, page 44 . 1.5 Auxiliary Components Bracket, Remov‐ing and Installing n Special tools and workshop equipment required ♦ Shop Crane - Drip Tray - VAS6208Caution r c This procedure contains mandatory replaceable parts. Refer to component overview prior to starting procedure. r Mandatory Replacement Parts ♦ Bolts - Auxiliary Components Bracket ♦ O-ring - Engine Oil Cooler ♦ eRemoving – Drain the coolant. Refer to in format ion in this document. Copyright by Volkswagen AG. ⇒ “1.3 Coolant, Draining and Filling”, page 217 . – Remove the generator. Refer to ⇒ Electrical Equipment; Rep.
Gr. 27 ; Generator; Generator, Removing and Installing .
CAUTION
Danger of frostbite from refrigerant. – Do not open the A/C system refrigerant circuit.
– Disconnect the connector -1- on the A/C Compressor Regu‐lator Valve - N280- .
– Remove the bolts -arrows-.
– Remove the A/C compressor from the bracket with the refrig‐erant hoses attached and tie up to the right side. Do not bend, twist or stretch the refrigerant lines and hoses.


