3 minute read
n3.2 Overview - Balance Shaft Drive Chain


Golf 2015 ➤ , Golf Variant 2015 ➤ Engine Mechanical, Fuel Injection and Ignition - Edition 04.2015
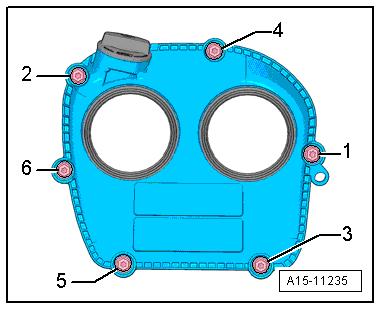
Installing – Replace seals. Protected by cpyright . Copying for pivate r co merci al pur po e s , i n p a r t r o r in w ho le, is not permitted unless authorised by Volkswagen AG. Volkswagen AG does notguarantee or accept any liabilit y wi th res pect t o t h e c o r r e c t n e ss o f in format ion in this document. Copyright by Volkswagen AG. s – Install the cover on the cylinder head the tighten the bolts hand tight. While doing so make sure that the seal lays correctly on the cylinder head. – Tighten the bolts -1 through 6- in the sequence shown. Refer to ⇒ Fig. ““Timing Chain Guard Upper Cover - Tightening Se‐quence”“ , page 105 . – Install the Camshaft Adjustment Valve 1 - N205- and Exhaust Camshaft Adjustment Valve 1 - N318- . Refer to ⇒ “4.4 Camshaft Adjustment Valve 1 N205 and Exhaust Cam‐shaft Adjustment Valve 1 N318 , Removing and Installing”, page 161 . – Install the engine cover. Refer to ⇒ “3.1 Engine Cover, Removing and Installing”, page 38 . Tightening Specifications ♦ Refer to ⇒ “2.1 Overview - Timing Chain Cover”, page 104 m 2.2.2 Lower Timing Chain Cover, Removing and Installing o Special tools and workshop equipment required ♦ Vibration Damper Assembly Tool - T10531Caution o This procedure contains mandatory replaceable parts. Refer to component overview prior to starting procedure.
Mandatory Replacement Parts ♦ Cover - Lower Timing Chain ♦ Bolts - Lower Timing Chain Cover ♦ O-ring - Oil Dipstick Tube
Note
Dependent on the sealing compound sealant, bends the cover when removing. Because of this, always replace the cover.
Removing – Remove right front wheel housing liner. Refer to ⇒ Body Ex‐terior; Rep. Gr. 66 ; Wheel Housing Liner; Front Wheel Hous‐ing Liner, Removing and Installing . – Remove the engine support. Refer to ⇒ “1.6 Engine Support, Removing and Installing”, page 55 . – Remove the vibration damper. Refer to ⇒ “1.4 Vibration Damper, Removing and Installing”, page 47 . – Drain the engine oil. Refer to ⇒ Maintenance ; Booklet 36.1 ;
Procedure Descriptions; Engine Oil, Draining, Replacing Oil
Filter, and Filling .
Golf 2015 ➤ , Golf Variant 2015 ➤ Engine Mechanical, Fuel Injection and Ignition - Edition 04.2015


– Remove the Oil Pressure Regulation Valve - N428- . Refer to ⇒ “4.8 Oil Pressure Regulation Valve N428 , Removing and
Installing”, page 206 . – Remove the ribbed belt tensioner. Refer to ⇒ “1.3 Ribbed Belt Tensioner, Removing and Installing”, page 47 .
– Free up the clip -2- for the electrical wiring harness. – Remove the screw -1-.
– Unclip the guide tube from the timing chain upper cover in di‐rection of -arrow-.
– Remove the guide tube from the timing chain guard.
p – Remove the bolts -1 through 15-.
Note
Protected by copyright . Copying fo pivate r commerci al pur o s e s , i n p a r t r o r in w ho le, is not permitted unless authorised by Volkswagen AG. Volkswagen AG does notguarantee or accept any liabilit y wi th res pect t o t h e c o r r e c t n e ss o f in format ion in this document. Copyright by Volkswagen AG. o There may be only eight bolts installed, depending on the version. r – Pry off the lower timing chain cover. Installing Note ♦ Be sure to check the expiration date of the silicone sealant. ♦ Refer to the Parts Catalog for the silicone grease. ♦ The cover must be installed within five minutes after applying the silicone sealant. ♦ Replace the bolts that were tightened with an additional turn. ♦ Replace sealing ring and O-ring. ♦ Risk of contaminating the lubricating system. Cover open parts of engine.
– Remove any sealant residue on the cylinder block using a flat blade scraper. – Clean any oil or grease off the sealing surfaces.


