
4 minute read
4.6 Oil Pressure, Checking


Golf 2015 ➤ , Golf Variant 2015 ➤ Engine Mechanical, Fuel Injection and Ignition - Edition 04.2015
Protected by copyriht . Copying for pivate or co merci al pur po s e s , i n p a r t r o r in w ho le, is not permitted unless authorised by Volkswagen AG. Volkswagen AG does notguarantee or accept any liabilit y wi th res pect t o t h e c o r r e c t n e ss o f in format ion in this document. Copyright by Volkswagen AG. 2.3 Mechanical Switch Valve, Removing and Installing Removing Caution This procedure contains mandatory replaceable parts. Refer to component overview prior to starting procedure. m Mandatory Replacement Parts ♦ O-rings - Mechanical Switch Valve – Remove the oil cooler. Refer to ⇒ “2.2 Engine Oil Cooler, Removing and Installing”, page 192 . – Remove the mechanical switch valve -1- from the auxiliary components bracket in direction of -arrow-. Installing Install in reverse order of removal. Note the following: Note g ♦ Always replace gaskets O-rings and seals. ♦ Secure hose connections with standard production clamps. Refer to the Parts Catalog. – Coat the mechanical switch valve O-rings with engine oil and install the switch valve.
– Install the engine oil cooler. Refer to ⇒ “2.2 Engine Oil Cooler, Removing and Installing”, page 192 .

Protected by copyright . Copying fo pivate or commerci al pur po s e s , i n p a r t r o r in w ho le, is not permitted unless authorised by Volkswagen AG. Volkswagen AG does notguarantee or accept any liabilit y wi th res pect t o t h e c o r r e c t n e ss o f in format ion in this document. Copyright by Volkswagen AG. 3 Crankcase Housing Ventilation ⇒ “3.1 Overview - Crankcase Ventilation”, page 195 . ⇒ “3.2 Oil Separator, Removing and Installing”, page 196 . 3.1 Overview - Crankcase Ventilation 1 - Cylinder Head Cover 2 - Seal ❑ Replace after removing 3 - Hose ❑ To EVAP Canister Purge Regulator Valve 1 - N80r 4 - Oil Separator ❑ Removing and instal‐ling. Refer to ⇒ “3.2 Oil Separator, Removing and Instal‐ling”, page 196 . 5 - Seal ❑ Replace after removing Golf 2015 ➤ , Golf Variant 2015 ➤ Engine Mechanical, Fuel Injection and Ignition - Edition 04.2015 6 - Hose ❑ For the crankcase ven‐tilation ❑ To turbocharger 7 - Bolt ❑ 4 Nm ❑ Self-tapping ❑ Position the bolt by hand and tighten it until it finds the old threads. Then tighten the bolt to the specification. 8 - Seal ❑ Replace after removing 9 - Bolt ❑ Self-tapping ❑ Position the bolt by hand and tighten it until it finds the old threads. Then tighten the bolt to the specifi‐cation. ❑ Tightening specification and sequence. Refer to ⇒ Fig. ““Oil Separator - Tightening Sequence”“ , page 196 .
Golf 2015 ➤ , Golf Variant 2015 ➤ Engine Mechanical, Fuel Injection and Ignition - Edition 04.2015
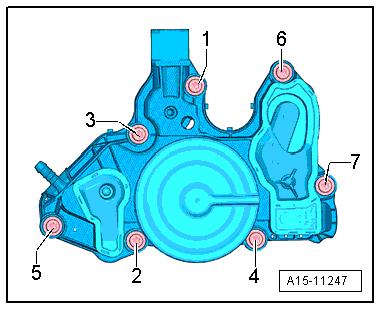
Oil Separator - Tightening Sequence – Tighten the bolts in the sequence -1 through 7-.
Bolts
-1 through 7Tightening Sequence and Tor‐que Specification 9 Nm.
Protected by copyriht . Copying for pivate or co merci al pur po s e s , i n p a r t r o r in w ho le, is not permitted unless authorised by Volkswagen AG. Volkswagen AG does notguarantee or accept any liabilit y wi th res pect t o t h e c o r r e c t n e ss o f in format ion in this document. Copyright by Volkswagen AG. 3.2 Oil Separator, Removing and Installing Removing Caution This procedure contains mandatory replaceable parts. Refer to component overview prior to starting procedure. m Mandatory Replacement Parts ♦ Seal - Oil Separator ♦ Seals - Oil Separator to Crankcase Hose – Disconnect the ignition coil sensors connectors and remove them from the ignition coils at the same time. – Remove the ignition coils bolts “3, 4”, and remove the ignition coils. g – Loosen the hose clamp -1- and remove the hose from EVAP Canister Purge Regulator Valve 1 - N80- . – Remove bolt -2- and then remove crankcase ventilation hose -3- from oil separator. – Remove the bolts -arrows- and the oil separator. Installing Install in reverse order of removal. Note the following: Note

Refer to the Parts Catalog.
Tightening Specifications ♦ Refer to ⇒ “3.1 Overview - Crankcase Ventilation”, page 195 .


