3 minute read
s2.7 Coolant Pump, Removing and Installing


Golf 2015 ➤ , Golf Variant 2015 ➤ Engine Mechanical, Fuel Injection and Ignition - Edition 04.2015
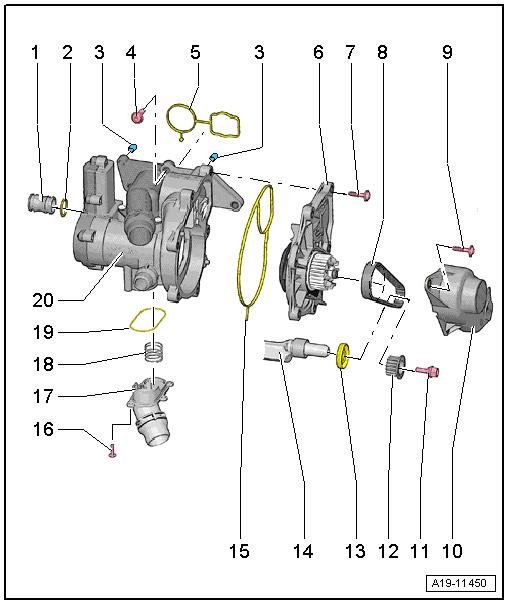
1 - Connection
2 - O-Ring ❑ Replace after removing ❑ Coat with coolant
3 - Centering Pin 4 - Bolt ❑ Tightening specification and sequence. Refer to ⇒ Fig. ““ Engine Tem‐perature Control Actua‐tor -N493- - Tightening Specifications and Se‐quence”“ , page 225 . 5 - Seal ❑ Replace after removing Protected by copyriht . Copying for pivate or co merci al pur po s e s , i n p a r t r o r in w ho le, is not permitted unless authorised by Volkswagen AG. Volkswagen AG does notguarantee or accept any liabilit y wi th res pect t o t h e c o r r e c t n e ss o f in format ion in this document. Copyright by Volkswagen AG. m 6 - Coolant Pump ❑ Removing and instal‐ling. Refer to ⇒ “2.7 Coolant Pump, Removing and Instal‐ling”, page 232 . ❑ With a new coolant pump, remove the pro‐tective cap 7 - Bolt ❑ Tightening sequence. Refer to ⇒ Fig. ““Coolant Pump Tightening Specification and Sequence”“ , page 225 8 - Toothed Belt ❑ For the coolant pump ❑ Removing and installing. Refer to ⇒ “2.8 Coolant Pump Toothed Belt, Removing and Installing”, page 235 . 9 - Bolt ❑ 9 Nm 10 - Toothed Belt Cover g 11 - Bolt ❑ 10 Nm + 90° ❑ Left thread ❑ Replace after removing 12 - Drive Gear for Toothed Belt ❑ Pay attention to the installed position. 13 - Balance Shaft Seal Intake Side ❑ Replacing. Refer to ⇒ “4.3 Balance Shaft Sealing Ring, Replacing, Intake Side”, page 75 . 14 - Balance Shaft
15 - Seal ❑ Replace after removing 16 - Bolt ❑ 9 Nm
Golf 2015 ➤ , Golf Variant 2015 ➤ Engine Mechanical, Fuel Injection and Ignition - Edition 04.2015
17 - Connecting Piece 18 - Spring 19 - Seal ❑ Replace after removing 20 - Engine Temperature Control Actuator - N493❑ Removing and installing. Refer to ⇒ “2.9 Engine Temperature Control Actuator N493 , Removing and Installing”, page 237 .
Engine Temperature Control Actuator - N493- - Tightening Spec‐ifications and Sequence – Tighten the bolts in the sequence -1 through 5-.
Tightening Sequence Tightening Specification -1- through -5- Tighten to 9 Nm.
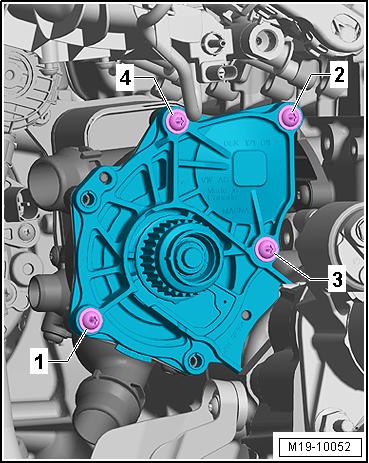
Coolant Pump - Tightening Specification and Sequence – Tighten the coolant pump bolts in the sequence -1 through 4-.
Tightening Sequence Tightening Specification -1 through 4- Tighten to 9 Nm.
Protected by copyright . Copying for pivate or commerci al pur po s e s , i n p a r t r o r in w ho le, is not permitted unless authorised by Volkswagen AG. Volkswagen AG does notguarantee or accept any liabilit y wi th res pect t o t h e c o r r e c t n e ss o f in format ion in this document. Copyright by Volkswagen AG. 2. Coolant Pump/Thermostat 225
Golf 2015 ➤ , Golf Variant 2015 ➤ Engine Mechanical, Fuel Injection and Ignition - Edition 04.2015
2.2 Overview - Electric Coolant Pump
After-Run Coolant Pump - V51- , Coolant Shut-Off Valve - N82-
1 - Coolant Hose
2 - Coolant Shut-Off Valve N82❑ Removing and instal‐ling. Refer to ⇒ “2.5 Coolant Shut-Off Valve N82 , Removing and Installing”, page 230 . 3 - After-Run Coolant Pump V51❑ With bracket ❑ Depending on the ver‐sion there can be slight differences. ❑ Removing and instal‐ling. Refer to ⇒ “2.4 After-Run Cool‐ant Pump V51 , Remov‐ing and Installing”, page 228 .

4 - Bracket ❑ For After-Run Coolant Pump - V51Protected by copyright . Copying for pivate or commerci al pur po s e s , i n p a r t r o r in w ho le, is not permitted unless authorised by Volkswagen AG. Volkswagen AG does notguarantee or accept any liabilit y wi th res pect t o t h e c o r r e c t n e ss o f in format ion in this document. Copyright by Volkswagen AG. 5 - Bolt ❑ 20 Nm 6 - Clamp 7 - Coolant Hoses 8 - Coolant Hose 9 - Bolt ❑ 9 Nm Transmission Coolant Valve - N488- , Vehicles with DSG® Trans‐mission


