
3 minute read
5 Special Tools


8 - Air Guide
9 - Air Guide
10 - Radiator Mount
11 - Condenser ❑ Removing and installing. Refer to ⇒ Heating, Ventilation and Air Conditioning; Rep. Gr. 87 ; Refrigerant Circuit; Condenser, Removing and Installing . 12 - Rubber Bushing ❑ For the charge air cooler 13 - O-Ring ❑ Replace after removing ❑ Coat with coolant n
14 - Clamp u ❑ For Engine Coolant Temperature Sensor on Radiator Outlet - G83-
Connect the Coolant Hose to the Coupling – Remove the old O-ring -2- in the coolant hose -3-. – Coat the new O-ring with coolant and insert it in the coolant hose. r
– Press the coolant hose on to the coolant pipe -1- until you hear it engage. g – Press the coolant hose on again and pull to make sure the connection is engaged correctly.
r po s e s , i ht . Copying fo pivate or commerci al p Protected by copyri
Golf 2015 ➤ , Golf Variant 2015 ➤ Engine Mechanical, Fuel Injection and Ignition - Edition 04.2015 p a r t o r in w ho le, is not permitted unless authorised by Volkswagen AG. Volkswagen AG does notguarantee or accept any liabilit y wi th res pect t o t h e c o r r e c t n e ss o f r in format ion in this document. Copyright by Volkswagen AG.
4.2 Overview - Auxiliary Cooler
Note
For vehicles with a DSG® transmission depending on the version an auxiliary cooler is installed front right.
Golf 2015 ➤ , Golf Variant 2015 ➤ Engine Mechanical, Fuel Injection and Ignition - Edition 04.2015
1 - Air Guide
2 - Auxiliary Cooler ❑ Removing and instal‐ling. Refer to ⇒ “4.7 Auxiliary Cooler, Removing and Instal‐ling”, page 251 . 3 - Hose Bracket
4 - Coolant Hose ❑ Return flow
5 - Coolant Hose ❑ Supply flow 6 - Radiator Mount ❑ Upper 7 - Nuts ❑ 9 Nm
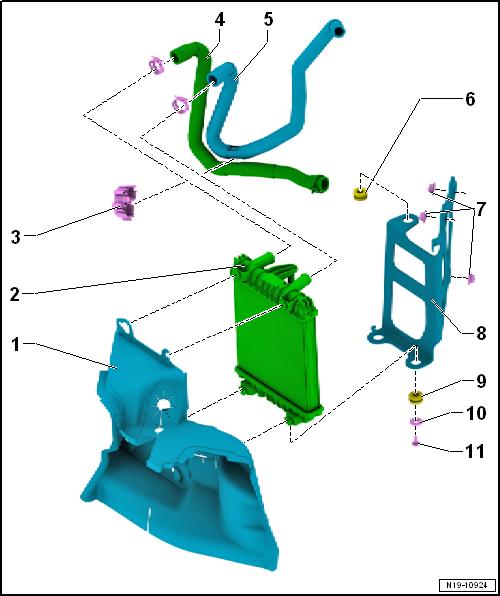
8 - Bracket ❑ For auxiliary cooler 9 - Radiator Mount ❑ Lower
10 - Rubber Buffer
11 - Bolt ❑ 3.5 Nm
Protected by copyright . Copying for pivate or commerci al pur po s e s , i n p a r t r o r in w ho le, is not permitted unless authorised by Volkswagen AG. Volkswagen AG does notguarantee or accept any liabilit y wi th res pect t o t h e c o r r e c t n e ss o f in format ion in this document. Copyright by Volkswagen AG.

Protected by copyright . Copying fo pivate or commerci al p r po s e s , i n p a r t r o r in w ho le, is not permitted unless authorised by Volkswagen AG. Volkswagen AG does notguarantee or accept any liabilit y wi th res pect t o t h e c o r r e c t n e ss o f in format ion in this document. Copyright by Volkswagen AG. 4.3 Overview - Fan Shroud and Radiator Fan 1 - Bolt ❑ 5 Nm u 2 - Fan Shroud ❑ Removing and instal‐ling. Refer to ⇒ “4.5 Fan Shroud, Re‐moving and Installing”, page 249 . 3 - Bolt ❑ 5 Nm r 4 - Coolant Fan - V7❑ Removing and instal‐ling. Refer to ⇒ “4.6.1 Coolant Fan V7 , Removing and In‐stalling”, page 250 . 5 - Coolant Fan 2 - V177❑ Removing and instal‐ling. Refer to ⇒ “4.6.2 Coolant Fan 2 V177 , Removing and Installing”, page 251 . Golf 2015 ➤ , Golf Variant 2015 ➤ Engine Mechanical, Fuel Injection and Ignition - Edition 04.2015
4.4 Radiator, Removing and Installing
Caution
This procedure contains mandatory replaceable parts. Refer to component overview prior to starting procedure.
Mandatory Replacement Parts ♦ O-rings - Radiator Removing – Drain the coolant. Refer to ⇒ “1.3 Coolant, Draining and Filling”, page 217 .


