3500 ENGINES
DISASSEMBLY AND ASSEMBLY CRANKSHAFT REAR SEAL AND WEAR SLEEVE
REMOVE CRANKSHAFT REAR SEAL AND WEAR SLEEVE
5P7409 6V3143
Tools Needed Distorter Distorter Adapter
1161-11
A 1
B 1
start by: a) remove flywheel NOTE: Any time the crankshaft seal is removed from the wear sleeve, a new sleeve and seal must be installed as a unit. If the seal is put back on the sleeve, the seal will be damaged. 1.
2. 3. 4.
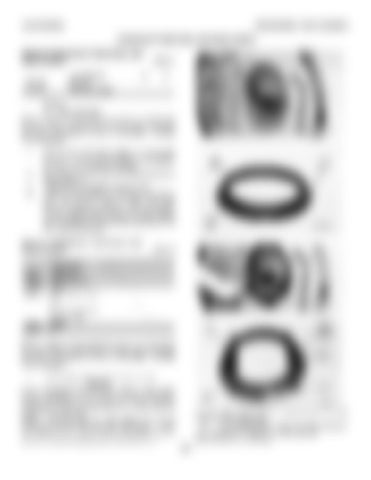
Remove the bolts from adapter (1) and install two 5/16"- 18 NC forcing screws in the adapter to remove it from the drive housing. Remove O-ring seal (3) and crankshaft seal (2) from adapter (1). Install tool (B) in adapter bore as shown. Install tool (A) between tool (B) and wear sleeve (4). Turn tool (A) until the edge of the tool makes a flat place (crease) in the wear sleeve. Do this several places around the wear sleeve until the sleeve can be removed from the end of the crankshaft by hand.
INSTALL CRANKSHAFT REAR SEAL AND WEAR SLEEVE 6V4002 6V4001 1B4330 6V4003 2N5006
6V4977 9S8858
Tools Needed Forcing Bracket Forcing Ring Nut (5/16"-18 NC) Locator Bolt (1"-14 NF x 2.5 in. long) Guide Bolts (5/16"-18 NC x 4 in. long) Installer Nut
A 2
B
C
D
1161-12 E
F
G
1 4 1
2 2 1 1
NOTE: Any time the crankshaft seal is removed from the wear sleeve, a new sleeve and seal must be installed as a unit. If the seal is put back on the sleeve, the seal will be damaged. 1.
Install adapter (3) on tooling (A) as shown. NOTICE If the crankshaft seal and wear sleeve come apart during installation, the seal and sleeve become scrap and a new seal and sleeve as a unit must be used as a replacement. NOTE: The rear seal and wear sleeve can not be exchanged with the front seal and wear sleeve. There are grooves in the sealing lip of the seals that direct the oil back into the crankcase as the crankshaft turns.
An exchange of front and rear seals can cause the oil to come out of the crankcase. 2. Put crankshaft seal (1) and wear sleeve (2) as a unit in position on adapter (3). Make sure the lip of the seal is up as shown. 356


