
1 minute read
Pressure Cap Test


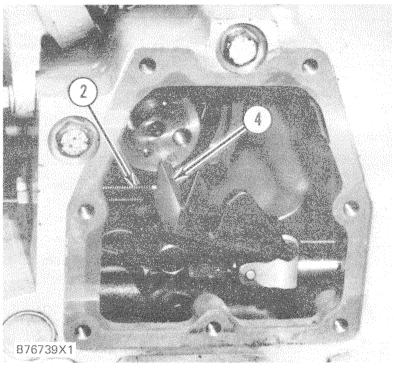
LOCATION OF FUEL SETTING COVER AND SYNCHRONIZING PIN 1. Plug. 2. Synchronizing pin. 3. Cover.
1. The top bolt that holds cover (3) in position is synchronizing pin (2). Remove synchronizing pin (2) and plug (1) from the front drive housing. DO NOT destroy seal or remove cover (3).
2. Remove the washer from synchronizing pin (2) and install it into the threaded hole where plug (1) was removed. Tighten synchronizing pin (2).
SYNCHRONIZING POSITION (Governor Fastener Cover Removed Only For Illustration)
2. Synchronizing pin. 4. Fuel stop lever. LOCATION FOR GAUGE AND CONTROL ROD ADJUSTMENT (Rocker Shaft Removed for Illustration)
5. 6V3119 Rack Synchronizing Gauge [12.7 mm (.50 in.)]. 6. Control rod.
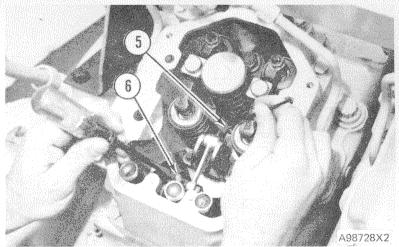
3. Turn the governor or actuator terminal shaft to the fuel "ON" position until the flat face of fuel stop lever (4) contacts synchronizing pin (2). This is the synchronizing position or zero reference point. Hold the control linkage in this position when the injectors are adjusted.
4. Remove the valve covers.
5. With the fuel stop lever against the synchronizing pin, put 6V3119 Rack Synchronizing Gauge (5) on the round part of the injector rack between the injector body and the end of the rack. Use a screwdriver and make an adjustment of control rod (6). Turn the screw on control rod (6) one "click" at a time until rack synchronizing gauge (5) just Fits between the injector body and the shoulder at the end of the rack. Remove the screwdriver from control rod (6) so no pressure is on the linkage while the setting is checked with rack synchronizing gauge(5). Any pressure on the linkage with the screwdriver will not give a correct indication when the setting is checked with the rack synchronizing gauge. To make sure the linkage is free and giving the correct setting, move (flip) the linkage and check the setting again. Put the box end of a 9/16" or 5/8" combination wrench over the nut and bolt that holds control rod (6) and the bellcrank together. Pull up on the control rod two or three times; then check the setting again.


