Mack Truck MAXITORQUE TRANSMISSIONS T313–T318(L)(LR)(21)(L21)(LR21) Service Manual(10-123)

Page 134

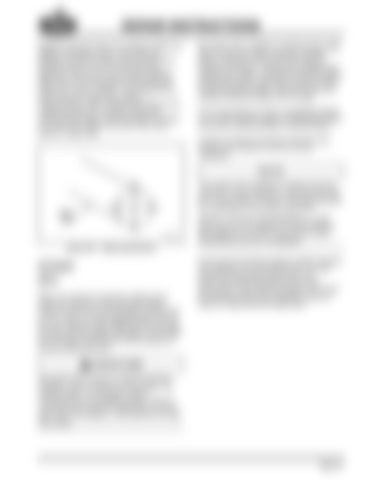
REPAIR INSTRUCTIONS Replace shift rails if they are cracked in either the poppet or setscrew holes. If the clearance between the shift rail and housing (cover) bore exceeds 0.254 mm (0.010 inch) maximum, determine which part is worn before replacing. Shaft wear can be checked by measuring the shaft at an unworn location. Then measure the shaft at the worn area and compare measurements. When measuring a shift rail, the reading should be an average of diameter measurements taken at four locations. Compare one side of the shaft to the other, AB–CD as shown in Figure 302.

Be careful when installing a shaft through a new seal (or seal over shaft). Lubricate the shaft before inserting it through the seal. Splines, keyways and holes in a shaft can damage seals unless care is taken. Lubricate the seal to prevent damage during the initial start-up period, before normal lubrication begins. Keep anti-seize and sealing compounds away from oil seals.

302

Lip-type oil seals are precision elements that require close attention and care during installation.

If an oil seal does not have a preapplied sealant on its outer diameter, apply an appropriate sealer around the outside diameter to prevent leaks.

The quality of the installation method and tools used has a direct influence on the life of the seal. Do not use a block of wood or discarded bearing as a substitute for the proper seal driver. However, with some seal applications, a seal driver may not be available. In these situations, light tapping in a circular motion using a light, broad-faced hammer is acceptable. Figure 302 — Measuring Shift Rail

Oil Seals [321] When an overhaul is required, replace all oil seals. Be careful to ensure that the sealing surface of any seal is not damaged, turned back or cut. A nick on a shaft sealing surface can cut the seal. Remove sharp edges that can damage the seal (chamfer edges if possible). Press seals into housings, using smooth, even pressure to prevent cocking the seal.

For the seal to function properly, install it squarely with respect to the shaft center line. The seal should be kept square within 0.254 mm (0.010 inch) Total Indicated Runout (TIR). Squareness of the seal to the shaft is controlled by using the proper seal installation tools, as shown in Figure 303 and Figure 304.

Be careful when using any abrasive polishing methods, such as emery or crocus cloth, on a sealing surface. It is possible to leave microgrooves on the sealing surface. This can cause oil to leak past the sealing lip(s) of the oil seal. With this condition, a new seal will not stop the oil leak.

Page 127


Turn static files into dynamic content formats.

Create a flipbook

Articles inside

REPAIR INSTRUCTIONS

1min
pages 229-230

REPAIR INSTRUCTIONS

1min
page 228

REPAIR INSTRUCTIONS

1min
page 227

REPAIR INSTRUCTIONS

1min
page 226

REPAIR INSTRUCTIONS

1min
page 225

REPAIR INSTRUCTIONS

1min
page 224

REPAIR INSTRUCTIONS

1min
page 223

REPAIR INSTRUCTIONS

1min
pages 221-222

REPAIR INSTRUCTIONS

1min
page 220

REPAIR INSTRUCTIONS

1min
page 219

REPAIR INSTRUCTIONS

1min
page 218

REPAIR INSTRUCTIONS

1min
page 217

REPAIR INSTRUCTIONS

1min
pages 215-216

REPAIR INSTRUCTIONS

1min
page 214

REPAIR INSTRUCTIONS

1min
page 211

REPAIR INSTRUCTIONS

1min
pages 209-210

REPAIR INSTRUCTIONS

1min
page 208

REPAIR INSTRUCTIONS

1min
page 207

REPAIR INSTRUCTIONS

1min
page 206

REPAIR INSTRUCTIONS

1min
page 205

REPAIR INSTRUCTIONS

1min
pages 186-187

REPAIR INSTRUCTIONS

1min
pages 183-184

REPAIR INSTRUCTIONS

1min
page 182

REPAIR INSTRUCTIONS

1min
page 181

REPAIR INSTRUCTIONS

1min
pages 179-180

REPAIR INSTRUCTIONS

1min
page 177

REPAIR INSTRUCTIONS

1min
page 174

REPAIR INSTRUCTIONS

1min
page 165

REPAIR INSTRUCTIONS

1min
page 164

REPAIR INSTRUCTIONS

1min
pages 162-163

REPAIR INSTRUCTIONS

1min
page 160

REPAIR INSTRUCTIONS

1min
page 157

REPAIR INSTRUCTIONS

1min
page 156

REPAIR INSTRUCTIONS

1min
page 155

REPAIR INSTRUCTIONS

1min
page 151

REPAIR INSTRUCTIONS

1min
pages 145-146

REPAIR INSTRUCTIONS

1min
page 142

REPAIR INSTRUCTIONS

1min
pages 135-137

REPAIR INSTRUCTIONS

1min
page 134

REPAIR INSTRUCTIONS

1min
page 133

REPAIR INSTRUCTIONS

1min
pages 131-132

REPAIR INSTRUCTIONS

1min
pages 125-127

REPAIR INSTRUCTIONS

1min
pages 123-124

REPAIR

1min
pages 121-122

REPAIR INSTRUCTIONS

1min
pages 119-121

REPAIR INSTRUCTIONS

1min
page 115

REPAIR INSTRUCTIONS

1min
pages 105-106

REPAIR INSTRUCTIONS

1min
page 75

REPAIR INSTRUCTIONS

1min
pages 72-74

REPAIR INSTRUCTIONS

1min
page 68

REPAIR INSTRUCTIONS

1min
page 67

REPAIR INSTRUCTIONS

1min
page 66

REPAIR INSTRUCTIONS

1min
page 65

REPAIR INSTRUCTIONS

1min
pages 63-64

REPAIR INSTRUCTIONS

1min
page 59

REPAIR INSTRUCTIONS

1min
page 57

MAINTENANCE

1min
page 55

MAINTENANCE

1min
page 54

MAINTENANCE

1min
page 53

TROUBLESHOOTING

1min
page 51

TROUBLESHOOTING

1min
page 50

TROUBLESHOOTING TROUBLESHOOTING CHARTS

1min
page 49

DESCRIPTION AND OPERATION

2min
pages 33-36

DESCRIPTION AND OPERATION

4min
pages 31-32

DESCRIPTION AND OPERATION

2min
pages 29-30

DESCRIPTION AND OPERATION

1min
pages 27-28

DESCRIPTION AND OPERATION

3min
pages 25-26

INTRODUCTION

1min
pages 12-14

INTRODUCTION

1min
page 11

INTRODUCTION SAFETY INFORMATION

2min
pages 9-10

ATTENTION

1min
pages 3-4
Issuu converts static files into: digital portfolios, online yearbooks, online catalogs, digital photo albums and more. Sign up and create your flipbook.
Mack Truck MAXITORQUE TRANSMISSIONS T313–T318(L)(LR)(21)(L21)(LR21) Service Manual(10-123) by www.heydownloads.com - Issuu