REPAIR INSTRUCTIONS SYNCHRONIZER DISASSEMBLY
261
260
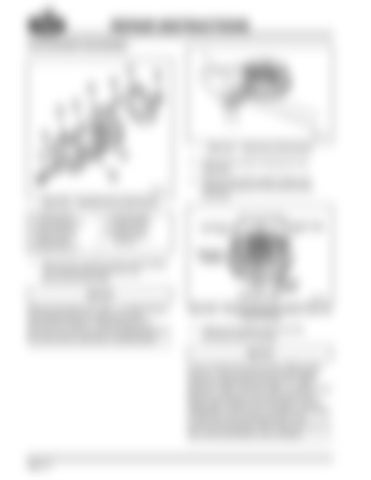
Figure 261 — Removing 12-Point Screws
2. Remove the clutch housing from the assembly. 3. Remove the three support tubes and preload springs from the synchronizer assembly. Figure 260 — Exploded View of Synchronizer 1. 12-Point Screw 2. Nonthreaded Insert 3. Clutch Housing 4. Synchronizer Pin 5. Sliding Clutch 6. Synchronizer Pin
262
7. Clutch Housing 8. Threaded Insert 9. Support Tube 10. Preload Spring Assembly
1. Remove the 12-point screws and threaded and nonthreaded inserts from the synchronizer assembly.
Effective November 28, 2007, a revised fastener was implemented into production at this synchronizer location. These fasteners are one-time use only and must be replaced anytime the synchronizer assembly is disassembled.
Figure 262 — Remove Synchronizer Support Tubes and Preload Springs
4. Remove the sliding clutch from the remaining clutch housing.
As you remove the synchronizer sliding clutch and pins, notice that the pins and the sliding clutch are marked with the letter “R”, which stands for “Rear.” All the R marks on either end of the pins are placed on the same side of the sliding clutch marked with the letter R. During reassembly, make sure to coordinate all R marks on both the pins and sliding clutch of the synchronizer assembly. All R marks must face the rear of the transmission when installed.
Page 114
