Complementary Feeding for Children Aged 6–23 Months
A Recipe Book for Mothers & Caregivers
By Ministry of Health Division of Nutrition and Dietetics
Global Alliance for Improved Nutrition
Complementary Feeding for Children Aged 6–23 Months
A Recipe Book for Mothers & Caregivers
Ministry of Health, Division of Nutrition and Dietetics
Printed in the Republic of Kenya Book designed by Amy Callis
This book is dedicated to the mothers, caregivers, and children of Kenya.
May a healthy start be the beginning of a bright future.

Table of Contents Acknowledgments 8 Introduction 10 How to use this book 11 Meet our guides 12 Section One: Good Nutrition What you will find in this section .............................................................................. 16 Why nutrition is important ......................................................................................... 16 Breastfeeding 17 Complementary Feeding 26 Frequency, Amount, and Texture 27 Variety 32 Active Feeding 41 Hygiene 42 Feeding sick children ................................................................................................. 48 Making foods safe for young children ...................................................................... 50 Things to remember .................................................................................................. 52 Section Two: Recipes Introduction What you will find in the recipes sections 56 Understanding measurements 57 Staple foods recipes 58 Things to remember 66 Section Three: Recipes for 6–8 Month Old Key things to know ..................................................................................................... 70 Feeding schedules and amounts .............................................................................. 71 Sample meal plans 72 Recipes 76 Key things to remember 104 Section Four: Recipes for 9–11 Month Old Key things to know 108 Feeding schedules and amounts ............................................................................ 109 Sample meal plans ................................................................................................... 110 Recipes ...................................................................................................................... 112 Key things to remember .......................................................................................... 146 Section Five: Recipes for 12–23 Month Old Key things to know 150 Feeding schedules and amounts 151 Sample meal plans 152 Recipes 154 Key things to remember .......................................................................................... 188 Index ................................................................................................................. 192
Acknowledgments
Making the Complementary Feeding for Children Aged 6–23 Months recipe book required a team of partners. We want to extend our sincere gratitude to all those who worked tirelessly to make this book possible.
The Kenyan Ministry of Health led the project, providing technical expertise and guidance. Specifically, we would like to acknowledge the efforts of the Head of the Division of Nutrition and Dietetics (DND) at the Ministry of Health, Veronica Kirogo, for taking the lead in this process. The Deputy Head at the DND, Leila Akinyi, the Maternal, Infant and Young Child Nutrition Program Manager, Rose Wambu, supported by Caroline Kathiari and the entire Division of Nutrition and Dietetics team provided coordination and insights. The Ministry also facilitated meetings with members of the Maternal, Infant, and Young Child Nutrition (MIYCN) Technical Working Group and the Kenya Nutrition Information Technical Working Group (NITWG) to ensure we had Kenya’s top experts contributing their knowledge to this project.
This book is an addendum to the United Nations Children’s Fund (UNICEF) Eastern and Southern Africa Regional Office’s (ESARO) nutrition work. UNICEF acted as both the funder and provided technical expertise to the project. We would like to acknowledge Patrick Codija, Laura Kiige, and Betty Samburu for their support, guidance, and commitment to this project.
As the project coordinating organization, the Global Alliance for Improved Nutrition (GAIN) provided oversight, coordination, and technical expertise. Leah Kaguara, Wendy Gonzalez, Caroline Aurah, and Andoni Santamaria Kampfner were thoughtful partners in guiding the development of the book.
The implementing partners were Georgia Health Policy Center (GHPC) at Georgia State University, Devi Partners, Great Lakes University of Kisumu, Emory University’s School of Public Health, and International Livestock Research Institute (ILRI). Team members included Ann DiGirolamo, Alyssa Lowe, Amma Amoateng, Amy Callis, Frida Okeyo, Lawrence Odollo, Amy
- 8 -
Webb Girard, Emily Ogutu, and Esther Omosa.
Finally, we want to thank the mothers and other caregivers of Kenya who are working hard to raise the next generation. Their commitment to improving the lives of their children was our constant inspiration.
Together this group of diverse partners across continents, countries, and cultures worked together to create a truly innovative approach to complementary feeding and nutrition. We are thankful for all the partners and excited to share this book with you, the mothers and caregivers of Kenya. If you wa nt to go fas t, g o al one.
- 9 -
If you wa nt to go far , go tog ethe r.
This is so much more than just a book of recipes, it is a kitchen guide that can help you turn your kitchen from a place where you cook to a place that creates foods that nurture and protect your children.
Every mother, father, and caregiver wants what is best for their children. They dream of strong, healthy children and better futures. While a recipe book cannot guarantee a better future for your child, it can help! Mothers know to cook, so this recipe book does more than give instructions on how to cook. It explains how to cook what is best for your child.
Mothers are very interested in learning more about what to cook and why. But they are also very busy. When we talked to mothers and caregivers they told us that recipes with a lot of steps and complex ingredients were not practical for their budget or time. They wanted simple, traditional meals that were healthy for their children.
So that’s what we created.
This book shows you what to cook...and why those ingredients are important. It helps you plan nutritious meals that meet your child’s needs as he grows. It also is a practical guide that shows you how to substitute certain ingredients based on what is available and what you can afford.
Cooking healthy and nutritious foods doesn’t have to be hard or expensive. This book shows you how to cook the most nutritious meals on a budget. And how to plan meals that will help your baby grow healthy and strong.
- 10Introduction
How to use this book
This book might be the most important tool in your kitchen. Why? Because if you use it, you can improve your children’s health and nutrition, and save money.
How can you use this book to improve your child’s nutrition?
The nutrition section is full of important information about good nutrition.
• Use this section as a resource for breastfeeding and solutions to common breastfeeding issues
• Use the feeding guidance to understand how often, how much, and what texture of foods to feed baby.
• Use the food wheel to understand how each food group helps your child
• Use this section to learn helpful hints on how to feed your baby.
• Use the hygiene guidance to make sure foods are safe.
The recipe sections show you how traditional recipes can be adapted and combined to make sure your child is eating a healthy diet.
How can you use this book to save you money? Learn how to substitute the right foods, so you can buy what is available and affordable, while giving your child all the nutrients she needs.
- 11 -
My mother started teaching me to cook from a young age and I have been cooking for my family for years. But there is always more I can learn.
I use this recipe book to make sure I am preparing foods my children need to grow up healthy and strong.
Meet our guides
If you’re like us, you want to hear from people who understand the challenges of making sure you are doing what is best for your child. So, throughout the book, motheres, and other caregivers just like you will guide you by sharing learnings, helpful hints, and words of encouragement. They have learned a lot, so be sure to pay attention when they show up on a page!
Mary has only been married a year and just gave birth to her first child, a little girl. She is a little overwhelmed but doing a great job learning how to raise a healthy baby.
Khadija has four children: a 6 year old, a four year old, a 22 month old, and a 6 month old. She feels pretty confident about raising kids but is focused on learning about nutrition because she wants her kids to do well in school.
Zawadi is a mother to three children: five year old and 3 year old boys, and a 9 month old baby girl. She is also a community health volunteer. Zawadi is focused on learning about nutrition so she can teach other mothers in her community.
Naserian is raising her two grandchildren, a 3 year old boy and a 1 year old girl. She raised six children of her own but recently learned about the benefits of dietary diversity and it gave her a desire to learn more to help her grandchildren.
Mercy is a mother of two boys: a 5 year old and a 12-month old baby. She was recently diagnosed with HIV. She is on ART and is doing well. She is focused on keeping the whole family healthy and knows good nutrition is a big part of that.
Kelvin is a great husband and father. While he leaves the cooking to his wife, he does bring home food from the market and his shamba. He wants his three boys to grow up strong so he learned about what foods are important for growth.
- 12 -
Mary
Khadija
Mercy
Naserian Kelvin
Zawadi

- 13 -
- 14 -
Good Nutrition
- 15 -
Nutrition Section
What you will find in this section
This section will help you better understand your child’s nutritional needs. The information in this section includes:
• Why nutrition is important for a baby.
• Why breastfeeding is important.
• Solutions to common breastfeeding problems.
• What things contribute to a healthy diet.
• Knowing when, what, and how much to feed baby depending on her age.
• Important information about feeding a sick child.
Why nutrition is important
Good nutrition is critical for infants and young children. Good nutrition helps babies get what they need to grow and develop. Did you know that the right foods can help with:
Energy
Protection from sickness (immunity)
Growth (healthy height and weight)
Strength (muscle development, bone health)
Learning (brain development)
Do you want your child to be energetic and healthy? Good nutrition can help! Do you want your child to have a strong mind and be able to learn? Good nutrition can help!
What we feed our children matters. It can make the difference between a sickly child and a healthy, energetic child who not only survives but thrives!
- 16 -
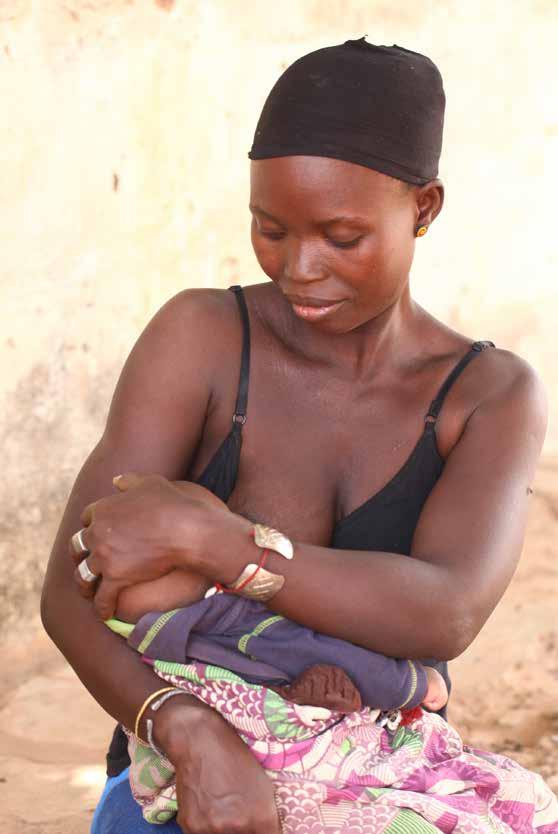
Breastfeeding
I decided to ONLY breastfeed my child for the first 6 months because I know it will help her grow up healthy and strong. I know breastfeeding is hard. It takes time and patience. But I also know it is the best for my baby.
During the first 6 months of life (180 days), your baby needs ONLY BREASTMILK to grow well and be healthy. Continue breastfeeding your baby for 2 years or more.
Benefits of exclusive breastfeeding
Good nutrition begins with breastfeeding. Breast milk is the perfect food for your baby aged 0–6 months because it:
• Has all the nutrients your baby needs for the first 6 months of life
• Has enough water to satisfy the thirst of your baby even in hot weather
• Has substances that protect your baby from common diseases such as diarrhea and chest infections
• Is clean, safe, easy to digest, and readily available
Breastfeeding
from the first hour of birth: Early initiation
Mothers should be supported to begin breastfeeding immediately after delivery. Early initiation has many benefits. It:
• Strengthens the bond between you and your baby
• Helps your baby develop the ability to suckle properly
• Increases your breast milk production
• Provides your baby with the first milk (colostrum) which acts like your baby’s first immunization and protects him/her from illnesses and infection
• Clears baby’s first dark stool and helps intestines to mature
• Prevents yellowing of the skin
- 17 -
Dangers of mixed feeding (starting complementary feeding too soon, sometimes called “early introduction”)
Babies should receive ONLY breast milk for the first 6 months. Introducing other foods earlier than 6 months of age, can lead to increased illness in the baby and decreased milk production in mothers.
Healthy eating for breastfeeding mothers
Mothers are amazing — their bodies create one of the most nutritious foods in the world. But it’s a lot of work and mothers need some help too. While you are breastfeeding be sure to:
• Drink plenty of clean water. At least 8 cups of clean drinking water a day will help your body make milk.
• Eat more food. Breastfeeding mothers are making their baby’s food so they need to eat more than if they were not breastfeeding. A breastfeeding mother should try to eat 2 more meals in addition to 3 larger meals and snacks throughout the day.
• Eat a healthy diet. Many times, mothers will eat last from the family pot. But while you are breastfeeding you need to make sure to eat enough to feed yourself and give you energy to care for your baby.
• Everyday try to eat:
• Protein like eggs, flesh foods (like chicken or fish), or legumes
• Whole grains like rice, bread, or chapati
• Fruits and vegetables (dark leafy greens, orange fruits, and vegetables)
• Foods that have good fats like fish, nuts, seeds, avocado, or plant oil
- 18 -
Proper positioning, attachment, and effective suckling
To make it easy for your baby to suckle the breast easily and get a good supply of milk, you need to:
Position your baby correctly to the breast:
• Sit comfortably in an upright position to breastfeed your baby
• Use a pillow or folded clothes to support and bring the baby closer to the breast.
• Support your baby’s whole body, not just head or neck.
• Ensure that your baby’s head and body is in a straight-line during breastfeeding.
• Ensure that your baby is close to you, facing you and can get to the breast without turning his or her neck.
• Make sure your nipple touches your baby’s nose so that the baby can open his or her mouth wide to attach to the breast.
Attach your baby to the breast correctly. Signs that your baby is attached well include:
• Your baby’s mouth should be wide open.
• You can see more of the dark surrounding the nipple above your baby’s mouth than you see below.
• Your baby’s lower lip should be turned outward and should not go in.
• Your breast should be touching your baby’s chin.
• Support your breast with your fingers forming a half moon or “C” shape.
- 19 -
Signs of effective suckling
• Your baby should take slow deep suckles with pauses in between.
• You should see or hear your baby swallowing after 1 to 2 suckles.
• When your baby is suckling well, you should not feel any pain on your breast.
• Always allow your baby to finish suckling from one breast before switching to the other to get all the nutrients from the early and later milk.
Your baby is getting enough milk when she is gaining weight – at least ½ kg per month, passing light coloured urine at least six times a day and is active
To encourage your breasts to make more milk let the baby empty the breast of milk before switching to the other breast. When your breast is empty, it will feel soft. An empty breast sends signals to the brain and breast to make more milk.
Remember...
Breast milk has everything your baby needs until 6 months, IF you feed your baby whenever he or she is hungry.
- 20 -
Breastfeeding on demand
Breastfeed on demand day and night, as often as the baby wants. Some families think that breast milk alone is not enough, but as long as you breastfeed your baby on demand, breast milk is all your baby needs. Breastfeeding on demand also produces more milk. So, the more you breastfeed, the more you can breastfeed.
Look for signs of hunger: fussing, sucking/moving lips, opening mouth, sticking out the tongue, putting hands in his mouth, and making rapid eye movement before his/her eyes are open. Do not wait for your child to cry before feeding your baby. Watch your baby’s hands. A hungry baby will fist his hands, but a satisfied baby’s hands will be relaxed.
Continue to breastfeed on demand (whenever your baby wants it) for two years or beyond. Continue to breastfeed even as you add different foods to your baby’s diet.
- 21 -
Hungry Baby
Full Baby
Expressing breast milk
Expressing breast milk while you are away from your baby will help you to continue breastfeeding your baby, maintain milk flow, and prevent unpleasant breast conditions such as breast engorgement and mastitis (a painful infection of the breast).
You should express breast milk as often as your baby would breastfeed (every 2–3 hours). Expressed breast milk can be stored in a covered container for about 8 hours at room temperature.
For instructions on how to express breast milk, talk to your health provider.
Breast conditions
Many breast conditions, such as flat nipple, inverted nipple, full or engorged breasts, mastitis, and candidiasis can interfere with breastfeeding if not managed properly.
If you have cracked nipples: If your baby does not have a good latch on your breast it can cause cracked nipples that can be painful and may lead to an infection in your breast. You can prevent this by helping your baby get a good latch. You can moisturize your nipples with your own breast milk or cooking oil. You can also apply a clean cloth with clean, warm water.
- 22 -
OR
If you have a warm, painful lump in your breast: You may have an infection in your breast. This can happen if you don’t nurse often enough or if your nipples are cracked. Visit the clinic or hospital to be treated for the infection.
While it may be painful, the best thing to do for both you and your baby is to continue to breastfeed. You can also apply a clean cloth with clean, warm water to your breast to relieve the pain.
Things to know if you are HIV+
If you are HIV+ and on antiretroviral therapy (ART), you can safely breastfeed your baby so he can get all the benefits of breast milk. As long as you don’t miss any ART doses your baby has very little chance of getting HIV, but can get a lot of benefits to from your breast milk.
Continue to breastfeed your baby for 2 years and beyond, and keep taking your ART.
- 23 -
Family Support
Breastfeeding mothers need support from their families and communities. Spouses, family members, and friends can help by:
• Allowing time and a comfortable space for mothers to breastfeed
• Helping with household chores, caring for older children, assisting the mother in feeding the baby with expressed breast milk and offering to take babies to their workplace for breastfeeding if necessary
• Ensuring mothers eat healthy foods so they can produce the nutrients they and their babies need to stay healthy
My wife always wants to feed me first, the kids second, and she eats what’s left over.
But when she is pregnant or breast feeding I know she needs more food to help my children grow healthy and strong so I encourage her to eat enough food.
- 24 -
Remember...
Only breast milk for the first 6 months Continue breastfeeding for 23 months
- 25 -
Complementary Feeding Giving other foods to your baby 6-23 months old baby
Breastfeeding should continue for 2 years and beyond. At 6 months, you will begin complementary feeding as you introduce new foods into your baby’s diet in addition to breast milk. But how can you make sure that your child is getting all the nutrition they need from their food?
Remember: “FATVAH.” FATVAH stands for:
1. Frequency (when to feed baby)
2. Amount (how much to feed baby)
3. Texture (the recommended thickness and consistency of baby’s food)
4. Variety (what to feed baby)
5. Active Feeding (how to feed baby)
6. Hygiene (cleanliness)
Let’s look at FATVAH in detail.
Frequency, Amount, and Texture
• Frequency: When or how often to feed your baby.
• Amount: How much a baby will eat changes as they grow. What size meals you should feed your baby depends on their age. It is important to make sure you are feeding your baby enough food for their age.
• Texture: The texture of your baby’s food is important as she is learning to eat solid foods and it will change over time. As your baby grows, he or she learns how to swallow and chew. To avoid choking it is important to feed the right food texture at the right age.
- 26 -
Frequency, amount, and texture change a lot as your baby grows so we are going to talk about them by each age group:
• 6 months
• 7–8 months
• 9–11 months
• 12–23 months
Understanding the icons
In the next couple of pages we introduce a series of icons to help understand when, what, and how often to feed your baby.
When
What
First foods Foods like porridge
How often
Snacks Meals
For example, if you see the image to the right it is telling you to one meal of first foods like porridge in the morning and breastfeed your baby on demand.
- 27 -
Morning Afternoon Night Evening Morn ing ON DEMAND
6 months
At this age, your child should be able to sit without support. You should plan to feed them two things:
• Breast milk: Your baby will still be getting most of his nutrition from breastfeeding. Plan to breastfeed your baby about on demand but at least eight times during the day.
• First foods: As your baby starts to eat, begin with cereals like porridge, mashed potatoes, or mashed banana, etc. Do not feed your baby animal milk until they are 1 year old.
Frequency
• Continue to breastfeed your baby on demand but at least 8 times during the day and night.
• Feed baby aged 6 months 2 “first foods” a day — in the morning and the evening.
Amount Texture
2 to 3 tablespoons of porridge or pureed food in each meal
Start with thick porridge or well mashed/pureed foods.
A tablespoon is equal to the size of your thumb.
Porridge should not drip off spoon
When you are introducing new foods, remember:
• Do not force the baby to eat. This can cause them to choke.
• Be patient and actively encourage the baby to eat.
• Have relaxed and happy mealtimes. Encourage the baby to eat by clapping hands, making funny faces, saying encouraging words.
- 28 -
Morning ON DEMAND Afternoon Evening ON DEMAND Night ON DEMAND ON DEMAND
7–8 months
At this age, your child should be crawling. As he gets older, increase the amount of food gradually. Do not feed your baby animal milk until they are 1 year old.
Frequency
• Continue to breastfeed your baby on demand but at least 8 times during the day and night.
• Feed baby aged 7–8 months 3 “snack: sized meals a day.
Amount Texture
½ cup of food at each meal.
Mashed or pureed family foods.
A ½ cup is equal to half of a fist.
It’s best to make only what you will serve for one meal. Since babies this age eat so little it can be hard to make such a small amount if you do not have other children in the house. If you do have to serve the food later in the day, make sure it is covered to keep flies away and do not store the food for more than 4 hours. Reheat the food to the boiling point before serving it again so you kill any germs. Never store food overnight to give the baby the next day.
- 29 -
Morning Afternoon Evening Night ON DEMAND ON DEMAND ON DEMAND ON DEMAND
9–11 months
At this age, your child should be able to stand with objects. Between 9 and 11 months, a lot of new foods can be introduced. Do not feed your baby animal milk until they are 1 year old.
Frequency
• Continue to breastfeed your baby on demand but at least 6 times during the day and night.
• Feed baby aged 9–11 months 3 meals a day and 1 snack.
Amount Texture
¾ cup of food at each meal. A ¾ cup is equal to ¾ of a fist.
Give your baby one snack (ripe banana, mango, boiled potato, arrow root, or avocado) either between morning and afternoon or afternoon and evening meal.
Finely chopped food
Pieces should be no bigger than the nail on your little finger.
- 30 -
Afternoon Morning ON DEMAND Evening Night ON DEMAND ON DEMAND ON DEMAND
12–23 months
At this age, your child should be walking without support. During your baby’s 2nd year of life (from 12–23 months) you should be getting them used to eating from the family pot. Just be sure that the food is cut into small pieces they can chew and is not too spicy. You can begin to introduce animal milk at this age.
Frequency
• Breastfeed your baby every time he or she wants (day and night)
• Feed baby aged 12–23 months 3 meals a day, plus two snacks.
Amount
1 cup of food at each meal
Texture
Give your baby 2 snacks (ripe banana, mango, boiled potato, arrow root, or avocado) between morning and afternoon then afternoon and evening meals
Give your baby food from the family pot cut into small pieces to make it easy for him or her to eat.
- 31 -
Afternoon Morning ON DEMAND Evening Night ON DEMAND ON DEMAND ON DEMAND
Variety—A Diverse and Healthy Diet
It’s important for every member of the family to eat a healthy diet, but it is particularly important for breastfeeding mothers and young children. The best way to ensure your child has a healthy diet is to make sure they eat lots of different types of foods.
- 32 -
The Food Wheel
The food wheel divides foods into 7 color-coded food groups:
1. Flesh Foods
2. Grains, Grain Products, and Other Starchy Foods
3. Eggs
4. Pulses, Legumes, Seeds, and Nuts
5. All Other Fruits and Vegetables
6. Vitamin A Rich Fruits and Vegetables
7. Dairy and Dairy Products
Using the wheel will help you give your child the food they need to grow up strong, smart, and healthy. Each food group contributes to these important benefits for your child:
Your child should have foods from at least 4 different food groups every day. Make sure your child has foods from all 7 food groups each week. It is also important to eat a variety of foods within the food group as well. For example, try to eat a variety of different types of pulses, not just one type. All the recipes in this book will show you the food groups it includes to help you plan a healthy diet for your child.
There are also special foods that are full of nutrients and are affordable. These special foods will have a yellow star next to them.
- 33 -
Growth (healthy height and weight) Learning (brain development) Protection from sickness (immunity) Energy Strength (muscle development, bone health)
I always thought that the most important thing was to make sure my child got enough food. But I have learned my child also needs to eat a lot of different types of food to be healthy.
Flesh Foods
These are flesh foods that help your child grow, be strong, and learn.
Foods included in the Flesh Food Group
Chicken
Cow Meat
Goat Meat
Organ Meats (like chicken livers or beef kidney)
Helpful hints for Flesh Foods
Fish
Omena (dried smoked fish)
Insects (like termites and grasshoppers)
• Focus on including foods (omena, insects, and organ meats) in your child’s diet. These foods are more affordable than flesh meats.
• Add ground omena or insects to your child’s food.
• Liver is a very nutritious. Your child only needs a small amount to get the benefits. Consider mixing it with leafy greens or other foods.
• Meat soup is not as nutritious as meat flesh. Modify the meat (mash, mince, grate, or cut the meat into small pieces) so it is easy for the child to eat.
• Keep poultry and small animals on your shamba.
I used to think cow meat was too expensive to feed my child. But he only needs a small amount. That makes it affordable to buy.
- 34 -
Grains, Grain Products, and Other Starches
These are grains, grain products, and other starchy foods. These are good basic foods that help with energy.
Foods included in the Grains, Grain Products, and Other Starches Food Group
Bread and Chapati Rice
Helpful hints for Grains, Grain Products, and Other Starches
• Flours included in food group can be a good source of iron. Iron is an important mineral that strengthens you baby’s muscles and brain.
You can increase the amount of iron your baby gets from flours by fermenting the flours. Fermented flours are also easier to digest and have vitamins that protect against disease. Fermentation also enhances flavor and color. The recipe section includes instructions on how to ferment flour.
• You can also germinate grains. Germinated food has more vitamins and is easier to digest.
• Do not mix many different flours together when preparing porridges for babies and young children.
- 35 -
Maize (corn)
Irish Potatoes Plantains
Porridge
Eggs
Eggs are extremely nutritious and help build strong muscles and smart brains.
Egg Food Group
All types of eggs including chicken eggs, duck eggs, and guinea fowl eggs.
Helpful hints for the Egg Food Group
• Eggs are a special food which means they are nutritious and affordable.
• Some communities resist feeding children eggs because they think eggs make a child unable to talk. Actually, eggs help children with language because they help build smart brains.
• For your child to get the important benefits from eggs, try to feed your child at least 2 eggs every week.
• Do not sell all your eggs, save some for your baby.
• Keep poultry on your shamba.
- 36 -
Pulses, Legumes, Seeds, & Nuts Food Group
These foods help your child grow and be strong.
Food in the Pulses, Legumes, Seeds, and Nuts Food Group
Helpful hints for the Pulses, Legumes, Seeds, and Nuts Food Group
• Many foods in this Food Group are special foods which means they are affordable and full of important nutrients. These include lentils, pulses and beans.
• You can germinate or “sprout” legumes (beans, green grams, lentils). Germinated food has more vitamins and is easier to digest. The recipe section includes instructions on how to germinate certain foods.
- 37 -
Groundnuts
Pulses Beans
Tree nuts (like cashews)
Lentils
Vitamin A Rich Fruits and Vegetables
Vitamin A rich fruits and vegetables are important for brain power and a good source of vitamins. Dark green leafy vegetables are also rich in iron.
Foods in the Vitamin A Rich Fruits and Vegetables Food Group
Dark green leafy vegetables (spinach, kale, rocket, etc.)
Helpful hints for the Vitamin A Rich Fruits and Vegetables Food Group
• Dark green leafy vegetables (spinach, kale, amaranth leaves, jute marrow leaves, pumpkin leaves, etc.) are very nutrition and important to your child’s diet. There is a variety of dark green leafy vegetables including traditional vegetables.
• Try to feed these foods at least once a day.
• Orange fruits and vegetables are also very important. Consider growing orange fleshed sweet potatoes, carrots and pumpkin so they are always available to you. If you do not have a fruit trees, make sure to save some money to buy fruits at the market.
• Grow your own dark green leafy vegetables.
Di d yo u kn ow tha t yo ur favori te foo ds a s an a du lt a re ba se d on w ha t yo u ar e fed as a ch il d? S et you r ch il d up for a lifetime of he al th y ea ting b y in trod uc in g a di vers e an d he al th y di et e arly !
- 38 -
Carrots Pumpkin
Sweet Potatoes Papaya Mango
All Other Fruits and Vegetables
All fruits and vegetables provide lots of vitamins that help protect your child from sickness.
Food in the Other Fruits and Vegetables Food Group
Helpful hints for the Other Fruits and Vegetables Food Group
• Try to feed these foods every day.
• Do not buy “fruit” juice at the market. Bottled or canned juice usually has very little real juice and a lot of sugar. It is always better for your child to have the actual fruit rather than the juice, but if you do want to give your child fruit juice as a rare treat, squeeze it yourself from whole fruit.
• Do not overcook vegetables or you will cook out all the important nutrients. Vegetables that are cooked well but not over cooked still have their bright color and are able to be pierced by a fork but are not mushy.
• Grow your own fruits and vegetables.
• Edible wild fruits are also nutritious and can be included in your child’s daily meals.
- 39 -
Tomato
Watermelon Oranges
Bananas Avocado Pineapple
Dairy and Dairy Products
These foods are milk and dairy products that help build strong muscles and bones.
Foods in the Dairy and Dairy Products
Milk (cow, goat, buffalo, and camel) Yogurt Cheese
Wait until your child is 1 year old before you feed them any animal milk including fermented milk.
Helpful hints for the Dairy Products Food Group
• Do not feed your family “raw” milk. It is best to boil milk and let it cool before serving it to kill any germs.
• Fermented milk is a great food with many health benefits. Consider making fermented milk at least once a week for your entire family. It can be made from cow, goat, or buffalo, or camel milk.
- 40 -
Active Feeding
Babies need to learn how to eat. Feed them with a lot of love and patience. Gradually introduce new foods and remember:
• Respond to your child with smiles, eye contact and speak or sing to your child during feeding time.
• Do not feed a child when he/she is tired and sleepy.
• Serve your child in his/her own bowl.
• Allow the child to finish chewing the food in his or her mouth before offering another spoon of food.
• Give babies 8 months and older food that he or she can hold with his or her fingers and eat by him or herself.
• Stay with the child throughout the meal and be attentive.
Helpful hints to eat healthy with less money
1. You only need a small amount of nutrient-dense foods to get the benefits; so you can purchase small amounts.
2. Eggs are very healthy, so do not sell all your eggs. Save 2 eggs a week for your child.
3. Consider affordable but healthy substitutions. For example, if your budget doesn’t allow you to buy meat today, consider buying offal.
- 41 -
I cover my food once I’m done cooking to prevent flies and bugs from contaminating the food with germs that cause diarrhea. Covering food can also help slow how quickly food will go bad.
Hygiene
Creating a healthy kitchen
A healthy diet helps your child grow up strong, but a healthy diet is not just about what you feed your child. It is also about how you prepare your food. Diarrhea is the second most common reason for death in children under 5. The good news is that safe food preparation can prevent many reasons for diarrhea and other food born illnesses. Here are some helpful hints to create a healthy kitchen and protect your children from illness.
Make sure your water is safe to drink. Treat water by either boiling it or using water treatment tablets or sachets to kill all the germs that can cause diarrhea and other disease.
Wash and dry utensils every time you use them. Some people only wash their utensils once a day, but this lets flies and animals contaminate them with germs that can make your family sick. Instead, wash utensils every time you use them.
- 42 -
OR
Wash vegetables before cutting and peeling them. Cook them for a short time to prevent overcooking and eat immediately to preserve its nutritional value.
Cook meat, fish, and eggs thoroughly.
Store food while it is still hot. When you leave your food uncovered, flies can land on it leaving behind germs that can make your child sick. To prevent this, store all your food as soon as you are done cooking in a clean container with a lid.
- 43 -
Use clean containers to store foods and keep food covered.
Wash your hands with soap and clean running water before you prepare food. Wash your hands before you prepare any food. This includes after cleaning, feeding animals, or getting food from the garden.
Wash your hands and your baby’s hands and face with soap and clean running water before you feed your baby. The hands of babies must be washed with clean running water and soap before eating even if they are unable to feed themselves.
- 44 -
Keep food away from animals and children. Make sure any animals are kept away from your food and the food preparation area, so they do not contaminate food. You should also keep young children away, so they do not burn themselves on hot items while you are cooking.
Reheat your food until it is hot. Many people reheat food only until it is warm, not hot. Food must be very hot to kill any germs that got on the food while it was stored.
I used to wash my utensils once at the end of the day. But I found out that germs can live on them and make my baby sick. So now I wash them every time I use them.
- 45 -
Do not store cooked food for more than 4 hours. Only cook enough for the day and do not store cooked food for more than 4 hours. That means that if you cook in the morning, you need to use the food by the afternoon. If you cook in the afternoon, you need to use the food by evening. Do not store cooked food overnight.
I didn’t know that a child’s hands should be washed the same way as an adult’s hands. But now, I wash my child’s hands and face with soap AND clean water before she eats and after she goes to the toilet.
- 46 -
Morning Afternoon Night Evening
Keep your cooking fire outside. Smoke from a cooking fire is can be dangerous for your child’s lungs and can cause permanent damage. Make sure your fire is outside and your child is not near it.
Things to know about cooking fires
The smoke from cooking fires can be dangerous to your baby, young children, and pregnant women.
Smoke can damage a child’s lungs and brains. It happens so slowly that you may not notice it so the safest thing is to keep babies and children away from fires.
Smoke can also cause early birth and miscarriages; so if you are pregnant consider wearing a cloth over your mouth and nose while cooking over a fire.
- 47 -
Feeding sick children
Even if you have a healthy kitchen, breastfeed, and feed your child a healthy diet, she may still get sick. When a child is sick, it’s important to breastfeed more, not less. Do not give them soda or tea. For children over 6 months of age, you can also give them a special mixture that prevents dehydration. The mixture is called Oral Rehydration Solution or ORS.
Buy ORS sachets at the market. Your local market will usually have sachets of oral re-hydration solution for sale. If your market does not have ORS, your community healthcare volunteer or nurse should have them. You will mix the entire sachet with a soda bottle full of safe water. Do not try to save some of the mixture for later.
Breast milk and clean water are important to keep your child hydrated.
Be sure to give your child the right things when they have diarrhea to help them feel better quickly. Continue to breastfeed your child but do not give them soda or tea.
- 48 -
Hints for feeding and sick children:
• Seek medical care for all sick children.
• Continue to breastfeed children when they are sick.
• Give extra foods.
• Make sure foods are soft and easy to swallow.
• Feed with a lot of patience and feed preferred, nutritious foods.
What not to feed baby
It is important that your child eats a lot of different foods to be healthy, but there are some foods that are not healthy or safe for young children:
Children under 12 months ALL infants and young children
Animal Milk Honey
Sweetened beverages like sodas or bottled / canned juices
Junk foods like candies, cakes, crisps and chips
- 49 -
I learned that I need to make sure my drinking water AND water I use to wash food and cook is safe by boiling or treating it.
Making foods adequate for young children
Children 6 months of age and older can eat all types of foods. Foods just need to be modified based on the child’s age. Modify foods for your child based on his age.
• Mashing: Use a fork to mash soft fruits, beans, and sweet potatoes into a texture that is easy for baby to swallow.
• Pounding: Use a mortar and pestle to pound omena into a fine powder to add to foods.
• Shredding: Use your clean hands to pull apart meats into small pieces. Make sure the shredded pieces are not too long.
• Grating: Use a grater on vegetables like potatoes, carrots, and boiled eggs to make small enough pieces for baby to eat safely.
• Mincing: Cut vegetables into very small pieces (smaller than your little finger’s nail) so baby can eat them without choking.
• Grinding: You can nuts to your child’s diet by grinding them using a rolling pin or mortar and pestle.
• Slicing and Dicing: Slicing is cutting vegetables into long, thin pieces and dicing is cutting them into small pieces (but not as small as mincing).
• Finger Foods: Once your child is old enough to hold his own food, cut foods into small pieces he can hold on his own. The pieces should be smaller than what he can fit in the palm of his hand.
• Whole Foods: Once your child is 1 year old, she is ready for whole foods like a peeled banana.
- 50 -
Mashing beans, sweet potatoes, and fruits
Pounding omena to add to porridge
Grinding nuts very fine to add to porridge
Grating root vegetables, boiled egg
Mincing vegetables
Shredding beef, fish, poultry
Slicing/Dicing vegetables
Finger Foods
Whole Foods
- 51 -
6 months 7–8 months 9–11 months 12–23 months
Things to remember
We know this is a lot of information. Here are some of the important things to remember:
• Only give your child breast milk for the first 6 months.
• To support your nutrition during breastfeeding, try to eat 3 main meals, 2 snacks, and 2 small extra meals throughout the day.
• Introduce foods at 6 months but continue breastfeeding until your baby is 2 years of age or older.
• Learn the foods in the food wheel so you can provide a variety of locally available and affordable foods.
• Household-level food production is encouraged.
• Feed your child at least 4 food groups every day and all 7 food groups at least once a week.
• Children younger than 1 year should not be fed animal milk or honey.
• Do not feed babies or young children junk food or sweetened beverages (soda and juice).
• Wash your hands before you prepare foods.
• Wash your hands and your baby’s hands and face with soap and clean running water before you feed the baby.
• If your child becomes sick, breastfeed more, not less.
- 52 -

- 53 -
- 54 -
Recipe Introduction
- 55 -
Nutrition Section What you will find in this section
The recipes are divided into three sections by age:
• 6–8 months
• 9–11 months
• 12–23 months
The different sections have recipes that are designed for the specific needs your child has at different ages.
In this introduction section you will find information to help with all the recipes in the age groups including:
• Using your hand to measure ingredients
• Staple food recipes for cooked ingredients like potatoes and rice
In each of the sections by age you will find:
• Important nutritional things to know for the age group
• Feeding schedules so you know how much to feed your baby at each age
• Sample meal plans to show you diverse and nutritious diets
• Recipes tailored for specific ages
The recipes use all the information from the nutrition section to help cook meals that will give my child the best foods to grow up healthy and strong.
Plus, the recipes are simple which is so important for a busy person like me.
- 56 -
Understanding Measurements
Measuring cups should always be used if you have them. But we know that not everyone has measuring cups. It is important to use the right amount of different ingredients to ensure meals both taste good and are nutritious. So while not everyone has measuring cups, everyone has hands. Here are some measurements using your hands that we have in recipes.
- 57 -
Your thumb tip equals 1 teaspoon (5 ml)
A cupped hand equals ¼ cup (62 ml)
Your full thumb equals 1 tablespoon (15 ml)
Your fist equals 1 cup (250 ml)
Half of your fist equals ½ cup (125 ml)
Nutrition Section Staple Food Recipes
Kenyan recipes are diverse and delicious but often have the following “staple” ingredients:
• Beans
• Boiled Potatoes
• Steamed Potatoes
• Sprouted Green Gram and Beans
• Rice
We know many mothers and caregivers already know how to cook these staple foods so how to cook them is not included as part of the recipes.
But for new cooks and for experienced cooks who are teaching the next generation how to cook, we have included instructions for each staple food in the next couple of pages.
- 58 -
Beans
Clean cooking area, any containers you will use, including pots, and utensils with soap and clean water. Dry the utensils. Wash hands with soap and clean running water.
Sort beans and remove any stones, mud clots, or shriveled beans.
Wash and soak dried beans with clean drinking water until they are plump (you can soak them overnight in a covered container).
Note: Beans that have soaked long enough will split down the middle when pierced with a fork.
Put the beans in a pot and fill it with enough safe water to cover the beans. Bring water to a boil.
If you are cooking over gas or kerosene reduce the heat and cook until the beans are tender but firm.
If you are cooking over a fire move the pot to the side of the flame and cook until the beans are tender but firm.
- 59 -
Nutrition Section Boiled Potatoes (Irish
or Sweet)
Clean cooking area, any containers you will use, including pots, and utensils with soap and clean water. Dry the utensils. Wash hands with soap and clean running water.
Wash potatoes with clean water. After cleaning potatoes, peel them.
Cut the potato into pieces.
• Try to make the pieces the same size.
• You can cook potatoes more quickly if you cut them into small pieces.
Put the potatoes in a pot and fill it with just enough safe water to cover the potatoes. Bring the water to a boil.
If you are cooking over gas or kerosene reduce the heat and cook until the potatoes are tender but firm.
If you are cooking over a fire move the pot to the side of the flame and cook until the potatoes are tender but firm.
- 60 -
Steamed Potatoes (Irish or Sweet)
Steaming uses less water and can reduce cooking time and cooking fuel. Steamed vegetables are also more nutritious.
Clean cooking area, any containers you will use, including pots, and utensils with soap and clean water. Dry the utensils. Wash hands with soap and clean running water.
Wash potatoes with clean water. After cleaning potatoes, peel them. Cut the potato into pieces.
• Try to make the pieces the same size.
• You can cook potatoes more quickly if you cut them into small pieces.
Add enough clean water to just cover the bottom of the pot. Add potatoes to the pot and bring to a boil.
Cover the pot. If you are cooking over gas or kerosene reduce the heat. If you are cooking over a jiko or fire move the pot to the side of the flame.
The steam will cook the potatoes.
Stir occasionally to prevent burning. If it gets too dry before being fully cooked, add a few spoons of clean water.
Cook until you can easily pierce the potato with a fork.
- 61 -
Nutrition Section Rice
Clean cooking area, any containers you will use, including pots, and utensils with soap and clean water. Dry the utensils. Wash hands with soap and clean running water.
Sort rice and remove any stones, mud clots, or shriveled grains.
Wash and rinse the rice with clean water.
Bring the water to a boil and add a pinch of iodized salt.
Add rice to boiling water.
Cover the pot. If you are cooking over gas or kerosene reduce the heat. If you are cooking over a jiko or fire move the pot to the side of the flame.
Cook the rice until almost all the water is gone and the grains are plump and soft. Do not stir while cooking.
Remove the pot from the heat and let it rest covered for about 10 minutes until the rest of the water is absorbed.
Fluff the rice with a fork. If the bottom layer of rice burned, discard it.
- 62 -
Sprouted Pulses (green grams, beans, legumes, lentils)
Germinated or “sprouted” legumes have more vitamins and are easier to digest.
Clean cooking area, any containers you will use, including pots, and utensils with soap and clean water. Dry the utensils. Wash hands with soap and clean running water.
Sort and remove any stones, mud clots, or shriveled pulses. Rinse pulses with clean water. Soak the pulses in clean water until they are plump (you can soak them overnight in a covered container). Drain water.
Put the lid back on the container. Make sure the lid is secure and free from any form of contamination. Keep in a dark place until sprouting begins.
They are ready in about 2–3 days, when the outer layer has split and small white roots appear. Cook as soon as possible.
If they are kept too long, they form foam. This means they are rotting. Throw them away.
- 63 -
Nutrition Section Dried Fermented Grain
Clean cooking area, any containers you will use, including pots, and utensils with soap and clean water. Dry the utensils. Wash hands with soap and clean running water.
Pour 1 cup (1 fist) of flour in a container that has a lid. You can use millet, wimbi, sorghum, or any available grain.
Pour 3 cups (3 fists) of warm clean water into the grains and stir to make a smooth paste.
Cover with a lid. Make sure the lid is secure and no flies can get into the container. Leave the covered grains in a cool, dark place for one day to ferment.
Discard grains that have grown fuzz.
Thinly spread the grains on a clean cloth or pan. Cover with a clean, thin cloth. Sun-dry away from animals and children to avoid contamination.
Dry for 3–7 days or until the grains are completely dry and there are no wet spots on the cloth or pan.
Put the grains in an airtight container and store in a cool dry place for up to 6 months.
- 64 -
Dried and Ground Green Leafy Vegetables
Clean cooking area, any containers you will use, including pots, and utensils with soap and clean water. Dry the utensils. Wash hands with soap and clean running water.
Wash green leafy vegetables twice in clean water. You can use any green leafy vegetable like spinach, kale, rocket, etc.
Dissolve salt in warm, clean water. Add the leaves and stir for about 5 minutes.
Thinly spread leaves on a clean cloth and sundry away from animals and children to avoid contamination. They are dry when there are no damp spots on the cloth.
When the leaves are dry, finely grind them.
Put the ground leaves in an airtight container and store in a cool dry place. The dried and ground green leafy vegetables can be stored for up to 6 months.
- 65 -
2
Things to remember
We know this is a lot of information. Here are the really important things to remember:
• Do not overcook your vegetables or they will lose some of their important nutrients.
• You hands are great measurement “tools” — become familiar with the measurements on page 57!
• Always wash your hands with soap and water.
• Clean your cooking area, pots, and cooking utensils before starting to prepare your meal.
• If your sprouted green grams or beans have white fuzz on them, they are rotting and MUST be thrown out.
• Dried fermented grain and dried ground leafy greens can be stored for up to 6 months.
• Dried ground leafy greens are a great way to add the Green Food Group to any recipe.
- 66 -
Nutrition Section

- 67 -
- 68 -
Feeding children
6 – 8 months
- 69 -
Key things to know
Here are the really important things to remember about feeding babies 6–8 months of age:
• After 6 months, your baby needs food in addition to breastmilk in order to grow well.
• You should try to feed your baby at least 4 food groups every day, and all food color groups, except for the diary and dairy products food group each week.
• Babies should not have any dairy or dairy products until they are 12 months old.
• Babies might not be good eaters at first. This is just because it is new and they are not used to it. Keep trying but be patient.
• Continue to breastfeed on demand day and night, as often as the baby wants. You can expect to breastfeed about 8 times during the day and night when your baby is 6-8 months.
• There are many foods you can give a baby learning to eat solid foods. Just make sure you have the right texture.
Mashing beans, sweet potatoes, and fruits
Pounding omena (to add to porridge)
Grinding nuts (grind VERY fine to add to porridge
Grating root vegetables, boiled egg
Mincing vegetables
Shredding beef, fish, poultry
- 70 -
6 months 7–8 months
Feeding schedules and amounts
At 6 months
When you see this image, it means it is a first food. First foods are great for babies at 6 months of age who are just starting to eat solid foods.
Frequency
• Continue to breastfeed your baby at least 8 times every day.
• Feed baby aged 6 months a “first food” twice a day — in the morning and the evening.
7–8 months
Frequency
• Continue to breastfeed your baby at least 8 times every day.
• Feed baby aged 7–8 months a meal 3 times a day.
Amount
2 to 3 tablespoons of porridge or pureed food in each meal.
A tablespoon is equal to the size of your thumb.
Start with thick porridge or well mashed/pureed foods. Porridge should not drip off spoon easily.
Amount
½ (125 ml) cup of food at each meal.
Mashed or pureed family foods.
A ½ cup is equal to half of a fist.
- 71 -
Texture
Texture
Sample Meals Plan: 6 months
Feed your child who is 6 months of age two “first food” meals each day. Continue to breast feed.
Aim for 4 food groups every day and every food group except the Dairy and Dairy Products Food Group in a week. Children should not have any dairy or dairy products until they are 12 months of age.
It can be hard to get all the food groups in my 6-month old’s diet. I rely on ground omena for the red food group and mashed eggs for the pink food group. This ensures a healthy diet for my baby.
- 72 -
Morning ON DEMAND Afternoon Evening ON DEMAND Night ON DEMAND ON DEMAND
Here is an example of a plan for the week that gives a child six months of age the healthy diet they need using the “first foods” recipes.
Monday
Meal 1: Maize porridge, ground nut paste and ripe banana
Meal 2: Fermented grain porridge, mashed sweet potatoes
Tuesday
Meal 1: Germinated grain porridge mixed with ground nut paste
Meal 2: Finger millet and sorghum porridge mixed with ground dried greens mashed avocado
Wednesday
Meal 1: Maize Porridge mixed with ground dried greens, ripe mashed mango
Meal 2: Fermented Grain Porridge, mashed green grams
Thursday
Meal 1: Finger millet and sorghum porridge, mashed avocado
Meal 2: Germinated grain porridge mixed with ground nut paste, mashed carrots
Friday
Meal 1: Maize Porridge with ground omena, mashed sweet potato
Meal 2: Fermented Grain Porridge with mashed beans
Saturday
Meal 1: Germinated grain porridge mixed with peanut butter
Meal 2: Finger millet and sorghum porridge mixed with ground dried greens, mashed banana
Sunday
Meal 1: Maize Porridge with ground dried greens, mashed green grams
Meal 2: Fermented Grain Porridge, mashed ripe avocado
Four Different Food Groups
Four Different Food Groups
Four Different Food Groups
Four Different Food Groups
Four Different Food Groups
Four Different Food Groups
Four Different Food Groups
- 73 -
Sample Meals Plan: 7–8 months
Feed your child who is 7–8 month of age three meals each day. Continue to breastfeed.
Aim for at least 4 food color groups every day and every food group except the Blue Dairy and Dairy Products Food Group (milk) in a week. Children should not have animal milkdairy or dairy products until they are 12 months of age.
On the next page is an example of a weekly meal plan that will give your child who is 7–8 months of age all the nutrients they need. As your child gets older and his or her diet includes more foods, it is easier to feed your baby at least 4 different food groups at each day.
- 74 -
Morning Afternoon Evening Night ON DEMAND ON DEMAND ON DEMAND ON DEMAND
Monday Meal 1: Mashed Irish potatoes with dried, ground greens
Meal 2: Sweet potato porridge, mashed beans
Meal 3: Butternut porridge, grated boiled egg
Tuesday Meal 1: Sweet potato porridge, minced mango
Meal 2: Fermented grain porridge, mashed carrots
Meal 3: Pumpkin and peanut butter
Wednesday Meal 1: Maize porridge, mashed beans and banana
Meal 2: Sweet potato and egg porridge
Meal 3: Mashed Irish potatoes with dried, ground greens
Thursday Meal 1: Maize porridge, mashed beans and banana
Meal 2: Sweet potato porridge, shredded chicken
Meal 3: Fermented grain porridge, mashed carrots
Friday Meal 1: Mashed Irish potatoes with dried, ground greens and ground omena
Meal 2: Fermented grain porridge, mashed carrots
Meal 3: Mashed sweet potatoes and beans, mashed banana
Saturday Meal 1: Maize porridge, mashed beans and banana
Meal 2: Sweet potato and egg porridge
Meal 3: Pumpkin and peanut butter
Sunday Meal 1: Mashed Irish potatoes with dried, ground greens
Meal 2: Fermented grain porridge, mashed carrots
Meal 3: Sweet potato porridge, shredded liver
Five Different Food Groups
Four Different Food Groups
Five Different Food Groups
Five Different Food Groups
Five Different Food Groups
Five Different Food Groups
Four Different Food Groups
- 75 -
Maize Porridge
Ingredients
½ cup (half fist) of maize meal
Steps
3 cups (3 fists) of clean water
Clean cooking area, any containers you will use, including pots, and utensils with soap and clean water. Dry the utensils.
Wash hands with soap and clean running water.
Put clean water and maize meal in a pot.
Bring to a boil.
If you are cooking over gas, kerosene, jiko or fire, use low heat.
Keep stirring the mixture until it is the proper consistency for your baby’s age.
- 76 -
Remove from the heat. Let porridge cool before serving so you do not burn your baby’s mouth.
Helpful Hints
Wash your hands and your baby’s hands and face with soap and clean water before you feed the baby.
• For children aged 6 months, the porridge should be thick, smooth, and well mashed. It should not run off the spoon. For children aged 7–8 months, the porridge should be thicker.
• If you have extra food, you can feed it to other children or store it in a covered container for NO MORE THAN 4 hours.
• If you store the food, be sure to heat it so it is hot (not just warm) before feeding it again to your baby.
Recommended additions for dietary diversity:
Mashed ripe banana
Mashed ripe mango
Mashed beans
Add a healthy fat, like vegetable oil (1 teaspoon or 1 thumb tip)
2
- 77 -
1 food group 2 2
Finger Millet and Sorghum Porridge
Ingredients
1cup (1 fist) of millet flour
Steps
½ cup (half fist) of sorghum flour
6 cups (6 fists) of clean water
Clean cooking area, any containers you will use, including pots, and utensils with soap and clean water. Dry the utensils.
Wash hands with soap and clean running water.
Boil 3 cups (3 fists) of clean water in a pot.
- 78 -
In a separate bowl, mix the finger millet and sorghum flour. Add 1 ½ cups (1 ½ fists) of clean water.
Stir until the mixture is smooth.
Add the mixture to the boiling water. Stir to stop lumps from forming until the mixture boils.
Add the rest of the clean water to the pot.
Continue cooking and stirring until the porridge is the right consistency for your child’s age.
Remove from the heat. Let porridge cool before serving so you do not burn your baby’s mouth.
Wash your hands and your baby’s hands and face with soap and clean water before you feed the baby.
Recommended additions for dietary diversity and helpful hints on are the next page.
- 79 -
1 food group
Recommended additions for dietary diversity: Mashed avocado
Mashed cooked sweet potato
Peanut butter paste
Add a healthy fat like vegetable oil (1 teaspoon or 1 thumb tip)
2 2 2
Using safe water is very important. If you are not sure if your water is safe to drink you can boil it for 3 minutes and let it cool.
- 80 -
Helpful Hints
• For children aged 6 months, the porridge should be thick, smooth, and well mashed. It should not run off the spoon.For children aged 7–8 months, the porridge should be thicker.
• If you have extra food, you can feed it to other children or store it in a covered container for NO MORE THAN 4 hours. If you store the food, be sure to heat it so it is hot (not just warm) before feeding it again to your baby.
• Continue breastfeeding on demand until your baby is 2 years old or older.
- 81 -
Fermented Grain Porridge
Ingredients
1cup (1 fist) of flour
Steps
3 cups (3 fists) of clean warm water
Clean cooking area, any containers you will use, including pots, and utensils with soap and clean water. Dry the utensils.
Wash hands with soap and clean running water.
Pour the ground flour (use millet, wimbi, sorghum, or any available grain) in a plastic container or pot.
Pour the warm water into the flour and stir to make a smooth paste.
Cover with a lid. Make sure the lid is secure and no flies can get into the container. Leave the covered mixture in a cool, dark place for one day to ferment.
If the grains grow fuzz on them, it means the grains have sat too long and are rotting. Throw them away.
Pour 1 cup (a fist) of water into a pot and bring to a boil.
Slowly add the prepared fermented flour paste to the pot and continue stirring until it thickens.
- 82 -
Reduce the heat and cook the mixture until it is cooked through (see helpful hints below).
Remove from the heat. Let porridge cool before serving so you do not burn your baby’s mouth.
Wash your hands and your baby’s hands and face with soap and clean water before you feed the baby.
Helpful Hints
• For children aged 6 months, the porridge should be thick, smooth, and well mashed. It should not run off the spoon. For children aged 7–8 months, the porridge should be thicker.
My grandmother often made us porridge from fermented flour. Fermentation is an inexpensive way to make grain more nutritious. It makes food easier for your body to process and nutrients easier to absorb.
Recommended additions for dietary diversity:
Mashed ripe avocado
Cooked and mashed carrot
Mashed green grams
Add a healthy fat like vegetable oil (1 teaspoon or 1 thumb tip)
2 2 2
- 831 food group
Germinated Grain Porridge
Ingredients
1cup (1 fist) of grain
Steps
2 cups (2 fists) of clean water
Clean cooking area, any containers you will use, including pots, and utensils with soap and clean water. Dry the utensils.
Wash hands with soap and clean running water.
Sort the grain (this can be wimbi or any other grain) to remove any stones and mud clots. Rinse grains.
Put the grain in a pot and cover with clean water. Soak for 24 hours.
Drain and put the grain in a clean jute bag, osinde grass, or banana leaves.
- 84 -
Store in a dark warm place and leave for 2 to 3 days until the grain germinates.
If the grains grow fuzz on them, it means the grains have sat too long and are rotting. Throw them away.
Thinly spread germinated grains on a clean cloth and sundry the germinated grain in an area away from animals and children to avoid contamination. Grains should be stirred occasionally. They are dry when there are no damp spots on the cloth.
Grind grains into flour.
Boil 1 cup (a fist) of water in a pot.
While the water is boiling, put 1 cup (a fist) of the germinated flour in a separate bowl with 1 cup (1 fist) of water and stir to make a paste.
Slowly add the paste to the boiling water while stirring.
Continue to stir the mixture until it thickens to the correct consistency for your baby’s age.
Recipe continues on the next page.
- 85 -
1 food color group
Remove from the heat. Let porridge cool before serving so you do not burn your baby’s mouth.
Wash your hands and your baby’s hands and face with soap and clean water before you feed the baby.
Recommended additions for dietary diversity:
Mashed watermelon
Mashed fish
Mashed boiled egg
Dried and ground dark green leafy vegetables
Add a healthy fat like vegetable oil (1 teaspoon or 1 thumb tip)
2 2 2 2
- 86 -
Helpful Hints
• For children aged 6 months, the porridge should be thick, smooth, and well mashed. It should not run off the spoon. For children aged 7–8 months, the porridge should be thicker.
• If you have extra food, you can feed it to other children or store it in a covered container for NO MORE THAN 4 hours. If you store the food, be sure to heat it so it is hot (not just warm) before feeding it again to your baby.
• Continue breastfeeding on demand until your baby is 2 years old or older.
- 87 -
Germinating grains takes some extra steps but the benefits are worth it. Did you know that germinating increases the nutrients in the grains?
Mashed Irish potatoes with ground green leafy vegetables
Ingredients
Boiled or steamed Irish potatoes (see recipes on pages 60 or 61)
Dried ground green leafy vegetables (see recipe on page 65)
Iodized salt to taste
Steps
1 teaspoon (1 thumb tip) fat or vegetable oil
Clean cooking area, any containers you will use, including pots, and utensils with soap and clean water. Dry the utensils.
Wash hands with soap and clean running water.
Add the fat or vegetable oil, iodized salt, and ground dried green leafy vegetables to the boiled or steamed potatoes. Mash the mixture.
Let potatoes cool before serving so you do not burn your baby’s mouth.
Wash your hands and your baby’s hands and face with soap and clean water before you feed the baby.
- 88 -
2 food groups
Helpful Hints
• If you have extra food, you can feed it to other children or store it in a covered container for NO MORE THAN 4 hours. If you store the food, be sure to heat it so it is hot (not just warm) before feeding it again to your baby.
• Continue breastfeeding on demand until your baby is 2 years old or older.
Recommended additions for dietary diversity:
Mashed cooked tomato for children
6 months of age
Minced cooked tomato for children
7–8 months of age
Orange juice squeezed from an orange, not canned juice
Mashed lentils
Dried, ground leafy green vegetables are easy to make with any dark green leafy vegetables and can be stored for 6 months.
I add them to recipes for the whole family. It’s an easy way to make meals healthier.
3 3 3
3
- 89 -
Sweet Potato Porridge
Ingredients
1 boiled or steamed orange-fleshed sweet potato (see recipes on pages 60 or 61)
1 teaspoon (1 thumb tip) of vegetable fat or oil
Steps
½ cup (Half fist) juice from an orange (not canned juice)
Clean water (if needed)
Clean cooking area, cooking bowls, and utensils with soap and clean water. Wash hands with soap and clean, running water.
Mash boiled or steamed potato with a fork.
Add the oil and orange juice and mix well. If needed, add clean water to make the porridge the right consistency for your baby’s age.
- 90 -
2 food groups
Helpful Hints
Let potatoes cool before serving so you do not burn your baby’s mouth.
Wash your hands and your baby’s hands and face with soap and clean, running water before you feed the baby.
• Orange-fleshed sweet potatoes and juice are sweet. There is no need to add sugar.
• For children aged 6 months, the porridge should be thick, smooth, and well mashed. It should not run off the spoon. For children aged 7–8 months, the porridge should be thicker.
• If you have extra food, you can feed it to other children or store it in a covered container for NO MORE THAN 4 hours. If you store the food, be sure to heat it so it is hot (not just warm) before feeding it again to your baby.
• Continue breastfeeding on demand until your baby is 2 years old or older.
Recommended additions for dietary diversity:
Mashed beans
Mashed egg for children 6 months of age
Minced egg for children 7-8 months of age
3 3 3
- 91 -
Mashed Sweet Potato and Beans
Ingredients
1 boiled or steamed sweet potato (see recipe on pages 60 or 61)
Steps
1 cup (1 fist) of cooked beans (recipe on page 59)
½ cup (half fist) juice from an orange (not canned juice)
1 teaspoon (1 thumb tip) of fat or vegetable oil
Clean water (if needed)
Clean cooking area, cooking bowls, and utensils with soap and clean water. Wash hands with soap and clean water.
Mix boiled or steamed orange-fleshed sweet potatoes, cooked beans, juice from the orange, and fat or vegetable oil. Mash together with a fork. If needed, add clean water to make the porridge the right consistency for your baby’s age.
- 92 -
Let potatoes cool before serving so you do not burn your baby’s mouth.
Helpful Hints
Wash your hands and your baby’s hands and face with soap and clean water before you feed the baby.
• Orange-fleshed sweet potatoes and juice are sweet. There is no need to add sugar.
• For children aged 6 months, the porridge should be thick, smooth, and well mashed. It should not run off the spoon. For children aged 7–8 months, the porridge should be thicker.
• If you have extra food, you can feed it to other children or store it in a covered container for NO MORE THAN 4 hours. If you store the food, be sure to heat it so it is hot (not just warm) before feeding it again to your baby.
• Continue breastfeeding on demand until your baby is 2 years of age.
Recommended additions for dietary diversity:
Shredded flesh foods for children 7-8 months of age
Mashed boiled egg for children 6 months of age
Grated boiled egg for children 7-8 months of age
4 4 4
- 93 -
3 food groups
Sweet Potato and Egg Porridge
Ingredients
1 orange-fleshed sweet potato
Thumb tip (1 teaspoon) of cooking oil, coconut oil, or expressed breast milk
Juice from an orange
Steps
1 egg
Clean drinking water
Clean cooking area, cooking bowls, and utensils with soap and clean water. Wash hands with soap and clean water. Wash vegetables.
Cut the sweet potato into small pieces and place into pan or pot.
- 94 -
2 food color groups
Crack the egg and pour on top of the slices.
Add the oil and enough clean drinking water to cover the bottom of the pot. Cover the pot.
The steam created by the water will cook the mixture. Steaming uses a lot less water and can reduce cooking time.
Stir occasionally to prevent burning. If it gets too dry before being fully cooked, add a few spoons of clean drinking water.
Cook until you can easily pierce the potato with a fork. Mash cooked potato with a fork.
Add juice from the orange and mix well.
Recipe continues on the next page.
- 95 -
Let potatoes cool before serving so you do not burn your baby’s mouth.
Wash your hands and your child’s hands with soap and clean water before feeding your child.
Recommended additions for dietary diversity:
- 96 -
Mashed cooked beans Mashed cooked fish for children 6 months of age Shredded cooked fish for children 7–8 months of age 4 4 4
Helpful Hints
• Orange-fleshed sweet potatoes and juice are sweet. There is no need to add sugar.
• For children aged 6 months, the porridge should be thick, smooth, and well mashed. It should not run off the spoon.
• For children aged 7–8 months, the porridge should be thicker.
• If you have extra food, you can feed it to other children or store it in a covered container for NO MORE THAN 4 hours. If you store the food, be sure to heat it so it is hot (not just warm) before feeding it again to your baby.
• Continue breastfeeding on demand until your baby is 2 years old or more.
When I was young it was believed that eggs would delay a child’s speech. But now I know that eggs are safe and healthy. They help children grow strong and learn well. Just make sure they are soft and mashed for babies 6–8 months of age.
- 97 -
Butternut Porridge
Ingredients
1 medium size butternut squash
Steps
½ cup (half fist) juice from an orange (not canned juice)
1 teaspoon (1 thumb tip) of fat or vegetable oil
Clean safe water (enough to cover the bottom of the pot)
Clean cooking area, cooking bowls, and utensils with soap and clean water. Wash hands with soap and clean water. Wash butternut squash.
Cut the squash into pieces:
• Try to make the pieces the same size.
• You can cook the butternut squash more quickly if you cut them into small pieces.
- 98 -
2 food groups
Put the squash in a pot and fill it with just enough clean water to cover the squash.
Bring water to a boil.
Cover the pot. If you are cooking over gas or kerosene reduce the heat. If you are cooking over a jiko or fire move the pot to the side of the flame. The steam created by the water will cook the squash.
Cook until the squash is tender but firm.
Remove the peel from the squash using a clean knife or fork.
Mash the squash using a clean fork.
Add the fat or vegetable oil and juice from the orange and mix well.
Recipe continues on the next page.
- 99 -
Wash your hands and your child’s hands with soap and clean water before feeding your child.
Recommended additions for
Let porridge cool before serving so you do not burn your baby’s mouth. 3 3
3
- 100 -
7–8
6
7–8
dietary diversity: Mashed liver for children 6 months of age Shredded liver for children
months of age Mashed boiled egg for children
months of age Grated boiled egg for children
months of age Peanut butter 3 3
Helpful Hints
• Orange-fleshed sweet potatoes and juice are sweet. There is no need to add sugar.
• For children aged 6 months, the porridge should be thick, smooth, and well mashed. It should not run off the spoon. For children aged 7–8 months, the porridge should be thicker.
• If you have extra food, you can feed it to other children or store it in a covered container for NO MORE THAN 4 hours. If you store the food, be sure to heat it so it is hot (not just warm) before feeding it again to your baby.
• Continue breastfeeding on demand until your baby is 2 years old or more.
It is important to me that my sons get the best start in life, that means their mother has to breastfeed them whenever they get hungry. I help with household duties so my wife can be free to breastfeed.
- 101 -
Pumpkin and Peanut Butter Porridge
Ingredients
1 large pumpkin, raw unpeeled
Steps
7 tablespoons (7 thumbs) peanut butter
Iodized salt to taste
4 teaspoons (4 thumb tips) fat or oil
2 ½ cups (2 ½ fists) clean water
Clean cooking area, cooking bowls, and utensils with soap and clean water. Wash hands with soap and clean water. Wash pumpkin.
Peel pumpkin and cut pumpkin:
• Try to make the pieces the same size.
• You can cook the pumpkin more quickly if you cut them into small pieces.
In a separate bowl mix the peanut butter with a small amount of clean water to make a paste.
- 102 -
2 food groups
Put the pumpkin into a cooking pot and add rest of the clean water. Cover and bring to a boil, add iodized salt and fat or vegetable oil.
Boil until the pumpkin is soft and can be easily pierced with a fork. When the pumpkin has cooked, add the peanut butter.
Cover and simmer. If you are cooking over gas, kerosene, jiko or fire, use low heat. Continue to simmer until it is the right texture for your baby’s age.
Let porridge cool before serving so you do not burn your baby’s mouth.
Wash your hands and your child’s hands with soap and clean water before feeding your child.
Recommended additions for dietary diversity:
Ground grasshoppers or termites
Mashed banana
Mashed boiled egg
3 3 3
- 103 -
Things to remember
We know this is a lot of information. Here are the really important things to remember:
• Babies at 6 months of age and 7–8 months of age have different needs in terms of how much, how often to feed them, and what texture is best for them. Look at the charts on pages 71 for guidance.
• Remember that at least four different foods groups each day is the goal but do not feed your baby dairy or dairy products at this age.
• For babies 6 months of age, look for the “first foods” image — these are great foods to get your baby used to solid foods.
• You should continue to breastfeed as you are introducing foods to your baby.
- 104 -

- 105 -
- 106 -
Feeding children
9 – 11 months
- 107 -
Key things to know
Here are the really important things to remember about feeding babies 9–11 months of age:
You should try to feed your baby at least 4 food groups every day, and all food color groups each week, except for the Dairy and Dairy Products food group (animal milk). Babies should not have dairy or dairy products until they are 12 months old.
• Babies should not have animal milk until they are 12 months old.
• Remember to continue to breastfeed your baby while you are introducing foods. You should feed your baby who is 9–11 months on demand. That means, whenever they want.
• At 9–11 months, your baby is able to chew many different types of textures. See the chart at the right for examples of appropriate ways to prepare your child’s food. Try to include these different textures in their food, it will help prepare them for family foods.
• You can feed your child from both the 6–8 month old recipes and the 9–11 month old recipes. But try to focus on these new recipes to prepare your child to eat from the family pot.
- 108 -
Feeding schedules and amounts
9–11 months
Your child should be able to stand with objects. Between 9 and 11 months, a lot of new foods can be introduced. Babies should not have dairy or dairy products until they are 12 months old.
Frequency
Amount
Texture
• Continue to breastfeed your baby on demand but at least 6 times every day.
• Feed baby aged 9–11 months 3 meals a day plus a snack.
¾ cup of food at each meal. A ¾ cup is equal to ¾ of a fist.
Give your baby one snack (ripe banana, mango, boiled potato, arrow root, or avocado) either between morning and afternoon or afternoon and evening meal.
Finely chopped food
Pieces should be no bigger than the nail on your little finger.
We’re introducing a new icon starting with this age group. When you see this family icon, it means this is a healthy recipe that can be served to the whole family. If you want to prepare it for only the children, you can reduce the amounts.
- 109 -
Sample Meals Plan: 9–11 months
Feed your child who is 9–11 month of age three meals each day and a snack. Continue to breast feed.
Aim for at least 4 food color groups every day except for the dairy and dairy products food group. Children should not have dairy or dairy products until they are 12 months of age.
On the next page is an example of a weekly meal plan that will give your child who is 9–11 months of age all the nutrients they need. As your child gets older and her diet includes more foods, it is easier to feed her 4 or more different food groups at every meal.
- 110 -
Afternoon Morning ON DEMAND Evening Night ON DEMAND ON DEMAND ON DEMAND
Monday Meal 1: Maize porridge, mashed beans and banana
Meal 2: Potato stew
Meal 3: Mashed Irish potatoes with dried, ground greens
Snack: Avocado pieces
Tuesday
Meal 1: Sweet potato and egg porridge
Meal 2: Minced meat stew
Meal 3: Pumpkin and peanut butter
Snack: Sliced banana
Wednesday Meal 1: Fermented grain porridge, mashed carrots
Meal 2: Stewed Nile perch
Meal 3: Arrowroot stew
Snack: Mashed beans
Thursday Meal 1: Butternut porridge, chopped boiled egg
Meal 2: Split green grams stew
Meal 3: Mashed Irish potatoes with dried, ground omena
Snack: Sliced banana
Friday Meal 1: Sweet potato porridge, minced mango
Meal 2: Stir-fried Amaranth leaves (Terere)
Meal 3: Pumpkin and peanut butter
Snack: Chopped boiled egg
Saturday
Meal 1: Maize porridge, banana
Meal 2: Rice with green grams
Meal 3: Jute mallow (mrenda) and pumpkin leaves
Snack: Cooked, diced carrots
Sunday Meal 1: Fermented grain porridge, mashed carrots
Meal 2: Sweet potato porridge with diced liver
Meal 3: Omena Stew
Snack: Banana and peanut butter
Four Different Food Groups
Five Different Food Groups
Six Different Food Groups
Six Different Food Groups
Five Different Food Groups
Four Different Food Groups
Five Different Food Groups
- 111 -
Potato stew
Ingredients
6 Irish potatoes
Steps
2 carrots
1 medium size onion
2 medium sized tomatoes
Iodized salt to taste
4 ½ cups (4 ½ fists) clean water
1 cup (1 fist) cooked beans (see recipe on page 59)
5 tablespoons (5 full thumbs) of fat or oil
Clean cooking area, cooking bowls, and utensils with soap and clean water. Wash hands with soap and clean, running water. Wash all vegetables with clean water.
Chop all vegetables into small bite sized pieces.
Heat the fat or oil in a cooking pot; add the onions and cook until they are soft and golden brown.
Add tomatoes, stir, and cook until they are soft.
- 112 -
4 food groups
Mix in potatoes, clean water, and iodized salt, cover and continue to cook.
Mix in carrots and beans. Continue cooking until vegetables are soft and you can pierce them with a fork.
Let stew cool before serving so you do not burn your baby’s mouth.
Wash your hands and your child’s hands with soap and clean water before feeding your child.
Recommended additions for dietary diversity: Minced meat
Boiled and chopped egg 5 5
Helpful Hints
• At this age, your child should be eating about ¾ cup (3 cupped handfuls) of food at each meal and a snack.
• If you have extra food, you can feed it to other children or store it in a covered container for NO MORE THAN 4 hours. If you store the food, be sure to heat it thoroughly before feeding it again to your baby.
• Continue breastfeeding on demand until your baby is 2 years old or more.
- 113 -
Minced meat stew
Ingredients
1 cup (1 fist) minced meat
Steps
1 medium size onion
2 medium sized tomatoes
2 carrots
1 tablespoon (1 full thumb) of fat or oil
1 cup (1 fist) clean water
Iodized salt to taste
Clean cooking area, cooking bowls, and utensils with soap and clean water. Wash hands with soap and clean water. Wash all vegetables with clean water.
Chop all vegetables into small bite sized pieces
- 114 -
3 food groups
Heat the fat or oil in a cooking pot; add the onions and cook until they are soft and golden brown.
Add tomatoes, stir, and cook until they are soft. If you are cooking over gas, kerosene, jiko or fire, lower the heat. Continue cooking until tomatoes are soft.
Mix in minced meat and clean water, cover and continue to cook until the meat is tender and falls apart easily.
Add carrots and continue to cook until carrots are soft, and you can pierce them with a fork.
Add iodized salt to taste. The stew should be thick, soft, and easy to eat.
Recipe continues on the next page.
- 115 -
Let stew cool before serving so you do not burn your baby’s mouth.
Wash your hands and your child’s hands with soap and clean water before feeding your child.
Recommended additions for dietary diversity:
- 116 -
Cooked
beans 4 4 4 Boiled and chopped egg Cooked and chopped pasta
Helpful Hints
• At this age, your child should be eating about ¾ cup (3 cupped handfuls) of food at each meal and a snack.
• If you have extra food, you can feed it to other children or store it in a covered container for NO MORE THAN 4 hours. If you store the food, be sure to heat it thoroughly before feeding it again to your baby.
• Continue breastfeeding on demand until your baby is 2 years old or more.
Growing up, I heard elders say that eating meat can make a child weak. At the nutrition clinic we were taught that meat is a nutritious food for children. As a community health volunteer, I teach families that the protein in meat help children grow strong. Young children can safely eat meat if it is soft and mashed.
- 117 -
Stewed Nile perch
Ingredients
1 large (about 4 cups or 4 fists) Nile perch fish (any other types of fish)
1 medium size onion
3 medium sized tomatoes
5 tablespoons (5 full thumbs) of fat or oil
7 cups (7 fists) clean water
Iodized salt to taste
Nile perch is in the flesh food group (red) which means it helps with muscles and energy. But Nile perch also has a special nutrient that helps make a heart healthy and strong.
- 118 -
2 food groups
Steps
Clean cooking area, cooking bowls, and utensils with soap and clean water. Wash hands with soap and clean, running water. Wash all vegetables with clean water.
Chop all vegetables into small bite sized pieces Put 4 cups (4 fists) of clean water and iodized salt in a pot. Bring it to a boil. Add the fish to the boiling water.
In a separate cooking pot, heat the fat or oil; add the onions and cook until they are soft and golden brown
Add tomatoes to the onions, stir and cook until they are soft.
Transfer the cooked onions and tomatoes into the boiling fish and stir.
If you are cooking over gas, kerosene, jiko or fire, and lower the heat. Continue cooking until the fish falls apart.
Recipe continues on the next page.
- 119 -
Let stew cool before serving so you do not burn your baby’s mouth.
Separate the flesh from bones. It is very important that there are no bones left in the fish because children can choke on them.
Wash your hands and your child’s hands with soap and clean water before feeding your child.
Recommended additions for dietary diversity:
Cooked sliced plantains
3
3 2 Chopped and cooked pumpkin
Sliced ripe banana
- 120 -
Helpful Hints
• At this age, your child should be eating about ¾ cup (3 cupped handfuls) of food at each meal and a snack.
• If you have extra food, you can feed it to other children or store it in a covered container for NO MORE THAN 4 hours. If you store the food, be sure to heat it thoroughly before feeding it again to your baby.
• Continue breastfeeding on demand until your baby is 2 years old or more.
- 121 -
Fish is a very healthy food for your baby. Just make sure you remove all the bones so your baby doesn’t choke on them.
Arrowroot stew
Ingredients
3 arrowroots
4 potatoes
3 carrots (or pumpkin)
3 medium sized tomatoes
1 medium size onion
1 orange
5 tablespoons (5 full thumbs) of fat or oil
6 cups (7 fists) clean water
Iodized salt to taste
- 122 -
Steps
Recipe continues on the next page.
3 food groups
Clean cooking area, cooking bowls, and utensils with soap and clean water. Wash hands with soap and clean, running water. Wash all vegetables with clean water.
Chop all vegetables into small bite sized pieces Heat the fat or oil in a cooking pot; add the onions and cook until they are soft and golden brown.
Add tomatoes, stir, and cook until they are soft.
Stir in the arrowroot, carrots, or pumpkin and 4 cups (4 fists) of clean water.
Stir in potatoes and iodized salt. Cook the mixture stirring occasionally.
- 123 -
Add the remaining 2 cups (2 fists) of clean water and cover.
If you are cooking over gas, kerosene, jiko or fire, lower the heat. Cook until you can easily pierce the vegetables with a fork.
Add juice from the orange and stir. Let stew cool before serving so you do not burn your baby’s mouth.
Wash your hands and your child’s hands with soap and clean water before feeding your child.
Recommended additions for dietary diversity:
Minced meat
Cooked bean
Shredded and cooked dark leafy vegetables
3
4 4
- 124 -
I used to cut up all my vegetables before washing them. But I learned that when you wash matters. You should always wash your hands, the knife and cutting area first. Then wash the vegetables before cutting them.
Helpful Hints
• At this age, your child should be eating about ¾ cup (3 cupped handfuls) of food at each meal and a snack.
• If you have extra food, you can feed it to other children or store it in a covered container for NO MORE THAN 4 hours. If you store the food, be sure to heat it thoroughly before feeding it again to your baby.
• Continue breastfeeding on demand until your baby is 2 years old or more.
- 125 -
Split green grams stew
Ingredients
1 cup (1 fist) cooked split green grams (see page 59 for recipe)
3 medium sized tomatoes
1 medium size onion
Juice from one lemon
2 tablespoons (2 full thumbs) of fat or oil
9 cups (9 fists) clean water
Iodized salt to taste
- 126 -
Steps
Recipe continues on the next page.
2 food groups
Clean cooking area, cooking bowls, and utensils with soap and clean water. Wash hands with soap and clean running water. Wash the tomatoes with clean water.
Chop all vegetables into small bite sized pieces
Mash the cooked split green grams with 5 cups (5 fists) water.
Heat the fat or oil in a cooking pot; add the onions and cook until they are soft and golden brown.
Add tomatoes, stir, and cook until they are soft.
Add remaining 4 cups (4 fists) water, lemon juice, and iodized salt.
- 127 -
Stir in the mashed green grams and cover.
If you are cooking over gas, kerosene, jiko or fire, lower the heat. Cook until the mixture is hot throughout.
The split green grams stew should be thick, soft, and easy to eat.
Let stew cool before serving so you do not burn your baby’s mouth.
Wash your hands and your child’s hands with soap and clean, running water before feeding your child.
Recommended additions for dietary diversity:
3
- 128 -
Minced meat
Cooked bean Shredded and cooked dark leafy vegetables 4 4
I thought that children under 1 year of age should not eat beans or meat because they could choke. But I have learned that these foods can be safe for younger children if they are prepared correctly. Cook these foods until they are soft, mash them and add soup or clean drinking water if they are too thick to make them safer for younger children.
Helpful Hints
• At this age, your child should be eating about ¾ cup (3 cupped handfuls) of food at each meal and a snack.
• If you have extra food, you can feed it to other children or store it in a covered container for NO MORE THAN 4 hours. If you store the food, be sure to heat it thoroughly before feeding it again to your baby.
• Continue breastfeeding on demand until your baby is 2 years old or more.
- 129 -
Stir-fried Amaranth leaves (Terere)
Ingredients
2-3 bunches of amaranth leaves (10 cups chopped)
2 medium sized tomatoes
1 medium size onion
2 tablespoons (2 full thumbs) of fat or oil
Iodized salt to taste
My wife told me that amaranth leaves and other dark green leafy vegetables are important for my children so I grow them on my shamba.
- 130 -
2 food groups
Steps
Clean cooking area, cooking bowls, and utensils with soap and clean water. Wash hands with soap and clean, running water. Wash the vegetables with clean water.
Chop all vegetables into small pieces. Heat the fat or oil in a cooking pot; add the onions and cook until they are soft and golden brown.
Add tomatoes, stir, and cook until they are soft.
Mix in the amaranth and iodized salt.
Recipe continues on the next page.
- 131 -
If you are cooking over gas, kerosene, jiko or fire, lower the heat. Cook until the mixture is hot throughout.
The amaranth leaves should be soft, and easy to eat.
Let mixture cool before serving so you do not burn your baby’s mouth.
Wash your hands and your child’s hands with soap and clean water before feeding your child.
Recommended additions for dietary diversity: Minced liver
3 2 3 Sliced ripe avocado Cooked rice
- 132 -
Stirred-fried amaranth leaves are a favorite in my house but they only have two food groups so I always add some foods from other foods groups .
Helpful Hints
• At this age, your child should be eating about ¾ cup (3 cupped handfuls) of food at each meal and a snack.
• If you have extra food, you can feed it to other children or store it in a covered container for NO MORE THAN 4 hours. If you store the food, be sure to heat it thoroughly before feeding it again to your baby.
• Continue breastfeeding on demand until your baby is 2 years old or more.
- 133 -
Rice with green grams
Ingredients
4 cups (4 fists) cooked rice (see recipe on page 62)
1 cup (1 fist) cooked sprouted green grams (see page 63 for recipe)
¾ cup (3 cupped handfuls) coconut milk
1 medium sized onion
2 tablespoons (2 full thumbs) of fat or oil
Iodized salt to taste
- 134 -
3 food groups
Steps
Clean cooking area, cooking bowls, and utensils with soap and clean water. Wash hands with soap and clean, running water. Wash the onion with clean water.
Chop all onions into small pieces. Heat the fat or oil in a cooking pot; add the onions and cook until they are soft and golden brown.
Add the cooked green grams and rice.
If you are cooking over gas, kerosene, jiko or fire, lower the heat. Cook until the mixture is hot throughout.
Recipe continues on the next page.
- 135 -
Add coconut milk and stir.
Let mixture cool before serving so you do not burn your baby’s mouth.
Wash your hands and your child’s hands with soap and clean water before feeding your child.
Recommended additions for dietary diversity:
The food should be thick, soft, and easy to eat. 4 4
4
- 136 -
Chopped
Shredded
cooked carrots
fish Cooked and chopped egg
Helpful Hints
• At this age, your child should be eating about ¾ cup (3 cupped handfuls) of food at each meal and a snack.
• If you have extra food, you can feed it to other children or store it in a covered container for NO MORE THAN 4 hours. If you store the food, be sure to heat it thoroughly before feeding it again to your baby.
• Continue breastfeeding on demand until your baby is 2 years old or more.
- 137 -
When you save food it can get germs by sitting out that is why I reheat my food so it is as hot as when I originally cooked it.
Jute mallow (mrenda) and pumpkin leaves
Ingredients
1 cup (1 fist) jute mallow leaves or other dark leafy green vegetable
1 cup (1 fist) pumpkin leaves or other dark leafy green vegetable
1 medium size onion
1 large tomato
2 teaspoons (2 thumb tips) fat or oil
Iodized salt to taste
3 cups (3 fists) clean water
- 138 -
2 food groups
Steps
Recipe continues on the next page.
Clean cooking area, cooking bowls, and utensils with soap and clean water. Wash hands with soap and clean, running water. Wash the vegetables with clean water.
Chop all the vegetables into small pieces. Add clean water to a cooking pot, bring to boil.
Add the jute mallow and pumpkin leaves to the pot and stir. Cook until almost all the water is gone, and the leaves are soft.
Heat the fat or oil in a separate cooking pot; add the onions and cook until they are soft and golden brown.
Add tomatoes, stir, and cook until they are soft.
- 139 -
Mix in the jute mallow and pumpkin leaves and iodized salt.
If you are cooking over gas, kerosene, jiko or fire, lower the heat. Cook until the mixture is hot throughout.
The jute mallow and pumpkin leaves should be soft, and easy to eat.
Let mixture cool before serving so you do not burn your baby’s mouth.
Wash your hands and your child’s hands with soap and clean water before feeding your child.
- 140 -
Edible insects
Scramble eggs Chopped pineapple
Recommended additions for dietary diversity:
3
3 2
Not all foods are available all year, and some foods can be too expensive to buy regularly. But that doesn’t mean you can’t provide your child with a balanced diet. If you can’t afford a certain food, replace it with a less expensive food from the same food group and don’t forget about wild and traditional fruits and vegetables that grow in your region!
Helpful Hints
• At this age, your child should be eating about ¾ cup (3 cupped handfuls) of food at each meal and a snack.
• If you have extra food, you can feed it to other children or store it in a covered container for NO MORE THAN 4 hours. If you store the food, be sure to heat it thoroughly before feeding it again to your baby.
• Continue breastfeeding on demand until your baby is 2 years old or more.
- 141 -
Omena stew
Ingredients
2 cups (2 fists) dried omena fish
2 medium size onions
3 medium size tomatoes
1 teaspoon (1 thumb tips) fat or oil
Iodized salt to taste
2 cups (2 fists) clean water
- 142 -
Steps
Recipe continues on the next page.
2 food groups
Clean cooking area, cooking bowls, and utensils with soap and clean water. Wash hands with soap and clean water. Wash the vegetables with clean water. Chop all the vegetables into small pieces. Sort omena and wash with clean water. Put omena, water and salt into cooking pot. Boil until almost all the water is gone.
In a separate cooking pot, heat the fat or oil; add the onions and cook until they are soft and golden brown.
Add tomatoes, stir, and cook until they are soft.
Add the cooked omena to the onions and tomatoes.
- 143 -
If you are cooking over gas, kerosene, jiko or fire, lower the heat. Cook until the mixture is hot throughout.
The stew should be thick, soft, and easy to eat.
Let mixture cool before serving so you do not burn your baby’s mouth.
Wash your hands and your child’s hands with soap and clean water before feeding your child.
- 144 -
Recommended additions for dietary diversity: Sliced mango 3 Cooked green peas Chopped guava
3 2
Helpful Hints
• At this age, your child should be eating about ¾ cup (3 cupped handfuls) of food at each meal and a snack.
• If you have extra food, you can feed it to other children or store it in a covered container for NO MORE THAN 4 hours. If you store the food, be sure to heat it thoroughly before feeding it again to your baby.
• Continue breastfeeding on demand until your baby is 2 years old or more.
- 145 -
As a grandmother I know that children’s preferences change over time. I have heard that a child has to taste a food 10 times before he develops a taste for it. Foods like omena and organ meat may take some getting used to, but they are very nutrient dense and inexpensive. So keep trying.
Things to remember
We know this is a lot of information. Here are the really important things to remember:
• Babies at 9–11 months of age have different needs in terms of how much, how often to feed them, and what texture is best for them. Look at the charts on pages 108 for guidance.
• Remember that four different foods groups each day is the goal.
• Recipes with the “family icon” mean that they are healthy meals perfect for your whole family.
• You should continue to breastfeed as you are introducing foods to your baby.
- 146 -

- 147 -
- 148 -
Feeding children
12 – 23 months
- 149 -
Key things to know
Here are the really important things to remember about feeding babies 12 – 23 months of age:
You should try to feed your baby at least 4 food group every day, and all food color groups, except for the Blue group (animal milk) each week.
• Babies at least 12 months of age can start to have milk.
• Remember to continue to breastfeed your baby while you are introducing foods. You should feed your baby who is 12 –23 months on demand. That means, whenever they want.
• At 12 months, your baby is able to chew many different types of textures (see the chart at the right). Try to include these different textures in their food, it will help prepare them for family foods.
• By the time your child is 12 months of age, you can feed them any recipe in this book. But try to focus on these new recipes to prepare your child to eat from the family pot.
Mashing beans, sweet potatoes, and fruits
Pounding omena
Shredding beef, fish, poultry
Grating root vegetables, boiled egg
Mincing vegetables
Grinding nuts
Slicing/Dicing vegetables
Finger Foods
Whole Foods
- 150 -
Feeding schedules and amounts
12 – 23 months
Your child should be walking without support. During your baby’s 2nd year of life (from 12 - 23 months) you should be getting them used to eating from the family pot. Just be sure that the food is cut into small pieces they can chew and is not too spicy. You can begin to introduce dairy and dairy products at this age.
Frequency
Amount Texture
• Continue to breastfeed your baby every time he or she wants (day and night)
• Feed baby aged 12–23 months 3 times a day.
1 cup of food at each meal
Give your baby 2 snacks (ripe banana, mango, boiled potato, arrow root, or avocado) between morning and afternoon then afternoon and evening meals
Give your baby food from the family pot cut into small pieces to make it easy for him or her to eat.
Remember, this family icon it means this is a healthy recipe that can be served to the whole family. If you want to prepare it for only the children, you can reduce the amounts.
- 151 -
Sample Meals Plan: 12 –23 months
Feed your child who is 12–23 month of age three meals each day and two snacks. Continue to breast feed.
Aim for at least 4 food color groups every day and every food group in a week. You should begin to include dairy and dairy products in your child’s diet.
On the next page is an example of a weekly meal plan that will give your child who is 12–23 months of age all the nutrients they need. As your child gets older and his diet includes more foods, it is easier to feed him 4 or more different food groups at every meal.
- 152 -
Afternoon Morning ON DEMAND Evening Night ON DEMAND ON DEMAND ON DEMAND
Monday Meal 1: Maize porridge, mashed beans and ripe banana
Meal 2: Sweet potatoes and vegetables with groundnut flour
Meal 3: Mashed Irish potatoes with dried, ground greens
Snack: Avocado pieces, chopped boiled eggs
Tuesday Meal 1: Sweet potato and egg porridge
Meal 2: Minced meat stew
Meal 3: Mashed green maize, beans, and sweet potatoes
Snack: Sliced banana, fermented milk
Wednesday Meal 1: Pigeon pea stew, mashed carrots
Meal 2: Stewed Nile perch
Meal 3: Arrowroot stew
Snack: Mashed beans, fermented milk
Thursday Meal 1: Enriched matoke, chopped boiled egg
Meal 2: Stir-fried Kale (Sukuma Wiki)
Meal 3: Mashed Irish potatoes with dried, ground omena
Snack: Sliced banana, cooked and diced carrots
Friday Meal 1: Sweet potato porridge, minced mango
Meal 2: Stir-fried Amaranth leaves (Terere)
Meal 3: Stewed cow peas leaves and jute mallow leaves
Snack: Chopped boiled egg, avocado pieces
Saturday Meal 1: Maize porridge, banana
Meal 2: Sprouted green grams stew
Meal 3: Liver stew
Snack: Cooked and diced carrots, papaya slice
Sunday Meal 1: Fermented grain porridge, mashed carrots
Meal 2: Sweet potato porridge with diced liver
Meal 3: Meat Stew
Snack: Banana and peanut butter, fermented milk
Five Different Food Groups
Seven Different Food Groups
Six Different Food Groups
Six Different Food Groups
Six Different Food Groups
Five Different Food Groups
Six Different Food Groups
- 153 -
Steamed sweet potato and vegetables with groundnut flour
Ingredients
Raw orange-fleshed sweet potato
Steps
1 cup (1 fist) of any dark green leafy vegetable
1 cup (1 fist) of roasted and ground groundnuts or any other nut
½ cup (½ fist) juice from an orange
2 cups (2 fists) of clean water
Clean cooking area, cooking bowls, and utensils with soap and clean water. Wash hands with soap and clean running, water. Wash ALL vegetables with clean water.
Cut the sweet potato into small pieces.
- 154 -
3 food groups
Add just enough clean water to cover the bottom of the pot. Add the ground nuts, dark green leafy vegetables and orange-fleshed sweet potatoes to the pot and bring to a boil.
Cover the pot. The steam created by the water will cook the mixture.
Steaming uses a lot less water and can reduce cooking time.
Stir occasionally to prevent burning. If it gets too dry before being fully cooked, add a few spoons of clean water.
Cook until you can easily pierce the potato with a fork.
Mash the mixture. Add juice from the orange and stir well.
Recipe continues on the next page.
- 155 -
`
Remove from the heat. Let cool before serving so you do not burn your baby’s mouth.
Wash your hands and your child’s hands with soap and clean water before feeding your child.
- 156 -
Recommended additions for dietary diversity: Passion fruit 3 Chopped meat Boiled animal milk 4 4
As a father, I feel it is my duty to provide the best for my family. Part of how I do this is by ensuring they get the nutrition they need. It does not take a lot of money if you know which foods are both nutritious and inexpensive.
Helpful Hints
• At this age, your child should be eating about 1 cup (1 fist) of food at each meal and a snack.
• If you have extra food, you can feed it to other children or store it in a covered container for NO MORE THAN 4 hours. If you store the food, be sure to heat it thoroughly before feeding it again to your baby.
• Continue breastfeeding on demand until your baby is 2 years old or more.
- 157 -
Fermented Milk
Ingredients
4 cups (4 fists) of fresh milk
Steps
Clean cooking area, cooking bowls, and utensils with soap and clean water. Wash hands with soap and clean water. Sieve the milk.
Put the milk in a cooking pot and bring to a rolling boil. Boil for at least 3 minutes.
Let the milk cool.
Put cooled boiled milk into a container made of stainless steel, enamel, or melamine with a tight-fitting lid.
Cover and leave for 2-3 days to ferment.
To prevent spoiling, do not move or shake the container.
- 158 -
1 food groups
The fermented milk should be thick and pull away from the sides of the container when you tilt it.
You can save about ¼ cup (1 cupped handful) to start a new batch of yogurt. This is called “a starter.” Use the starter right away to avoid contamination. Add fresh boiled milk to the starter and leave to ferment.
Wash your hands and your child’s hands with soap and clean water before feeding your child.
Recommended additions for dietary diversity: Sliced papaya
4
4
3 Whole ripe banana Bread
Helpful Hints
• At this age, your child should be eating about ¾ cup (3 cupped handfuls) of food at each meal and a snack.
• If you have extra food, you can feed it to other children or store it in a covered container for NO MORE THAN 4 hours. If you store the food, be sure to heat it thoroughly before feeding it again to your baby.
• Continue breastfeeding on demand until your baby is 2 years old or more.
- 159 -
Sweet potato and beans
Ingredients
4 cups (4 fists) cooked beans (can use any bean, see recipe on page 59)
2 cobs green maize
4 orange-fleshed sweet potatoes
1 1⁄3 cups (1 and 1⁄3 fist) groundnut paste
Iodized salt to taste
9 cups (9 fists) clean water
- 160 -
3 food groups
Steps
Clean cooking area, cooking bowls, and utensils with soap and clean water. Wash hands with soap and clean, running water. Wash vegetables.
Cut the sweet potato into small pieces.
Remove the maize from the cob. Put the cooked beans in a pot and add the green maize.
Add 4 cups (4 fists) clean water and bring to a boil. Cook until the maize is soft. Add orange-fleshed sweet potatoes, groundnut paste, iodized salt and the rest of the water to the maize and beans.
Recipe continues on the next page.
- 161 -
Cook until you can easily pierce the orange-fleshed sweet potatoes with a fork.
Once cooked, mash the maize, beans, orange-fleshed sweet potato, and groundnut paste mixture.
Remove from the heat. Let cool before serving so you do not burn your baby’s mouth.
Wash your hands and your child’s hands with soap and clean water before feeding your child.
Recommended additions for dietary diversity:
3
meat 3 4
- 162 -
Chapati
Boiled
Chopped
cabbage
Before I start preparing my child’s food, I ensure that the food preparation surface is cleaned with soap and water. This will kill germs which could be transferred to the food if the surfaces are not clean.
Helpful Hints
• At this age, your child should be eating about ¾ cup (3 cupped handfuls) of food at each meal and a snack.
• If you have extra food, you can feed it to other children or store it in a covered container for NO MORE THAN 4 hours. If you store the food, be sure to heat it thoroughly before feeding it again to your baby.
• Continue breastfeeding on demand until your baby is 2 years old or more.
- 163 -
Pigeon pea stew (Mchuzi wa Mbaazi)
Ingredients
7 cups (7 fists) cooked pigeon peas and the water peas were cooked in (other beans could be used here as well, see recipe on page 59)
1 medium size onion
2 tomatoes
3 tablespoons (3 full thumbs) cooking fat
Iodized salt to taste
Clean water (enough to cover peas)
- 164 -
2 food groups
Steps
Clean cooking area, cooking bowls, and utensils with soap and clean water. Wash hands with soap and clean, running water. Wash vegetables.
Chop onions and tomatoes..
Heat the fat or oil in a cooking pot; add the onions and cook until they are soft and golden brown.
Add tomatoes, stir, and cook until they are soft.
Add the cooked pigeon peas and stir. Add enough clean water to cover the peas. Add salt and stir.
Recipe continues on the next page.
- 165 -
Cover the pot and bring to a boil. Cook until pigeon peas are hot. Stir mixture.
Remove from the heat. Let cool before serving so you do not burn your baby’s mouth. Recommended
Wash your hands and your child’s hands with soap and clean water before feeding your child.
- 166 -
additions for dietary diversity: Chapati
Boiled cabbage Chopped meat
3
3 4
When I had leftover food it would get ants in it or have a bad smell. To prevent wasting food or getting my family sick, now I cook smaller amounts so I don’t have food left over. If there is leftover, I cover it and store it for 4 hours only. I also make sure to reheat the food so it is hot before I serve it again.
Helpful Hints
• At this age, your child should be eating about ¾ cup (3 cupped handfuls) of food at each meal and a snack.
• If you have extra food, you can feed it to other children or store it in a covered container for NO MORE THAN 4 hours. If you store the food, be sure to heat it thoroughly before feeding it again to your baby.
• Continue breastfeeding on demand until your baby is 2 years old or more.
- 167 -
Stir-fried kale (Sukuma Wiki)
Ingredients
2-3 bunches of kale (sukuma wiki) leaves or any other dark green leafy vegetable
Steps
2 tomatoes
1 onion
1 tablespoon (1 thumb) fat or oil
Iodized salt to taste
Clean cooking area, cooking bowls, and utensils with soap and clean water. Wash hands with soap and clean, running water. Wash vegetables.
Chop onions, tomatoes, and sukuma wiki (or other dark green leafy vegetable).
Heat the fat or oil in a cooking pot; add the onions and cook until they are soft and golden brown.
- 168 -
2 food groups
Add tomatoes, stir, and cook until they are soft.
Add the chopped Sukuma wiki (or other dark leafy green) and iodized salt. Stir until everything is well mixed.
If you are cooking over gas, kerosene, jiko or fire, lower the heat. Cook just until the sukuma wiki is wilted and the tomatoes are well mixed. Do not overcook. Overcooking makes your vegetables less nutritious.
Remove from the heat. Let cool before serving so you do not burn your baby’s mouth.
Wash your hands and your child’s hands with soap and clean water before feeding your child.
Recommended additions for dietary diversity:
Peanut butter
Chopped goat meat
3
3
- 169 -
Rice 3
Stewed cow pea leaves and jute mallow leaves
Ingredients
3 cups (3 fists) jute mallow leaves (or other dark green leafy vegetables)
1 cup (1 fist) cow pea leaves
1 onion
1 large tomato
1 cup (1 fist) milk
2 teaspoon (2 thumb tips) fat or oil
Iodized salt to taste
3 cups (3 fists) clean water
- 170 -
3 food groups
Steps
Clean cooking area, cooking bowls, and utensils with soap and clean water. Wash hands with soap and clean, running water. Wash vegetables.
Chop onions, tomatoes, and cow pea leaves and jute mallow leaves (or other dark green leafy vegetable).
Add water to a cooking pot and bring to boil.
Add the chopped jute mallow and cow pea leaves. If you are cooking over gas, kerosene, jiko or fire, lower the heat and cook just until the greens are wilted and soft.
Do not overcook. Overcooking makes your vegetables less nutritious.
Heat the fat or oil in a separate cooking pot; add the onions and cook until they are soft and golden brown.
Add tomatoes, stir, and cook until they are soft.
Recipe continues on the next page.
- 171 -
Add jute mallow leaves, cow peas leaves and milk to the onions and tomatoes, stir and let the mixture cook until everything is hot and well mixed.
Remove from the heat. Let cool before serving so you do not burn your baby’s mouth.
Wash your hands and your child’s hands with soap and clean water before feeding your child.
- 172 -
Recommended additions for dietary diversity: Ugali 4 Sliced lychee Fish 3
4
It is important to cook vegetables thoroughly to kill germs and make them soft enough to eat. But if vegetables are overcooked, they can lose nutrients. Cook vegetables until they are soft but firm and don’t throw out the water they create when they are cooked.
Helpful Hints
• At this age, your child should be eating about ¾ cup (3 cupped handfuls) of food at each meal and a snack.
• If you have extra food, you can feed it to other children or store it in a covered container for NO MORE THAN 4 hours. If you store the food, be sure to heat it thoroughly before feeding it again to your baby.
• Continue breastfeeding on demand until your baby is 2 years old or more.
- 173 -
Sprouted green grams stew Ingredients
2 cups (2 fists) of sprouted green grams (or other sprouted legumes), see page 63
1 onion
1 large tomato
2 carrots
1 teaspoon (1 thumb tip) fat or oil
Iodized salt to taste
5 cups (5 fists) clean water
- 174 -
3 food groups
Steps
Clean cooking area, cooking bowls, and utensils with soap and clean water. Wash hands with soap and clean, running water. Wash vegetables.
Chop all vegetables into small bite sized pieces
Put the sprouted green grams into a cooking pot and add water.
Cook until the green grams are soft.
Heat the fat or oil in a separate cooking pot; add the onions and cook until they are soft and golden brown.
Add tomatoes, stir, and cook until they are soft.
Add the carrots and iodized salt to the onions and tomatoes. Mix well, cover and cook until you can pierce the carrots with a fork.
Recipe continues on the next page.
- 175 -
Add the boiled sprouted green grams and mix well.
If you are cooking over gas, kerosene, jiko or fire, lower the heat. Cook until the ingredients are well mixed.
Remove from the heat. Let cool before serving so you do not burn your baby’s mouth.
Wash your hands and your child’s hands with soap and clean water before feeding your child.
- 176 -
additions for dietary diversity: Chapati 4 Boiled milk Fried egg 4 4
Recommended
The longer the food is kept, the more likely it is that germs will get on it. Some of these germs can cause diarrhea. So I stopped storing my child’s food for an extended period of time and my child rarely gets diarrhea.
Helpful Hints
• At this age, your child should be eating about 1 cup (1 fist) of food at each meal and a snack.
• If you have extra food, you can feed it to other children or store it in a covered container for NO MORE THAN 4 hours. If you store the food, be sure to heat it thoroughly before feeding it again to your baby.
• Continue breastfeeding on demand until your baby is 2 years old or more.
- 177 -
Meat stew
Ingredients
¼ kilogram (1 fist) of meat (beef, chicken, goat, camel)
1 onion
Steps
1 large tomato
1 tablespoon (1 full thumb) fat or oil
Iodized salt to taste
1 cup (1 fist) clean water
Clean cooking area, cooking bowls, and utensils with soap and clean water. Wash hands with soap and clean water. Wash vegetables.
Chop tomatoes and onions into small pieces.
- 178 -
2 food groups
Wash the meat with clean water and cut into small pieces.
Put the meat into a cooking pot, add enough clean water to cover the bottom of the pot, and boil until tender. Shred meat using a fork or clean fingers.
Heat the fat or oil in a separate cooking pot; add the onions and cook until they are soft and golden brown.
Add tomatoes to the onions, stir and cook until they are soft.
Add cooked meat to the onions and tomatoes and stir. Add 1 cup (1 fist) of clean water and mix well.
Recipe continues on the next page.
- 179 -
If you are cooking over gas, kerosene, jiko or fire, lower the heat. Cook until the ingredients are well mixed.
Remove from the heat. Let cool before serving so you do not burn your baby’s mouth.
Wash your hands and your child’s hands with soap and clean water before feeding your child.
- 180 -
Recommended additions for dietary diversity: Boiled or steamed yams 3 Cooked spinach Yogurt 3 3
I didn’t know that a child’s hands should be washed the same way as an adult’s hands. But now, I wash my child’s hands with soap AND water before she eats and after she goes to the toilet.
Helpful Hints
• At this age, your child should be eating about ¾ cup (3 cupped handfuls) of food at each meal and a snack.
• If you have extra food, you can feed it to other children or store it in a covered container for NO MORE THAN 4 hours. If you store the food, be sure to heat it thoroughly before feeding it again to your baby.
• Continue breastfeeding on demand until your baby is 2 years old or more.
- 181 -
Liver stew
Ingredients
¼ kilogram (1 fist) of liver
1 onion
1 large tomato
½ cup (½ fist) milk
1 tablespoon (1 full thumb) fat or oil
Iodized salt to taste
1 cup (1 fist) clean water
- 182 -
3 food groups
Steps
Recipe continues on the next page.
Clean cooking area, cooking bowls, and utensils with soap and clean water. Wash hands with soap and clean, running water. Wash vegetables.
Chop tomatoes and onions into small pieces.
Wash the liver with clean water and cut into small pieces.
Put the liver into a container and cover with milk. Put a cover on the container and let soak for 30-60 minutes. Soaking the liver in milk removes the bitter flavor making it more tasty to children.
Drain the milk and put the liver into a cooking pot, add ½ cup (½ fist) of water, and boil until tender.
- 183 -
Heat the fat or oil in a separate cooking pot; add the onions and cook until they are soft and golden brown.
Add tomatoes to the onions, stir and cook until they are soft.
Add the liver and remaining ½ cup (½ fist) water to the onions and tomatoes and mix well.
If you are cooking over gas, kerosene, jiko or fire, lower the heat. Cook until the ingredients are well mixed.
Remove from the heat. Let cool before serving so you do not burn your baby’s mouth.
Wash your hands and your child’s hands with soap and clean water before feeding your child.
- 184 -
Helpful Hints
• At this age, your child should be eating about ¾ cup (3 cupped handfuls) of food at each meal and a snack.
• If you have extra food, you can feed it to other children or store it in a covered container for NO MORE THAN 4 hours. If you store the food, be sure to heat it thoroughly before feeding it again to your baby.
• Continue breastfeeding on demand until your baby is 2 years old or more.
Recommended additions for dietary diversity:
Matoke 4
Beans 4 4
Cooked amaranth
- 185 -
Liver is so healthy but my children didn’t like it at first. I had to try a couple of times before my children started to like liver. I also soak it in milk before cooking which makes it more tasty.
Enriched matoke
Ingredients
9 green bananas
Steps
¼ cup (1 cupped handful) peanut butter
1 tablespoon (1 full thumb) fat or oil
Iodized salt to taste
4 ½ cups (4 and ½ fists) of clean water
Clean cooking area, cooking bowls, and utensils with soap and clean water. Wash hands with soap and clean, running water. Wash bananas.
Peel bananas and put into a pot. Add iodized salt and all the clean water and bring to boil.
- 186 -
2 food groups
Cook the bananas until you can easily pierce them with a fork.
Add the peanut butter and oil. Mash well.
Remove from the heat. Let cool before serving so you do not burn your baby’s mouth.
Wash your hands and your child’s hands with soap and clean water before feeding your child.
- 187 -
Recommended additions for dietary diversity: Boiled and chopped butternut squash 3 Chopped chicken Yogurt 3
3
Things to remember
We know this is a lot of information. Here are the really important things to remember:
• Babies at 12–23 months of age have different needs in terms of how much, how often to feed them, and what texture is best for them. Look at the charts on pages 150 for guidance.
• Remember that four different foods groups each day is the goal.
• Recipes with the “family icon” mean that they are healthy meals perfect for your whole family.
• You can start including animal milk (blue food group) in your child’s diet.
• You should continue to breastfeed as you are introducing foods to your baby.
- 188 -

- 189 -
- 190 -
- 191 -
Index
Common Foods and Food Group Colors
This index lists the foods that are in the recipes, and some common foods that are not. Use the index to help you identify food groups and plan nutritious meals for your baby. You want to include at least four food group colors in your baby’s diet every day. Remember, foods with a yellow star are both nutritious and affordable.
- 192 -
- 193 -
- 194 -

- 195 -
- 196 -

