REAR AXLE DIFFERENTIAL CARRIER 4-4 degrees apart so th at they engage side gears. R otate gears until pinion shaft holes are aligned. Install pinion shaft and lock screw. It is not necessary to torque lock screw until axle shafts are installed.
Drive Pinion Removal 1. 2. 3.
Remove differential as previously outlined. Remove propeller shaft. Install Tool J-8614-1 on pinion flange and remove pin ion flange nut and w asher (fig. 6A). (Position J-8614-1 on flange so th at the four notches are tow ard flange.) Discard nut and use a new one upon reassembly.
4.
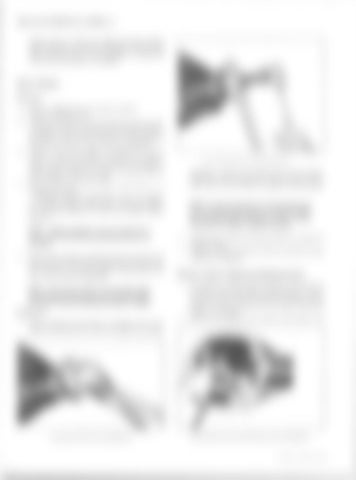
Thread end of Tool J-8614-3 into small O.D. end of J-8614- 2. Then with J-8614-1 installed as in Step 6, insert J-8614-2 into J-8614-1 and turn it 45 degrees to locked position. Remove flange by turning J-8614-3 while holding J-8614-1 (fig. 7A). Pry old seal out of bore, using a screw driver or a ham m er and chisel. If deflector requires replacement, remove by tapping from flange. Clean up stake points. Install new deflec tor, and stake deflector at three new equally spaced positions.
5.
NOTE: Staking operation must be performed in such a manner that the seal operating surface is not damaged.
Fig. 7A~Drive Pinion Flange Removal
chipping or evidence of excessive wear. On pinion bear ing rollers, inspect large end of rollers for wear. This is where wear is most evident on tapered roller bearings.
NOTE: The pinion bearings are of the tapered type, and the natural wear pattern is a frosted condition with occasional slight scratches on races or rollers. This does not indicate a defective bearing. 2. 3.
6.
Remove drive pinion by tapping on front end w ith a soft faced ham m er. T hen remove pinion front bearing cone from carrier bore. D iscard pinion bearing spacer and use a new one upon reassembly. NOTE: Care must be taken not to damage pinion bearings while removing pinion from carrier. Inspect bearings and cups for damage and replace if needed.
Pinion and/or Bearing Replacement 1.
Inspection 1.
Clean all gears and bearings in cleaning solvent and inspect all bearing cups, races and rollers for scoring,
Fig. 6A -D rive Pinion Nut Removal
Inspect pinion splines and flange splines for evidence of excessive wear. Inspect ring gear and pinion teeth for possible scoring, cracking or chipping.
2.
If necessary to replace pinion bearings, tap old cups out of carrier using a brass drift. Tap alternately on oppo site sides of cup to prevent cups from cocking in carrier. Inspect cup seats and bore for any nicks or burrs and remove as necessary. Position new bearing cup in carrier, thick edge of cup
Fig. 8A -D rive Pinion Rear Bearing Cup Installation
CHEVROLET OVERHAUL MANUAL


