4 minute read
1.2 Disconnecting exhaust pipes/silencers


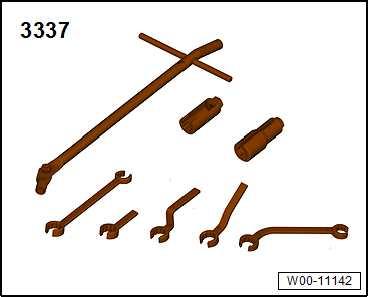
♦ Lambda probe open ring spanner set - 3337-
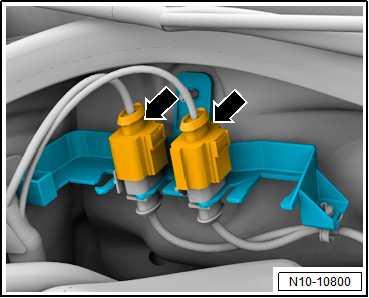
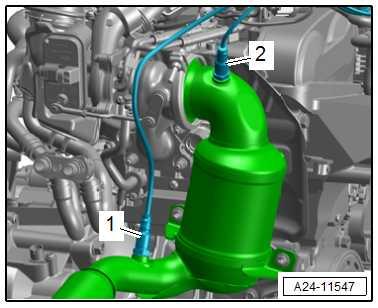
♦ Safety gloves Removing – Disconnect corresponding connector -arrow-: Conector marrón - Lambda probe before catalytic converter GX10-
Conector negro - Lambda probe after catalytic converter - GX7-
– Unscrew corresponding Lambda probe using a tool from Lambda probe open ring spanner set - 3337- . 1 - Lambda probe 1 after catalytic converter - GX72 - Lambda probe 1 before catalytic converter - GX10Installing Install in reverse order of removal, observing the following:
Note
♦ New lambda probes are coated with an assembly paste. This paste must not get into the slots on the Lambda probe body. ♦ In the case of a used Lambda probe, grease only the thread with high-temperature paste. This paste must not get into the
Protected by copyright. Copying for private or commercial purposes, in part or in whole, is notslots on the Lambda probe body. High-temperature paste ⇒ Electronic parts catalogue (ETKA) . permitted unless authorised by SEAT S.A. SEAT S.A does not guarantee or accept any liability with respect to the correctness of information in this document. Copyright by SEAT S.A. ♦ During installation, the electrical connecting cable of the Lambda probe must be secured at the same points. The elec‐trical wiring must be prevented from touching the exhaust pipe.
Specified torque ♦ ⇒ “8.1.2 Assembly overview - lambda probe, Toledo 2013, Ibiza 2016”, page 430

26 – Exhaust system
1 Exhaust pipes, silencers
⇒ “1.1 Assembly overview - silencers”, page 435 ⇒ “1.2 Disconnecting exhaust pipes/silencers”, page 440 ⇒ “1.3 Removing and installing silencer”, page 444 ⇒ “1.4 Aligning exhaust system free of stress”, page 452 ⇒ “1.5 Checking exhaust system for leaks”, page 453 ⇒ “1.6 Installation position of clamp”, page 453 ⇒ “1.7 Align end exhaust pipes”, page 454
1.1 Assembly overview - silencers
⇒ “1.1.1 Assembly overview - silencer, Ateca, Leon 2013”, page 435 ⇒ “1.1.2 Assembly overview - silencer, Ibiza 2018, Arona”, page 437 ⇒ “1.1.3 Assembly overview - silencer, Toledo 2013, Ibiza 2016”, page 439
Protected by copyright. Copying for private or commercial purposes, in part or in whole, is not permitted unless authorised by SEAT S.A. SEAT S.A does not guarantee or accept any liability with respect to the correctness of information in this document. Copyright by SEAT S.A.
1 - Retainer ❑ Renew if damaged 2 - Bolts ❑ 23 Nm
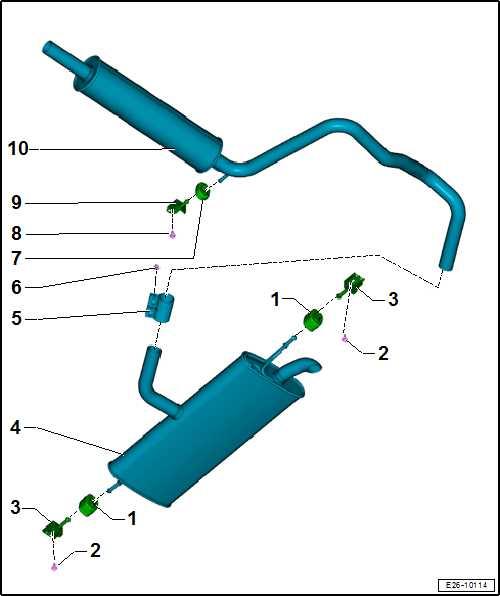
3 - Mounting »A« ❑ Renew if damaged ❑ Only for rear silencer ❑ Aligning ⇒ page 437 4 - Rear silencer ❑ Combined in one unit with front silencer as original equipment. Re‐new separately for re‐pair purposes ❑ Removing and installing ⇒ “1.3.4 Removing and positioning back silenc‐er, Ateca, Leon 2013”, page 449 ❑ Disconnecting exhaust pipes/silencers ⇒ “1.2.1 Disconnecting exhaust pipes/silenc‐ers, Ateca, Leon 2013”, page 440 ❑ Aligning exhaust sys‐tem free of stress Protected by copyright. Copying for private or commercial purposes, in part or in whole, is not permitted unless authorised by SEAT S.A. SEAT S.A does not guarantee or accept any liability with 5 - Clamp respect to the correctness of information in this document. Copyright by SEAT S.A. ❑ Fitting position ⇒ page 437 6 - Securing nuts ❑ 30 Nm
7 - Retainer ❑ Renew if damaged 8 - Bolt ❑ 20 Nm +90°
9 - Mounting »B« ❑ Renew if damaged ❑ Only for front silencer ❑ Aligning ⇒ page 437 10 - Front silencer ❑ Combined in one unit with rear silencer as original equipment. Renew separately for repair purposes ❑ Removing and installing ⇒ “1.3.1 Removing and positioning front silencer, Ateca, Leon 2013”, page 444 ❑ Disconnecting exhaust pipes/silencers ⇒ “1.2.1 Disconnecting exhaust pipes/silencers, Ateca, Leon 2013”, page 440 ❑ Aligning exhaust system free of stress ⇒ “1.4 Aligning exhaust system free of stress”, page 452
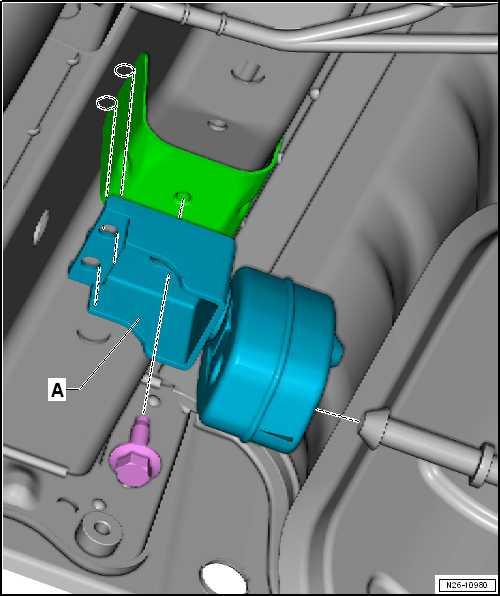
Aligning mounting »A« – Pre-tighten bolt. – Arrange hanger over the long hole bore – Using blunt side of commercially available 8 mm drill bit, align holes of mounting -A- centrally and perpendicular to longitu‐dinal member.
– Then tighten to specified torque.
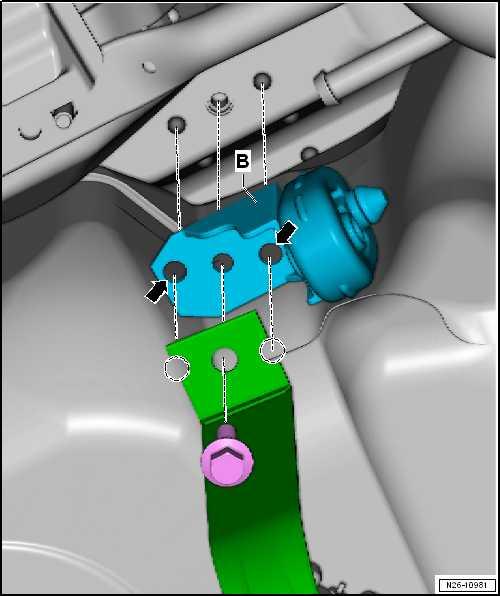
Aligning mounting »B« – Pre-tighten bolt. – Arrange hanger over the long hole bore – Using blunt side of commercially available 8 mm drill bit, align holes -arrows- of mounting -B- centrally and parallel to longi‐tudinal member.
– Then tighten to specified torque.
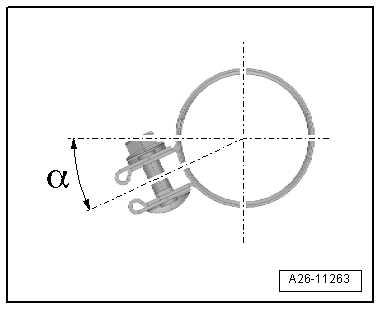
Installation position of rear clamp – Fit clamp in position shown. • Permissible installation angle -α- = approx. 20°. • Bolted connection faces towards rear.
• Nuts upwards.
Protected by copyright. Copying for private or commercial purposes, in part or in whole, is not permitted unless authorised by SEAT S.A. SEAT S.A does not guarantee or accept any liability with respect to the correctness of information in this document. Copyright by SEAT S.A.