2 minute read
5.2 Checking fuel pressure sender G247


10 - Seals ❑ Renew after removal
11 - Bolt ❑ Specified torque and tightening sequence ⇒ page 400 12 - O-ring ❑ Renew after removal
13 - Bolt ❑ Repair solution when retaining tabs have broken off ❑ Thread-forming ❑ Fit and screw in bolt by hand so that it screws into old thread Then tighten bolt to torque. ❑ 7 Nm
14 - Intake manifold sender - GX9❑ Removing and installing ⇒ “5.3 Removing and installing intake manifold sender GX9 ”, page 408 15 - Vacuum line
16 - O-ring ❑ If damaged, renew entire vacuum line ⇒ Item 15 (page 400)
Protected by copyright. Copying for private or commercial purposes, in part or in whole, is not permitted unless authorised by SEAT S.A. SEAT S.A does not guarantee or accept any liability with respect to the correctness of information in this document. Copyright by SEAT S.A.17 - Hose ❑ For crankcase ventilation.
Intake manifold - specified torque and tightening sequence – Tighten bolts in stages as follows:
Stage Bolts Specified torque 1. -Arrows- Starting in centre, screw in bolts alter‐nately by hand until they make contact 2. -Arrows- Starting in centre, screw in bolts alter‐nately to 8 Nm
Note
-Items 1, 2- can be disregarded.
4.2 Removing and installing intake manifold
Special tools and workshop equipment required ♦ Hose clip pliers - VAS 6362-


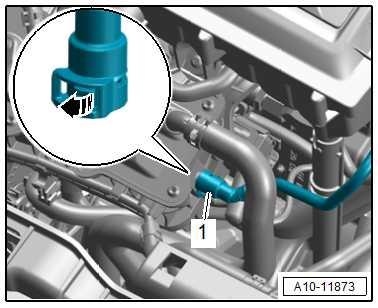
Removing – Drain coolant ⇒ “1.3 Draining and adding coolant”, page 260 . – Press release buttons -arrow-, and pull off line -1-. – Remove air filter housing ⇒ “3.2 Removing and installing air filter housing”, page 397 . – Remove air intake pipe ⇒ “2.5 Removing and installing air pipe ”, page 368
– Remove line -2- for activated charcoal filter system. To do this, press release button -3- on both sides.
Note
Protected by copyright. Copying for private or commercial purposes, in part or in whole, is not permitted unless authorised by SEAT S.A. SEAT S.A does not guarantee or accept any liability with respect to the correctness of information in this document. Copyright by SEAT S.A.
Disregard item -1-.
– Disconnect connector -1- for throttle valve module - GX3- .
Note
Disregard item -2-.
– Unscrew bolt -1-.
– Release hose clip -2- and remove coolant hose.