2 minute read
2.5 Removing and installing air pipe


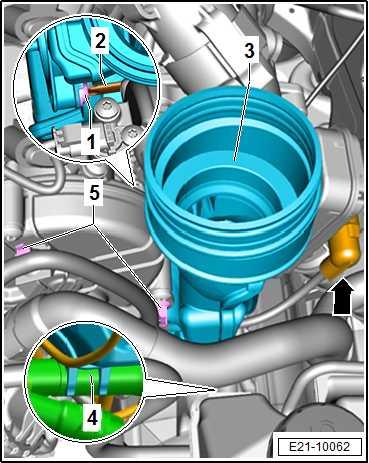
– Pull off electrical connector -arrows- for charge pressure po‐sitioner - V465- .
– Loosen clear wiring harness from the retaining clips -5- and depending on the version the coolant hose -4- as well, and push them to one side. – Unscrew screw -1- with the torque wrench - VAS 6854- , the ratchet 1/4" - VAS 6234- and the socket bit Torx T 30 - T10405-2-.
– Seal open lines and unions with clean plugs from engine seal‐ing plug set - VAS 6122- . – Pull union -3- towards left of turbocharger, and carefully re‐move it upwards. Installing Install in reverse order of removal, observing the following:
Note
Renew O-rings.
Specified torques ♦ ⇒ “3.1 Assembly overview - air filter housing”, page 393 ♦ ⇒ “1.1 Assembly overview - turbocharger”, page 351
Protected by copyright. Copying for private or commercial purposes, in part or in whole, is not permitted unless authorised by SEAT S.A. SEAT S.A does not guarantee or accept any liability with respect to the correctness of information in this document. Copyright by SEAT S.A.

2 Charge air system
⇒ “2.1 Assembly overview - charge air system”, page 363 ⇒ “2.2 Removing and installing charge air cooler”, page 365 ⇒ “2.3 Removing and installing charge pressure sender GX26 ”, page 366 ⇒ “2.4 Checking charge air system for leaks”, page 367 ⇒ “2.5 Removing and installing air pipe ”, page 368
2.1 Assembly overview - charge air system
Note
Check all air hoses, air pipes and vacuum lines to make sure they are firmly seated and not leaking before carrying out tests or repairs.
1 - Seal ❑ Renew after removal
2 - Sealing lip ❑ Renew after removal ❑ Before installing, mois‐ten lightly with clean en‐gine oil. 3 - Intercooler ❑ Removing and installing ⇒ “2.2 Removing and in‐stalling charge air cool‐er”, page 365 ❑ Change coolant after re‐newing ❑ Installation location of the coolant connections is different
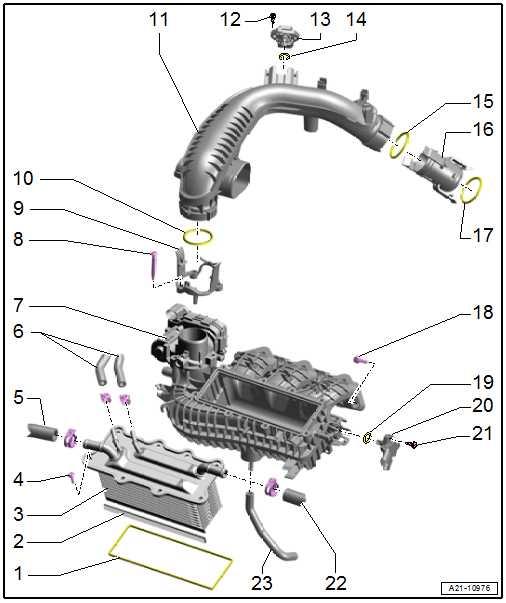
4 - Bolt
Protected by copyright. Copying for private or commercial purposes, in part or in whole, is not permitted unless authorised by SEAT S.A. SEAT S.A does not guarantee or accept any liability with ❑ Thread-forming respect to the correctness of information in this document. Copyright by SEAT S.A.❑ Fit and screw in bolt by hand so that it screws into old thread Then tighten bolt to torque. ❑ 15 Nm
5 - Coolant hose
6 - Coolant hoses
7 - Intake manifold
Removing and installing ⇒ “4.2 Removing and installing intake manifold”, page 400
8 - Bolt ❑ Thread-forming ❑ Fit and screw in bolt by hand so that it screws into old thread Then tighten bolt to torque. ❑ 7 Nm


