4 minute read
4.8 Removing and installing radiator blind control motor V544


♦ Engine bung set - VAS 6122-
Removing Arona
– Remove front bumper cover ⇒ General body repairs, exterior; Rep. gr. 63 ; Front bumper; Removing and installing front bumper cover . Continued for all vehicles
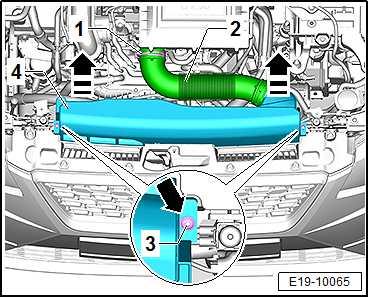
– Release hose clip -1-, and pull air hose -2- off air filter housing. – Unscrew bolts -3- on both sides.
– Release locking lugs -arrow-, unclip air hose -4- from the front end and remove on both sides in -direction of the arrow-.
CAUTION
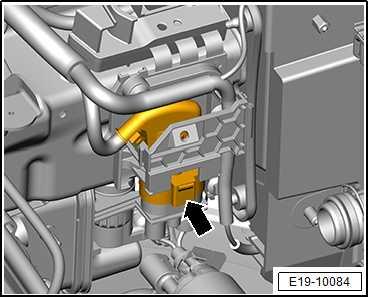
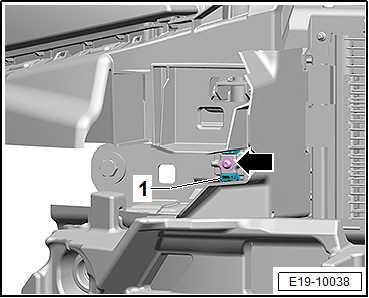
Risk of injury; the radiator fans can run at any time. – Separate electrical connector.
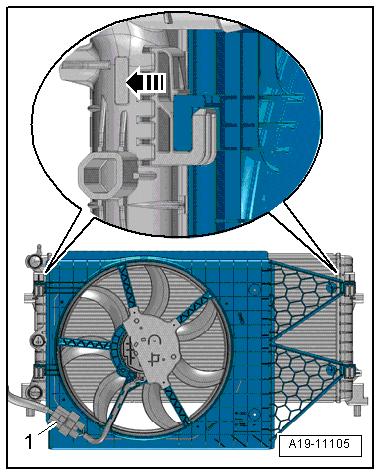
– Remove electrical connector -arrow- from radiator fan.
Protected by copyright. Copying for private or commercial purposes, in part or in whole, is not permitted unless authorised by SEAT S.A. SEAT S.A does not guarantee or accept any liability with respect to the correctness of information in this document. Copyright by SEAT S.A.

Vehicles with radiator, variant 2
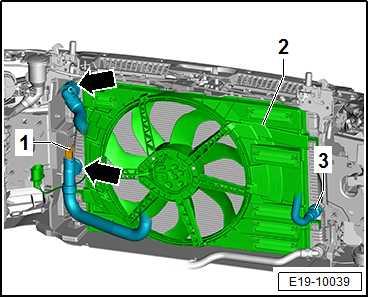
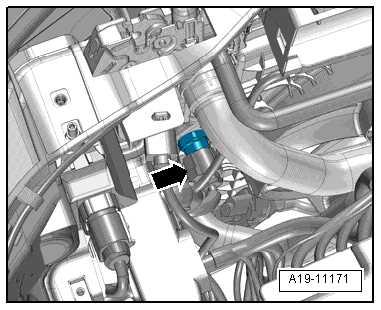
– Place drip tray for workshop hoist - VAS 6208- beneath en‐gine. – Disconnect connector -1- on radiator outlet coolant tempera‐ture sender - G83- .
– Slightly lift retaining clip -3-, disconnect coolant hose from ra‐diator (top right) and drain off coolant. – Slightly lift retaining clips -arrows-, disconnect coolant hoses from radiator and drain off remaining coolant. – Seal open lines and unions with clean plugs from engine seal‐ing plug set - VAS 6122- .
Arona
– Release catches -arrows- of radiator mounting -1- on left and right, or cut through using side cutters.
Note
The radiator mounting will be reused when reinstalling the radia‐tor. It will then be bolted to the lock carrier. Bolts ⇒ ETKA (Electronic parts catalogue) .
– Vehicles with coolant bearing support, screwed. – Unscrew the screws -arrow- of the radiator mounting bracket -1- right and left. – Slide the radiator and radiator cowl assembly slightly in the direction of the engine.
Continued for all vehicles
Note

-Item 3- should be disregarded.
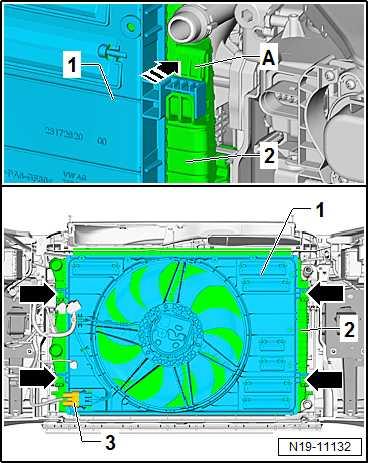
– Press in the locking tabs for radiator cowl -A- left and right in -direction of arrow-.
– Pull radiator fan cowling upwards and remove from radiator -arrows-.
– Carefully remove the fan cowl -1- upwards.
Note
Protected by copyright. Copying for private or commercial purposes, in part or in whole, is not permitted unless authorised by SEAT S.A. SEAT S.A does not guarantee or accept any liability with respect to the correctness of information in this document. Copyright by SEAT S.A.
If there are minor dents in the fins, refer to ⇒ “3.7 Fitting radiator and condensers”, page 12 .
Installing Install in reverse order of removal, observing the following: – Insert the radiator cowl upwards. • The fan frame must engage audibly on the right and left at the top. – Check that it has engaged securely by pulling on it.
Arona
– Secure radiator mountings -1-, whose fasteners have been pinched off, to lock carrier. Bolts -2- ⇒ Electronic parts cata‐logue (ETKA) . • Specified torque: 5 Nm – Install front bumper cover ⇒ General body repairs, exterior; Rep. gr. 63 ; Front bumper; Removing and installing front bumper . Continued for all vehicles
– Electrical connections and routing ⇒ Current flow diagrams, Electrical fault finding and Fitting locations. Vehicles with radiator, variant 2
– Connect coolant hoses ⇒ page 310 . – Add coolant ⇒ page 269 . Specified torques ♦ ⇒ “3.1.2 Assembly overview - air filter housing, Ibiza 2018, Ar‐ona”, page 395 ♦ ⇒ General body repairs, exterior; Rep. gr. 63 ; Front bumper; Assembly overview - bumper cover
4.5.3 Radiator cowl - removing and installing, Toledo 2013, Ibiza 2016
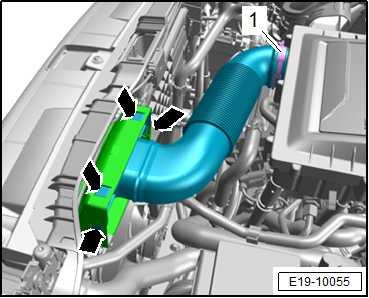
Removing – Release fasteners -arrows- and remove air duct.
– Loosen retaining clip -1-.
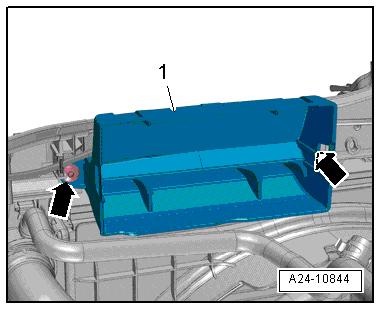
– Unscrew bolts -arrows-, and remove air duct -1-.

Protected by copyright. Copying for private or commercial purposes, in part or in whole, is not permitted unless authorised by SEAT S.A. SEAT S.A does not guarantee or accept any liability with respect to the correctness of information in this document. Copyright by SEAT S.A.
– Disconnect connector -arrow- on radiator outlet coolant tem‐perature sender - G83- .
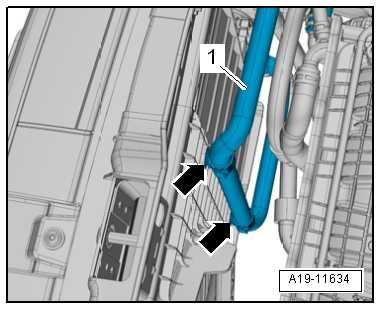
– Move clear coolant hose -1- on radiator cowl -arrows-.
CAUTION
Risk of injury; the radiator fans can run at any time. – Separate electrical connector.
– Disconnect connector -1- for radiator fan at bottom of radiator cowl.
– Simultaneously press locking tabs on left and right of radiator cowl -arrow-, and lift radiator cowl off radiator.
Installing Install in reverse order of removal, observing the following: Specified torques ♦ ⇒ “3.1.3 Assembly overview - air filter housing, Toledo 2013, Ibiza 2016”, page 396
Protected by copyright. Copying for private or commercial purposes, in part or in whole, is not permitted unless authorised by SEAT S.A. SEAT S.A does not guarantee or accept any liability with respect to the correctness of information in this document. Copyright by SEAT S.A.


