13 minute read
4.3 Removing and installing radiator


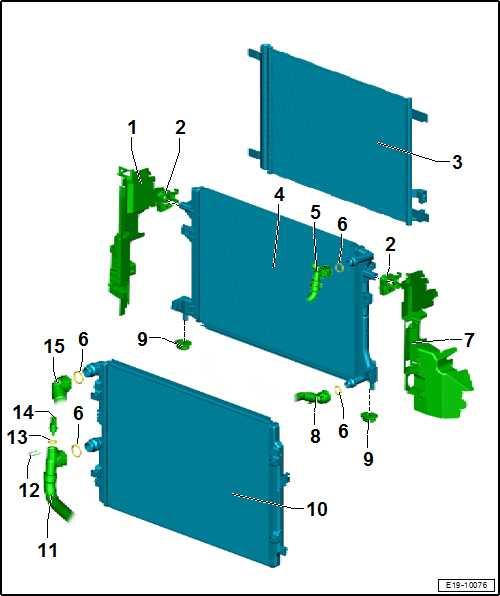
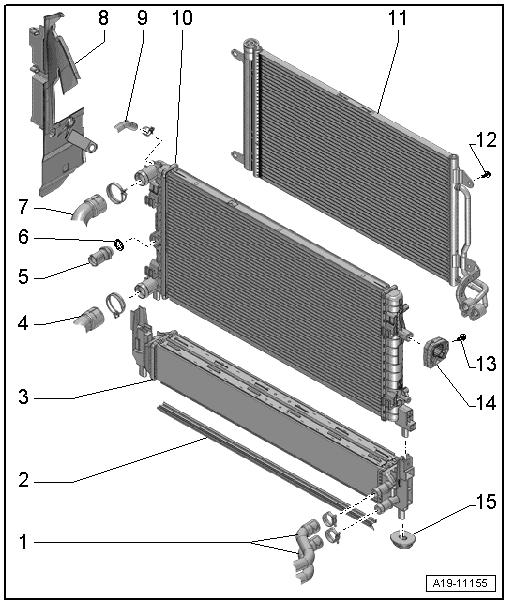
1 - Cowling 2 - Radiator mount support ❑ The radiator mounting will be reused when re‐installing the radiator. It will then be bolted to the lock carrier. Bolts ⇒ Electronic Parts Cata‐logue (ETKA) 3 - Condenser ❑ Removing and installing ⇒ Heating, air condi‐tioning; Rep. gr. 87 ; Refrigerant circuit; Re‐moving and installing condenser .
4 - Radiator for charge air cool‐ing circuit ❑ Removing and installing ⇒ “4.4.2 Removing and installing water radiator for charge air cooling circuit, Ibiza 2018, Aro‐na”, page 329 5 - Coolant hose ❑ Pull out retaining clip to remove ❑ Connect ⇒ page 308 6 - O-ring
Protected by copyright. Copying for private or commercial purposes, in part or in whole, is not ❑ Renew after removal permitted unless authorised by SEAT S.A. SEAT S.A does not guarantee or accept any liability with respect to the correctness of information in this document. Copyright by SEAT S.A.7 - Cowling 8 - Coolant hose ❑ Pull out retaining clip to remove ❑ Connect ⇒ page 308 9 - Bonded rubber bush ❑ For the charge-air cooler radiator 10 - Radiator for engine coolant ❑ Removing and installing ⇒ “4.3.2 Removing and installing radiator, Model 1, Arona, Ibiza 2018”, page 315 ❑ Renew coolant after replacing. 11 - Coolant hose ❑ Pull out retaining clip to remove ❑ Connect ⇒ page 308 12 - Retaining clip 13 - O-ring ❑ Renew after removal

14 - Radiator outlet coolant temperature sender - G83❑ Removing and installing ⇒ “2.9.2 Removing and installing radiator outlet coolant temperature sender G83 , Ibiza 2018, Arona”, page 299
15 - Coolant hose ❑ Pull out retaining clip to remove ❑ Connect ⇒ page 308
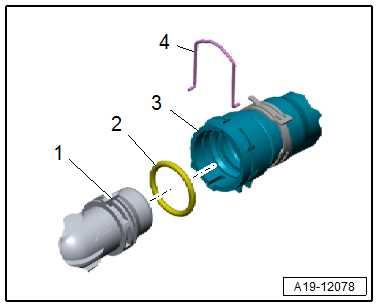
Connecting coolant hose with plug-in connectors
Note
Renew retaining clip -4- if damaged.
Connecting coolant hose with plug-in connectors
Note
Renew retaining clip -4- if damaged.
– Remove old O-ring -2- in coolant hose -3-. – Moisten new O-ring with coolant and insert into coolant hose. – Press coolant hose onto coolant pipe -1- until it engages with a click.
– Push coolant hose further on, and pull it back then to check if plug-in connector is engaged securely.
Protected by copyright. Copying for private or commercial purposes, in part or in whole, is not permitted unless authorised by SEAT S.A. SEAT S.A does not guarantee or accept any liability with respect to the correctness of information in this document. Copyright by SEAT S.A.
1 - Cowling 2 - Condenser ❑ Removing and installing ⇒ Heating, air condi‐tioning; Rep. gr. 87 ; Refrigerant circuit; Re‐moving and installing condenser .
3 - Cowling 4 - Radiator mount support ❑ For radiator
5 - Bonded rubber bush ❑ For radiator
6 - O-ring ❑ Renew after removal
7 - Coolant hose ❑ Pull out retaining clip to remove ❑ Connect ⇒ page 310 8 - Coolant hose ❑ Pull out retaining clip to remove ❑ Connect ⇒ page 310 9 - Radiator for engine coolant ❑ Removing and installing ⇒ “4.3.2 Removing and installing radiator, Mod‐el 1, Arona, Ibiza 2018”, page 315 ❑ Renew coolant after re‐placing. 10 - Coolant hose ❑ Pull out retaining clip to remove ❑ Connect ⇒ page 310 Protected by copyright. Copying for private or commercial purposes, in part or in whole, is not permitted unless authorised by SEAT S.A. SEAT S.A does not guarantee or accept any liability with 11 - Retaining clip respect to the correctness of information in this document. Copyright by SEAT S.A. 12 - O-ring ❑ Renew after removal
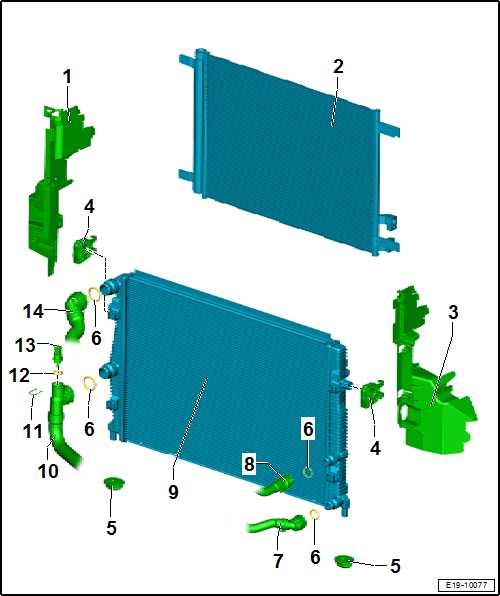
13 - Radiator outlet coolant temperature sender - G83❑ Removing and installing ⇒ “2.9.2 Removing and installing radiator outlet coolant temperature sender G83 , Ibiza 2018, Arona”, page 299 14 - Coolant hose ❑ Pull out retaining clip to remove ❑ Connect ⇒ page 310
Connecting coolant hose with plug-in connectors
Note
Renew retaining clip -4- if damaged.
Connecting coolant hose with plug-in connectors
Note
Renew retaining clip -4- if damaged.
– Remove old O-ring -2- in coolant hose -3-. –Protected by copyright. Copying for private or commercial purposes, in part or in whole, is not permitted unless authorised by SEAT S.A. SEAT S.A does not guarantee or accept any liability withMoisten new O-ring with coolant and insert into coolant hose. respect to the correctness of information in this document. Copyright by SEAT S.A.– Press coolant hose onto coolant pipe -1- until it engages with a click. – Push coolant hose further on, and pull it back then to check if plug-in connector is engaged securely.
1 - Coolant hoses ❑ For coolant circuit of charge air cooler 2 - Air duct
3 - Water radiator for charge air cooler ❑ Radiator and water radi‐ator for charge air cool‐ing circuit are removed together ❑ Renew coolant after re‐placing. ❑ Removing and installing ⇒ “4.3.4 Radiator - re‐moving and installing, Toledo 2013, Ibiza 2016”, page 321 4 - Coolant pipe - bottom ❑ Use release tool - VAS 531 001- to lock. ❑ Clamp moulded 5 - Radiator outlet coolant tem‐perature sender - G83❑ Removing and installing ⇒ “2.9.3 Coolant tem‐perature sensor at radi‐ator outlet G83 - remov‐ing and installing, Tole‐do 2013, Ibiza 2016”, page 299 ❑ 35 Nm
6 - Seal ❑ Renew after removal
7 - Upper coolant hose ❑ Use release tool - VAS 531 001- to lock. ❑ Clamp moulded 8 - Air duct
9 - Coolant hose ❑ To coolant expansion tank ❑ Use release tool - VAS 531 001- to lock. ❑ Clamp moulded 10 - Radiator for engine coolant ❑ Removing and installing ⇒ “4.3.4 Radiator - removing and installing, Toledo 2013, Ibiza 2016”, page 321 ❑ Renew coolant after replacing. 11 - Condenser ❑ Removing and installing ⇒ Heating, air conditioning; Rep. gr. 87 ; Refrigerant circuit; Removing and installing condenser . 12 - Bolt ❑ Specified torque ⇒ Heating, air conditioning system; Rep. gr. 87 ; Refrigerant circuit; Assembly overview - condenser
13 - Bolt ❑ 5 Nm
14 - Support ❑ Check fitting position 15 - Support ❑ For water radiator for charge air cooler
Protected by copyright. Copying for private or commercial purposes, in part or in whole, is not permitted unless authorised by SEAT S.A. SEAT S.A does not guarantee or accept any liability with respect to the correctness of information in this document. Copyright by SEAT S.A.
⇒ “4.2.1 Assembly overview - radiator cowl and radiator fan, Tol‐edo 2013, Ibiza 2016”, page 312 ⇒ “4.2.2 Assembly overview - radiator cowl and radiator fan, Ate‐ca, Leon 2013, Ibiza 2018, Arona”, page 313
Radiator cowl and radiator fans
1 - Pin ❑ For spreader clip 2 - Air duct ring ❑ For radiator fan(s) ❑ Depending on version 3 - Radiator fan - V7❑ With radiator fan control unit - J293- . ❑ Removing and installing ⇒ “4.6 Removing and in‐stalling radiator fan V7 ”, page 341 4 - Fan ring ❑ Removing and installing ⇒ “4.5 Removing and in‐stalling radiator cowl”, page 335 Protected by copyright. Copying for private or commercial purposes, in part or in whole, is not5 - Air flow flap 6 - Clip permitted unless authorised by SEAT S.A. SEAT S.A does not guarantee or accept any liability with respect to the correctness of information in this document. Copyright by SEAT S.A. ❑ For coolant hose
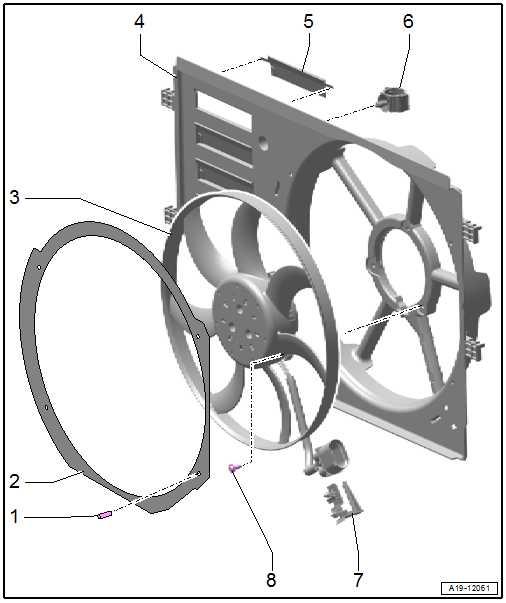
7 - Support ❑ For electrical connector.
8 - Bolt ❑ 1.5 Nm
1 - Bolt ❑ 5 Nm
2 - Radiator cowl ❑ Removing and installing ⇒ “4.5.1 Removing and positioning the radiator cowl, Ateca, Leon 2013”, page 335 3 - Radiator fan - V7❑ Removing and installing ⇒ “4.6.1 Radiator fan V7 removing and installing, Leon 2013, Ibiza 2018, Arona”, page 341

Protected by copyright. Copying for private or commercial purposes, in part or in whole, is not permitted unless authorised by SEAT S.A. SEAT S.A does not guarantee or accept any liability with ⇒ “4.3.1 Removing and installing radiator, Ateca, Leon 2013”, page respect to the correctness of information in this document. Copyright by SEAT S.A.313 ⇒ “4.3.2 Removing and installing radiator, Model 1, Arona, Ibiza 2018”, page 315 ⇒ “4.3.3 Removing and installing radiator, Model 2, Arona, Ibiza 2018”, page 317 ⇒ “4.3.4 Radiator - removing and installing, Toledo 2013, Ibiza 2016”, page 321
Special tools and workshop equipment required
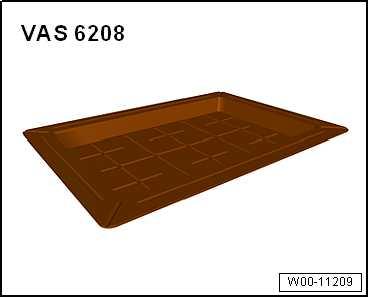
♦ Drip tray for workshop hoist - VAS 6208-
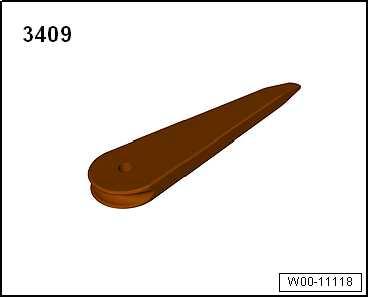
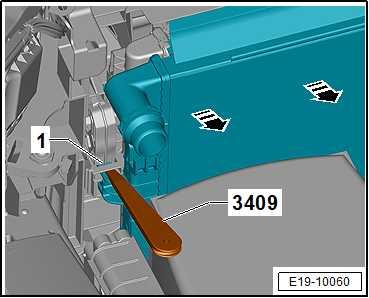
♦ Removal wedge - 3409-
Removing – Drain coolant ⇒ “1.3.1 Draining and adding coolant, Ateca, Leon 2013”, page 260 .
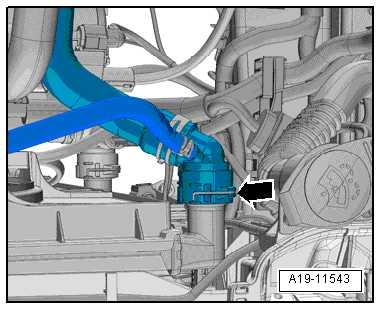
– Lift the retaining clip -arrow-, separate the coolant hose at the top left from the radiator.
Protected by copyright. Copying for private or commercial purposes, in part or in whole, is not permitted unless authorised by SEAT S.A. SEAT S.A does not guarantee or accept any liability with respect to the correctness of information in this document. Copyright by SEAT S.A.
– Lift retaining clip slightly -arrow- and separate coolant hose (top right) from water radiator for charge air cooling circuit. – Remove radiator cowl ⇒ “4.5.1 Removing and positioning the radiator cowl, Ateca, Leon 2013”, page 335 .

– Use the removal wedge to press both sides of locking tab -1away from the engine compartment - 3409- and push the radiator -in the direction of the arrow-.
– Pull radiator out of mountings at bottom. – Remove radiator from water radiator for charge air cooling cir‐cuit.
– Remove radiator (top section). Installing Install in reverse order of removal, observing the following:
Note
– Insert radiator into mounting at bottom. Engage radiators with one another. Ensure proper engagement by pulling. – Install radiator cowl Protected by copyright. Copying for private or commercial purposes, in part or in whole, is not permitted unless authorised by SEAT S.A. SEAT S.A does not guarantee or accept any liability with respect to the correctness of information in this document. Copyright by SEAT S.A.⇒ “4.5.1 Removing and positioning the radiator cowl, Ateca, Leon 2013”, page 335 . – Connect coolant hose with plug-in connector ⇒ page 306 . – Add coolant ⇒ page 262 . Specified torques ♦ ⇒ “4.1.1 Assembly summary - radiator/radiator fan, Ateca, Leon 2013”, page 304 ♦ ⇒ “3.1.1 Assembly overview - air filter housing, Ateca, Leon 2013”, page 393
Special tools and workshop equipment required ♦ Drip tray for workshop hoist - VAS 6208-
♦ Removal wedge - 3409-
Version 1
– Drain coolant ⇒ “1.3.2 Draining and adding coolant, Ibiza 2018, Arona”, page 265 .
– Lift the retaining clip -arrow-, separate the coolant hose at the top left from the radiator. – Remove radiator cowl ⇒ “4.5.2 Removing and positioning the radiator cowl, Arona, Ibiza 2018”, page 336 .
– Use the removal wedge to press both sides of locking tab -1- 3409- and push the radiator -in the direction of the arrow-. – Pull radiator out of mountings at bottom. – Remove radiator from water radiator for charge air cooling cir‐cuit.
– Remove radiator (top section). Installing Install in reverse order of removal, observing the following:
Note
Protected by copyright. Copying for private or commercial purposes, in part or in whole, is not permitted unless authorised by SEAT S.A. SEAT S.A does not guarantee or accept any liability with respect to the correctness of information in this document. Copyright by SEAT S.A.
– Insert radiator into mounting at bottom. Engage radiators with one another. Ensure proper engagement by pulling. – Install radiator cowl ⇒ “4.5.2 Removing and positioning the radiator cowl, Arona, Ibiza 2018”, page 336 . – Connect coolant hose with plug-in connector ⇒ page 308 . – Add coolant ⇒ page 269 . Specified torques ♦ ⇒ “4.1 Assembly overview - radiator/radiator fan”, page 304 ♦ ⇒ “3.1.2 Assembly overview - air filter housing, Ibiza 2018, Ar‐ona”, page 395
Special tools and workshop equipment required ♦ Removal wedge - 3409-
♦ Drip tray for workshop hoist - VAS 6208-
Protected by copyright. Copying for private or commercial purposes, in part or in whole, is not permitted unless authorised by SEAT S.A. SEAT S.A does not guarantee or accept any liability withRemoving respect to the correctness of information in this document. Copyright by SEAT S.A.– Drain coolant ⇒ “1.3.2 Draining and adding coolant, Ibiza 2018, Arona”, page 265 .
– Remove front bumper cover ⇒ General body repairs, exterior; Rep. gr. 63 ; Front bumper; Removing and installing front bumper cover . – Lift the retaining clip -arrow-, remove the coolant hose at the top left from the radiator. – Remove radiator cowl ⇒ “4.5.2 Removing and positioning the radiator cowl, Arona, Ibiza 2018”, page 336 .
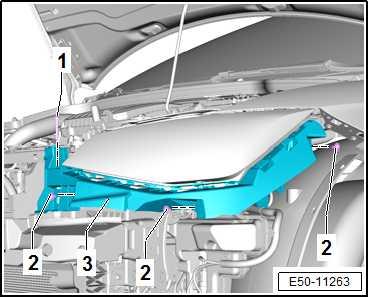
Ibiza with original radiator mount support – Unscrew the screws -1- and -2- of the bottom headlight guide -3-.
– Remove headlight rail -3-.