4 minute read
4.9 Assembly overview - radiator blind


4.6 Removing and installing radiator fan V7-
⇒ “4.6.1 Radiator fan V7 removing and installing, Leon 2013, Ibiza 2018, Arona”, page 341 ⇒ “4.6.2 Radiator fan V7 removing and installing, Toledo 2013, Ibiza 2016”, page 341
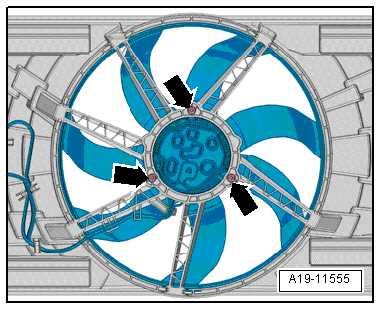
Removing – Remove radiator cowl ⇒ “4.5 Removing and installing radiator cowl”, page 335 . – Remove electrical line from the wire guide. – Unscrew nuts -arrows-, and remove radiator fan - V7- .
Installing Install in reverse order of removal, observing the following: – Install radiator cowl ⇒ “4.5 Removing and installing radiator cowl”, page 335 . Specified torques ♦ ⇒ “4.1 Assembly overview - radiator/radiator fan”, page 304
Removing Protected by copyright. Copying for private or commercial purposes, in part or in whole, is not permitted unless authorised by SEAT S.A. SEAT S.A does not guarantee or accept any liability with – Remove radiator cowl respect to the correctness of information in this document. Copyright by SEAT S.A. ⇒ “4.5.3 Radiator cowl - removing and installing, Toledo 2013, Ibiza 2016”, page 339 . – Push through clamping pins -arrows-, and remove fan ring -1-.

– Remove electric cable -1- from cable guide. – Unscrew nuts -arrows-, and remove radiator fan - V7- .

Installing Install in reverse order of removal, observing the following: – Install radiator cowl ⇒ “4.5.3 Radiator cowl - removing and installing, Toledo 2013, Ibiza 2016”, page 339 . Specified torques ♦ ⇒ “4.1.4 Assembly summary - radiator/radiator fan, Toledo 2013, Ibiza 2016”, page 310

4.7 Removing and installing radiator blind
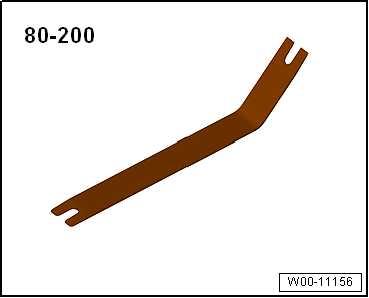
Special tools and workshop equipment required ♦ Removal lever - 80 - 200-
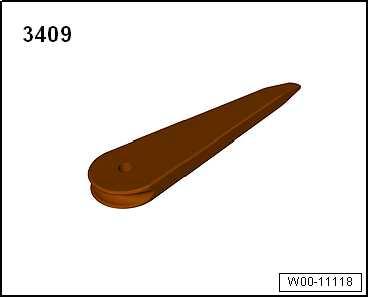
♦ Removal wedge - 3409-
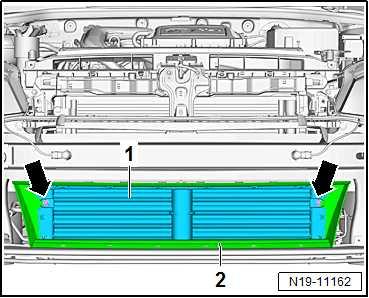
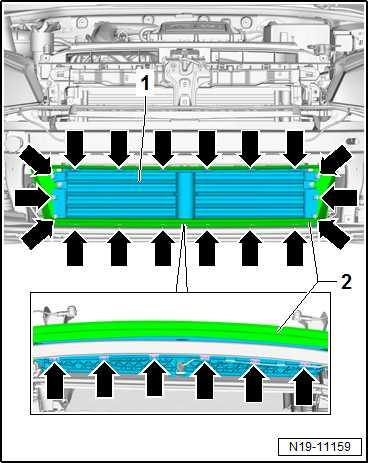
Removing – Remove noise insulation ⇒ Rep. gr. 66 ; Noise insulation; Removing and installing noise insulation . – Remove front bumper cover ⇒ General body repairs, exterior; Rep. gr. 63 ; Front bumper; Removing and installing front bumper cover . – Release and pull off connectors -2- and -3-. – Unclip bracket -arrows- from front end -1-.
Protected by copyright. Copying for private or commercial purposes, in part or in whole, is not permitted unless authorised by SEAT S.A. SEAT S.A does not guarantee or accept any liability with respect to the correctness of information in this document. Copyright by SEAT S.A.

– Remove bolts -arrows-.
– Pull radiator blind -1- together with seal -2- towards front. – Secure radiator blind -1- to prevent it from falling.
– Unclip seal -2- on retaining tabs -arrows-. – Pull seal -2- off radiator blind -1-.
– Remove radiator blind -1- downwards.
Installing Installation is in the reverse sequence of removal. Observe the following:
– Make sure that the guides of radiator blind -2- are properly seated on bumper carrier -1- -arrow-. – After replacing radiator blind, a basic setting must be per‐formed.
– Use ⇒ Vehicle diagnostic tester. – Clear event memory ⇒ Vehicle diagnostic tester. – Switch on ignition, select and execute following menu options on ⇒ Vehicle diagnostic tester:
Protected by copyright. Copying for private or commercial purposes, in part or in whole, is not permitted unless authorised by SEAT S.A. SEAT S.A does not guarantee or accept any liability with respect to the correctness of information in this document. Copyright by SEAT S.A. ♦ 0001 - Radiator blind control motor adaption -
V544

– Remove radiator blind ⇒ “4.7 Removing and installing radiator blind”, page 342 .
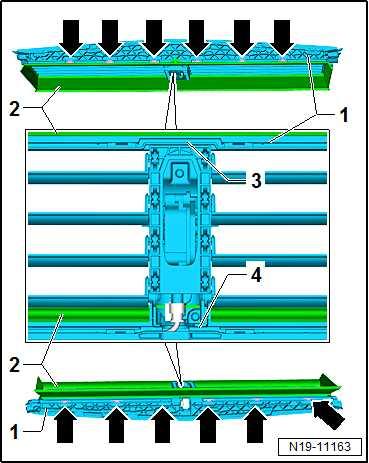
– Unclip seal -2- at top and bottom on retaining tabs -arrows-. – Pull seal -2- off radiator blind -1-.
– Unclip seal -2- on left and right on retaining tabs -arrows-. – Pull seal -2- off radiator blind -1-.
Protected by copyright. Copying for private or commercial purposes, in part or in whole, is not permitted unless authorised by SEAT S.A. SEAT S.A does not guarantee or accept any liability with respect to the correctness of information in this document. Copyright by SEAT S.A.

– Set flaps of radiator blind to open position as shown in illus‐tration.
– To do this, move connecting piece -1-. – Release electrical connector -3- and pull off. – Remove bolts -arrows-.
– Lift radiator blind control motor - V544- together with flaps up‐wards out of motor mounting ⇒ Item 3 (page 349) . – Push radiator blind control motor - V544- with flaps -2- as far to the left as possible -arrow B-.


