
4 minute read
3.2 Removing and installing oil separator


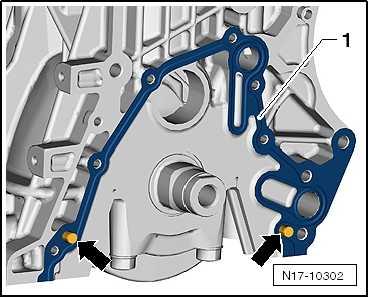
• Thickness of sealant bead: 2 ... 3 mm
• run along inner side of bolt holes -arrows-.
Note
♦ Apply the sealant bead with particular care around the sealing flange. ♦ The sump must be installed within 5 minutes after applying the sealant.
– Position oil sump and tighten bolts . ⇒ page 235 – Install oil filter ⇒ page 254 .
Note
Protected by copyright. Copying for private or commercial purposes, in part or in whole, is notAllow sealant to cure for approx. 30 minutes after installing lower permitted unless authorised by SEAT S.A. SEAT S.A does not guarantee or accept any liability withpart of sump. Only then fill with engine oil. respect to the correctness of information in this document. Copyright by SEAT S.A.
– Fill with engine oil and check oil level ⇒ “1.2 Engine oil:”, page 237 .

Note
The oil level must not be above the max. marking on the dipstick - danger of damage to the catalytic converter!
Specified torques ♦ Securing bolts for air conditioner compressor ⇒ Heating, air conditioning system; Rep. gr. 87 ; Air conditioner compressor; Removing and installing air conditioner compressor ♦ ⇒ “1.1 Assembly overview - sump/oil pump”, page 233 ♦ ⇒ General body repairs, exterior; Rep. gr. 66 ; Noise insula‐tion; Assembly overview - noise insulation ♦ Noise insulation assembly bolts, Toledo 213, Ibiza 2016 ⇒ General body works, exterior; Rep. gr. 50 ; Underbody pro‐tection; Assembly overview: underbody protection
1.4 Removing and installing oil pump
Removing – Remove alternator ⇒ Electrical system; Rep. gr. 27 ; Alter‐nator; Removing and installing alternator . – Remove toothed belt ⇒ “2.3 Removing and installing toothed belt”, page 176 . – Remove sump ⇒ “1.3 Removing and installing sump”, page 237 . – Remove the seal ⇒ “1.6 Renewing crankshaft oil seal - belt pulley end”, page 132 .
– Unscrew bolts -1 and 2-, and pull oil pump in a straight line off dowel pins. – Remove seal.
Installing Install in reverse order of removal, observing the following:
Note
♦ Renew bolts that are tightened with turning further angle after each removal.
♦ Renew seal.

– Check whether dowel pins -arrows- for centring oil pump and cylinder block are present. Renew any missing dowel pins. – Fit new gasket -1-.
– To check oil pump for ease of movement, turn bearing -arrows- with one finger.
Note
Renew oil pump if sluggish.
– Rotate oil pump gear to a position where 2 opposing notches -arrows- are aligned vertically. – Fit oil pump, and tighten bolts ⇒ page 235 . – Install new crankshaft oil seal on belt pulley end ⇒ “1.6 Renewing crankshaft oil seal - belt pulley end”, page 132 . – Install oil pan ⇒ “1.3 Removing and installing sump”, page 237 . – Install toothed belt ⇒ “2.3 Removing and installing toothed belt”, page 176 . – Install alternator ⇒ Electrical system; Rep. gr. 27 ; Alternator;
Protected by copyright. Copying for private or commercial purposes, in part or in whole, is not Removing and installing alternator . permitted unless authorised by SEAT S.A. SEAT S.A does not guarantee or accept any liability with respect to the correctness of information in this document. Copyright by SEAT S.A. – Connect battery ⇒ Electrical system; Rep. gr. 27 ; Battery; Disconnecting and connecting battery . – Replenish engine oil and check oil level ⇒ “1.2 Engine oil:”, page 237 Specified torques ♦ Securing bolts for sump ⇒ “1.1 Assembly overview - sump/oil pump”, page 233 ♦ Securing bolts of alternator ⇒ Rep. gr. 27 ; Alternator; As‐sembly overview - alternator .

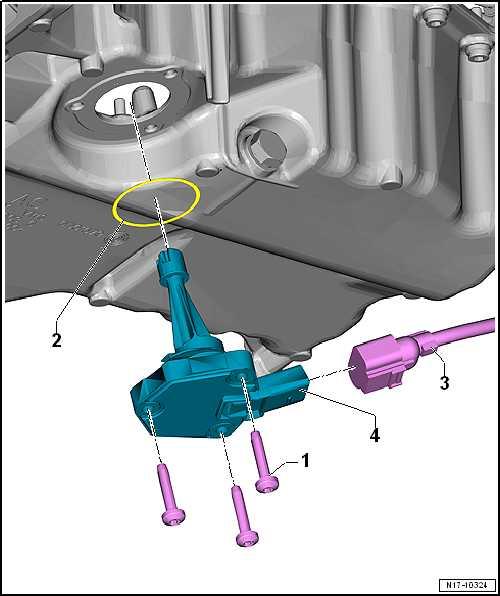
Removing – Drain oil ⇒ “1.2 Engine oil:”, page 237 – Disconnect connector -3-.
– Unscrew bolts -1- and remove oil level and oil temperature sender - G266- -item 4-.
Installing Install in reverse order of removal, observing the following:
Note
Renew oil seal -2-. Moisten seal with oil before installing.
– Replenish engine oil and check oil level ⇒ “1.2 Engine oil:”, page 237 Specified torques ♦ ⇒ “1.1 Assembly overview - sump/oil pump”, page 233
Protected by copyright. Copying for private or commercial purposes, in part or in whole, is not permitted unless authorised by SEAT S.A. SEAT S.A does not guarantee or accept any liability with respect to the correctness of information in this document. Copyright by SEAT S.A.


