5 minute read
1.4 Removing and installing vibration damper


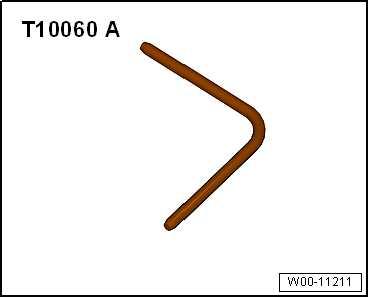
4 - Tensioning device for poly V-belt ❑ Pivot with socket to slacken poly V-belt ❑ Lock with locking tool - T10060 A- . ❑ Removing and installing ⇒ “1.3.2 Removing and installing tensioner for poly V-belt, vehicles with air conditioner compressor”, page 117 5 - Bolt ❑ Renew after removal ❑ 20 Nm +90°
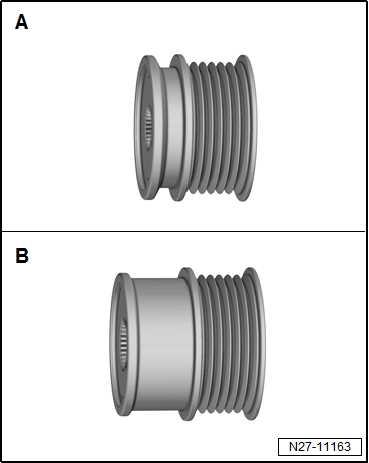
6 - Bolt ❑ Tightening torque ⇒ Electrical system; Rep. gr. 27 ; Alternator; Alternator: Exploded view 7 - Alternator ❑ removing and installing ⇒ Electrical system; Rep. gr. 27 ; Alternator; Removing and installing alternator . ❑ With freewheel ❑ Depending on the type and version of the alternator different overrunning alternator pulleys -A- and -Bmay be installed: correspondence ⇒ page 112 . ❑ The length of the poly V-belt must be determined depending on the design of the overrunning alternator pulley in accordance with the ⇒ Electronic Parts Catalogue (ETKA) . 8 - Dowel sleeve ❑ For air conditioner compressor. 9 - Air conditioner compressor ❑ Do not unscrew or disconnect refrigerant lines ❑ Removing and installing ⇒ Heating, air conditioning system; Rep. gr. 87 ; Air conditioner compressor; Removing and installing air conditioner compressor from and to bracket 10 - Bolt ❑ Specified torque ⇒ Heating, air conditioning; Rep. gr. 87 ; Air conditioner compressor; Assembly over‐view - drive unit of air conditioner compressor .
Allocation of overrunning alternator pulley
Protected by copyright. Copying for private or commercial purposes, in part or in whole, is not permitted unless authorised by SEAT S.A. SEAT S.A does not guarantee or accept any liability with respect to the correctness of information in this document. Copyright by SEAT S.A.

1.2 Removing and installing poly-V belt
⇒ “1.2.1 Removing and installing poly V-belt, vehicles without air conditioner compressor”, page 113 ⇒ “1.2.2 Removing and installing poly V-belt, vehicles with air conditioner compressor”, page 114
Special tools and workshop equipment required ♦ Locking pin - T10060 A-
Removing – Remove nose insulation ⇒ General body repairs, exterior; Rep. gr. 66 ; Noise insulation; Assembly overview - noise in‐sulation .
Toledo 2013, Ibiza 2016
– Remove noise insulation ⇒ General body repairs, exterior; Rep. gr. 50 ; Underbody protection; Underbody protection –assembly overview . Continued for all vehicles
Note
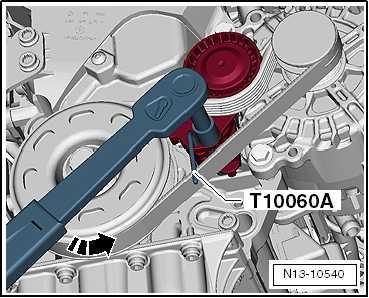
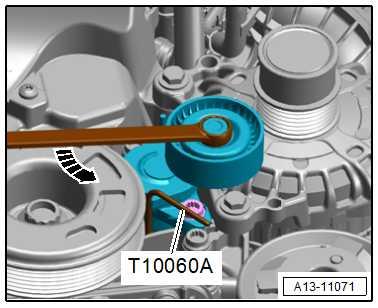
– To slacken poly V-belt turn tensioning device in direction of -arrow-.
Protected by copyright. Copying for private or commercial purposes, in part or in whole, is not– Lock tensioner with locking tool - T10060 A- . – Remove poly V-belt. permitted unless authorised by SEAT S.A. SEAT S.A does not guarantee or accept any liability with respect to the correctness of information in this document. Copyright by SEAT S.A.
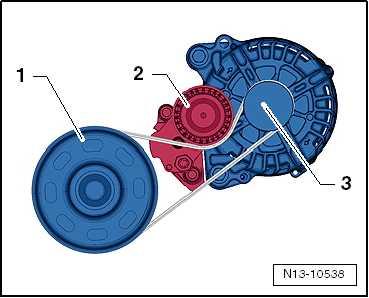
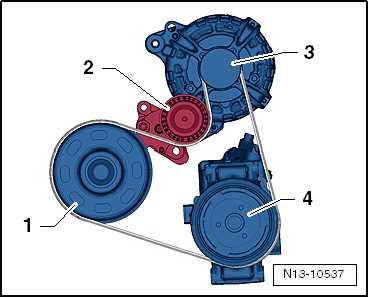
Installing Install in reverse order of removal, observing the following: – Fit poly V-belt as shown in illustration. 1 - Pulley 2 - Tensioning device for poly V-belt 3 - Alternator
– Turn tensioner in direction of -arrow- and remove retention tool - T10060 A- .
– Release tensioner.
– Check that poly V-belt is properly seated. – Start engine and check that poly V-belt runs properly. Specified torques ♦ Securing bolts for noise insulation ⇒ General body repairs, exterior; Rep. gr. 66 ; Noise insulation; Assembly overview noise insulation
♦ Noise insulation assembly bolts, Toledo 213, Ibiza 2016 ⇒ General body works, exterior; Rep. gr. 50 ; Underbody pro‐tection; Assembly overview: underbody protection
Protected by copyright. Copying for private or commercial purposes, in part or in whole, is not permitted unless authorised by SEAT S.A. SEAT S.A does not guarantee or accept any liability with respect to the correctness of information in this document. Copyright by SEAT S.A.
Special tools and workshop equipment required ♦ Locking pin - T10060 A-
Removing – Remove nose insulation ⇒ General body repairs, exterior; Rep. gr. 66 ; Noise insulation; Assembly overview - noise in‐sulation .
Toledo 2013, Ibiza 2016
Remove noise insulation ⇒ General body repairs, exterior; Rep. gr. 50 ; Underbody protection; Underbody protection – assembly overview
Continued for all vehicles
Note
Version 1
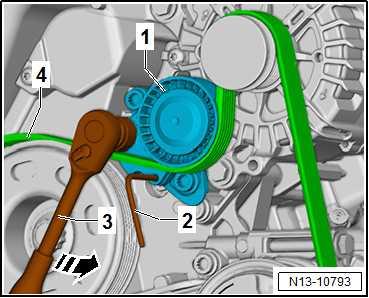
– Fit tool -3- onto hexagon of tensioner -1-. – To slacken poly V-belt push tool -3- in -direction of arrow-. – Lock tensioning device -1- with locking pin - T10060 A- -2-. – Remove poly V-belt -4-.
Version 2
– To slacken poly V-belt turn tensioning device in direction of -arrow-.
Continued for all vehicles
– Lock tensioner with locking tool - T10060 A- . – Remove poly V-belt.
Installing Install in reverse order of removal, observing the following: – Fit poly V-belt as shown in illustration. 1 - Pulley 2 - Tensioning device for poly V-belt 3 - Alternator Protected by copyright. Copying for private or commercial purposes, in part or in whole, is not permitted unless authorised by SEAT S.A. SEAT S.A does not guarantee or accept any liability with respect to the correctness of information in this document. Copyright by SEAT S.A.4 - Air conditioner compressor
Version 1
– Turn tensioning device in -direction of arrow-, and pull out locking pin - T10060 A- .


