CHRYSLER SERVICE MANUAL
60—BRAKES c. Cleaning and Inspection Thoroughly wash all metal parts in Bendix Metaclene (or recommended MOPAR Cleaner), and wash rubber parts in alcohol. Use air hose to blow out dirt and cleaner fluid from recesses and internal passages. Place washed parts on clean paper or lintless cloth. When overhauling power unit, use all parts in repair kit. Discard matching parts from original unit. Inspect all other parts and replace damaged or excessively worn parts. If inside of vacuum cylinder is rusted or corroded, polish with steel wool or fine emery cloth. If inspection reveals nicks or scratches on piston rod, valve seat at end of valve rod, or valve seat at center of piston plate, replace parts. If piston leather packing or piston rod leather seal are worn excessively, replace. d. Assembly Assemble piston plate with threaded hole side up (Fig. 26). Assemble leather packing on piston with lip side up. Place packing retainer plate on packing, with raised side up, and align holes in piston. Coil cotton wick inside of packing lip and cut wick to required length. Remove and dip wick in Bendix Vacuum Cylinder Oil. Let excess oil drip off, and again coil wicking inside of lip of packing. Install expander spring inside of wicking, with gripper points next to wicking. Engage notch at loop end of spring with hook at opposite end of spring. Align holes in expander spring retainer plate with threaded holes in piston plate. Install six screws and tighten securely. Assemble vacuum inspection port screw and screw gasket to mounting ring, if screw was removed (Fig. 27.) Insert four bolts and lockwashers through holes in end plate and assemble mounting ring rubber gasket over bolts.
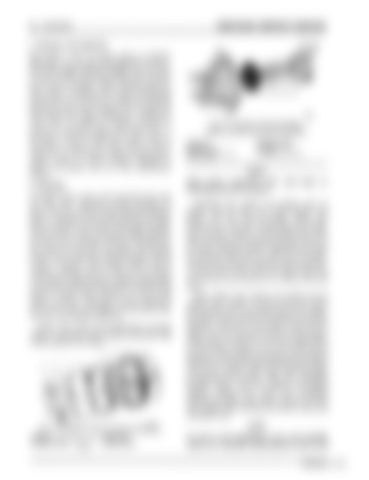
Fig. 26—Assembly of Piston Packing and Retainer 1—Screw 2—Expander spring retainer plate 3—Expander spring 7_Pi s t o n
4—Cotton wick 5—Piston plate 6—Leather packing
6
7
56x97
Fig. 27—Assembly of Mounting Ring, Gasket and Piston Rod Seal to End Plate 1-Screw (4) 2—End plate 3—Rubber gasket 4—Piston rod leather seal 5—Seal retainer
6—Retaining spring 7—Mounting spring 8-Gasket 9—Inspection port screw
NOTE Align gasket inspection hole with holes in mounting ring and end plate. Assemble new piston rod leather seal on gasket, with lip side away from gasket, and center seal over hole in gasket. Place seal retainer over seal and install retaining spring. Coat bearing surface of mounting ring with silicone grease and assemble mounting ring on end plate, making certain inspection port hole in mounting ring lines up with hole in gasket. Thread four bolt into mounting ring and securely fasten bolts. When bolts are tight, outer rim of mounting ring should be in contact with end plate. Slide rubber stop washer over piston rod up against steel washer on piston rod, and insert rod through seal in end plate (Fig. 28). Assemble piston return spring on end plate, with large diameter end next to end plate. Align slot in piston rod with vacuum test port in end plate. Align piston so that two of four threaded holes in valve side of piston are in line with slot in piston rod. Press piston on piston rod up against shoulder of rod and install retaining pin. Insert valve rod in piston until end of rod protrudes at opposite end of plate. (Fig. 29). Assemble friction collar, valve rod spring, and spring retainer washer over valve rod. Compress spring and install snap ring in groove of valve rod. Install valve rod seal over end of valve rod and piston rod. NOTE To aid in seal installation, turn seal partially inside out. Assemble small diameter end of seal MyMopar.com


