

“We serve one of the most complex types of artforms, which requires a combination of polar qualities - the mind of a rational mathematician and the soul of a passionate artist.”
- OLEH HOLOVCHAK
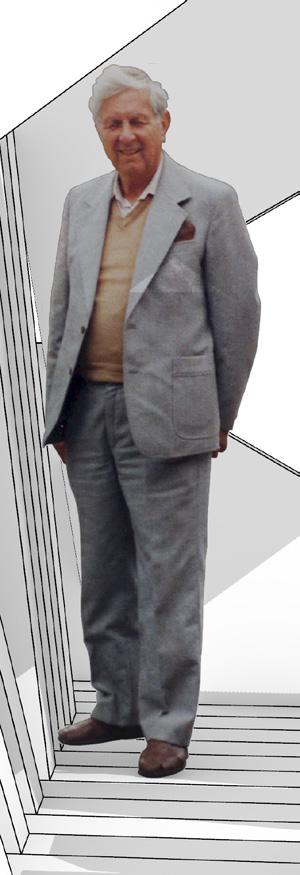
I am a first-year architecture major at the University of Oregon. I have been living in Oregon for the past 8 years; before that, I was living in Ukraine. I look forward to learning more about humanist design and working with differing spatial organizational systems to understand how they shape the human experience of a building. I am also interested in how materiality impacts spaces, how environmental design can further sustainability, and how new structures can be integrated with old ones.
My current strengths lie in geometric design and the iterative process. I most enjoy drafting and sketching by hand. However, I understand that in the professional field computer-assisted design is essential; thus, I am looking for ways to integrate digital and hand drafting into my design process.
My long-term goal is to further sustainability initiatives in Ukraine and help rebuild the country’s infrastructure.
Willy Zybachynskyi Portfolio
Pages 6-7
Module 1
Laser Cut Model of Primitive Solid
Page 12-13
Module 2
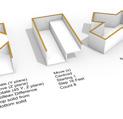
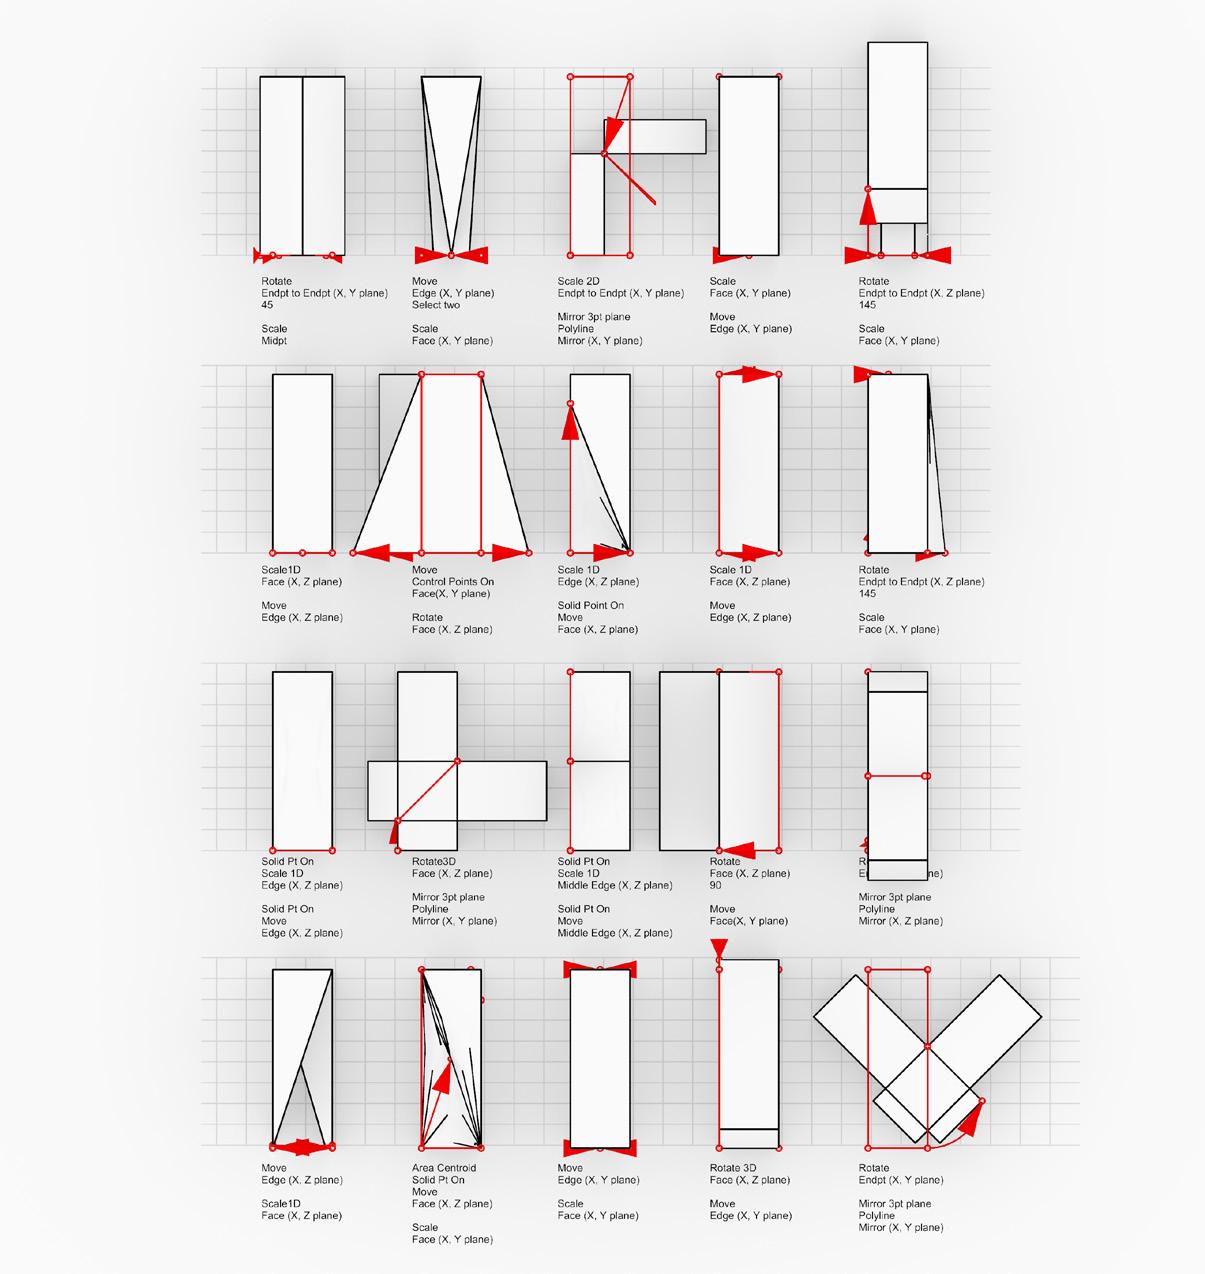
MoveEdge(X,Yplane)
Digital Primitive Rules
MoveEdge(X,Zplane)
Page 8
Module 1
Laser Cut File
MoveEdge(X,Yplane) Selecttwo
MoveEdge(X,Zplane) Selecttwo
MoveFace(X,Yplane)MoveFace(X,Zplane)
Page 14-19
Module 2
Digital Primitive Rules
SolidPoints MoveFace(X, Select SolidMoveFaceSelect
Page 9
Module 1 Laser Cut Model
Page 20-23
Module 2
Digital Primitives Additive
Page 10
Module 1 Laser Cut Template
Page 24-25
Module 2
Digital Primitives
Subtractive
Page 11
Module 1 Model of Primitive Solid
Page 26-27
Module 2 Assembly Primitives
Page 30-33
Module 3 Topography
Page 52-55
Guest Lectures
Page 34-41
Module 3 Digital Frames
Page 56-59 Guest Lectures
SOFTWARE USED RHINO 8.0
FABRICATION TIME
15 min. Laser Cutting
1 Hour Assembly
5 Hours Digitally Modeling
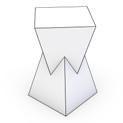
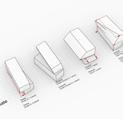
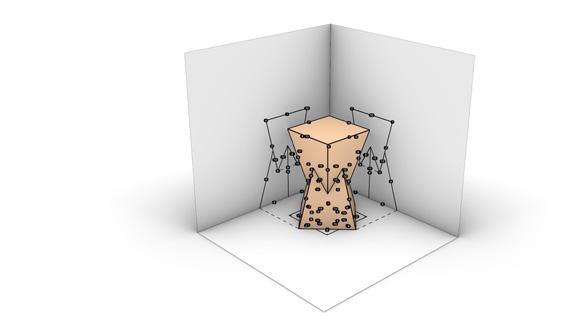
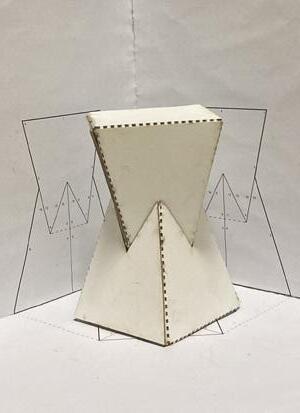
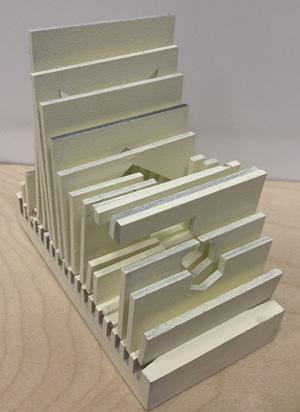
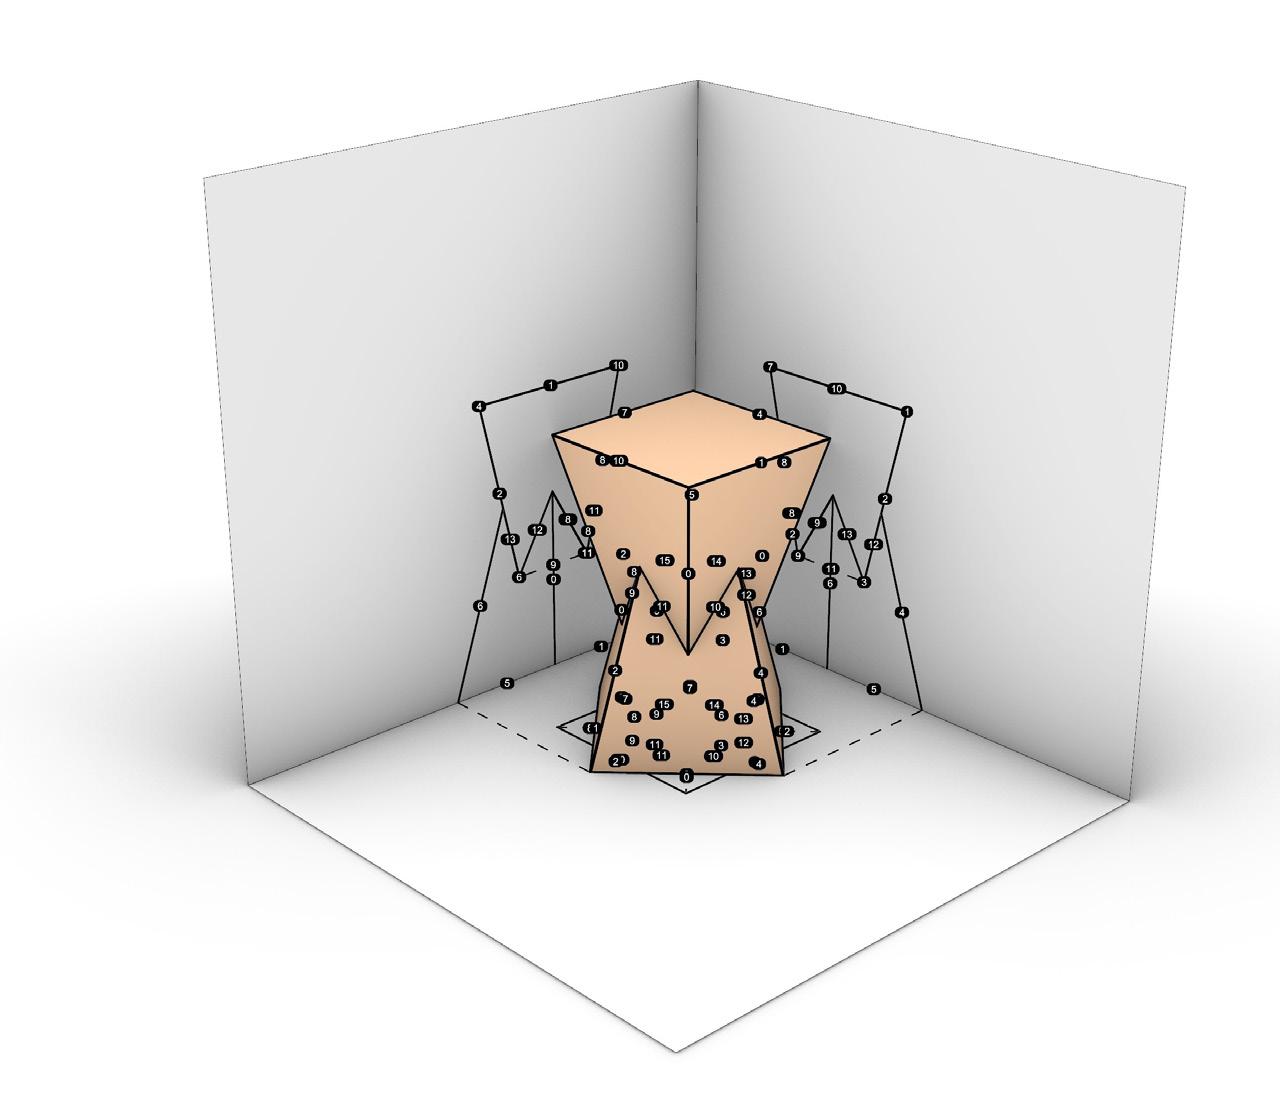
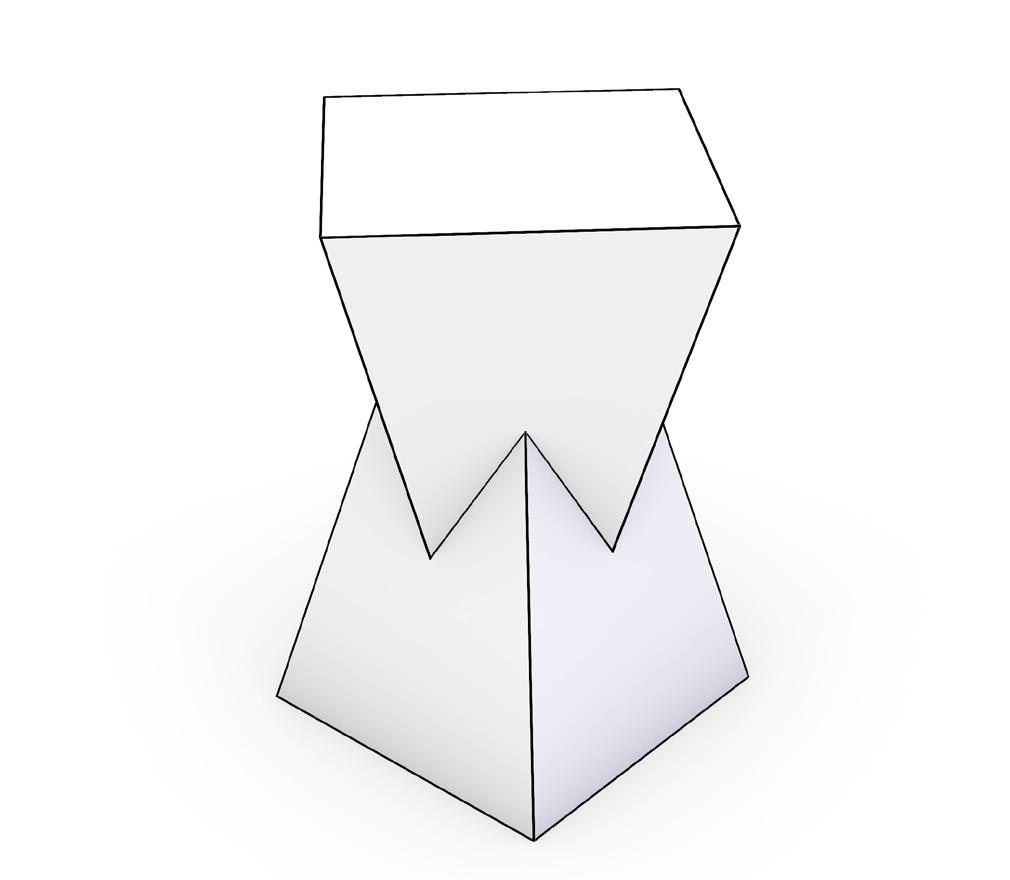
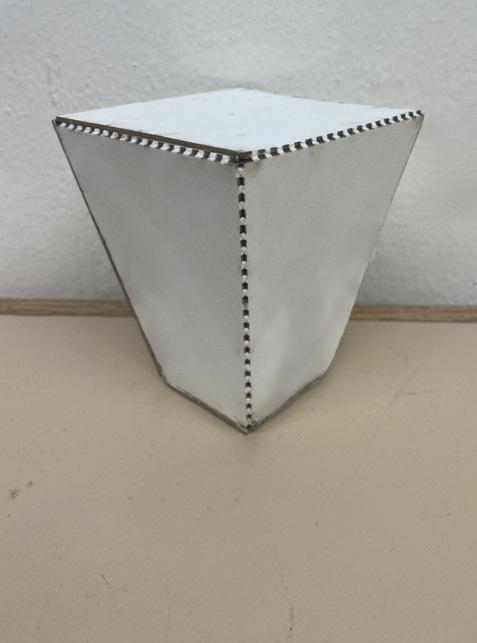
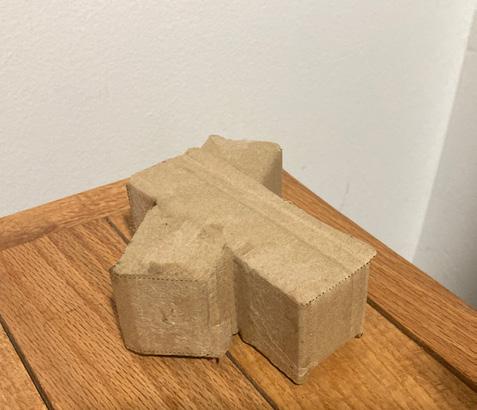
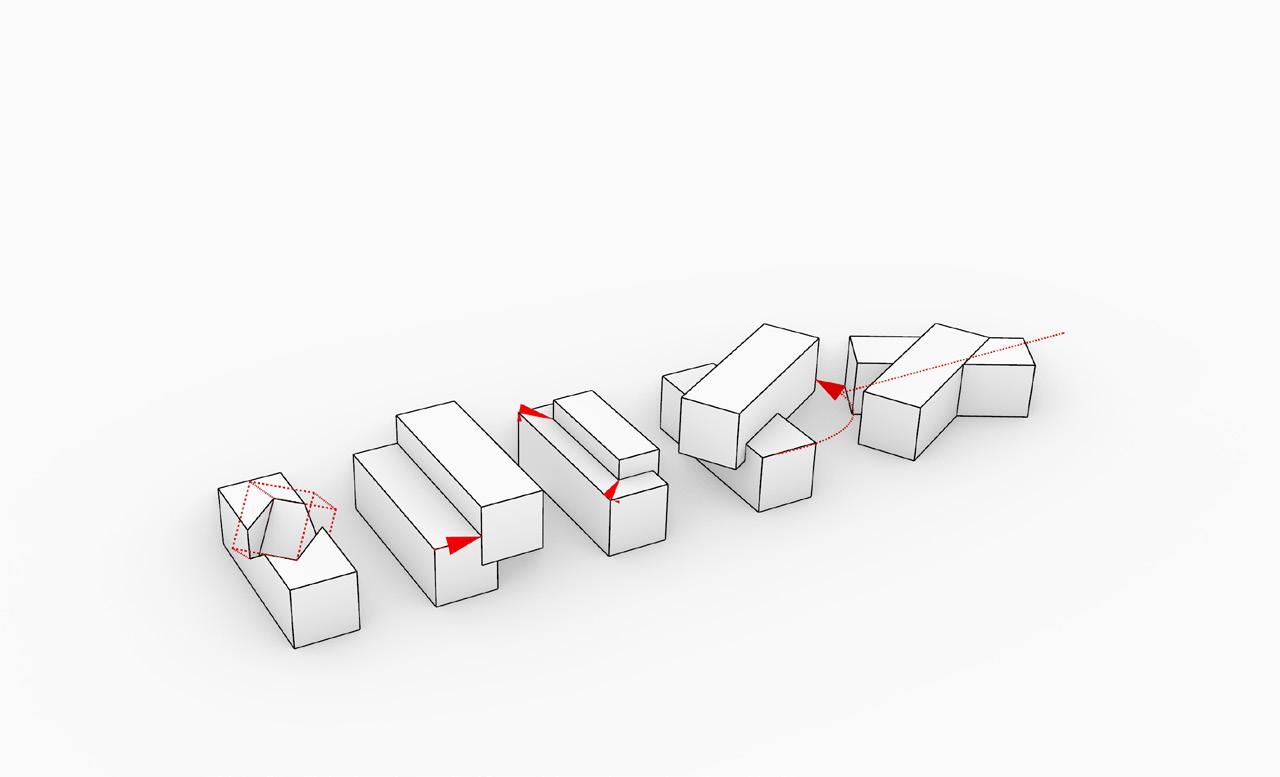
For the digital modeling process, I made an array of simple shapes that I put together in various ways. I ended up settling on this combination because I think it was the most succesful. While simple, it has good interlock and resembles an hourglass which I like. Through this process I discovered that even with very simple geometries, interesting shapes and spaces can be made.
MODELING MATERIALS
1/8” Museum Board
1/8” Chipboard
Tacky Glue
Spray Mount
Cutting Mat
X-Acto Knife
In terms of 3D modeling, I found RHINO 8 to be a pretty straightforward program to use. It is not difficult to create and combine simple shapes, so I was able to do many iterations until I got something I liked. I could easily see how this program could be used to create much more complex structures as well.
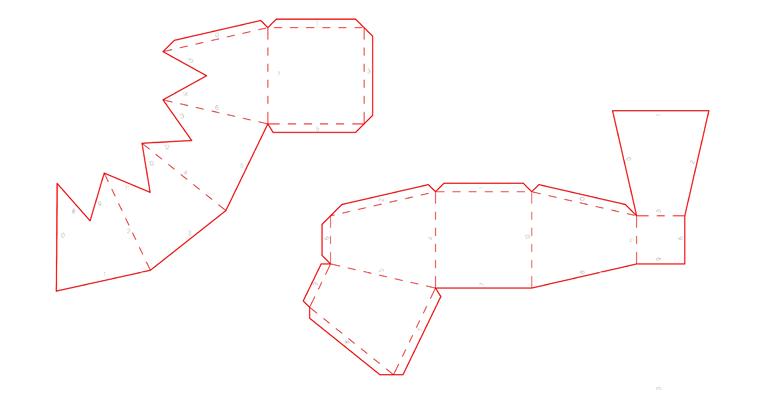
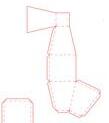
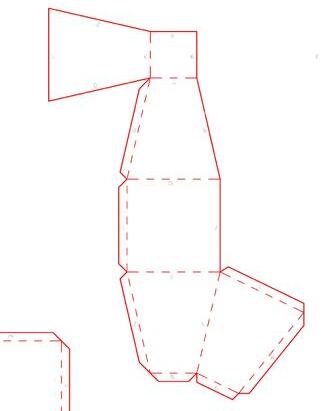
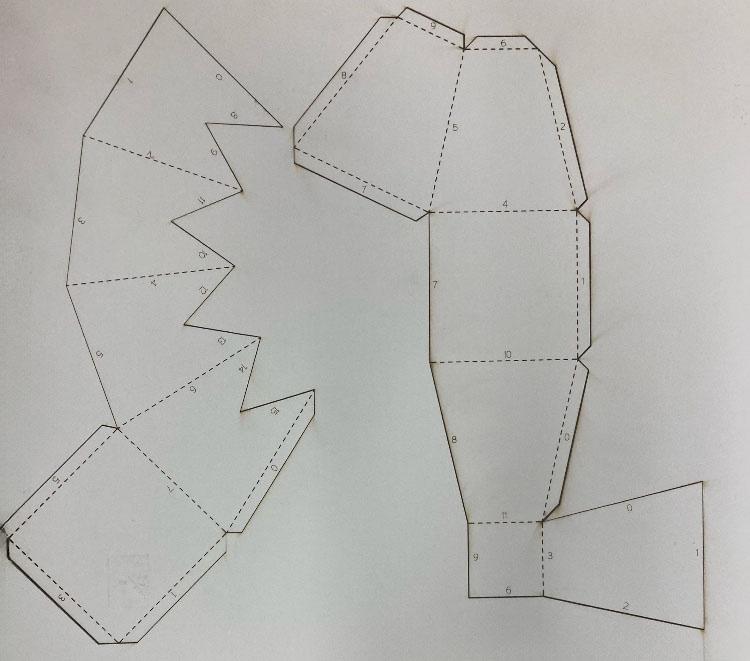
Making the shape into a laser cut file involved many steps, some of which were fairly complicated. It’s not that any one step was too difficult for me, but doing the sequence in the right order without forgetting something took some time. There were times I had to trace my steps back because I had forgotten some previous part of the process.
Overall it wasn’t too bad though, I was able to make a succesful projection and unrolled version of my shape. I appreciate that RHINO makes it fairly easy to unroll and prepare a shape for laser cutting; all the functions are there and it’s just a matter of memorizing them.
Willy Zybachynskyi Portfolio
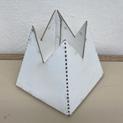
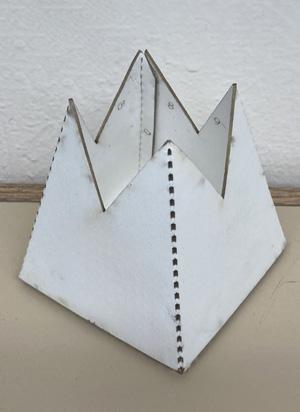
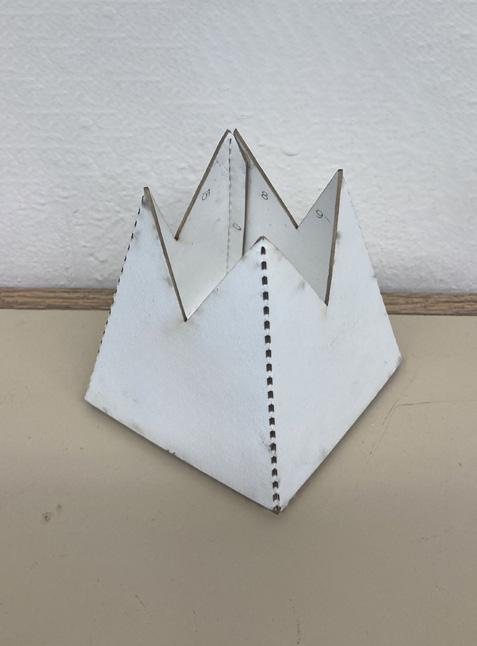
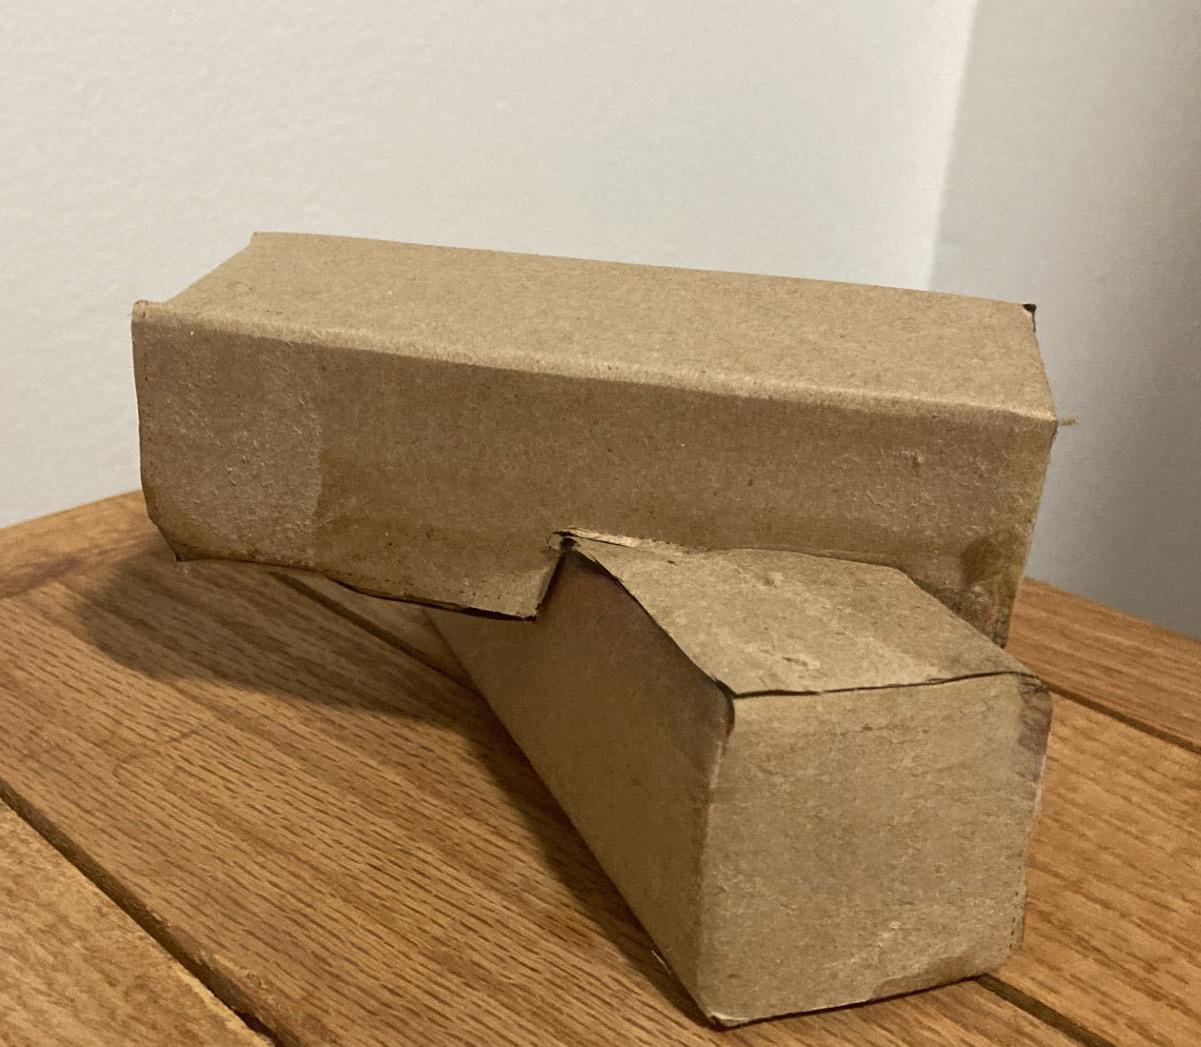
During production there were no major difficulties.The laser cutter was able to make the shape very quickly and efficently. It is definitely a tool I will want to use for my future projects. I used museum board for my shape and it did leave burn marks; I did my best to erase them and it doesn’t look too bad overall. For bigger projects in the future I will be sure to tape up one side of my material so that it doesn’t happen.
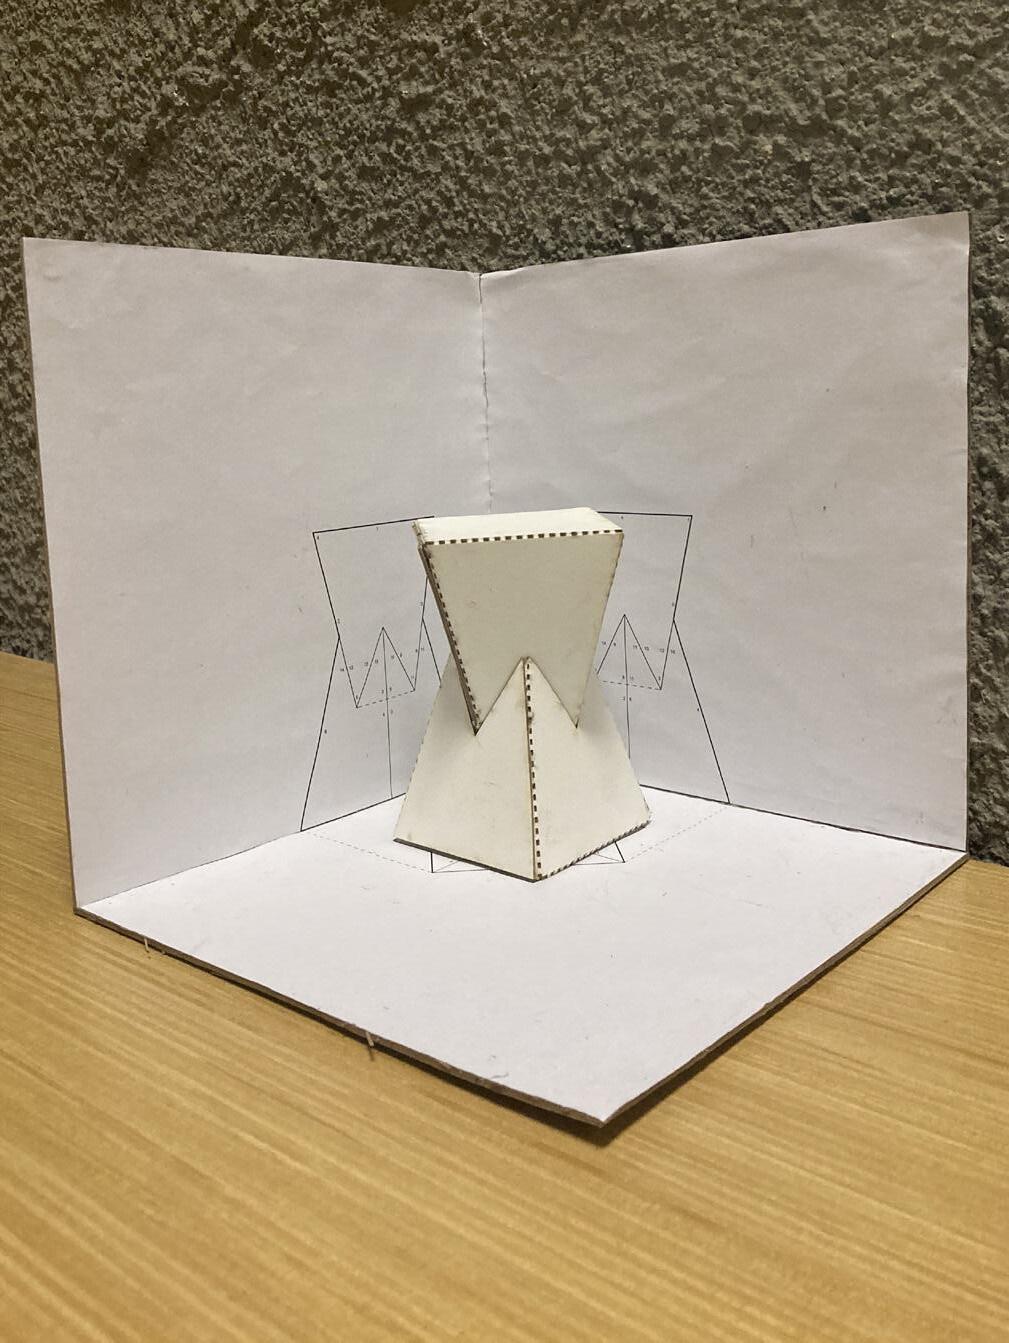
Everything else went smoothly; I was able to cut out and assemble the enclosure without many difficulties. The spray mount was a little challenging to use but it worked out. Some of the edges of the enclosure are not as neat as I’d like them to be, but overall I am happy with the work I produced. This project was definitely a learning experience and I appreciate the new skills it has taught me.
Willy Zybachynskyi Portfolio
SOFTWARE USED Rhino 8.0 Illustrator
MATERIALS USED 1/8” Cardboard
Tacky Glue
Cutting Mat
X-Acto Knife
FABRICATION TIME
1 Hour Laser Cutting
1 Hour Assembly
15 Hours Digitally Modeling
I have learned a lot from this module overall. I learned how to make a lot of iterations and how to refine those iterations into models. One thing I could work on is doing these iterations more quickly, since a lot of them took me more time to develop than I would’ve liked.
I have learned the basics of Grasshopper and am continuing to learn the various functions within Rhino. I now also feel very comfortable exporting models from Rhino to the laser cutter. I am also growing more familiar with Illustrator, and how to bring my work from Rhino to Illustrator.
Willy Zybachynskyi Portfolio
MoveEdge(X,Yplane) Selecttwo
MoveEdge(X,Zplane) Selecttwo
MoveFace(X,Yplane)MoveFace(X,Zplane)
SolidPointsOn MoveFace(X,Yplane) SelectOneSolidPointsOn MoveFace(X,Zplane) SelectOne
SolidPointsOn MoveFace(X,Yplane) SelectTwoSolidPointson MoveFace(X,Zplane) SelectTwo

Willy Zybachynskyi Portfolio
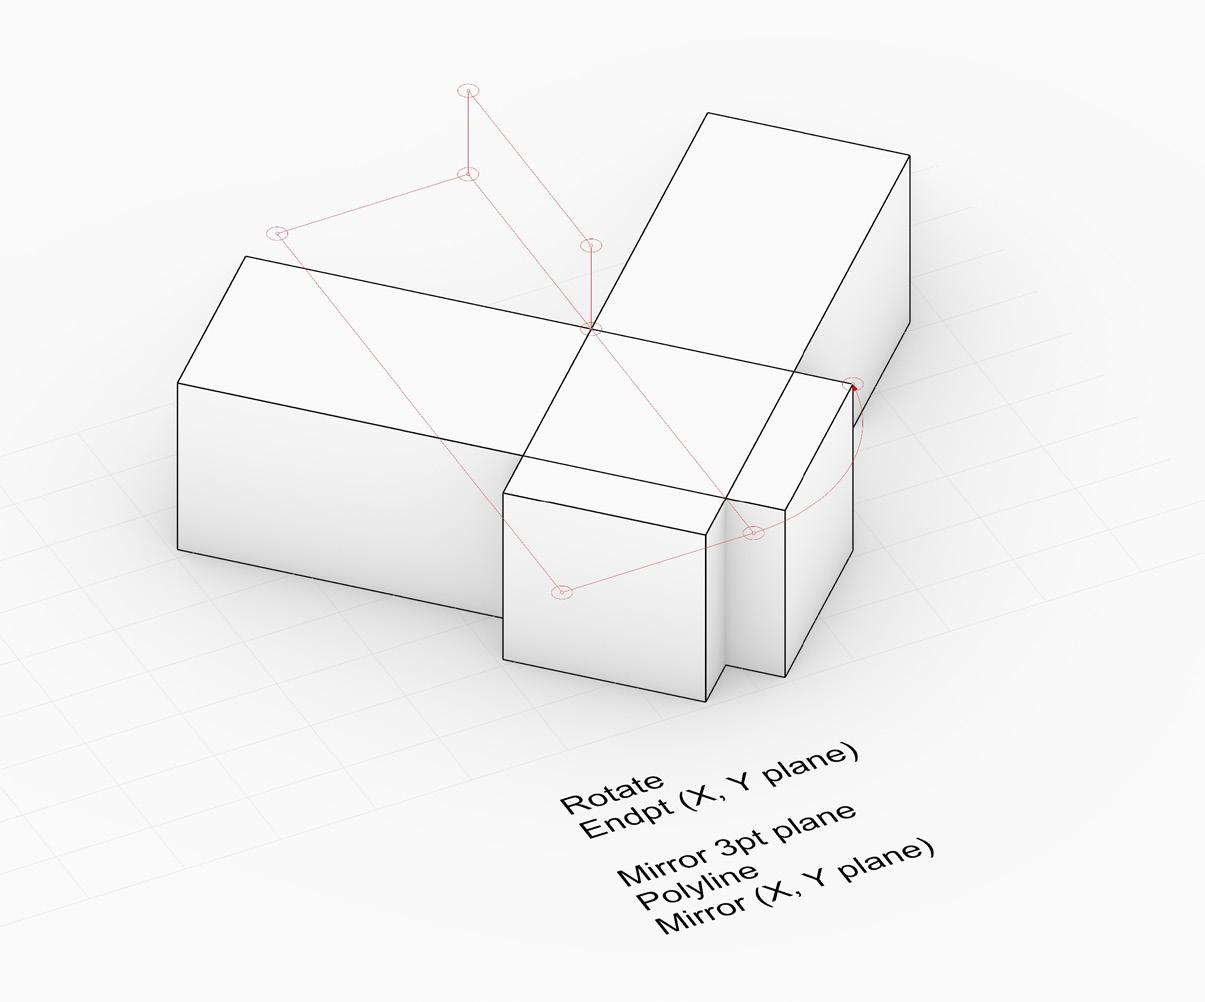
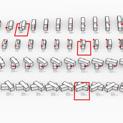
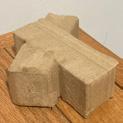
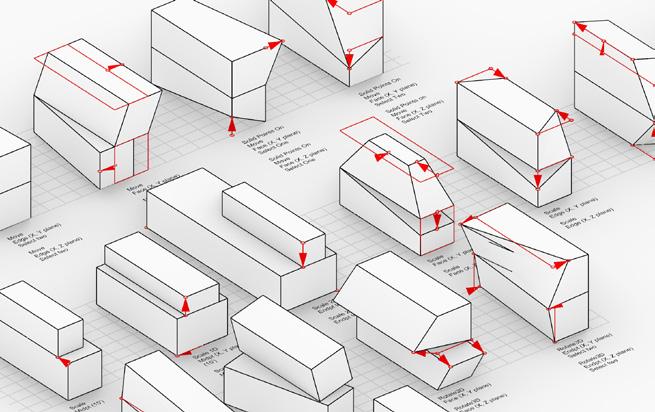
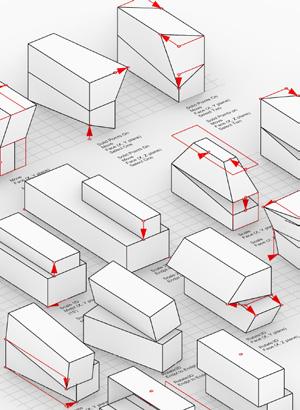
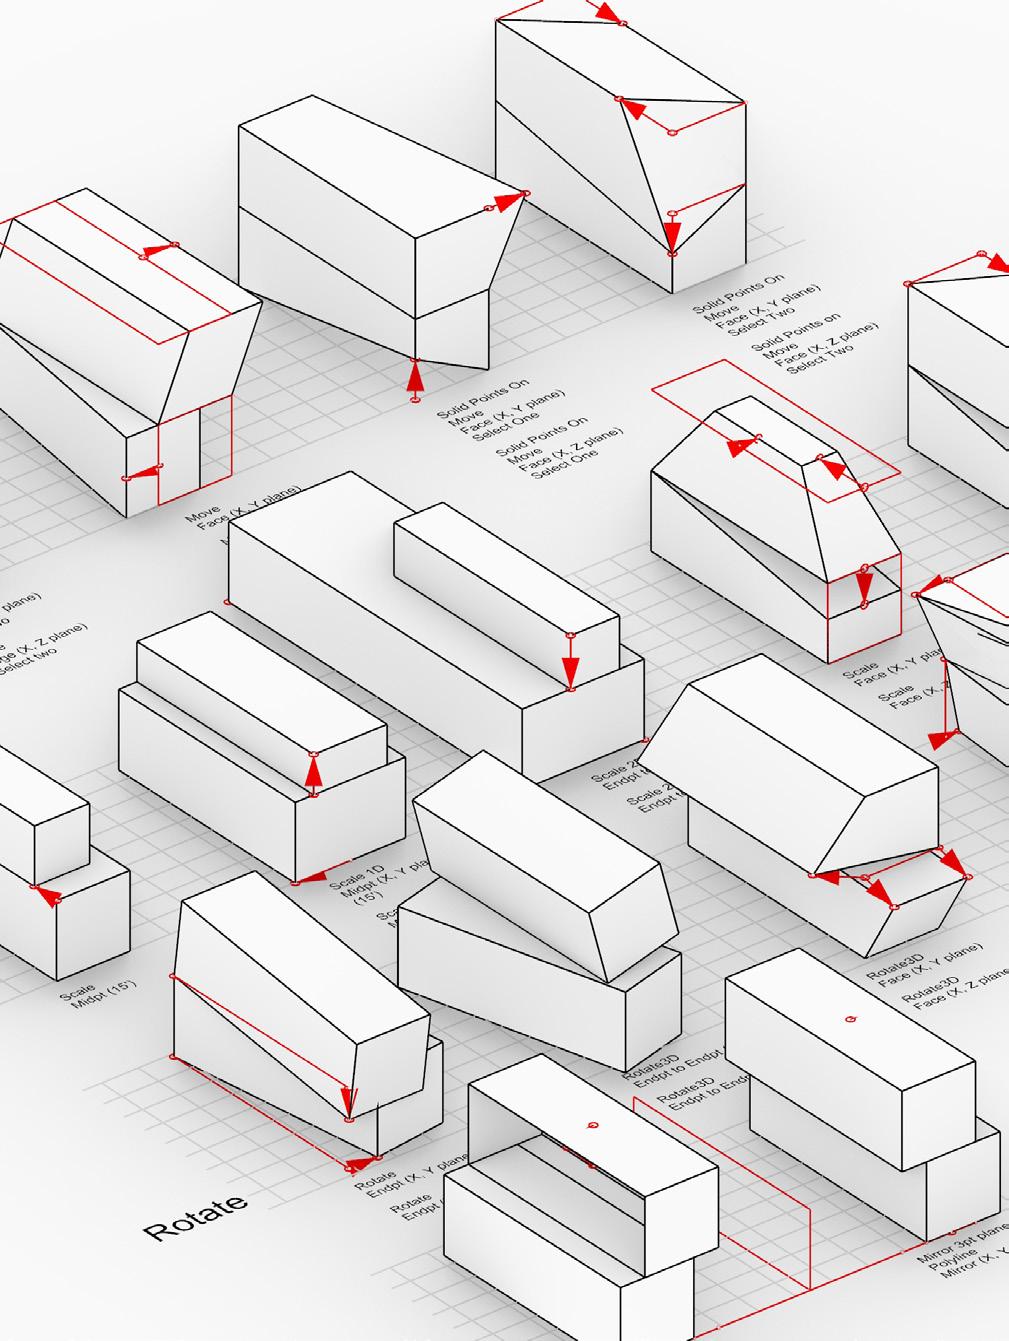
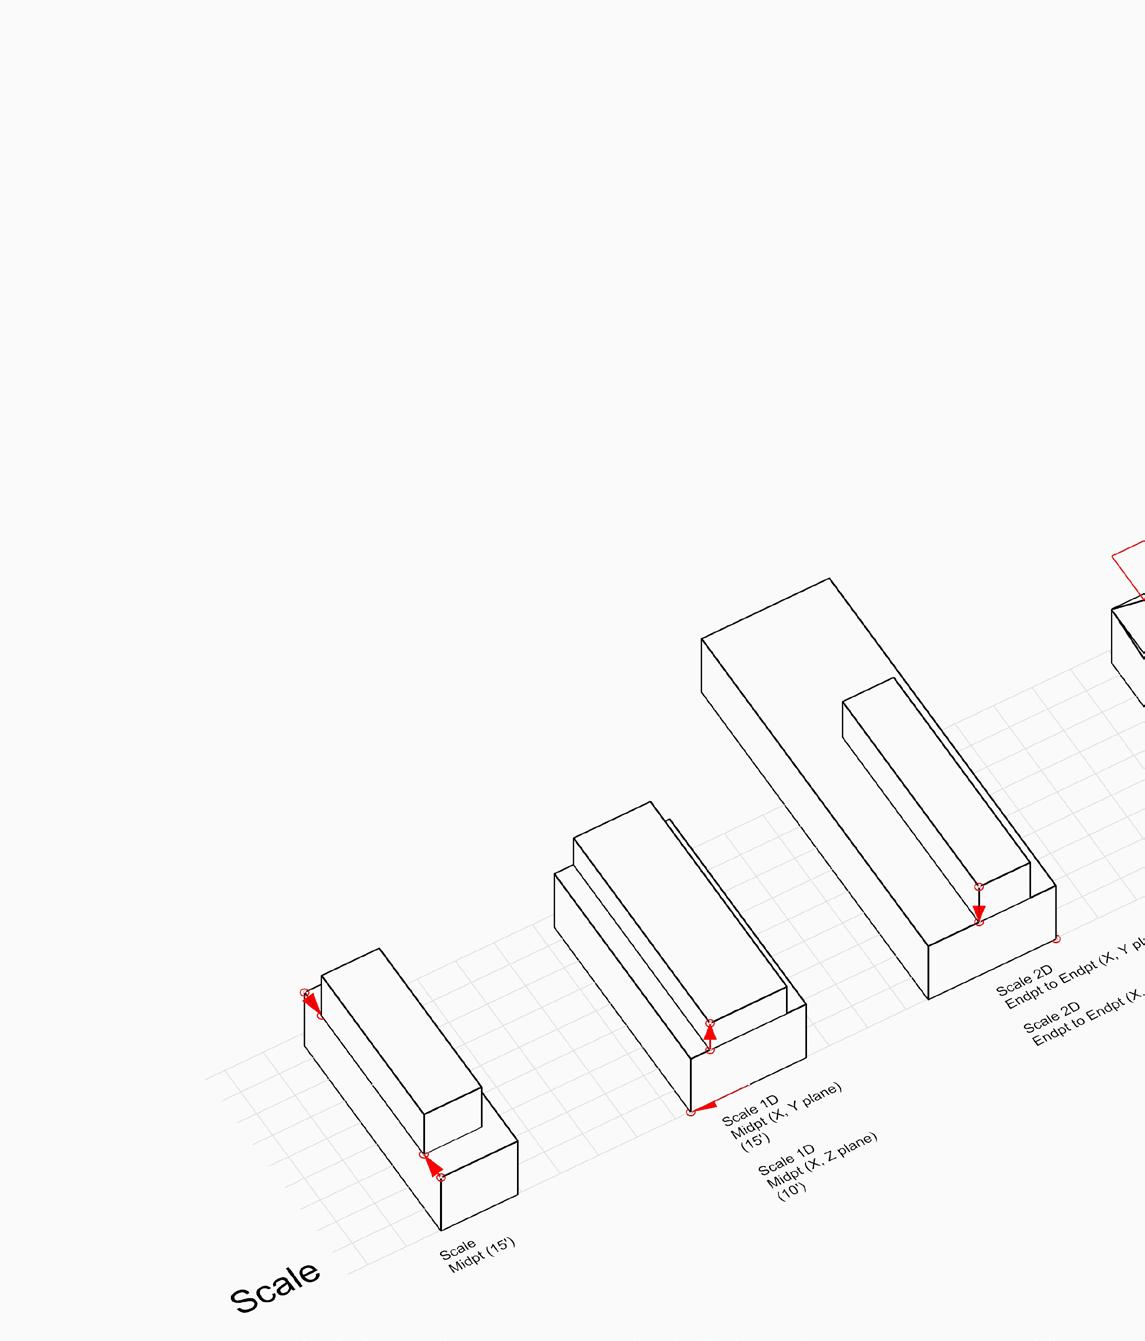
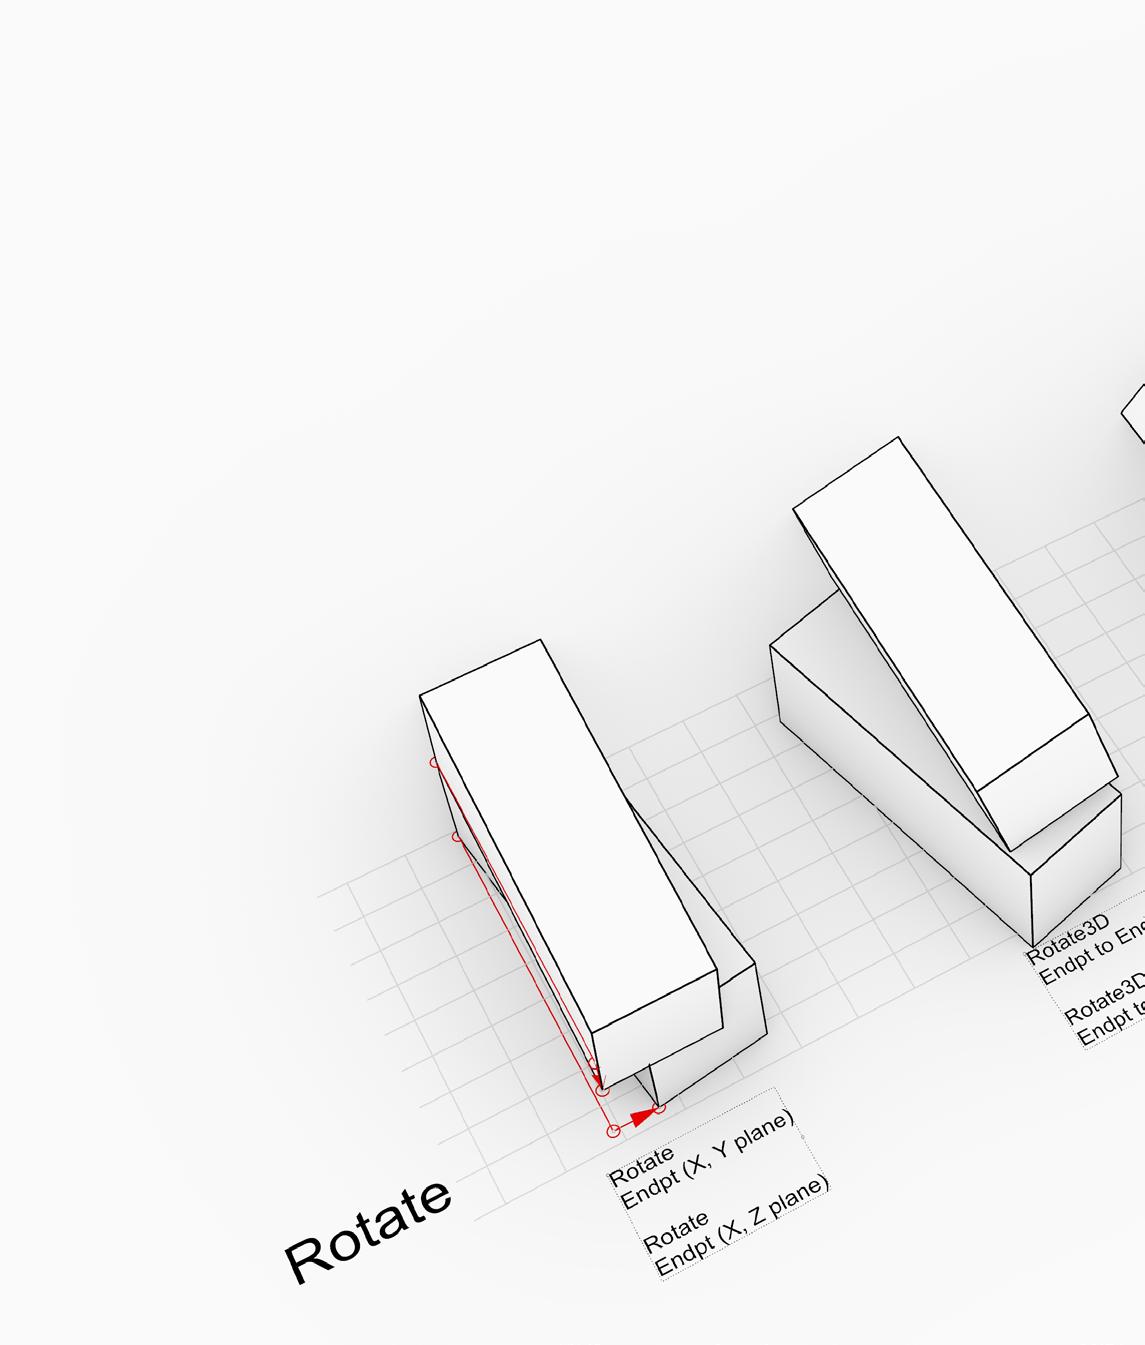
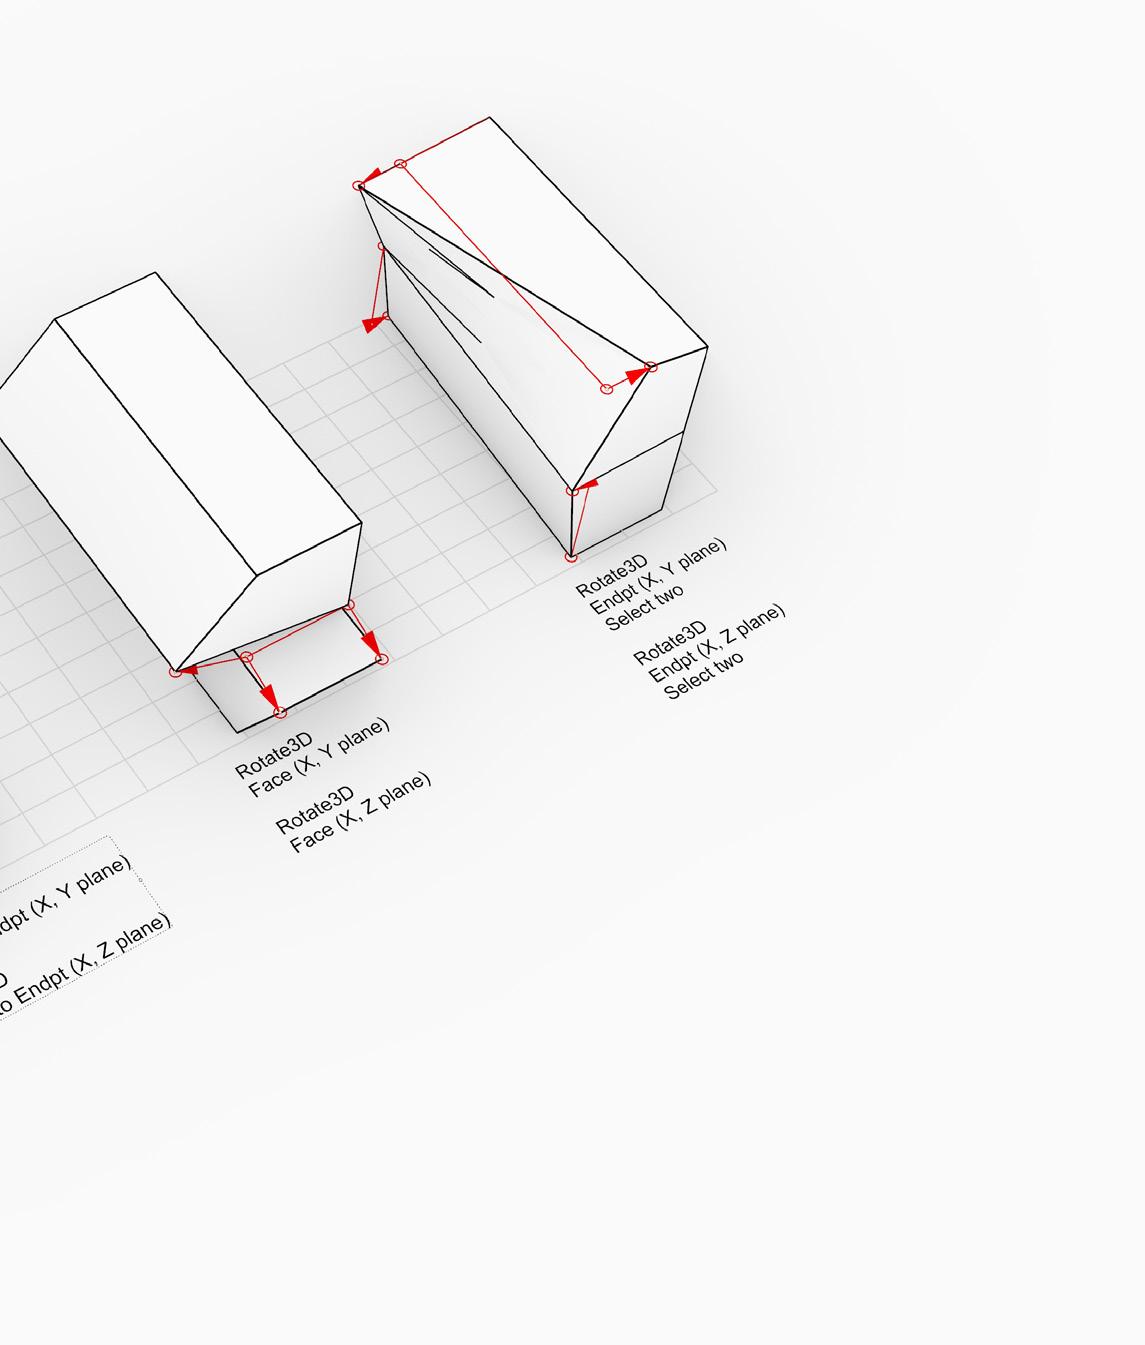
These models show my exploration of the move, scale, mirror, and rotate commands. Having learned these I feel much more comfortable creating more complex shapes, as well as creating a wide variety of shapes. It does take a good amount of time for me as of right now, however.
The shape above is my favorite because it has good interlock. All of these shapes, however, have very interesting variations and it’s interesting to see how combining them creates variety.
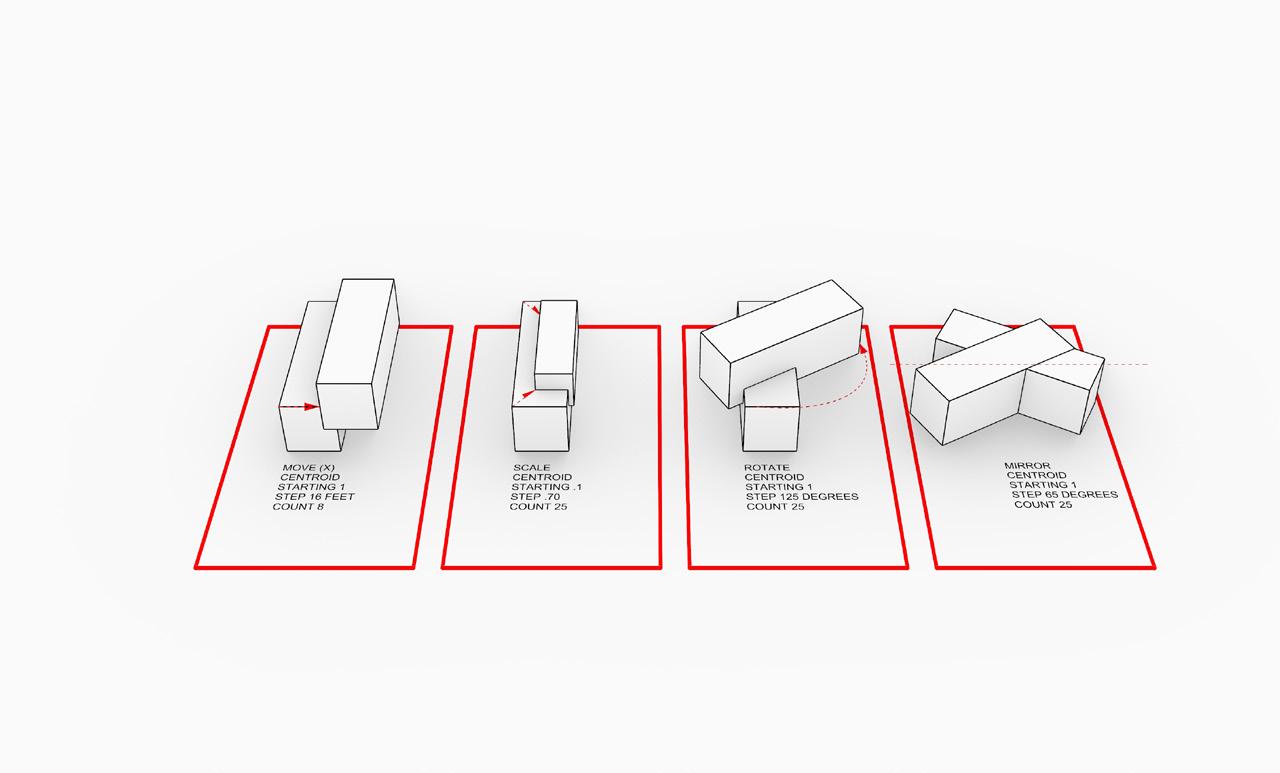
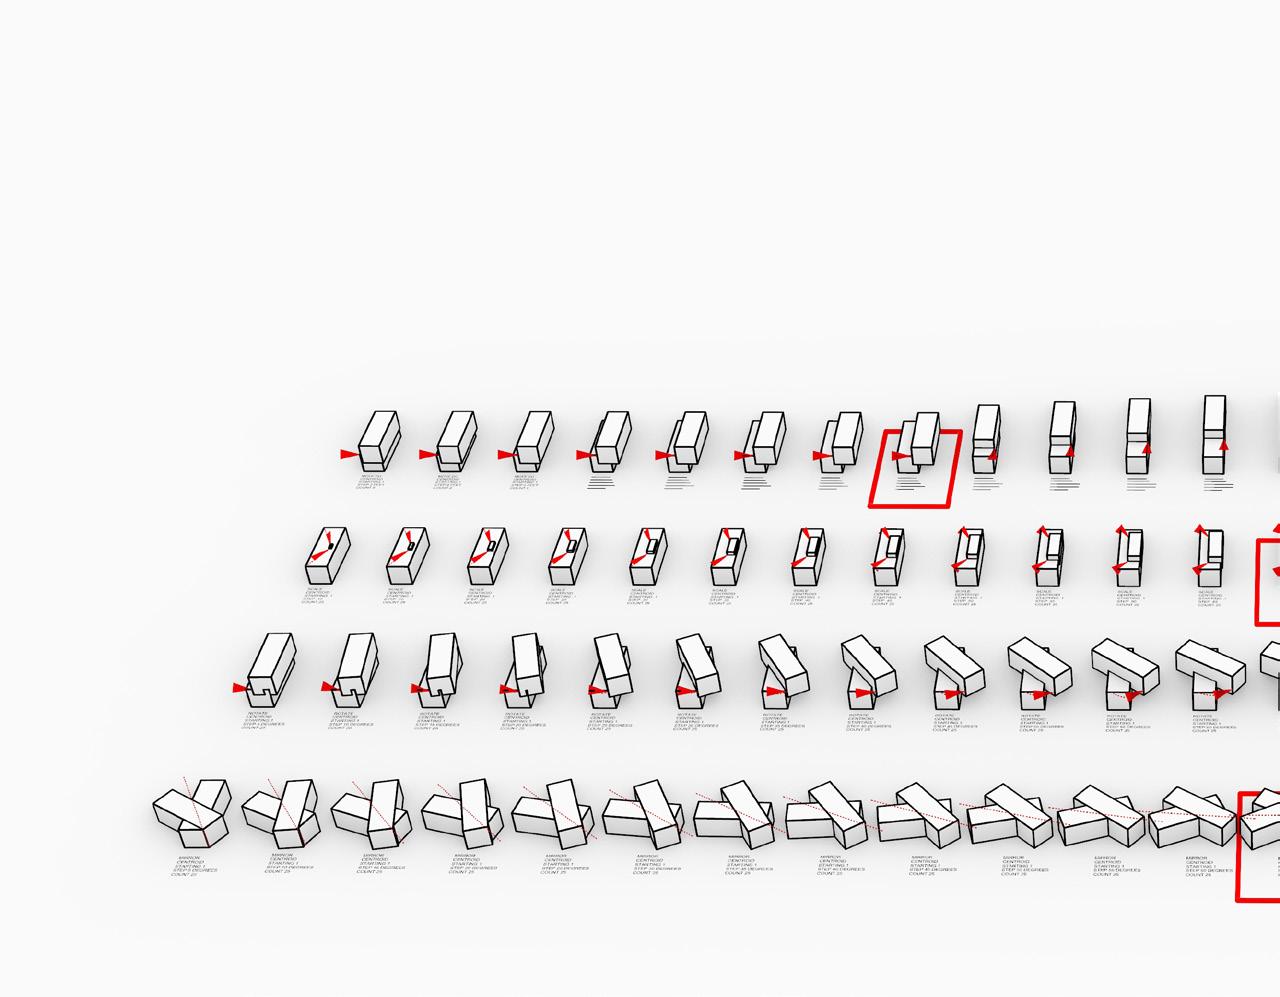
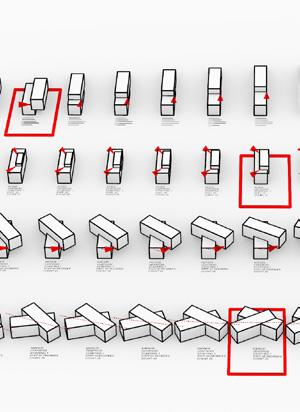
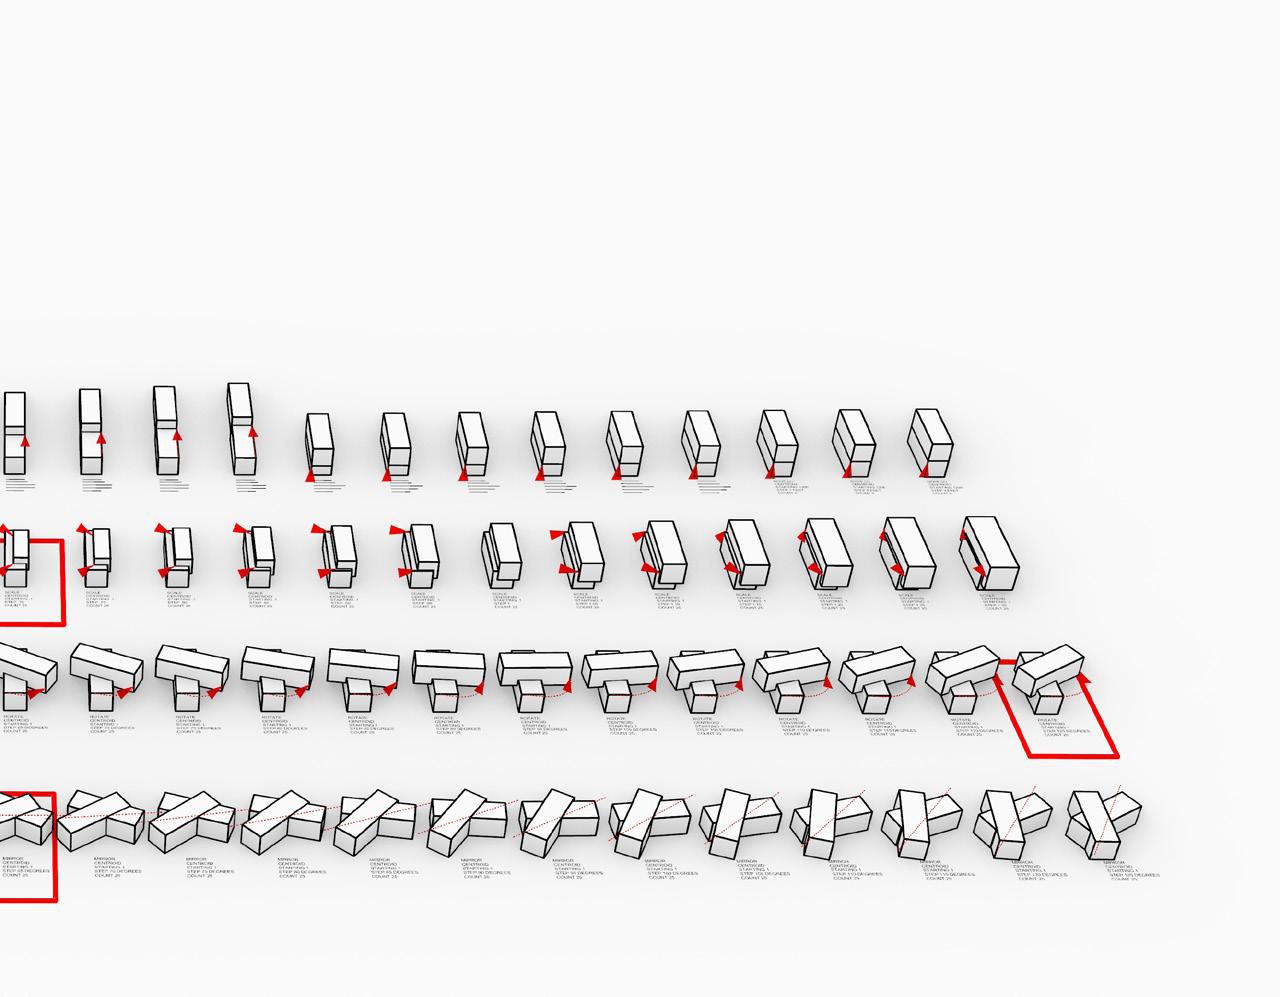
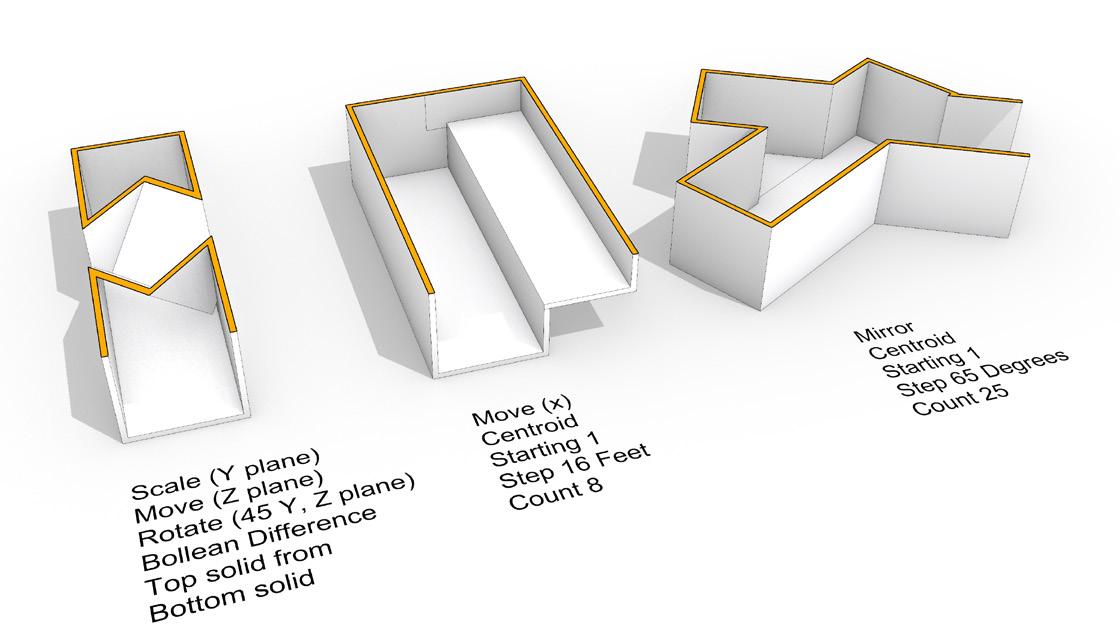
Rule x100
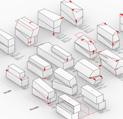
I used Grasshopper for all of the x100 iterations. It took a good amount of time to program it all, but it would’ve taken me much longer to do it by hand so I am glad I have learned the basics of Grasshopper. I also wanted to challenge myself and see if I could iterate with the mirror command. It worked out well, I just had to create the two shapes in different places and then I attached them together manually.
The end result of this work is very interesting, I enjoy the variety in subtle changes that doing many variations like this provides. I could definitely see myself doing this in the future to test things out.
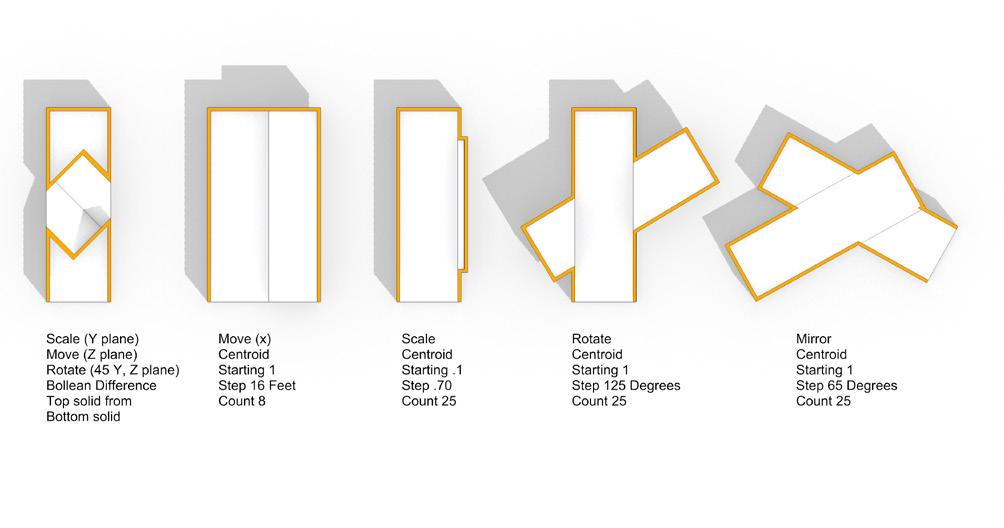
Scale (Y Plane)
Move (Z Plane)
Rotate (45 Y, Z Plane)
Bollean Difference
Top Solid From Bottom Solid
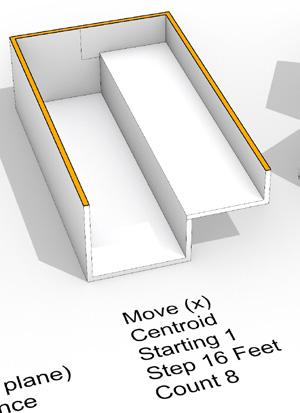
Move (X)
Centroid
Starting 1
Step 16 Feet
Count 8
Scale Centroid
Starting .1
Step .70
Count 25
Rotate Centroid
Starting 1
Step 125 Degrees
Count 25
Mirror
Centroid
Starting 1
Step 65 Degrees
Count 25
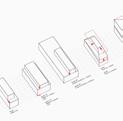
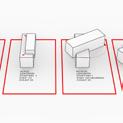
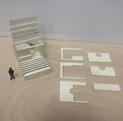
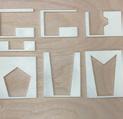
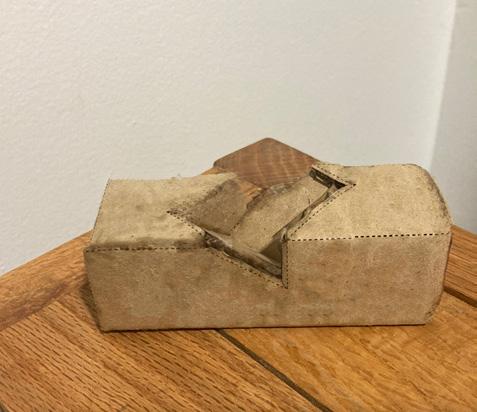
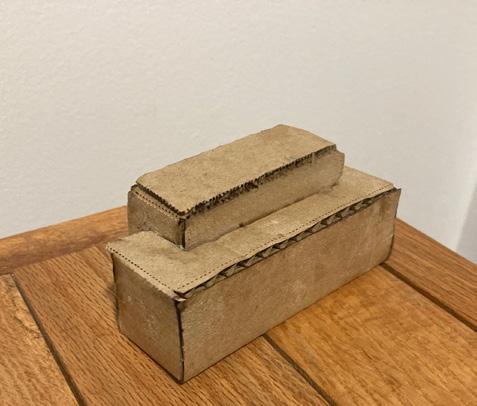
I really enjoyed learning the subtractive commands, I think they unlock a whole new layer of modeling that is very interesting. I also enjoyed learning to use the clip plane, as I could see this being used to easily produce sections or plan drawings. The 5 shapes I chose interest me because they combine in differring ways. The subtractive one is especially appealing I think.
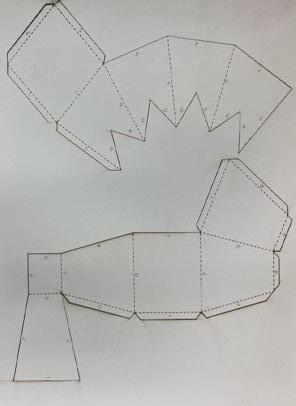
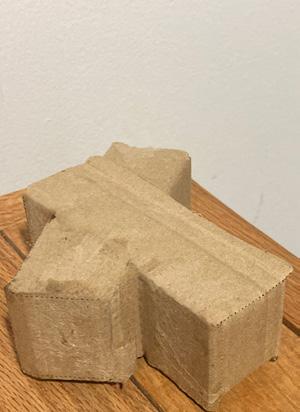
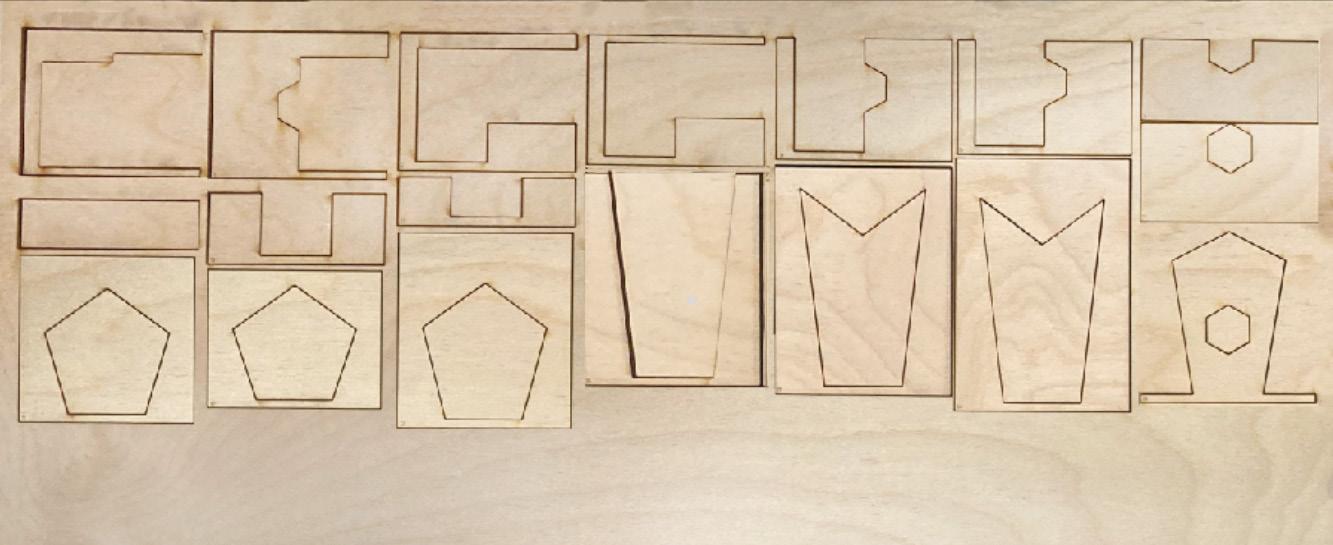
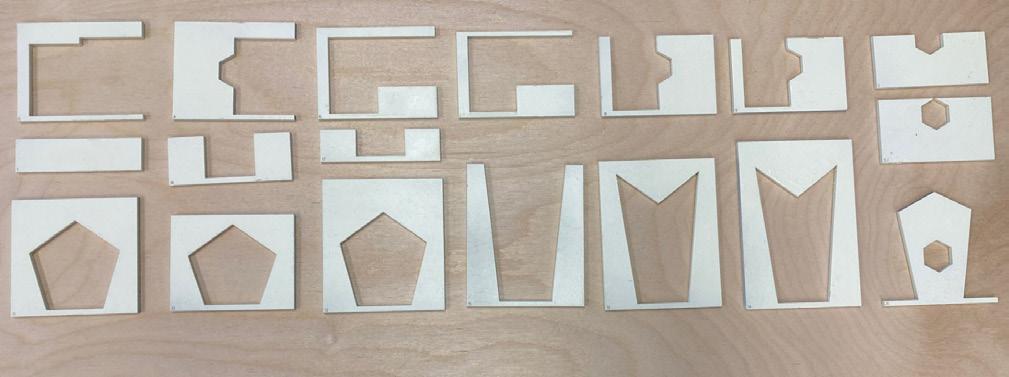
I had a lot of difficulties transferring these models into real life. At first I lasercut them out of a material that was too thick to bend, so I had to pivot quickly and sign up for another laser session and use cardboard. I ran out of time during the session, however, and had to finish some of the shapes by hand. The end result is not as neat as I would’ve liked but it was definitely a learning experience.

Willy Zybachynskyi Portfolio
SOFTWARE USED
Rhino 8.0
FABRICATION TIME
1 Hour Laser Cutting
20 Hours Digitally Modeling
MATERIALS USED
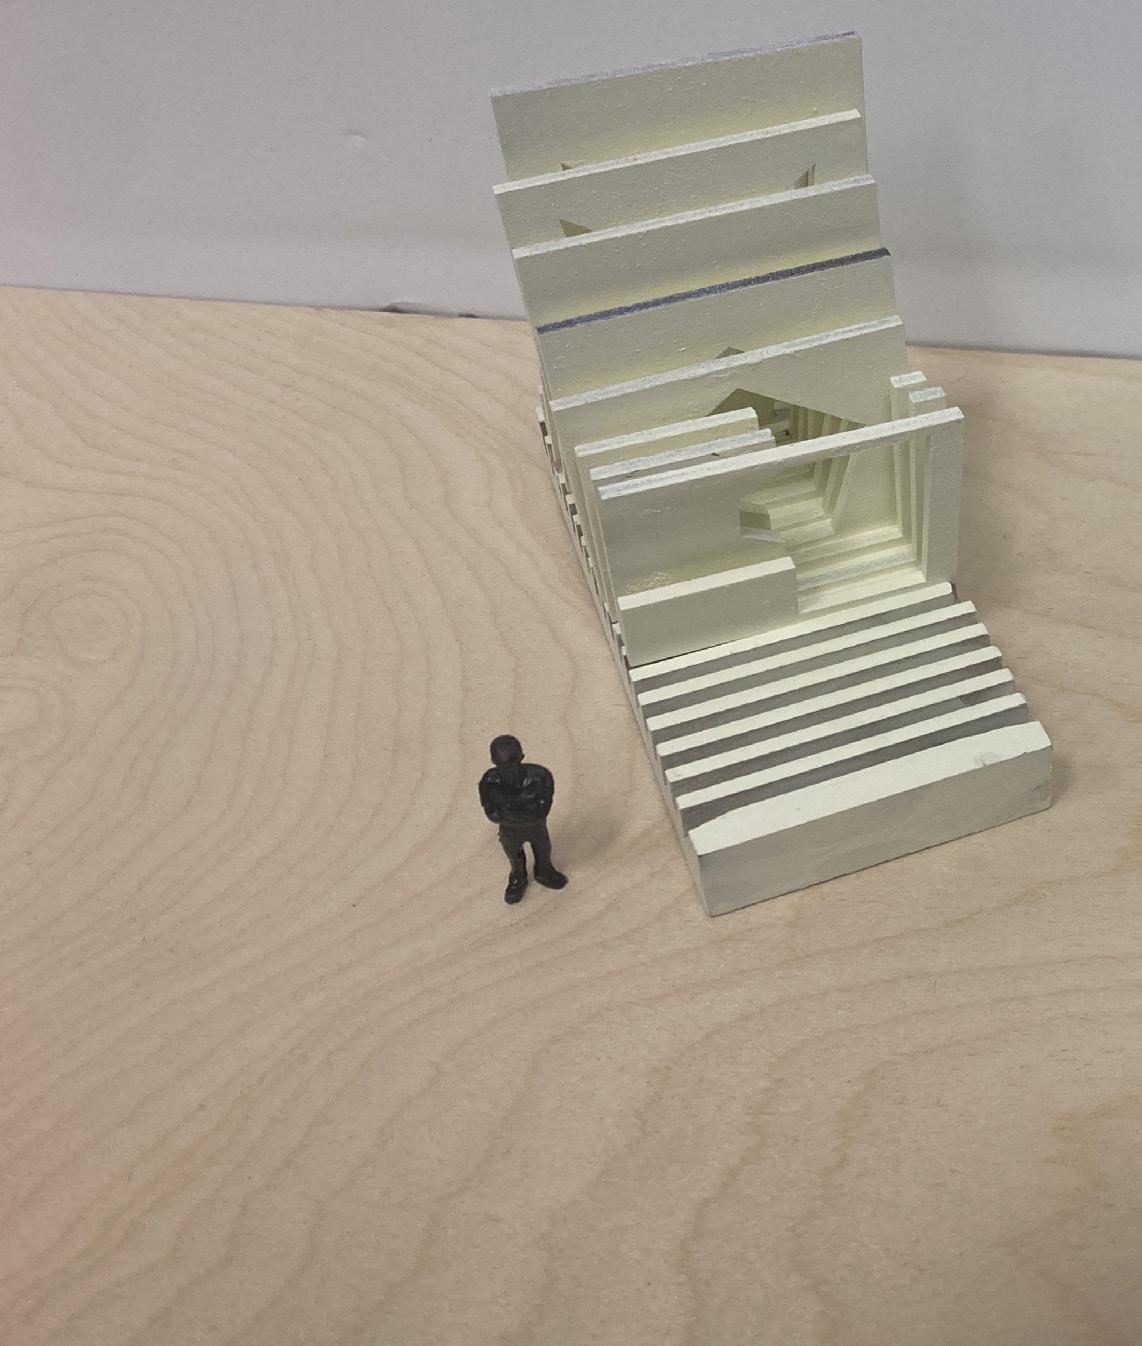
1/8” Plywood
1/2” Wood Base
White Spray Paint
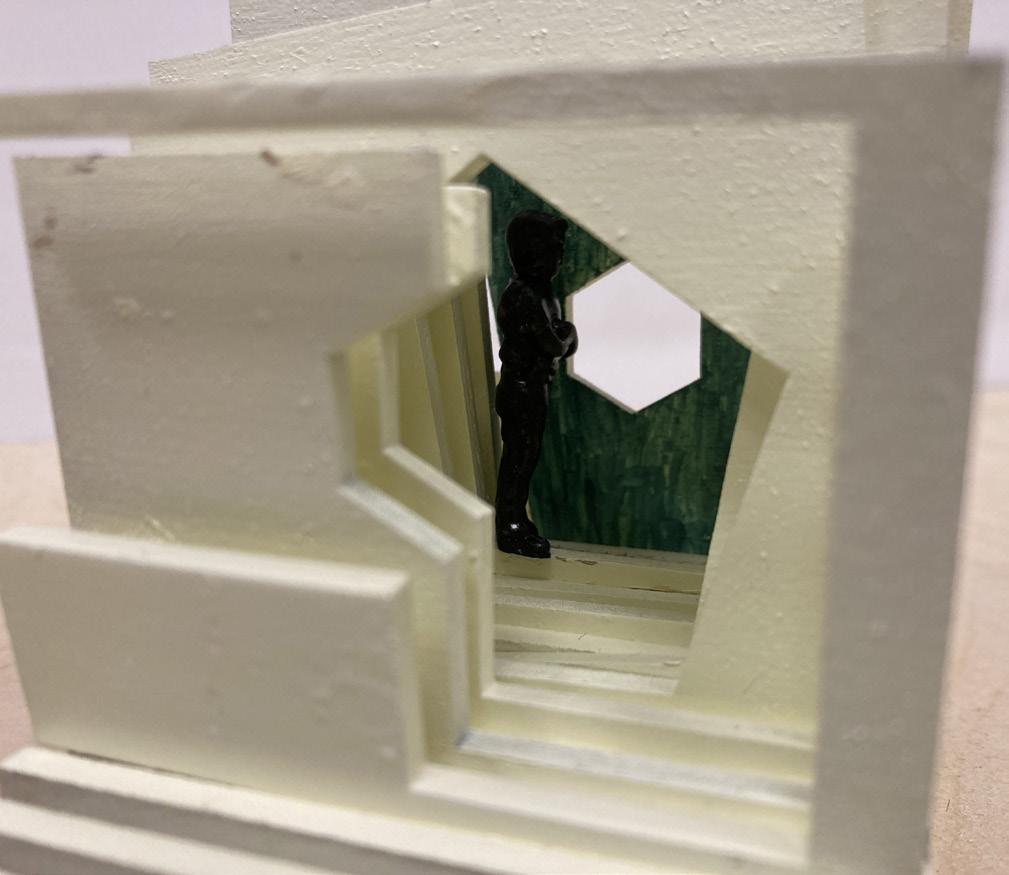
Red, Green Markers
Plastic Figurine
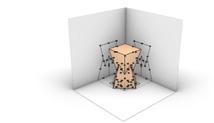
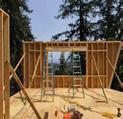
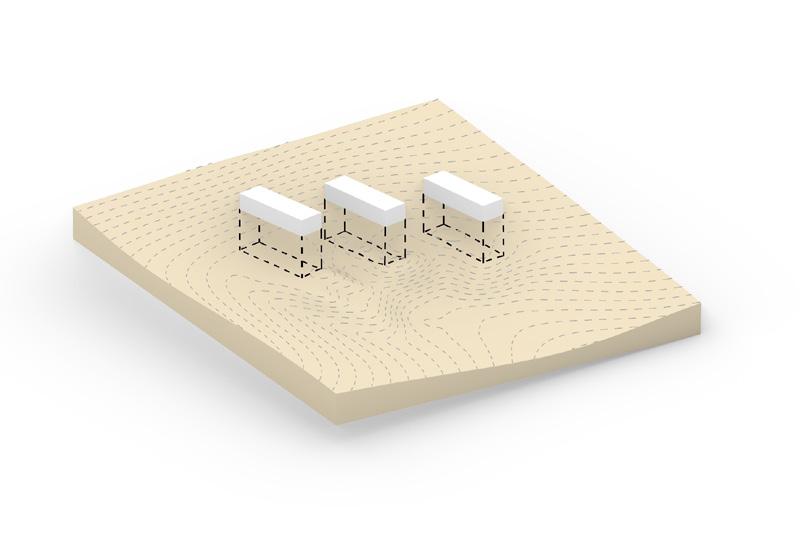
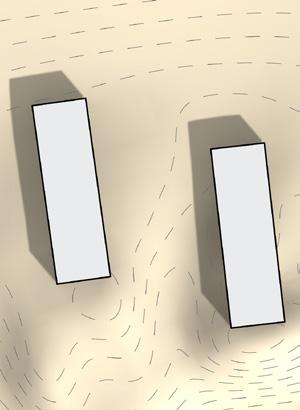
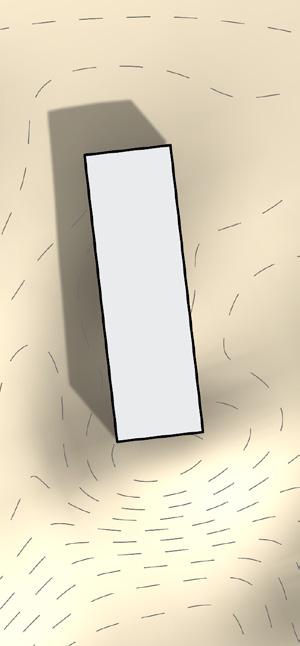
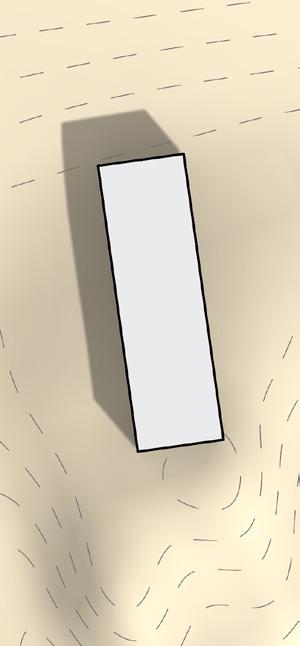
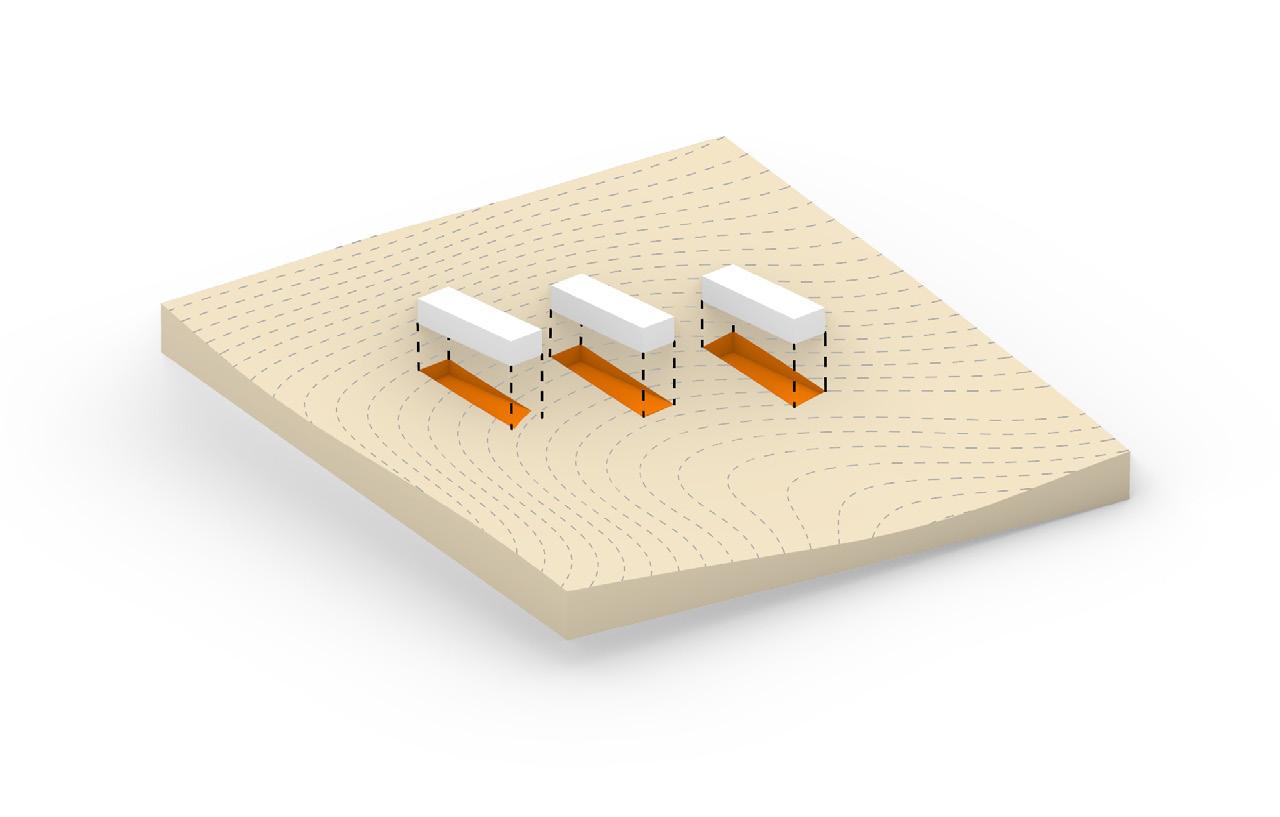
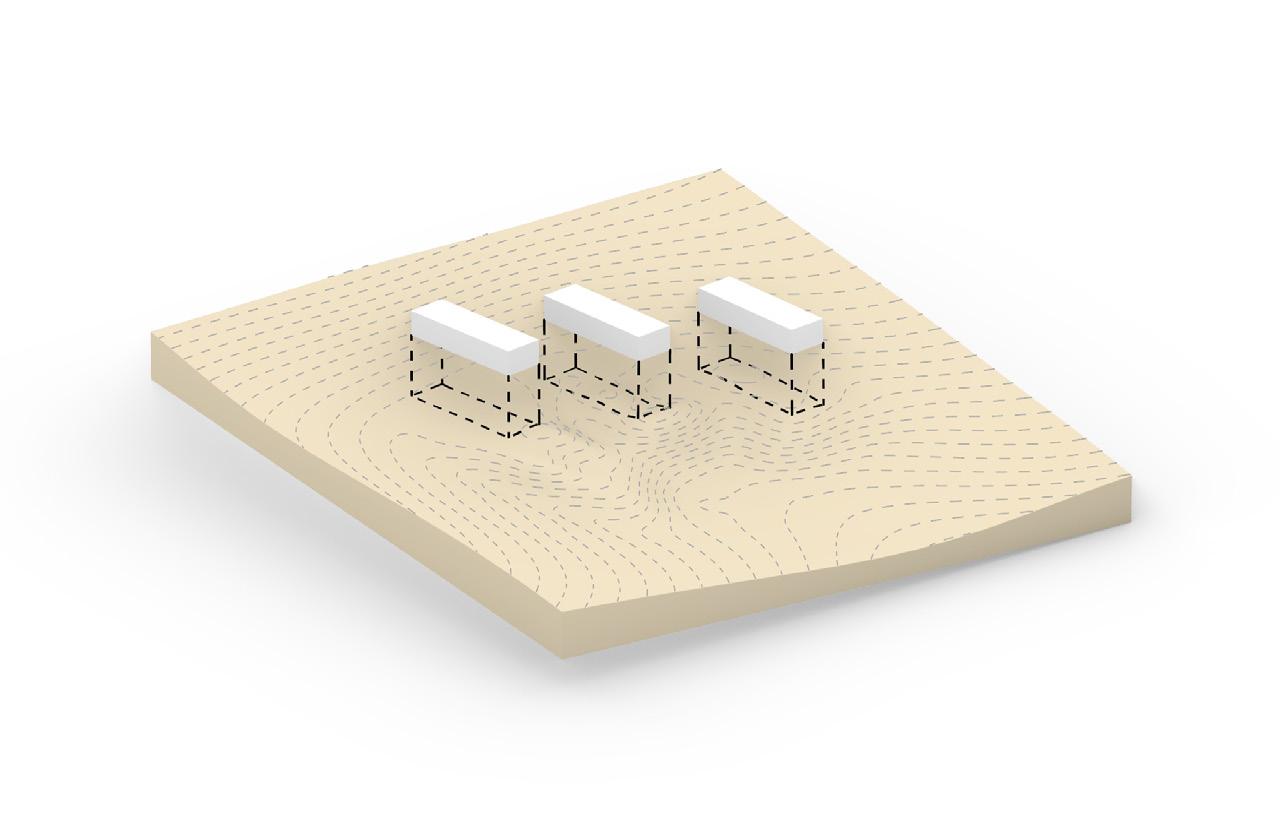
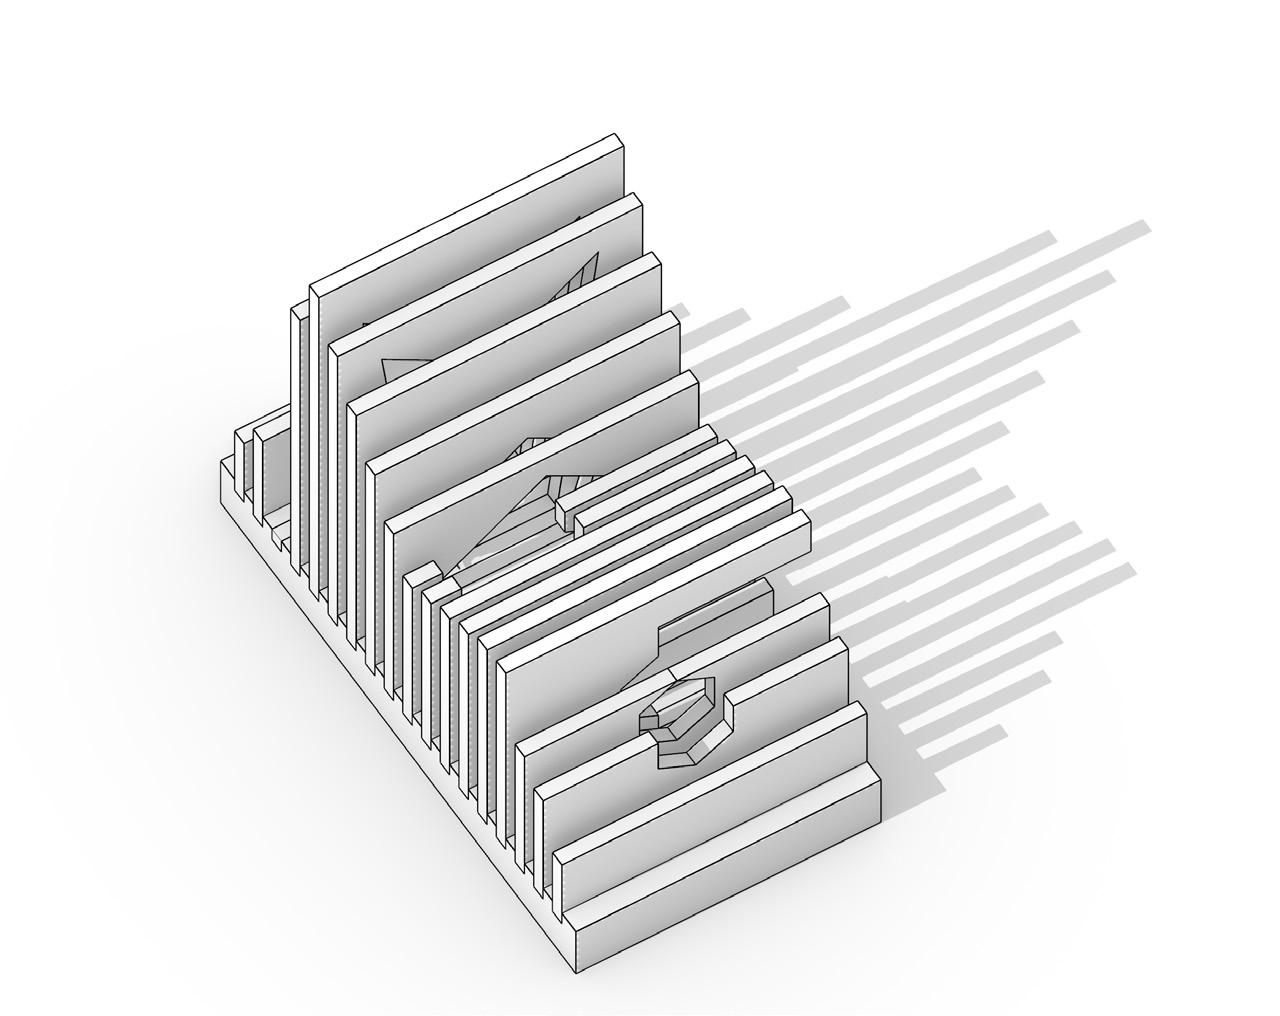
Modeling the topography was very interesting. I enjoyed being able to process any terrain into a topographical model, it seems very useful for future projects. There were no major issues for me in this part of the process. Adjusting the terrain to the built structures was more difficult. Subtracting from the topography was simple enough, but the additive part was more challenging.
I had trouble pulling up on the topography in an even manner, which caused some imperfections. Another thing I didn’t quite grasp is how potential water would interact with the topography and the building. I ended up creating some topographies that are probably not optimal in terms of water hitting the building. Overall I’m happy with the outcome even though it’s not perfect.


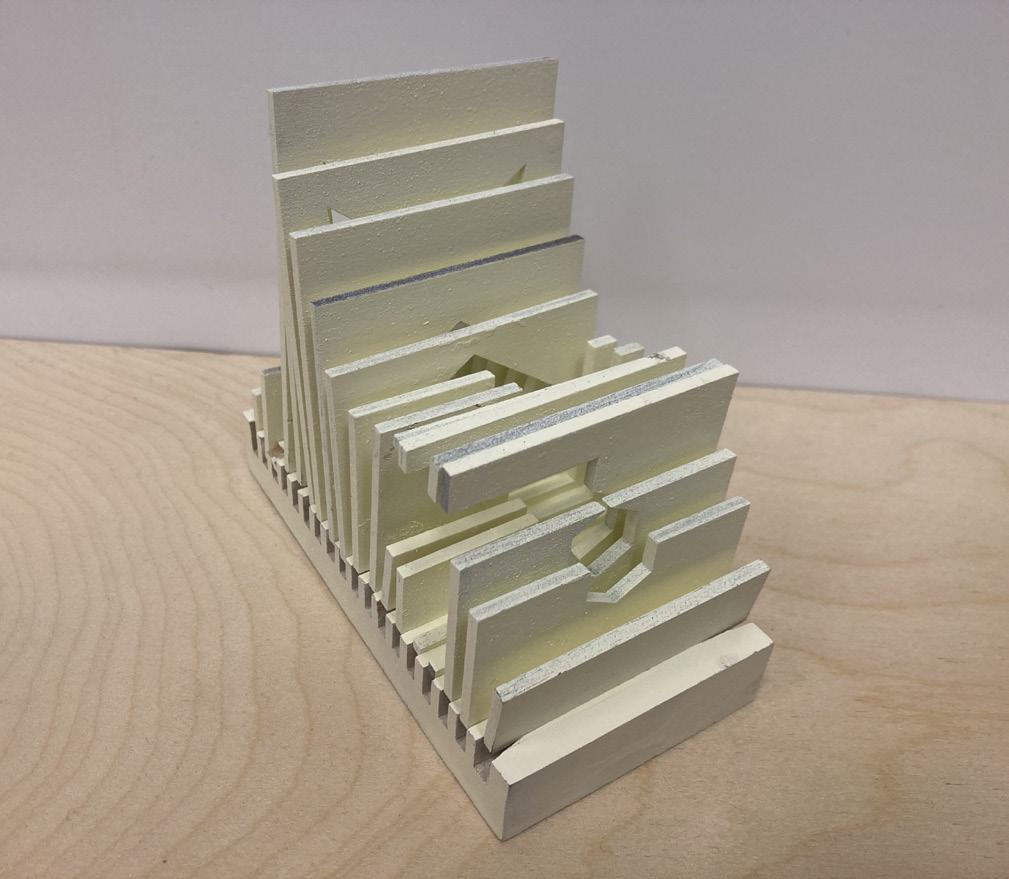
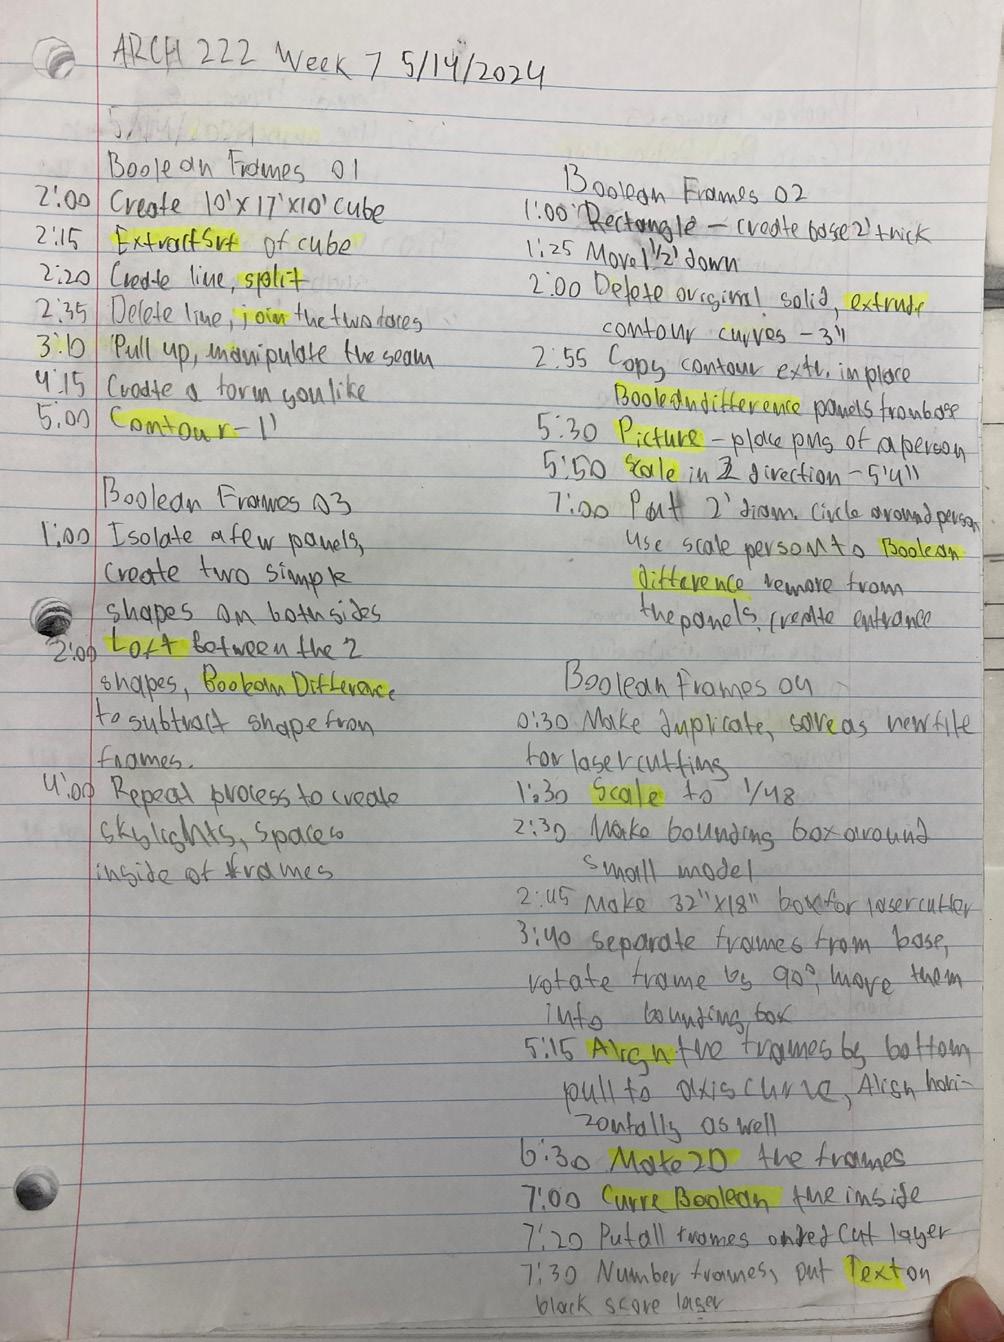
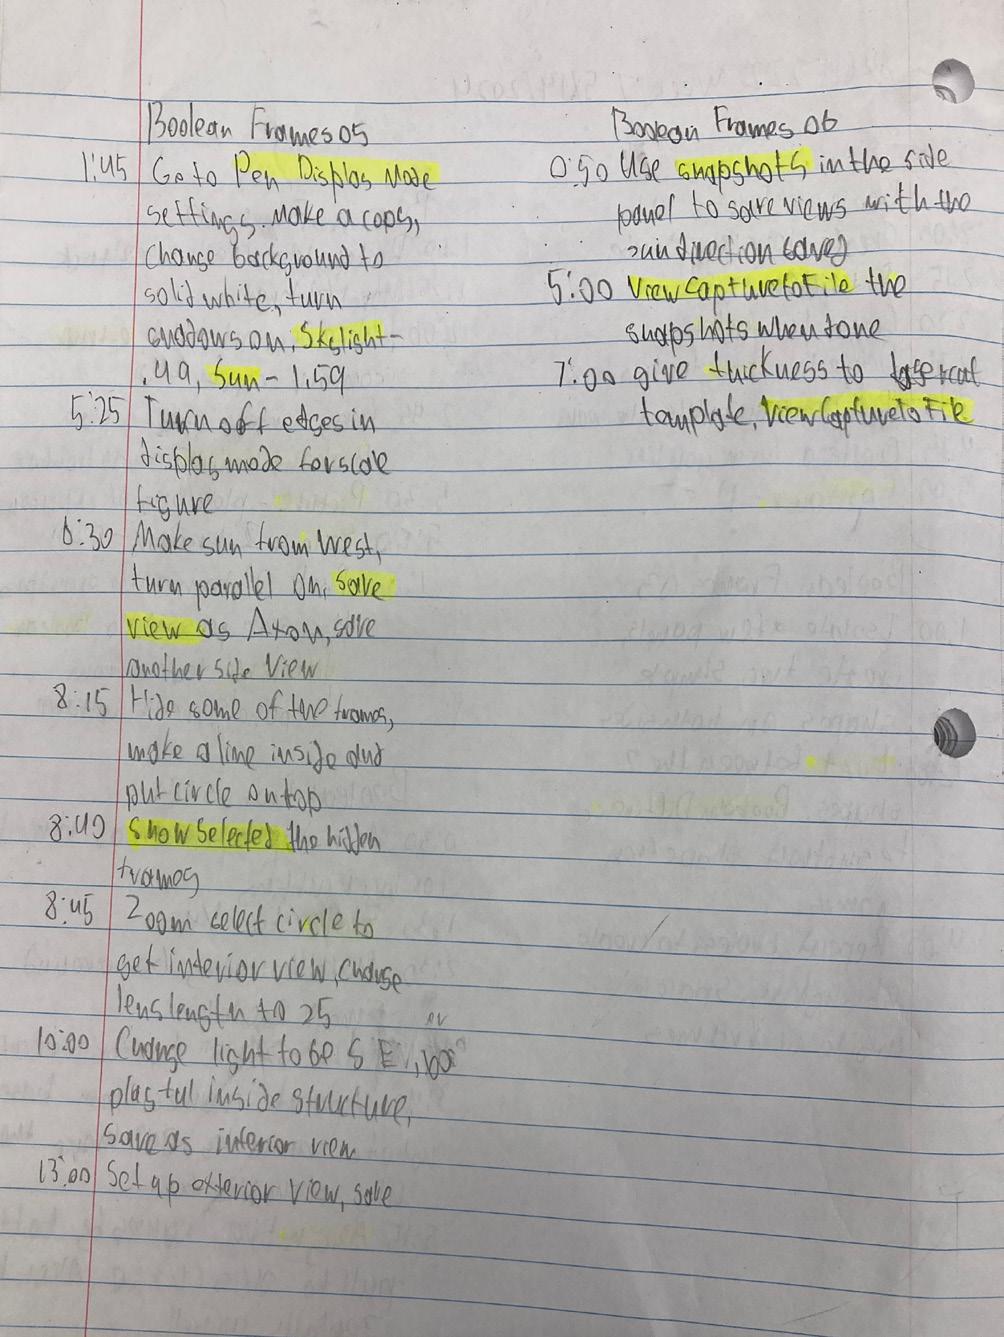
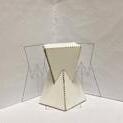
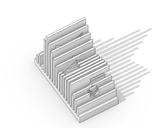
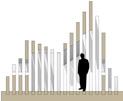
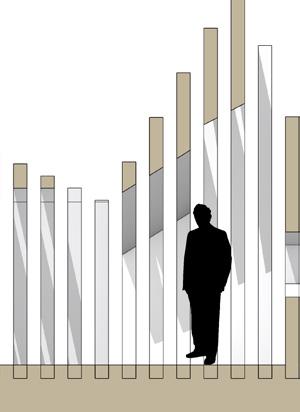
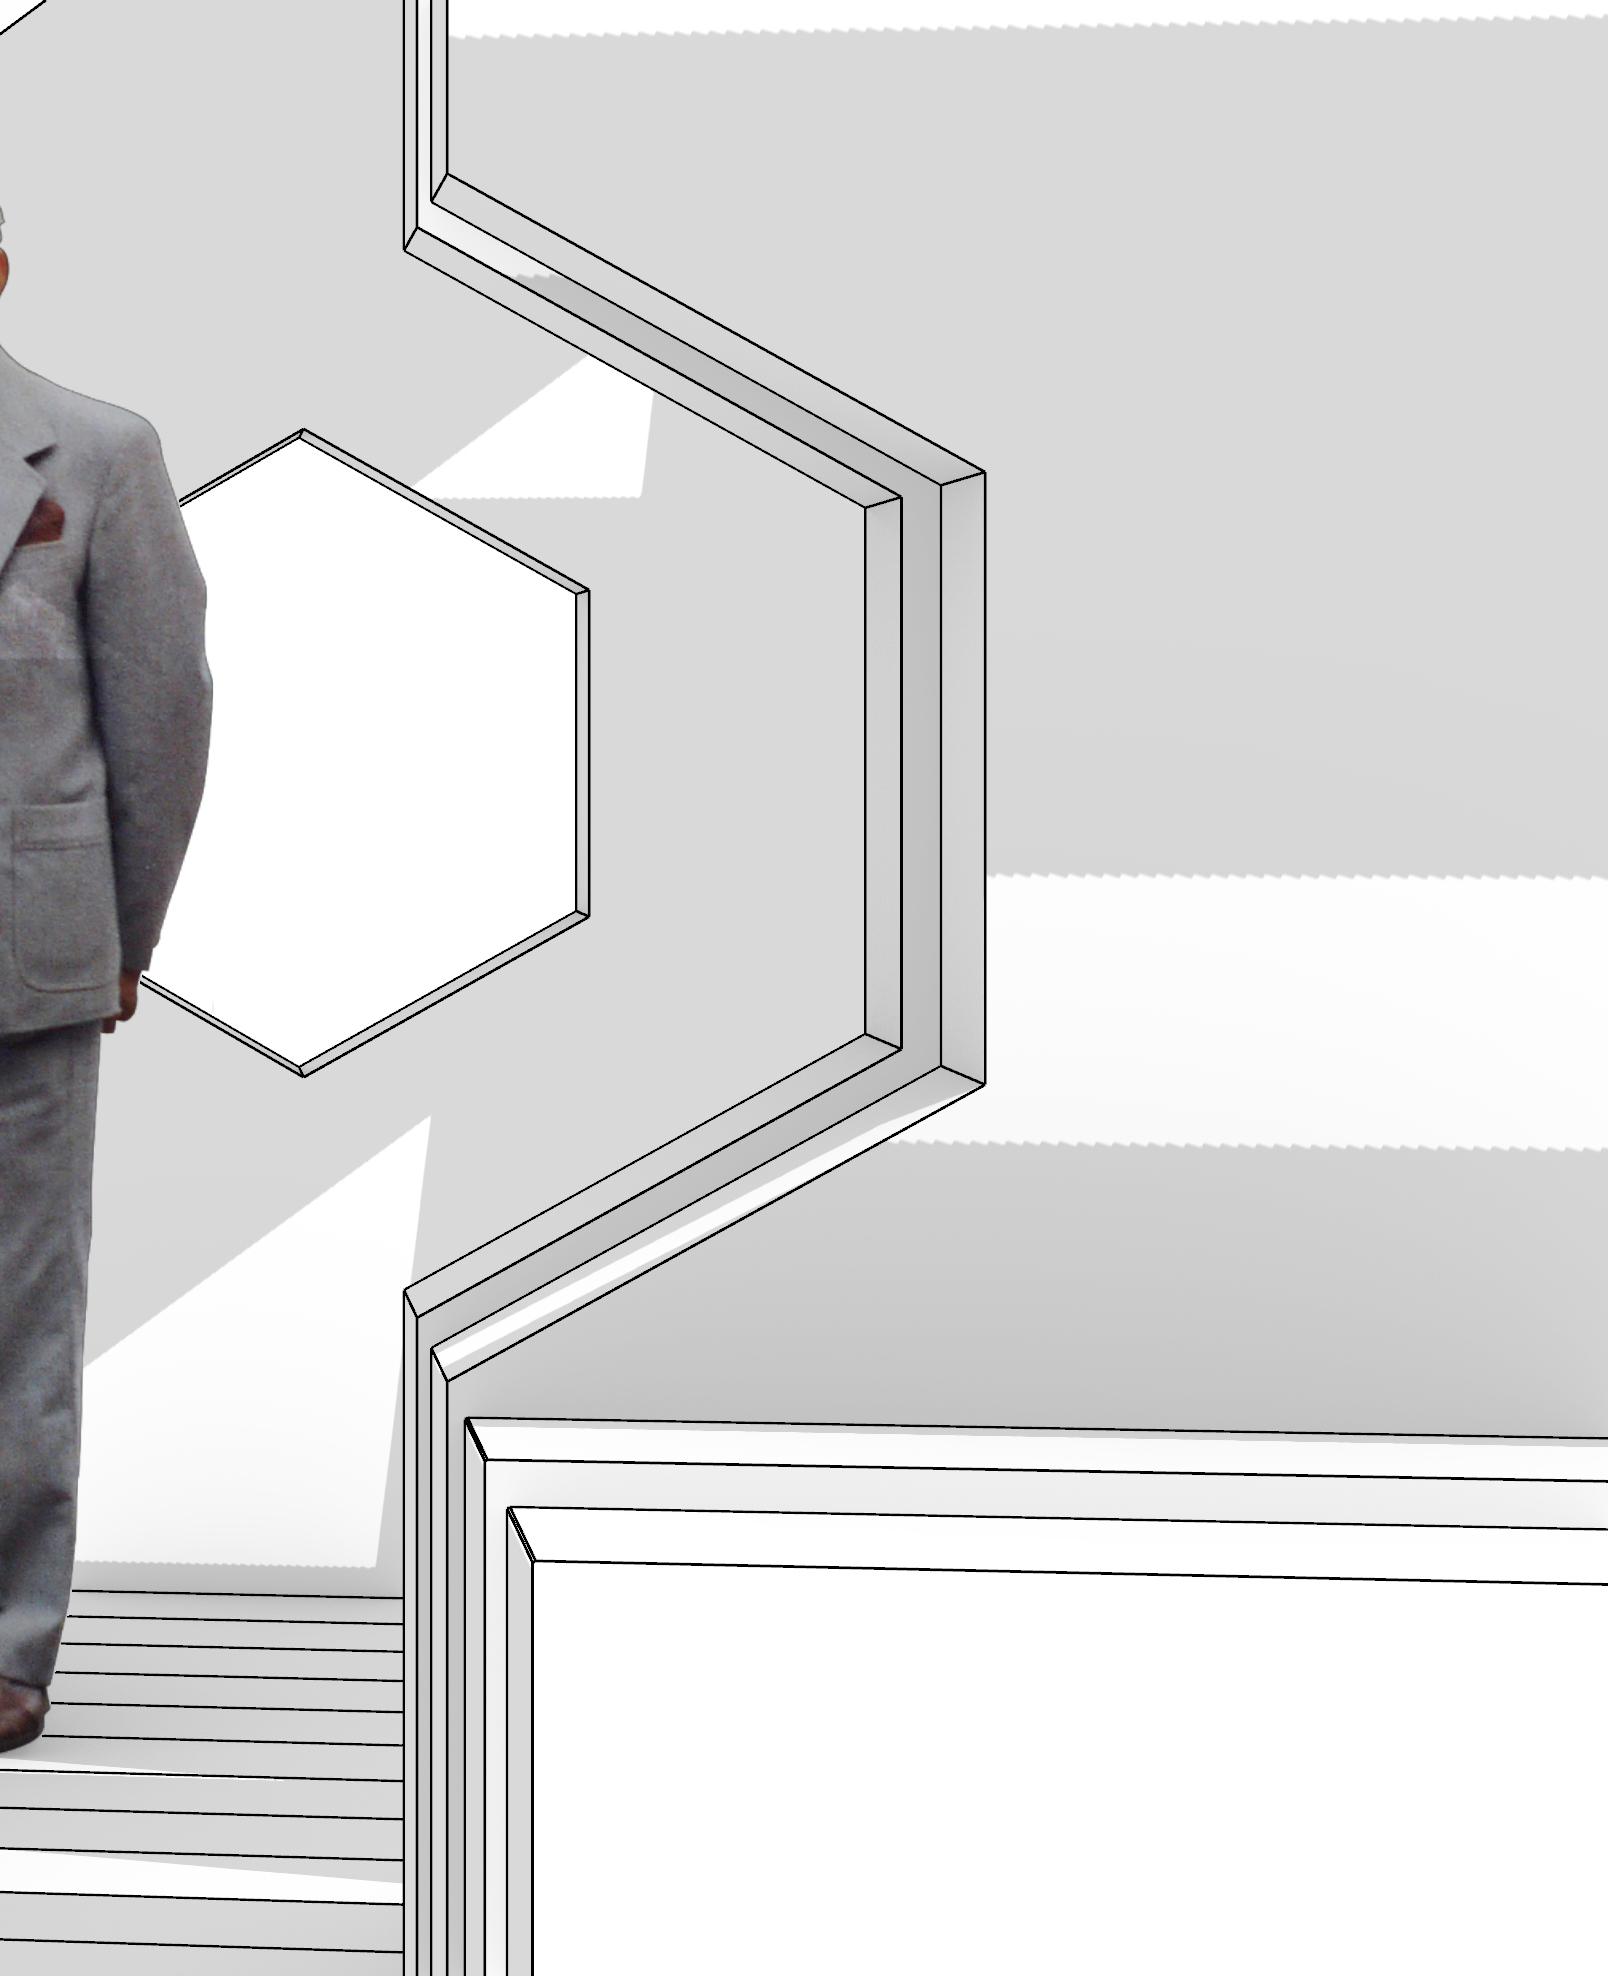
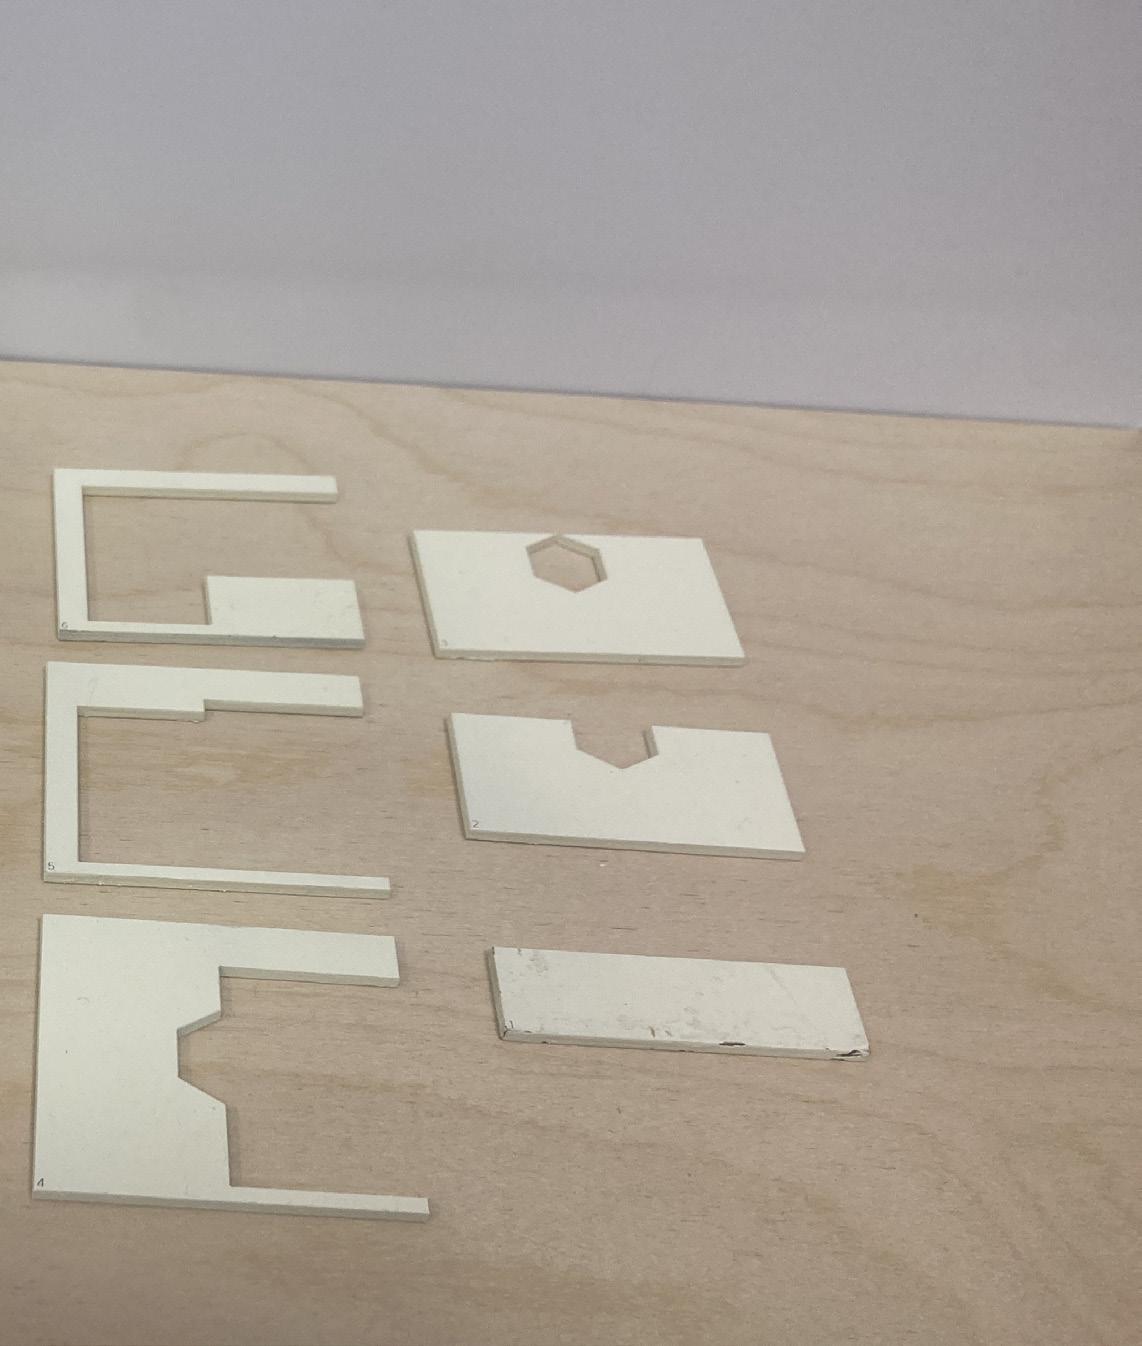
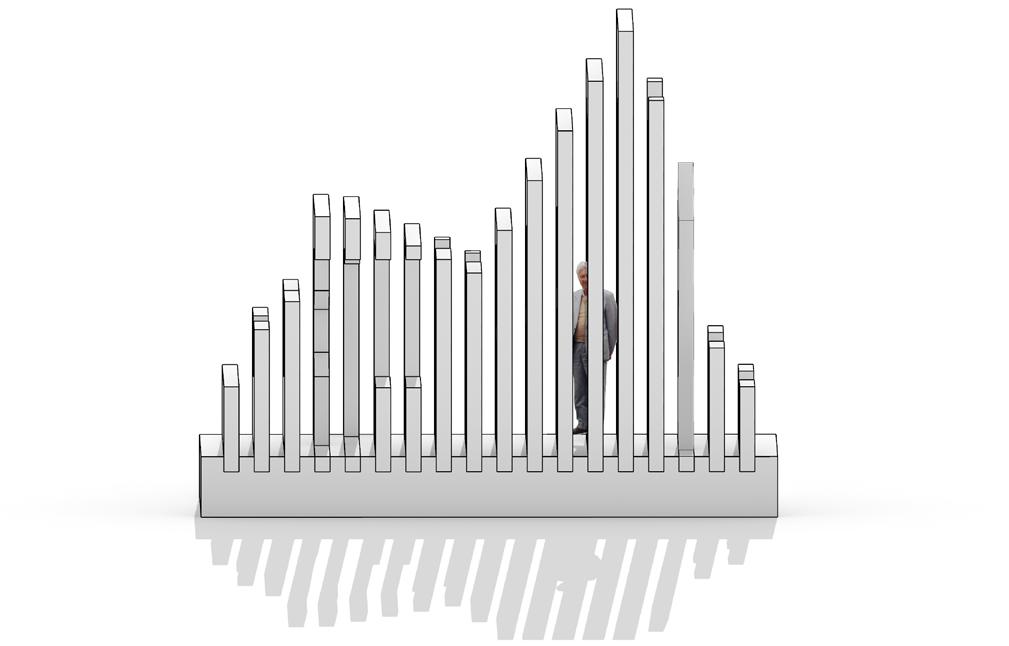
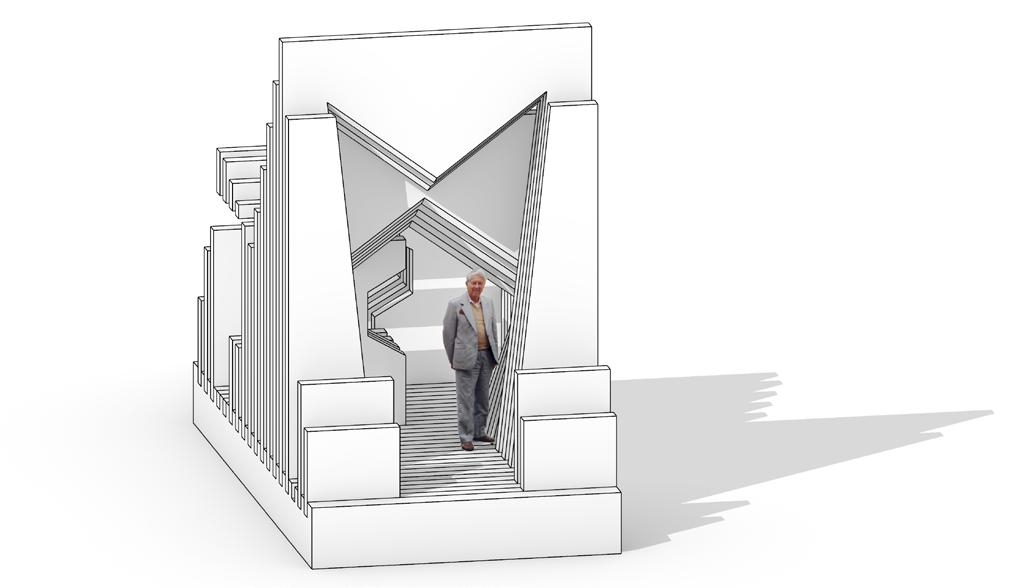
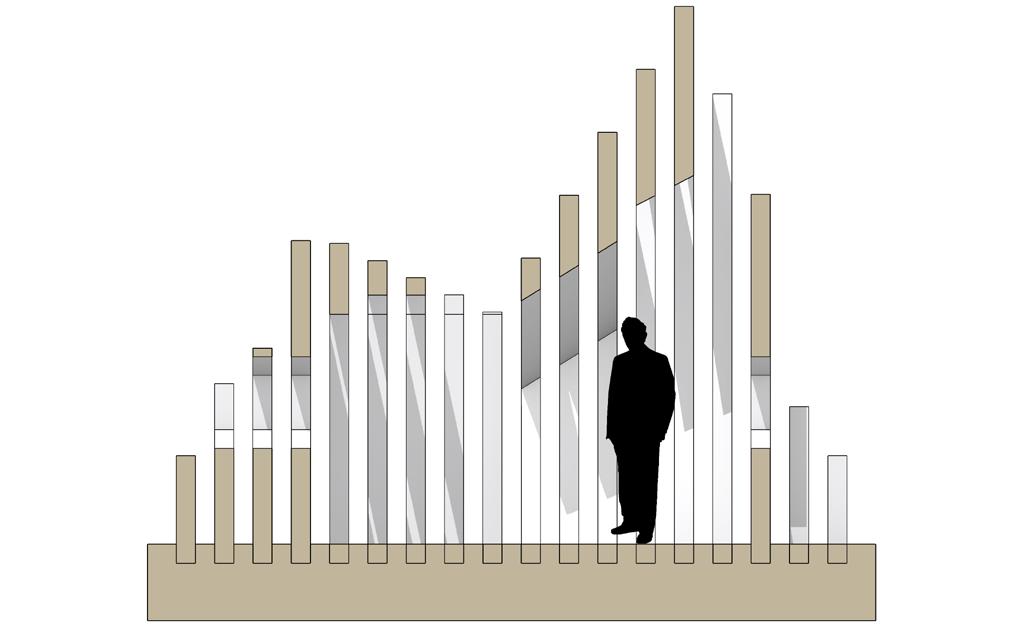
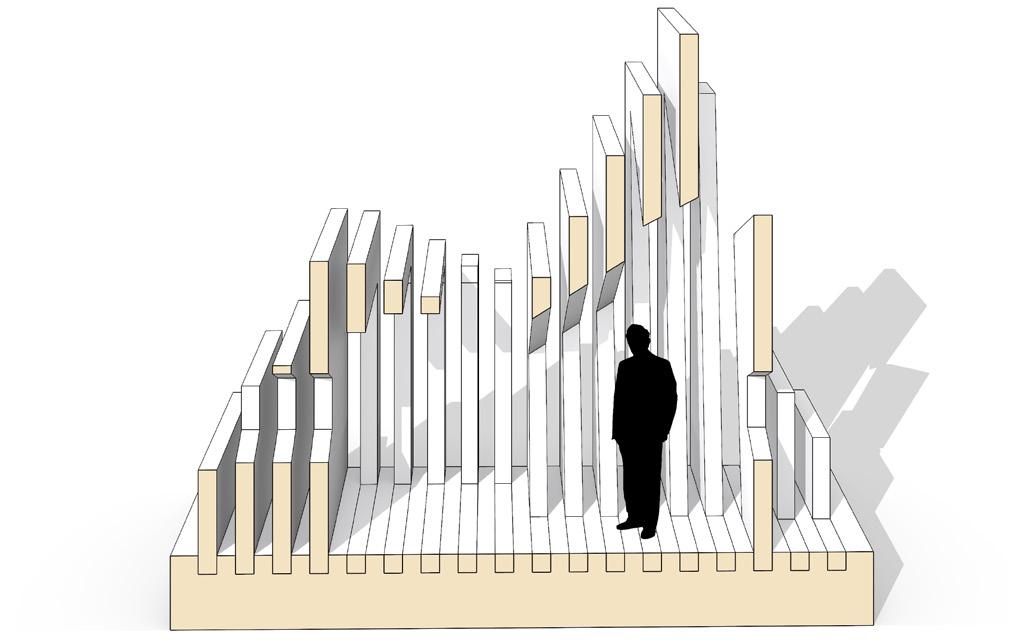
The modeling process for the frames was pretty straightforward. I was able to modify the surface through using seams to change the proportions, and used BooleanDifference to create a variety of spaces and openings within the model. One thing is that a lot of the spaces are pretty tight for humans, but I don’t think it matters much in this exercise.
I had some trouble manufacturing the base for the frames, and had to remake it two times. The jig setup at the woodshop
was pretty straightforward to use, but I messed up the spacing of the notches a few times. I was able to lasercut the frames without any problems, and I was able to put them into the base without any trouble. I did a few coats of white spray paint on the base and frames, which didn’t take too long. The only issue is that the color was a little more yellow than I expected and there were some imperfections on the frames from where the fresh paint struck to the cardboard. Overall, however, I was satisfied with the end result.


Willy Zybachynskyi Portfolio
Week 8
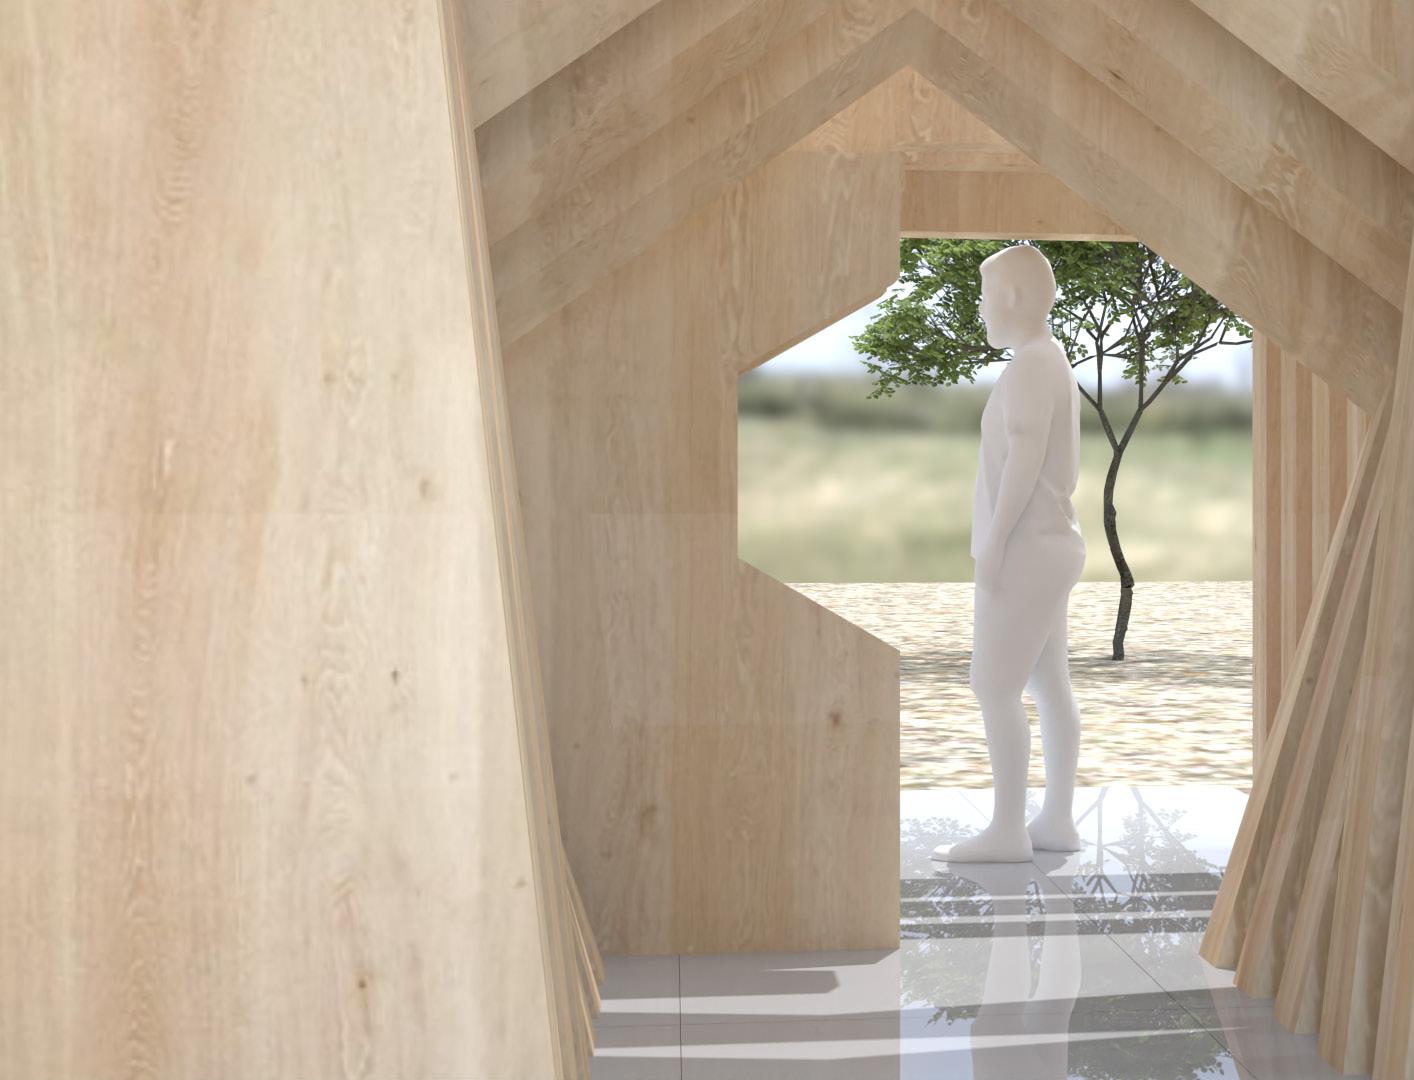
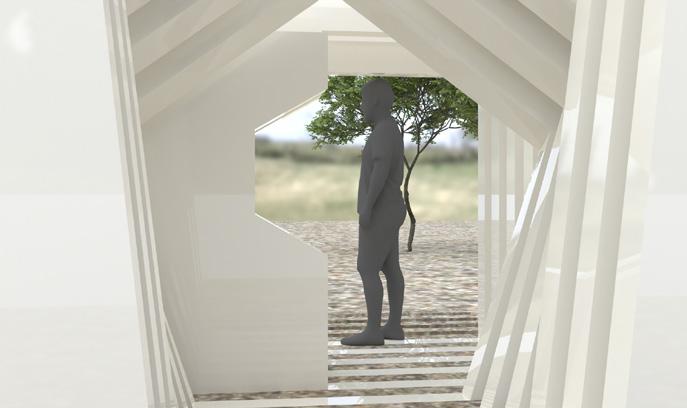
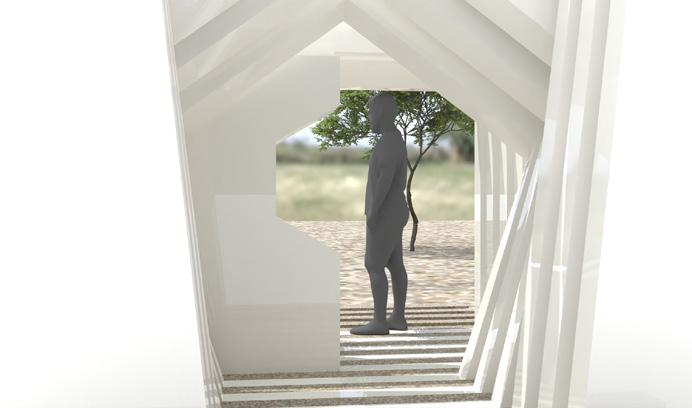
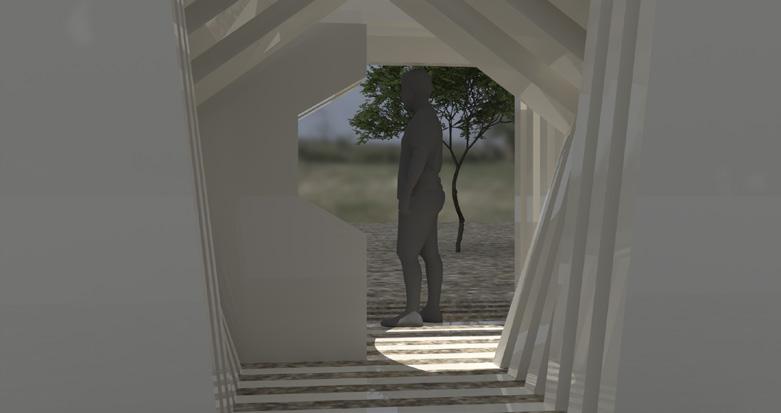
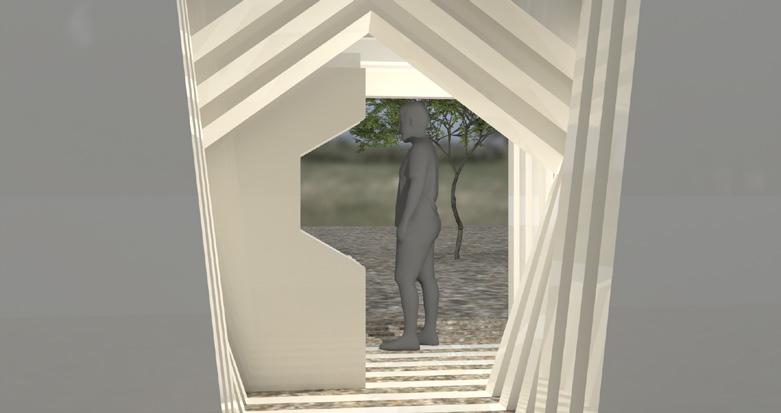
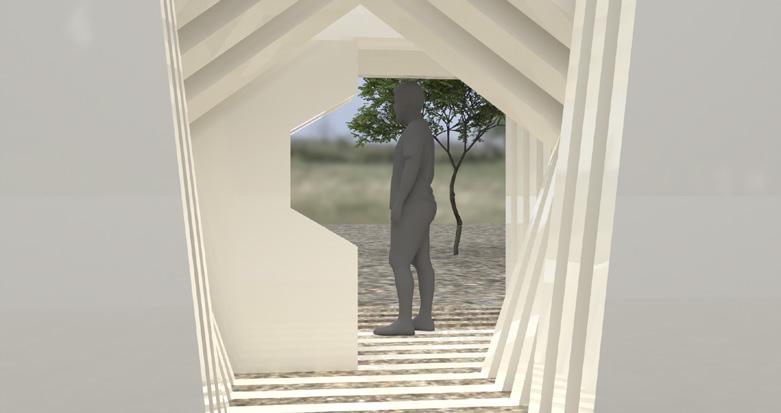
Rendering & Physical Model
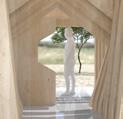
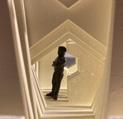
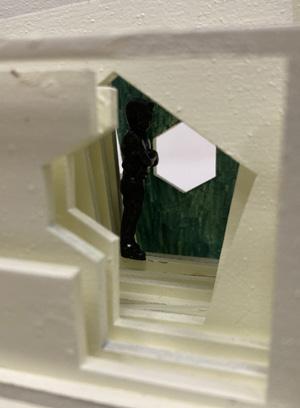
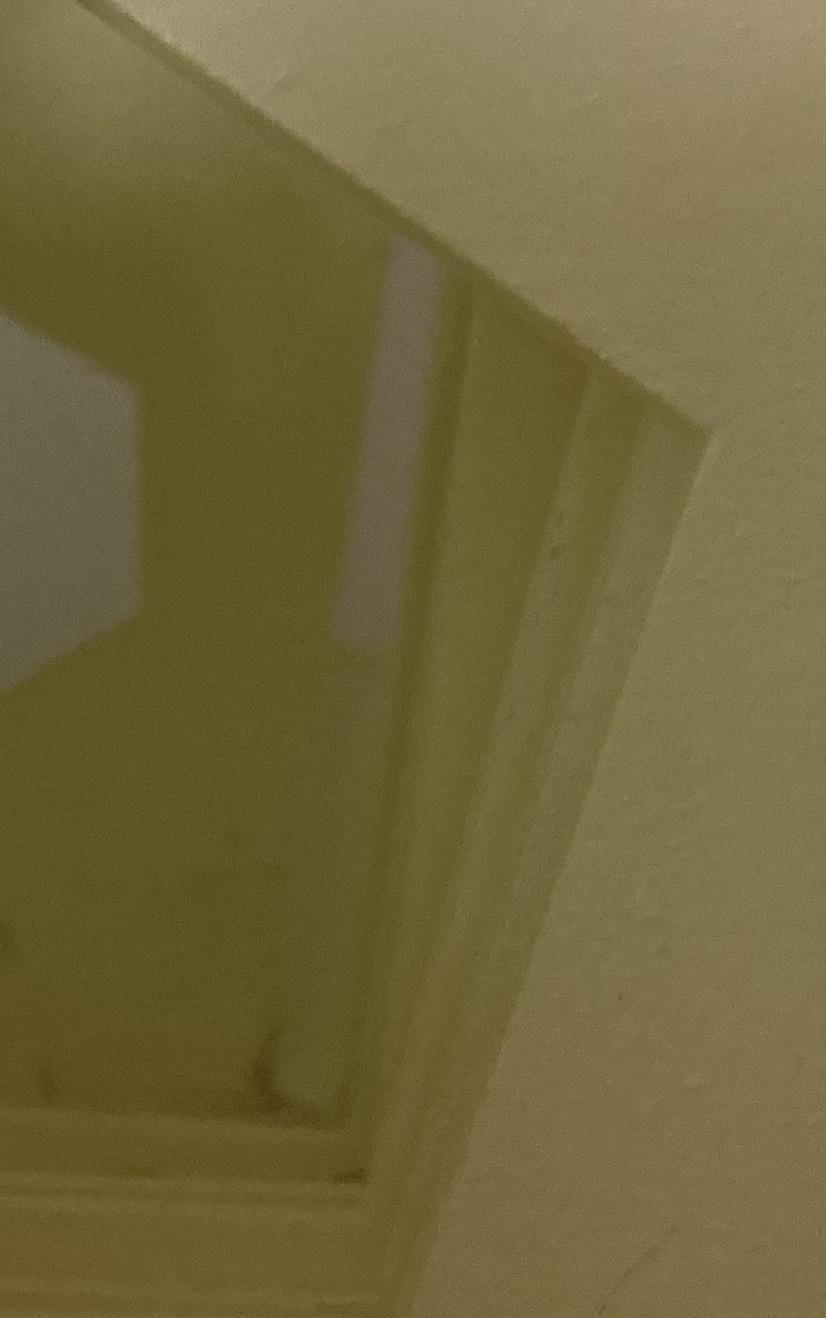
I really enjoyed exploring the rendering in this exercise. It was interesting to see what kind of models Rhino was able to produce. I did find out, however, that my computer was not really powerful enough to do some of the processing stuff. It took an hour to produce a high quality rendering, for example, and my computer was often very slow when the display was on raytraced or rendered display view. I was able to use the computer lab to do the renderings and do other high end work, but I will consider getting a computer with more processing power in
the future. I am happy with the end result of the renderings; especially the modeled material render I think looks really nice.
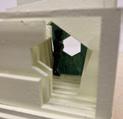
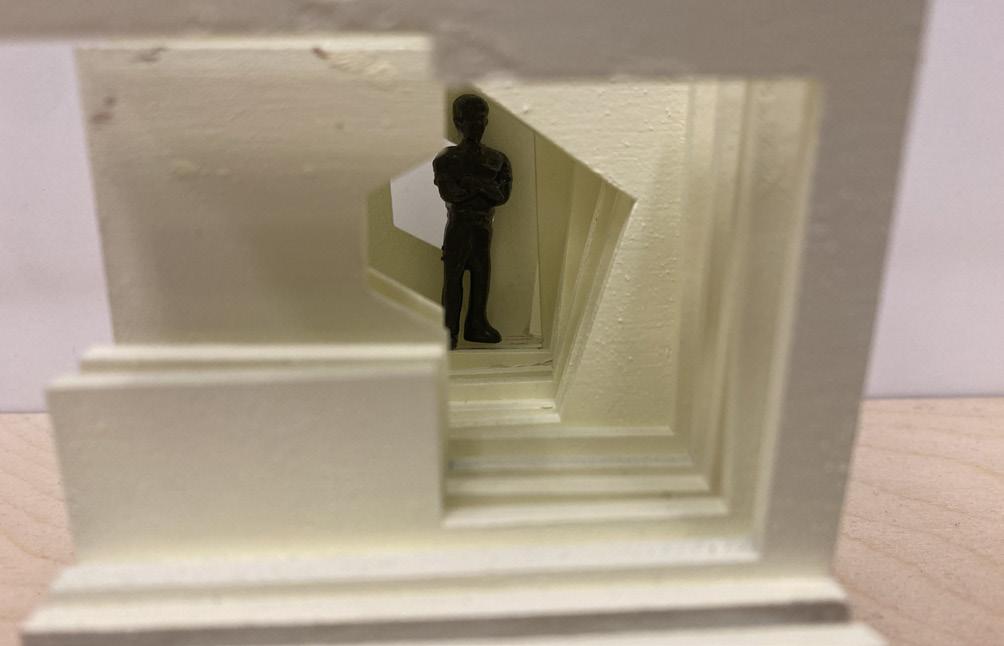
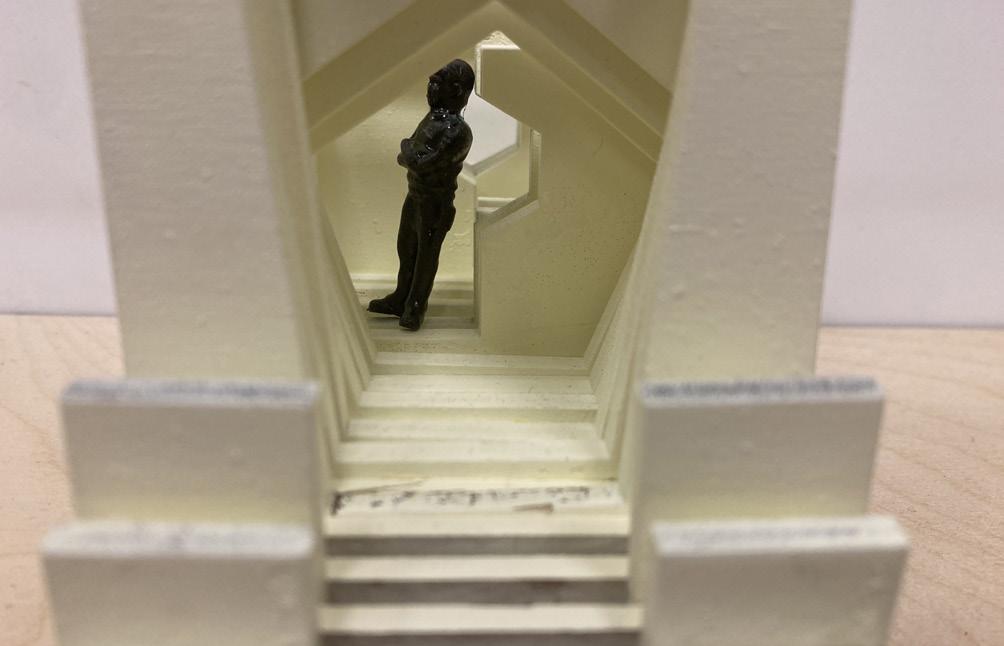
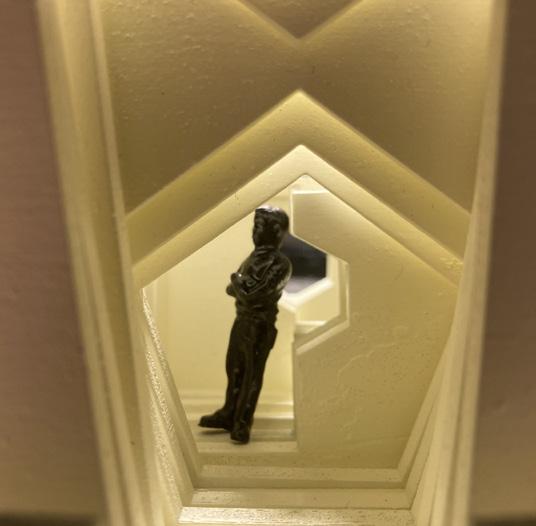
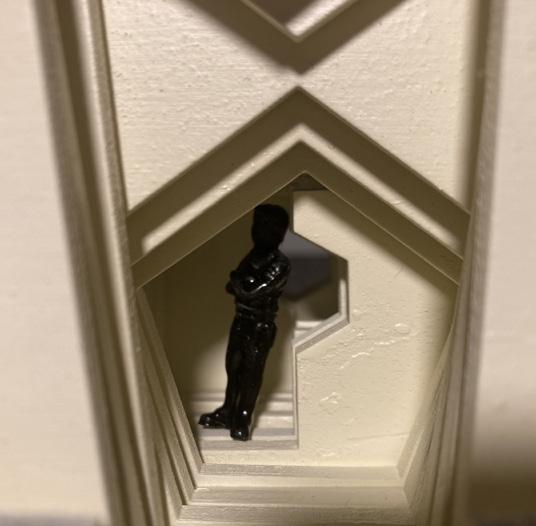
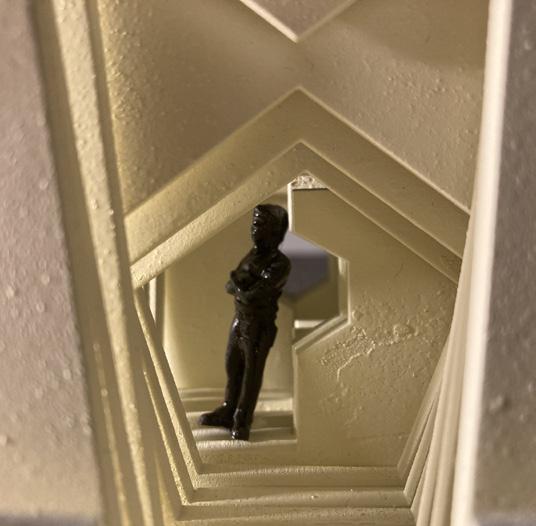
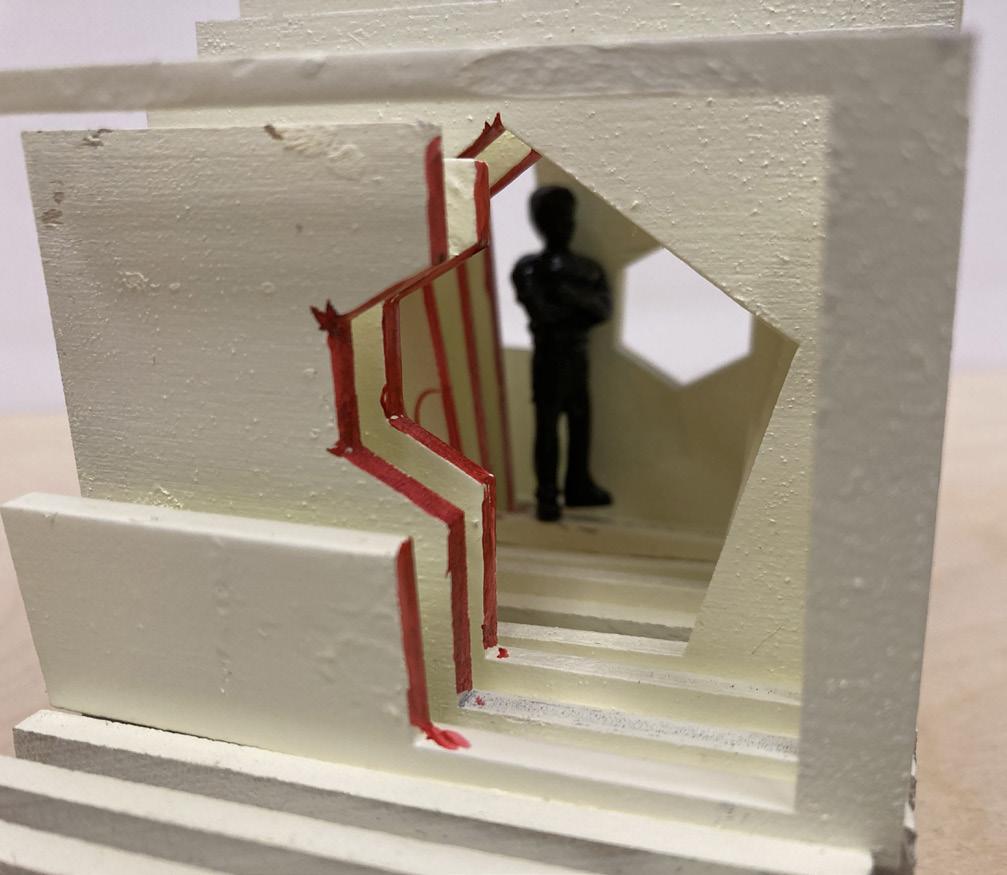
For the physical model, I used red and green markers to color the interior. The idea for this was to invoke a sense of calmness with the green, and a sense of excitment with red. They are complimentary colors so I was interested in exploring how they would influence the perception of the space, and how light would interact with them. In the end I think I achieved my goal and am happy with the result.
Images
Top Left: Sun & Material Render
Top Right: SkyLight Render
Bottom Right: Sun Render
Images Opposite Page
Top: Spot Light Render
Middle: Point Light Render
Bottom: Rectangular Light Render
Zybachynskyi Portfolio

Willy Zybachynskyi Portfolio
Week 02 Cory Olsen
Week 03 Nancy Chang
Week 04 Dylan Wood
Week 05 Ignacio Lopez Buston
Week 06 Philip Speranza
Week 07 Siobhan Rockcastle
I really enjoyed the guest lectures over this term. They brought in diversity in terms of expertise and experience and it was interesting to see the variety of courses offered at University of Oregon. It was good to see how many different fields of architecture are being explored by professors in various classes. The guest lectures also did a good job of showing how digital technologies are incorporated into professional architectural work, since all guest lecturers presented digital work in their presentations in one way or another.
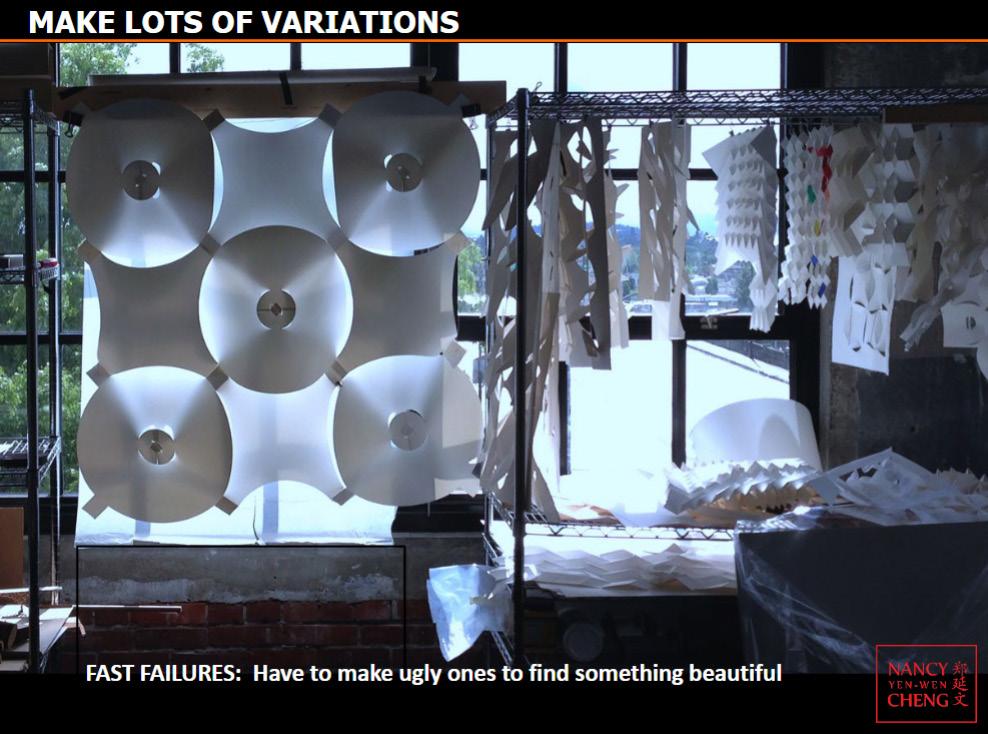
After listening to all the guest lectures, I am very interested in taking some of the classes the guest lecturers talked about. I am interested in taking a digital fabrication class like what Nancy Cheng showcased, for example. If there are classes that shape and use wood as a material like Dylan Wood showed, I would also be interested in taking that. I am also interested in taking a class that studies light like what Siobhan Rockcastle presented. Either way, I am looking forward to developing my digital technologies skills in any class I take.


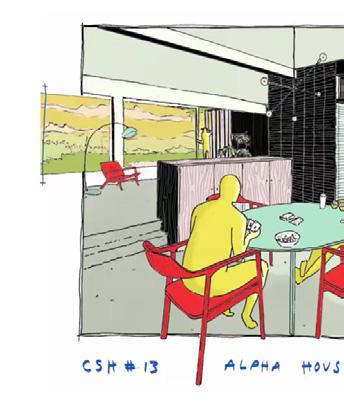
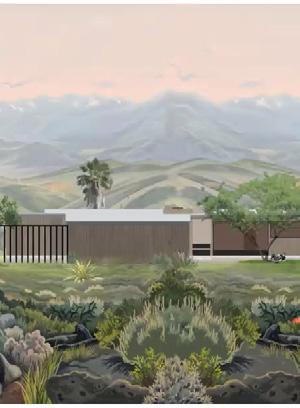
I found this rendering to be very appealing. It highlights the nature and the setting much more than the building itself, I wonder if that was the intent. I found it very interesting that the speaker talked about how the foreground is a wallpaper pattern that was mirrored to create all that nature. This makes me want to explore these combined media design methods in my drawings.
I found this rendering to also be sketching and drawing by hand modern standard in architecture This combination of media my hand-drawn work with digital encouraging that the speaker he is all about digital media, he drawings into his work.

be very appealing. I really enjoy hand but I understand that the architecture requires digital media. encourages me to combine digital design. I also find it very talks about how even though he is still able to integrate hand
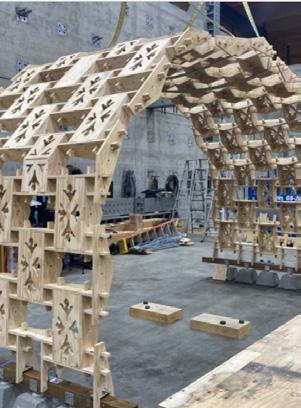
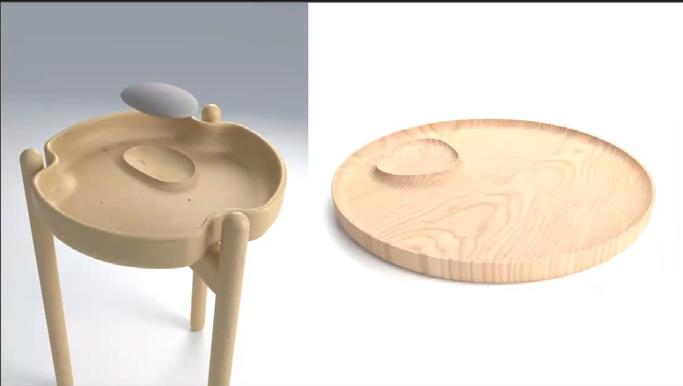
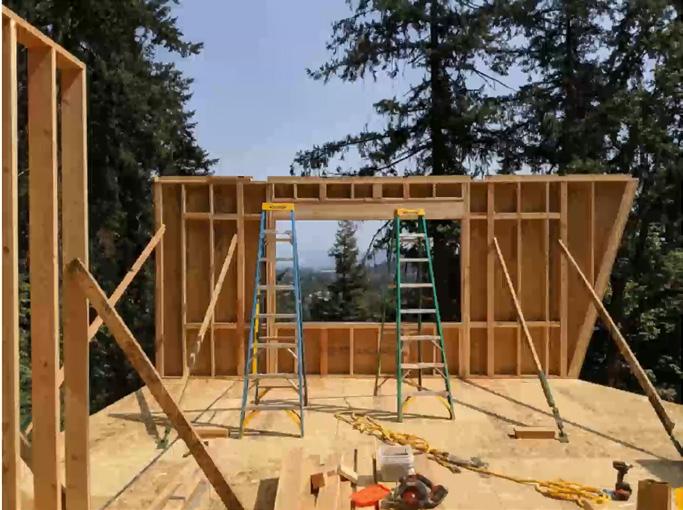
I found this project very interesting because it shows how something designed digitally is made in the real world. This shows the transition between digital drawing and the model/ actual product very well. I can see that the unusual digital design was recreated 1:1 in the real world and I am interested in exploring that process in my work.
I found it very interesting when the guest speaker talked about her design process at the beginning. She made many iterations using different commands, which is basically the same thing we’ve been doing. I find it encouraging that an architect at the professional level is still doing the things we are being taught right now. I am not super interested in the origami itself, but I would be curious to hear more about how she incorporates this process into architectural creations.
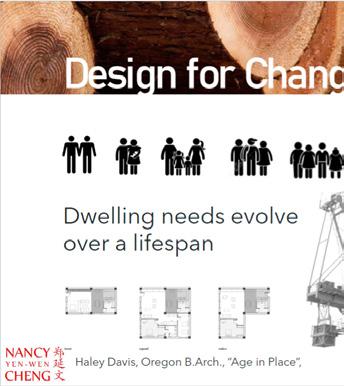
I find the adaptive reuse discussion very interested in reusing old material is a lot of waste currently. I find you can add rooms onto very how practical it would be. Overall discussion around re-using existing definitely something I want to architect.
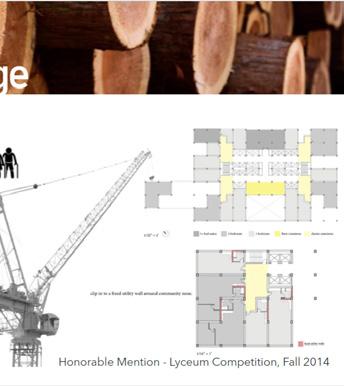
discussion very interesting. I am material and I agree that there find the idea of an apartment very curious, although I wonder Overall I am very inspired by the existing materials, and this is to explore when I become an
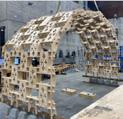
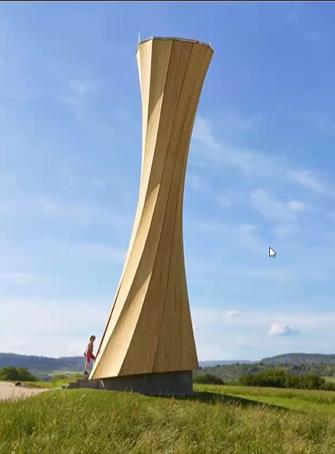
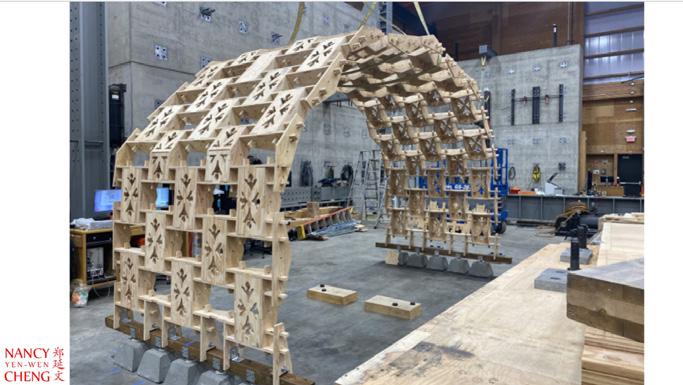
I find all the lessons learned/outcomes very interesting. This sort of hands-on, practical building project is very inspiring to me and something I want to engage in in the future. Machining constraints, iterations, and materiality are something I will consider in my future projects. I also find it interesting that they didn’t use any nails or separate joining pieces, it’s all just interconnected. I wonder how practical that approach is in full-scale architecture.
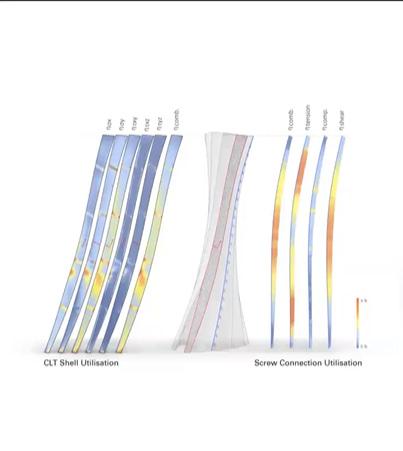
I am interested in the discussion about the combination of digital modeling and physical materials. It makes me think more about how different materials can be used in a building. I agree that some materials are more useful for certain shapes than others, and I am interested in seeing which materials are best combined with which digital modeling methods. Currently I know, for example, that thin materials that don’t have very complex shapes are good for the laser cutter.
I am interested in the discussion different shapes than just the think about how materials can how digital design can assist with structures that use wood this in seeing it implemented. Also, of mass timber in America could haven’t seen what architecture it’s also interesting that other long time. I’m from Ukraine, for very first permanent structures difference in that is interesting.
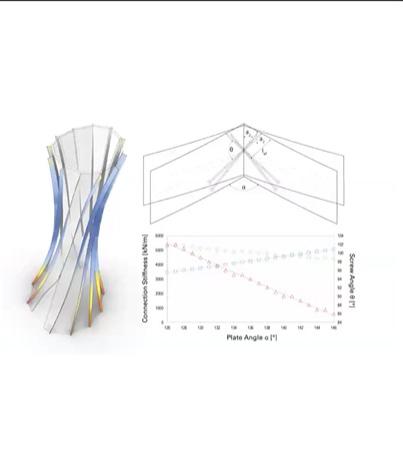
discussion about making wood into standard square. It makes me can be pushed to their limit and with that. I haven’t seen many way so I would be interested Also, I would agree the future could be exciting because we architecture it leads to at a large scale. But cultures have used wood for a for example, and some of our structures were timber, so the cultural interesting.
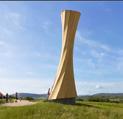
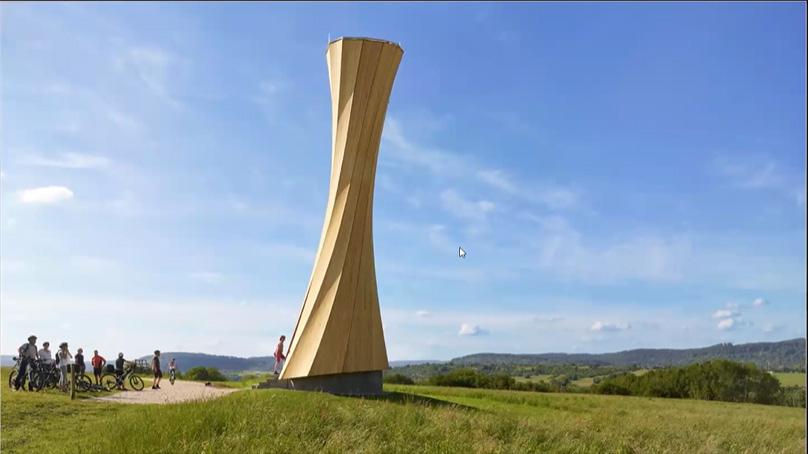
This final version of the mass timber structure is interesting. It seems like a proof of concept that shows how timber can be pushed to its limit as a material. It would be interesting to see more structures like this in architecture.
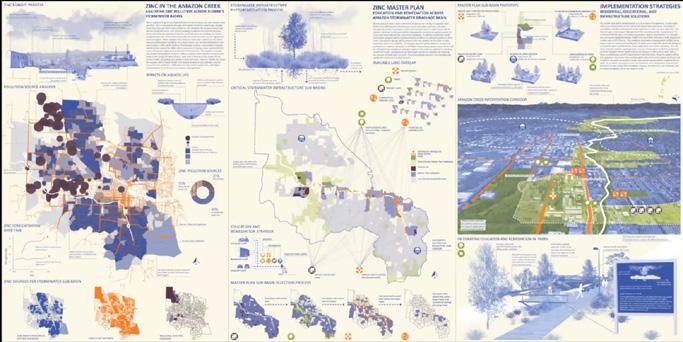
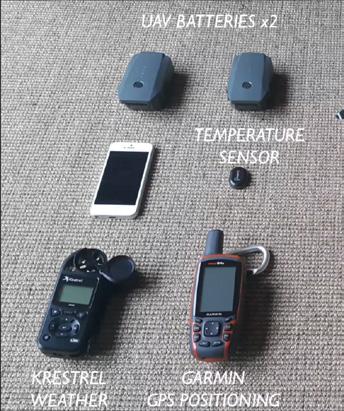
The use of digital technology in landscape architecture is very interesting. It seems like a lot of information is captured and shared in these renderings. I wonder what the process is for this, and how technology assists in understanding the landscape. I would be interested in exploring this during my career.
The use of drones to understand interesting. A drone seems very of information about the site. drone photos seems like a cool common it is to use drones to the professional field. I am also are translated into models that
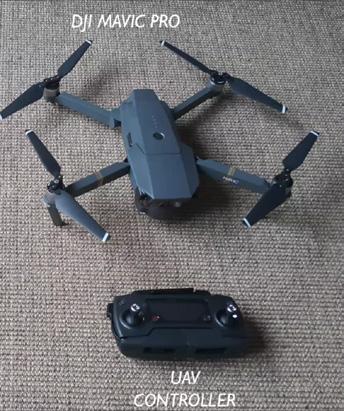

understand the landscape is also very useful in capturing a lot site. Creating a 3d model from cool exercise, and I wonder how to understand the landscape in also curious how drone photos that convey other information.
The discussion about the necessity of digital methods during the design process is interesting. This is something I have been racking my brain around during studio; I am not sure at which point I should start digitally modeling. I enjoy sketching and drafting by hand very much but I understand that using digital tools is necessary in the professional field. I wonder if there is a distinction between which software you should use at what point in the process (AutoCAD vs. RHINO vs. Revit).
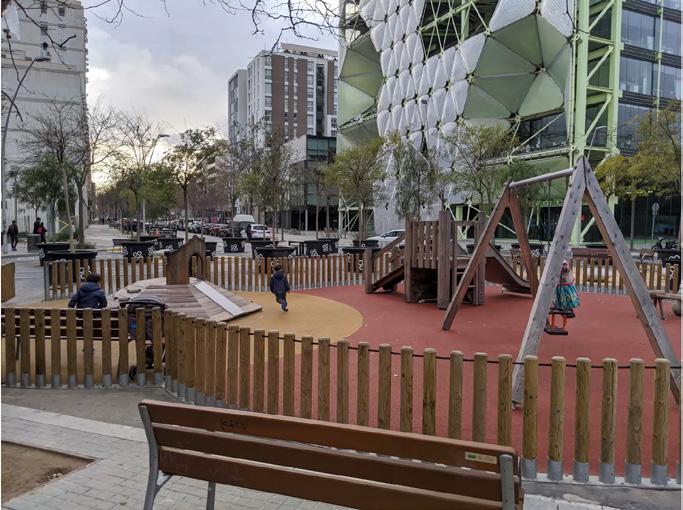
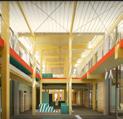
The idea of making more spaces for people in an urban setting is very interesting to me. It’s very cool to see urban spaces that are very dense be organized so that there is still enough room to accommodate all pedestrians. I am curious about how this idea could be implemented city to city, and what challenges different urban environments offer.
It’s very interesting to see a house in a dense urban environment. and humid so it is very inspiring without the use of electricity. If technology like this the problem I wonder what kind of computation and assessing the effectiveness wonder if the building is able to without electricity.
house with no air conditioning environment. Big cities can get pretty hot inspiring to see that being mitigated If more buildings incorporated problem would probably be better. computation goes into designing effectiveness of something like this. I also to store heat during the winter
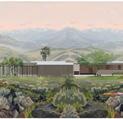
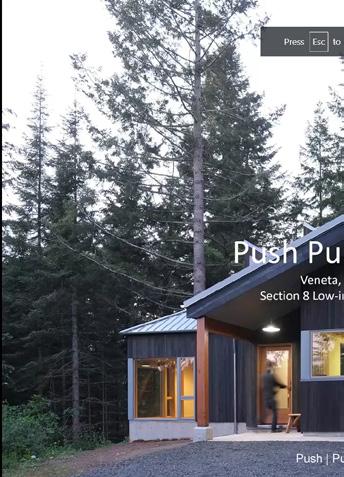
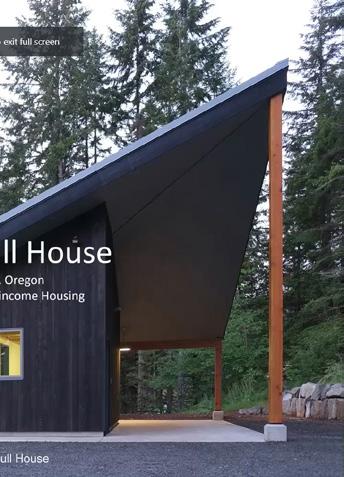
This hands-on practice of architecture is very interesting to me and is what I aspire to practice in the long run. I don’t think the building shape looks that appealing, but it seems like there are practical reasons for its shape. I wonder what decision-making went into that, as well as for the odd placement of the windows. I like how it’s set within the topography, it makes it look like it’s rising as part of the bedrock. I also wonder how this house does with natural heating and cooling systems.
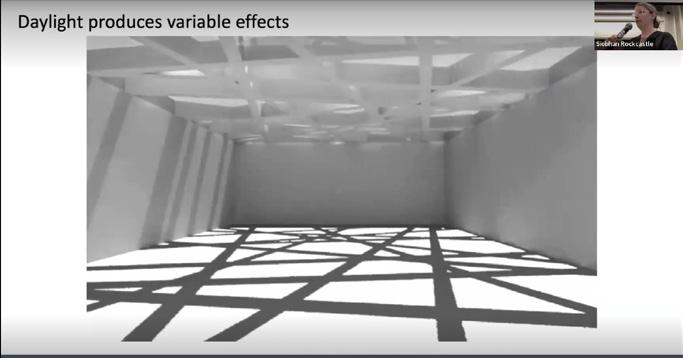
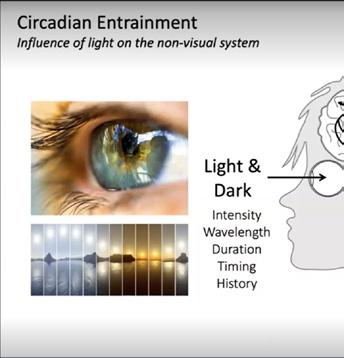
It was interesting to hear the speaker talk about how volatile natural light is. We did a project last term that had to do with mapping the shadow and light, so I definitely agree. I wonder how digital technologies can help account for this volatility.
It was interesting to see the speaker ways in which sunlight impacts experience. I never thought of to think of light as impacting many other aspects of our experience wonder how this can be accounted designing a building.
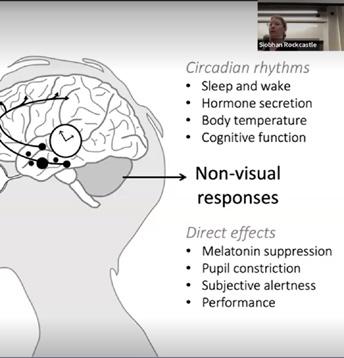
speaker talk about the various impacts the human brain and it that way, so it is interesting impacting not just what we see but so experience as well. It makes me accounted for and modeled when
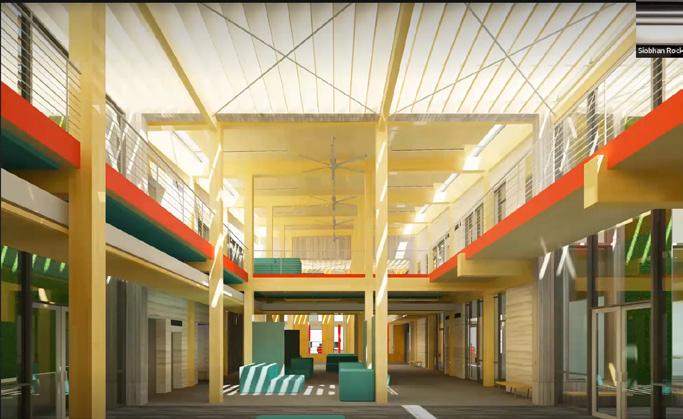
The project of the grad student looked very impressive. It is sort of intimidating how many details there are in his models. The introduction of sunlight into the modeling also looked very impressive. This is similar to what we’re doing right now with the various light renderings for our project. It was especially interesting to see how different materials interacted with the light, letting it bounce or absorbing it. I also wonder how Rhino differs from Revit in terms of introducing light into modeling. So far it seems like Rhino is more so the tool used for sunlight renderings.
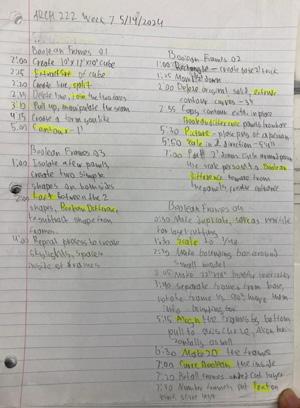
Time Management Schedule
Both of the extra credit assignments were helpful to me. The schedule helped me consider the time I have in a week and how to manage it in order to maximize the amount of work I can get done. Although in all honesty, I can’t say I followed it very well. Especially near the end of the term it was harder to stick by it.
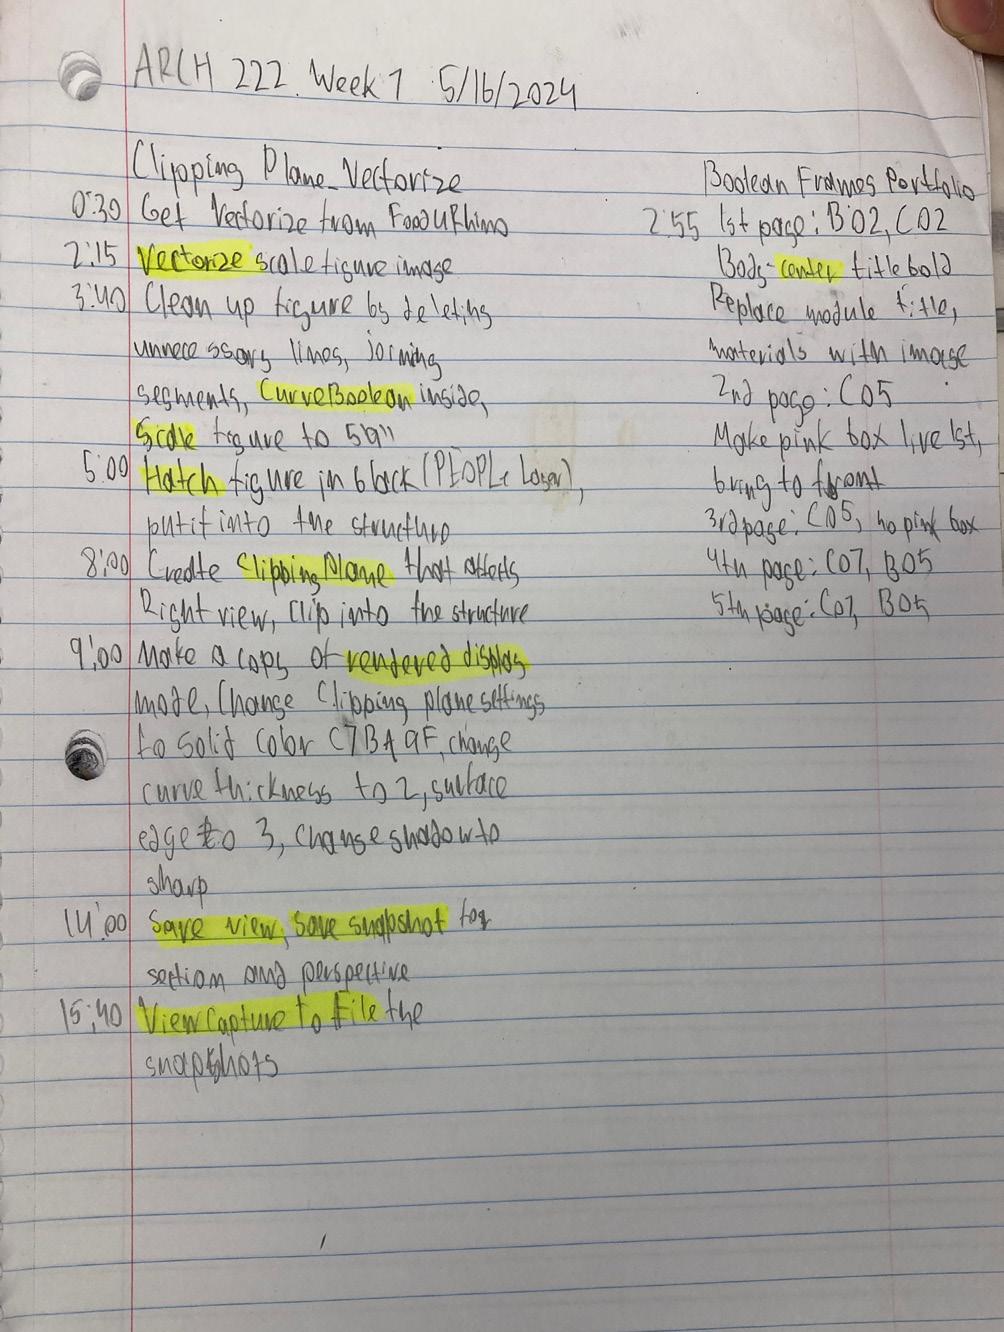
The handwritten notes were also very helpful. It helped me memorize the content of the videos and it was nice to have something to look back to for directions without having to rewatch the videos all over again.
ARCH 284(study) ARCH 222(study) PPPM 201
Sleep Jiu Jitsu Gym
FBD club (blank space is commute)
Typical Week Plan Year & Term: Spring 2024