Design and Validation of a Light Vehicle Tubular Space Frame Chassis
Poula kamel, George A. Fayek, Ibrahim Gafar, Ahmed Saad, Helwan UniversityAbstract
ThisworkpresentsthedesignofanSAEBAJAspaceframe based on static finite element analysis. The design of such an off-road vehicle is intended to achieve extreme performance objectives in terms of safety, durability, rigidity, and reliability. First, the frame structural members are selected according to BAJA rules, and it is alsoconstrainedbythematerialavailabilityinthemarket. Then,acomparisonsetbasedonvon-missesstresscriteria between analytical and three numerical models is constructed. Consequently, the one-dimensional beam element mesh is found to be more efficient regarding computational time and accuracy of the results. However, the engine-frame fixation plate is modeled using twodimensionalelementsduetotheplategeometry.Secondly, the3DmodeloftheframeisconstructedusingSolidWorks software, and the simulation of various loading scenarios includinginertial,impact,andframetorsionalrigiditytests are implemented using Static Structural Analysis System. Several vehicle parameters are utilized to simulate roadvehicle interaction. Longitudinal and lateral vehicle load transfer as a result of powertrain acceleration, braking deceleration, road grade, and rotational acceleration are considered in the inertial loading tests. Moreover, front, rear, side-impact, and rollover tests are conducted using an equivalent static system to model the possible crash scenariosforthevehicleframe.Furthermore,thetorsional stiffness of the vehicle structure is obtained to ensure a safeframetwistinglimitresultingfromroadirregularities. Finally, the simulation results indicate that the proposed vehicleframecanbeoperatedsafelythroughtheexpected road conditions. Therefore, the developing of the vehicle framethroughthemanufacturingprocesscanbeexecuted.
Introduction
SAE BAJA is an intercollegiate competition in which many engineeringteamscontesttoachievecertainrequirements and performance for an off-road vehicle. These requirements include clear rules that attain fair competitive levels and ensure vehicle driver safety. However, a trade-off between the vehicle frame rigidity and weight must be considered. Since engine capacity is pre-determined by the rules [1], the vehicle frame weight represents a crucial role in the overall vehicle performance.
Many research studies discussed the key factors of the design, simulation, and implementation of the SAE BAJA vehicle frame as in [2], and [3]. Most of these studies discussthecompetition’smainconcern,whichisthesafety of the vehicle driver as in [4], [5], and [6]. Weight reduction of the frame design is also one of the most important design considerations and could be achieved through many strategies such as minimizing secondary members, and frame design optimization [7], and [8] Moreover, A modification for Structural rigidity enhancement is analyzed in [9] by using additional strengtheninggussetsatthecriticalframelocationswhere high stresses are detected. Nevertheless, most studies don’tfocuson meshing qualityasa parameter that affects thefiniteelementanalysis(FEA)process[10]
In this work, various element criteria are applied to a simple meshed model representing the geometry of the frame members. This technique is used to validate the output results with the analytical values to select the optimal element criteria for frame meshing. Furthermore, the design of the vehicle frame is simulated using ANSYS software in terms of inertial, impact, and frame torsional stiffness simulations to ensure that the vehicle frame can worksafelyunderthepredictedoff-roadconditions.
Frame Design and Validation
Frame Design Considerations
Off-road vehicles are intended to be superior regarding framestrengthandtorsionalrigidityduetotheiroperation inextremeconditions.In theSAE BAJAcompetition,many rulesthatarerelatedtosafetyarea mustintermsof min. requirements for outside members’ diameters, min. wall thickness, min. carbon content for the utilized material. Moreover, suspension fixation geometry, driver ergonomics, powertrain system fixation, and accessibility arealsoconsidered.
Material Selection and Frame Members Cross Sections
Due to the restrictions of SAE BAJA rules concerning the framematerialandtheavailabilityinthelocalmarket,few options are found to be eligible for selection. The selected material properties are shown in Table 1 The utilized frame cross sections for primary and secondary members areobtainedin

Primary and Secondary Members Validation
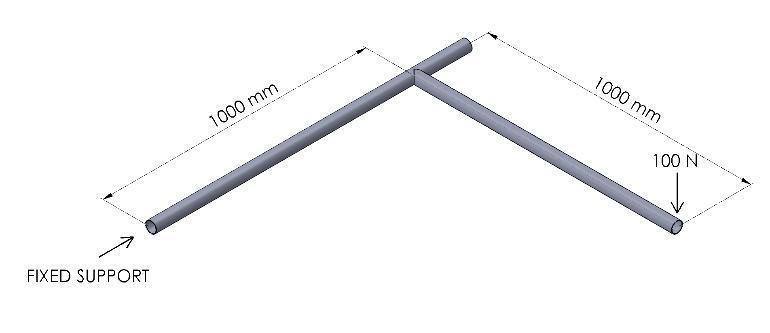
The primary and secondary members are validated to ensure the methodology used to simulate the loading scenariosontheframestructure.AsdepictedinFigure1,a simple problem is introduced in SolidWorks in which a vertical force of 100 N is acting on the edge of the 1000 mm primary member. This member is connected to another member at a distance from fixed support of 1000 mm.
Where isthesecondmomentofinertia,Misthebending moment, and y ( ) is the max. distance from the neutral axis, J is the polar moment of area, and T is the torque. The primary and secondary member parameters utilized in the analysis are shown in Table 3 and Table 4 TheanalyticalvaluesobtainedfromEquations (1), (2), and (3) are compared to the validated values produced from themodelingprocessintheAnsysworkbenchusingFEAin 1D beam element, 2D, and 3D mesh types. The resulting stress values are illustrated in Table 5 and Table 6. Also, the error in von-misses stress is obtained from Equation (4) as the difference between the analytical value and the valueofeverymeshtypedividedbytheanalyticalvalueas follows[12]: (4)
Where is the difference between the analytical value andthevalueofeverymesh,and istheanalyticalvalue.
The bending stress , shear stress due to torque , and von-misesstress areobtainedasfollows[11]:

Based on the results shown in Table 5, and Table 6, it’s clearthatthe1Dbeamelementmeshtypeinbothprimary and secondary members is the optimum type in terms of minimum error and computational effort. Hence, the vehicleframeismeshedusinga1Dbeamelementtype.
Results and discussion
Inertial Loadings Results

Acceleration while climbing a hill scenario
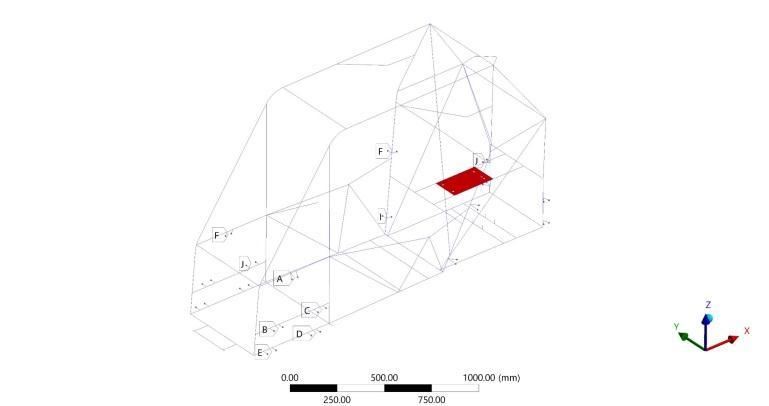
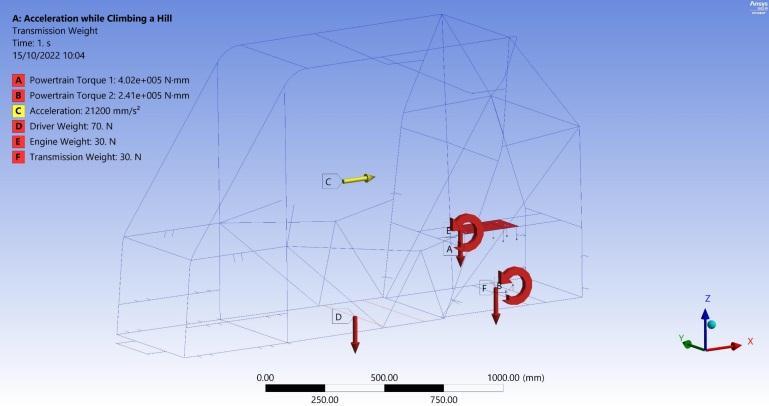
Various kinds of loadings, inertial, and impact are simulatedtodevelopandvalidatethevehicleframedesign. Inertial loadings are represented in longitudinal and lateral load transfers. Longitudinal load transfers are due to acceleration and braking while lateral load transfer is due to cornering. Additionally, load transfer induced by maximum inclination is considered in every inertial scenario. The fixations for the inertial scenarios are representedinFigure2whereeachfixationpointishinged about the y-axis. In the 1st inertial loading scenario, the vehicle accelerates with the maximum acceleration of the powertrain system and ascends a grade of 25°, causing longitudinal load transfer according to Equation (5). Boundaryconditionsareappliedtothestructureasshown inFigure3andtheweighttransferisexpressedby[13]:
weight, is the distance from the center of the front axle tothevehicleC.Gposition, istheroadinclinationangle, isthevehicleC.Gheight, isthevehicleacceleration,and isthevehiclewheelbase.
Acceleration while climbing a hill results
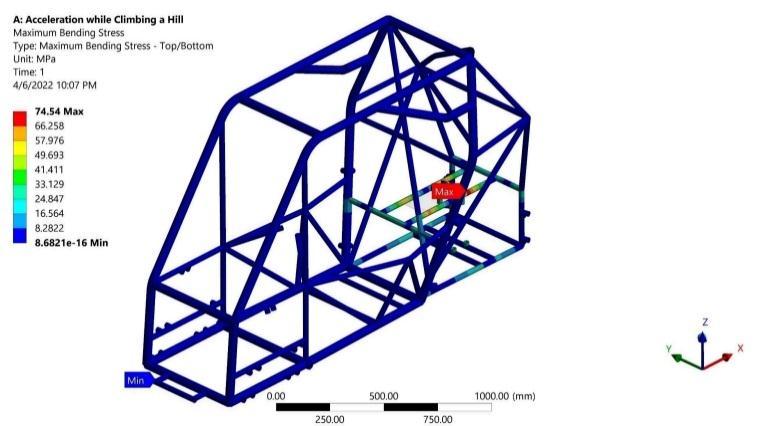
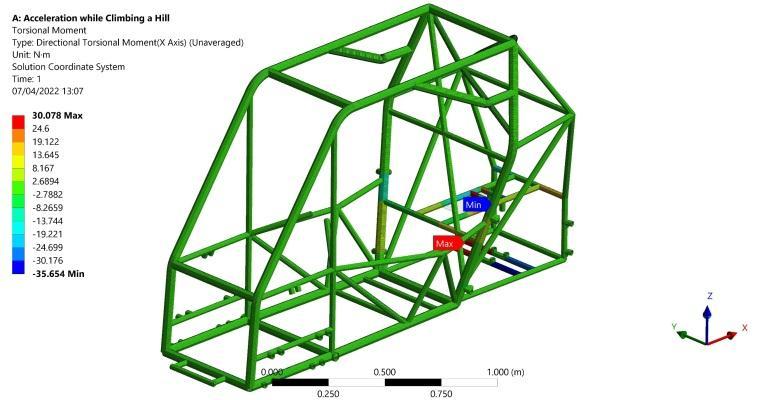
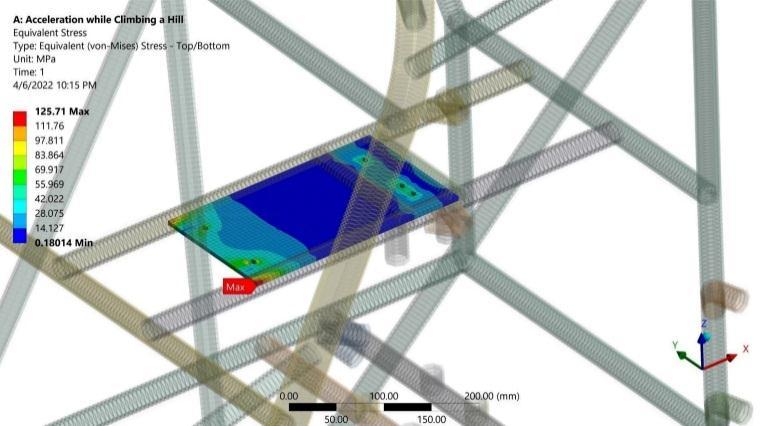
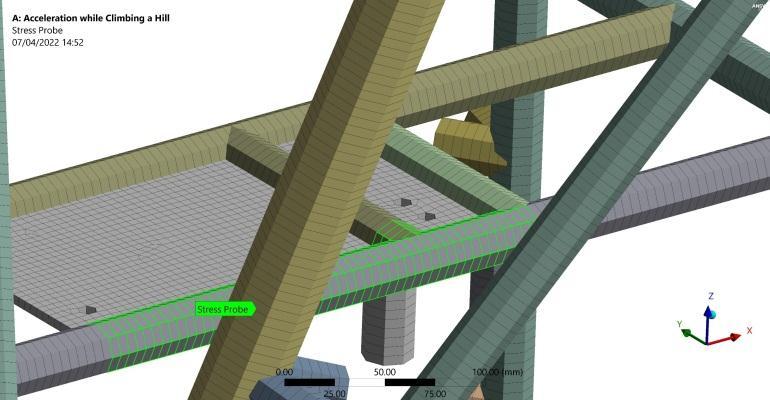
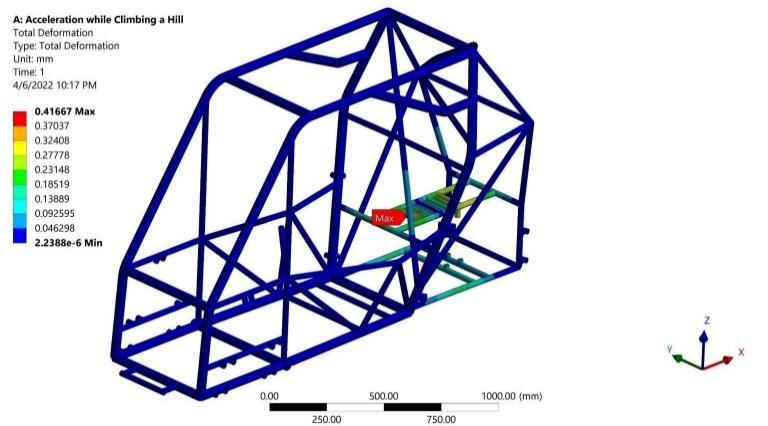
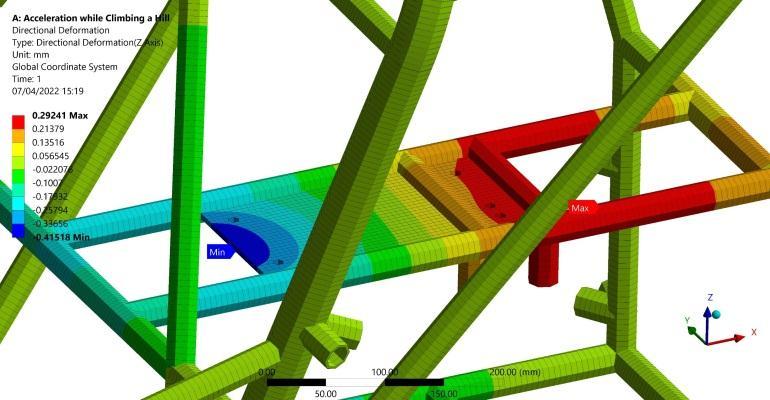
Resultsshowmaximumbendingstressof74.54MPainthe longitudinalmembersjoiningtheengineandtransmission fixation points as expected due to the applied powertrain system torque about the negative Y direction as shown in Figure 4. Consequently, this applied bending moment due tothepowertrainsystemistransmittedtotheshortlateral members joining the two longitudinal members as a torsional moment with a maximum absolute value of 35.6 N.m as shown in Figure 5. As a result, the maximum torsional shear stress is 16.18 MPa as obtained from Equation (2). Moreover, as the plate welded to the structuralmembersis modeledwithshellelements,direct von-mises stress is generated with a maximum value of 125.71 MPa as illustrated in Figure 6. This hotspot in the plate represents a stress concentration produced from a geometrychangeintheintersectionbetweentheplateand the longitudinal frame member. Regarding the previous results, the maximum von-mises stress of 126.95 MPa is captured and recorded in the portions of the frame memberssubjectedtothemaximumbendingandtorsional stresses and intersecting with the engine fixation plate at its maximum von-mises stress as shown in Figure 7 Furthermore,asafetyfactorof2.57canbecalculatedfrom Equation (6). Finally, as depicted in Figure 8, the engine plate deformed with 0.4 mm of a maximum absolute total deformation at its far end as a result of the applied powertrain system torque. The directional deformation plot in Figure 9 ensures that the 0.4 mm deformation occursinthenegativeZdirection.
Where is the vehicle weight on the rear axle, is the vehicle weight on the front axle, is the total vehicle

Deceleration and cornering while descending a hill scenario
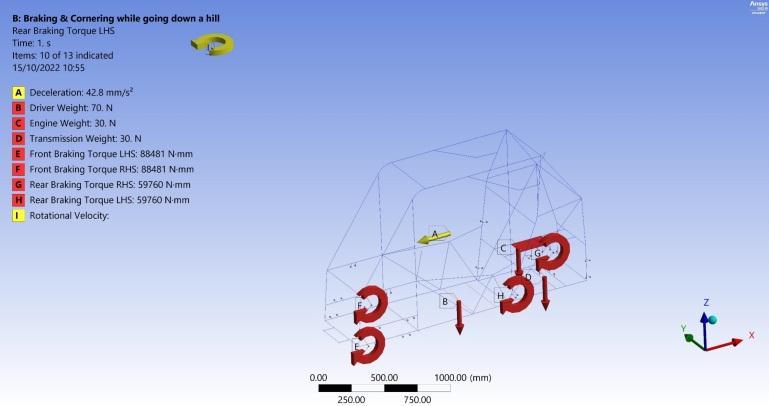
The longitudinal load transfer in the 2nd scenario is generated due to the braking action and descending a grade of 25 as represented in Equation (7), while the lateral load transfer is due to a constant angular velocity with a minimum turning radius of 4 meters causing roll moment. The scenario boundary conditions are shown in Figure10 theweighttransferisexpressedby[13]:
(7)
Where isthedistancefromthecenteroftherearaxleto thevehicleC.Gposition.
Deceleration and cornering while descending a hill results
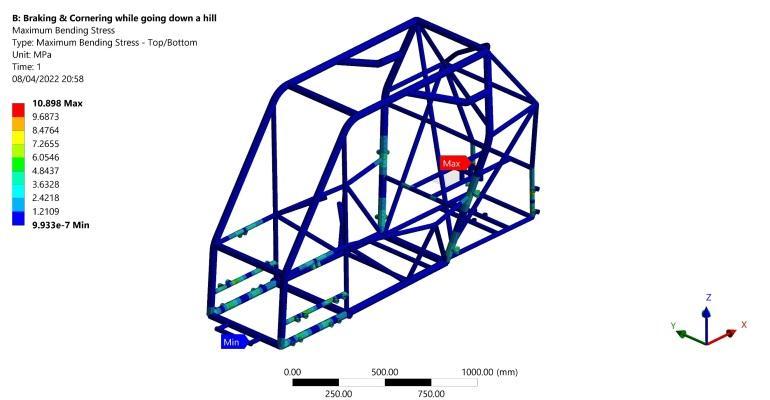

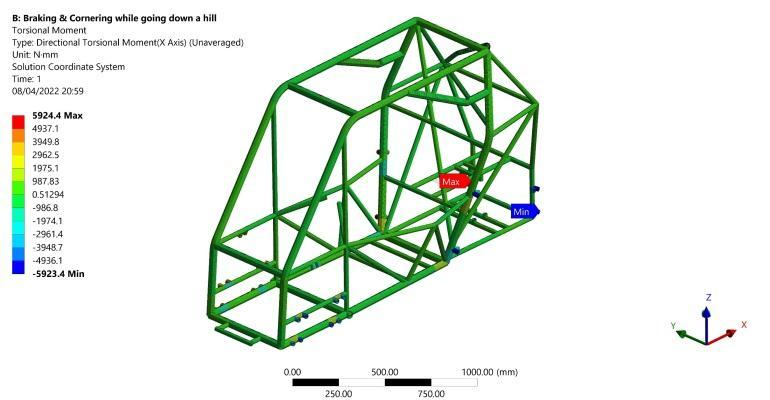
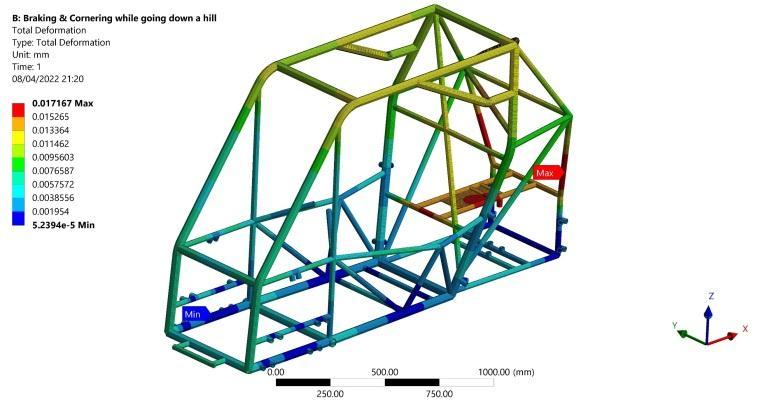
A bending stress of 10.9 MPa is induced in the far rear vertical members as shown in Figure 11 and a maximum torsional moment of 5.92 N.m occurs in the far lower suspension fixation points as shown in Figure 12 Originally, most of the powertrain system and the driver weights are loaded on the rear axle. Thus, the vertical weight on the rear axle decreased as a result of the longitudinal load transfer between the two axles. Finally, maximum total deformation of 0.017 mm resulted in the rearendofthestructureasshowninFigure13
Impact loading

Front Impact Loading Scenario
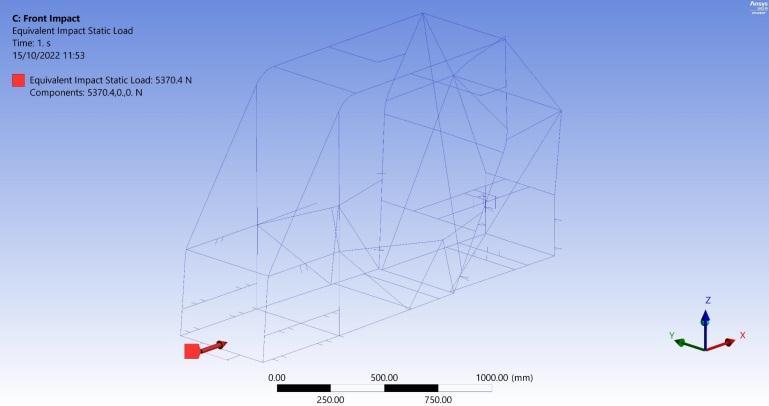
TheStaticStructuralAnalysisSysteminANSYSworkbench is used to simulate impact loadings using the appropriate static force representing the effect of the dynamic event. Generally, the fixations for all impact scenarios are represented in Figure 14 where all of the suspension points’degreesoffreedomarerestricted.Thefrontimpact scenario and its boundary conditions are illustrated in Figure 15. A force of 5370 N is calculated using Equation (8).
Where isthevehiclemass, isthevelocity difference, is the time of the deceleration time. It's assumed that the is 0.3 seconds and the vehicle velocity just beforeimpactis16km/hr.
Front Impact Loading Results
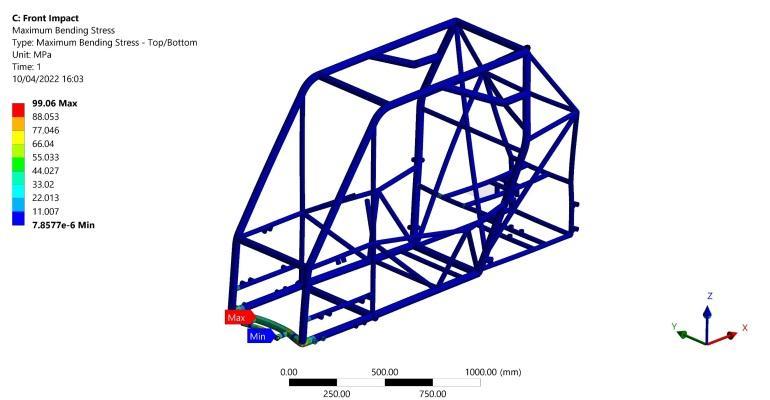
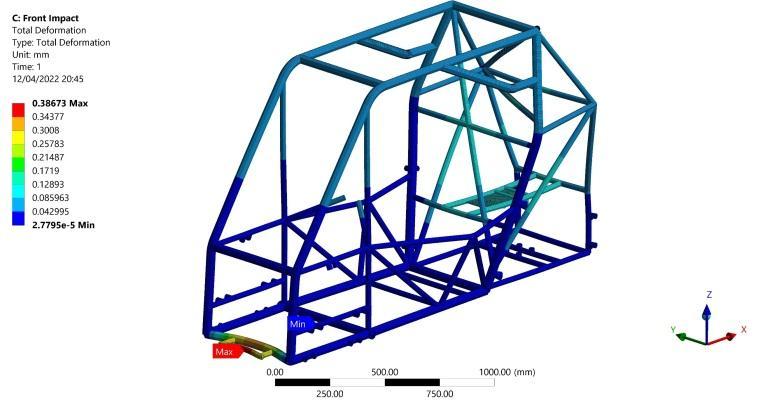
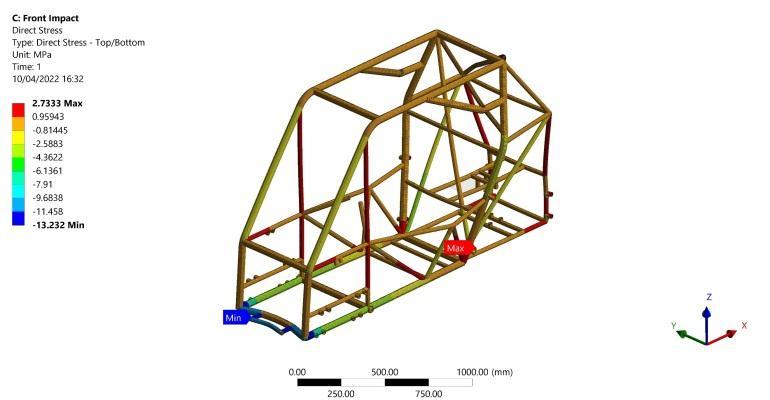
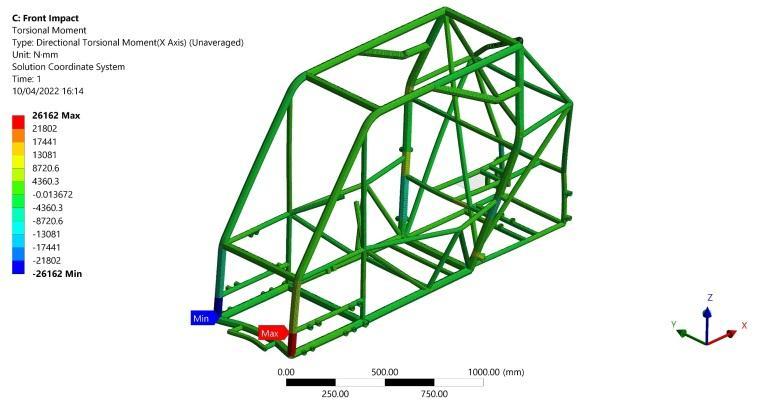
The results show maximum bending stress of 99.06 MPa occursasshowninFigure16inthesecondarylongitudinal member at its intersection point with the primary lateral member. Figure 17 shows a maximum absolute torsional moment of 26162 N.mm in the vertical members which produce torsional shear stress of 6.39 MPa as calculated from Equation (2). Moreover, the Normal axial stress of13.23MPaisshowninFigure18whichislessseverethan the bending stress. As a result, the factor of safety (F.O.S) of 2.9 is calculated for this scenario from Equation (6) Finally,amaximumdeformationof0.4mmisgeneratedin the middle of the lower lateral front member as shown in Figure19.

Rear Impact Loading Scenario
In this scenario, the vehicle frame is subjected to a rear impact force similar to the exerted force of the front impact scenario. The boundary conditions of the rear impactscenarioareshowninFigure20.
Rear Impact Loading Results
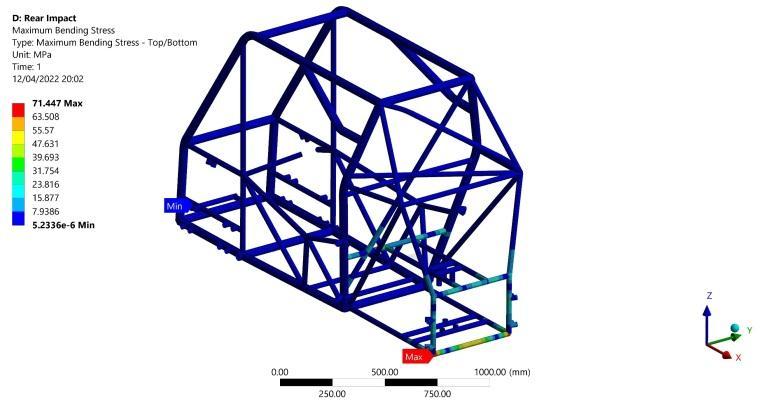
Amaximumbendingstressof71.4MPaisgeneratedatthe very rear lateral member subjected to the impact load as showninFigure21.Consideringthislateralbeam,afixedfixed ends beam subjected to constant distributed load
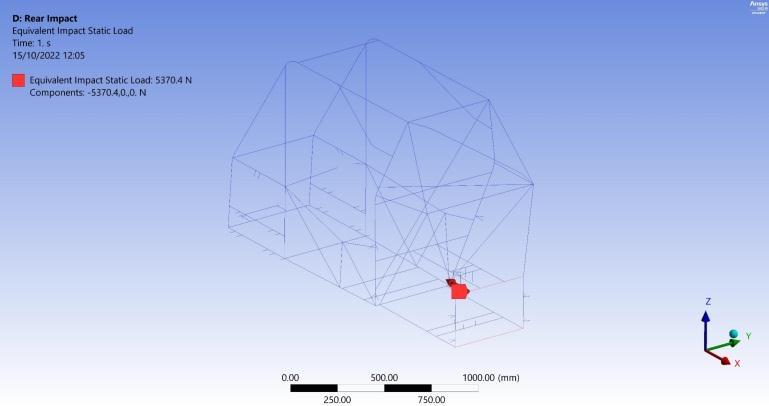
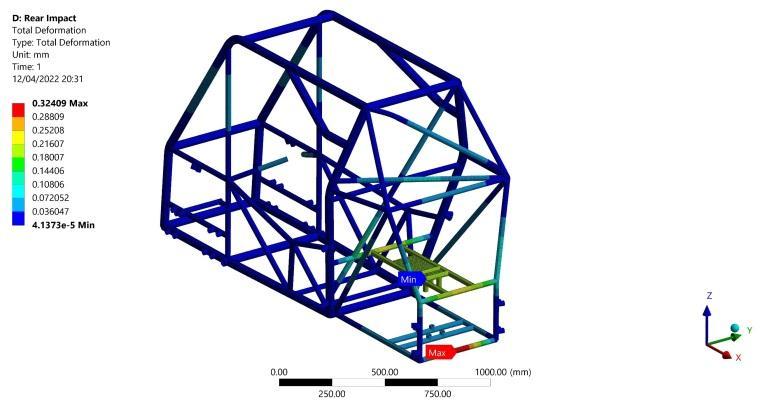
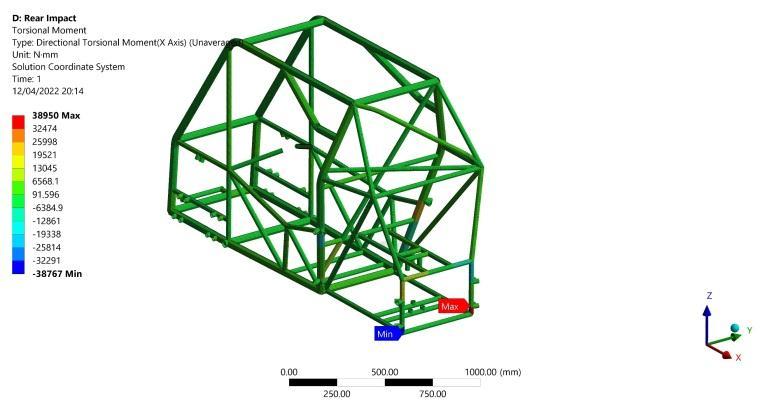
acrossitswholelength,itisexpectedtogetthisresultdue to the maximum bending moment generated at both fixed ends. Furthermore, the maximum bending stress in the lower lateral member is lower than the upper due to the existence of two longitudinal members supporting the uppermember.Inaddition,duetothedeformabilityofthe rear lateral member ends having the maximum bending stress, maximum torsional moments of 38950 N.mm are generated at the vertical members joining that lateral memberinoppositedirectionsasshowninFigure22.This generates maximum torsional shear stress of 17.7 MPa as calculated from Equation (2). Assessing the previous results concerning von-Misesfailurecriteria,a F.O.Sof4.6 is obtained from Equation (6) in this scenario. Finally, a maximum deformation of 0.3 mm occurs in the middle of therearlateralmemberasshowninFigure23

Side Impact Loading Scenario
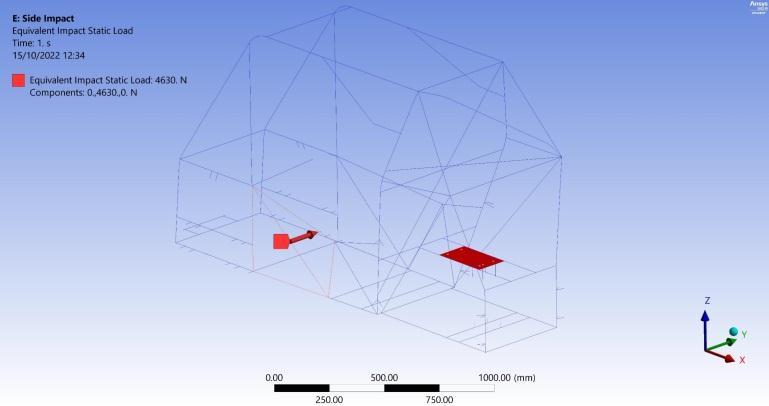
The 3rd scenario involves a side impact equivalent to a static force applied to the longer span of the frame just before the vehicle skidding as shown in the boundary conditionsinFigure24.
Side Impact Loading Results
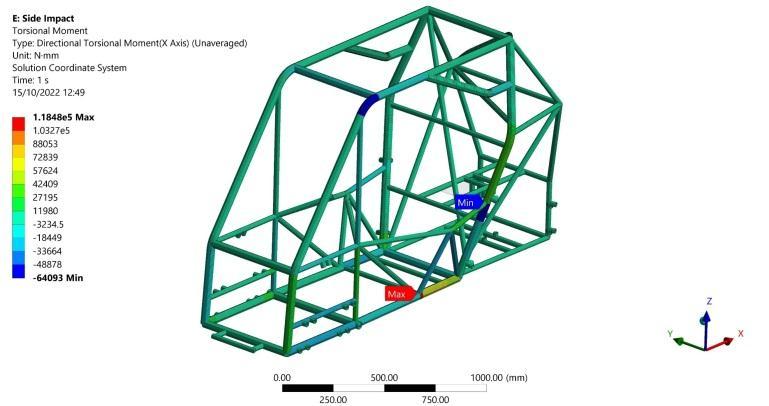
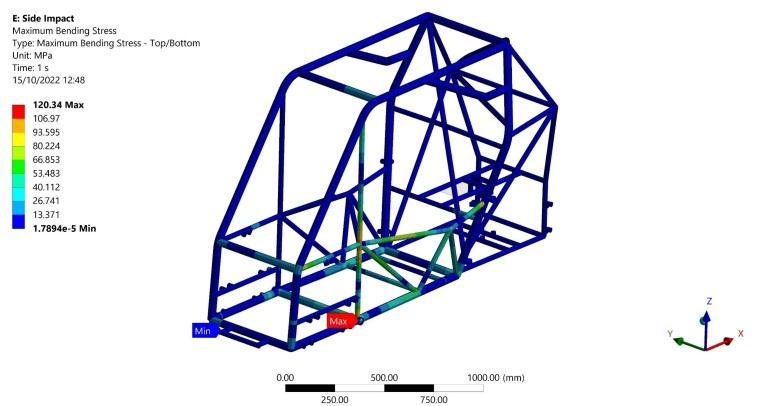
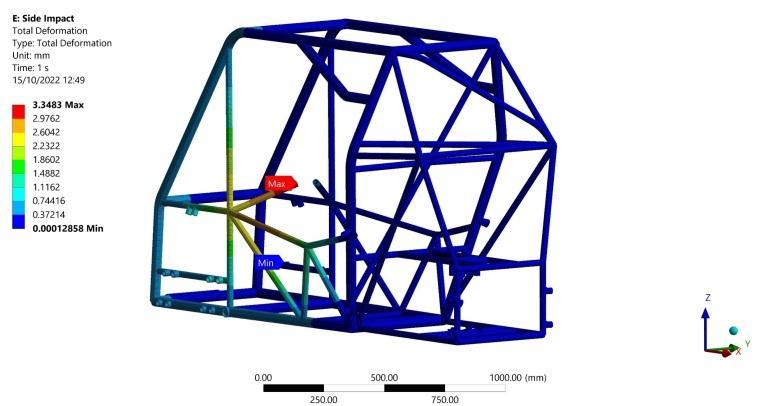
Maximum bending stress of 120.34 MPa is captured as showninFigure25attheintersectionbetweenthevertical and the lateral members. Moreover, a maximum torsional moment of 118480 N.mm is recorded on the lower side frame member as shown in Figure 26 resulting in maximum torsional shear stress of 43.1 MPa which is calculated from Equation (2). Regarding the previous results, a F.O.S of 2.3 can be obtained from Equation (6) Finally, a total deformation of 3.3 mm is recorded in the steering wheel supporting member as shown in Figure 27 whichexertsnohazardouseffectonthedriver.

Rollover Scenario
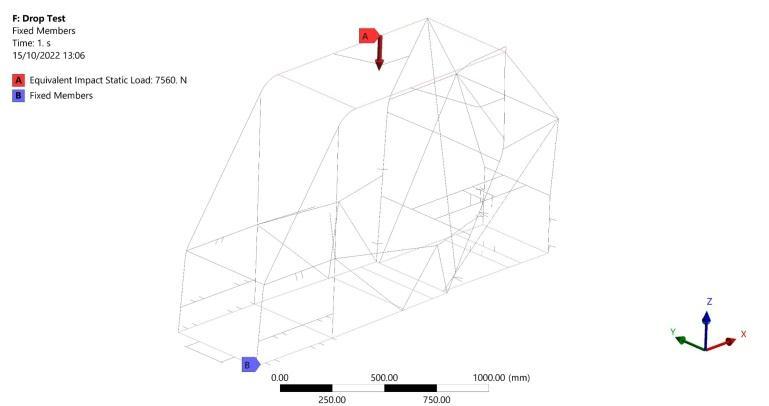
The 4th scenario represents a rollover event, where the vehicleisassumedtohaveanequivalentimpactstaticload on the top planar four members of the frame, and all the bottomplanarmembersareassumedtobefixedasshown intheboundaryconditionsinFigure28 Aforceof7560 is calculated from Equation (8). While the velocity is calculated with the aid of Equations (9), and (10) as follows[14]:
Where is the drop distance, is the initial velocity, is thevehicleacceleration( ), isthedroptime,and is thevehiclefinalvelocity.

Rollover results
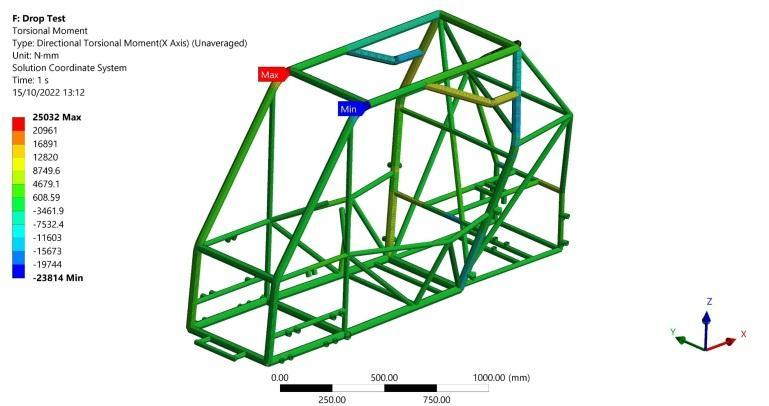
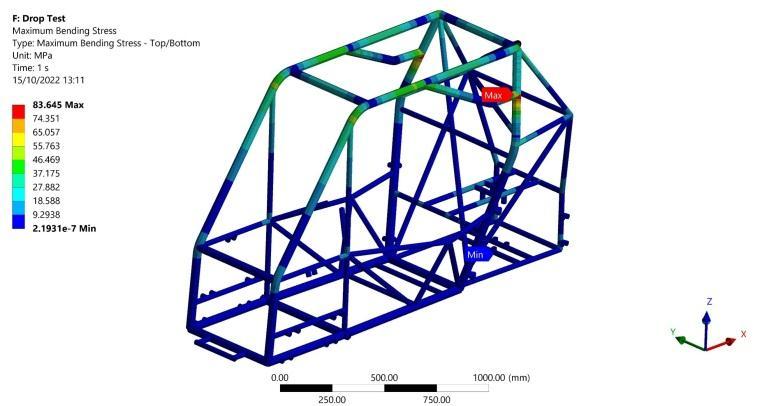
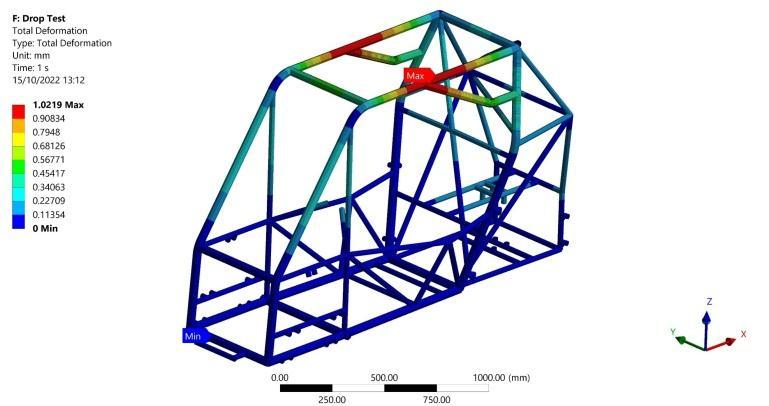
Maximumbendingstressof83.6MPaiscapturedasshown in Figure 29. Moreover, a maximum torsional moment of 25032 N.mm is recorded occurring in a primary member asshowninFigure30whichproducesmaximumtorsional shear stress of 9.1 MPa calculated from Equation (2) Additionally, a minimum F.O.S of 3.8 can be calculated for this scenario using Equation (6). Finally, a maximum deformation of 1 mm in the negative vertical direction is recorded in the far upper primary members as shown in Figure31whichhasnohazardouseffectonthedriverand alsoagreeswiththesmalldisplacements’assumption.
Torsional stiffness
Torsional stiffness Scenario
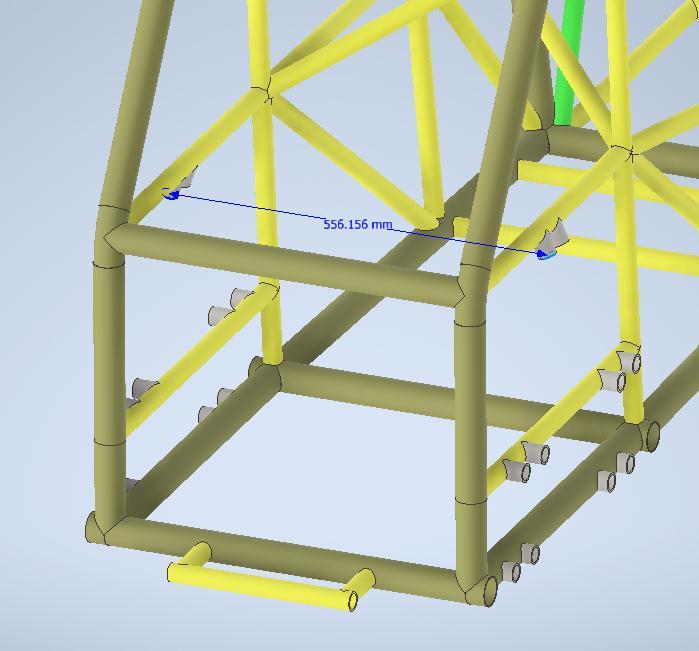
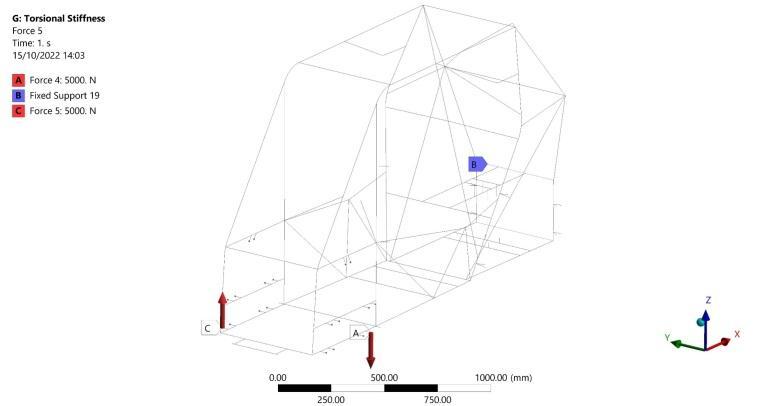
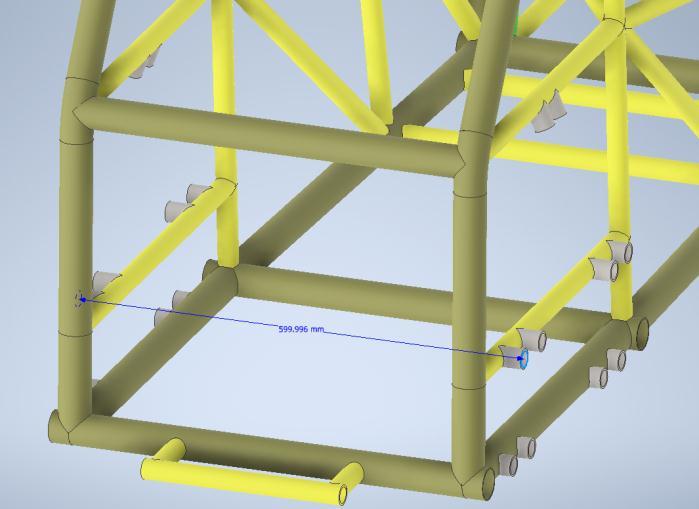
Thisscenariosimulatesthevehicle’sframebehaviorwhen the front wheels are subjected to opposite bumps at the same time. Boundary conditions are illustrated in Figure 32 where the far two cross members are fixed, and two opposite and equal forces are applied at the suspension points in the vehicle frame. Also, the two opposite and equal forces form a couple where the normal distance between the two forces is assumed to be the average distanceforthosepresentedinFigure33andFigure34
Torsional Stiffness Results
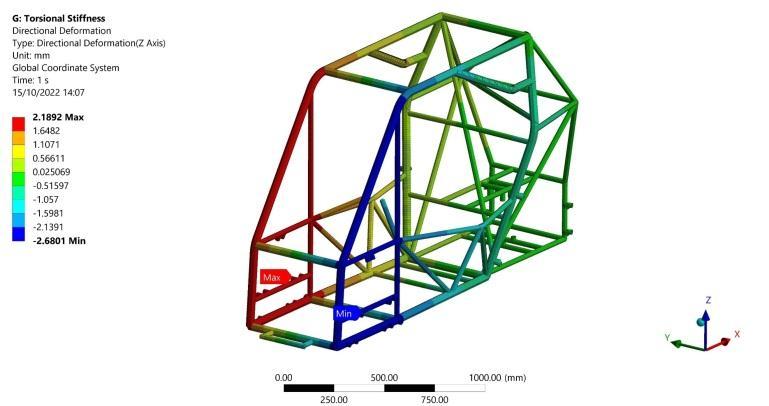

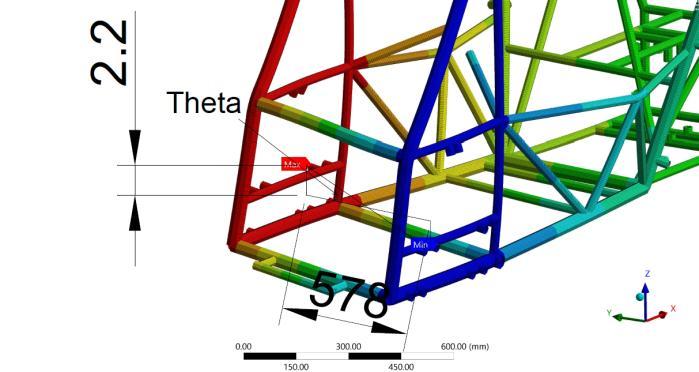
Torsional stiffness of is calculated fromEquation (11) wheretheangle isthetwistingangle due to maximum and minimum deformation as observed from Figure 36 The torsional stiffness formula is expressedas[15]
Where is the average distance between upper and lowersuspensionpoints.
Conclusions
This research focuses on the design and validation of the SAE BAJA space frame which is modeled and analyzed using FEA. The design process includes three different stages. In the 1st stage, selection of the frame members cross sections and the material is selected considering aspects of the material availability and the competition rules. While in the 2nd stage, the frame CAD model is constructed in SolidWorks software. The final stage includes testing the vehicle frame using many simulation scenariosthattheoff-roadvehicledesigncouldfaceinthe competition environment. These scenarios consider the vehicle frame stresses due to longitudinal and lateral load transfer, road grade, and rotational acceleration. Also, vehicleimpactandrollover scenariosareanalyzedaswell asthevehicletorsionalstiffnesstest.Theproposedvehicle frame design fulfils all aspects of the safety requirements withanacceptablefactor of safetyvaluesaccordingtothe simulationscenarios.
References
[1] “Collegiate Design Series Baja SAE ® Rules.” [Online]. Available: https://bajasae.pyrotectstore.com/.
[2] D. Raina, R. Dev Gupta, and R. Kumar Phanden, “Design and Development for Roll Cage of AllTerrain Vehicle,” International Journal For Technological Research In Engineering (IJTRE), vol. 2,no.7,2015.

[3] A. T. Owens, M. D. Jarmulowicz, and P. Jones, “StructuralConsiderationsofaBajaSAEFrame.”
[4] S. Fu et al., “Optimal Design of the Frame of Baja RacingCarforCollegeStudents,”in Lecture Notes in Electrical Engineering,2022,vol.769,pp.293–310. doi:10.1007/978-981-16-2090-4_17.
[5] S. Krishna, A. Shetye, and P. Mallapur, “Design and AnalysisofChassisforSAEBAJAVehicle.”[Online]. Available:www.iosrjen.org
[6] A. S. Shridhar, A. Tukkar, A. Vernekar, V. Badderu, A. Y. Patil, and B. B. Kotturshettar, “Modeling and AnalysisofATVRollCage,”2020,pp.281–292.doi: 10.1007/978-981-13-8468-4_21.
[7] Y.Chandra,“Design,AnalysisandOptimizationofa BAJA-SAE Frame,” International Journal of Science and Research, 2018, doi: 10.21275/SR20208233756.
[8] A. Burke and J. Carlos Miranda, “Minibaja Frame Design using Topological Optimization and Impact Testing,”2006.
[9] N.NoorbhashaandB.J.O’Toole,“StaticAnalysison a Roll Cage Frame for an Off-Road Vehicle,” in SAE Technical Papers, Mar. 2017, vol. 2017-March, no. March.doi:10.4271/2017-01-1299.
[10] “Practical Aspects of Finite Element Simulation A StudyGuideAcademicProgram,”2015.
[11] R.G.BudynasandJ.KeithNisbett,“Shigley’sMecha nicalEngineeringDesign.”
[12] S. Javanbakht, “Error calculation for beginners an example-oriented introduction for students of the TUHH.” [Online]. Available: https://www.researchgate.net/publication/28329 2479
[13] J. Y. (Jo Y. Wong, Theory of ground vehicles. John Wiley,2001.
[14] Brake Design and Safety. 1999. doi: 10.4271/9780768027105.
[15] D. Krzikalla, J. Mesicek, J. Petru, A. Sliva, and J. Smiraus, “Analysis of Torsional Stiffness of the Frame of a Formula Student Vehicle,” J Appl Mech Eng, vol. 08, no. 01, 2019, doi: 10.35248/21689873.19.8.315.
Nomenclature
-vehicleacceleration.
-decelerationtime.
-velocitydifference.
-gravitationalacceleration.
-vehicleC.Gheightfromtheground.
I -secondmomentofinertia.
J -polarmomentofarea.
-vehiclewheelbase.
Lavg - average distance between upper and lower suspensionpoints
-Distancebetweenthevehicle’sfrontaxleanditsCG.
-Distancebetweenthevehicle’srearaxleanditsCG.
M -bendingmoment
-vehiclemass.
-dropdistance.
T -torque.
-droptime.
-vehicleinitialvelocity.
-vehiclefinalvelocity.
-vehicleweight.
-vehicleloadonthefrontaxle.
-vehicleloadontherearaxle.
-analyticalvalue.
y-max.distancefromtheneutralaxis.
- difference betweentheanalytical valueandthevalue ofeverymesh.
-twistingangle.
-roadinclinationangle.
-bendingstress.
-von-misesstress.
-yieldstrength.
-shearstress.
Contact Information
PoulaMagdyKamel
Teaching Assistant, Faculty of Engineering, Mataria, HelwanUniversity
Poula.m.kamel@m-eng.helwan.edu.eg

