
International Research Journal of Engineering and Technology (IRJET) e-ISSN: 2395-0056
Volume: 12 Issue: 07 | Jul 2025 www.irjet.net p-ISSN: 2395-0072

International Research Journal of Engineering and Technology (IRJET) e-ISSN: 2395-0056
Volume: 12 Issue: 07 | Jul 2025 www.irjet.net p-ISSN: 2395-0072
Tejas Satpute1 , Sattyaksh Mangsulikar2 , Aditya Shetty3, Aditya Rasal4
1Student, Mechanical Engineering, SPPU
2Student, Mechanical Engineering, SPPU
3Student, Mechanical Engineering, SPPU
4Student, Mechanical Engineering, SPPU
Abstract
Rigid flange couplings are widely used mechanical components in rotating machinery, designed to transmit torque between aligned shafts. Their performance is often influenced by factors such as load variations, material properties,andgeometricdiscontinuities,whichmayleadto structural failures during service. This study investigates potentialfailure modes ina rigidflange couplingthrougha simulation-based analysis. The geometric model of the couplingwas developedusingcomputer-aideddesign(CAD) tools,andfiniteelementanalysiswasconductedtoevaluate structural behavior under operational conditions. Static structural analysis was used to identify regions of stress concentration and deformation, while modal analysis was performed to determine the natural frequencies of the assembly and assess susceptibility to vibration-induced failures. Based on these simulations, a systematic Failure Modes and Effects Analysis (FMEA) was developed to qualitatively evaluate the significance and impact of possible failure mechanisms. The study emphasizes predictive failure identification rather than structural validation, offering a methodological framework for integrating simulation data into failure analysis and componentreliabilityassessment.
Key Words: Rigid Flange Coupling, Failure Modes and Effects Analysis, Finite Element Analysis, Design of MachineElements,Computer-AidedEngineering
Rigid flange couplings are mechanical devices used to connect two rotating shafts in order to transmit torque while maintaining alignment and mechanical continuity. Commonly employed in industrial machinery, automotive drivetrains, and power transmission systems, they are favoured for their ability to ensure firm, backlash-free connectionsinhigh-loadapplications.Owingtotheirrigid construction, such couplings do not accommodate misalignment or flexibility, and are therefore subject to concentrated stress under torsional loads and assembly constraints.
During operation, rigid flange couplings experience a combination of torsional loading, cyclic stress, and potentialgeometricdiscontinuities,allofwhichcontribute tostructuralfatigueorsuddenmechanicalfailure.Inhighperformance or mission-critical systems, early identification of failure-prone regions is essential to maintainsafety,reliability,andoperationalefficiency.
The present study aims to analyse potential failure mechanisms in a rigid flange coupling through a simulation-based approach. The coupling geometry was modelled based on standard machine design principles, and finite element analysis was conducted to evaluate stress distributions and deformation patterns under applied torque. Modal analysis was also performed to determine the natural frequencies of the assembly and assess susceptibility to vibration-induced failures. Informed by the simulation results as well as established failure scenarios in mechanical design practice, a structuredFailureModesandEffectsAnalysis(FMEA)was developed to identify, classify, and evaluate potential failuremodesaffectingthecouplingsystem.
The integration of classical design methodology, simulation tools, and engineering judgment provides a comprehensive framework for predictive failure analysis. The outcomes of this study are intended to support informed decision-making during the design, assessment, and optimization of rigid flange coupling systems in engineeringapplications.
The preliminary geometric parameters of the rigid flange coupling were established using standard analytical methods provided in Design of Machine Elements by V. B. Bhandari [1]. The design was based on a power transmissionrequirementof40kWatarotationalspeedof 200 revolutions per minute (rpm). To incorporate allowances for service irregularities and overload conditions,aservicefactorof1.5wasapplied.

International Research Journal of Engineering and Technology (IRJET) e-ISSN: 2395-0056
Volume: 12 Issue: 07 | Jul 2025 www.irjet.net p-ISSN: 2395-0072
The design torque TTT was calculated using the following relation:

Where:
T=Designtorque(N·mm)
P=Power(kW)
Cs=Servicefactor
n=Rotationalspeed(rpm)
Substituting P=40 kW, Cs=1.5 and n=200 rpm yields a designtorqueofapproximately2,864,788N·mm.
The shaft diameter corresponding to this torque was computed using torsional strength criteria, resulting in an initial value of 57 mm. This was rounded to 60 mm to conform with standard shaft sizes used in mechanical design.
Using the finalized shaft diameter as a reference, the remaining dimensional parameters of the coupling assembly such as hub length, flange diameter, key size, and bolt circle diameter were determined according to empirical proportions and standard guidelines. These dimensions served as the geometric basis for the CAD model and subsequent simulation analyses. The focus of the study remains on the behaviour of the coupling under loadratherthanondesignoptimization;hence,thespecific dimensions are treated as representative inputs rather thanvariablesofinterest
A three-dimensional computer-aided design (CAD) model of the rigid flange coupling was developed to support simulation-based structural and modal analysis. ThemodellingwasperformedusingAutodeskFusion360, a parametric design platform widely used for mechanical component development. All geometric parameters were defined according to the design calculations previously outlined, and proportions were selected based on standardmachinedesignpractices.
The model consists of two co-axial shafts, each connected to a flange, which are joined together using multiple bolts distributed along a circular bolt pattern. A flat key was incorporated into the shaft-hub interface to facilitate torque transmission and prevent relative rotation. Geometric features such as the hub, flanges, bolt holes, and keyways were modelled in accordance with accepted engineering conventions to ensure representativemechanicalbehaviourunderloading.
The design was finalized after confirming dimensional consistency and proper assembly alignment. The model was then exported in STEP format for compatibility with the finite element simulation environment used in the subsequentphaseofthestudy.
Finite element analysis of the rigid flange coupling assembly was carried out using ANSYS Workbench to evaluate its structural response under applied torque and todetermineitsnaturalfrequencies.Twotypesofanalyses were performed: static structural analysis to assess stress distribution and deformation, and modal analysis to study thesystem'sdynamicbehaviour.
The coupling model consisted of three primary materials selected to represent typical mechanical design configurations. The shafts were assigned 40C8 steel, the keysweremodelledusing30C8steel,andtheflangeswere assigned gray cast iron. All materials were treated as linearly elastic, homogeneous,and isotropic, with material properties obtained from standard engineering references [3].
In the static structural analysis, the shaft at one end was constrained using fixed support conditions to replicate real-world restraint. A torsional load was applied at the opposite end, corresponding to the design torque derived from power transmission calculations, multiplied by a service factor of 1.5 to account for operational variability. Allcontactinterfaceswithintheassembly includingthose betweenshafts,keys,hubs,andflanges weremodelledas bonded to simulate ideal load transfer without relative motion.
The assembly was meshed using unstructured tetrahedral elements with a uniform global element size of 10 mm. Mesh quality was verified prior to solving to ensure convergence stability and acceptable element behaviour underbothstructuralandmodalconditions
3.1 Results

International Research Journal of Engineering and Technology (IRJET) e-ISSN: 2395-0056
Volume: 12 Issue: 07 | Jul 2025 www.irjet.net p-ISSN: 2395-0072

Equivalent(von-mises)stressdistribution
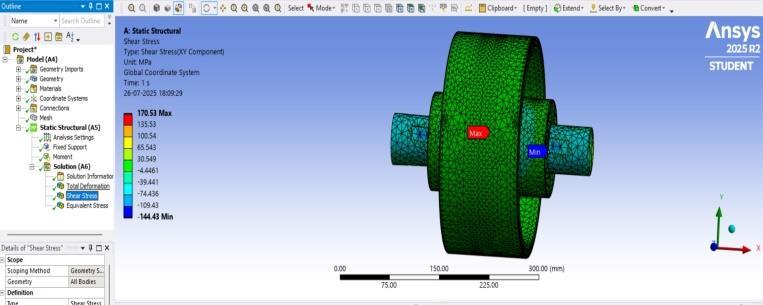
3.1.3:Shearstressdistributionunderstaticloading
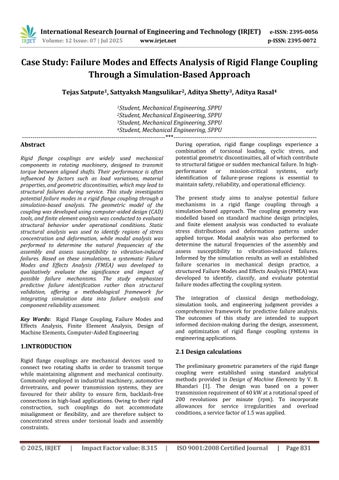
The static structural analysis was conducted to assess the deformation and stress response of the rigid flange coupling under design torque. The simulation showed a maximum total deformation of 0.27238 mm, occurring on the flanges as shown in Figure 3.1.1. The deformation followed a torsional profile consistent with the loading conditions,withminimal displacementobservedalongthe fixedshaft.
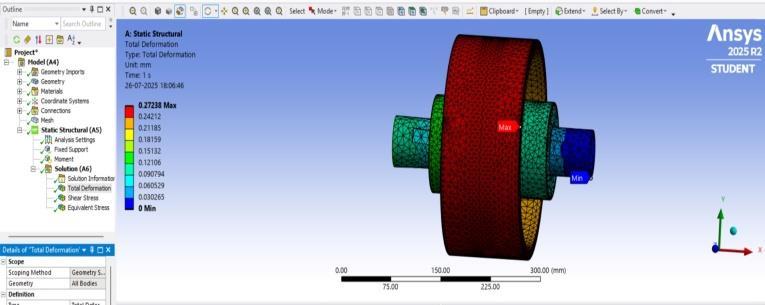
ThevonMisesstressdistributionisshowninFigure3.1.2, with a maximum stress of 355.93 MPa located near the shaft–key interface. Thisregion experienceshigh torsional load transfer, making it a critical stress zone within the assembly.
The maximum shear stress obtained was 170.53 MPa, concentrated in the same region as the peak von Mises stress(Figure3.1.3).Thisisconsistentwithexpectedshear behaviour in keyed connections under torque. The results of the static analysis serve as the basis for identifying potentialfailuremodesaddressedinthesubsequentFMEA.
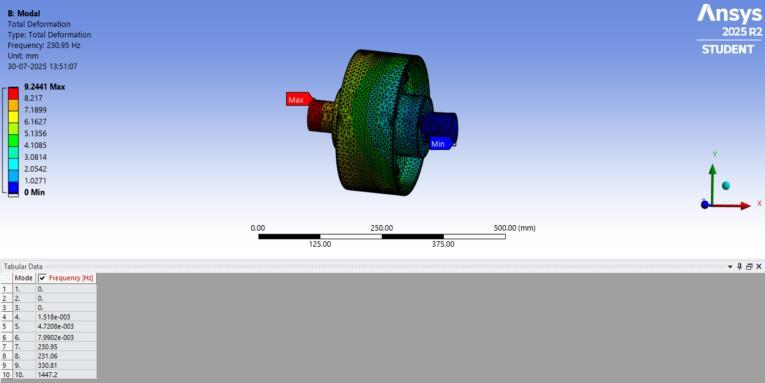
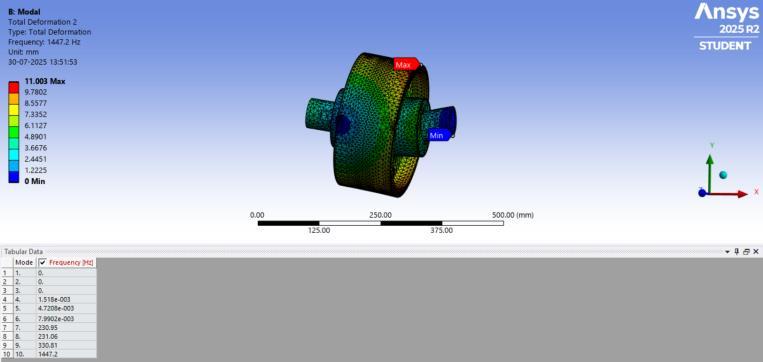
A modal analysis was conducted to evaluate the natural frequenciesandassociatedmodeshapesoftherigidflange coupling assembly. This analysis assists in identifying possibleresonanceconditionsthatcouldleadtovibrationinducedfailuresovertime.
The simulation yielded ten mode shapes. The first three modes presented zero frequencies, corresponding to rigid body motion. Modes four to six displayed extremely low frequencies, which are considered negligible and typically associated with numerical artifacts or near-rigid motions due to boundary conditions. These modes were therefore excludedfrompracticalinterpretation.
The first meaningful natural frequency was observed at 230.95 Hz, followed closely by 231.06 Hz, 330.81 Hz, and 1447.2 Hz. These represent structural resonances involving torsional and bending behaviour of the coupled shaftsandflanges.Sincetheoperatingspeedofthesystem (200 rpm) is well below these natural frequencies, the likelihood of resonance during normal operation is minimal. However, the identified modes are relevant in assessingpotentialdynamicfailurescenariosconsideredin theFMEA.
FailureModesandEffectsAnalysis (FMEA)isa systematic approachusedto identifypotential failure modes within a system,assesstheircausesandeffects,andprioritizethem basedonrisk.Inthisstudy,FMEAisemployedtoevaluate therigidflangecouplingassemblybasedonstructuraland modal simulation results, material properties, and mechanicaldesignconsiderations[2].
The analysis incorporates observed stress concentrations, deformation patterns, and dynamic behaviour obtained through finite element simulations. In addition, failure modes related to fatigue, wear, loosening, and misalignment are considered based on engineering judgment and common industrial failure scenarios. Each failure mode is assessed using the standard Risk Priority Number (RPN) method, based on severity (S), occurrence (O),anddetection(D)ratings.Thisprocessfacilitatesearly

International Research Journal of Engineering and Technology (IRJET) e-ISSN: 2395-0056
Volume: 12 Issue: 07 | Jul 2025 www.irjet.net p-ISSN: 2395-0072
identification of critical failure points and supports preventivedesignormaintenanceactions.

Shaft (40C8 steel)
Key(30C8 steel)
Keyway (shaftor hub)
Flange (Graycast iron)
Bending/torsiona lfatiguefracture
Shearorfatigue failure
Wearorfatigue cracking
Brittlefractureor fatiguecrack
Bolts Fatiguefracture orloosening
Assembly Misalignment/vib ration;torque loss
Repeatedcyclictorqueandbending; stressconcentrations
The application of finite element simulation provided detailed insight into stress and deformation patterns across the coupling assembly, enabling a data-driven approach to failure mode identification. Static structural
analysis revealed critical stress zones, particularly at the shaft–key interface, indicating susceptibility to shear and yielding in those regions. Modal analysis further contributed by identifying natural frequencies that, if matched with operational harmonics, could lead to vibration-related fatigue. These simulation results served as the foundation for defining failure modes associated withstructuraloverstress,wear,anddynamicinstability.
Shaftcrack,shaftfracture,immediate drivefailure,possiblesecondary
Hightorque/shearloadorshock; movementinkeyway;material fatigue Keyshears,lossoftorquetransmission, shaft-hubslippage,couplinglockup
Fretting;stressconcentrationat sharpcorners
Overloadorbending;castingdefects orunevenloads
Looseningfit,increased vibration/backlash,keydrop-outor shaftfracture
Flangecrack/break,completefailure, possibleequipmentdamage
Cyclicbending;impropertightening; corrosion Boltbreaksorloosens,flange separationorslip,lossofclamppreload
Shaftmisalignment;thermal expansion;looseguards
Vibration/noise,acceleratedwear, eventualfailure
Table 1: Failuremodesandeffectsanalysis(FMEA)table
Thesimulation-drivenanalysisoftherigidflangecoupling provided critical insights into its structural integrity and potential failure mechanisms. The static structural results indicated a maximum von Mises stress of 355.93 MPa, concentrated at the shaft–key interface, which closely approaches the yield strength of the 30C8 steel used for the key. Additionally, the maximum shear stress recorded at 170.53 MPa further substantiates the key's susceptibilitytoshear-inducedfailure.Theseobservations stronglysupporttheFMEAoutcome,whereinthekeywas assigned a higher Risk Priority Number (RPN) than the surrounding keyway, reflecting its greater vulnerability underappliedtorque.
Deformation analysis revealed the highest displacement (0.27238 mm) occurring in the flanges, consistent with expectations for components made from gray cast iron, a material known for its brittleness and lower ductility. However,theoverallstressdistributionwithintheflanges remained within the material’s permissible limits, suggesting a low probability of fracture under static loading. The bolts, although critical to assembly integrity, did not exhibit significant stress concentrations in the simulation, justifying their comparatively lower severity andoccurrenceratingsintheFMEAtable[4]
Importantly, the modal analysis provided valuable information regarding the system’s dynamic behaviour. The first significant natural frequency, 230.95 Hz, was

International Research Journal of Engineering and Technology (IRJET) e-ISSN: 2395-0056
Volume: 12 Issue: 07 | Jul 2025 www.irjet.net p-ISSN: 2395-0072
found to be substantially higher than the coupling’s operational excitation frequency (3.33 Hz at 200 rpm). This wide separation effectively eliminates the possibility of resonance under normal service conditions, and as such, resonance-induced failure modes were deliberately excluded from the FMEA. The inclusion of modal characteristics in the failure analysis thus enhanced the robustness of the study by eliminating a common but potentiallymisattributedsourceofdynamicfailure.
Overall, the integration of simulation results into the FMEA framework allowed for an evidence-based assessment of failure risks. By correlating areas of high stress and deformation with material properties and loading conditions, the study provides a rational basis for prioritizing inspection, design modification, or preventive strategies. The methodology demonstrates the effectiveness of combining structural simulation with engineering judgment in the context of early-stage failure assessmentformechanicalassemblies.
While this study provides a comprehensive failure mode analysis of a rigid flange coupling through structural simulationandFMEA,certainlimitationsopenavenuesfor further work. For instance, dynamic loading conditions such as shock and vibration during start–stop operations were not simulated, and thermal effects were excluded. Future studies may incorporate transient dynamic analysis, fatigue life prediction, and thermal-mechanical couplingtoobtainmoreholisticinsights.
The structured FMEA approach developed here lays a foundation for predictive maintenance frameworks in industrial environments. By identifying high-risk components such as keys and flanges, this methodology can support condition monitoring systems in anticipating failuresbeforetheyoccur.Furthermore,thisanalysismay aiddesignengineersinoptimizinggeometry,materials,or tolerances during early development, and assist maintenance planners in prioritizing inspections and preventiveactionsbasedonrisk-priorityvalues
There is also scope to extend this work to different coupling types, compare alternative materials, and integratemachinelearning-basedhealthmonitoringusing historicalfailuredataandsimulationparameters.
The simulation-assisted FMEA of the rigid flange coupling enabled the identification and prioritization of critical failure modes through a combination of structural analysis, modal analysis, and engineering judgment. By leveraging simulation results, the study enhanced the objectivity of risk assessment and enabled failure modes
to be evaluated under realistic mechanical conditions ratherthansolelytheoreticalassumptions.
Thisapproachallowedfordata-drivenassignmentofRPN values and provided insight into the vulnerability of specific components, notably the key and shaft. Additionally, the inclusion of modal analysis allowed resonance-relatedfailurestobeexcludedwithconfidence, streamlining the focus toward more probable mechanical issuessuchasfatigue,shear,andfriction.
The outcome is a structured and replicable methodology that strengthens early-stage design validation and failure prediction.Itcontributesbothasapracticalassessmentof a commonly used mechanical joint and as a methodological reference for integrating simulation with failureanalysisinmechanicalengineeringapplications.
[1] Bhandari, V. B. Design of Machine Elements, 4th Edition,McGrawHillEducation.
[2]Stamatis,D.H.FailureModeandEffectAnalysis:FMEA fromTheorytoExecution,2ndEdition,ASQQualityPress, 2003.
[3] Khurmi, R. S., and Gupta, J. K. A Textbook of Machine Design,Revised2022Edition,S.ChandPublishing.
[4] Callister, W. D. Materials Science and Engineering: An Introduction,10thEdition,Wiley.