7 minute read
3.3. INSTRUMENT PANEL


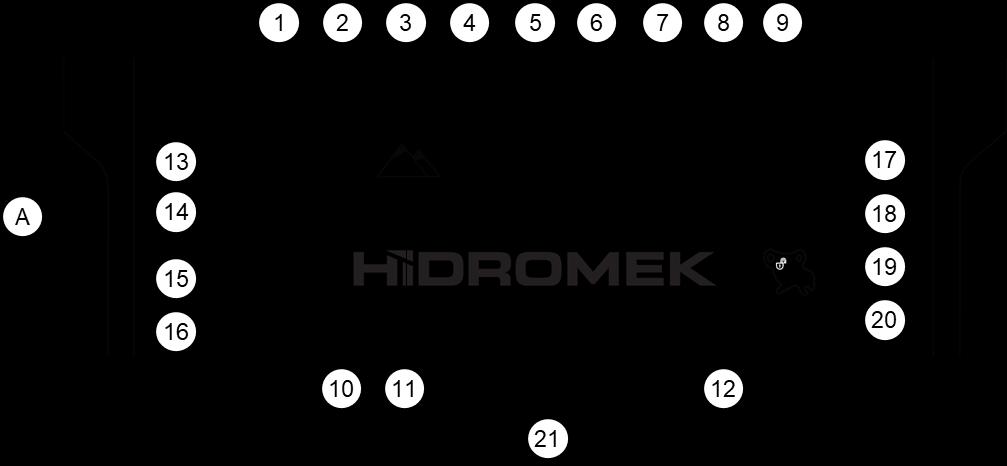
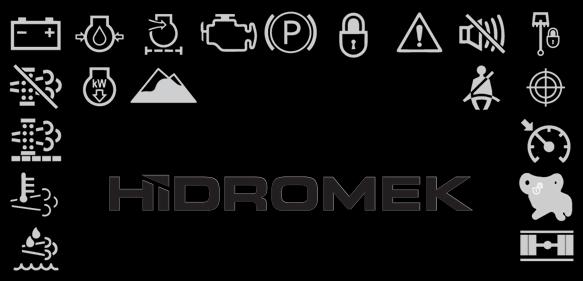
Section A: Warning and indicator lights
Warning indicators are shown on this section of the monitor.
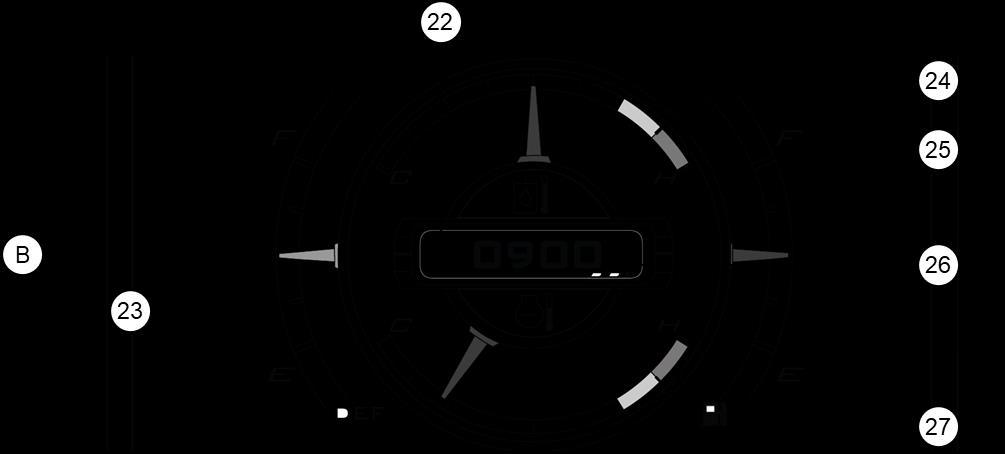
Section B: Gauges/Camera
This section shows gauges and also camera views if selected.
Section C: MODE Indicators
Selected/activated modes can be viewed on this section.
Section D: MENU Keys
Menu keys are located on this section of the monitor.
Section A: Warning and indicator lights
1.
2.
12. Seat belt warning light
13. "Urea SCR Purge Disabled" warning light
14. "Urea SCR system is purging" warning light
15. "DPF regeneration is active" warning light
16. “Diesel Exhaust Fluid (DEF/AdBlue®) level is low” warning light
17. Swing Align Indicator
18. Cruise Control Indicator
19. “Quick coupling lock disengaged” warning light
20. “Axle lock” indicator
21. Message and Error Display

1. Battery charge indicator: This indicator light comes on when the alternator is not charging the battery. Thus, the voltage from the battery falls and simultaneously “Charging Error” message comes on the Display Panel. Should this happen while the engine is running, it means that all the electrical components of the machine are energized by the battery. In this case, park the machine in a suitable area and call a Hidromek Authorized Service or Dealer.
7. Failure warning light: This warning light comes on when any failure occurs on the machine.
2. Engine oil low pressure indicator: This indicator comes on when the engine oil pressure decreases under specified value. In this case, immediately stop the engine, park the machine in a suitable area and call a HIDROMEK Authorized Service or Dealer.
8. Buzzer muted warning light: This warning light comes on when the buzzer is muted using the Buzzer Mute Switch on the Opera Instrument Panel. Buzzer warns the operator in case of an error. If the error is not critical and stopping the operation of the machine is not necessary, the operator may cancel the buzzer and continue working.
3. "Air cleaner clogged" indicator: This indicator comes on when the air filter is clogged. When it comes on, replace the air filter elements.
9. "Swing lock engaged" warning light: This symbol illuminates when swing lock is engaged. This indicator is available for wheeled excavators.
4. Engine warning indicator: This light comes on in case of a failure in engine electronic control system. An error code comes on Display Panel.
Caution
When the engine warning indicator light comes on, or the engine failure code is displayed in the Instrument Panel, immediately contact Hidromek Authorized Service.
10. Reduced engine power (Derate) indicator light: This indicator comes on when the engine output is restricted because of the low DEF/AdBlue® level in the tank or there is an abnormality with either the DEF/AdBlue® quality or the DEF/AdBlue® injection system.
Refer to Chapter "DEF/AdBlue® Warning Light (REFILL DEF/AdBlue®)".
11. High altitude function indicator: This light comes on when high altitude function is enabled.
5.“Parkingbrake applied” indicator: This light comes on when the parking brake is applied. This indicator is available for wheeled excavators.
12. Safetybelt warning light:Warns the operator that the seat belt is not fastened. Always fasten your seat belt before operating the machine.
6. "Joystick safety lock engaged" warning light: This warning light comes on when the lock lever is pushed down and the control of all attachments is disabled. When the safety lock lever is in the upper position, this warning light comes off and control of attachments is enabled.
13. "Urea SCR system is disabled" warning light: Warns the operator that SCR purging process is disabled.
14. "Urea SCR system is purging" warning light: Warns the operator that SCR purging process is started and being carried away.
lock indicator light is on. This indicator is available for wheeled excavators.
15. "DPF regeneration is active" warning light: This light comes on during active regeneration and it is available in HMK 60 CR excavators.
21. Message and Error Display (MED) area
All information, failure messages and codes are displayed in this area (For details call HIDROMEK Authorized Service or Dealer).
16. "Dieselexhaust fluid (DEF/AdBlue®) levelis low" warning light: This warning light comes on when DEF/AdBlue® level in the tank is low or when there is an abnormality with either the DEF/AdBlue® quality or the DEF/AdBlue® injection system.
Refer to Chapter "4.5.3. DEF/AdBlue® Warning Light (REFILL DEF/AdBlue®)".
22. Travel direction indicator

Indicates the selected travel direction with F, N, R letters which means the transmission is set to Forward, Neutral or Reverse direction, respectively. This indicator is available for wheeled excavators.
17. Swing Align Indicator: If upper chassis and lower chassis was not aligned to each other this light glows in red. When the upper chassis is aligned with lower chassis this light glows in green. This indicator is available for wheeled excavators.
18. Cruise Control Indicator: Indicator light comes on when cruise function is on. This indicator is available for wheeled excavators.
23. Diesel Exhaust Fluid (DEF/AdBlue®) level gauge: Shows the level of Diesel Exhaust Fluid (DEF/AdBlue®). The amount of DEF/AdBlue® remaining in the tank is indicated with "F" representing full and "E" representing empty.
19. "Quick coupling lock disengaged" warning light: This light comes on when the quick coupling attachment switch is kept pressed for disengaging quick coupling lock. Refer to Chapter 8.8. Quick Coupling Attachment.
20. “Axle lock” indicator: This light comes on when the front axle lock is engaged.When it is locked, axle can’t oscillate. When it is unlocked, axle oscillates according to the ground structure. At position ON, oscillation cylinders are at locked position and axle

24. Hydraulic oil temperature gauge: This shows the temperature of the oil in the hydraulic system. Error message appears with buzzer sound on the display when hydraulic oil temperature is higher than permitted operating temperature.
25. Fuel level gauge: This shows the fuel level in the tank.When the fuel level is in the yellow zone, “LOW FUEL LEVEL” warning will be displayed.
HP (High Power Mode): For heavy load operations and operations which need high speed and power. Productivity is the priority and fuel consumption is secondary.
F (Fine Mode): For fine control operations. Operator uses this mode when the load is to be positioned accurately and with controlled movements.
WARNING
Use F mode for safety while loading/unloading machine or lifting objects.
26.
28.
E (Economy) mode: For light digging and loading operations where fuel economy is the priority.
29. Preheat indicator: This indicator comes on when the glow plugs are energized to assist engine starting in cold weather. Preheat function is controlled automatically by the engine control module (ECM).
30. Auto idle mode indicator: This indicator lamp comes ON when the Auto-Idle function is active.
Refer to Chapter 3.4. OPERA INSTRUMENT PANEL for more information about "Auto Idle On-Off / Auto Warm up Cancellation" Key.
P (Power Mode): For general digging and loading operations where performance is as important as fuel economy.
31. Travel mode indicator: This indicator displays the selected travel speed mode. Turtle symbol comes on when low speed is selected. Rabbit symbol comes on when high speed is selected.
32. Power boost on indicator: This indicator comes on when the power boost is on. Power boost is controlled electronically depending on hydraulic pressure. Power boost will be on in accordance with a predetermined period and then it will be off automatically.

33.Work mode indicator: Activate work mode can be viewed through this indicator. When the engine is started, default work mode is adjusted to digging. Press the Work button on the Opera Instrument Panel to change the active work mode. The work mode sequences are given in the table depending on the type of the machine.
Refer to "Chapter 3.4.7.2. Attachment Settings" for more information about configuration of the optional attachments.
34. Home key Touch to return the home page.
35. Camera key Touch to view the camera. Touch again to view the next camera. Touch home key or back key to exit from the camera page
36. Menu key Touch to enter the menu.
Digging mode: Hydraulic oil is being sent to attachments without any priority.
Optional attachment mode: Various types of hydraulic attachments can be connected to the machine. Activated attachment symbol is displayed.
37. Back (Cancel) key Touch to exit current page/menu and return to previous page/menu.
38. Radio key Touch to open the radio page.
This symbol shows that the active attachment is a single acting attachment.
The number shows the attachment number which is assigned during creating the attachment under settings page.
39. USB/MP3 player key Touch to open the USB/MP3 player page.
This symbol shows that the active attachment is a double acting attachment.
The number shows the attachment number which is assigned during creating the attachment under settings page.
When the optional attachment is selected, the active attachment number will be displayed near the WORK optional attachment icon. Active attachment can be selected and attachment configuration can be changed through the instrument panel's menu, under the "Settings>Attachment Settings" page. There is an alternative shortcut to open this menu: select the optional attachment using the work button and touch the WORK optional attachment icon on the instrument panel.
40. AUX key Touch to open the AUX page.
3.4. MENU ITEMS
Touch the menu key (1) to enter the main menu. Alternatively, keep the menu/enter button on Opera Instrument Panel pressed for 3 seconds.
When entered, on the B Section of the instrument panel, instead of Gauges/Camera, the main menu is displayed.
The main menu includes 7 sub-menus as listed below:
LANGUAGE
Use this menu to set the machine control menu in your preferred language.
STATUS INFO
Operational parameters such as Machine Parameters, Engine Parameters, and Optional Attachment Parameters can be viewed through this menu.
WORKING HOURS
Different types of operating hours can be registered and viewed on this menu.
Maintenance
Hours remaining to the next maintenance, last maintenance hours and maintenance period can be adjusted. After maintenance performed, remaining hours can be reset to adjusted value.
Failures
Previously displayed alarms and warning messages that are registered in the control system can be viewed.
Machine Information
Software versions of the machine control unit, Instrument panel, Opera, Optional Attachment, Smartlink, Attachment Control Unit, and machine type information can be viewed through this menu.
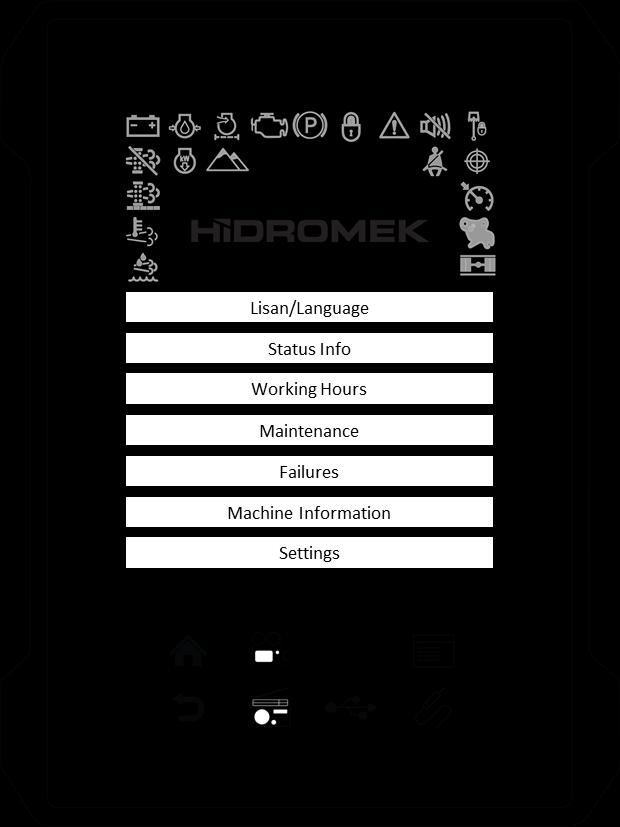
Settings
Settings can be done through this menu.
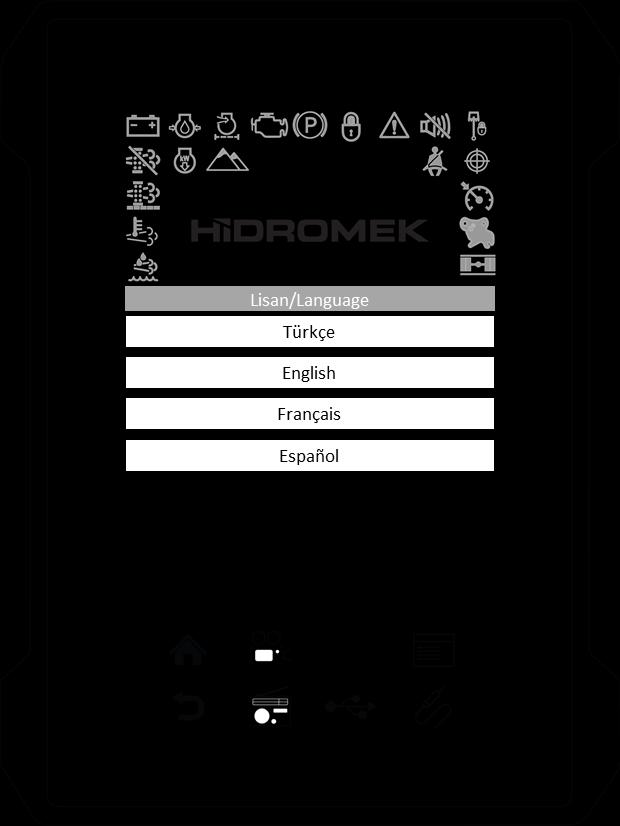
3.4.1. LANGUAGE
To set your preferred language, perform the followings:

Touch the “Lisan/Language” button to open the Language page.
Touching the button with a name of your desired language on, highlights that button and sets that language as the current language.
If you cannot see your desired language, slide the page up.
To exit from the menu, touch the back key or home key. Also, you can press the back key or home key on the Opera Instrument Panel.