3 minute read
10.8 COOLING SYSTEM - REMOVAL AND INSTALLATION

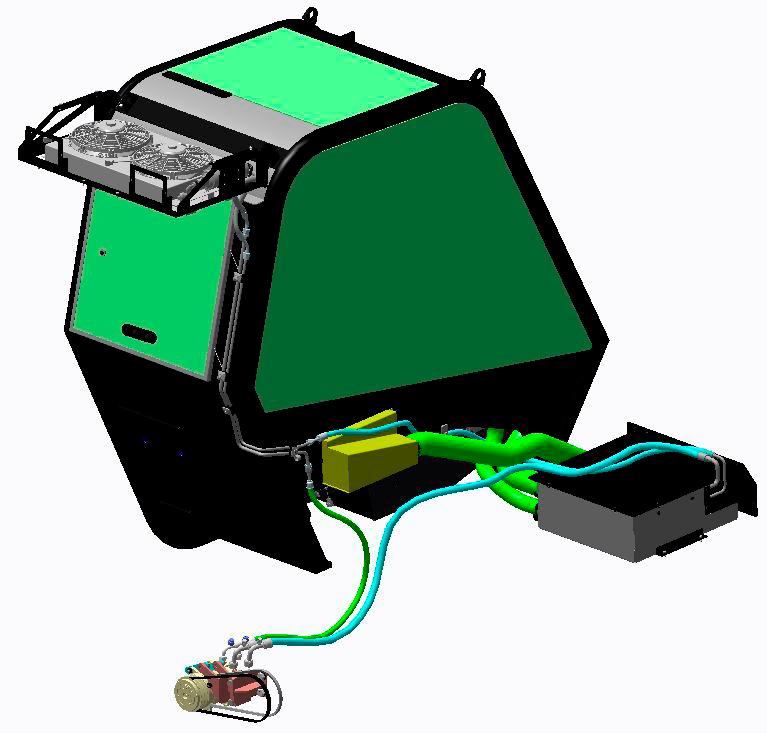
10.8.1 PREPARATION AND SAFETY INSTRUCTIONS
• Stabilise the machine on level ground, fully retract the boom, place transmission control lever in neutral position.
• Ensure the engine is Shut OFF.
• Disconnect the battery.
Note
Hot oils and fluids must be left to cool down before carrying out the uninstallation procedure.
Caution
Before considering radiator or oil cooler replacement for other than obvious damage, conduct a cooling system pressure test check the coolant specific gravity, coolant level, fan belt tension and dash panel temperature indicator.
• Unscrew the Bolts - Washers (1) and remove the license plate (2).
• Unscrew the Bolts - Washers (3) and uninstall the Grill (4).
NOTE !
Unintall the respective clamps prior to removal of the following hoses from the Radiator.
Cut the Cabie Ties. Use new Cable Ties while installation.
NOTE ! Disconnect all electrical connections.
Caution
Take help of an assistant for removal of Radiator from chassis.
• Loosen the Gear Pump Assembly (21) and release it down to allow Radiator assembly to pass through the cut out provided on the chassis.
Caution
Provide support at the bottom of Gear Pump assembly on the chassis to avoid falling down.
• Manoeuvre the radiator assembly out of the chassis through the cut out.
• Installation is the reverse of removal procedure.
10.9 ENGINE - REMOVAL
10.9.1 PREPARATION AND SAFETY INSTRUCTIONS
• Stabilise the machine on level ground, fully retract the boom, place transmission control lever in neutral position.
• Ensure the engine is Shut off.
• Disconnect the battery.
• Open engine cover. Allow system fluids to cool.
• Uninstall and remove the Air Intake System. Refer Air Intake System removal for procedure.
• Uninstall and remove the Exhaust System. Refer Exhaust System removal for procedure.
• Disconnect Fuel lines from the Engine.
• Disconnect all electrical connections from the Engine.
NOTE !
Fuel pipes and Electrical cables must be disconnected, capped (If the end is open) and labelled.
NOTE !
Remove the Heater Hoses attached to the engine (if equipped.
• Drain and remove the radiator assembly. Refer Cooling System removal for procedure.
• Label and disconnect all electrical wire connections on the engine.
!
Caution
Engine harness is routed and attached to engine using hold-down clamps and plastic wire ties at various places on engine. Before removing engine, ensure that harness has been completely separated (disconnected) from engine. Move harness clear of engine, and with help of an observer, ensure that engine clears harness during removal.
• Secure the engine with a lifting strap or chain from the appropriate lifting points. Use a suitable hoist or overhead crane.
• Unscrew the Bolts-Washers (1) from the Engine mounts(3) on both LH and RH side.

WARNING
Place
• Slightly lift and pull engine out of machine, ensure that engine clears all frame components during removal.
• Place engine on a flat, level surface.
10.10 ENGINE -INSTALLATION
• Secure the engine with a lifting strap or chain from the appropriate lifting points. Use a suitable hoist or overhead crane.
• Install the Engine Mounts on both RH and LH side on to the Engine with Bolts and washers.
Apply Loctite 242 to mount bracket bolt threads before installation.
• Lift engine and slowly push and lower into engine bay, ensure that engine clears frame, hose and harness components during engine installation.
• Position the Engine Mounts (3) on both LH and RH sides over the Transmission Isolator (5).
• Install the Hex Head Bolts- Washers (2) on to the Engine Mounts (3).
• Tightening torque for Hex Bolt (14) is 102 Nm.
• Push engine towards the Gear Box Assembly aligning with the corresponding holes and install the 12 Hex Bolts (4) and washers.
NOTE
• Install the Exhaust System.
• Install the Air Intake System.
• Connect the Fuel lines to the Engine.
• Install Cooling System.
• Reconnect the Battery.
• Install the engine cover and adjust.
• Check that all hydraulic system, electrical system, cooling system, fuel system and exhaust system connections are correct and connected appropriately.
• Start the engine and run to normal operating temperature then shut off engine. While engine is cooling, check for leaks.
CAUTION Keep a Class B fire extinguisher handy.
• Allow engine to cool. Check radiator coolant level and add coolant if required. Replace pressure cap.
• Check for leaks from engine, main hydraulic pump and lines, gear box assembly, hydraulic reservoir and fuel tank. Check the levels of all fluids and lubricants. Fill as required.
• Obtain and connect an appropriate engine analyzer or tachometer. Check engine rpm at full throttle.
• Purge hydraulic system of air by operating all boom functions through their entire range of motion several times. Check hydraulic oil level.
• Check for proper operation of all components.
• Turn OFF the Engine.
10.11
10.11.1
SPECIFIC ENGINE TOOLING
FAN BELT FITTING TOOL
Tool for facilitating elastic belt installation (Ref. 894113).
10.11.2
ELECTRONIC TENSION METER
Electronic tension meter (Ref 895692) for controlling belt tension.

10.11.3
ADDITIONAL ENGINE TOOLS
647461 EN (TCDflD6 3.6 l4 ENGINE) - SPECIFIC TOOLING