
5 minute read
4.5 Removing and installing radiator cowl


Vehicles with radiator mounting carrier, bolted – If fastener was cut off, bolt radiator mountings to lock carrier. Bolts -2- ⇒ Electronic parts catalogue (ETKA) .
Bolts
-2Specified torque
5 Nm
Continued for all vehicles
– Install front bumper cover ⇒ General body repairs, exterior; Rep. gr. 63 ; Front bumper; Removing and installing front bumper . – Install radiator cowl ⇒ “4.5.1 Removing and positioning the radiator cowl, Ateca, Leon 2013”, page 335 . – Connect coolant hose with plug-in connector ⇒ page 306 . – Add coolant ⇒ page 262 . Specified torques ♦ ⇒ “4.1.1 Assembly summary - radiator/radiator fan, Ateca, Leon 2013”, page 304 ♦ Protected by copyright. Copying for private or commercial purposes, in part or in whole, is not permitted unless authorised by SEAT S.A. SEAT S.A does not guarantee or accept any liability with ⇒ “3.1.1 Assembly overview - air filter housing, Ateca, Leon 2013”, page 393 respect to the correctness of information in this document. Copyright by SEAT S.A. 4.4.2 Removing and installing water radiator for charge air cooling circuit, Ibiza 2018, Arona
Special tools and workshop equipment required ♦ Drip tray for workshop hoist - VAS 6208-
♦ Removal wedge - 3409-

Removing – Drain coolant ⇒ “1.3.2 Draining and adding coolant, Ibiza 2018, Arona”, page 265 .
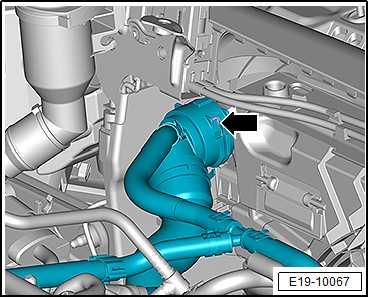
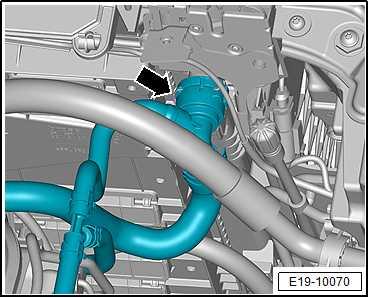
– Lift the retaining clip -arrow-, separate the coolant hose at the top left from the radiator.
– Lift retaining clip -arrow- and disconnect coolant hose (top right) from water radiator for charge air cooling circuit. – Remove radiator cowl.
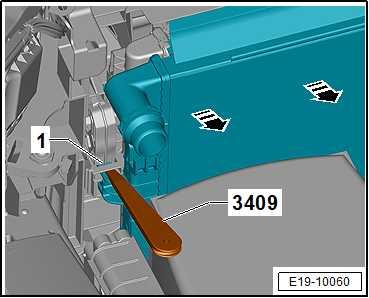
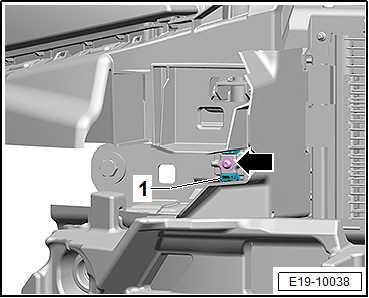
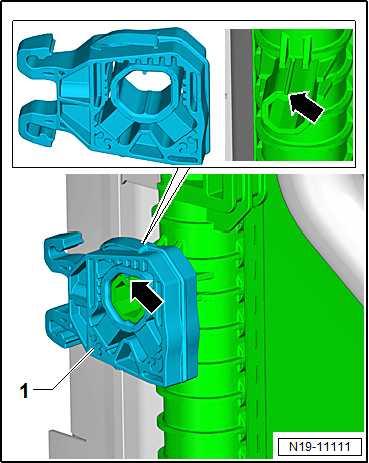
– Use the removal wedges to press both sides of locking tab -1- - 3409- and push the radiator -in the direction of the arrow-.
– Remove water radiator upwards ⇒ “4.5.2 Removing and positioning the radiator cowl, Arona, Ibiza 2018”, page 336 . – Remove front bumper cover ⇒ General body repairs, exterior; Rep. gr. 63 ; Front bumper; Removing and installing bumper cover .
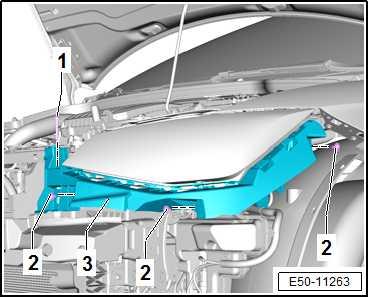
Protected by copyright. Copying for private or commercial purposes, in part or in whole, is not permitted unless authorised by SEAT S.A. SEAT S.A does not guarantee or accept any liability with respect to the correctness of information in this document. Copyright by SEAT S.A.Ibiza with original radiator mount support – Unscrew the screws -1- and -2- of the bottom headlight guide -3-.
– Remove headlight rail -3-.
Continued for all vehicles
– Release catches -arrows- of radiator mounting -1- on left and right, or cut through using side cutters.
Note
The radiator mounting will be reused when reinstalling the radia‐tor. It will then be bolted to the lock carrier. Bolts ⇒ ETKA (Electronic parts catalogue) .

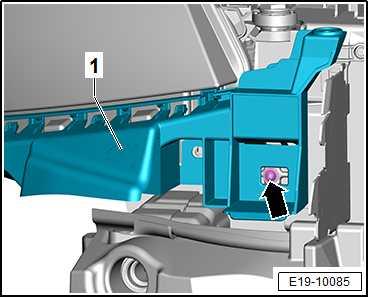
Ibiza with coolant bearing support, screwed – Protected by copyright. Copying for private or commercial purposes, in part or in whole, is notLeft and right, using the fixing of the bottom guide -1-, unscrew permitted unless authorised by SEAT S.A. SEAT S.A does not guarantee or accept any liability withthe bolt -arrow- from the cooler bracket. respect to the correctness of information in this document. Copyright by SEAT S.A.
Arona with coolant bearing support, screwed – Unscrew the screws -arrow- of the radiator mounting bracket -1- right and left.
Vehicles with air conditioner compressor – Loosen the clips -arrows- using the removal wedge - 3409-1- and disconnect the air line -2-.

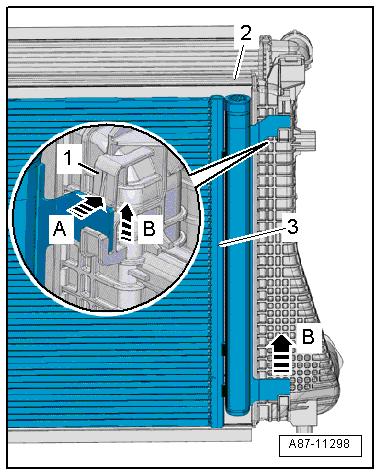
– Push upper edge of radiator slightly in direction of engine. – Press catches -1- on both sides in direction of -arrow A- to release them.
– Pull condenser -3- in -direction of arrow B-, and detach it from charge-air cooler -2-. – Tie up condenser to lock carrier.
Continued for all vehicles
– Dismantle and remove radiator mountings -1- right and left on the radiator.
– Pull water radiator for charge air cooling circuit -1- at bottom out of radiator mountings -arrows-. – Remove water radiator for charge air cooling circuit down‐wards.
Installing Install in reverse order of removal, observing the following:
Note
Protected by copyright. Copying for private or commercial purposes, in part or in whole, is not permitted unless authorised by SEAT S.A. SEAT S.A does not guarantee or accept any liability with respect to the correctness of information in this document. Copyright by SEAT S.A.

♦ Observe the instructions if there are minor dents in the fins ⇒ “3.7 Fitting radiator and condensers”, page 12 . ♦ Renew O-rings after removal.
– Insert water radiator for charge air cooling circuit -1- at bottom into radiator mountings -arrows-.
– Bring condenser -3- into installation position.
Protected by copyright. Copying for private or commercial purposes, in part or in whole, is not permitted unless authorised by SEAT S.A. SEAT S.A does not guarantee or accept any liability with respect to the correctness of information in this document. Copyright by SEAT S.A.
Vehicles with air conditioner compressor – Install air duct -2-.
Installation position of radiator mounting – Fit radiator mountings -1- on left and right onto radiator. When doing so, note the installation position -arrow-.
– Swing water radiator for charge air cooling circuit into lock carrier. Ensure proper seating of radiator mountings -1- in lock carrier.
Protected by copyright. Copying for private or commercial purposes, in part or in whole, is not permitted unless authorised by SEAT S.A. SEAT S.A does not guarantee or accept any liability with respect to the correctness of information in this document. Copyright by SEAT S.A.


