3 minute read
2.4 Removing and installing electric coolant pump


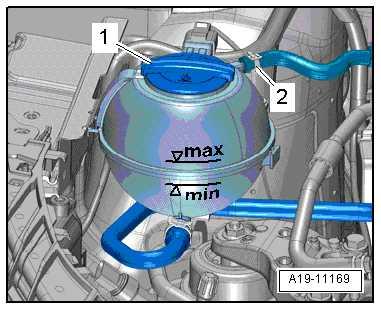
– Check coolant level.
• The coolant level must be between the “min. mark” and the “max. mark” when the engine is cold. • When the engine is at operating temperature, it is permissible that the coolant level is at the “max. mark” or above.
– Top up with coolant again if necessary.
Protected by copyright. Copying for private or commercial purposes, in part or in whole, is not permitted unless authorised by SEAT S.A. SEAT S.A does not guarantee or accept any liability with respect to the correctness of information in this document. Copyright by SEAT S.A.

2 Coolant pump, regulation of cooling system
⇒ “2.1 Assembly overview - coolant pump, thermostat”, page 278 ⇒ “2.2 Assembly overview - electric coolant pump”, page 280 ⇒ “2.3 Assembly overview - coolant temperature sender”, page 282 ⇒ “2.4 Removing and installing electric coolant pump”, page 283 ⇒ “2.5 Removing and installing coolant pump”, page 286 ⇒ “2.6 Removing and installing thermostat”, page 291 ⇒ “2.7 Removing and installing toothed belt pulley for coolant pump”, page 294 ⇒ “2.8 Removing and installing coolant temperature sender G62 ”, page 294 ⇒ “2.9 Removing and installing radiator outlet coolant tempera‐ture sender G83 ”, page 297
2.1 Assembly overview - coolant pump, thermostat
1 - Thermostat housing ❑ Removing and installing ⇒ “2.5 Removing and in‐stalling coolant pump”, page 286 2 - Thermostat ❑ For cylinder block cool‐ant circuit ❑ Until >> 10.07.2016: Start of opening at ap‐proximately 80 °C ❑ As of 11.07.2016 >>: Start of opening at ap‐proximately 97 °C ❑ Removing and installing ⇒ “2.6.2 Removing and installing thermostat for cylinder block coolant circuit”, page 293 3 - Seal ❑ Renew after removal
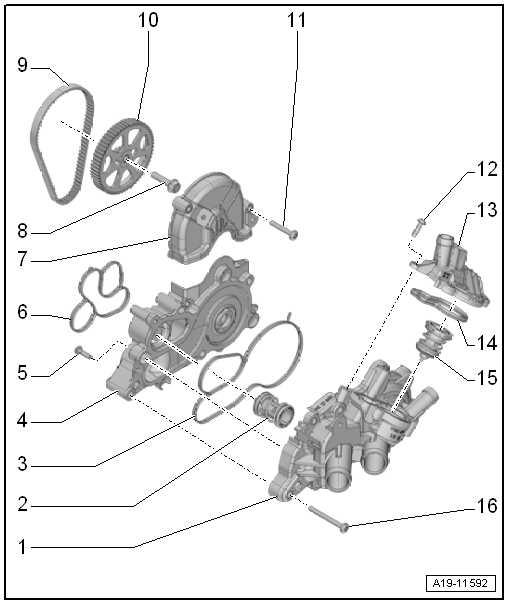
4 - Coolant pump ❑ Removing and installing ⇒ “2.5 Removing and in‐stalling coolant pump”, page 286 ❑ Renew toothed belt as well when renewing coolant pump 5 - Bolt ❑ Thread-forming ❑ Fit and screw in bolt by hand so that it screws
Protected by copyright. Copying for private or commercial purposes, in part or in whole, is not permitted unless authorised by SEAT S.A. SEAT S.A does not guarantee or accept any liability with respect to the correctness of information in this document. Copyright by SEAT S.A.
into old thread Then tighten bolt to torque. ❑ Specified torque and tightening sequence ⇒ page 280 6 - Seal ❑ Renew after removal
7 - Toothed belt guard ❑ For toothed belt for coolant pump 8 - Bolt ❑ Renew after removal ❑ 20 Nm +90°
9 - Toothed belt ❑ For coolant pump ❑ Renew after removal
10 - Coolant pump pulley ❑ For coolant pump ❑ Removing and installing ⇒ “2.7 Removing and installing toothed belt pulley for coolant pump”, page 294 ❑ Fitting position ⇒ page 294 ❑ Apply sealant when installing 11 - Bolt ❑ 8 Nm
12 - Bolt ❑ Thread-forming ❑ Fit and screw in bolt by hand so that it screws into old thread Then tighten bolt to torque. ❑ Specified torque and tightening sequence ⇒ page 280 13 - Slider ❑ For thermostat
14 - Seal ❑ Renew after removal
15 - Thermostat
Protected by copyright. Copying for private or commercial purposes, in part or in whole, is not❑ For main coolant circuit (radiator) permitted unless authorised by SEAT S.A. SEAT S.A does not guarantee or accept any liability with respect to the correctness of information in this document. Copyright by SEAT S.A.❑ Until >> 10.07.2016: Start of opening at approximately 105 °C ❑ As of 11.07.2016 >>: Start of opening at approximately 87 °C ❑ Removing and installing ⇒ “2.6.1 Removing and installing thermostat for main coolant circuit (radiator)”, page 291 ❑ Fitting position ⇒ page 280 16 - Bolt ❑ Specified torque and tightening sequence ⇒ page 289


