4 minute read
Replacing the toothed belt (engine 2.0 liters


Turn Poly-V belt tensioner in the direction of the arrows in Figure 2.79. Clear Poly-V belt. Remove the lower engine splash guard. Block and squeeze the Poly-V belt tensioner in the direction of the arrow (clockwise).
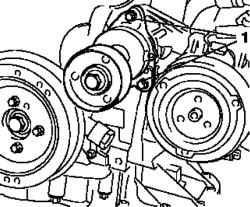
Fig. 2.80. Screw tensioner Poly-V
belt: 1 - screws
Loosen the clamping screws and remove the bearing compressor tensioner Poly-V belt (Figure 2.80). Remove the snubber holding his attachment bolt drive gears. Loosen the mounting bolts and remove the bottom of the cover toothed belt with the back cover toothed belt.
Setting
Attach the bottom part of the new toothed belt cover to the back cover of the toothed belt, tighten the time 6 Nm Attach the snubber to the drive gears toothed belt, tighten the moment 20 Nm Connect Poly-V belt tensioner to the support of the compressor, tighten the moment 25 Nm Squeeze the Poly-V belt tensioner (clockwise) and remove the retainer. Install the lower engine splash guard Replace Poly-V belt.
NOTE Make sure that the direction of rotation and position of Poly-V belt compliance.
Tighten Poly-V belt, using a Poly-V belt tensioner. Attach the top of the cover toothed belt to the back cover of the toothed belt, tighten the time 6 Nm Replace the air filter housing with the sensor mass air flow. Connect the wiring harness connector sensor mass air flow.
Withdrawal
Unplug the wiring harness connector sensor mass air flow. Disconnect the air intake hose, inlet pipe. Remove the air filter housing with the sensor mass air flow. Loosen the mounting bolts and remove the top element covers a toothed belt from the back cover toothed belt. Check direction of rotation of Poly-V belt. Turn Poly-V belt tensioner clockwise. Clear Poly-V belt. Remove the lower engine splash guard. Block and squeeze the Poly-V belt tensioner in the direction of the arrow (clockwise). Loosen the clamping screws and remove the bearing compressor tensioner Poly-V belt. Remove the snubber holding his attachment bolt drive gears. Loosen the mounting bolts and remove the bottom of the cover toothed belt with the back cover toothed belt. Attach a special device KM-6173 to the body of the front axle.
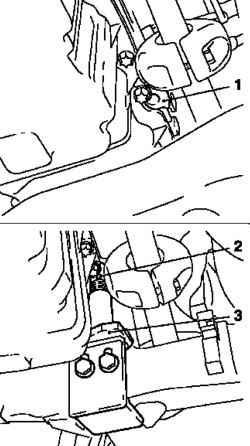
Fig. 2.81. Mounting a special
device KM-6173 to the body of the front axle: 1 - mount on the engine block, 2 - support; 3 - a special device
Raise your legs to hit in the neck fastening on the cylinder block (Figure 2.81). Loosen the mounting bolts (arrows) on adjusting tire accessories KM-6001-A.
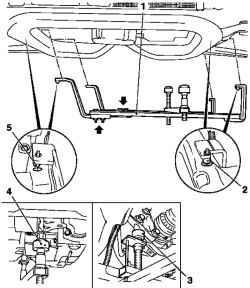
Fig. 2.82. Installation of a special
device KM-6001-A on the housing front axle: 1 - a special device, 2, 5 neck, 3 - rear support 4 - front support
Install it as shown in Figure 2.82.
NOTE Necks should be in the holes of the guiding body of the front axle.
Tighten the bolts fastening the adjustment tires. Raise the front and rear pillars, and then sending them in front of the necks brackets front and rear damping block engine.
NOTE Necks should be in the supports gapless.
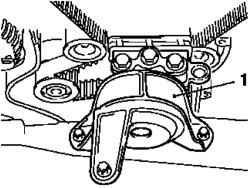
Fig. 2.83. Damping engine block: 1
- block
Remove the damping motor unit with spar and support damping engine block (Figure 2.83).
Adjustment
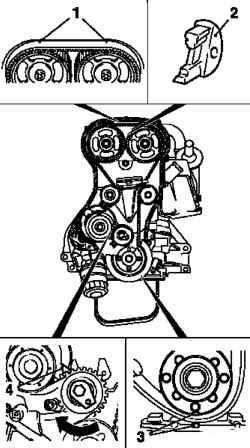
Fig. 2.84. Adjust the toothed belt: 1 - marks on the lid of the cylinder head, 2 - a special tool, 3 - mark the first cylinder; 4 - pointer regulator
Set the crankshaft in TDC position of the first cylinder (label 3) (Fig. 2.84).
NOTE Rotate the crankshaft slowly and smoothly. Turn his attachment bolt drive gears. NOTE Notches on the camshaft sprocket should be aligned with marks on the lid of the cylinder head.
Block camshafts with a special tool KM-853 (Fig. 2.84) Loosen the bolt mounting tension pulley toothed belt. Turn the eccentric knob in the direction of the arrow (clockwise) until the pointer reaches the left limiter (Figure 2.84). Check direction of rotation of the toothed belt. Remove the timing belt.
Setting
Check timing belt for wear and replace if necessary. Pay attention to the direction of rotation of the toothed belt. Install timing belt.
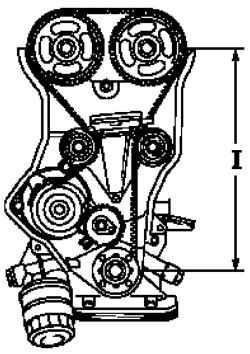
Fig. 2.85. Party Tension
NOTE Make sure that the side of tension I stretched (Fig. 2.85).
NOTE Costs will depend on the reference mark.
Adjust the tension of the toothed belt. Attach damping engine block to spar and tighten the moment 35 Nm Attach the bracket damping engine block to frame damping engine block and tighten the moment 55 Nm Remove the mounting KM-6001-A and KM-6173. Attach the bottom of the cover toothed belt to the back cover of the toothed belt and tighten the moment of 6 Nm Attach snubber to lead the drive gear and tighten the moment 20 Nm Hold him for attachment bolt drive gears. Replace Poly-V belt tensioner on the anvil of the compressor and tighten the moment 25 Nm Squeeze the Poly-V belt tensioner (clockwise) and remove the retainer. Install the lower engine splash guard. Replace Poly-V belt.
NOTE Make sure the correct direction of rotation and of Poly-V belt.
Tighten Poly-V belt, using a Poly-V belt tensioner. Install the upper part of the toothed belt cover on the back cover of the toothed belt and tighten the moment of 6 Nm Replace the air filter housing with the sensor mass air flow.
NOTE Do not forget to write the date of the replacement tooth belt.
Connect the air intake hose to the intake tube and secure it ring. Connect the wiring harness connector sensor mass air flow.


