
Academic Authors: Jatinder Kaur, Ayushi Jain
Book Production: Rakesh Kumar Singh
Project Lead: Jatinder Kaur
VP, Learning: Abhishek Bhatnagar
All products and brand names used in this book are trademarks, registered trademarks or trade names of their respective owners.
© Uolo EdTech Private Limited
First published 2025
This book is sold subject to the condition that it shall not by way of trade or otherwise, be lent, resold, hired out, or otherwise circulated without the publisher’s prior written consent in any form of binding or cover other than that in which it is published and without a similar condition including this condition being imposed on the subsequent purchaser and without limiting the rights under copyright reserved above, no part of this publication may be reproduced, stored in or introduced into a retrieval system, or transmitted in any form or by any means, electronic, mechanical, photocopying, recording or otherwise, without the prior written permission of both the copyright owner and the above-mentioned publisher of this book.
Book Title: Hexa ICSE Computer Science Teacher Manual 4
ISBN: 978-81-985754-2-5
Published by Uolo EdTech Private Limited
Corporate Office Address:
85, Sector 44, Gurugram, Haryana 122003
CIN: U74999DL2017PTC322986
Illustrations and images: www.shutterstock.com, www.stock.adobe.com and www.freepik.com
All suggested use of the internet should be under adult supervision.
In today’s rapidly evolving digital landscape, computer science has become an essential field of study, shaping the world around us in countless ways. From the smartphones in our pockets to the vast networks that connect people across the globe, computer science drives innovation and progress in nearly every aspect of modern life. In today’s fast-paced digital world, understanding the basics of computer science is as important as learning to read, write, or solve maths problems.
Recognising this imperative, the National Education Policy (NEP) 2020 has strongly recommended the integration of coding skills, computational thinking, critical analysis, and problem-solving abilities into the curriculum.
Inspired by these insights, Uolo has introduced a comprehensive program, Hexa, for grades 1 to 8, to empower young minds with the knowledge and skills they need to thrive in the digital age. From the basics of how computers function to the tools that shape our digital landscape, this series opens the door to a world of endless possibilities.
We believe that learning computer science should be an engaging and accessible experience for all children. This series takes a project-based approach, allowing students to learn by way of concurrently applying acquired knowledge and skills. As they progress through the course, they will build strong foundations in computational thinking, coding basics, and digital literacy. Our program focuses on three key areas:
1. Computer Science Fundamentals: Core concepts are introduced step by step, ensuring a solid grasp of how computers function, and how information is processed and stored.
2. Latest Computer Tools: Various computer tools relevant to today’s world are included, equipping students with the confidence to thrive in the digital age.
3. Introduction to Coding: The series offers an introductory look into coding, preparing students for more advanced learning in the future.
To support teachers in delivering effective and engaging lessons, we offer a thoughtfully designed Teacher Manual to enhance the teaching and learning experience. Rather than prescribing teaching methods, the manual provides examples and demonstrates how and why teachers can apply these examples in their classes.
Each chapter in this manual is structured to provide a comprehensive lesson plan. The chapters are divided into multiple sessions, each following the Warm up, Engage, Build, and Sum up (WEBS) strategy.
• The Warm up phase sets the stage for learning by connecting to prior knowledge and building curiosity.
• The Engage phase captures the students’ attention and motivates them to participate actively.
• In the Build phase, questions from various sections are discussed to build the understanding of the students.
• Finally, the Sum up phase reinforces learning through easy-to-recall activities and questions.
Time duration for each section has been suggested based on the requirements of the students. Additionally, an answer key for every chapter is provided to assist teachers in assessing their students’ understanding and guiding their learning effectively.
We hope this Teacher Manual empowers educators to implement the curriculum effectively, support diverse student learning, and create interactive, engaging environments tailored to their students’ needs and interests.
Events, Sound, and Control Blocks
a Project in Scratch
Pen Extension and Drawing a Line
Erasing a Drawing and Adding a Delay
Saving and Opening a Scratch Project

This chapter is divided into the following sessions 1. Understanding Computers
Computer Memory
At the end of the session, the students will be able to:
● describe ancient devices and modern smart devices, including computers.
● describe the concept of Data, Processing, and Information.
Keywords
● Devices: Things around us that perform specific tasks are called devices.
● Computer: It is an electronic device or a machine that performs various calculations and carries out different tasks for us based on the instructions that we give it.
● Data: It is facts, numbers, or symbols that we collect and enter into the computer.
● Information: It is the knowledge or understanding that we gain when the computer analyses and puts together the data that we entered into it.
● CPU: The CPU is like the brain of the computer. It takes our inputs and processes them.
Ask the students what devices were there in ancient times, for instance, to know the time of the day.
Ask the students what devices are used in modern times and how the present-day devices are different from the older ones.
Explain about the various devices, including computers.
Explain about data, processing, and information.
Think and Tell
Group discussion
Conclude the concepts
Assign homework
5 mins Warm Up
● Ask the students what devices were there in ancient times to know the time of the day.
● Tell the students that people used sundials. They used the sun’s shadow to know what time it was.
● Ask the students what devices are used in modern times and how these devices are different from the old ones. Tell them that nowadays smartwatches are being used that not only tell us the time but also allow the use of the internet. Tell them that a computer is also one of these smart devices.
Explain the following concepts:
Learning Outcomes
Describe ancient devices and modern smart devices, including computers.
Describe the concept of Data, Processing, and Information.
Explanation
Tell them that things around us that perform specific tasks are called devices. Explain ancient and smart devices as given on pages 1 and 2.
Tell the students that a computer takes inputs from us in the form of ‘data’, processes them, and finally provides us with output in the form of ‘information’. Then explain the concept of Data, Processing, and Information as given on pages 2 to 4.
● Read aloud the questions provided in the Do It Yourself 1A section and encourage the students to solve the questions. Instruct the students to write the answers in their book.
Correct Responses:
1. a. Virus
2. a. F
b. T
c. F
d. T
3. Steps
b Processing the input
c Looking at the movement of the mouse on the screen
a Moving the mouse on the table
● Ask the students to give the answer to the question, “Name a few devices around you and say how you use them.” asked in the Think and Tell section, given on page 1.
Possible Responses: I use Television to watch educational shows and cartoons. I use my parents’ smartphone to call my friends, take photos, and access educational apps to make learning fun.
● Conduct a group discussion in the class among the students based on the topic, ‘‘Give one example of data and information with your partner.” provided in the Discuss section as mentioned on page 3.
Possible Response: Data: (32°C, 50% chances of rain), Information: It’s warm, and it might rain today.
● Ask the students to give the answer to the question, “Can you think of some more examples of input and output in computers?” asked in the Think and Tell section, given on page 4.
Possible Response: Input: Typing on the keyboard and Output: Displaying text on the monitor screen. Sum Up
3 mins
● Conclude the session by summarising that the things around us that perform specific tasks are called devices. Similarly, computers perform various calculations and carry out different tasks based on the instructions that we give them. A computer takes inputs from us in the form of ‘data’, processes them, and finally provides us with the output in the form of ‘information’.
● Assign the following from the Chapter Checkup given at the end of the chapter as homework.
A. Fill in the Blanks: Questions 1, 2, and 3
B. Tick the Correct Option: Question 5
C. Who Am I?: Question 2
E. Answer the Following: Questions 1 and 5
At the end of the session, the students will be able to:
● describe computer memory.
● describe primary memory and its types.
● describe secondary memory and secondary storage devices.
Keywords
● Memory: A computer has memory to store data and information.
● Bytes: Computer memory is measured in units called bytes.
● Cloud storage: It is like a big storage space on the internet where you can keep all your files and access them anytime, anywhere, and from any device as long as you are connected to the internet.
Ask the students to name the devices that can be used for storage, such as your diary, where you store all the details about your day-to-day activities.
Explain to the students what computer memory is.
Explain to them about the primary memory and its types. Explain to them about the secondary memory and the various secondary storage devices.
Think and Tell Conclude the concepts
Assign homework
5 mins
Warm Up
● Ask the students to name a few storage devices from their surroundings.
● Tell them that similar to the diary that stores the details of your entire day, a computer has memory to store the data and information. Everything that we do on the computer is stored in its memory.
Explain the following concepts:
Describe computer memory. Tell the students that the computer has a memory to store data and information, as given on page 5.
Describe primary memory and its types.
Explain to the students that the primary memory is of two types—RAM and ROM, as given on pages 6 and 7.
Describe secondary memory and secondary storage devices. Explain to the students about the secondary memory and secondary storage devices, like Hard Disk Drive (HDD), Pen Drive, Memory Card, etc., as given on pages 7 to 9.
● Read aloud the questions provided in the Do It Yourself 1B section and encourage the students to solve the questions. Instruct the students to write the answers in their book.
Correct Responses:
1. a. CD: Secondary Memory Device
b. HDD: Secondary Memory Device
c. DVD: Secondary Memory Device
d. ROM: Primary Memory
e. Pen Drive: Secondary Memory Device
f. RAM: Primary Memory
2. a. RAM
b. ROM
c. ROM
d. RAM
3. Cloud Storage → HDD → Pen Drive → DVD → CD
Note: These are general trends and the actual storage capacity may vary from model to model and with advancements in technology.
7 mins
Build
● Ask the students to give the answer to the question, “Sometimes, our computers hang, or programs suddenly crash. Is this problem related to RAM or ROM?” asked in the Think and Tell section, given on page 7.
Correct Response: RAM
● Conclude the session by summarising that everything that we do on the computer is stored in its memory, for example, saving a file, storing pictures, and downloading something from the internet. Primary memory is the computer’s internal memory where it stores data related to currently running programs. Secondary memory is the computer’s external storage beyond the primary memory.
● Assign the following from the Chapter Checkup given at the end of the chapter as homework.
A. Fill in the Blanks: Questions 4, 5, 6, and 7
B. Tick the Correct Option: Questions 1, 2, 3, and 4
C. Who Am I?: Questions 1, 3, and 4
D. Write T for True and F for False: Questions 1, 2, 3, and 4
E. Answer the Following: Questions 2, 3, and 4
F. Apply Your Learning: Questions 1, 2, and 3
This chapter is divided into the following sessions
1. Operating Systems and Desktop Elements
2. Shortcut Menus and Keys
3. Desktop Settings
1. Operating Systems and Desktop Elements
At the end of the session, the students will be able to:
● describe an operating system and its features.
● describe about the Windows 10 operating system.
● discuss the different elements of the Windows 10 desktop.
Keywords
● Operating system: An Operating System is a software that helps us to communicate with the computer and tell it what to do.
● Software: It is a set of instructions that tells a computer what to do.
● Booting: When you press the power button to turn on your computer, the computer starts getting the system ready for you to use it. This process is called booting.
Ask the students what things they can do on a computer. Ask the students if they know what makes a computer run smoothly and do multiple things.
Explain to the students about the operating system and its features. Also tell them about the popular operating system—Windows 10 and the different elements of the desktop.
Think and Tell
Group
Conclude the concepts Assign homework
5 mins
Warm Up
● Ask students what tasks they can do on a computer.
● Tell the students that they can do a lot of things on computers—play music, watch videos, play games, etc. And then tell them that the operating system makes the computer run smoothly.
Explain the following concepts:
Describe an operating system and its features.
Describe about the Windows 10 operating system.
Discuss the different elements of the Windows 10 desktop.
15 mins
Explanation
Explain to the students that an operating system is a software that helps us communicate with the computer and tell it what to do. Also, explain its features, as given on page 13.
Introduce the students to the Windows 10 operating system and tell them the steps to start a computer with this operating system. Also, brief them about the taskbar, start button, icons and wallpaper, as given on pages 14 and 15.
Explain to the students about the taskbar and its components. Describe the Aero Peek feature of Windows 10. Also, tell them the steps to change the taskbar location, as given on pages 16 to 18.
● Read aloud the questions provided in Do It Yourself 2A and Do It Yourself 2B, Questions 1 and 2. Encourage the students to solve the questions. Instruct the students to write the answers in their book.
Correct Responses: Do It Yourself 2A
1. d. All of the above
3. Match the Columns. 3
2. a. F b. T c. T
Column A
Column B
Desktop Manages computer software
Booting Process of starting the computer
Taskbar Area where you see icons and wallpapers
1. c. Using Aero Peek 2.
● Ask the students to give the answer to the question ‘’Which icons do you think we should have on our desktop?’’ asked in the Think and Tell section, as given on page 14.
Possible Responses: Recycle bin, Google Chrome
● Conduct a group discussion in the class among the students based on the topic ‘’How can you take Cortana’s help to quickly open your favourite game?’’ provided in the Discuss section, as mentioned on page 17.
Possible Response: We can quickly open our favourite game by giving a voice command to Cortana, for example, saying “Hey Cortana, open [your favourite game]”.
3 mins
Sum Up
● Conclude the session by summarising that an operating system helps us to communicate with the computer and tell it what to do. An operating system has features such as easy-to-use interface, file management, multitasking, etc. Booting is the process that starts getting the system ready for you to use it when you turn on the computer. The Taskbar is the bar in the bottom of the window.
● Assign the following questions from the Chapter Checkup given at the end of the chapter as homework.
A. Fill in the Blanks: Questions 1, 2, 3, 4, and 5
B. Tick the Correct Option: Questions 3 and 4
C. Who Am I?: Questions 1, 3, 4, and 5
D. Write T for True and F for False: Questions 1, 3, and 4
E. Answer the Following: Questions 1, 2, 3, 4, and 5
At the end of the session, the students will be able to:
● open the shortcut menu to personalise the desktop.
● open the icon shortcut menu to change the properties of an application.
● apply few shortcut keys for Windows 10.
● Shortcut menus: They are the menus that pop up when we right-click on the desktop and icons.
Ask the students where do they keep their belongings (clothes, notebooks, toys, etc.) that they frequently use.
Explain the students about shortcut menus and the Windows 10 shortcut keys.
Group discussion Conclude the concepts
Assign homework
● Ask the students where do they keep their belongings that they frequently use.
● Tell them that we place our frequently used things on the tabletop. This is similar to putting our most important apps, files, and folders on the desktop.
15 mins
Explain the following concepts:
Open the shortcut menu to personalise the desktop.
Open the icon shortcut menu to change the properties of an application.
Apply few shortcut keys for Windows 10.
Tell the students that the shortcut menus are menus that pop up when we right-click on the desktop and icons. Also tell them the steps to open the shortcut menu, as given on pages 18 and 19.
Tell students the steps to open the icon shortcut menu to change the properties of an application, as given on page 19.
Tell the students that the windows key is a special key at the bottom-left of the keyboard. Also, tell them about a few shortcut keys and their functions, as given on pages 19 and 20.
● Read aloud the questions provided in Do It Yourself 2B section Question 3. Encourage the students to solve the questions. Instruct the students to write the answers in their book.
Correct Response:
3.
c. To personalise the desktop
● Name the option from the shortcut menu that lets you change features such as the desktop background, windows colour, etc.
Correct Response: Personalize
● Conduct a group discussion in the class among the students on the topic ’Use of Shortcut Menu’.
Possible Responses: We can choose a few options such as making new files or folders, sorting icons, opening or renaming the names of apps, etc.
● Conclude the session by summarising that the shortcut menus are menus that pop up when we right-click on the desktop and icons. You can personalise your desktop and change the properties of an application in Windows 10. The windows key is used in combination with other keys to make the shortcut keys.
● Assign the following questions from the Chapter Checkup given at the end of the chapter as homework.
C. Who Am I?: Question 2
● What is the shortcut key to open the Task View?
Correct Response: Windows key + Tab
● Name the option in the icon shortcut menu that helps you change the property of an application.
Correct Response: Properties
At the end of the session, the students will be able to:
● set the theme colour and theme font of the desktop.
● set the desktop background.
● set the screen saver.
● change mouse pointer.
● set date and time.
● adjust the volume.
Keywords
● Screen saver: It is a fun and colourful display that appears on a computer screen when you are not using it for a while.
● Toggle: It means switching between two options by pressing or clicking.
Ask the students if they know that they can change the background, theme colour, etc., of the desktop.
Explain to the students how to set the theme colour and theme font of the desktop.
Explain the students how to set the desktop background and screen saver.
Explain to the students how to change the mouse pointer.
Explain to the students how to set the date and time.
Explain to the students how to adjust the volume.
Think and Tell Conclude the concepts
Assign homework
5 mins
● Ask the students if they know that they can change the background or the theme colour of the desktop.
● Then, build the concept by telling them how to customise the colours on their computer.
Explain the following concepts:
Set the theme colour and theme font of the desktop.
Set the desktop background.
Set the screen saver.
Change mouse pointer.
Tell the students the steps to customise the colours on their computers. Also tell them the steps to adjust fonts on their computers, as given on pages 21 to 23.
Tell the students that they can change their desktop background by right-clicking on the desktop and selecting the Personalize option, as given on page 23.
Tell the students that a screen saver is a fun and colourful display that appears on a computer screen when you are not using it for a while. Also, tell them the steps to change the same, as given on pages 23 and 24.
Explain the steps to change the mouse pointer from the Control Panel app, as given on pages 24 to 26.
Set date and time. Explain to the students the steps to set the date and time, as given on pages 26 and 27.
Adjust the volume. Tell the students the steps to adjust the volume, as given on pages 27 and 28.
● Read aloud the questions provided in Do It Yourself 2C section. Encourage the students to solve the questions. Instruct the students to write the answers in their book.
Correct Responses:
1. d. Open the Start menu and click on “Time and Date”.
2. a. T b. T c. F d. F
Build
7 mins
● Ask the students to give the answer to the question ‘’What are some creative or fun screen savers that you have come across or would love to have on your computer?’’ asked in the Think and Tell section, as given on page 23.
Possible Responses: Bubbles, ribbons, photos, etc.
● Ask the students to give the answer to the question ‘’Which style of mouse pointer would you like to use?’’ asked in the Think and Tell section, as given on page 26.
Possible Responses: Normal select, text Select, etc.
3 mins
● Conclude the session by summarising that we can apply various settings such as theme colour, font, background, screen saver, mouse pointer, date and time, volume on the computer desktop, etc.
● Assign the following questions from the Chapter Checkup given at the end of the chapter as homework.
B. Tick the Correct Option: Questions 1 and 2
D. Write T for True and F for False: Question 2
F. Apply Your Learning: Questions 1, 2, 3, 4, and 5
This chapter is divided into the following sessions
1. Introduction to Files and Folders
2. Working with Files and Folders and Shortcut Icons
3. Good Practices While Using a Computer
At the end of the session, the students will be able to:
● work with files and folders.
● create a file, folder, and subfolder on the desktop.
Keywords
● File: A file is a digital space used to store different types of information on a computer. It acts like a container for items, like images, videos, texts, etc.
● Folder: A folder is a container that stores files. Folders help organise files, making them easier to find.
Ask the students how they keep their toys or books organised and why do they think it is important to have a designated place for everything.
Describe that just like we organise our physical belongings, we also organise our digital information on a computer using files and folders. Also, explain the steps to create files, folders, and subfolders to the students.
● Ask the students that how they keep their toys or books organised and why do they think it is important to have a designated place for everything.
● Relate the concept of organising the items on the computer to files and folders.
Explain the following concepts:
Learning Outcomes
Work with files and folders.
Create a file, folder, and subfolder on the desktop.
Explanation
Explain the concept of files and folders to students. Describe how all the information is stored in files on a computer system. A file is a digital space used to store different types of information on a computer, as given on page 32.
Explain the steps to create a Word file, folder, and sub-folder to the students as given on pages 33 and 34. Also, tell them that we can create different types of files.
● Read aloud the questions provided in the Do It Yourself 3A section and encourage the students to solve the questions. Instruct the students to write the answers in their notebook.
Correct Responses:
1. T 2. F 3. T 4. T
2. Steps to create a folder are:
a. Right-click on the desktop.
b. Position the cursor over the New option.
c. Click on the Folder option.
d. Give it a name.
● Conduct a group discussion in the class among the students based on the topic ”When we are at school, we take notes in our notebooks. Can we compare a computer file with a notebook?” provided in the Discuss section as mentioned on page 32.
Possible Responses: Yes, we can compare a computer file with a notebook. Just like we write and store information in a notebook at school, we can create and save information in a computer file. Both notebooks and computer files help us keep our thoughts, ideas, and important information organised and accessible.
● Conclude the session by summarising that files are digital containers that store different kinds of information on a computer, and folders help us organise these files. We learnt how to create a Microsoft Word file and folders or subfolders on the desktop to manage information effectively on a computer.
● Assign the following questions from the Chapter Checkup given at the end of the chapter as homework.
A. Fill in the Blanks: Questions 1 and 3
B. Tick the Correct Option: Questions 2, 3, and 4
C. Who Am I?: Questions 1 and 2
D. Write T for True and F for False: Questions 1 and 2
E. Answer the Following: Question 1
F. Apply Your Learning: Question 4
At the end of the session, the students will be able to:
● rename files and folders.
● select files and folders.
● duplicate and move files and folders.
● create shortcut icons on desktops.
Keywords
● Renaming: Renaming a folder or a file means changing the name of the digital files and folders.
● Duplicate: To duplicate is to make an exact copy of a file or folder.
● Move: To move is to transfer a file or folder to a different location.
● Shortcut icons: Shortcut icons are quick-access symbols on the desktop for frequently used files or folders.
● Delete: To delete is to remove a file or folder from the computer.
● Restore: Restore is to bring back a deleted file or folder from the recycle bin.
Ask the students if they label the boxes containing their important things.
Now, relate them to the concept of renaming the files and folders according to their preferences.
Explain to the students how to rename files and folders and how to select them.
Explain how to create a duplicate file and how to move a file or folder to a different location.
Also, describe how to create shortcut icons on the desktop.
Warm Up
Ask the students if they label the boxes containing their important things. Now, relate them to the concept of renaming the files and folders according to their preferences.
Explain the following concepts:
Rename files and folders.
Explain to the students that the new files and folders are assigned the default names once they are created. However, they can be renamed later, according to our preferences. Describe the steps to do so as given on pages 34 and 35.
Select files and folders. Explain that to do any operation on a file or folder, we first need to select it. Discuss that there are various methods to select single or multiple files and folder, as given on pages 36 and 37.
Duplicate and move files and folders.
Create shortcut icons on desktops.
Deleting and restoring files and folders.
Explain to the students that we can create a duplicate file or a folder by using the Copy and Paste options as given on pages 37 and 38. Also, describe the steps to do so.
After that, explain the concept of moving a file or folder to a different location on the computer along with the steps as given on page 39.
Explain to the students that the shortcut icon helps us quickly open a file or folder, as given on page 39. Also, describe the steps to do so as given on page 40.
Describe the use and demonstrate the steps to delete and restore files and folders, as given on page 41.
● Read aloud the questions provided in the Do It Yourself 3A and Do It Yourself 3B sections and encourage the students to solve them. Instruct them to write the answers in their book.
Correct Responses: (Do It Yourself 3A)
1. a. T b. F c. T d. T e. F
Correct Responses: (Do It Yourself 3B)
Left 2. Ctrl 3. Shift 4. Copy 5. Cut 6. Shortcuts
● Ask the students to give the answer to the question “Why do you think it is important to give correct names to folders?” asked in the Think and Tell section given on page 35.
Possible Response: Giving correct names to folders is important for efficient organisation and easy access to files.
● Ask the students to give the answer to the question “How is moving files and folders different from duplicating them?” asked in the Think and Tell section given on page 39.
Possible Response: Moving files and folders relocates them, while duplicating creates copies of them.
● Conclude the session by summarising that we can rename the files and folders in our computer. We need to select the files before performing any operations on them. We can also create duplicate files using Copy and Paste options and move the files using Cut and Paste options. At last, revise the steps of creating the shortcut icons on the desktop.
● Assign the following questions from the Chapter Checkup given at the end of the chapter as homework.
A. Fill in the Blanks: Questions 2, 4, and 5
B. Tick the Correct Option: Question 1
C. Who Am I?: Questions 3 and 4
D. Write T for True and F for False: Questions 3 and 4
E. Answer the Following: Questions 2 and 3
F. Apply Your Learning: Questions 2 and 5
At the end of the session, the students will be able to:
● follow good practices while using a computer.
Ask the students whether they follow the teacher’s instructions to move in a line or to keep quiet in the class. Tell them that just as they practice good manners in daily life, we also have a few good practices when using a computer.
Discuss the various good practices with the students that they should follow while using the computer.
Group discussion
Conclude the concepts
Assign homework
Warm Up
● Ask the students whether they follow the teacher’s instructions to move in a line or to keep quiet in the class.
● Tell them that just as they practice good manners in daily life, we also have a few good practices when using a computer.
Explain the following concept:
Learning Outcome
Follow good practices while using a computer.
Explanation
Explain to the students that they should follow a few good practices when using a computer, such as naming and storing the files and folders properly, organising the files in labelled folders, being respectful of others’ files, etc., as given on page 42.
● Read aloud the questions provided in the Do It Yourself 3C and encourage students to solve them. Instruct them to write the answers in their book.
Correct Responses: 1. T 2. T 3. F 4. F
● Conduct a group discussion in the class among students based on the topic provided below: Discuss why it is important to name and store files properly.
Possible Responses: It helps to keep the computer organised, especially when many people share one computer.
3 mins
Sum Up
● Conclude the session by summarising that students should follow a few good practices when using a computer, such as naming and storing the files and folders properly, organising the files in labelled folders, being respectful of others’ files, etc.
● Assign the following questions from the Chapter Checkup given at the end of the chapter as homework.
F. Apply Your Learning: Questions 1 and 3
This chapter is divided into the following sessions
1. About the Internet and Basic Requirements 2. Basic Terminologies of the Internet
At the end of the session, the students will be able to:
● define internet.
● describe about the history of the internet.
● identify the basic requirements for an internet connection.
Keywords
● Internet: The internet is a network of networks that connects computers and devices from all over the world.
● Network: A network is a group of computers connected to each other.
Ask the students what makes it possible to video call a friend who may be in a different part of the world. Explain the term ‘internet’ to the students. Tell the students about the history of the internet and how it began. Also, discuss the basic requirements for an internet connection.
Warm Up
● Ask the students what makes it possible to video call a friend who may be in a different part of the world.
● Then relate the concept by telling them that internet helps them do so.
Explain the following concepts:
Learning Outcomes
15 mins
Explanation
Define internet. Explain to the students that the internet is a network of networks that connects computers and devices from all over the world. Also, get them familiar with the term network, as given on page 45.
Describe about the history of the internet.
Identify the basic requirements for an internet connection.
Discuss the timeline of the internet with the students and tell them how the internet started, as given on pages 45 and 46.
Tell the students that we need a computer and an internet connection to start exploring the internet. Tell them to set up an internet connection, we need a modem, ISP, and communication media as given on pages 47 and 48.
● Read aloud the questions provided in the Do It Yourself 4A and encourage students to solve them. Instruct them to write the answers in their notebook.
Correct Responses:
● Conduct a group discussion in the class on the topic “What would our lives be without internet?” provided in the Discuss section on page 47.
Possible Responses: Without the internet, our lives would be limited in terms of communication, access to information, and everyday conveniences.
● Ask the students to answer the question, “Can you think of more examples of Analog and Digital signals?” asked in the Think and Tell section on page 47.
Possible Responses: Analog signals: Human voice transmitted through airwaves. Digital signals: Text message sent over a cellular network.
● Conduct a group discussion in the class based on the topic “Find out which type of internet connection your house or school has.” provided in the Discuss section on page 48.
Possible Response: Cable networks are used in homes. A cable from a local central office (CO) runs to our homes or schools and provides internet.
3 mins
Sum Up
● Conclude the session by summarising that the internet is like a web that connects computers and phones all over the world, letting us send messages, pictures, and even see each other on video calls. It started many years ago with just a few computers and has grown so much that we can now shop online, learn new things, and make friends in faraway places. To connect to the web, our computers use a special box called modem and an ISP. The fastest connection is through fibre optic cables as they carry information in the form of light.
● Assign the following questions from the Chapter Checkup given at the end of the chapter as homework.
A. Fill in the Blanks: Questions 1 and 2
B. Tick the Correct Option: Questions 1 and 5
C. Who Am I?: Questions 4 and 5
D. Write T for True and F for False: Questions 1, 2, 3, 4, and 5
E. Answer the Following: Questions 1, 2, and 4
F. Apply Your Learning: Questions 1 and 2
At the end of the session, the students will be able to:
● define the basic terminologies of internet.
● describe about Google Chrome, search engines, URL, and Net Surfing.
Tell the students that whenever they pick a new hobby, they need to learn some basic terms about it. Similarly, before using the internet, they need to know some basic terms about it.
Discuss the basic terminologies of the internet such as Web page, Website, WWW, Web browser, Search Engine, URL, and Net Surfing. Discuss Google Chrome and the steps to use Chrome and its components.
Action Plan
Group discussion Conclude the concepts Assign homework
Warm Up
● Tell the students that whenever they pick a new hobby, they need to learn some basic terms about it. Similarly, before using the internet, they need to know some basic terms about it.
● Build the concept to introduce and explain to them the basic terminologies of internet.
Explain the following concepts:
Define the basic terminologies of internet.
Describe the basic terminologies of the internet, such as webpages, websites, WWW, etc., to students, as given on pages 49 and 50. Describe about Google Chrome, search engines, URL, and Net Surfing.
Explain to the students that Google Chrome is a web browser made by Google. It is one of the most popular browsers in the world. Explain the steps to open Chrome. Also, describe about search engines, URL, and net surfing to students, as explained on pages 50 to 52.
● Read aloud the questions provided in the Do It Yourself 4B and encourage the students to solve them. Instruct them to write the answers in their notebook.

c Web World Wide
Correct Responses:
Match the column:
1. b. World Wide Web
2. a World Wild Web
Column A


Build


7 mins
● Conduct a group discussion in the class on the topic ‘Net Surfing’.
Possible Responses: Net surfing is used to visit websites, watch videos, listen to music, and shopping. We require an internet connection and web browser for it.
3 mins
Sum Up
● Conclude the session by summarising that digital documents, called webpages, when grouped together, form a website. We use programs called web browsers to explore websites and find information through search engines such as Google Chrome, all by typing in unique addresses called URLs. Net surfing involves using a computer or mobile device with an internet connection and a web browser to visit websites, watch videos, listen to music, and discover new things online.
● Assign the following questions from the Chapter Checkup given at the end of the chapter as homework.
A. Fill in the Blanks: Questions 3, 4, and 5
B. Tick the Correct Option: Questions 2, 3, and 4
C. Who Am I?: Questions 1, 2, and 3
E. Answer the Following: Questions 3 and 5
F. Apply Your Learning: Questions 3 and 4
This chapter is divided into the following sessions
1. Understanding Stepwise Thinking
2. Learn with Examples
At the end of the session, the students will be able to:
● describe problem solving.
● solve problems using stepwise thinking.
● use reasoning with better solutions.
Keywords
● Problem solving: Problem solving means to find a solution to a problem.
● Stepwise thinking: Stepwise thinking means to think step by step to complete a task or solve a problem.
● Reasoning: Reasoning refers to the act of thinking about the facts in order to make a decision.
Ask the students what steps they would take to clean their rooms.
Explain stepwise thinking to the students.
Encourage the students to consider the reasoning behind their problemsolving approach. Explain reasoning to the students.
Group discussion
Conclude the concepts
Assign homework
5 mins
Warm Up
● Ask the students what steps they would take to clean their rooms.
● Discuss the step-by-step problem-solving process to clean rooms.
Explain the following concepts:
Describe problem solving.
Solve problems using stepwise thinking.
Use reasoning with better solutions.
15 mins
Discuss with the students that when we try to find a solution to a problem, it is known as problem solving. Explain the concept of problem solving with the help of an example of cleaning the room, as given on page 56.
Describe that stepwise thinking means to think step by step to complete a task or solve a problem. Explain stepwise thinking to the students, as given on pages 56 and 57.
Define that the act of thinking about the facts to make a decision is called reasoning. Explain reasoning to the students, as given on pages 56 and 57.
Ask the following questions to the students to check their understanding.
● Why is it important to break a problem down into smaller parts?
a. It makes the problem look bigger.
b. It helps to solve the problem more easily.
c. It is not important.
d. It makes the problem more complicated.
Correct Response:
b. It helps to solve the problem more easily.
● What should you do after identifying the problem?
a. Solve it immediately.
b. Break it down into smaller parts.
c. Ignore it.
d. Tell someone else to solve it.
Correct Response:
b. Break it down into smaller parts.
● Conduct a group discussion in the class among the students based on the topic ‘What role does reasoning play in solving problems?’
Possible Response: Reasoning helps us think about the facts and make better decisions, ensuring we choose the best solution to a problem. Sum Up 3 mins
● Conclude the session by summarising that solving a problem is like cleaning an untidy room; it involves identifying the problem, breaking it down into smaller parts, and then solving each part one by one. Also, reasoning helps us make good decisions by thinking carefully about our choices.
● Assign the following questions from the Chapter Checkup given at the end of the chapter as homework.
A. Fill in the Blanks: Questions 1, 2, and 3
B. Write T for True and F for False: Questions 1, 2, and 3
At the end of the session, the students will be able to:
● plan a picnic using stepwise thinking.
● find a lost watch using stepwise thinking.
Ask the students to create a list of picnic activities. Also, ask them how would they find their favourite watch if they had lost it at the school.
Encourage the students to brainstorm activities for a picnic. Help the students to prepare a list of to-do things on a picnic.
Encourage the students to consider losing their favourite watch at school. Brainstorm with the students to follow the steps to find the lost watch.
● Ask the students to create a list of picnic activities.
Group discussion Conclude the concepts
Assign homework
● Also, ask them how would they find their favourite watch if they had lost it at school. Relate the examples with identifying the problem and then breaking the problem in smaller steps in order to solve it.
Engage
Explain the following concepts:
Plan a picnic using stepwise thinking.
Explain to the students how to arrange a picnic step-by-step to ensure they have the best experience possible. Explain the process to the students, as given on pages 57 and 58.
Find a lost watch using stepwise thinking.
Discuss with the students what steps they would take if they have lost their favourite watch at school. Explain the stepwise process to the students, as given on pages 59 and 60.
Ask the following questions to the students to check their understanding.
● What would you do if you found your watch?
Correct Responses: Finally, when you find your watch, thank the person who found it and returned it. Make a promise to yourself to be more careful in future.
● How will you and your guests get to the picnic location?
Correct Responses: By taking a car, or a rented van, or a school bus.
● Conduct a group discussion in the class among the students based on the topic ‘Imagine you want to go on a picnic. List the stepwise approach to have clear and better solutions.’
Possible Responses:
1. Identify the problem.
2. Break the problem down into smaller sub-problems.
3. Solve each part of the problem separately.
3 mins
● Conclude the session by summarising that in order to plan a fun picnic, we first decide who will join, then pick a spot and time, post that, choose yummy foods to eat, then plan games and activities, then decide what to wear, and finally figure out how to get there. Also, tell the students that if they lose something, like a watch at school, they can think about where and when they last saw it, ask people who might have seen it, let everyone know by putting up notices, and remember to say thank you when they find it.
● Assign the following questions from the Chapter Checkup given at the end of the chapter as homework.
C. Number the Steps in the Correct Order: Questions 1 and 2
D. Apply Your Learning: Questions 1, 2, and 3
This chapter is divided into the following sessions
1. Introduction to Word Processor
2. Formatting Documents-I
3. Formatting Documents-II
At the end of the session, the students will be able to:
● describe what a word processor is.
● create a Google document.
● identify the components of a Google document.
● add a text.
● format the text.
Keywords
● Word processor: A word processor is a software used to type and edit text.
● Google Docs: It is a free online word processor.
● Formatting: Formatting refers to the process of changing the appearance and layout of a written document or text to make it more visually appealing, organised, and easier to read and understand
Warm Up
Engage Build Sum Up
Ask the students how they will write a paragraph on a computer. Explain to the students what a word processor is. Also, tell them the steps to create a Google document. Explain the different components of a Google document. Also, tell them the steps to add and format a text in Google Docs.
Think and Tell Conclude the concepts Assign homework
● Ask the students how they will write a paragraph on a computer.
● Tell the students that a word processor is a software which is used to type and edit text. Microsoft Word and Google Docs are the two most popular ones.
Explain the following concepts:
Learning Outcomes
Describe what a word processor is.
Explanation
Tell the students that a word processor is a software that is used to type and edit text. Also tell them the features of Google Docs, a free online word processor, as given on page 62.
Create a Google document. Explain the steps to create a Google document, as given on page 62.
Identify the components of a Google document.
Tell the students about different components of the Google document window, such as the menu bar, toolbar, working area, etc., as given on page 63.
Add a text. Tell the students the steps to add text to a Google document, as given on pages 63 and 64.
Format the text. Tell the students about formatting the text. Also tell them the steps to format text, as given on pages 65 and 66.
● Read aloud the questions provided in the Do It Yourself 6A section, Questions 1 and 2 (part a, b, and c). Encourage the students to solve the questions. Instruct the students to write the answers in their book.
Correct Responses:
1. a. Type text
2. a. Google Docs
b. Text
c. Bold Build 7 mins
● Ask the students to give the answer to the question, “Would you ever make the title of your paragraph bold? Why or why not?” asked in the Think and Tell section given on page 66.
Possible Responses: Yes/No
Correct Response: Yes, because the title of the paragraph should look thicker and darker than the rest of the text.
● Conclude the session by stating that a word processor is a software which is used to type and edit a text. The two most popular ones are Microsoft Word and Google Docs. There are different components of the Google document window, such as the menu bar, toolbar, working area, etc. Formatting text refers to the process of changing the appearance and layout of a written document or piece of text to make it more visually appealing, organised, etc. Also summarise the steps to create a Google document, format text, and edit text.
● Assign the following from the Chapter Checkup given at the end of the chapter as homework.
A. Fill in the Blanks: Questions 1 and 5
C. Who Am I?: Question 1
At the end of the session, the students will be able to:
● use the Paint format tool.
● use superscript and subscript formatting styles.
● add a header and a footer to a document.
● insert a page break in a document.
● insert a line break in a document.
Keywords
● Superscript: It is a formatting style where the text or number is made smaller and raised above the regular text line.
● Subscript: It is a formatting style where the text or number is made smaller and lowered below the regular text line.
● Header: The header is the text that appears at the top of every page in a document.
● Footer: The footer is the text that appears at the bottom of every page in a document.
● Page break: A page break is an instruction to the computer that tells it where to start a new page, when writing or printing.
Ask the students if they want to apply the same formatting to more texts in the document. Should they repeat the steps, one by one, or all over again?
Explain the use and the steps to apply the features of Google Docs—the Paint format tool, superscript, subscript, header and footer, page break, and line break.
Think and Tell Conclude the concepts Assign homework
5 mins
● Ask the students if they want to apply the same formatting to more texts in the document. Should they repeat the steps one by one, or all over again? Now build the concept of the Paint format.
Explain the following concepts:
Use the Paint format tool.
Use superscript and subscript formatting styles.
Add a header and footer to a document.
Insert a page break in a document.
Insert a line break in a document.
Tell the students that the Paint Format tool helps us copy the formatting from one piece of text and apply it to another text. Tell students to use the Paint Format tool, as given on pages 66 and 67.
Tell the students that applying a superscript makes the text or number smaller and raised above the regular text line, and applying a subscript makes it smaller and lowered below the regular text line. Also tell them the steps to apply the two features, as given on page 68.
Tell the students that the header is the text that appears at the top and the footer at the bottom of every page in a document. Also tell them the steps to add a header and footer to a document, as given on pages 69 and 70.
Tell the students the steps to insert a page break, as given on page 70.
Tell the students the steps to insert a line break, as given on page 71.
● Read aloud the questions provided in the Do It Yourself 6A section, Question 2 part d and e and Do It Yourself 6B section, Questions 1, 2, and 3. Encourage the students to solve the questions. Instruct the students to write the answers in their book.
Correct Responses:
Do It Yourself 6A
2. d. Paint format
e. Superscript, Subscript
Do It Yourself 6B
1. Header, Footer
2. Page break
3. line Build
7 mins
● Ask the students to give the answer to the question “What information can you include in headers and footers?” asked in the Think and Tell section given on page 70.
Possible Response: The header can include the company logo, title of the document, author name, etc., while the footer can include the page number, notes, etc.
● Conclude the session by summarising that the Paint Format tool helps us copy the formatting from one piece of text and apply it to another text. Applying a superscript makes the text or number smaller and raised above the regular text line, and applying a subscript makes it smaller and lowered below the regular text line. The header is the text that appears at the top, and the footer is at the bottom of every page in a document.
● Assign the following from the Chapter Checkup given at the end of the chapter as homework.
A. Fill in the Blanks: Question 2
B. Tick the Correct Option: Questions 2, 3, and 5
C. Who Am I?: Questions 2 and 5
D. Write T for True and F for False: Questions 1, 2, and 4
E. Answer the Following: Questions 1, 3, and 4
F. Apply Your Learning: Question 1
At the end of the session, the students will be able to:
● insert a column in a document.
● change the page margins, orientation, and paper size of a document.
● indent text.
Keywords
● Page margins: These are the spaces around the edges of your paper where you don’t type.
● Page orientation: Page orientation is about choosing if you want your paper to be longer or wider when you type on it.
● Paper size: Page size refers to the size of the paper on which we are going to take a printout.
● Indentation: It refers to the process of adjusting the horizontal positioning of text within a document.
Ask the students if they have ever noticed how a newspaper is set up.
Explain the steps to insert a column, change page margins, orientation, paper size, and indent text in a document.
Group discussion Conclude the concepts Assign homework
● Ask the students if they have ever noticed how a newspaper is set up.
● Tell them that the newspapers use a column format. We can use the column format in Google Docs as well.
Engage
Explain the following concepts:
Learning Outcomes
Insert a column in a document.
Explanation
Tell the students the benefits of using a column format in a document. Also tell them the steps to use the column format in Google Docs, as given on pages 71 and 72.
Change the page margins, orientation, and paper size of a document. Tell the students that the page margins are the spaces around the edges of your paper where you don’t type. Page orientation is about choosing if you want your paper to be longer or wider when you type on it. Paper size refers to the size of the paper on which we are going to take a printout. Also tell them the steps to change page margins, orientation, and paper size of a document, as given on pages 72 to 74.
Indent text. Tell the students that indentation refers to the process of adjusting the horizontal positioning of text within a document. Also tell them the steps to indent text, as given on pages 74 and 75.
● Read aloud the questions provided in the Do It Yourself 6B section, Questions 4 to 8. Encourage the students to solve the questions. Instruct the students to write the answers in their book.
Correct Responses:
Do It Yourself 6B
4. column
5. margins
6. landscape, portrait
7. paper size
8. indentation
Build
● Conduct a group discussion in the class among the students on the topic ‘Benefits of using a Column Format’.
Correct Response: Easy reading, organised look, space saving, etc.
● Conclude the session by summarising that the newspapers use a column format. Page margins are the spaces around the edges of your paper where you don’t type. Page orientation is about choosing if you want your paper to be longer or wider when you type on it. Paper size refers to the size of the paper on which we are going to take a printout. Indentation refers to the process of adjusting the horizontal positioning of text within a document.
● Assign the following from the Chapter Checkup given at the end of the chapter as homework.
A. Fill in the Blanks: Question 4
B. Tick the Correct Option: Questions 1 and 4
C. Who Am I?: Questions 3 and 4
D. Write T for True and F for False: Questions 3 and 5
E. Answer the Following: Questions 2 and 5
F. Apply Your Learning: Questions 2, 3, and 4
This chapter is divided into the following sessions
1. Enhancing Documents-I
2. Enhancing Documents-II
3. Enhancing Documents-III
At the end of the session, the students will be able to:
● work with shapes in Google Docs.
● insert shapes in Google Docs.
Keywords
● Shapes: Shapes are the outlines of things we see around us.
● 2D shapes: 2D shapes are flat shapes with only length and width, such as circles and squares.
● 3D shapes: 3D shapes are shapes with depth, like spheres and cubes.
Ask the students whether they have ever thought about how they can make their documents more interesting by adding shapes, like circles, squares, etc.
Discuss what shapes are and how to insert shapes in Google Docs.
Group discussion
Conclude the concepts
Assign homework
Warm
● Ask the students whether they have ever thought about how they can make their documents more interesting by adding shapes, like circles, squares, etc.
● Build the concept of shapes and how to insert them in a document.
Engage
Work with shapes in Google Docs.
Insert shapes in Google Docs.
Explanation
Shapes are the outlines of things we see around us. Shapes can be 2D or 3D shapes. Explain working with shapes to the students, as given on page 79.
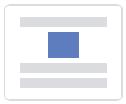
Explain the steps to insert shapes in a document to the students as given on pages 79 and 80. You can take the example to create a Chandrayaan-3 model using shapes in Google Docs.
Ask the following questions to the students to check their understanding.
● What are flat shapes and shapes with depth, also known as?
Explain the following concepts: Build 7
Correct Response: The two types of shapes mentioned are 2D (flat) shapes and 3D (shapes with depth).
● To colour the shape, which tool should be used?
● Conduct a group discussion in the class among the students based on the topic ‘Which shapes would you use and why to better represent and understand the Chandrayaan-3 mission to the moon?’
Possible Responses:
● Circles would be great for the rocket’s base and the moon to show their round shapes.
● Triangles could represent the rocket’s fins or the mountains on the moon’s surface.
● We might use a cylinder (a 3D shape) if we are trying to show the rocket in a more realistic way.
Correct Response: To colour the shape, use the Fill colour tool. Sum
● Conclude the session by summarising how adding shapes in a Google document makes the project on Chandrayaan-3 model more interesting and realistic.
● Assign the following questions from the Chapter Checkup given at the end of the chapter as homework.
A. Fill in the Blanks: Question 1
D. Write T for True and F for False: Questions 4 and 5
F. Apply Your Learning: Questions 1, 4, and 5
At the end of the session, the students will be able to:
● insert images in Google Docs.
● insert clipart in the projects.
● crop images.
Keywords
● Image: An image or a picture is a visual representation. It can be a drawing, painting, or photograph.
● Clipart: A clipart is a computer-made image which is available on the internet.
Ask the students that why do they find the comics more interesting than their school books.
● Cropping: Cropping is to remove unwanted parts of an image. 5 mins
Warm Up
Explain the different ways of inserting images in a Google document.
Explain how to insert a clipart in a document.
Explain how to crop an image.
Group discussion Conclude the concepts
Assign homework
● Ask the students that why do they find the comics more interesting than their school books.
● Relate the question to the concept of images and importance of adding an image in an existing document.
Explain the following concepts:
Insert images in Google Docs.
Insert clipart in the projects.
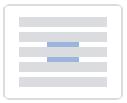
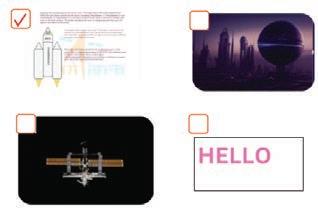
Explain the ways to insert images from different sources, such as the computer and the web, to the students, as given on pages 82 and 83.
Explain that clipart is a computer-made image which is available on the internet. Also, discuss the steps to insert a clipart image in a Google document with the students, as given on page 84.
Crop images. Explain that cropping an image means removing unwanted parts of an image. Also, discuss the steps to crop an image in a Google document with the students, as given on pages 85 and 86.
● Read aloud the questions provided in the Do It Yourself 7A section and encourage the students to solve the questions. Instruct the students to write the answers in their book.
Correct Responses:
1. a. iii b. i
● Conduct a group discussion in the class among students based on the topic “What is the difference between an image and a shape?” provided in the Discuss section, as mentioned on page 86. Possible Response: An image or a picture is a visual representation. It can be a drawing, painting, or photograph. Images are used to show people, objects, places, or ideas in a visual way. Shapes are the outlines of things we see around us. Shapes can be flat or have depth.
● Conclude the session by summarising that in documents, you can add pictures or clipart from your computer or the internet to your projects. Also, summarise that if a picture is too big or has unwanted parts, you can use the crop tool to cut it just the way you like it.
● Assign the following questions from the Chapter Checkup given at the end of the chapter as homework.
A. Fill in the Blanks: Question 4
B. Tick the Correct Option: Questions 1 and 2
C. Who Am I?: Question 1
D. Write T for True and F for False: Question 3
E. Answer the Following: Questions 3 and 4
F. Apply Your Learning: Question 3
At the end of the session, the students will be able to:
● wrap text in different styles in a document.
● add watermarks in the documents.
● find and replace words in Google Docs.
Keywords
● Text wrap: Text wrap refers to the automatic adjustment of text in a text editor, such as Google Docs, to ensure that it fits neatly without exceeding the boundaries.
● Watermark: A watermark is like a stamp that you put on a card or notebook.
● Find: Find means to look for a piece of text or a word and discover where it is.
● Replace: Replace means to take out the old text and add a new text instead.
Ask the students how they wrap a gift. Then, relate the topic to wrapping text around images.
Explain how text can be wrapped in different styles.
Explain how to insert a watermark in a document.
Explain how to find a text or a word, replace the old text, and add a new text in its place.
● Ask the students how they wrap a gift.
Group discussion Conclude the concepts
Assign homework
● Relate the above question to the concept of text wrapping.
Explain the following concepts:
Wrap text in different styles in a document.
Add watermarks in the documents.
Find and replace words in Google Docs.
Explain text wrapping to the students. Also, explain to them the default text wrapping style for a shape or an image, as given on pages 87 and 88.
Explain to the students that watermarks are like a stamp that you put on a card or notebook. Also, explain the steps to insert the watermark in a document, as given on pages 88 and 89.
Explain to the students that find means to look for a piece of text or a word and replace means to take out the old text and add a new text instead, as given on page 90.
● Read aloud the questions provided in the Do It Yourself 7B section and encourage the students to solve the questions. Instruct the students to write the answers in their book.
Correct Responses:
1. Icon

7 mins
● Conduct a group discussion in the class among the students based on the topic “Imagine a real-life situation where you might find the “Find and Replace” feature in Google Docs really handy.” provided in the Discuss section as mentioned on page 90.
Possible Response: Imagine you’re working on a group project called ‘Water Cycle’ for school. After completing the document, you realise that you’ve incorrectly referred to ‘evaporation’ as ‘vaporisation.’ This is where the ‘Find and Replace’ feature in Google Docs becomes incredibly handy. By using this feature, you can quickly search for every instance of the word ‘vaporisation’ and replace it with ‘evaporation’ in just a few clicks.
● Conclude the session by summarising that we can make our text wrap around pictures in different ways, like having the text go around the image or behind it. We can also add a special see-through picture called a watermark to the background of our document. Also, if we need to change a word everywhere it appears in our document, we can use the ‘Find and Replace’ feature to do it quickly.
● Assign the following questions from the Chapter Checkup given at the end of the chapter as homework.
A. Fill in the Blanks: Questions 2, 3, and 5
B. Tick the Correct Option: Questions 3 and 4
C. Who Am I?: Questions 2, 3, and 4
D. Write T for True and F for False: Questions 1 and 2
E. Answer the Following: Questions 1, 2, and 5
F. Apply Your Learning: Question 2
This chapter is divided into the following sessions
At the end of the session, the students will be able to:
● define and identify the uses of a presentation.
● create a presentation.
● identify the components of the Google Slides window.
● provide a name and add a title to a presentation.
Keywords
● Presentation: It is a tool to create, showcase and share information in an interactive, interesting, and visually appealing way.
● Slide workspace: It is the main area where you can add and arrange content like text, pictures, and videos on a slide.
● Slides panel: It is a section where you can see small versions of all your slides, helping you to navigate through your presentation easily.
● Speaker notes: It is a space to write notes for each slide that can help the presenter remember what to say during the presentation.
Ask the students how they will share the information in a more presentable and interesting way. Introduce them to what presentations are and the uses of presentations.
Introduce Google Slides to make the presentations and explain its components. Introduce how to name a presentation and add title to a presentation.
Think and Tell Conclude the concepts Assign homework
● Ask the students how they will share the information in a more presentable and interesting way.
● Build the concept that a presentation is a tool to share information in a more presentable and interesting way.
Engage
Explain the following concepts:
Learning Outcomes
Define and identify the uses of a presentation.
Explanation
Explain that a presentation is a tool to create, showcase and share information in an interactive, interesting, and visually appealing way. Discuss with them that presentations are used to share information, add visuals, stay organised, visualise and present. Presentations are used at various places like education, training, workshops, etc. as given on page 94.
Create a presentation. Tell them Google Slides is an online presentation tool that lets you create and share exciting presentations as given on page 95.
Identify the components of the Google Slides window.
Provide a name and add a title to a presentation.
Explain the components of Google Slides windows to the students as given on pages 95 and 96. Also, get them familiar with using Google Slides.
Explain that before adding more things to the presentation, they should give a name to the presentation. After giving a name, add the title to the presentation as given on pages 96 and 97.
● Read aloud the questions provided in the Do It Yourself 8A section and encourage the students to solve the questions. Instruct the students to write the answers in their notebook.
Correct Responses:
1. d 2. a 3. b.
Build
7 mins
● Ask the students to answer the question “Where else can we use presentations?” given in the Think and Tell section on page 94.
Possible Responses: marketing, seminars, hospitals, etc.
● Conclude the session by summarising that a presentation is a tool to create, showcase and share information in an interactive, interesting, and visually appealing way. Presentations are used to share information, add visuals, stay organised, visualise and present. Presentations are used at various places like education, training, workshops, etc. Google Slides is an online presentation tool that lets you create and share exciting presentations. Google Slides window has various components like Rename box, Menu bar, Toolbar, Slide workspace, Speaker notes, etc. Everything we do gets saved automatically, and we can identify a presentation by giving a name and adding a title to it.
● Assign the following questions from the Chapter Checkup given at the end of the chapter as homework.
A. Fill in the Blanks: Questions 1, 3, and 4
B. Tick the Correct Option: Questions 1 and 2
C. Who Am I?: Question 1
D. Write T for True and F for False: Question 1
E. Answer the Following: Question 4
At the end of the session, the students will be able to:
● add and change the position of the text box after adding text to it.
● add new slides.
● insert shapes on a slide.
● add and edit image in a slide.
Keyword
● Text box: A space on the slide where you can add text.
Ask the students to imagine preparing a presentation on renewable energy. Do you think incorporating visual aids could enhance the impact of their presentation and make the concepts more accessible?
Explain the text box to add text and get them familiar with changing the position of the text box.
Introduce adding new slides to an existing presentation.
Introduce inserting shapes in a slide and also, get them familiar with adding and editing images.
Group discussion Conclude the concepts
Assign homework
Warm Up
Ask the students to imagine preparing a presentation on renewable energy. Do you think incorporating visual aids could enhance the impact of their presentation and make the concepts more accessible?
Build the concept that Google Slides allows us to add visuals to our presentations which makes the presentation more attractive and informative.
Engage
Explain the following concepts:
Add and change the position of the text box after adding text to it.
Explanation
Explain to the students how to add a text box and move the position of the text box after adding text to it as given on pages 97 and 98.
Add new slides.
Describe to the students how to add new slides as given on page 99. Insert shapes on a slide.
Add and edit image in a slide.
Discuss with the students how to insert, move, resize and colour shapes on a slide as given on pages 99 to 102.
Explain to the students how to add and edit image in a presentation as given on pages 103 and 104.
● Read aloud the questions provided in the Do It Yourself 8A, Do It Yourself 8B, and Do It Yourself 8C sections and encourage the students to solve the questions. Instruct the students to write the answers in their notebook.
Do It Yourself 8A
Correct Response: 4. a
Do It Yourself 8B
Correct Responses: 1. c 2. a
Do It Yourself 8C
Correct Responses: 1. Insert image 2. Resizing 3. crop
7 mins
● Conduct a group discussion in the class among students based on the topic ‘How would you decide which shapes to use for each planet, and what colours would you choose to make a presentation on Solar System?’
Possible Responses: For the sun, we should use a big yellow circle because the sun is really big and bright. For Earth, we can use a smaller circle but colour it blue and green to show the water and land. For Saturn, we should also use a circle but add rings around it. Mars can be a red circle because it’s called the Red Planet. Jupiter is the biggest planet, so we should make its circle bigger than the others, except for the sun. Venus is similar to Earth in size, so we can use a circle of the same size as Earth. For Mercury, we need a small grey circle because it’s the smallest planet and Uranus and Neptune can be light blue and dark blue circles because they’re known as ice giants and have a lot of water and ice.
3 mins
● Conclude the session by summarising how to work with text boxes, slides, shapes, and images in a presentation. It explains how to add text, move text boxes and shapes by clicking and dragging with the mouse, add new slides and add images. It also covers resizing shapes and images by clicking and dragging the blue squares, and cropping images using the Crop tool.
● Assign the following questions from the Chapter Checkup given at the end of the chapter as homework.
A. Fill in the Blanks: Question 2
B. Tick the Correct Option: Questions 3 and 4
C. Who Am I?: Questions 2, 3, and 4
D. Write T for True and F for False: Question 3
E. Answer the Following: Questions 1, 3, and 5
F. Apply Your Learning: Questions 1, 2, 3, 4, and 5
At the end of the session, the students will be able to:
● create a copy of a slide.
● delete a slide.
● showcase a presentation.
● open a presentation.
Ask the students what a photocopy machine does. Introduce how to duplicate a slide. Explain the steps to delete a slide. Also, get them familiar with presenting slides and steps to open an existing presentation. Group discussion Conclude the concepts Assign homework
Ask the students what a photocopy machine does. Build the concept that like the photocopy machine Google Slides allows us to duplicate a slide.
Explain the following concepts:
Learning Outcomes
Explanation
Create a copy of a slide. Explain to the students how to create a duplicate slide as given on page 105. Delete a slide. Discuss the steps of deleting a slide if it’s not needed anymore in the presentation as given on page 106.
Showcase a presentation. Tell them how to showcase a presentation as given on pages 106 and 107.
Open a presentation. Explain to the students how to open a presentation as given on page 107.
● Read aloud the questions provided in the Do It Yourself 8C section and encourage the students to solve the questions. Instruct the students to write the answers in their notebook.
Correct Responses: 4. Duplicate 5. Deleted
● Conduct a group discussion in the class among the students based on the topic ‘Will you be able to retrieve the presentation, if you accidentally deleted your presentation?’
Possible Response: Deleted presentations go to a “Trash” or “Recycle Bin” where they stay for a while before they’re deleted permanently. Yes, a deleted presentation can be restored.
● Conclude the session by summarising how to make a copy of a slide, delete a slide that we don’t need, show the presentation to others, and open an existing presentation.
● Assign the following questions from the Chapter Checkup given at the end of the chapter as homework.
D. Write T for True and F for False: Questions 2 and 4
E. Answer the Following: Question 2
This chapter is divided into the following sessions
1. Introduction to Scratch 3.0 2. Components of Scratch
At the end of the session, the students will be able to:
● explain what coding is.
● describe block-based coding.
● explain about Scratch 3.0.
● create a project.
Keywords
● Coding: A way of giving instructions, to tell a computer what to do.
● Scratch 3.0: Scratch 3.0 is a free and simple platform where we use colourful blocks to create our own games, stories, and drawings.
Ask the students to think of any machine or toy they’ve seen that works by following instructions (like a remote car or robot).
Explain to them what coding is; tell them about block- based coding; introduce them to Scratch 3.0; also tell them how to create a project. Attempt the given activity. Conclude the concepts Assign homework
Warm Up
● Ask the students to think of any machine or toy they’ve seen that works by following instructions (like a remote car or robot).
● Then relate the concept to how computers also follow instructions through coding.
Explain the following concepts:
Explain what coding is. Tell the students that coding is a way of giving instructions to tell a computer what to do, as given on page 110.
Describe block-based coding.
Tell the students that block-based coding is the language in which we use colourful code blocks to tell computers what to do, as given on page 110.
Explain about Scratch 3.0. Introduce the students to Scratch 3.0. Tell them it is a platform that lets you create your own games, stories, and drawings, as given on page 111. Create a project. Demonstrate to the students the steps to create a project, as given on pages 111 and 112.
● Ask the following additional question to students to check their understanding.
● Why do you think using coding blocks (like puzzle pieces) is better for beginners than typing all the instructions?
Possible Response:
Using coding blocks is better for beginners because blocks are easy to use, they fit together like a puzzle, and we do not have to remember spellings or special symbols—so we can focus on what we want our project to do.
● What is coding?
Correct Response: Coding is a way of giving instructions, to tell a computer what to do. 15 mins
● Write the step-by-step instructions for making a vegetable sandwich.
Possible Response:
1. Gather the ingredients like bread slices, butter, sliced cucumber, tomato, onion, and boiled potato.
2. Use a knife to spread butter on one side of each bread slice.
3. Place the cucumber, tomato, onion, and potato slices on one bread slice.
4. Sprinkle some salt and pepper to your sandwich.
5. Place the second bread slice on top, buttered side down.
6. Serve your sandwich and enjoy.
● Conclude the session by summarising that coding is a language that is used to give step-by-step instructions to computers. Block-based coding, such as Scratch 3.0, employs colourful coding blocks to create games and perform tasks. It’s a free and user-friendly platform that allows individuals to express their creativity by designing games, stories, and art through visual programming. Also, revise how to create a project in Scratch.
● Assign the following questions from the Chapter Checkup given at the end of the chapter as homework.
A. Fill in the Blanks: Questions 1, 2, and 3
D. Write T for True and F for False: Question 1
E. Answer the Following: Question 1
At the end of the session, the students will be able to:
● identify and define the components of the Scratch window.
Keywords
● Sprite: A sprite can be a character or an object in a Scratch project.
Warm Up Engage Build Sum Up
Ask the students to name and describe parts of a classroom (like board, desk, cupboard).
Explain to the students the various components of the Scratch window. Attempt the given activity. Conclude the concepts Assign homework 5 mins 15 mins 7 mins 3 mins
Action Plan
● Stage: The stage is where you can see backdrops and sprites in action. 5 mins
Warm Up
● Ask the students to name and describe parts of a classroom (like board, desk, cupboard).
● Then relate the concept to how Scratch also has different parts that help us create and control projects.
15 mins
Engage
Explain the following concepts:
Learning Outcome
Identify and define the components of the Scratch window.
Explanation
Introduce the students to the various components of the Scratch window such as the Menu bar, Tabs, Block panel, Block palette, Script area, Backdrop, etc., as given on pages 112 to 114.
● Read aloud the questions provided in the Do It Yourself 1A section and encourage the students to solve them. Instruct the students to write the answers in their book.
Correct Responses:
1. Sprite
2. Sprites pane
3. Block panel
4. Script area
5. Block palette
Build
7 mins
● Ask the students to open Scratch 3.0. Then, let them move the mouse over each area and read its name. Ask them to drag a simple block like move 10 steps to the scripting area.
● Finally, instruct them to click the green flag to see what happens on the stage.
Sum Up
3 mins
● Conclude the session by summarising that the Scratch editor holds all the components needed to create and run a Scratch project. Some of these components are the Menu bar, Tabs, Block panel, Block palette, Script area, Backdrop, etc. Revise these components with the students.
● Assign the following questions from the Chapter Checkup given at the end of the chapter as homework.
A. Fill in the Blanks: Questions 4 and 5
B. Tick the Correct Option: Questions 1, 2, 3, 4, and 5
C. Who Am I?: Question 1
D. Write T for True and F for False: Questions 2, 3, 4, and 5
E. Answer the Following: Questions 2, 3, 4, and 5
F. Apply Your Learning: Questions 1, 2, 3, 4, and 5
This chapter is divided into the following sessions
1. Motion and Looks Blocks
2. Events, Sound, and Control Blocks
3. Script to Move and Turn a Sprite
At the end of the session, the students will be able to:
● describe Motion blocks.
● describe Looks blocks.
Keywords
● Motion blocks: These blocks are used to control the movement of the sprites.
● Looks blocks: These blocks are used to control how a sprite looks.
Ask the students to act on the given instructions and follow simple commands like “walk forward” or “smile”.
Explain to the students what Motion and Looks blocks do. Attempt the given activity. Conclude the concepts
Action Plan
Warm Up
● Ask the students to act on the given instructions and follow simple commands like “walk forward” or “smile”.
● Then relate the concept to how we use Motion blocks to move sprites and Looks blocks to change how they appear in Scratch.
Explain the following concepts:
Describe Motion blocks. Tell the students that Motion blocks control the movement of the sprites. Introduce them to some of the Motion blocks, as given on page 117.
Describe Looks blocks. Tell the students that Looks blocks are used to control how a sprite looks. Introduce them to some of the Looks blocks, as given on page 118.
● Ask the following additional questions to the students to check their understanding.
● If a sprite can move, talk, and even change costumes in Scratch, which types of blocks do you think help it do all these things—and why might we need both?
Possible Response:
Motion blocks help the sprite move around the stage, and Looks blocks change how it appears (like speaking, hiding, or changing costumes), so we need both to make our stories and animations more fun and realistic.
● Create a simple Scratch project by using Motion and Looks blocks together to make a sprite move and say something.
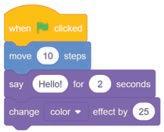
● Conclude the session by summarising that Motion blocks are blue in colour and Looks blocks are purple in colour. Tell them about some of the Motion blocks such as move () steps, turn () degrees, go to x() y(). Also, tell them about some of the Looks blocks such as say(), show, hide, etc.
● Assign the following questions from the Chapter Checkup given at the end of the chapter as homework.
A. Fill in the Blanks: Questions 1 and 3
B. Tick the Correct Option: Questions 1 and 2
C. Who Am I?: Question 1
D. Write T for True and F for False: Questions 1 and 4
E. Answer the Following: Questions 2, 3, and 5
F. Apply Your Learning: Questions 1, 2, and 3
At the end of the session, the students will be able to:
● describe Events blocks.
● describe Sound blocks.
● describe Control blocks.
Keywords
● Events blocks: These blocks are used to tell a computer when to run a script to make things happen.
● Sound blocks: These blocks are used to control the sound.
● Control blocks: These blocks are used to control the scripts.
Ask the students to clap when the teacher says “Go!”, make a sound like a drum, and then stop when the teacher says “Freeze!”
Explain to the students what Motion and Looks blocks do. Attempt the given activity. Conclude the concepts
Warm Up
● Ask the students to clap when the teacher says “Go!”, make a sound like a drum, and then stop when the teacher says “Freeze!”.
● Then relate the concept to how Event, Sound, and Control blocks in Scratch help a sprite know when to start, what sound to make, and when to stop or repeat actions.
Engage
Explain the following concepts:
Learning Outcomes
Describe Events blocks.
Explanation
Tell the students that an event is something that makes an action happen. Introduce them to when clicked and when this sprite clicked blocks, as given on pages 118 and 119.
Describe Sound blocks.
Describe Control blocks.
Tell the students that Sound blocks are used to control the sound of the sprites. Introduce them to a few sound blocks, such as start sound, stop all sounds, etc., as given on page 119.
Tell the students that Control blocks are used to control the scripts. Introduce them to a few Control blocks such as wait() seconds, repeat(), forever, etc., as given on pages 119 to 121.
Plays a sound and pauses the script until it finishes.
● Read aloud the questions provided in the Do It Yourself 10A section and encourage the students to solve the questions. Instruct the students to write the answers in their book.
Correct Responses:
Turns the sprite (clockwise) to the specified value.
Repeats the instructions inside the block specified number of times.
the sprite (clockwise) to the specified value.
Runs the script when the green flag (the Go button) is clicked.
Repeats the instructions inside the block specified number of times.
Pauses the script for the specified time.
Runs the script when the green flag (the Go button) is clicked.

Build
Pauses the script for the specified time.
7 mins
● Create a Scratch project using Events, Sound, and Control blocks to make a sprite clap or make a noise when a key is pressed, and then stop.
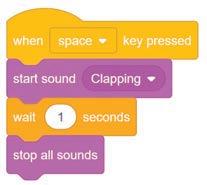
● Conclude the session by summarising that the Events blocks are used to tell a computer when to run a script to make things happen. Sound blocks are used to control the sound and Control blocks are used to control the scripts.
● Assign the following questions from the Chapter Checkup given at the end of the chapter as homework.
A. Fill in the Blanks: Questions 2, 4, and 5
B. Tick the Correct Option: Questions 3, 4, and 5
C. Who Am I?: Questions 2, 3, 4, and 5
D. Write T for True and F for False: Questions 2, 3, and 5
E. Answer the Following: Questions 1 and 4
F. Apply Your Learning: Questions 4 and 5
At the end of the session, the students will be able to:
● create a script to move and turn a sprite.
Warm Up
Ask the students to stand up and follow instructions like “walk forward” and “turn right”.
Engage Build Sum Up
Demonstrate to the students how to create a script using various code blocks.
Attempt the given activity.
Conclude the concepts
Warm Up
● Ask the students to stand up and follow instructions like “walk forward” and “turn right”.
● Then relate the concept to how we give similar movement and turning commands to sprites using scripts in Scratch.
15 mins
Engage
Explain the following concepts:
Learning Outcome
Create a script to move and turn a sprite.
Explanation
Demonstrate to the students the steps to create a script using the Motion and Events blocks, as given on pages 120 and 121.
● Ask the following additional questions to the students to check their understanding.
● If a sprite only moves straight but never turns, how will that affect your game or animation? Why is turning important?
Possible Response:
Without turning, the sprite can only move in one direction. Turning helps it change direction, making the movement more realistic and useful for things like mazes, games, or animations.
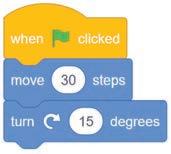
● Create a Scratch script that moves the sprite forward and turns it. Sum Up
● Conclude the session by summarising the steps to create a script using the Motion and Event blocks.
This chapter is divided into the following sessions
1. Creating a Project in Scratch 3. Erasing a Drawing and Adding a Delay
2. Pen Extension and Drawing a Line 4. Saving and Opening a Scratch Project
At the end of the session, the students will be able to:
● name a project.
● delete a sprite.
● add a sprite.
● choose a sprite.
● position a sprite.
● move a sprite.
Keywords
● Sprite: A sprite is a character or object that you can move around on the stage and make this object does things.
● Position: A position is a place on the stage where you want a sprite to go.
Ask the students to imagine creating their own puppet show by picking a puppet, naming it, placing it on stage, and making it move.
Explain to the students how to name a project and how to delete, add, and choose a sprite.
Attempt the given activity.
Conclude the concepts
Assign homework
Warm Up
● Ask the students to imagine creating their own puppet show by picking a puppet, naming it, placing it on stage, and making it move.
● Then relate the concept to how we do similar actions—like choosing, naming, positioning, and moving sprites—in a Scratch project.
Explain the following concepts:
Name a project. Tell the students that when a new Scratch project gets created, it comes with the default name ‘Untitled’ and we can replace it with a new name, as given on pages 124 and 125.
Delete a sprite. Tell the students that we can change the default sprite in Scratch; for that, we have to delete it. Describe the steps to delete a sprite, as given on page 125.
Add a sprite. Tell the students that in Scratch, you can choose to add a sprite from the Sprites pane in four ways, as given on page 125.
Choose a sprite. Tell the students the steps to choose a sprite from the Sprite library, as given on page 126.
Position a sprite. Tell the students that a position is a place on the stage where a sprite can go. Demonstrate to them how to make a sprite go to the centre of the stage, as given on page 127.
Move a sprite. Tell the students that in order to move a sprite, they can use the move steps block. Demonstrate to the students how to move a sprite forward by some steps, as given on page 128.
● Ask the following additional question to the students to check their understanding.
● Why is it important to name your project and choose the right sprite before you start adding movements or actions in Scratch?
Possible Response:
Naming a project and choose the right sprite because naming helps you organise your work, and choosing the right sprite helps you plan your story or game better before you start coding actions or movements.
● Create a Scratch project by following the given instructions:
● Open Scratch 3.0 and click on the “Untitled” project name to rename it (e.g., “My First Animation”).
● Delete the default cat sprite by right-clicking and selecting “delete.”
● Click “Choose a Sprite” and add a new sprite (like a dinosaur or robot).
● Click and drag the sprite to a new position on the stage.
● Add this code to make it move:
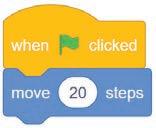
Sum Up
3 mins
● Conclude the session by summarising that we can change the name of Scratch project by clicking the default name and replacing it with the new name. Also, revise with them the steps to delete, add, and choose a sprite.
● Assign the following questions from the Chapter Checkup given at the end of the chapter as homework.
A. Fill in the Blanks: Question 1
D. Write T for True and F for False: Question 3
E. Answer the Following: Questions 1, 2, and 5
F. Apply Your Learning: Questions 1, 2, and 3
At the end of the session, the students will be able to:
● describe about pen extension.
● add the pen extension.
● draw a line using Pen blocks.
Keyword
● Pen blocks: They are used to create simple drawings such as lines, shapes, and patterns or more complex drawings such as pictures and animations.
Ask the students to draw a line on paper using a pencil and notice how the line follows where the hand moves.
Explain to the students the use of the pen extension. Also, tell them how to add the pen extension.
Attempt the given activity.
Conclude the concepts
Assign homework
5 mins
● Ask the students to draw a line on paper using a pencil and notice how the line follows where the hand moves.
● Then relate the concept to how in Scratch, the Pen extension helps the sprite draw lines as it moves— just like a moving pencil.
Engage
Explain the following concepts:
Explanation
Describe about pen extension. Tell the students that pen blocks are green in colour and used to create drawings, as given on page 128.
Add the Pen extension.
15 mins
Demonstrate the steps to add the Pen extension and tell them about some of the Pen blocks, such as pen down, pen up, etc., as given on pages 128 and 129.
Draw a line using Pen blocks. Demonstrate to the students the steps to draw a line with the Pen blocks using Pencil sprite, as given on pages 129 and 130.
● Ask the following additional questions to the students to check their understanding.
● If a sprite moves without using the Pen blocks, will it leave a trail behind? What must we do to make it draw like a pencil?
Correct Response:
No, the sprite will not leave a trail unless we use Pen blocks. To make it draw, we need to add the Pen extension and use blocks like pen down and move steps.
● Create a Scratch project where a car drives across the road and leaves a tire mark. For this, add a car sprite and use a city backdrop with a road.
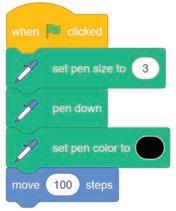
3 mins
● Conclude the session by summarising that the Pen Extension in Scratch allows sprites to draw on the stage. The Pen blocks are green in colour and are used to create simple drawings. Commonly used Pen blocks are pen down, pen up, erase all, etc. Also, revise the steps to draw a line.
● Assign the following questions from the Chapter Checkup given at the end of the chapter as homework.
A. Fill in the Blanks: Questions 2, 3, and 4
B. Tick the Correct Option: Questions 1, 3, and 4
C. Who Am I?: Question 1
D. Write T for True and F for False: Questions 1 and 4
E. Answer the Following: Questions 3 and 4
At the end of the session, the students will be able to:
● erase a drawing.
● add a delay.
Ask the students to draw a quick doodle on their notebooks or a whiteboard, wait for 2 seconds, and then erase it.
Explain to the students the steps to erase a drawing and add a delay.
Attempt the given activity.
Conclude the concepts
Assign homework
5 mins
Warm Up
● Ask the students to draw a quick doodle on their notebooks or a whiteboard, wait for 2 seconds, and then erase it.
● Then relate the concept to how we can use pen blocks to draw, control blocks to delay, and clear the drawing using the erase (clear) block in Scratch.
15 mins
Engage
Explain the following concepts:
Learning Outcomes
Explanation
Erase a drawing. Tell the students the steps to erase the old drawing when the green flag is clicked, as given on pages 130 and 131.
Add a delay. Tell the students the steps to add a delay of 1 second between the erasing of the old drawing and the creation of the new drawing, as given on page 131.
● Ask the following questions to the students to check their understanding.
1. Which block is used to erase a drawing?
Correct Response: erase all block
2. Which block is used to add delay in a drawing?
Correct Response: wait() seconds block
● Create a Scratch project where a sprite (a wizard or fairy) waves a magic wand and draws a glowing magical line. After a few seconds, the spell fades and the line disappears.
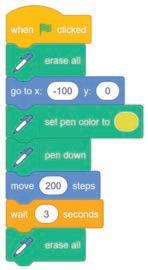
Sum Up
3 mins
● Conclude the session by summarising them that the erase all block helps delete a drawing, and the wait seconds() block helps add a delay. Also revise the steps to erase and add a delay to a drawing.
● Assign the following questions from the Chapter Checkup given at the end of the chapter as homework.
A. Fill in the Blanks: Question 5
B. Tick the Correct Option: Question 2
D. Write T for True and F for False: Question 2
At the end of the session, the students will be able to:
● save a Scratch project.
Ask the students to imagine writing a story and putting it safely in a folder to read again later.
Demonstrate the steps to save a Scratch project and open an existing Scratch project.
● open an existing Scratch project. 5 mins
Attempt the given activity.
Conclude the concepts
Assign homework
Warm Up
● Ask the students to imagine writing a story and putting it safely in a folder to read again later.
● Then relate the concept to how we save and open projects in Scratch to keep and continue our coding work.
Engage
Explain the following concepts:
Learning Outcomes
Explanation
Save a Scratch project. Explain to the students the steps to save a Scratch project, as given on page 132.
Open an existing Scratch project.
Explain to the students the steps to open an existing Scratch project, as given on pages 132 and 133.
● Ask the following additional question to the students to check their understanding.
● What could happen if you create a fun Scratch project but forget to save it before closing the computer? Why is saving important?
Possible Response:
If you do not save it, your work will be lost and you will have to start all over again. Saving helps you keep your progress so you can open it later and continue from where you left off.
7 mins
Build
● Create a Scratch project using a wizard sprite that draws a magical line when clicked, waits a moment to show the magic, and then erases it with a puff of magic.
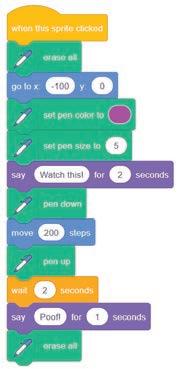
Sum Up
● Conclude the session by summarising how to save and open an existing Scratch project.
3 mins
● Assign the following questions from the Chapter Checkup given at the end of the chapter as homework.
D. Write T for True and F for False: Question 5
F. Apply Your Learning: Question 4
Chapter Checkup
A. Fill in the Blanks.
1. Data 2. information 3. Devices 4. 1024 5. GBs and TBs 6. ROM, RAM 7. Primary, Secondary
B. Tick () the Correct Option.
1. a. Hard Drive 2. b. Cloud Storage 3. a. Byte 4. b. Two 5. b. The user clicks on the Print command.
C. Who Am I?
1. Memory Card 2. Data 3. RAM 4. Cloud Storage
D. Write T for True and F for False.
1. F 2. F 3. T 4. T
E. Answer the Following.
1. Yes, a computer is an electronic device or machine that performs various calculations and carries out different tasks for us based on the instructions that we give it.
2. There are two types of computer memories—Primary and Secondary.
Primary Memory is the computer’s internal memory where it stores data related to currently running programs. It is the built-in memory of the computer. It is always accessible to the CPU.
Secondary memory is the computer’s external storage that stores data and programs that are not in use by the computer’s processor.
3. Secondary memory, also called auxiliary memory, is the computer’s external storage. It is used to store the data and programs that are not in use by the computer’s processor. Some examples are hard disk drive (HDD), pen drive, memory card, etc.
4. Cloud Storage is a digital space where you can store your files and get them whenever you want, using the internet.
Some advantages are as follow:
● Cloud Storage can provide large storage capacity. Often, we get free Cloud Storage of up to a few GBs.
● It is like a big storage space on the internet where you can keep all your files and access them from any device, anywhere, and anytime , as long as you are connected to the internet.
5. Data:
● Data is facts, numbers, or symbols that we collect and enter into the computer.
● Data takes up less space.
Information:
● Information is the knowledge or understanding that we gain when the computer analyses and organises the data that we entered in it.
● Information may require more storage due to added context and structure.
F. Apply Your Learning.
1. Cloud Storage
2. She should keep in mind the capacity of the RAM and hard disk.
3. No, Rahul will not find his website exactly as he left it when he turns his computer on again after the power cut. When a computer unexpectedly shuts down, such as during a power cut, any unsaved work or changes made since the last save will be lost.
Chapter Checkup
A. Fill in the Blanks.
1. Operating system 2. booting 3. desktop 4. Cortana Search 5. notification
B. Tick () the Correct Option.
1. c. Mouse Pointer Personalization 2. c. Volume Control 3. b. Search Bar 4. c. Wallpaper
C. Who Am I?
1. Operating System 2. Desktop 3. Icon 4. Taskbar 5. Cortana
D. Write T for True and F for False.
1. F 2. F 3. T 4. T
E. Answer the Following.
1. An Operating System is a software that helps us to communicate with the computer and tell it what to do.
2. Features of the Windows 10 operating system are Aero Peek, Cortana, the Start button, the Search button, the Desktop Show/Hide button, etc.
3. When we press the power button to turn on a computer, the computer starts getting the system ready for use. This process is called booting.
4. Cortana Search helps you find things on your computer using voice or text-based searches. Cortana responds with a voice.
5. Aero Peek is a feature in the Windows that lets you see your desktop without actually minimising any of your open windows. To use Aero Peek, you just need to hover your mouse over open applications in the taskbar.
F. Apply Your Learning.
1. Anika can customise the colour and font settings of her Windows 10 interface, by following the given steps:
i. Click the Start button and select the Settings option.
ii. Choose the Personalization option from the menu.
iii. Select the Colors option from the sidebar and choose a colour of your choice.
iv. Now, select the Fonts option from the sidebar and choose the font style and size.
v. Preview the font as you make the changes.
2. Rahul can customise the appearance of his mouse pointer by following the given steps:
i. Type “control” in the Search bar
ii. Choose the Control Panel app.
iii. Choose the Mouse option.
iv. Go to the Pointers tab in the Mouse Properties window.
v. Choose a Pointer of your choice from the Customize section.
vi. Preview and select your favourite pointers.
vii. Click on Apply and then the OK buttons to save the changes.
3. Anika can change the wallpaper on her Windows 10 desktop to a picture of her favourite superhero, by following the given steps:
i. Right-click on the desktop.
ii. Select the Personalize option.
iii. Select the Background option.
iv. Click on the Browse tab and select the picture from its location on the computer.
4. Rohit can adjust the volume of the music on his computer, by following the given steps:
i. Click on the Speaker icon at the right-hand corner of the taskbar.
ii. Choose the Open Volume mixer option.
iii. Move the volume slider up or down to adjust the volume as you want.
5. John should change the date and time settings on his computer by following the given steps:
i. Open Settings from the Start button.
ii. Select the Time & Language option.
iii. Select the Date & Time option.
iv. Toggle the switch to turn on the automatic time settings.
Chapter Checkup
A. Fill in the Blanks.
1. containers 2. Recycle Bin 3. information 4. Ctrl 5. Cut
B. Tick () the Correct Option.
1. a. Opens it 2. b. Group similar files together 3. a. Digital containers of information
4. a. folder inside another folder
C. Who Am I?
1. Folder 2. File 3. Recycle Bin 4. Cut and Paste
D. Write T for True and F for False.
1. T 2. F 3. T 4. F
E. Answer the Following.
1 A file is a digital space used to store different types of information on a computer. It acts like a container for items like images, videos, texts, and so on. A folder is a container that stores and organises files and other folders.
2.
Moving a file means removing it from its original position and pasting it to another location.
When we want to move a file on a computer, we can use a special command called Cut and Paste.
Duplicating a file means making an exact copy of a file and pasting the copied file into a different location.
When we want to duplicate a file on a computer, we can use a special command called Copy and Paste.
3. Shortcut icon helps us quickly open a file or folder. Shortcut icons are usually kept on the desktop to open the most frequently used items.
F. Apply Your Learning.
1. Avni should not explore the shared folder without Nishant’s permission because one must be respectful of others’ files. One must not explore the files that belong to someone else without their permission.
2. Raj can get the deleted picture back by restoring the file using the following steps:
i. Opening the Recycle Bin on his computer.
ii. Right-clicking on the file he wants to restore.
iii. Selecting the Restore option from the pop-up menu.
3. No, it is not a wise thing to do because folders can be used to organise files and make them easier to find. Tany should therefore, store the maths homework in the ‘Maths’ folder only.
4. Satish must follow the given steps to create a new folder:
i. Right-click on an empty space on the desktop. A pop-up menu will appear.
ii. Select the New option.
iii. Click on the Folder option.
5. Rina can make a copy of the file in another folder by following the given steps:
i. Right-click on the file that she wants to copy. A pop-up menu will appear.
ii. Click on the Copy option.
iii. Open the folder she wants to paste it in.
iv. Right-click on the empty space in the desired folder. Then, select the Paste option.
Chapter Checkup
A. Fill in the Blanks.
1. computers 2. ARPANET 3. websites 4. information 5. Uniform Resource Locator
B. Tick () the Correct Option.
1. d. All of the above
2. a. A program that lets you see websites on the internet
3. a. Browsing the internet to visit various websites
4. a. To access websites on the internet
5. a. To connect our computer to the internet and exchange information between the two
C. Who Am I?
1. URL 2. Search Engines 3. WWW 4. Modem 5. DSL
D. Write T for True and F for False.
1. T 2. T 3. T 4. F 5. T
E. Answer the Following.
1. The internet is a network of networks that connects computers and devices from all over the world. It allows people to collect and share information, and communicate with each other.
2. Just as we can do only two things with the switch on the switchboard—turn it on or turn it off, similarly, a digital signal either comes in or does not come in.
Just as how a regulator on the switchboard changes the speed at which the fan spins—we can have the fan spin at the fastest speed, reduce it to a slower speed and finally switch it off. That is how analog signal is.
3. A webpage is a digital document on the internet. It can have text, images, videos, and other content.
4. The basic requirements for an internet connection are:
i. Modem: A device that will help connect the computer to the internet.
ii. Internet Service Provider: A company that provides access to the internet.
iii. Communication Media: Different types of connections, like DSL (telephone lines), television cable wires, and fibre optic cables, that connect the computers to the internet.
5. Search engines are used to find information on the internet. Some examples of search engines are Google, Bing, etc.
F. Apply Your Learning.
1. Riya can use the email service on the internet to wish her friend on his/her birthday. She would need a modem, an ISP and a communication media to connect to and use the internet.
2. DSL
3. Yes, I can help Rohan by telling him that:
a. A webpage is a single document on the internet that can have text, images, videos, and other content whereas, a website is a collection of multiple webpages that are all related to each other.
4. Some popular search engines that Lovey can use are:
a. Google b. Yahoo c. Bing
Chapter Checkup
A. Fill in the Blanks.
1. steps 2. problem solving 3. thinking, decision
B. Write T for True and F for False.
1. F 2. F 3. F
C. Number the Steps in the Correct Order.
1. i. Open the tap ii. Wash her hands iii. Close the tap iv. Apply Soap v. Open the tap again
vi. Rinse hands again vii. Close the tap again viii. Wipe hands with a towel
2. i. Take brush from the shelf ii. Open the tap iii. Rinse the brush a little iv. Close the tap
v. Apply toothpaste on the brush vi. Brush teeth vii. Open the tap again viii. Rinse mouth ix. Clean the brush and close the tap
D. Apply Your Learning.
1. Steps to make a cucumber and tomato sandwich are:
i. Take 2 slices of bread.
ii. Toast the bread.
iii. Add slices of cucumber and tomato on one slice of the bread.
iv. Place the second slice of the bread on the top of the first slice and serve.
2. Steps to organise a birthday party are:
i. Fix the date and venue of the party.
ii. Call people to invite, and note the names of those who will come.
iii. Decide the menu.
iv. Decorate the venue.
v. Get a gift and make/order the birthday cake.
3. We can make the card in 3 steps:
i. Get all the things we need—paper, markers, scissors, glitters, etc.
ii. Write the message.
iii. Decorate the card.
Yes, the step “Decorate the card” can be broken down into smaller steps like drawing pictures, adding stickers, glitters, etc.
Chapter Checkup
A. Fill in the Blanks.
1. plus (+) 2. raised 3. top 4. File 5. word processor
B. Tick () the Correct Option.
1. a. To add structure to the document
2. a. To add a text at the top of every page
3. a. Select the text and click on the Superscript in the Format menu
4. d. Click on the Page setup option in the File menu
5. c. Insert menu
C. Who Am I?
1. Google Docs 2. Paint Format 3. Indentation 4. Page orientation 5. Header
D. Write T for True and F for False.
1. F 2. T 3. F 4. T 5. T
E. Answer the Following.
1. Superscript is used to raise the text or number above the regular line, in a document. For example, the “rd” in 3rd.
2. Page orientation is choosing if we want our paper to be longer or wider when we type on it. Steps to change the page orientation:
a. Click on File, and then select Page setup.
b. In the Page setup dialog box, in the Orientation section, select the Portrait or Landscape option.
c. Click on OK.
3. Steps to insert a line break:
a. Click where you want the line break to appear.
b. Press Enter.
4. Paint Format is used to copy and apply the styles from one text to another.
5. Page margins are the spaces around the edges of your paper where we don’t type.
Steps to change the page margins:
a. Click on File, and then select Page setup.
b. In the Page setup dialog box, go to the Margins section, enter the numbers in the Top, Bottom, Left, and Right margins.
c. Click on OK.
F. Apply Your Learning.
1. Aman can add his name and roll number in the Header so that it appears on every page of the document.
2. Simran can adjust page margins under the File > Page setup to narrow the margins. She can also arrange her text in multiple columns through Format > Columns.
3. Rahul can use a line break to separate his poem into different stanzas. In order to do that, he can either press Enter at the start of the line he wants to separate or go to Insert > Break.
4. He can adjust the width of his document by clicking on File > Page setup and then changing the orientation to Landscape or reducing the values in Left and Right under Margins.
Chapter Checkup
A. Fill in the Blanks.
1. Drawing 2. text flow 3. background 4. Crop 5. look
B. Tick () the Correct Option.
1. c. To decorate the document with pre-made drawings
2. d. Click on the image → Click on Crop tool
3. b. Adjusting the text around an image
4. c. To show ownership of the document
C. Who Am I?
1. Crop tool 2. Text Wrap 3. Watermark 4. Find and Replace
D. Write T for True and F for False.
1. T 2. T 3. F 4. T 5. F
E. Answer the Following.
1. Click on Insert menu → Click on Watermark option → Select Image → Click on Browse button → Click Upload button.
2. Different text-wrapping styles are:
● Inline with text
● Wrap text
● Break text
● Behind text
● In front of text
3. Cropping an image means to remove the unwanted parts of an image.
4. Clipart is a computer-made image which is available on the internet. Clipart can be of anything—animals, people, objects, or even scenes. It is different from an image or a shape. Shapes are the outlines of things we see around us. Shapes can be flat or have depth. Examples of shapes are circles, squares, cubes, cones, etc. A shape can be filled using the Fill color tool. Shapes can be inserted from the drawing toolbar of the Google Docs. An image or a picture is a visual representation of a drawing, painting, or photograph. Images can be inserted from a computer or from the web.
5. Replace means to take out the old text and add a new text instead. In the Replace with box, enter the word you want to replace, a pre-existing word with. Click on Next to locate the first instance of the word that you want to replace. If you want to replace all instances of that word, click Replace all
F. Apply Your Learning.
1. Click Insert → Drawing → New → Select shape → Click and drag in the drawing area → Fill color tool → Fill colours in the shape.
2. Aman should use the Find and replace tool.
3. Sonam can either insert images from the web or use Clipart.
4. Simran can insert images from her computer and save them.
5. Ritu can use a watermark.
Chapter Checkup
A. Fill in the Blanks.
1. presentation 2. move 3. Toolbar 4. automatically
B. Tick () the Correct Option.
1. b. Sharing information with others
2. d. Paint
3. a. By clicking on the + button on the toolbar
4. a. Insert
C. Who Am I?
1. Google Slides 2. Crop tool 3. Resize 4. Fill color tool
D. Write T for True and F for False.
1. F 2. T 3. F 4. T
E. Answer the Following.
1. Click on the Insert tab at the menu bar → Image menu → Select “Upload from computer” → Select the image you want to add to the slide.
2. Steps to duplicate a slide:
● Select the slide you want to duplicate from the Slides Panel.
● Right-click on the slide, and then select the Duplicate slide option.
3. Click on Insert tab → Text box → Move the mouse cursor on the screen where you want to add the text box, then press the left button on the mouse.
4. Google Slides are used for making online presentations.
5. The method to insert a shape in Google Slides is:
● Click on the Insert tab in the menu bar.
● Select the Shape option from the drop-down menu. Then, select the Shapes option.
● Click on the shape you want. It will appear on your slide.
F. Apply Your Learning.
1. Shikha can add an image to her slide with text by following these steps: Click on the Insert tab → Image → select “Upload from computer” option. A selection window opens. She can then select the image that you want to put on the slide.
2. Rahul can add shapes to his slides by clicking on Insert → selecting Shape → selecting any of the options in Shapes
3. Resizing is changing the size of an image from small to large and vice versa, whereas Cropping means to remove those parts of the image that we do not want to show.
4. Right-click in the slide panel → Select the New slide option. A new slide will appear below Shubham’s current slide.
5. Jyoti can add colour to the shapes on her Google Slides in the following way:
● Select the part of the shape that you want to colour.
● Click on the Fill color tool on the toolbar and select the colour of your choice.
Chapter-9 Introduction to Scratch 3.0
B Tick () the Correct Option. 1 Which block is used to move a sprite?
Chapter Checkup
b Sprites pane
A. Fill in the Blanks.
d Script area your running scripts?
Correct Option. block is used to move a sprite?
1. Blocks 2. Create 3. Untitled 4. Menu bar 5. Backdrop
B. Tick () the Correct Option.
b
1. b.

C. Write T for True and F for False. 1. F 2. F 3. T 4. T
d . b listen to songs
2 Which block is used to make a sprite turn clockwise?
B Tick () the Correct Option.
Chapter-10 Scratch Blocks
Chapter Checkup
block is used to make a sprite turn clockwise?
1 Which block is used to move a sprite?
d open the Costumes editor option has the icon?
A. Fill in the Blanks.
1. Scratch blocks 2. Control 3. go to x y 4. green flag 5. Wait Second
B. Tick () the Correct Option. 1. c.
3 Which block is used to run a script when the sprite is clicked?
b Edit menu

d Costumes tab options has this icon?

block is used to run a script when the sprite is clicked?
B. Tick () the Correct Option. 1. b. Pen 2. d. line, you need to use the block. allows sprites to on the stage. line, you need to use the block. marks on a screen, you need to use the block. Option.
you need to make the sprite draw? b Pen d Text used to add delay? b d

2 Which block is used to make a sprite turn clockwise?
C. Write T for True and F for False. 1. F 2. T 3. T 4. T
b Stage
Chapter-11 Making a Scratch Project Chapter Checkup
4 Which block can pause a script for 10 seconds?
A. Fill in the Blanks. 1. sprite 2. pen down 3. draw 4. pen up 5. erase all
3 Which block is used to run a script when the sprite is clicked?
block can pause a script for 10 seconds?

used to set the colour of the sprite’s pen? 3. b. Stops drawing
C. Write T for True and F for False. 1. F 2. F 3. F 4. T
d All of these 7 11/28/2023
5 Which block can repeat a script 5 times?
4 Which block can pause a script for 10 seconds?
block can repeat a script 5 times?
A. Fill in the Blanks.
1. Devices 2. Windows 3. Sub-folder 4. Reasoning
B. Tick () the Correct Option.
1. c. 1 GB 2. a. DSL 3. a. Deleting
C. Write T for True and F for False.
1. T 2. T 3. F 4. F
D. Answer the Following Questions.
1. Cloud Storage is a digital space where you can store your files and get them whenever you want, using the internet.
2. Stepwise thinking means to think step by step to complete a task or solve a problem.
3. Restoring a folder or file means getting it back to the previous location from the Recycle Bin.
4. Search engines help you find information on the internet. Some examples of search engines are: Google, bing, etc.
E. Apply Your Learning.
1. To change the location of the taskbar:
Move the mouse pointer to the Taskbar and right-click on it.
Choose the Taskbar settings option from the pop-up menu.
The Settings window opens up for Taskbar features. Scroll down to the option ‘Taskbar location on screen’.
Select where you would like your taskbar to be. The taskbar will automatically move to the new position you selected.
2. Steps to create a folder:
Right-click on an empty space on the desktop. A pop-up menu will appear.
Place the cursor over the New option.
Click on the Folder option.
A new folder will be created with a default name—New folder. Or to create a folder quickly, press the Ctrl+Shift+N keys together.
3. A web browser is a program that lets you see websites on the internet. Whereas, a website is a collection of webpages that are all related to each other.
A. Fill in the Blanks.
1. Type 2. Coding 3. Sprite 4. Position
B. Tick () the Correct Option.
1. c. Document title 2. b. Control 3. c. Surprise
C. Write T for True and F for False.
1. T 2. T 3. F 4. T
D. Answer the Following Questions.
1. Formatting text refers to the process of changing the appearance and layout of a written document or piece of text to make it more visually appealing, organised, and easier to read and understand.
2. Superscript is a formatting style where the text or number is made smaller and raised above the regular text line. Whereas, subscript is a formatting style where the text or number is made smaller and lowered below the regular text line.
3. Clipart is a computer-made image which is available on the internet. Clipart can be of anything—animals, people, objects, or even scenes.
4. To insert an image from your computer in Google Docs:
Click on the Insert menu.
Go to the Image option.
Select the Upload from computer option.
The Choose file to upload window opens up.
Select the image you want to upload.
Click on the Open button.
E. Apply Your Learning.
1. Paint Format tool
2. Steps to find and replace words in Google Docs:
Open your Google Docs.
Click on Edit in the top menu.
Select Find and replace.
In the Find box, enter the word you want to find.
In the Replace with box, enter the word you want to replace it with.
Click Next to locate the first instance of the word.
If you want to replace all instances of the word, click Replace all.
3. Steps to delete slides:
Select the slide you want to delete.
Right-click on the slide.
Select the Delete option.
Uolo has introduced a comprehensive program, Hexa, for Grades 1 to 8, aimed at empowering young minds with essential knowledge and skills for the digital age.
To support the effective implementation of Hexa in classrooms, this Teacher Manual has been thoughtfully designed. It provides structured lesson plans for each chapter, guiding teachers through both classroom instruction and computer lab activities. Every lesson follows Uolo’s research-based WEBS framework, which simplifies teaching methodologies and enhances lesson delivery, making learning more engaging and impactful for students.
• Sharp Lesson Planning: Each lesson plan focuses on specific sub-learning outcomes within a chapter and are designed for delivery within the stipulated class or lab time.
• Real-life and Application-based Questions: Additional questions that link Computer Science to real-life contexts and assist teachers to develop learners' conceptual understanding and application skills.
• Support and Detailed Solutions: In-depth solutions for in-class and post-class activities to reinforce learning.
Uolo partners with K-12 schools to bring technology-based learning programs. We believe pedagogy and technology must come together to deliver scalable learning experiences that generate measurable outcomes. Uolo is trusted by over 15,000+ schools across India, South East Asia, and the Middle East.
ISBN 978-81-985754-2-5