Television studios recording options & Lightworks Quick User Guide
Ways to record in Studios A, B, and C:
High Definition (HD format)
Record into an SSD card (Solid state drive)
Record onto personal external hard drive (via Lightworks)
-Using the SD recorder, you can ISO record (record each camera angle) but you won’t have audio on the ISO recordings
Recording options when using an SSD
FILE FORMAT
FILE EXTENSION FILE DATA
FILE SIZE FOR 26MIN SHOW
Uncomp 10 bit .mov Use only if you have hard drive space and a fast computer. 247.36GB
ProRes HQ .mov For the highest quality compression at the maximum ProRes data rate. 46.55GB
PRORes .mov For extremely high quality compression using a low ProRes data rate. 32.23GB
PRORes LT .mov For high quality compression at a lower ProRes data rate. 23.54GB
PRORes Proxy .mov For high quality offline compression at the lowest ProRes data rate. 12.48GB
DNxHD QT .mov Preferred if using AVID for editing. 46.55GB
DNxHD MXF .mof Use only if you edit using AVID. 42.95GB

Programing reminder:
Information of the latest technical standards and acceptable file formats can be found in our operations manual, or visit www.fcac.org/standards
Fairfax Public Access
v. 10.2022
File formats accepted by our Programming Department
All SD files must be 720x480 pixels HD
All HD files must be one of the following resolutions:
720p – 1280x720, 59.94fps
1080i 1920x1080, 29.97fps
• MPEG 2 Program Stream
• Main Profile, Main level
• Audio Codec: MPEG1 Layer II or Linear PCM
• 4:2:0 chroma format
• Closed GOP Structure (Group of Pictures) with one I frame and four P frames every 15 frames, using the pattern IBBPBBPBBPBBPBB. Video sequence frame before every GOP.
• Interlaced Bottom Field First
• Audio bit rate of 192, 256, or 384 kbps
• Audio sampling rate of 48 kHz
• Constant bit rate
• Strick maximum program mux rate of 9Mbps for video, audio & overhead
The following HD formats are accepted: Note: Bold formats are native to the playout system, and will require less transcoding time to be available on the playout system. Use of these formats is recommended when possible.
• MPEG 2 Program Stream
• MP2 or PCM Audio
• I Frame Only on Long GOP
• Fixed GOP Structure
• Max of B frames within GOP
• Closed GOP recommended
• .MPG or .MPEG file extension
• XDCamHD/XDCamHD422
• PCM Audio
• .MXF file extension
• Apple ProRes/PRoRes 422 (good when using SSD)
• Avid DNxHD
• QuickTime
• H.264 MPEG-4
• High Profile/HiP or greater
SD
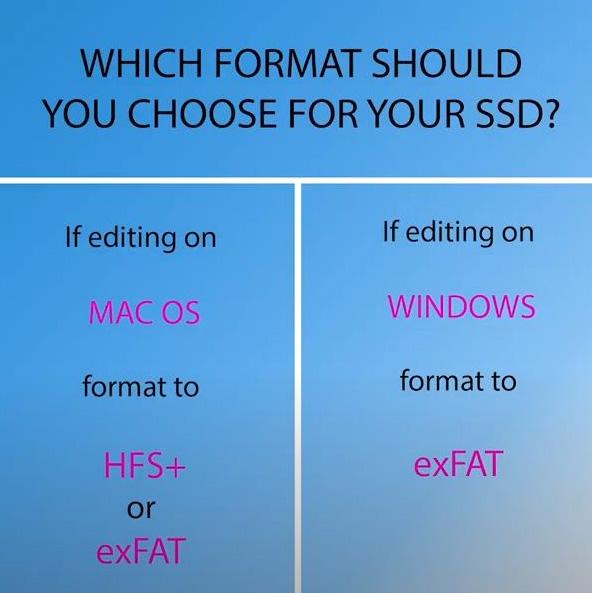


Studio Package: Recording Options ways to record shows in the control room (A or B) 1. SSD recorders 2. SD recorders 3. Lightworks computer • If you are planning on editing your footage in Adobe Premiere Rush, you must use record options 2 or 3 OPTION 1: SSD Cards Need to format cards before use (only once or if recycling a card) • If planning to edit on a MAC o Use format HFS+ How to format an SSD card: 1. Place card in 1st bay of SSD2 2. press the MENU button


3.Look at the small screen to the right 4.Use the wheel to navigate to the Storage screen 5.Press the SET button 6.Use the wheel to scroll to the bottom of the menu options • Format media option 8.Press the SET button 9.Select MEDIA 1 slot (SSD 1) 10.Press the SET button Studio Package: Recording Options


11. In the Choose Format screen, use the wheel to choose exFAT 12. Press the SET button 13. A WARNING SCREEN will appear, reminding you that all of the footage that currently exists on the SSD card will be erased if you continue. 14. Use the wheel to choose FORMAT option. 14. Press the SET button Studio Package: Recording Options


Studio Package: Recording Options 15. A Progress window will appear 16. When the SSD card is formatted, a FORMAT COMPLETE window will appear 16. Press the SET button 17. Press the MENU button twice to back up to the main screen NOTE Formatting your SSD card only needs to be done if you are using a brand new card


Choosing a record format • Must be done prior to EVERY recording • Choose “ProRes” as the record format - This is an FPA Staff Recommendation • Its good quality • It creates a reasonable file size How to set a record format: Studio Package: Recording Options NOTES Press the MENU button to go to the RECORD screen Use the WHEEL to scroll to CODEC Press the SET button 1 2 3


Studio Package: Recording Options NOTES Use the wheel to select ProRes and then press SET to make ProRes your record format NOTE If ProRes is already selected, you will see a after it. 4 5 6 Option 2: Using SD cards • Not a huge difference between SSD & SD cards o SD cards are less expensive o Staff recommends SSD cards but either will work New or recycled cards need formatting prior to use How to format an SD card: 1. Place card in Bay #1 of SD2


2. Press the MENU button • Then press the SET button • Scroll down to “Format Card” using the wheel • Press the SET button • Select SD1 (bay#1) using the wheel o Press the SET button • Select exFAT using the wheel o Press the SET button • Use the wheel to select FORMAT o Press the SET button • Formatting progress message will appear on the screen o A new screen will appear when formatting is complete o Press the SET button to choose OK 3. Choose a file format to record in • This step is REQUIRED to be done prior to EVERY record session How to choose a file format for recording: 1. Press MENU button and then SET button - Codec will be highlighted 2. Press SET button again 3. Use wheel or knob to scroll through the Codec menu - Choose the one you wish to use • Staff Recommendation: ProRes - Choose ProRes 4. Press the SET button to select it 5. Press the MENU button twice to back completely out of the menu NOTE You can also record ISO feeds from the studio cameras. Only video can be recorded this way. Audio from individual cameras is not available to record using this method. Studio Package: Recording Options NOTES (BAY #1)


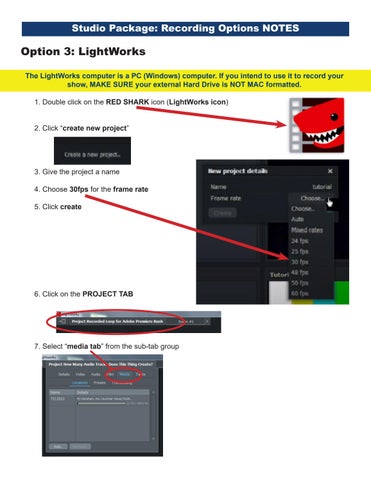
Option 3: LightWorks The LightWorks computer is a PC (Windows) computer. If you intend to use it to record your show, MAKE SURE your external Hard Drive is NOT MAC formatted. 1. Double click on the RED SHARK icon (LightWorks icon) 2. Click “create new project” 3. Give the project a name 4. Choose 30fps for the frame rate 5. Click create 6. Click on the PROJECT TAB 7. Select “media tab” from the sub-tab group Studio Package: Recording Options NOTES


8. Under “locations” oSelect the item listed oClick the REMOVE button oWhen the warning message appears, click the “YES” button 9. click the “ADD” button onavigate to the D:\ (media) • click the “CREATE NEW FOLDER” button 10. Give the folder a name 11. Click the “DO IT” button 12. Click the “OK” button 13.In the “TOOLS” bar (on the left side of the screen), click the record new clips from tape button Studio Package: Recording Options NOTES


14. In the “RECORD WINDOW” • Clip format should be 1080i • Clip format should also be 29.97fps • File type should be MOV • Compression = DVCPRO 100 • Destination = AUTO • If A3 and A4 are selected, deselect them 15. Click the STAND BY button • Make sure you can see whatever source is currently being viewed in the ME2 Program Bus of video the switcher • You should also see audio levels moving from the Master Mix of the Audio Mixer o This ensures BOTH video and audio is being recorded by the computer Studio Package: Recording Options NOTES


16. When you are ready to begin recording • Click the RECORD button 17. When you are finished recording • Click the END button • a new window (Reel) will pop up IF you plan on taking your footage and editing it in Adobe Premiere Rush, there are a few steps you should follow when exporting your clips from Lightworks. 1. Right click on the completed clip 2. Choose Export from the pop out menu Studio Package: Recording Options NOTES


Studio Package: Recording Options NOTES 3. Select Audio Location from the Export:Reel window 4. Choose Seperate Files option to export audio seperately from the video clip 5. Choose Embeded option to export video and audio together as one file 6. Change the destination of the file by clicking on the current location listed in “Folder” under “Destination” and then choose a new path from the drop down menu • Click OK to commit the change (if any) 7. Click [Automatic] next to Name to change the name of the file(s) 8. Click the Start button to complete the export