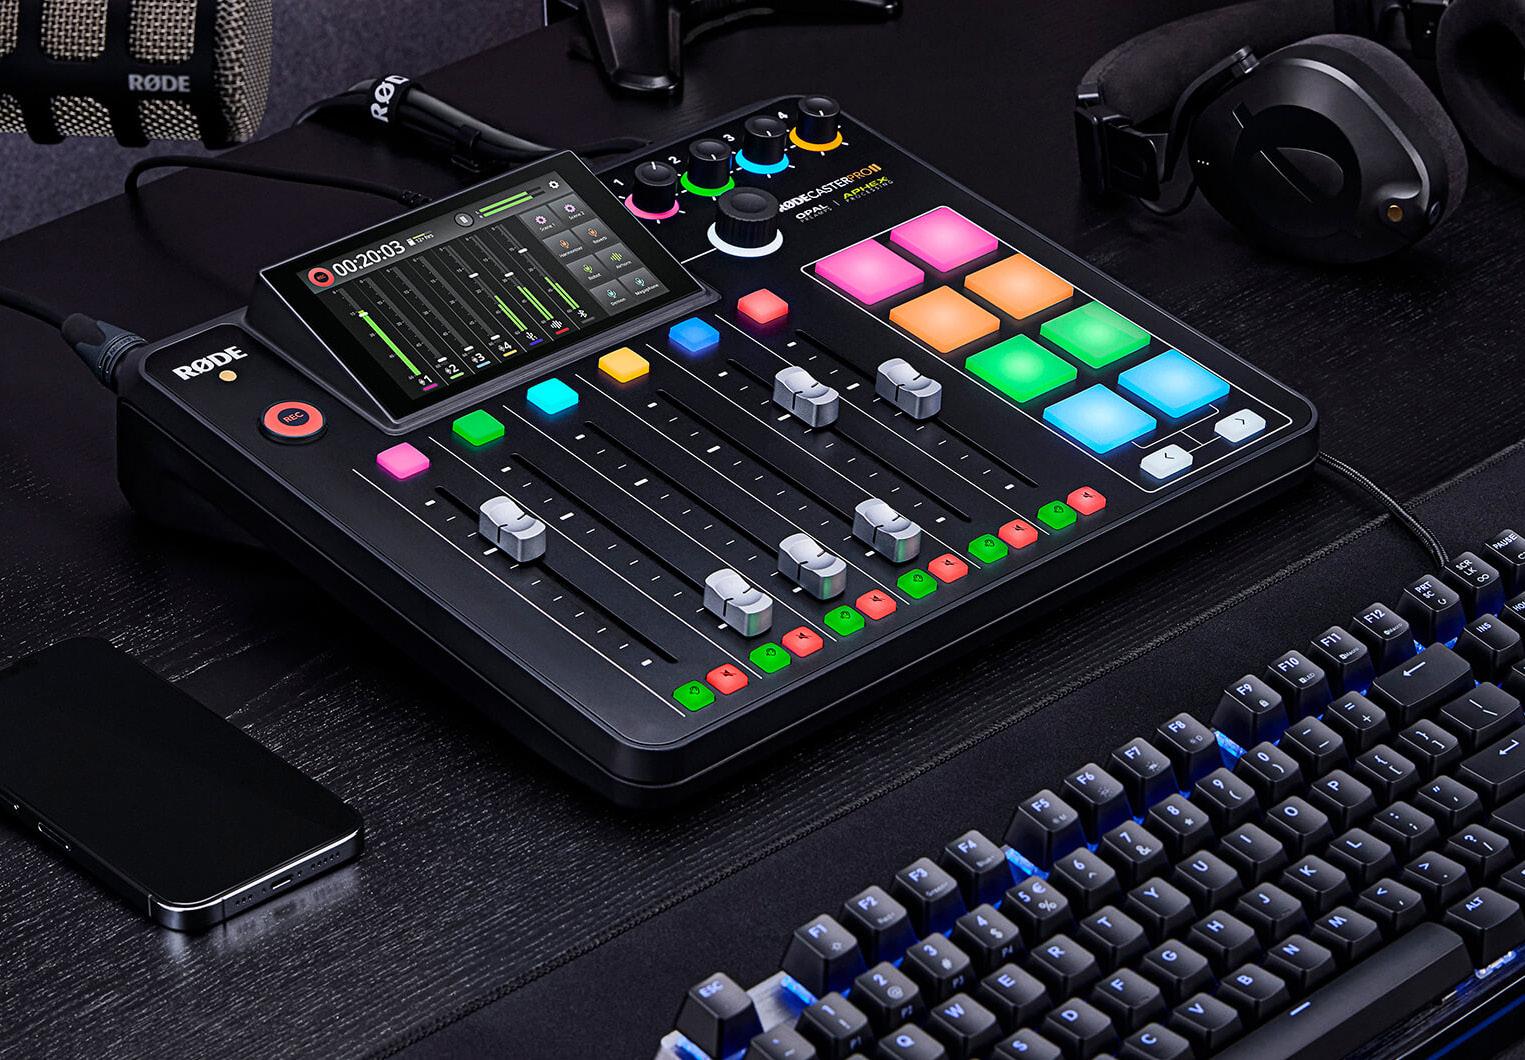
Powering The RodeCaster Pro II
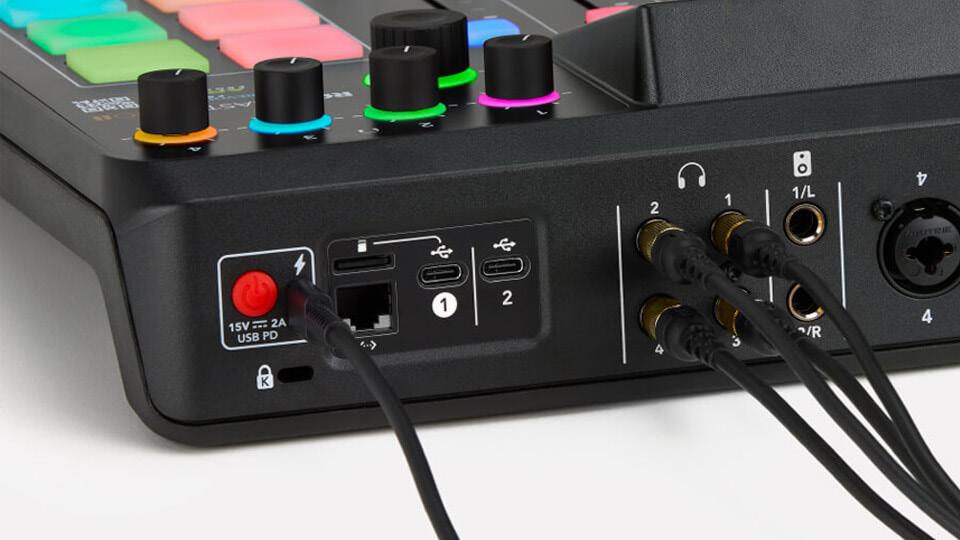
The RØDECaster Pro II comes with a power supply unit. Plug this into the USB-C input next to the RED BUTTON on the back of the unit to provide power. It can also be powered by a USB power bank, as long as it is capable of providing 30W USB-C PD (15V, 2A).
You will get approximately one hour of operation per 10W/h capacity, so a high-quality battery pack will give you around ten hours of power (note: the power drawn from the battery depends on usage factors including screen and LED brightness, USB connectivity, and phantom power status, so results may vary).
If insufficient power is provided to the unit, you will see a warning screen indicating so. In this case, either use the provided power supply or a power supply rated to the specifications above.
5
Connecting Headphones
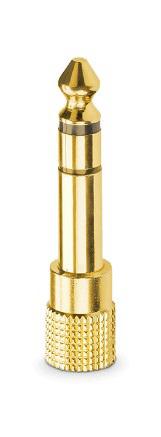
There are four outputs on the back of the RØDECaster Pro II for connecting four pairs of headphones. These feature high-quality ¼-inch connectors. If your headphones have a 3.5mm connector, use a ¼-inch to 3.5mm adaptor to connect them to the unit.

Adjusting Headphone Levels
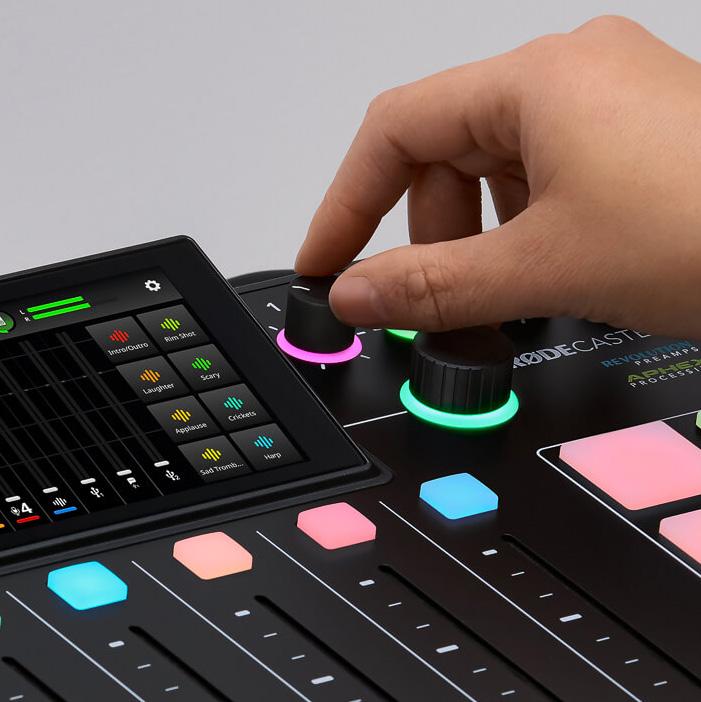
Each headphone output has an independent level control. These are located on the front of the unit and labelled 1-4. This allows you to easily control thevolume of your headphones and balance the levels for others you are recording with.
You can also optimize the output level for the type of headphones you are using (i.e., whether they are high sensitivity or low sensitivity).
To do this:
1. tap the SETTINGS COG

2. then tap ‘Outputs’
3. then tap ‘Headphones’
4. then select your headphone type
High sensitivity models have more output while low sensitivity models have less output. Selecting the correct setting for your headphone type will optimize the gain structure to make setting headphone levels as consistent as possible.
6
Basic Audio Equipment Guide - RODECaster Pro 2
Connecting and Using Speakers/Monitors
There are two balanced ¼-inch line outputs on the back of the RØDECaster Pro II for connecting a pair of speakers/monitors. These are clearly labelled left and right. The monitor output level is controlled using the rotary encoder on the front of the unit and there is an icon on the top of the mixer screen to check your level.

Monitor Output Settings
You can access two additional settings for the monitor outputs by tapping the settings cog, then ‘Outputs’ > ‘Monitor’.
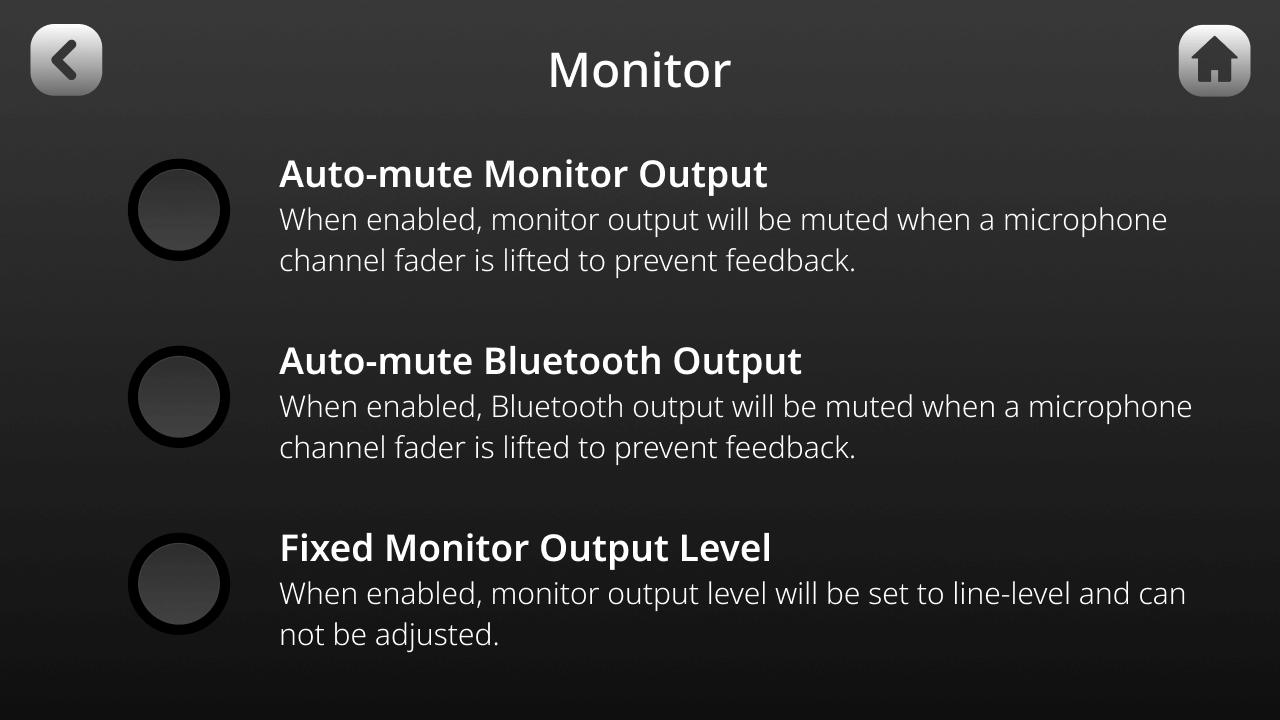
Auto-mute Output
When enabled, the monitor output will automatically be muted whenever a microphone channel fader is turned up in order to prevent feedback.
Auto-mute Bluetooth Output
When enabled, the Bluetooth output will be muted when a microphone channel fader is lifted to prevent feedback.
Fixed Output Level
When enabled, the monitor output level will be set to line-level and cannot be adjusted. This is useful if you are using the monitor outputs to send audio to outboard equipment, such as broadcast or livestreaming equipment, and want to ensure that your levels aren’t too high or low.
7
Connecting Microphones, Instruments and Other Devices
The RØDECaster Pro II features four high-quality Neutrik™ combo jacks for plugging in microphones, instruments (such as guitars and basses), and line-level devices like keyboards and drum machines. In this section, we’ll show you how to connect these devices and get them set up for recording.
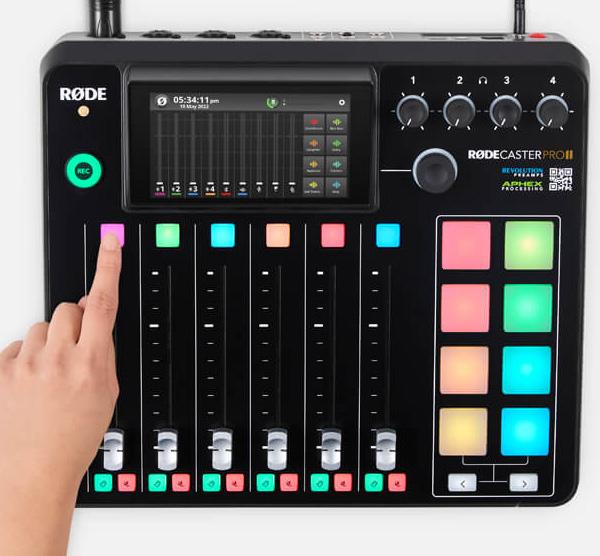

Connecting Microphones
To start, plug your microphone into input 1 on the back of the unit using a standard 3-pin XLR cable. You can use any XLR microphone with the RØDECaster Pro II, including condenser microphones that require phantom power
Note:
USB microphones cannot be used with the RØDECaster Pro II.
By default, inputs 1-4 will be allocated to faders 1-4 on the mixer. Ensuring that fader 1 is all the way down, also plug a pair of headphones into headphone channel 1 so you will be able to monitor your audio.
Basic Microphone Setup
To access the channel setup screen for fader 1, press the coloured button above the physical fader or tap the fader on the screen. Here you can select what type of microphone you are using, which will adjust the level, voicing and activate phantom power (if required).
If your microphone does not appear in the “mic locker” menu, select the universal dynamic or condenser option. You can also manually turn phantom power on and off.
8
Setting Microphone Levels
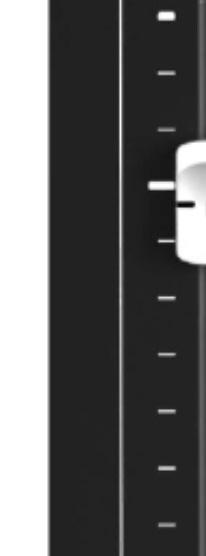
Once your microphone is set up, push fader 1 up to the thick line just over halfway up the fader. This represents ‘unity gain’.
Then, turn headphone channel 1 up to a comfortable listening level. Underneath the “mic locker” is a level meter and gain control. Keeping an eye on the level meter, talk at a natural level as close to the microphone as you will be when recording. Your audio should be jumping around the green section of the meter while you’re talking. If you selected the correct microphone setting, you should already be at a good recording level. Use the ‘+’ and ‘-’ buttons to adjust if required.
Repeat this process for as many microphones as you need for your recording.
Note:
You may notice that you are still getting levels on the meter even if the fader is all the way down. This is because the fader controls the level that is being sent to the output of the RØDECaster Pro II, not the channel input level.
Using Microphone Presets
The RØDECaster Pro II offers a selection of professionally tailored microphone presets ideal for podcasting and livestreaming.
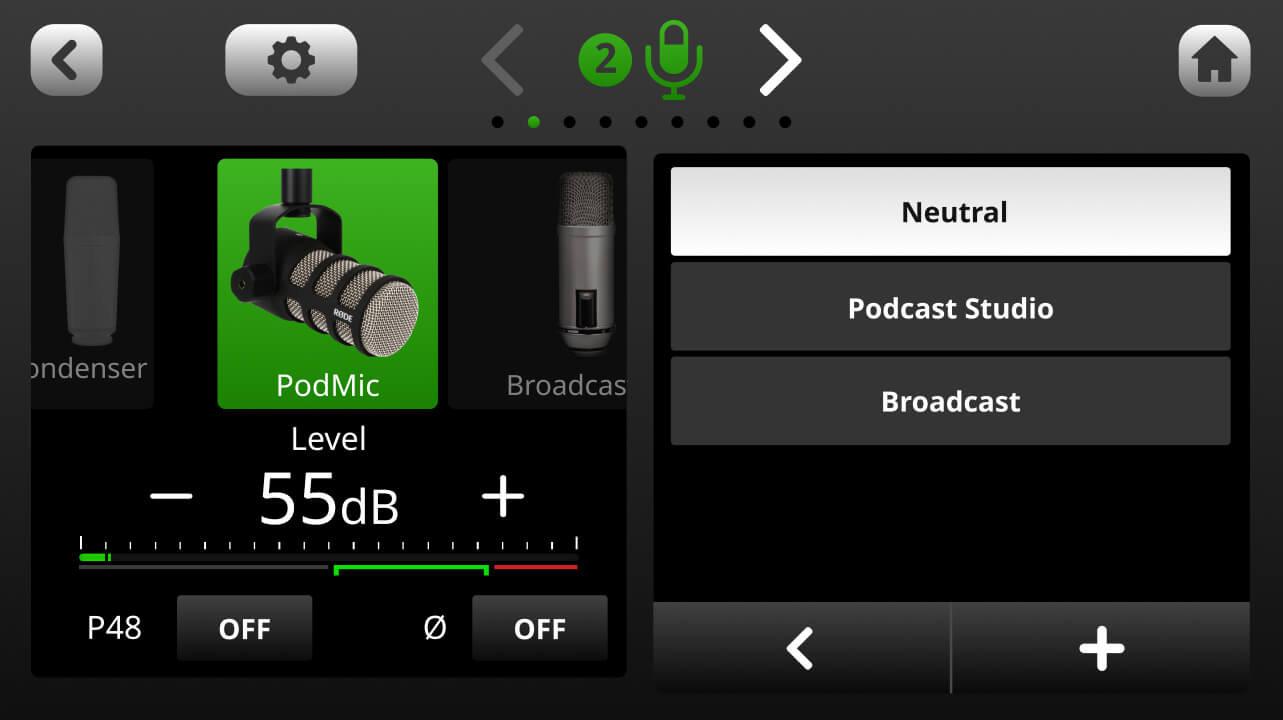

To access these, click the ‘Presets’ tab in channel setup screen.
There are three default presets to choose from:
• ‘Neutral’
• ‘Podcast Studio’
• ‘Broadcast’
9
Connecting Instruments and Line-Level Devices
To connect an instrument or line-level device, the process is much the same as connecting a microphone:
1. Plug it in to any of the four inputs using a TRS or instrument cable
2. Open the channel setup screen - select either ‘Line-in’ or ‘Instrument’ from the “mic locker” menu – this will adjust the input gain to a suitable level depending on what is connected
3. Use the level meter and ‘+’ and ‘-’ buttons to adjust the input gain as required
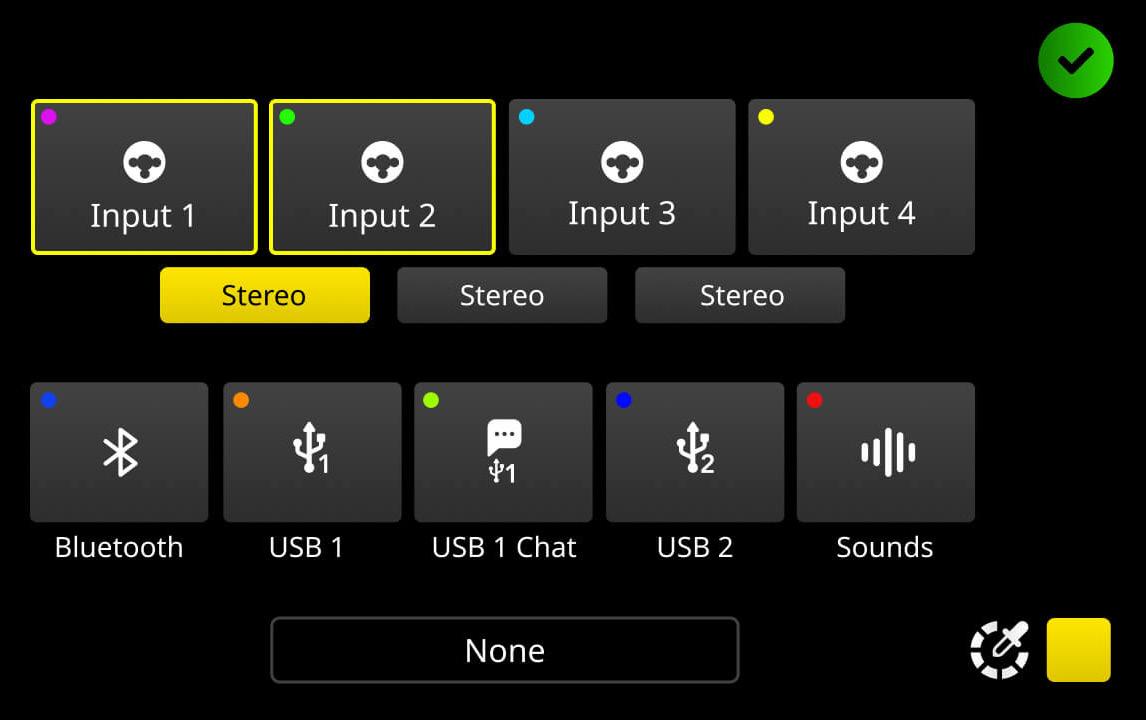
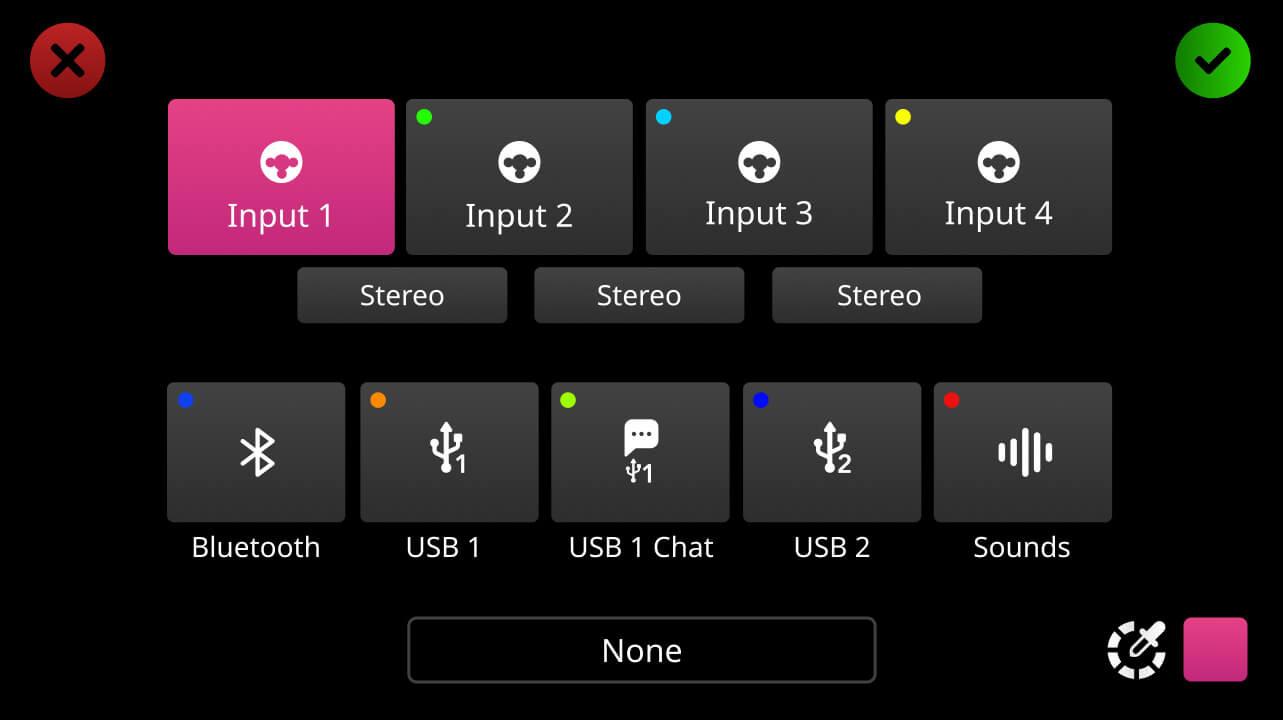
Stereo Linking Inputs

If you are using an instrument or line level device with stereo outputs, or recording a stereo microphone pair, you can link two inputs and route them to one channel. This will allow you to control the level of both inputs with a single fader, ensuring both channel levels are exactly the same.
To link two inputs:
1. open the channel setup screen for the fader you want to allocate them to
2. click the settings cog to access the fader
3. assignment screen
NOTE:
you can only link inputs that are next to each other...
i.e., 1 and 2, 2 and 3, and 3 and 4
4. tap the ‘Stereo’ icon underneath the inputs you want to link
5. Tap the green tick icon to save
6. After saving, ensure that you have the correct input type selected from the “mic locker” menu
10
Basic Audio Equipment Guide - RODECaster Pro 2
Saving and Exporting Settings as a 'Show'
All of your settings, including your channel setup, mixer and SMART pad configuration, processing, effects, and device configuration, can be saved onto a microSD card or hard drive as a ‘Show'.
Here’s how you can do it:
1. tap the icon in the top left corner of the home screen or tap the settings cog
2. tap ‘Show’
3. tap ‘Export’
- this will take a snapshot of all your settings and save them as a file to your storage device, which can then be transferred to your computer
You can save and export as many ‘Show’ snapshots as you like, which is handy if you share your RØDECaster Pro II with other creators or if you create several different podcasts, livestreams or different types of content.
To import a ‘Show’ that you have saved: Importing a Saved ‘Show’
1. make sure the file is loaded onto a microSD card or external hard drive
2. connect this to your device
3. tap the icon in the top left corner of the home screen or tap the settings cog
4. then tap ‘Show’
5. tap ‘Import’
6. then select the ‘Show’ you want to import from the list

11
Setting Up Channels and Outputs
The RØDECaster Pro II’s fully customizable mixer makes routing audio sources incredibly easy no matter what kind of content you create. Learn how to set up and assign channels to the six physical faders and three virtual faders, and how to configure your different audio outputs.

12
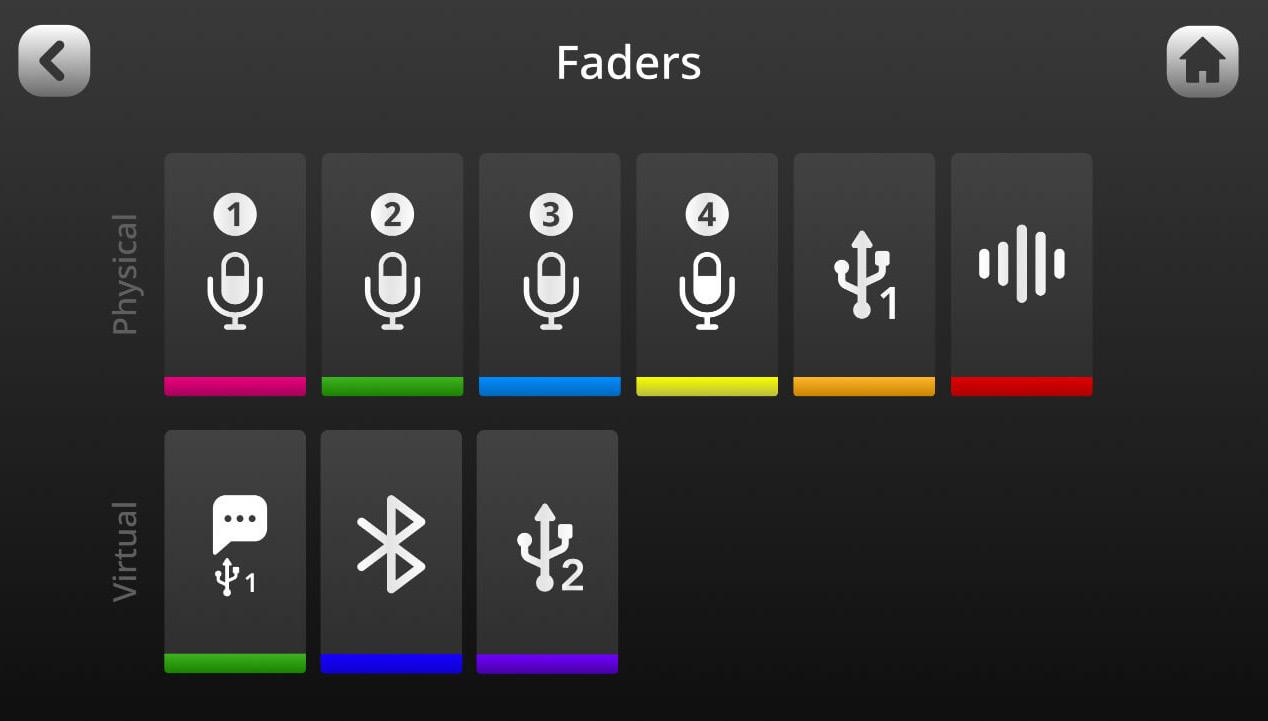
1 - Physical Faders
2 - Mute Button
3 - Listen (Solo) Button
4 - Virtual Faders
5 - Fader Level Meters
Basic Audio Equipment Guide - RODECaster Pro 2
6 - Unity Gain Indicator
The Default Mixer Configuration
The RØDECaster Pro II has nine separate inputs for connecting a wide range of devices and audio sources: four combo jacks for connecting microphones, instruments and other devices, a Bluetooth channel for connecting computers and mobile devices wirelessly, the SMART pad channel, and dual USB-C interfaces for connecting two computers and mobile devices, plus an extra virtual USB channel called ‘Chat’ for connecting chat apps, which is useful for livestreaming and other applications.
By default, these channels will be assigned to the faders as follows :
• Fader 1-4: XLR/TRS Inputs 1-4
• Fader 5: Bluetooth
• Fader 6: SMART Pads
• Fader 7: USB 1
• Fader 8: USB 1 Chat
• Fader 9: USB 2
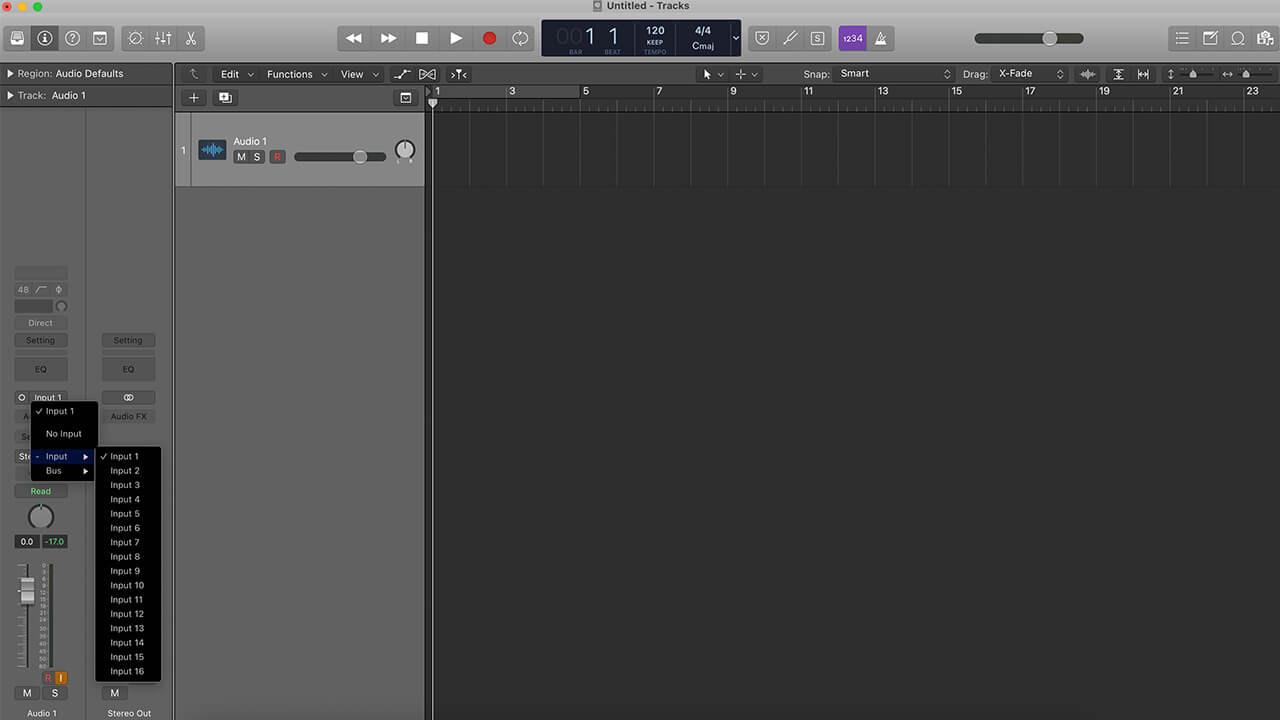
Assigning Inputs to Faders
There are multiple ways to change the mixer configuration. This can either be done during the Setup Wizard process, or via the fader set-up screen or the channel set-up screen.
To access the channel set-up screen for a fader, simply tap the button above the fader or the icon below the level meter, then tap the settings cog to access the channel assignment screen. Here you can select what input is assigned to that channel, unassign inputs, link stereo inputs and change the color-coding of the channel.
 green tick icon
Once you have configured the channel, tap the green tick icon to save the settings. Repeat the process for the other faders you want to assign inputs to.

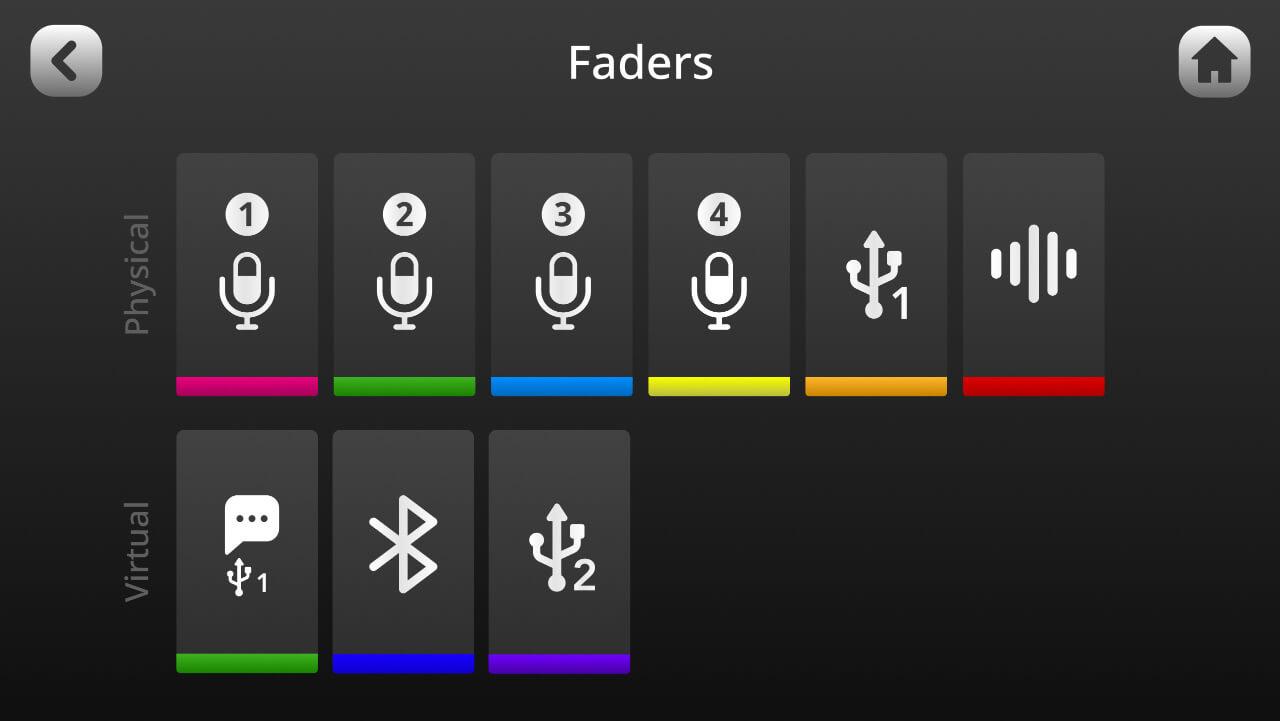
To access the fader set-up screen:
1. tap the settings cog
2. then tap ‘Faders’ (or tap the fader icon on the bottom left corner of the channel set-up screen) Here you can assign channels to the physical and virtual faders by dragging and dropping their icons to the desired location using the touchscreen
This is a quick and easy way to change the configuration of the mixer. You can also tap a fader icon to access the channel assignment screen.
Using the Physical and Virtual Faders
The RØDECaster Pro II features six broadcast-quality physical faders and three virtual faders, allowing you to mix a total of nine separate inputs with complete hands-on control.
The physical faders function like any other mixer: simply use the sliders to adjust the level for that channel. The fader position will be mirrored in real-time on the mixer interface.
The virtual faders work just like the physical faders, only you have a digital fader that is controlled by tapping the level meter then using the rotary encoder. You can also easily scroll through the virtual channels by pressing the rotary encoder. Pressing and holding the rotary encoder will mute the selected virtual channel.
NOTE:
‘Unity gain’ for each fader indicated by the white markers on the physical mixer and small arrows on the virtual mixer (in default level meters mode only).
This is helpful for balancing the input level with the output level and is a good starting point when setting your levels. If a fader is at unity gain and the signal is still too low, boost the preamp gain level in the channel set-up screen rather than pushing the fader up further.
This will help you achieve a healthy signal with minimal noise.
•
Basic Audio Equipment Guide - RODECaster Pro 2
Changing the Level Meter Display
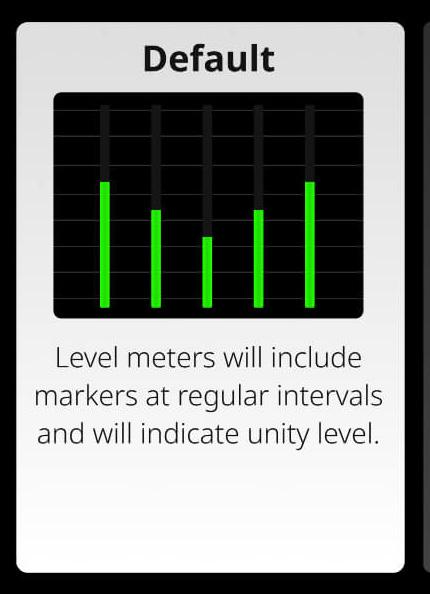
There are two ways to display the level meters on the virtual mixer: ‘Default’ mode and ‘Broadcast’ mode
In ‘Default’ mode, there are markers at regular intervals, allowing you to easily visualise your levels, as well as a marker for unity gain.
In ‘Broadcast’ mode, the level meters will include dBFS (decibels full scale) markers as well as a gain reduction meter (if you have the compressor activated on that channel).

To switch between the two modes:
1. go to settings
2. then go to‘Display’
3. then go to ‘Metering’
4. and then select either ‘Default’ or ‘Broadcast’
15
Using the Mute Buttons Using the Mute and Listen Buttons
The red button under each of the RØDECaster Pro II’s physical faders is a MUTE BUTTON.
This will simply mute that channel on the output. You can also access a mute button for the three virtual channels by tapping the level meter then tapping the mute icon, or by pressing and holding the rotary encoder when a channel is selected.
When a channel is muted, the button and fader on the virtual mixer will be illuminated RED
Using the Listen Buttons
The green button under each of the RØDECaster Pro II’s physical faders is a “LISTEN” BUTTON (also known as a SOLO BUTTON)
This allows you to monitor the audio from a channel by itself, without the rest of the audio mix (note: the solo’d audio will only be heard by the host/producer on headphone channel 1). You can also access this feature for the three virtual channels by tapping the level meter then tapping the ear icon.
Note:
Pressing both the listen and mute buttons will activate ‘Back Channel’ mode, allowing the host/producer and guest to communicate “off-air”.

There are two different listen button modes:
‘After-fader Listen’ and ‘Pre-fader Listen’
To switch between these modes:
1. go to settings
2. then go to ‘Outputs’
3. and then go to‘Listen’
‘After-fader Listen’:
When ‘Listen’ is engaged, the host/producer on headphone channel 1 will hear the channel at the fader level.
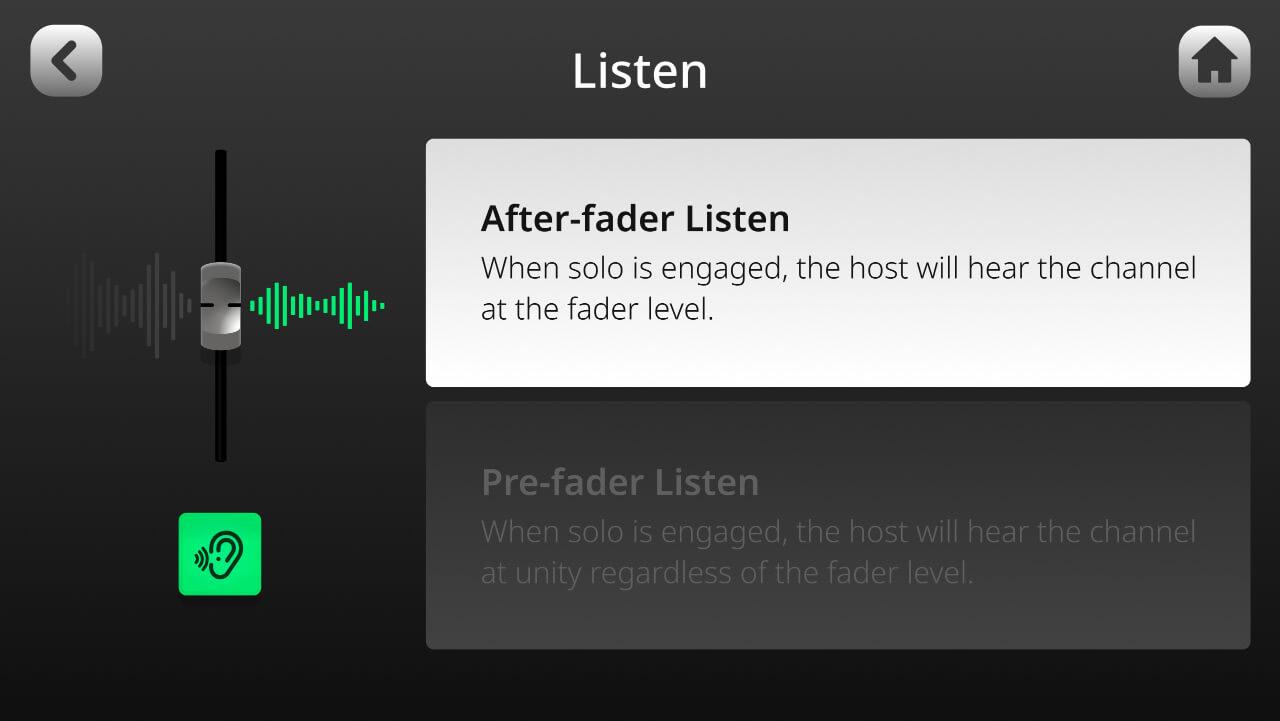
‘Pre-fader Listen’:
When ‘Listen’ is engaged, the host/producer on headphone channel 1 will hear the channel at unity gain, regardless of the fader position.
16
Basic Audio Equipment Guide - RODECaster Pro 2
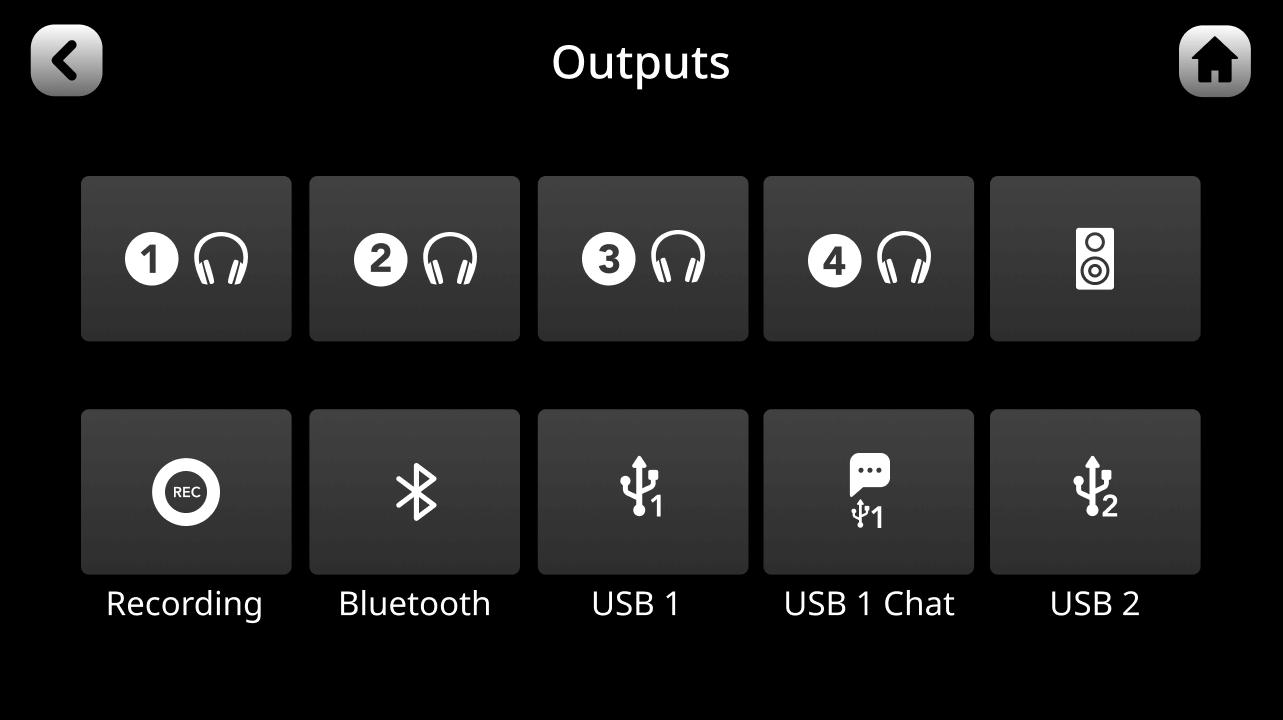
Understanding the Outputs
The RØDECaster Pro II has a total of ten audio outputs. These comprise of both analog outputs, including the four headphone outputs and the stereo monitor output, as well as digital outputs, including the Bluetooth channel, the audio that is recorded to the on board microSD card, and the three USB outputs. By default, the levels that you set using the physical and virtual faders on the main mixer will dictate the audio mix that is sent to all of these outputs.
17
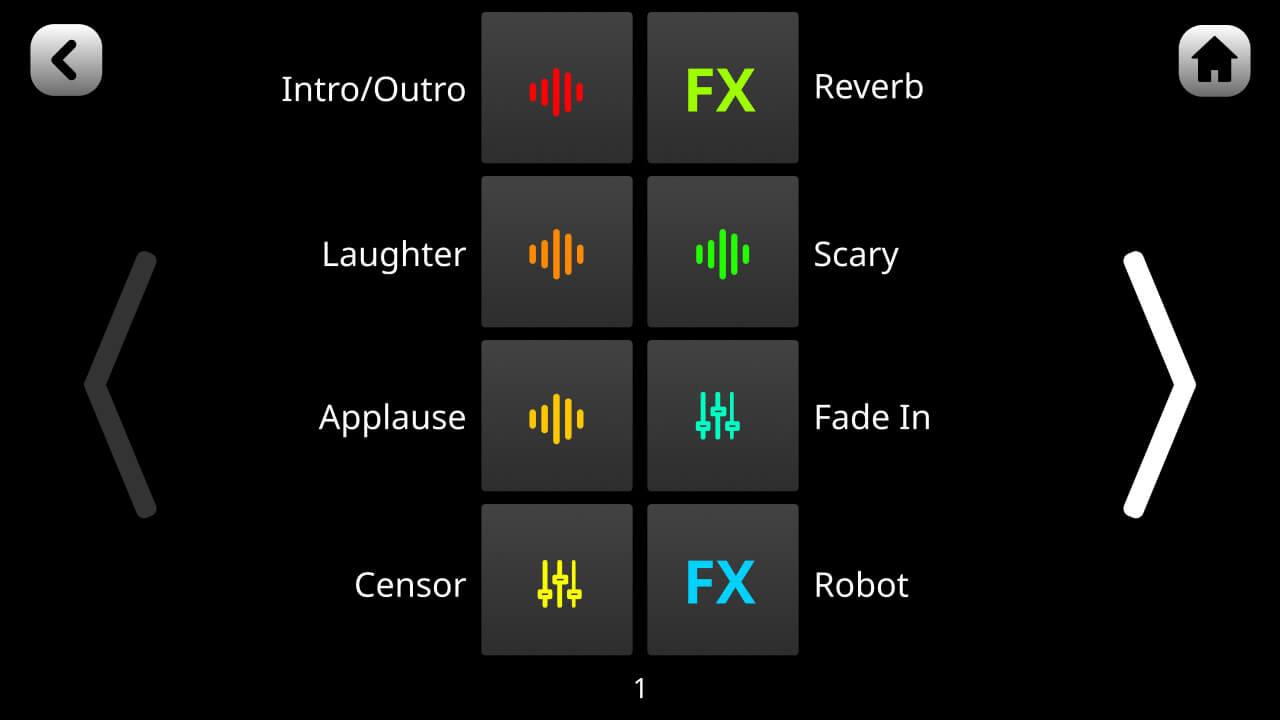
Using the SMART Pads
The RØDECaster Pro II is equipped with eight fully customizable SMART pads that can be programmed to perform a variety of functions, including triggering sounds, voice FX, mixer actions, and MIDI commands.
What Are the SMART Pads?
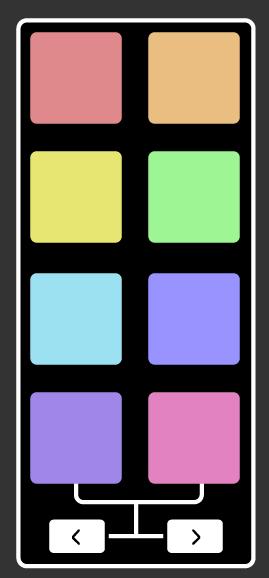
The SMART pads section of the RØDECaster Pro II consists of eight pads with two bank switching buttons, giving you access to eight banks for a total of 64 unique actions.
The SMART pads are also mirrored on the RØDECaster Pro II screen with individual names for each pad and icons that indicate what type of pad is assigned to it.
Setting Up Your SMART Pads
To set up a SMART pad, either tap the pad icon from the main screen or tap the settings cog then ‘SMART Pads’ to access the pad menu. Then either tap an empty pad slot or an existing pad and then ‘Clear’ to clear the pad. There are four different SMART pad categories: ‘Sound’, ‘Effects’, ‘Mixer’ and ‘Trigger’.
Within each of these different categories there is a range of different functions that the pad can perform.
18
Basic Audio Equipment Guide - RODECaster Pro 2
Using the SMART Pads to Trigger Sounds
When in ‘Sound’ mode, audio can be assigned to pads and will play when the pad is pressed. Audio can be loaded onto or recorded directly to the pads and played back in different ways. This is useful for firing off stings, intro or outro music, sound effects, pre-recorded interviews or other content during a podcast or livestream, or any other application where you need to trigger audio with instant playback. The RØDECaster Pro II has 4GB of internal storage.
Connecting to RØDE Central to Load and Export sounds
The simplest way to allocate audio to a pad is to use an existing sound file from your computer and load it onto the unit using RØDE Central. To do this, connect your RØDECaster Pro II to your computer via USB and launch the RØDE Central app. Click the icon for the RØDECaster Pro II, then select ‘Customize SMART Pads’. Note: This process will put your RØDECaster Pro II into ‘Transfer Mode’; you cannot use audio functions on the device whilst in transfer mode, so do not do this if you are using the RØDECaster Pro II for audio playback, recording or streaming.
Loading an Audio File onto a Sound Pad
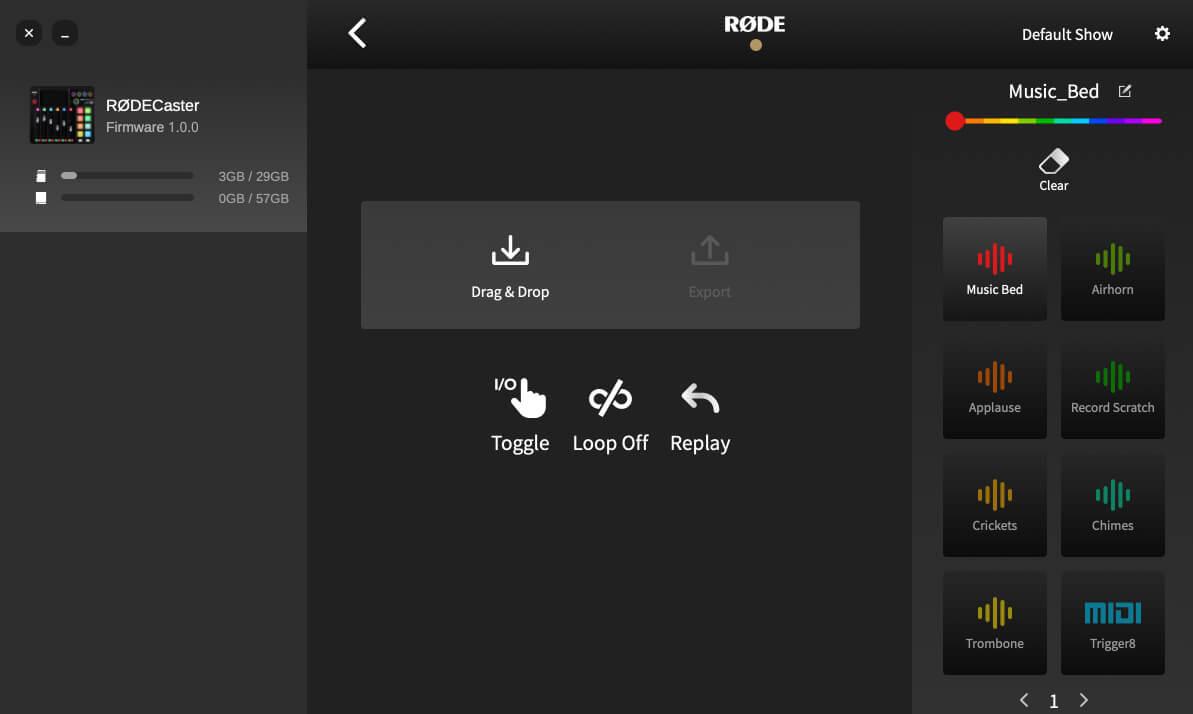
To load a sound onto a pad, click on the target pad. If it is blank or already has a sound loaded on it, you will see ‘Drag & Drop’ and ‘Export’ icons (if it has a different function allocated, you will see an icon for that function – to change this to a sound pad, you must first click the ‘clear’ icon above the list of pads). Simply drop the audio file from your computer file browser onto the ‘Drag & Drop’ icon to load a sound. The file will be transferred, and the sound allocated to the pad, replacing the existing sound if one was previously loaded.
Note: the RØDECaster Pro II only accepts MP3 or WAV files.
19
Exporting an Audio File from a Sound Pad
You can also export a sound from a pad onto your computer. This is useful if you want to archive a recording you have made directly to a pad.
To do this:
1. select the pad with the recording you want to save from the pad list on the right
2. then click ‘Export’
- a dialog box will allow you to specify where to save the file
Sound Pad Playback Modes
There are multiple audio playback modes for the sound pads.
To access these on the RØDECaster Pro II:
1. tap the target pad from the main screen
2. then tap ‘Edit’
- If you’re using RØDE Central, go to the ‘Customize SMART pads’ screen and click on the pad you want to edit

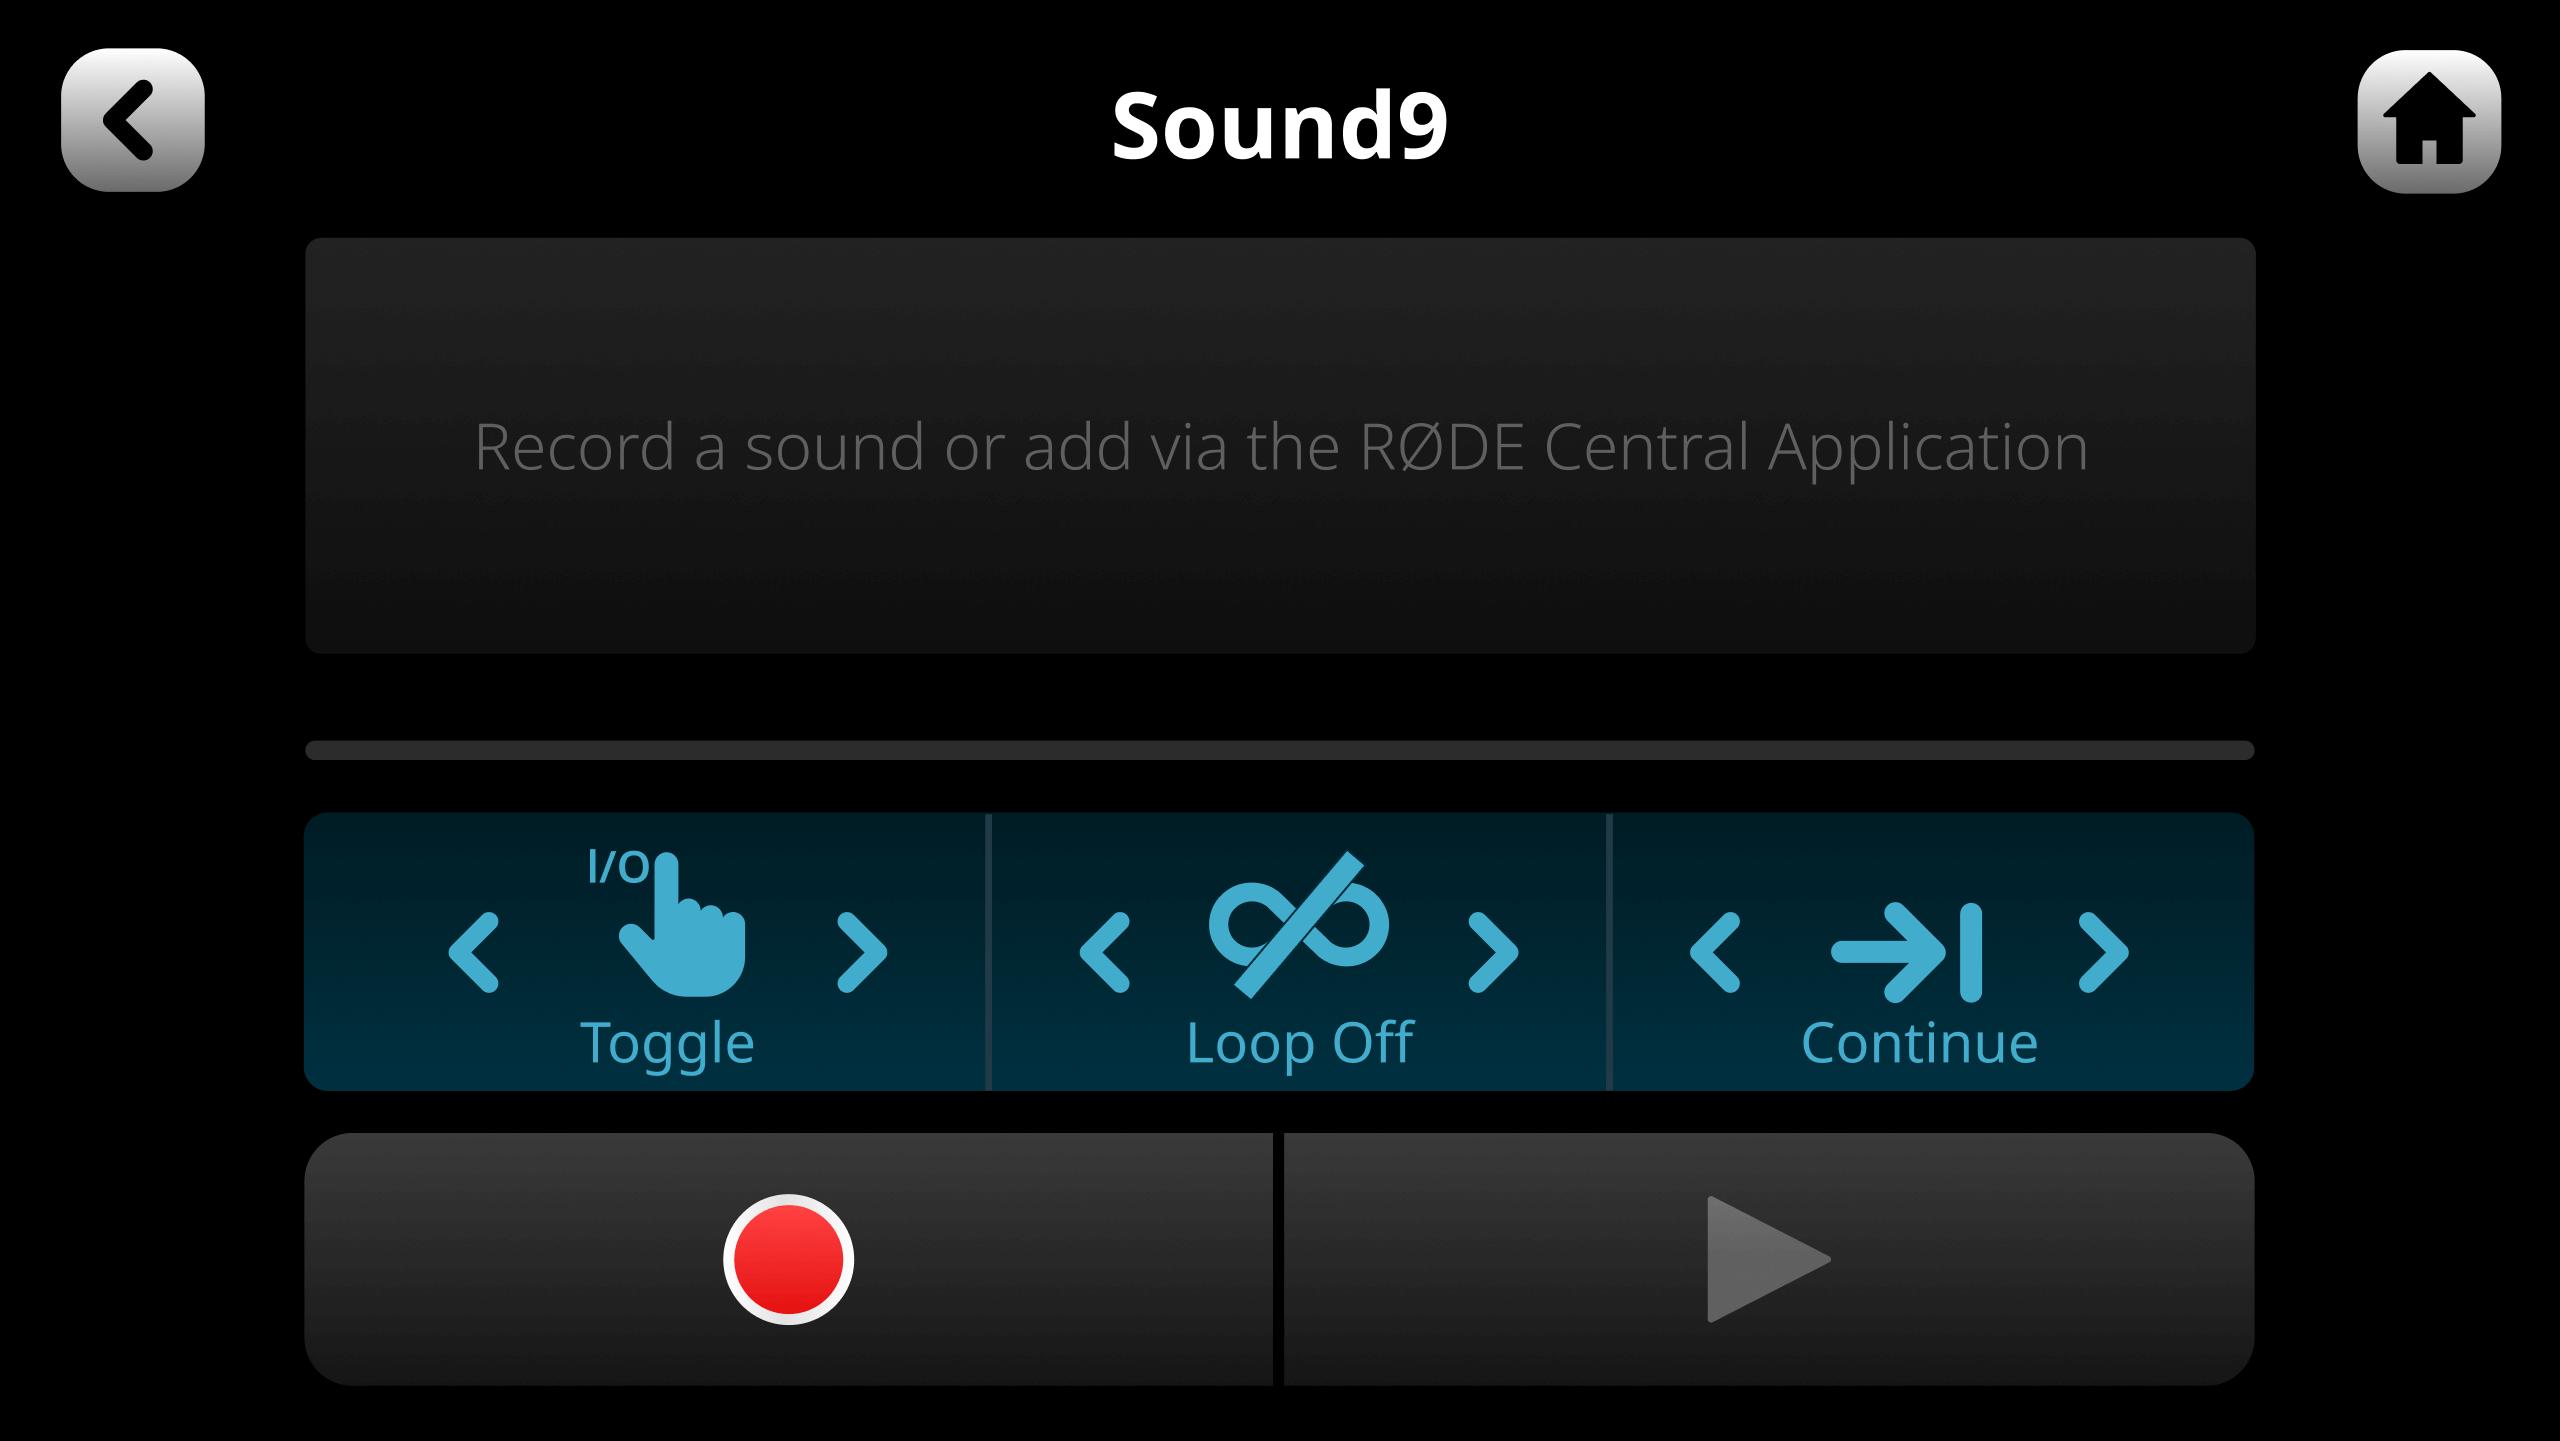
There are three parameters you can adjust:
1. Toggle/One Shot/Hold
• This setting affects how the audio triggers when you press the pad.
• ‘Toggle’ means one press will start the sound and a second press will stop it. ‘One Shot’ means pressing the pad will play the sound from the beginning –repeated presses will restart playback from the beginning (note: you cannot force stop playback in this mode –either let the sound play out or fade the sound out manually). ‘Hold’ will play the sound for as long as the pad is pressed.
2. Loop
• In this mode, the audio will play repeatedly in a loop until playback is stopped (note: this mode is not available in ‘One Shot’ mode).
3. Replay/Continue
• When in ‘Toggle’ mode, this sets whether playback starts from the beginning (if the pad is pressed after being stopped) or resumes from the pause position.
20 Basic Audio Equipment Guide - RODECaster Pro 2
Trimming the Audio on a Sound Pad
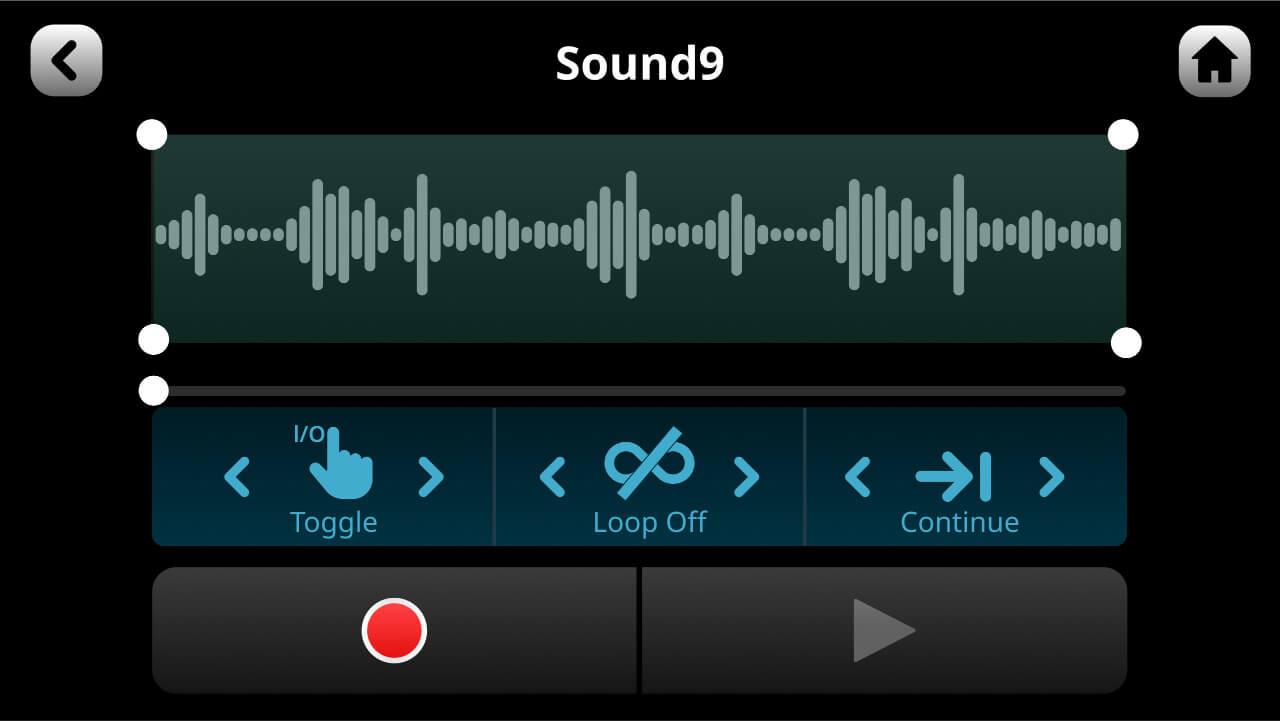
You can trim the start and end points of the audio on a pad as well as adding in a fade in or fade out.

This is great for eliminating any silence at the beginning of your file, or for ensuring a smooth fade out at the end.
To do this:
• drag the bottom corners of the waveform to trim the audio
• and drag the the top corners to create a fade in or out
To preview your edit, press the play icon Press the green tick in the top right corner of the screen to save the edit and exit edit mode.
Recording Audio Directly to a Sound Pad
In addition to using RØDE Central to load audio files to a pad, you can also record audio directly to a sound pad from the RØDECaster Pro II.
To activate recording: click on the red record icon on the pad edit screen (if there is already a sound on the pad, a dialogue will warn you that recording will overwrite the existing sound).
Recording will begin, and any audio source connected to the RØDECaster Pro II (including all channels except the sound pads) will be recorded to the pad.
You can pause or stop the recording using the controls. Once the recording has been stopped, you can replay it and trim it as described above.
21
There are four effects available:
1. reverb
2. echo (delay)
3. megaphone
4. voice-altering effects
Using the SMART Pads to Trigger Voice Effects
Voice effects allow you to add a range of transformations and enhancements to microphone channels by pressing the pads. This could be as subtle as adding reverb for a vocal performance to drastic vocal effects for livestreaming or podcasting.
There are three voice-altering effects modes:
1. robot voice
2. voice disguise
3. pitch shift
Any of the four effect types can be combined and activated simultaneously.
Setting up an FX Pad
To create or edit an effect pad, go to the pad edit screen and either clear a pad and then select ‘FX’ as the type, or click ‘edit’ for an existing FX pad. At the top of the screen, you can select which of the four microphone channels the effects will be applied to. Next to the mic selection buttons is a control labelled ‘Latching’. This switches between two trigger modes: if ‘Latching’ is engaged (highlighted), then pressing the pad will activate the effect, and it will stay activated until the pad is pressed again; if it is not engaged, the pad will only trigger the effect whilst it is being pressed.
At the time this publication was being compiled, you can only assign one microphone channel to an effect pad at a time.
In order to apply effects to multiple microphone channels, you will need to set up and trigger an effect pad per channel. The major benefit of this is that you can now apply different effects to each microphone channel, and these effects are recorded on individual channels in multitrack recording mode, rather than just the main stereo mix.
22 Basic Audio Equipment Guide - RODECaster Pro 2
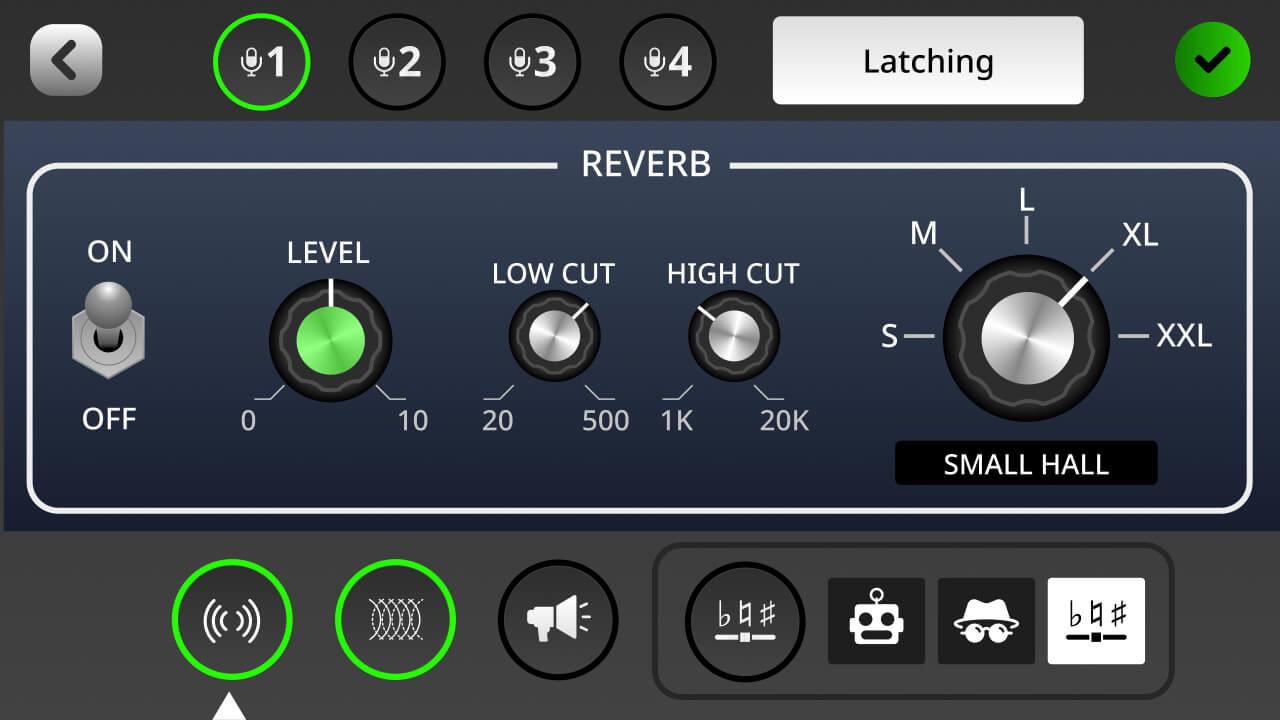
Reverb
Reverb is selected by tapping the reverb icon at the bottom left of the screen. The reverb effect has a range of controls that can be used to modify the effect to taste. Toggle the effect on and off using the switch on the left. The ‘Low Cut’ and ‘High Cut’ controls can be used to adjust the tonal balance of the reverb. And the type (or ‘size’) of reverb can be adjusted using the large control on the right. The rotary controls can be adjusted by tapping the control on the screen and then turning the rotary encoder.
Echo
The echo (delay) effect is selected by tapping the second icon at the bottom of the screen. The delay setting has a range of controls that can be used to modify the effect.
Toggle the effect on and off using the switch on the left. The level function controls the amount of echo that will be heard in the mix. The ‘Low Cut’ and ‘High Cut’ controls can be used to adjust the tonal balance of the echo.
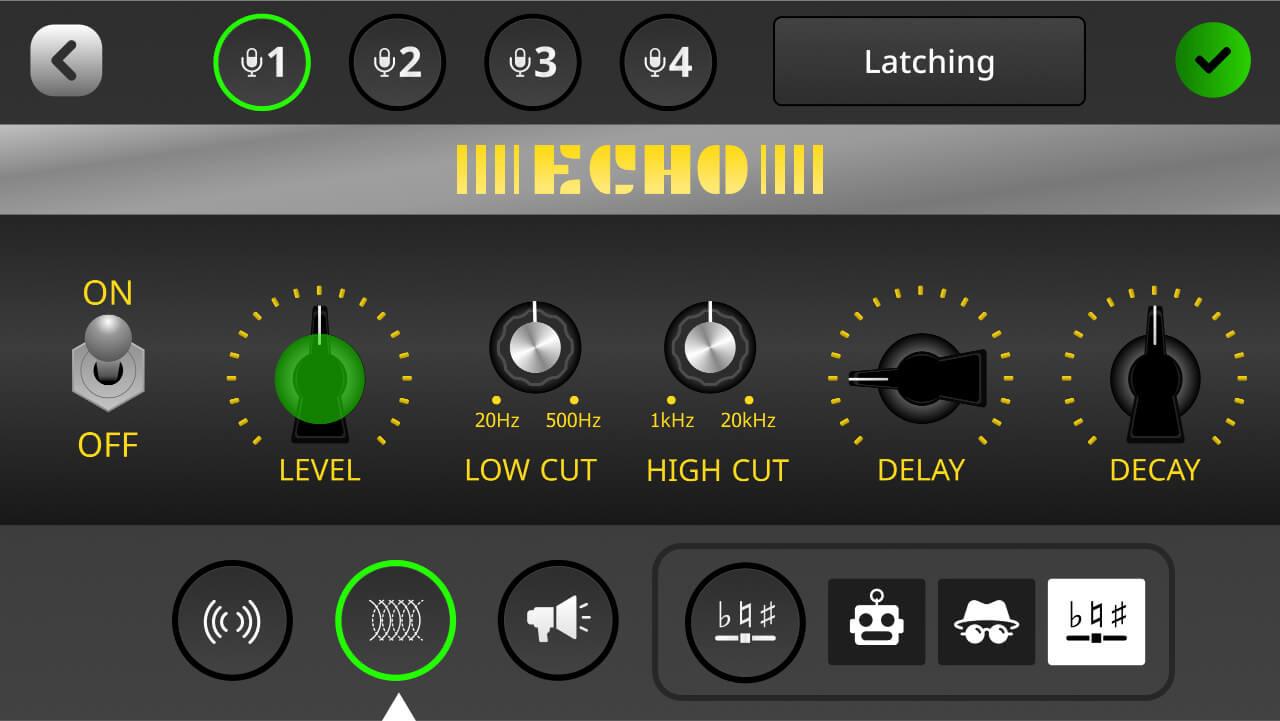
The ‘Delay’ control determine the time between echoes, with a maximum of one second. The ‘Decay’ control sets how long it takes for the echoes to die away.
The rotary controls can be adjusted by tapping the control on the screen and then turning the rotary encoder
23
Megaphone
The megaphone effect is selected by tapping the third icon at the bottom of the screen. Toggle the effect on and off using the ‘Power’ switch on the right.
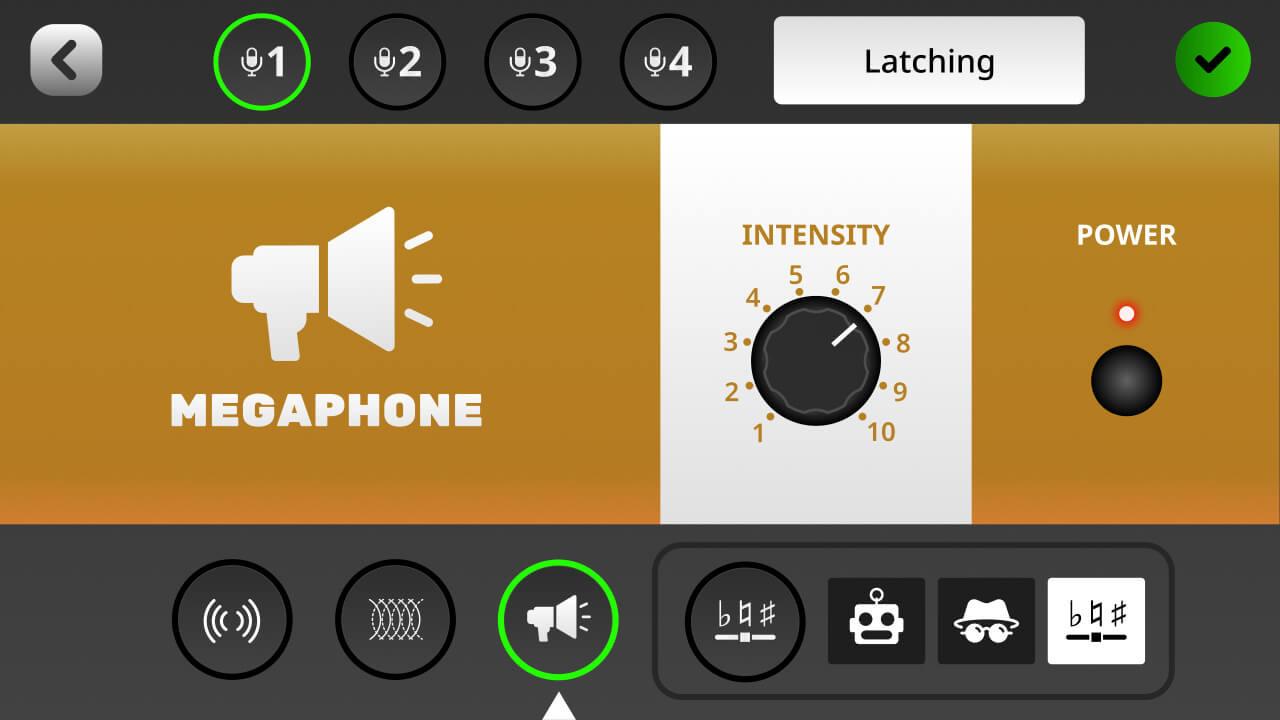
The ‘Intensity’ control will adjust how dramatic the effect is. The rotary control can be adjusted by tapping the control on the screen and then turning the rotary encoder.
Activating the Voice-altering Effects
There are three different voice-altering effects, which can be accessed by tapping the fourth icon at the bottom of the screen. These are robot, voice disguise and pitch shift. The icon will show which voice effect is currently loaded.
Robot
This is a classic robot voice effect. Toggle the effect on and off using the I/O switch on the right of the screen. There are three different robot voice types available, which can be selected using the control on the left. The intensity of the effect is set by the ‘Level’ control. The rotary controls can be adjusted by tapping the control on the screen and then turning the rotary encoder.


24 Basic Audio Equipment Guide - RODECaster Pro 2
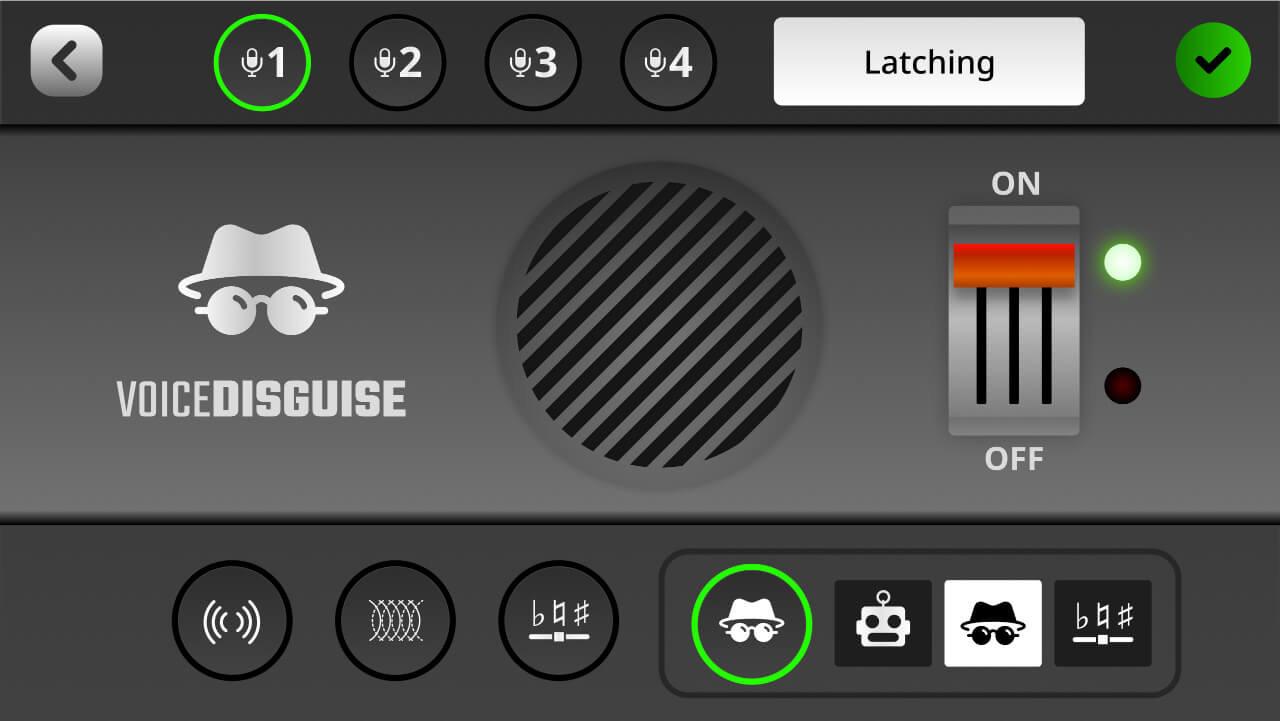
Voice Disguise
This effect changes to your voice timbre to make it unrecognizable.
It has a single on/off control.
Pitch Shifter
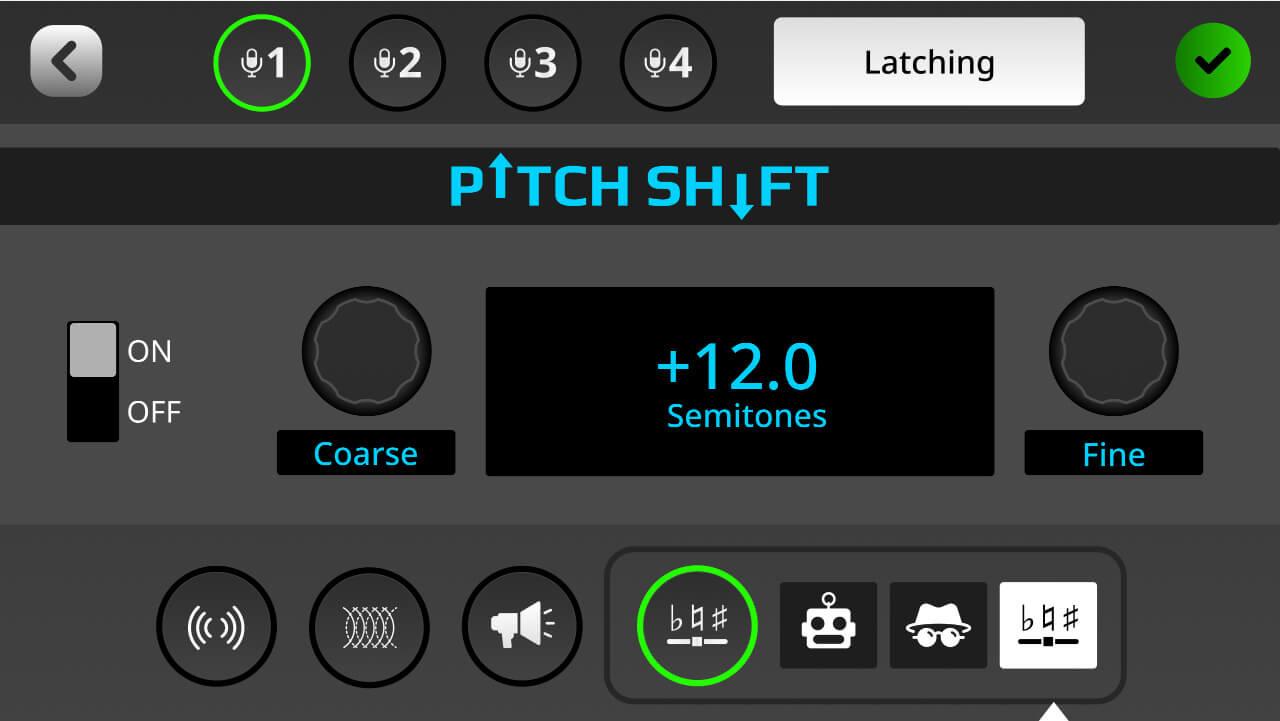
This effect adjusts the pitch of the incoming signal by a set amount. It is calibrated in semitones, meaning it can be used for musical effects, as well as for comedic voices. Toggle the effect on and off using the ‘On/Off’ switch on the left of the screen.
Use the ‘Coarse’ and ‘Fine’ controls to set the range of the pitch shifting, up to a maximum of one octave (12 semitones) above or below the incoming signal. The rotary controls can be adjusted by tapping the control on the screen and then turning the rotary encoder.
Mixer Actions
The ‘Mixer’ pad type offers a range of different actions that have an impact on your mixer levels and routing. They essentially allow you to perform multiple mixer functions with a single press of a pad, rather than having to make adjustments manually. This is especially useful in a live podcasting or streaming scenario.
There are five (5) different modes:
1. ‘Censor’
2. ‘Trash Talk’
3. ‘Fade In/Out’
4. ‘Back Channel’
5. ‘Ducking’
25
Censor
In this mode, when a pad is pressed, a preset sound will play, and all channels will be muted. By default, it uses a classic ‘beep’ tone, but this can be replaced with any sound you want.
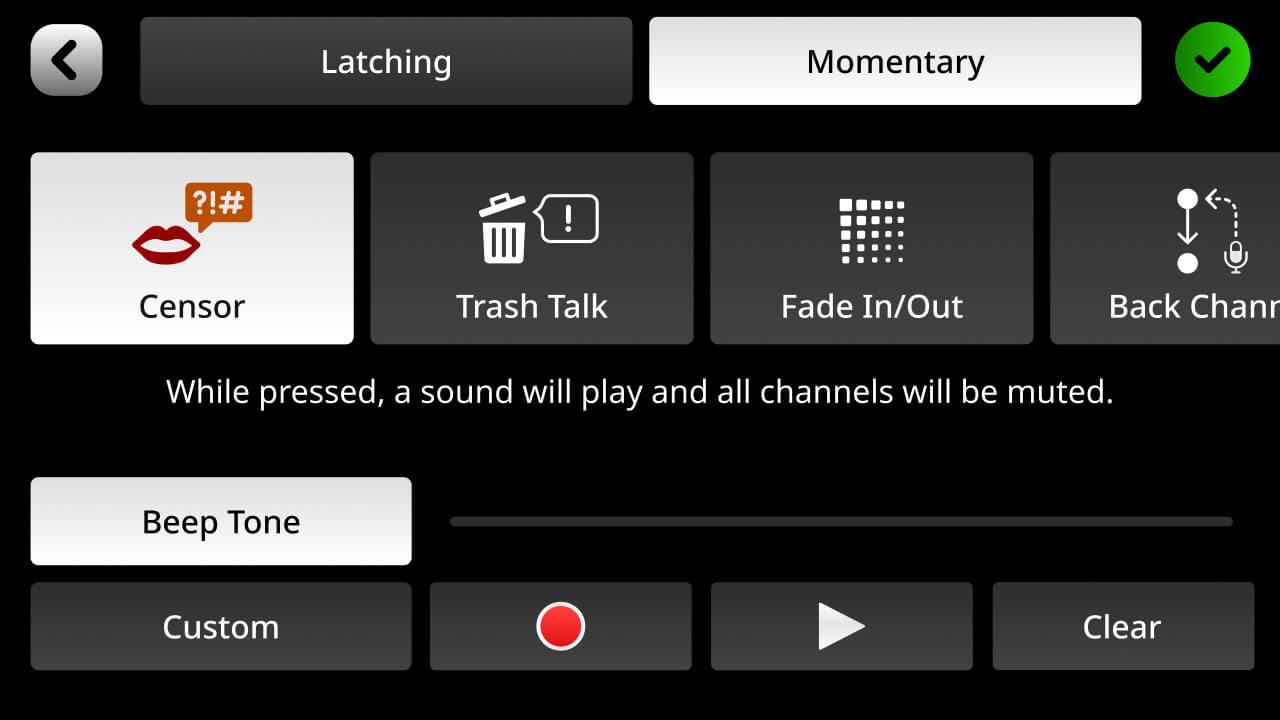
To record a custom sound, tap ‘Custom’. Pressing the red ‘Record’ button will record any source coming into the mixer – this could be microphones, instruments, or audio from a USB source etc.
Note: you will need to ensure the audio source you want to record is faded up prior to pressing record.
You can preview the recording with the play button and clear the recording using the clear button. The trigger mode can be set at the top of the screen.
In ‘Latching’ mode, the Censor effect will start when the pad is pressed and stop when the pad is pressed again.
In ‘Momentary’ mode, the effect will only play whilst the pad is pressed.
Note: custom recordings will loop for as long as the pad is activated.
Trash Talk
The ‘Trash Talk’ function cuts the audio sent to the mix-minus channels on USB and Bluetooth. This means any guests you have connected will no longer hear you (but if they speak, they will still be heard). The trigger mode can be set at the top of the screen.

In ‘Latching’ mode, the ‘Trash Talk’ function will start when the pad is pressed and stop when the pad is pressed again.
In ‘Momentary’ mode, it will only be active whilst the pad is pressed.
26 Basic Audio Equipment Guide - RODECaster Pro 2
Fade In/Out
The ‘Fade In/Out’ function allows you to fade your entire audio mix in or out at a predetermined rate. This means, for example, at the end of a show you could fade out all the audio sources together in one smooth action. You can set the speed of both the fade in and the fade out by tapping the values and setting the length of the fade using the rotary encoder.
Clicking ‘Exclude Host’ means microphone channel 1 will be excluded from the fade, meaning you can fade down the rest of the audio whilst the host continues to talk. The trigger mode can be set at the top of the screen.
In ‘Latching’ mode, tapping the pad will activate the fade. Tapping the fader again will cause the sound to fade back in.

In ‘Momentary’ mode, tapping the pad will activate the fade out whilst the pad is being pressed; if it is released the audio will immediately fade back in again.
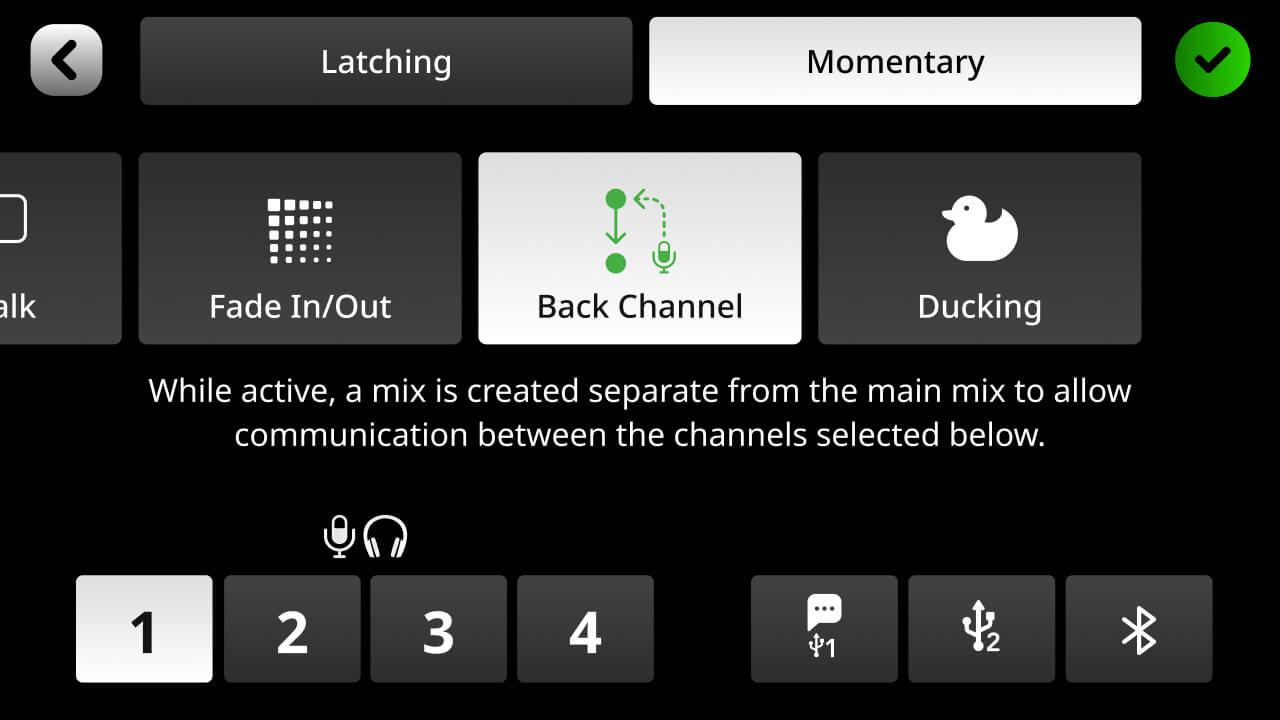
Back Channel Mode
‘Back Channel’ allows you to set up a communications link between audio sources that will not be recorded. This means, for example, the host can communicate with a remote guest prior to introducing them, or all the participants can talk to each other to discuss the next segment whilst other audio is playing. Use the icons at the bottom of the screen to select which sources will be a part of the communication channel. It can be just two sources, or it can be multiple. When the pad is activated, any source linked to the communications channel will have their output muted (so they will no longer be a part of the recording or livestream), and the ‘Listen’ and ‘Mute’ buttons will glow yellow to indicate they can communicate with each other. The pad mode can be set at the top of the screen.
27
Back Channel Mode (continued)
In ‘Latching’ mode, the ‘Back Channel’ function will start when the pad is pressed and stop when the pad is pressed again.
In ‘Momentary’ mode, the ‘Back Channel’ function will only be enabled whilst the pad is pressed.
Ducking
‘Ducking’ is a function that lowers the volume of all the audio sources except the host (microphone channel 1) when activated. This is useful for allowing a host to get control of a discussion or talk over a music bed without having to adjust the fader levels. The pad mode can be set at the top of the screen.
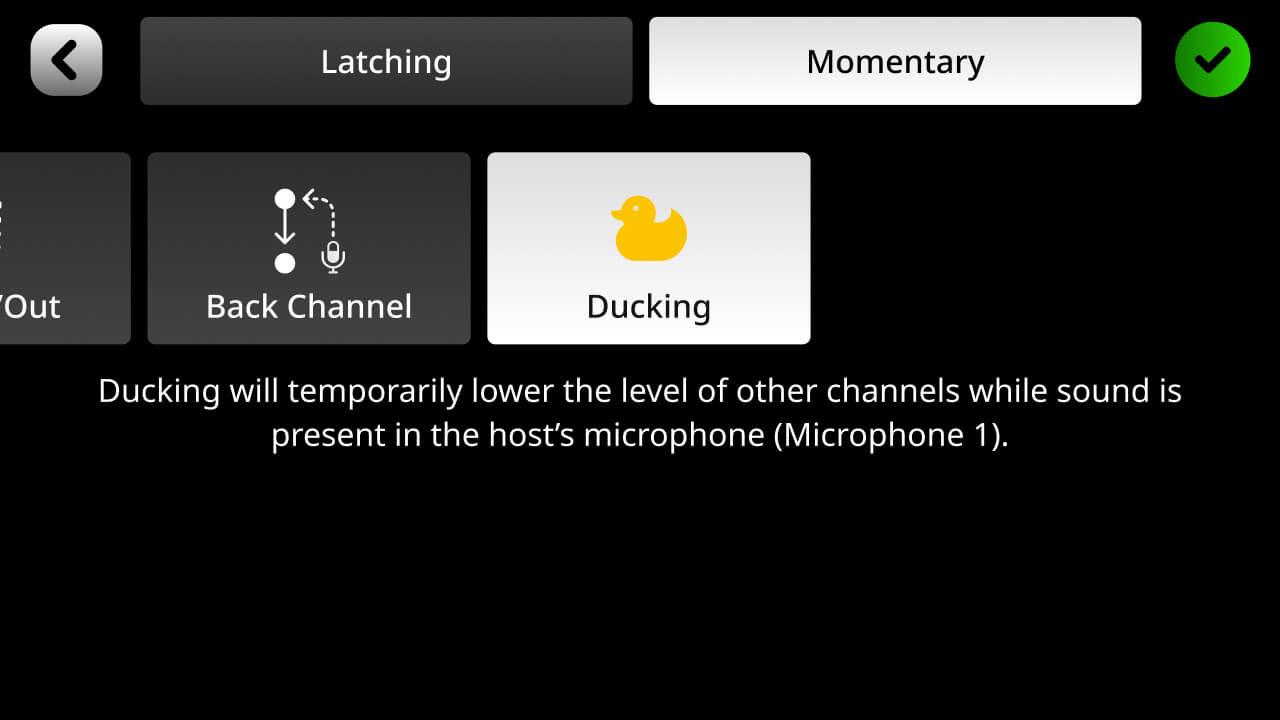
In ‘Latching’ mode, the ‘Ducking’ function will lower the volume of all other channels when the pad is pressed and raise them again when the pad is pressed again.
In ‘Momentary’ mode, the function will only be enabled whilst the pad is pressed.
28 Basic Audio Equipment Guide - RO-
MIDI Triggers
Setting Up Custom MIDI Triggers
The pads can also be used to send MIDI messages to software on a computer. This can be used for a wide variety of functions, depending on the software you are using, from vision switching on streaming software to triggering samples in a DAW.
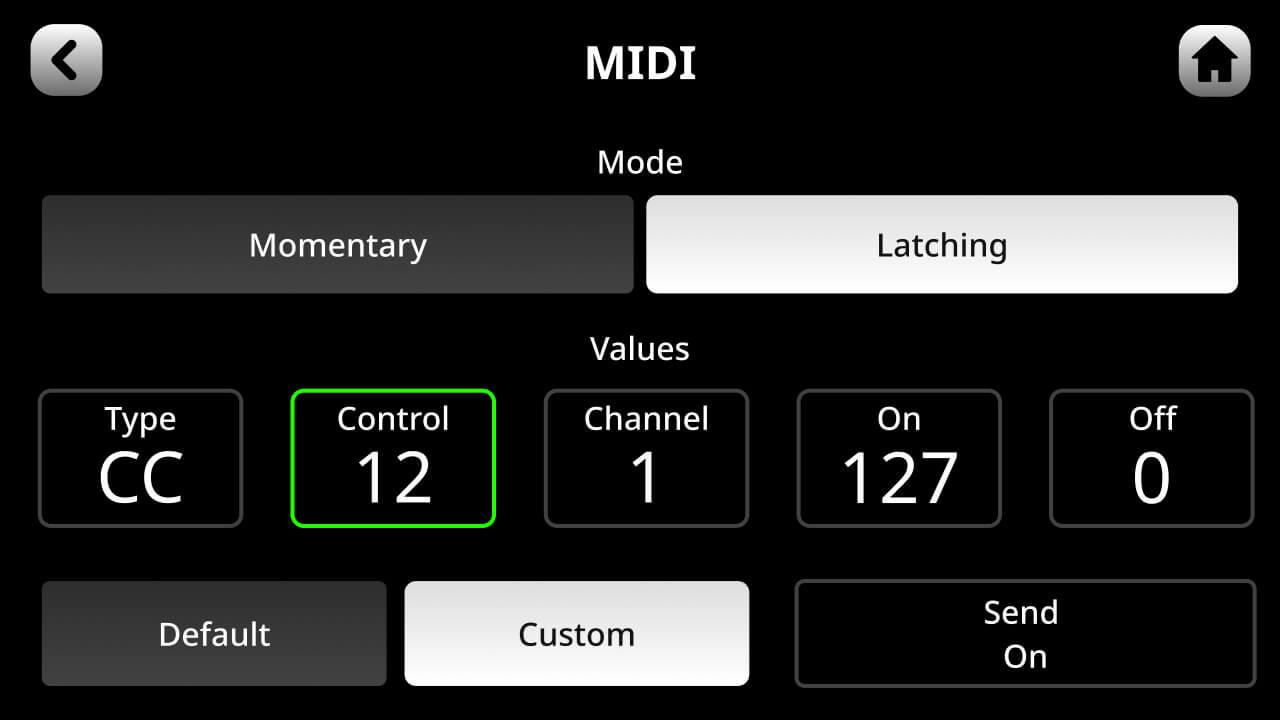
By default, each pad sends an ‘On’ Control Change (CC) message to MIDI Channel
1: pad 1 on bank 1 sends CC #0, the one below CC #1, and so on down the first column, and then the second up to CC #7; this continues across the pad banks, with pad 1 of bank 2 activating CC #8, the pad below CC# 9, and so on.
Alternatively, you can set the pad to send any custom MIDI message by clicking ‘Custom’. You can then adjust the type of message (Control Change [CC] or Note), the control number or note, the MIDI channel the message is sent to, and the value.
DAW - digital audio workstation - audio production software that allows users to record audio onto a personal computer.
You can also set the pad to send just an ‘On’ message, just an ‘Off’ message or to send both ‘On’ and ‘Off’ messages – in which case the ‘On’ message is sent when the pad is pressed, and the ‘Off’ message is sent when the pad is released.
29

30 1 - Mix L 2 - Mix R 3 -
1 4 -
2 5 -
3 6 - XLR/TRS 4 7 - Bluetooth L 8 - Bluetooth R 9 -
L 10 -
R 11 - USB Main L 12 - USB Main R 13 - USB Chat L 14 - USB Chat R 15 - USB Secondary L 16 - USB Secondary R Basic Audio Equipment Guide - RODECaster Pro 2
XLR/TRS
XLR/TRS
XLR/TRS
SMART Pads
SMART Pads
The RØDECaster Pro II has two USB interfaces, labelled 1 and 2. While they both offer audio connectivity, they have slightly different functionality as follows:
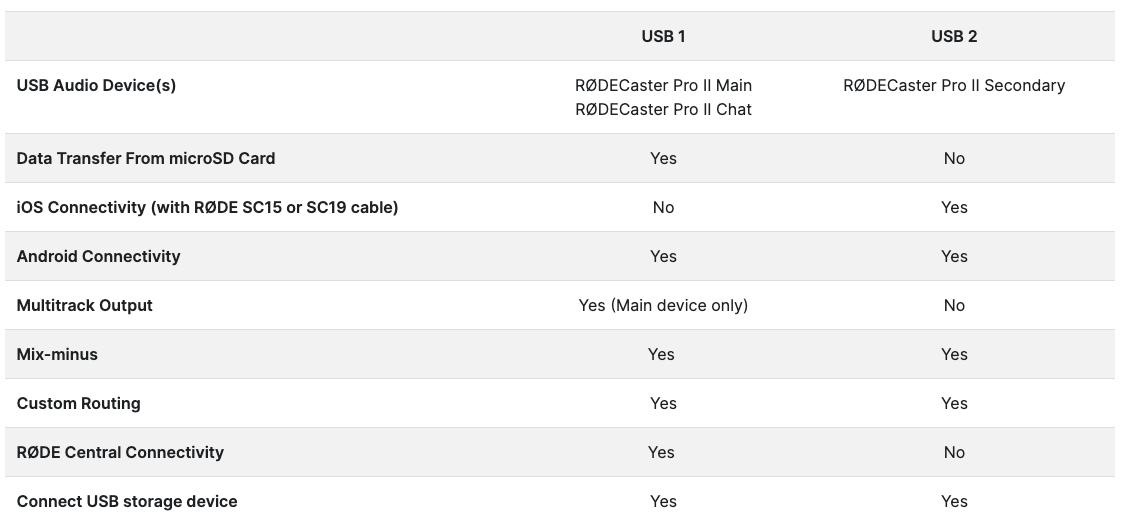
Understanding the Physical USB Interfaces
Understanding the capabilities of each interface can help determine the best setup for you. In general, USB 1 should be connected to your primary computer. USB 2 can then be connected to a secondary device (such as a smartphone, another computer, or the same computer).
In a dual-PC setup, you can use the appropriate USB port for each computer’s role in your setup, depending on which computer runs your stream, which runs your chat, and which runs your content or gameplay.
31
USB Main
The main output of the RØDECaster Pro II is the device called ‘RØDECaster Pro II Main’. To access this device on your computer, connect your computer to the USB 1 port on the back of the RØDECaster Pro II.
You should then see an audio device labelled ‘RØDECaster Pro II Main’ appear in the list of audio devices available. Note: you will also see ‘RØDECaster Pro II Chat’ appear, as this is also available via the USB 1 port.
If you set ‘RØDECaster Pro II Main’ as the default audio device for your computer, audio from your computer will be sent to the RØDECaster Pro II via the USB 1 audio input, which you can allocate to any fader you choose.

Your entire audio mix (unless otherwise specified using custom routing; see below) will also be sent from the RØDECaster Pro II to your computer via the same audio interface and will be available on any software that you are using – for example, a digital audio workstation (DAW), streaming software, or a communications app.
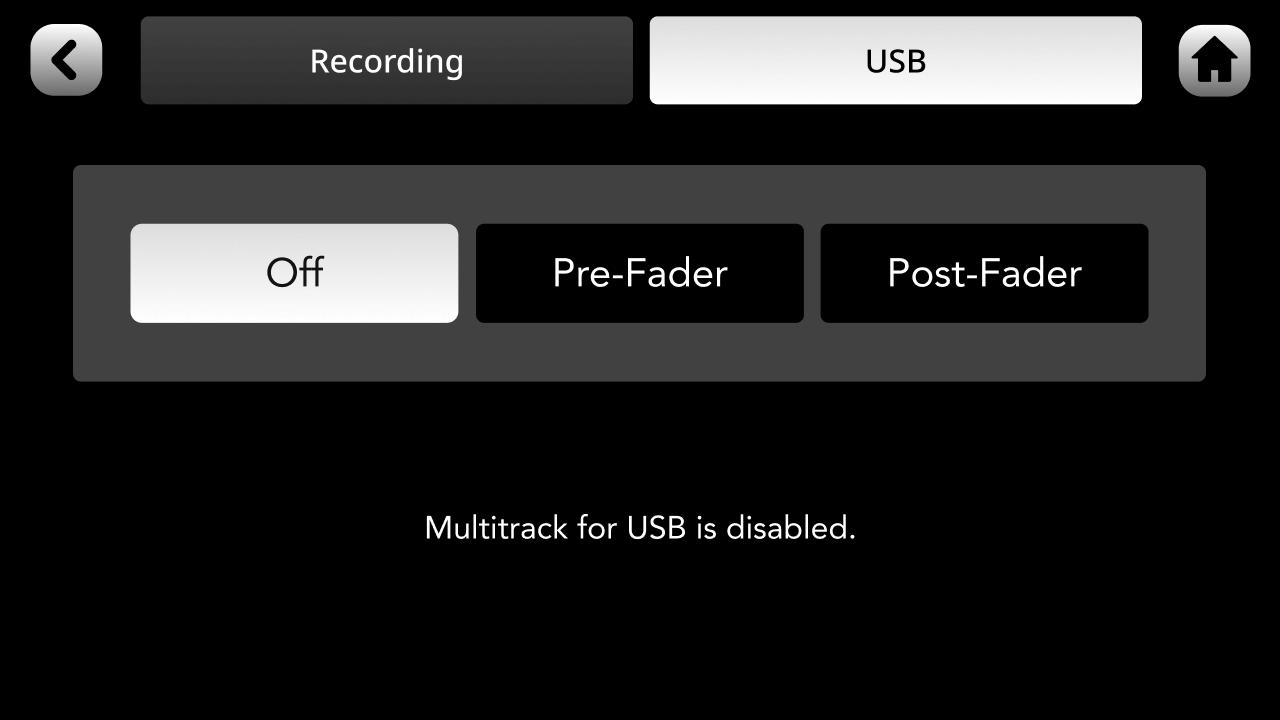
By default, ‘RØDECaster Pro II Main’ is a stereo USB output, but it can be set to multitrack by going to settings > ‘Outputs’ > ‘Multitrack’ > ‘USB’ and deselecting ‘Off’. When in multitrack mode, you will be able to record each track you have set up on your RØDECaster Pro II individually in recording software such as a DAW
Note:
When Multitrack mode is off, the ‘RØDECaster Pro II Main’ audio device will appear as ‘RØDECaster Pro II Main Stereo’; when it is on, it will appear as ‘RØDECaster Pro II Main Multitrack’ (Mac) or just ‘RØDECaster Pro II Main’ (Windows).
32
Basic Audio Equipment Guide - RODECaster Pro 2
If you are using software or an application that does not allow you to select which channel(s) you want to use, staff recommends turning off multitrack mode. This is because some software automatically mixes all 16 channels together if it detects a multitrack audio device, which can cause unexpected results when muting or fading, or using voice effects.
Staff also recommends switching off multitrack mode when using a browser-based streaming platform (such as restream.io) on a Windows PC, as the streaming platform may not accept ‘RØDECaster Pro Main Multitrack’ as an audio source. This is a limitation of browser-based software due to multitrack audio devices not being properly recognized.
USB Chat
When using USB 1 to connect the RØDECaster Pro II to a computer, another audio device called ‘RØDECaster Pro II Chat’ will be available alongside the ‘RØDECaster Pro II Main’ device described above. This is a completely independent audio device that can be allocated to its own fader on the RØDECaster Pro II’s mixer and is optimized to be used with communications applications such as Skype and Discord. To set this up, simply select ‘RØDECaster Pro II Chat’ as both the input (microphone) and output (speaker) device in your communications app’s audio preferences and allocate ‘USB 1 Chat’ to a fader on the RØDECaster Pro II.

USB Secondary
The RØDECaster Pro II has an additional USB audio device called ‘RØDECaster Pro II Secondary’. This is accessed using the USB 2 port on the back of the RØDECaster Pro II. You can use USB 1 and USB 2 with two different computers or connect them both to a single computer simultaneously (you will just need an additional cable and an extra USB port on your computer).
‘RØDECaster Pro II Secondary’ is useful in a range of applications. For example, if you are using ‘RØDECaster Pro II Chat’ for your communications application, you can route additional audio from an app such as Spotify to ‘RØDECaster Pro II Secondary’ (simply select ‘RØDECaster Pro II Secondary’ as the output device in the app settings), which will then be sent to the fader that USB 2 is allocated to.
33
Remember, if you are using the ‘RØDECaster Pro II Secondary’ device to connect to a communications app, your caller will hear the main output mix – including any audio sources connected to the ‘RØDECaster Pro II Main’ and ‘RØDECaster Pro II Chat’ devices via the USB 1 port – unless you create a custom output mix.
It is also important to note that the ‘RØDECaster Pro II Secondary’ output device is not a multitrack output – only the full output mix will be sent to your computer. The USB 2 port should also be used for connecting smartphones and tablets to the RØDECaster Pro II as it is MFi-certified, meaning it will interact seamlessly with iOS devices (you will need to connect iOS devices with a Lightning Accessory Cable such as the SC19; a standard charging cable will not work), and it has mix-minus available, which is important when making calls.
Custom Routing for the USB Outputs
As mentioned, by default, the main audio mix will be sent to all USB outputs on the RØDECaster Pro II (with mix-minus applied for USB Chat and USB 2). However, this can be problematic in recording or streaming scenarios where you don’t want a particular audio input being sent to one of the USB outputs, or you want it sent at a different volume level – for example, if you don’t want your game sounds that are being sent to USB 1 being heard on your chat application on USB 2, or you just want them to be heard at a lower volume.

To solve this, you can set up a custom sub-mix for USB 1, USB Chat and USB 2, giving you full control over what audio inputs are being sent to each USB outputs and at what levels.
To access this, either go to the channel set-up screen for the USB channel you want to configure and tap ‘Routing’ > ‘Custom’, or go to settings then ‘Outputs’ > ‘Routing’ > ‘Custom’. From the custom routing set-up screen, you can adjust levels, mutes and links for each input track.
34
Basic Audio Equipment Guide - RODECaster Pro 2
Recording and Exporting Audio
Where to Record Your Audio
There are two options when recording with the RØDECaster Pro II. You can either record to a storage device that you connect directly to the unit (such as a microSD card or USB hard drive) or to a computer via USB. Using a storage device is very easy as you can record directly on-board, with little set-up required. Recording to a computer will require recording software (such as a DAW) on your computer and will require some set-up, though recording this way removes the need to transfer files if you plan to do further editing in post-production.
Recording to a MicroSD Card
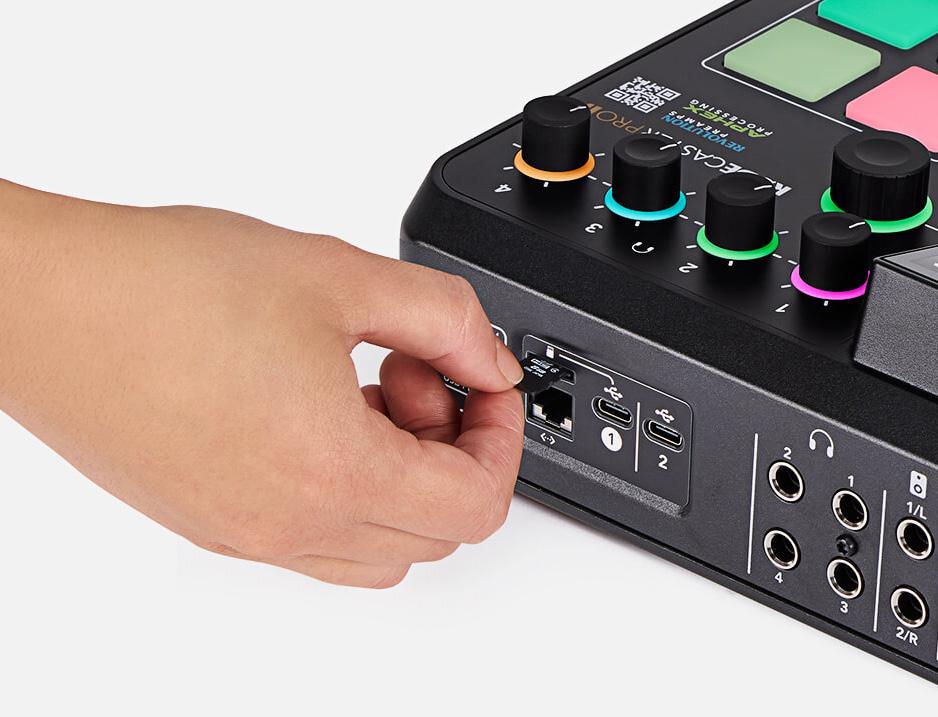
Connecting a MicroSD Card
You can record your audio directly to a microSD card. You will need to use a high-quality microSD card that supports data rates of at least 100MB/s. Any quality microSD card labelled either ‘microSDHC’ or ‘microSDXC’ will work well. Cards without these standards or low-quality unbranded cards are not recommended and may cause glitches or other recording issues.
Insert the microSD into the slot on the rear of the RØDECaster Pro II and click it into place.
Formatting the MicroSD Card
If the card is already formatted, after being inserted an icon will appear on the home screen of the unit showing the available recording time, and the ‘REC’ button will turn green.
If the card is not formatted (or is not formatted using a file system recognized by the RØDECaster Pro II), a dialog box will appear asking you to format the card.
Note: Formatting will delete all files on the card. You can also format the card manually by clicking on the card icon on the main screen, and then selecting ‘Erase’.
35 Basic Audio Equipment Guide - RODECaster Pro 2
Recording to a USB Storage Device
Connecting a USB Storage Device
You can record your audio directly to a USB storage device (for example a hard drive or SSD) via the RØDECaster Pro II’s USB audio interfaces.

You will need to use a high-quality device that supports data rates of at least 100MB/s and has a USB-C connection. Low-quality or unbranded devices are not recommended by staff as they may affect performance or cause glitches and other recording issues.
You can connect a USB storage device to either of the USB inputs to suit your setup.
Making Recordings to Local Storage
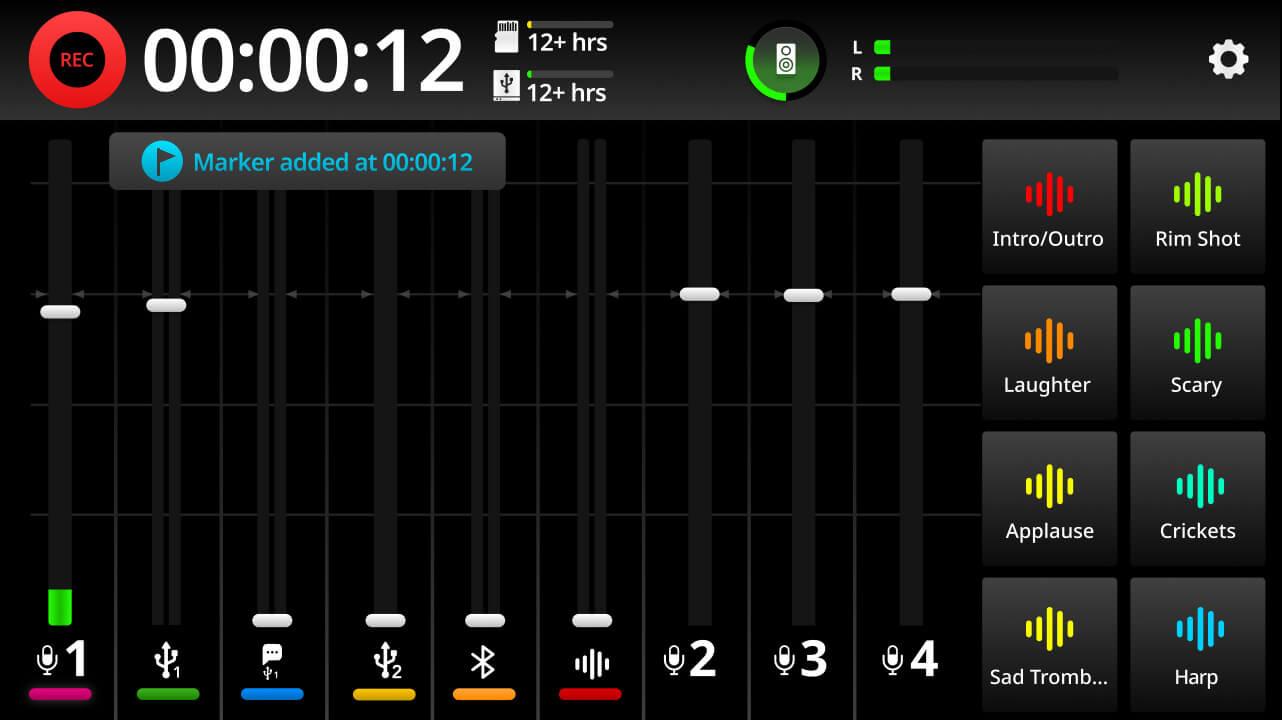
Starting and Stopping the Recording
To start a recording, press the ‘REC’ button to the left of the screen. The ‘REC’ button will turn red, and a timer will indicate how long your elapsed recording time is.
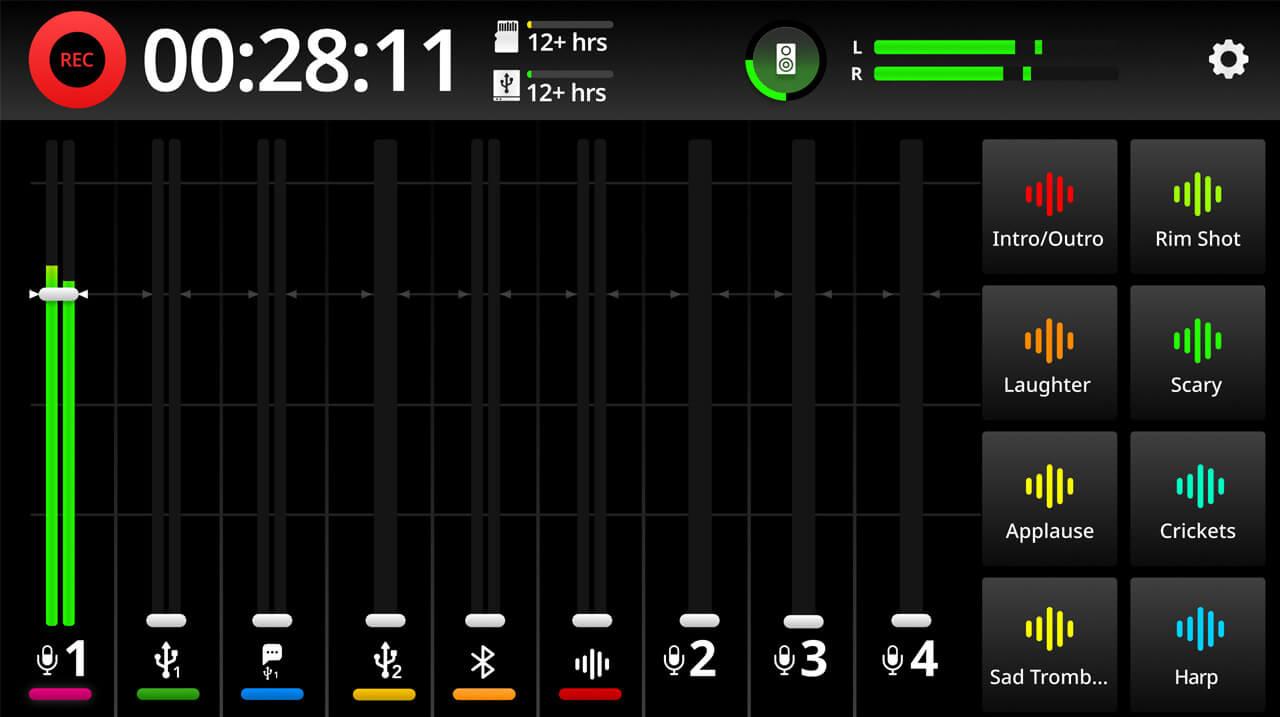
To stop recording, press and hold the ‘REC’ button.
Note: The above method is called ‘Press to Pause Recording Mode’, which is activated by default. In this mode, a short press will pause the recording.
You can switch to ‘Press to Stop Recording Mode’ by going to settings, then ‘Display’ > ‘REC Button’. In this mode, a short press will stop the recording and a press and hold will pause the recording (see below for more info).
Note: The minimum record time is three seconds. Once recording has started, you will not be able to stop the recording until at least three seconds have elapsed.
36
Pausing the Recording
To pause a recording, short press the ‘REC’ button.
The button will turn orange, and the recording will pause. To resume the recording, press ‘REC’ again. To stop the recording while in the paused state, press and hold ‘REC’ again. You can also pause the recording by long-pressing the ‘REC’ icon at the top left of the home screen.
Note: The above method is called ‘Press to Pause Recording Mode’, which is activated by default. You can switch to ‘Press to Stop Recording Mode’ by going to settings, then ‘Display’ > ‘REC Button’. In this mode, a short press will stop the recording and a press and hold will pause the recording.
Placing Markers
You can place a marker at any point during recording. These can be used to locate sections of your recording when playing them back or when they are imported into a DAW (note: not all DAWs are able to read marker information in audio files; check the documentation for your DAW for more information). To place a marker, simply tap the recording timer while you’re recording.

Activating Multitrack Recording
When recording on the RØDECaster Pro II, you can select to record either the full stereo mix or each track individually (plus the full stereo mix). The latter is called multitrack recording and allows you to edit your tracks individually in post-production if needed.
Basic Audio Equipment Guide - RODECaster Pro 2
Bypassing Processing (Multitrack Recording Only)
When recording in multitrack, you can choose to exclude processing from your recordings. This means that the raw audio will be recorded without any of the channel processing applied (i.e., the APHEX processing or effects). The ‘mix’ output will not be affected by this setting and will always reflect the final mix output including all processing.
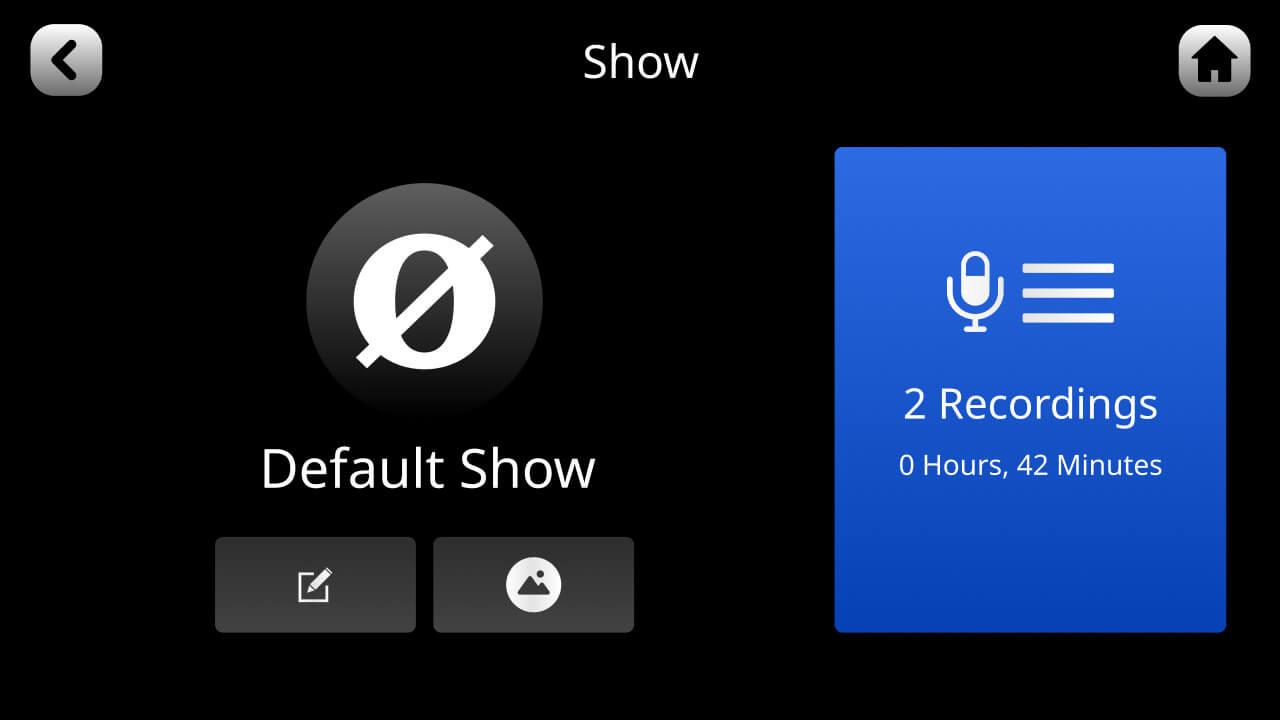
Accessing Local Recordings
Listening to your Recordings
You can play back your recordings directly from the RØDECaster Pro II. To access your recordings, press the ‘Show’ icon at the top left of the home screen, then click the ‘Recordings’ icon. A list of your recordings will be displayed. To access a recording, tap on it. To play back your recording, tap on the ‘play’ icon.
Note: all other audio functions on the RØDECaster Pro II will be muted when the playback screen is open.
Navigating Through A Recording
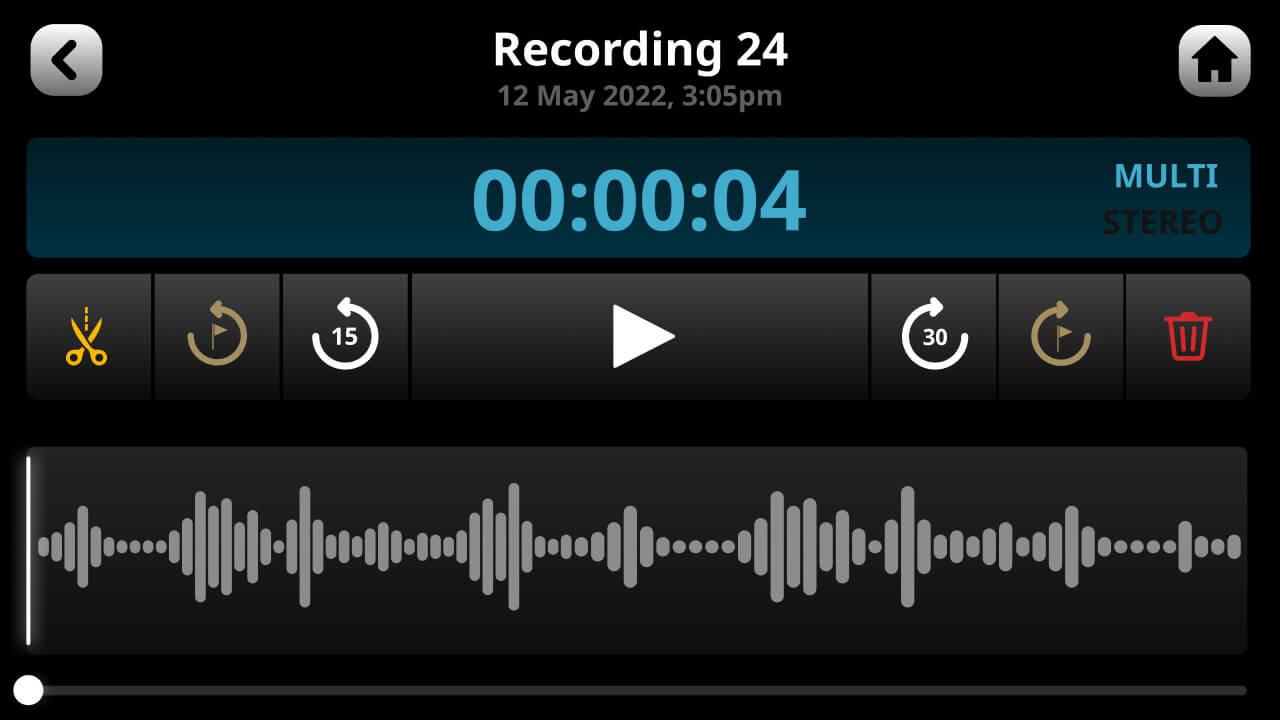
There are several ways to navigate through the file when playing back audio. You can use the slider at the bottom of the screen, the ‘jump’ icons to move back and forward through the audio in 15 second or 30 second increments or advance through any markers you may have placed in the recording.
38
Trimming and Editing a Recording
You can trim the start and end points of a recording as well as adding in a fade in and fade out. To do this, activate edit mode in the playback screen by tapping on the scissor icon. You can now drag the corners of the waveform to trim the audio and create a fade in or fade out. To preview your edit, use the play controls. Press the green tick in the top right corner of the screen to save the edit and exit edit mode.
Selecting the Main USB Device on your Computer
The RØDECaster Pro II features three USB audio devices that your computer will recognize. The USB 1 output has two USB devices called ‘RØDECaster Pro II Main’ and ‘RØDECaster Pro II Chat’. The USB 2 output will be recognized as ‘RØDECaster Pro II Secondary’. Staff recommends using the ‘RØDECaster Pro II Main’ (USB 1) for recording your production, as this is the only device that can be configured as a multitrack device. Make sure you select the ‘RØDECaster Pro II Main’ device as your input either in your computer control panel or in the devices section of you recording software or DAW.
39 Basic Audio Equipment Guide - RODECaster Pro 2
Recording to a Computer via USB
Switching Between Stereo and Multitrack Recording Mode
By default, ‘RØDECaster Pro II Main’ (USB 1) is configured to output the main stereo mix (all of your audio inputs mixed together). To activate multitrack recording via USB, go to settings then ‘Outputs’ > ‘Multitrack’ > ‘USB’ and deselect ‘Off’.
Note: USB 2 and USB Chat cannot be configured as multitrack outputs.
40
Multitrack Recording via USB
When in multitrack mode, the RØDECaster Pro II Main output features 16 different audio outputs, as follows:
41 1 - Mix L 2 - Mix R 3 - XLR/TRS 1 4 - XLR/TRS 2 5 - XLR/TRS 3 6 - XLR/TRS 4 7 - Bluetooth L 8 - Bluetooth R 9 - SMART Pads L 10 - SMART Pads R 11 - USB Main L 12 - USB Main R 13 - USB Chat L 14 - USB Chat R 15 - USB Secondary L 16 - USB Secondary R
Basic Audio Equipment Guide - RODECaster Pro 2
You can select any of these as the input source for each track on your DAW. Usually tracks in your DAW can be configured as stereo, to accept a pair of inputs, or mono, for a single input. Set up the tracks in your DAW to match the channels you wish to record, with the appropriate output from the RØDECaster Pro II selected for each track.
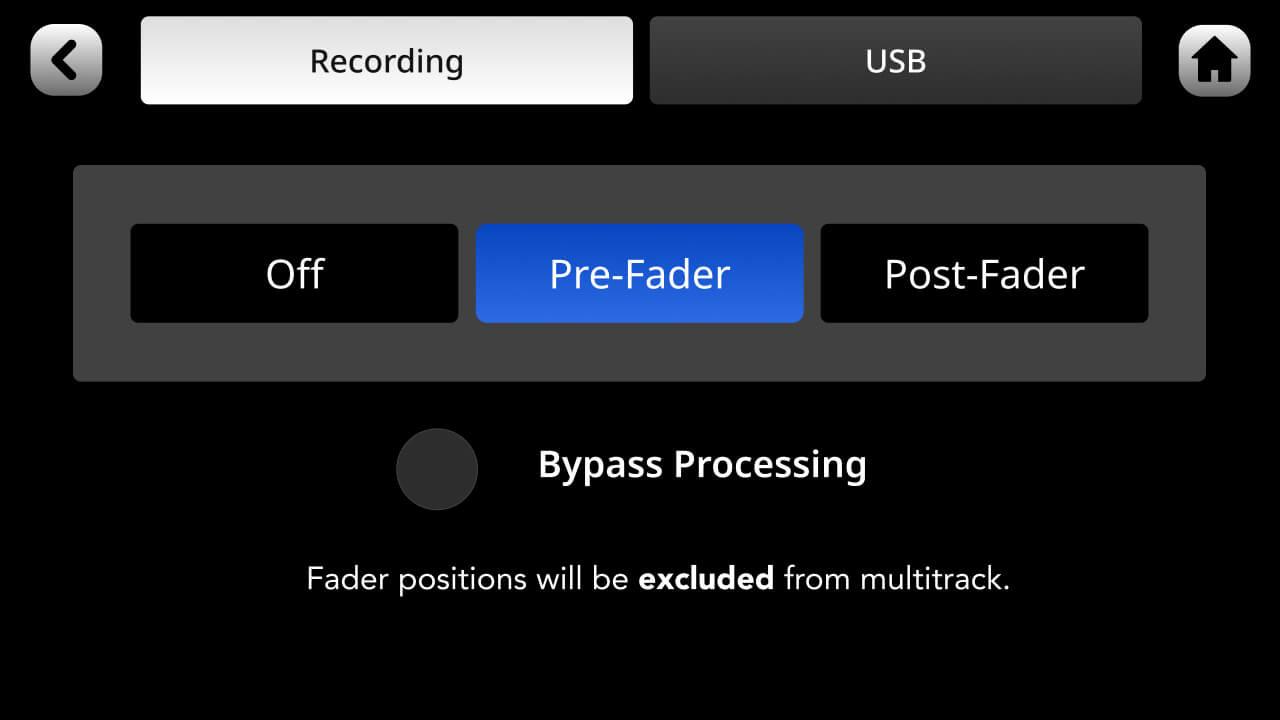
Pre- or Post-Fader Recording in Multitrack Mode
When recording individual tracks to your DAW (see ‘Multitrack Recording via USB’ above), you can select to record the audio either pre- or post-fader.
Recording pre-fader means that the position of the fader will have no effect on the audio being recorded – i.e., even if the source is faded down, it will still be recorded at unity gain.
Post-fader means that the audio will be recorded at the level set by the fader – i.e., if a source is faded right down, nothing will be recorded. You can select pre- or post-fader recording by tapping the settings cog then ‘Outputs’ > ‘Multitrack’. The ‘mix’ output will not be affected by this setting and will always reflect the final mix output, including fader positions.
Bypassing Processing
When recording in multitrack, you can choose to exclude processing from your recordings. This means that the raw audio will be recorded without any of the channel processing applied (i.e., the APHEX processing or effects). The ‘mix’ output will not be affected by this setting and will always reflect the final mix output including all processing.
42
Starting the Recording
In its default configuration, the RØDECaster Pro II’s ‘REC’ button will not start the recording in your DAW or recording software. To start recording, check your track(s) are armed, and that the input is set to ‘RØDECaster Pro II Main’. You can then start recording in your DAW.
It is possible to use MIDI to control your DAW from the RØDECaster Pro II. For example, you can map the ‘REC’ button to the record function in your DAW, so you can start your DAW recording directly from your unit. How you do this will depend on your DAW. By default, the ‘REC’ button sends the MIDI CC#17 on MIDI channel 1 with a value of 1 for ‘On’, and 0 for ‘Off’. If your DAW supports MIDI control, you can map this value to the record function on your DAW via the ‘RØDECaster Pro MIDI’ device that is available on USB 1.

43
Using the ‘REC’ Button to Start Recording in Your DAW


