Education has always existed since the inception of the human race. However, it was informal in the beginning but took a more formal and structured shape later. The objective remained the same: to prepare the inquisitive learners of today for the challenges of tomorrow. Now, we are in the 21st century, where dynamic curriculum, engaging pedagogy, and performance-based assessments are the essential elements for an impactful education system, where integration of technology is indispensable and inseparable due to the extensive exposure of learners to media and information. These circumstances make the establishment of engaging and relevant education a true challenge for educators.
It is an open fact that the challenges of the 4th industrial revolution cannot be encountered through conventional educational approaches. Our STEM education model, based on STEM Resource books and makerspace, is developed according to the Science, Technology, Engineering, Mathematics (STEM) approach, inter-disciplinary and integrated learning that engages learners in learning, inculcates skills development and enhances problem-solving abilities.
STEM challenges in this book are developed by STEM-certified educators, based on Next Generation Science Standards, The National Curriculum of England and the Common Core for Mathematics. These challenges were then reviewed by international STEM experts & organizations, including STEM.org, an eminent research & accrediting body in the United States. These challenges and pedagogy were put to the test in a long & robust process of prototyping on students & their teachers for their feedback on learning attainment and experience.
Expert teachers appreciate and endorse the systematic initiative of STEM programs in schools, through which learners are challenged to solve problems of real-world situations and emerge as innovators and inventors. Apart from developing collaboration and communication skills, students choose their career paths and achieve their goals in life.
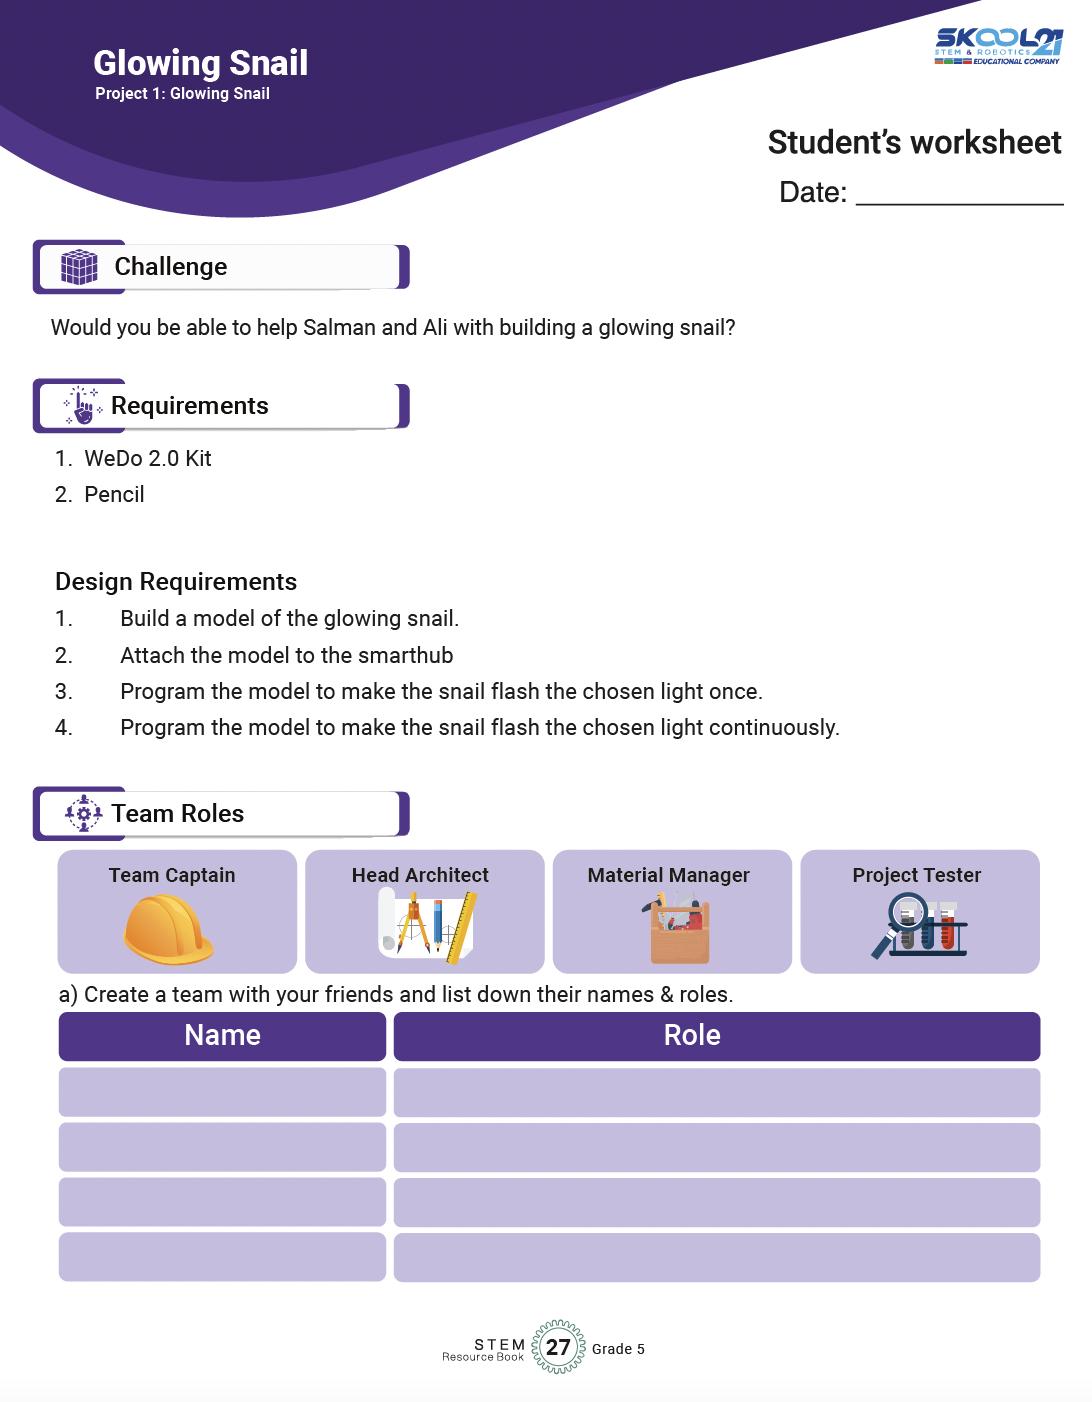
Introduction to the Kit
Understanding the Structure of the Lesson
Requirements for the project
Team Roles in the Team
Alignment with the Sustainable Development Goals
NGSS Curriculum Linkage
Cambridge Science Curriculum Linkage
Technology Connection
Engineering Connection
Common Core for Mathematics Curriculum Linkage
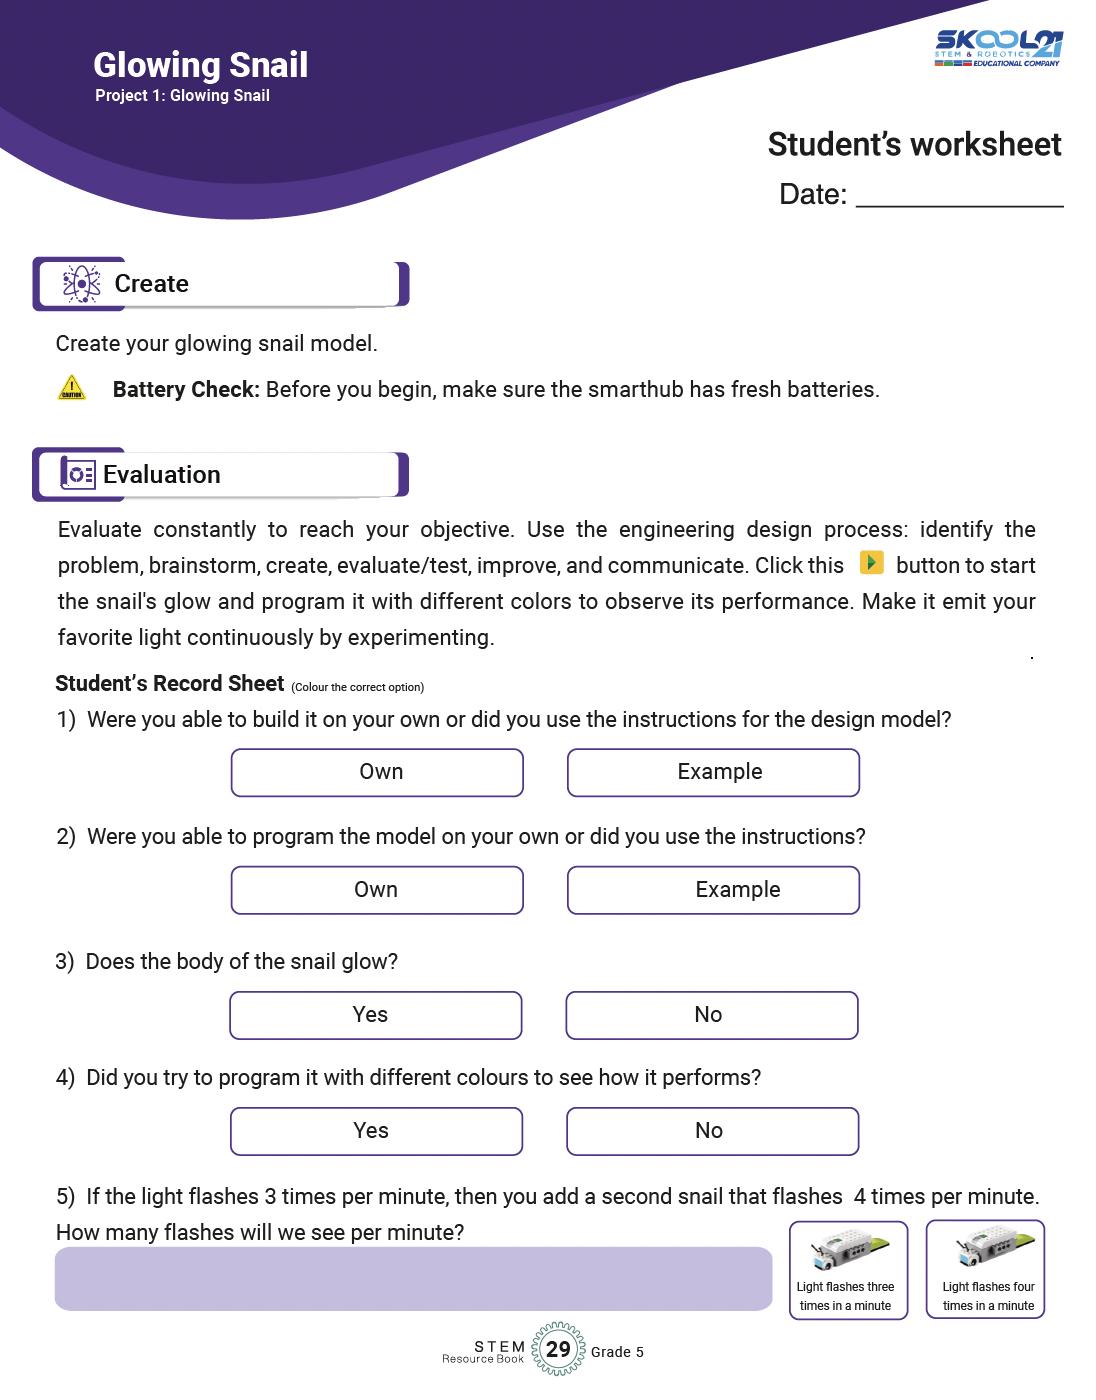
After brainstorming Learners create their model.
Evaluation is the phase where learners reflect on the performance of their model and link it to their classroom learning.
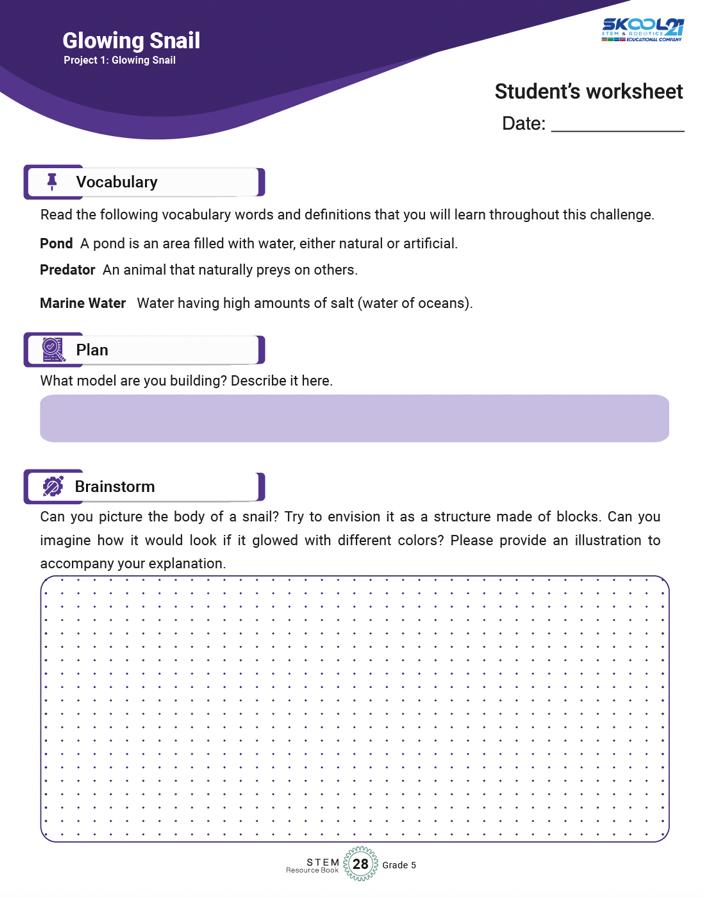
Learners write about the project they are building
Learners sketch their model and label as many parts for clarity in execution.
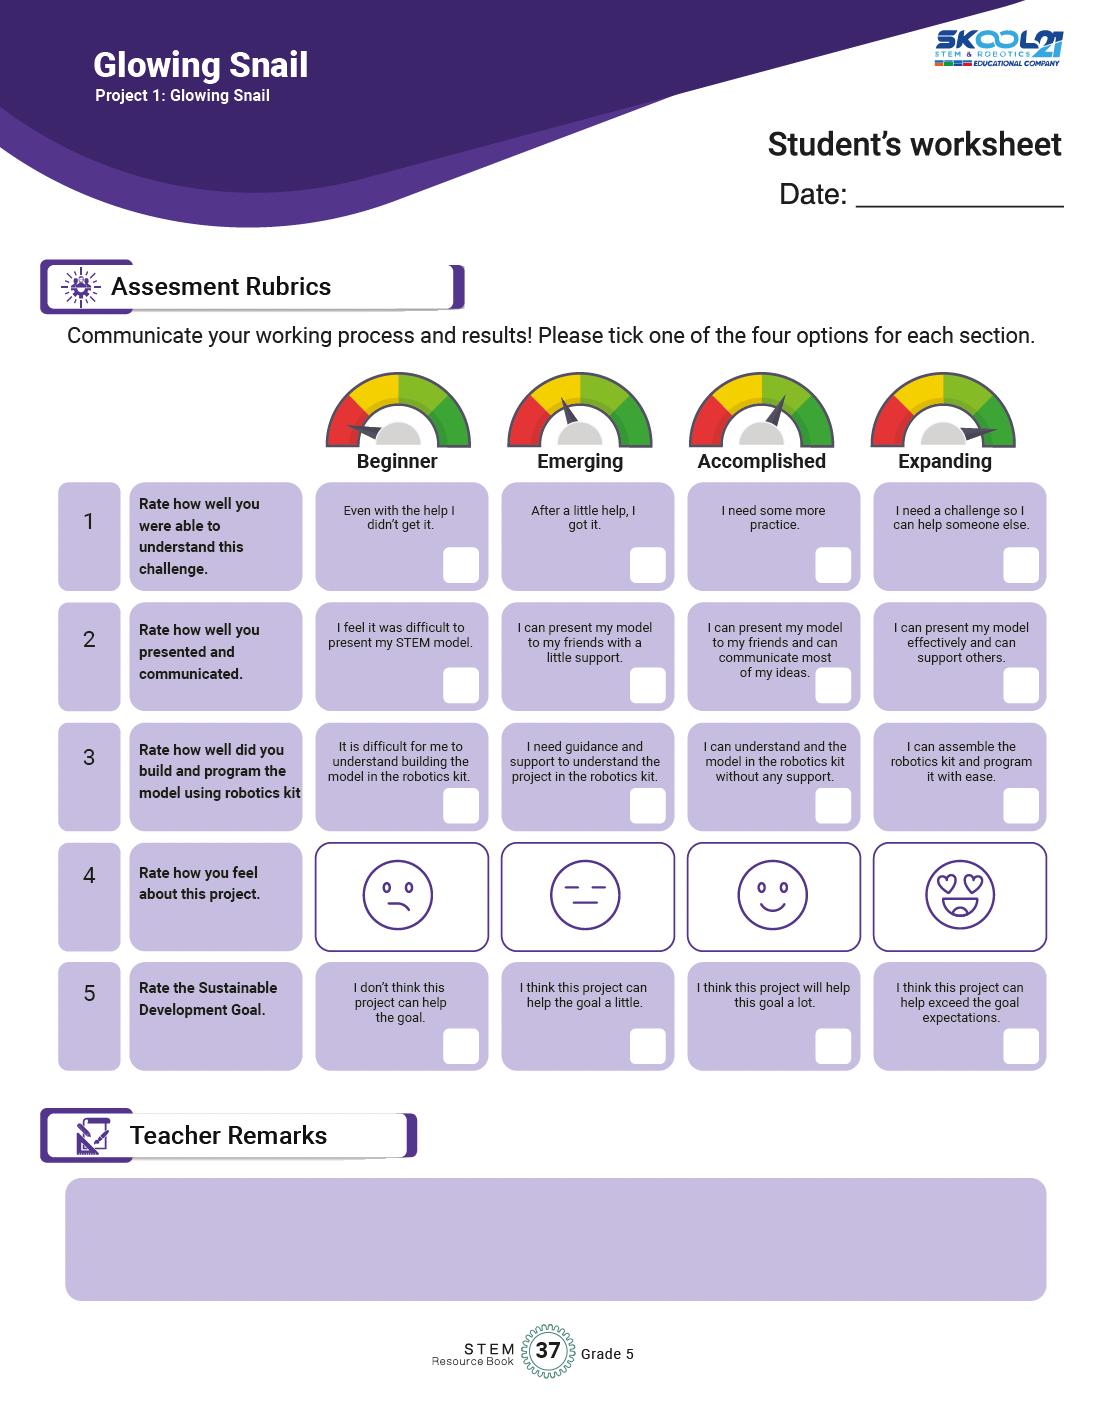
Assessment rubrics is a grid for teachers and learners to reflect on their progress in each of the project.
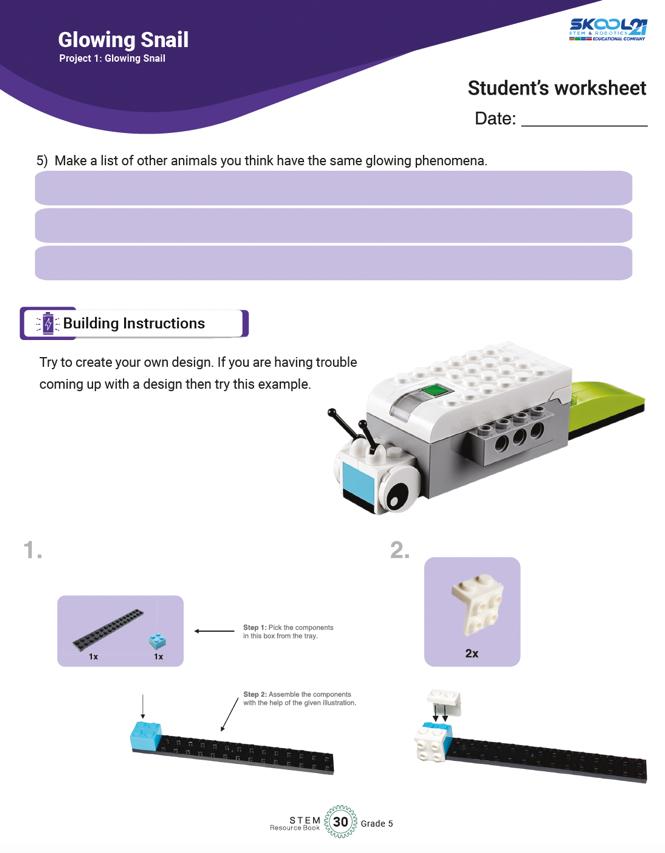
Building instructions are also provided to help learners get started, If they struggling in the first phase.
This space is for teachers to provide any remarks if needed on the participation of the learner in each of the project.
Alignment with the Sustainable Development Goals
Sustainable Development Goals (SDGs) are a set of 17 global goals adopted by all United Nations Member States in 2015 as part of the 2030 Agenda for Sustainable Development. eved by being for all at
Ensure inclusive and equitable quality education and promote lifelong learning opportunities for all. empower all women and
Ensure access to affordable, reliable, sustainable, and
Promote sustained, inclusive, and sustainable economic growth, full and productive employment, Build resilient infrastructure, promote inclusive and nable industrialization, and foster innovation.
Take urgent action to combat climate change and its marine resources for sustainable development.
Protect, restore, and promote sustainable use of terrestrial ecosystems, halt deforestation, and combat desertification and biodiversity loss.
Promote peaceful and inclusive societies for sustainable development, provide access to justice for all, and build effective, accountable, and inclusive institutions at all levels.
Partnerships for Strengthen the means of implementation and revitalize the Global Partnership for Sustainable Development.
Now, let's see how the students' projects can be linked to these SDGs:
When students design projects using STEM Resource Book and Wedo 2.0 Kit, they can focus on creating solutions that tackle real-world problems related to sustainable development. For example, they could create smart home systems that conserve energy (SDG 7Affordable and Clean Energy) or design a production (SDG 12
Linking their projects to specific SDGs requires critical thinking and understanding of the global challenges we face today. Students can also focus on projects that address local community needs and align them with relevant SDGs.
Encouraging students to consider the SDGs when designing their projects will help them understand the broader context of their work and how their technological and scientific skills can contribute to building a more sustainable and equitable world. This approach also empowers them to become responsible global citizens who actively engage with the challenges facing our planet.
The Engineering Design Process
The Engineering Design Process is a systematic approach used by engineers and designers to solve problems and create innovative solutions. It provides a structured framework for developing new products, processes, or systems by following a series of well-defined steps. This process is not only applicable in engineering but is also widely used in various STEM disciplines to tackle challenges and develop creative solutions.
The typical steps of the Engineering Design Process are: Icons Phases
Define the Problem
Brainstorm Ideas
Design and Plan
Details
• Present the project's objectives and requirements to students, such as building a model, attaching it to the smarthub, and programming it.
• Encourage students to understand the purpose of the project, its context, and what they need to achieve.
• Engage students in brainstorming sessions where they envision and sketch possible solutions.
• Encourage creativity and diverse ideas, allowing students to explore various design options.
• Guide students to describe their chosen model's structure and function in detail.
• Help them plan how to use STEM Kit components effectively to build their models.
• Facilitate discussions on how they intend to program the model to perform specific
Build and Create
Test and Evaluate
Iterate and Improve
Communicate and Share
actions.
• Provide assistance as needed while students assemble their models.
• Encourage hands-on exploration, experimentation, and iteration as they build and refine their designs.
• Support students in testing their models and programming, providing guidance for troubleshooting.
• Ask questions to help them critically assess whether the model meets the specified requirements.
• Encourage students to identify areas for improvement based on testing outcomes.
• Guide them in making iterative changes to their designs to enhance performance and functionality.
• Organize opportunities for students to present their projects to peers or the class.
• Encourage them to explain their design choices, programming logic, and problemsolving strategies.
Fostering Social Skills
The STEM projects outlined in the "STEM Resource Book" provide opportunities for students to develop important social skills alongside their technical knowledge. These social skills are crucial for effective collaboration, communication, and engagement in real-world scenarios. Here's a brief introduction to some of the key social skills covered in these projects:
S# Social Skills
1 Collaboration
Details
Working together is a fundamental skill across all projects. Students learn to cooperate, share ideas, delegate tasks, and contribute collectively to achieve project goals. They experience the benefits of pooling strengths and perspectives to create more comprehensive and innovative solutions.
2 Communication Effective communication is vital in sharing ideas, presenting findings, and troubleshooting challenges. Through the projects, students practice articulating their thoughts clearly, listening actively to peers, and engaging in meaningful discussions that promote understanding.
3 ProblemSolving
4 Empathy and Respect
Engaging in the engineering design process exposes students to various challenges. They learn to approach problems analytically, brainstorm solutions, evaluate alternatives, and make decisions collaboratively. These skills are applicable beyond STEM and are valuable in everyday decision-making.
Encouraging students to appreciate different viewpoints, respect diverse ideas, and consider the feelings of their peers fosters a positive and inclusive learning environment. These skills promote effective teamwork and strengthen relationships within the group.
5 Critical Thinking
6 Time Management
As students work on designing, building, testing, and refining their projects, they enhance their critical thinking abilities. They learn to analyze situations, make informed judgments, and consider implications and consequences of their choices.
Working on projects requires efficient time management. Students develop skills in setting priorities, allocating time to tasks, meeting deadlines, and juggling multiple responsibilities –all of which are valuable in academic and professional contexts.
7 Conflict Resolution Collaboration can sometimes lead to disagreements or conflicts. Through open discussions and respectful negotiations, students learn how to address conflicts, find common ground, and work towards mutually satisfactory solutions.
8 Presentation Skills
9 Reflection
Sharing their projects with peers and instructors hones students' presentation skills. They practice structuring their thoughts, speaking confidently, and using visuals effectively to convey complex information.
After completing each project, students reflect on their experiences, successes, challenges, and lessons learned. This practice encourages self-awareness, self-assessment, and the
ability to apply insights from one project to others.
By incorporating these social skills into STEM projects, educators prepare students not only for academic success but also for success in their future careers and personal lives. These skills empower students to collaborate effectively, contribute meaningfully to teams, and navigate the complexities of a rapidly changing world.
Makerspace
What is a Makerspace?
A makerspace is a collaborative workspace inside a school, library, or public/private facility for making, learning, exploring, and sharing. Here, students have the tools and resources to design, experiment, build, and invent. Makerspaces typically include a variety of materials and equipment, ranging from high-tech to no-tech, all aimed at fostering creativity, problem-solving, and critical thinking.
Features of an Ideal Makerspace
1. Space: The ideal makerspace should be spacious enough to accommodate groups of students working on projects. It should be well-lit and have areas for both individual and group work.
2. Furniture:
• Flexible Seating: Chairs and tables that are easily movable and can be reconfigured for different tasks.
• Storage Units: Shelves and drawers for organizing tools, materials, and student projects.
• Workbenches: Sturdy surfaces for hands-on activities.
• Display Boards: Walls or boards to showcase projects, ideas, or instructions.
3. Equipment Needed:
• Electronics STEM Kits: A core tool for the Grade 5 makerspace, these kits integrate hardware and software to produce a comprehensive learning tool.
• Computers or Tablets: For programming and accessing digital resources.
• General STEM Tools: Rulers, protractors, magnifying glasses, and basic lab equipment.
• Safety Equipment: Safety goggles, first aid kit, gloves, etc.
4. STEM Resource Book: This will guide students and educators in carrying out projects aligned with NGSS, the National Curriculum of England, and the Common Core State Standards for Mathematics.
Importance of a Makerspace in Schools
1. Enhanced Learning: Makerspaces enable hands-on learning, making complex concepts more accessible.
2. Fosters Creativity: Provides an environment where students can freely express and test out their ideas.
3. Teamwork: Students learn to collaborate, delegate tasks, and work towards a common goal.
4. Problem-solving: Tackling real-world challenges makes students more adept at thinking critically.
5. Prepares for the Future: Engaging with technology and tools prepares students for future job roles and challenges.
Executing STEM Activities in the Makerspace
1. Planning: Begin with the end in mind. Identify the learning outcomes you aim to achieve from the activity.
2. Group Formation: Divide students into small groups to encourage collaboration.
3. Introduction: Introduce the STEM Kit and how it can be used. Brief students on the activity using the STEM Resource Book.
4. Hands-on Activity: Allow students to build, experiment, and iterate using the kits. Ensure that they refer to the STEM Resource Book for guidance.
5. Reflection: Post-activity, allow students to discuss their findings, challenges faced, and what they learned.
6. Showcase: Encourage students to display their projects, explaining the science and math concepts they applied.
7. Safety: Always stress the importance of following safety guidelines, especially when using tools and equipment.
Standard Operating Procedure (SOP) for a Makerspace
1. Objective:
Provide a safe, organized, and productive environment for students to explore, invent, and learn using various tools and materials available in the makerspace.
2. Scope:
This SOP applies to all students, educators, and visitors within the makerspace area.
3. Responsibilities:
• Educators/Staff: Supervise activities, ensure the safety and proper use of tools/equipment, provide necessary training, and maintain equipment.
• Students: Comply with all guidelines, work safely, and respect all equipment and fellow makers.
4. Access:
• Makerspace access should be limited to authorized personnel and students during scheduled times.
• All users must sign in and out of the makerspace, noting their purpose of visit.
5. Safety:
• Before using any tool or equipment, students must receive proper training.
• Safety equipment like goggles, gloves, and aprons should be worn as required.
• No food or drink is allowed in the makerspace.
• First aid kits and fire extinguishers should be easily accessible.
6. Equipment Usage:
• All equipment should have clear, written instructions posted nearby.
• Users must report any damage or malfunction immediately.
• After use, equipment must be returned to its designated place and left in a clean and usable state for the next user.
7. Materials:
• All materials must be stored in their designated areas.
• Users must log materials used for inventory and restocking purposes.
• Waste should be disposed of properly in the provided bins.
8. Conduct:
• Respect fellow makers; do not interrupt or hinder someone else’s project.
• Clean up after completing a project or task.
• Notify staff of any issues, concerns, or suggestions.
• Always ask if unsure about equipment use or any makerspace procedure.
9. Training:
• Regular workshops should be held to train students on the use of new equipment or software.
• New users should undergo an orientation session before accessing the makerspace.
10. Maintenance:
• A routine check of all tools and equipment should be carried out to ensure they are in good working condition.
• Expired or worn-out materials should be discarded and replaced.
• Cleaning routines must be established to maintain the hygiene and tidiness of the makerspace.
11. Project Storage:
• Designate a space where students can store ongoing projects.
• All projects should be labeled with the student's name, class, and date.
12. Showcase:
• A dedicated space should be available for showcasing exemplary projects.
• Educators can rotate the showcased projects based on relevance, innovation, and educational value.
13. Continuous Improvement:
• Collect feedback regularly from users to understand what can be improved.
• Explore new tools, materials, and technologies to keep the makerspace updated.
14. Emergency Procedures:
• Clearly display emergency procedures, including evacuation routes.
• Train staff and students on how to respond to emergencies like fires, electrical failures, or injuries.
15. Periodic Review:
• This SOP should be reviewed at least annually to ensure its relevance and effectiveness.
In conclusion, a well-structured SOP ensures that the makerspace remains a hub of creativity while being safe and organized. Adhering to these procedures ensures that the makerspace is beneficial for all and remains a vital resource for students for years to come.
Scheme of Work
Introduce basic engineering concepts through building a car.
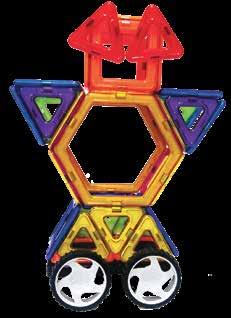
Project 1: Hexa Car Mechanical Engineer
Develop fine motor skills and spatial awareness. Explore the concept of shapes and their application in design.
Kidversity Level 2 Kit
Sketching materials
Digital Camera or Tablet
Printer Crayons
STEM Resource Book – Grade KG
Introduction to Hexa Car
Explain the project and its objectives.
Introduce the concept of a car and its parts. Discuss the role of mechanical engineers. Explore shapes in a car's design.
Building the Hexa Car Distribute kit components and guide students to build their cars.
Emphasize using hexagons in the car's design.
Testing and Evaluation
Test the cars' movement and discuss design variations.
Evaluate students' understanding of shapes and car components.
Introduction to House Building
Kidversity Level 2 Kit
Introduce architectural concepts through building a house.
Project 2: House Architectural Engineer
Sketching materials
7 Project 3: Balance Wheel Mechanical Engineer
Develop spatial reasoning and fine motor skills. Explore the stability of different shapes in construction.
Digital Camera or Tablet
Printer
Crayons
STEM Resource Book – Grade KG
Explore the concept of balance through building a wheel.
Kidversity Level 2 Kit
Sketching
Explain the project's goal and its connection to architecture.
Discuss different types of houses and their functions.
Constructing the House
Guide students to build a house using squares and triangles.
Explore the concept of stability in building design.
Testing and Evaluation
Discuss the stability of the built houses.
Evaluate students' understanding of shapes in construction.
Introduction to Balance Wheel
Explain the concept of balance and its
Develop fine motor skills and understanding of symmetry.
Introduce the role of mechanical engineers in design.
materials
Digital Camera or Tablet
Printer Crayons
STEM
Resource Book – Grade KG
importance. Discuss the role of symmetry in engineering design.
Building the Balance Wheel Guide students to create a balanced wheel with symmetrical shapes. Explore different shapes for achieving balance.
Testing and Evaluation
Test the balance of the wheels and discuss design variations.
Evaluate students' understanding of symmetry and balance.
Introduction to Model Robot
Kidversity Level 2 Kit
Introduce the concept of robotics and design through building a robot. Develop fine motor skills and understanding of symmetry. Explore the role of robotics engineers in creating machines.
Sketching materials
Digital Camera or Tablet
Printer Crayons
STEM
Resource Book – Grade KG
Explain the project's focus on robotics and design.
Discuss the different types of robots and their functions.
Building the Model Robot Guide students to create a robot with symmetry and recognizable features. Discuss the importance of wheels and symmetry in robotics.
Testing and Evaluation
Test the robot's movement and discuss design variations. Evaluate students' understanding of symmetry and robot components.
Introduce
Develop
Kidversity Level 2 Kit
Sketching materials
Digital Camera or Tablet
Introduction to FerrisWheel
Explain the project's focus on mechanical design and amusement rides.
Discuss different types of amusement rides and their structures.
Project 6: Plane Aerospace Engineer
Explore the role of engineers in designing amusement rides.
Printer Crayons
STEM Resource Book – Grade KG
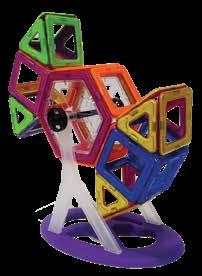
Building the FerrisWheel Guide students to create a spinning Ferris wheel with an axle.
Discuss the importance of symmetry in the structure.
Testing and Evaluation
Test the Ferris wheel's rotation and discuss design variations.
Evaluate students' understanding of mechanics and symmetry.
Introduction to Plane Building
Kidversity Level 2 Kit
Introduce the concept of flight through building a plane. Develop fine motor skills and understanding of aerodynamics. Explore the role of aerospace engineers in designing aircraft.
Sketching materials
Digital Camera or Tablet
Printer Crayons
STEM Resource Book – Grade KG
Explain the project's focus on aviation and design.
Discuss different types of aircraft and their functions.
Building the Plane Guide students to create a plane with wings, cockpit, and rudder.
Discuss the importance of symmetry in aircraft design.
Testing and Evaluation
Discuss the concept of flight and test the plane's gliding.
Evaluate students' understanding of aerodynamics and symmetry.
Introduce the concept of buoyancy through building a sailboat. Develop fine motor skills and understanding of watercraft design.
Explore the role of marine engineers in designing boats.
Kidversity Level 2 Kit
Sketching materials
Digital Camera or Tablet
Printer Crayons
Introduction to Boat Building
Explain the project's focus on watercraft design and buoyancy. Discuss different types of boats and their purposes.
Building the Boat Guide students to create a sailboat with a hull, mast, and sail.
Discuss the importance of
Project 8: Bridge
Civil Engineer, Structural Engineer, Architect
Introduce the concept of bridge construction through building a bridge model. Develop fine motor skills and understanding of structural stability.
Explore the role of engineers and architects in designing bridges.
STEM
Project 9: 3D Addition Sign Mathematician, Accountant
Introduce basic mathematics concepts through building a 3D addition sign.
Develop fine motor skills and understanding of shapes and numbers.
Explore the role of mathematicians and accountants in working with numbers.
Resource Book – Grade KG symmetry and balance in boat design.
Grade 1 – Kit
Kidversity
Level 2 Kit
Sketching materials
Digital Camera or Tablet
Printer Crayons
STEM
Resource Book – Grade KG
Testing and Evaluation
Test the boat's floating ability and discuss design variations.
Evaluate students' understanding of buoyancy and boat components.
Introduction to Bridge Construction
Explain the project's focus on structural engineering and design.
Discuss different types of bridges and their functions.
Building the Bridge Guide students to create a bridge model with a focus on stability.
Discuss different shapes and materials used in bridge construction.
Testing and Evaluation
Test the bridge's loadbearing capacity and discuss design variations.
Evaluate students' understanding of structural stability and engineering.
Kidversity
Level 2 Kit
Sketching materials
Digital Camera or Tablet
Printer Crayons
STEM Resource Book – Grade KG
Introduction to 3D Addition Sign
Explain the project's focus on mathematics and shapes.
Discuss the importance of numbers and addition.
Building the 3D Addition Sign
Guide students to create a 3D addition sign using blocks.
Discuss the concept of addition and number sentences
Testing and Evaluation
Discuss different ways
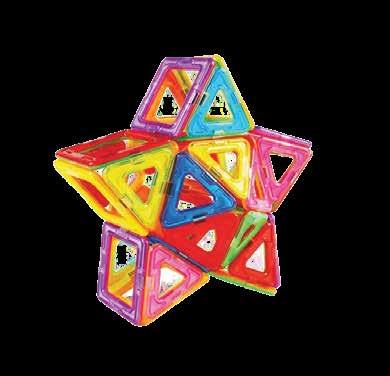
Project 10: Star Architect, Space Scientist
Introduce the concept of shapes and symmetry through building a star. Develop fine motor skills and understanding of patterns.
Explore the role of architects and space scientists in design and exploration.
Kidversity Level 2 Kit
Sketching materials
Digital Camera or Tablet
Printer Crayons
STEM
Resource Book – Grade KG
to use the 3D addition sign for math practice.
Evaluate students' understanding of shapes, numbers, and addition.
Introduction to Star Building
Explain the project's focus on shapes, symmetry, and patterns.
Discuss different types of stars and their significance.
Building the Star Guide students to create a symmetrical star using blocks.
Discuss different ways to arrange shapes for patterns.
Testing and Evaluation
Discuss the concept of symmetry and patterns in design.
Evaluate students' understanding of shapes, symmetry, and patterns.
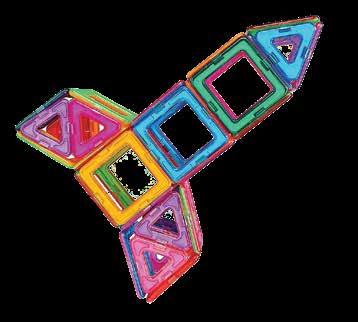
Introduction to Rocket Building
Kidversity Level 2 Kit
Introduce the concept of space exploration through building a rocket.
Project 11: Rocket Spacecraft Engineer, Astronaut
Develop fine motor skills and understanding of aerodynamics. Explore the role of spacecraft engineers and astronauts in space travel.
Sketching materials
Digital Camera or Tablet
Printer Crayons
STEM
Resource
Book – Grade KG
Explain the project's focus on space exploration and design.
Discuss the significance of rockets in space travel.
Building the Rocket Guide students to create a rocket with propulsion features.
Discuss the importance of symmetry and stability in rocket design.
Testing and Evaluation
Discuss the concept of space exploration and rocket launches.
Evaluate students' understanding of aerodynamics and symmetry.
34 Project 12: Agricultural Introduce the Kidversity Introduction to Plant
Plant Engineer, Botanist
concept of plants and their parts through building a model.
Develop fine motor skills and understanding of plant anatomy. Explore the role of agricultural engineers and botanists in plant science.
Level 2 Kit
Sketching materials
Digital Camera or Tablet
Printer Crayons
STEM
Resource Book – Grade KG
Model
Explain the project's focus on plant anatomy and science. Discuss the different parts of a plant and their functions.
Building the Plant Model
Guide students to create a model of a plant with its parts.
Discuss the importance of symmetry and balance in plant growth.
Testing and Evaluation
Discuss the concept of plant science and growth.
Evaluate students' understanding of plant anatomy and symmetry.
Introduce the concept of building tall structures through constructing a tower.
Develop fine motor skills and understanding of stability in architecture. Explore the role of architects and engineers in designing tall buildings.
Kidversity Level 2 Kit
Sketching materials
Digital Camera or Tablet
Printer Crayons
STEM
Resource Book – Grade KG
Introduction to Tall Tower Building
Explain the project's focus on architecture and structural design.
Discuss the significance of tall buildings and their purposes.
Building the Tall Tower Guide students to create a tall tower with a focus on stability.
Discuss different shapes and materials used in tall building construction
Testing and Evaluation
Test the tower's stability and discuss design variations.
Evaluate students' understanding of architecture and structural stability.
40 Project 14: Tree Agricultural Engineer, Landscape Gardner
Introduce the concept of trees and their parts through building
Kidversity Level 2 Kit
Sketching
Introduction to Tree Model
Explain the project's focus on plant
a model. Develop fine motor skills and understanding of plant components.
Explore the role of agricultural engineers and landscape gardeners in plant care.
materials
Digital Camera or Tablet
Printer Crayons
STEM Resource Book – Grade KG
anatomy and landscape design.
Discuss the importance of trees in the environment and plant care.
Building the Tree Model Guide students to create a model of a tree with its different parts.
Discuss the importance of roots, trunk, branches, and leaves.
Testing and Evaluation
Discuss the concept of plant care and the role of trees.
Evaluate students' understanding of plant anatomy and symmetry.
Introduce the concept of furniture design through building a table and chair. Develop fine motor skills and understanding of functional design. Explore the role of manufacturers and physical therapists in designing furniture.
Kidversity Level 2 Kit
Sketching materials
Digital Camera or Tablet
Printer Crayons
STEM Resource Book – Grade KG
Introduction to Furniture Design
Explain the project's focus on functional design and ergonomics.
Discuss the significance of furniture in our daily lives.
Building the Table and Chair Guide students to create functional furniture pieces.
Discuss the importance of balance, stability, and proportions.
Testing and Evaluation
Discuss the concept of ergonomic design and functional furniture.
Evaluate students' understanding of furniture design and symmetry.
Project-wise Lesson Plan and Answer Key
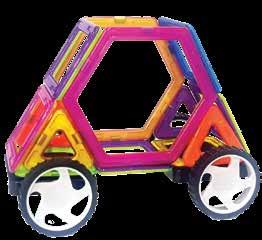
Making a ‘Hexa-Car’ with the help of Kidversity Level 2 Kit.
Next Generation Science Standards
K-PS2-2.
Analyze data to determine if a design solution works as intended to change the speed or direction of an object with a push or a pull.
K-2-ETS1-1.
Ask questions, make observations, and gather information about a situation people want to change to define a simple problem that can be solved through the development of a new or improved object or tool.
National Curriculum of England
ELG: Managing SelfBe confident to try new activities and show independence, resilience and perseverance in the face of challenge.
ELG: Fine Motor SkillsHold a pencil effectively in preparation for fluent writing – using the tripod grip in almost all cases.
ELG: Creating with MaterialsShare their creations, explaining the process they have used.
Engineering Connection
To create a hexa-car using the Kidversity kit.
To use spatial reasoning to understand the location and position of each piece in the diagram.
To test the hexa-car to see if it can travel.
To evaluate the design and rebuild where necessary.
To share ideas and solutions with peers.
Common Core Math Standards
K.G.A.1
Describe objects in the environment using names of shapes, and describe the relative positions of these objects using terms such as above, below, beside, in front of, behind, and next to.
K.G.A.5
Model shapes in the world by building shapes from components (e.g., sticks and clay balls) and drawing shapes.
Lesson Plan: Hexa Car (Project 1)
Week 1: Introduction and Brainstorming Objective:
Introduce the concept of building a car using hexagons. Encourage creative thinking and problem-solving. Develop fine motor skills through manipulation of kit components. Explore basic shapes and their properties.
Duration: 45 minutes
S# Phase Duration Details
1 Introduction 10 minutes
2 Brainstorming and Sketching 20 minutes
3 Sharing Ideas 15 minutes
• Introduce the project and its objectives.
• Explain the use of hexagons to create a car.
• Show examples of different car designs.
• Discuss the concept of a "Hexa Car."
• Ask students to sketch their vision of the finished car design.
• Encourage them to think about the placement of hexagons, wheels, and other components.
• Have a few students share their sketches and ideas.
• Emphasize the diversity of designs and creativity.
Week 2: Building the Hexa Car
Objective:
Engage students in hands-on construction of the Hexa Car. Develop spatial reasoning and manipulation skills. Promote teamwork and collaboration.
S#
1 Building the Hexa Car 30 minutes
Duration: 45 minutes
• Distribute the Kidversity Level 2 Kit components to each group.
• Guide students in constructing the Hexa Car according to their sketches.
• Encourage experimentation with different placements of hexagons and wheels.
2 Testing and Adjustments 10 minutes
• Invite students to test their Hexa Cars on a flat surface.
• Discuss how different placements of wheels and hexagons affect the car's movement.
• Encourage adjustments to improve performance.
3 Reflection 5 minutes
• Ask students to reflect on the construction process.
• Discuss challenges faced and solutions
found.
Week 3: Evaluation and Sharing
Objective:
Assess student understanding of shapes and their properties. Foster communication skills through sharing and presentation.
Duration: 45 minutes
S# Phase Duration Details
1 Evaluation 20 minutes
2 Sharing and Presentation 20 minutes
3 Feedback and Reflection 5 minutes
• Students work individually to answer the questions.
• Each student presents their Hexa Car to the class.
• Emphasize the use of hexagons and other shapes in the design.
• Discuss the reasons behind design choices.
• Invite classmates to provide feedback on the presentations.
• Students reflect on what they learned and enjoyed during the project.
Answer Key
Q# Answer
1 Four shapes are used: hexagons, wheels, triangles, and rectangles.
2 The hardest part could vary, but it might involve attaching wheels securely.
3 Hexagons were used for sides because they are sturdy and can connect easily.
5 Feedback can include suggestions for improving the car's design or functionality.
6 Share:
Encourage students to display their Hexa Cars in a designated area for others to admire. This promotes a sense of accomplishment and peer appreciation.
7 Extension:
For an extension activity, challenge students to redesign their Hexa Cars to incorporate other shapes from the kit, such as triangles and rectangles.
Making
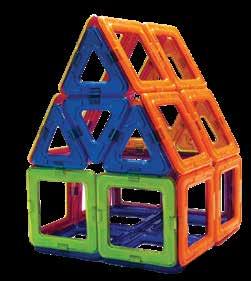
a ‘House’ with the help of Kidversity Level 2 Kit.
Next Generation Science Standards
K-ESS3-1.
Use a model to represent the relationship between the needs of different plants and animals (including humans) and the places they live.
K-2-ETS1-2.
Develop a simple sketch, drawing, or physical model to illustrate how the shape of an object helps it function as needed to solve a given problem.
National Curriculum of England
ELG: Managing Self -
Be confident to try new activities and show independence, resilience and perseverance in the face of challenge
ELG: Fine Motor SkillsHold a pencil effectively in preparation for fluent writing – using the tripod grip in almost all cases
ELG: Creating with MaterialsShare their creations, explaining the process they have used;
Engineering Connection
To create a house using the Kidversity kit.
To use spatial reasoning to understand the location and position of each piece in the diagram.
To create a stable base for the house to stand on.
To evaluate the design and rebuild where necessary.
To share ideas and solutions with peers.
Common
K.G.B.5
Model shapes in the world by building shapes from components (e.g., sticks and clay balls) and drawing shapes.
K.G.A.1
Describe objects in the environment using names of shapes, and describe the relative positions of these objects using terms such as above, below, beside, in front of, behind, and next to.
K.G.A.2
Correctly name shapes regardless of their orientations or overall size
Lesson Plan: House (Project 2)
Week 1: Introduction and Brainstorming Objective:
Introduce the concept of building a house using squares and triangles. Develop fine motor skills and spatial reasoning. Explore the concepts of symmetry and stability.
Duration: 45 minutes
S# Phase Duration Details
1 Introduction 10 minutes
2 Brainstorming and Sketching 20 minutes
3 Sharing Ideas 15 minutes
• Explain the project's objective: building a house with squares and triangles.
• Show images of different types of houses to spark imagination.
• Discuss the key components of a house: walls, roof, windows, door.
• Ask students to sketch their vision of the house design.
• Encourage them to think about symmetry and a strong base.
• Invite a few students to share their house sketches.
• Discuss the common elements and differences among the designs.
Week 2: Building the House
Objective:
Engage students in hands-on construction of the house. Explore concepts of symmetry and stability in architecture.
Duration: 45 minutes
S# Phase Duration Details
1 Building the House 30 minutes
• Distribute the Kidversity Level 2 Kit components to each group.
• Guide students in constructing the house based on their sketches.
• Emphasize symmetry in the design.
2 Testing and Stability 10 minutes
3 Reflection 5 minutes
• Ask students to observe their houses' stability.
• Discuss the importance of a strong base to support the house.
• Prompt students to reflect on the building process.
• Discuss any challenges faced and how they were overcome.
Week 3: Evaluation and Sharing
Objective:
Assess student understanding of shapes, symmetry, and stability. Develop communication skills through sharing and presentation.
Duration: 45 minutes
S# Phase Duration Details
1 Evaluation 20 minutes
2 Sharing and Presentation 20 minutes
3 Feedback and Reflection 5 minutes
• Distribute evaluation questions.
• Students work individually to answer the questions.
• Each student presents their house design to the class.
• Discuss how symmetry and stability were incorporated into the design.
• Invite classmates to provide feedback on the presentations.
• Students reflect on what they learned and enjoyed during the project.
Answer Key
Q# Answer
1 Most students might use squares for walls and triangles for roofs.
2 The hardest part could vary, but it might involve achieving a stable structure.
3 Symmetry provides balance and aesthetic appeal to the design.
4 Symmetry provides balance and aesthetic appeal to the design.
5 Share:
Encourage students to display their house models together to create a "neighborhood" display.
6 Extension:
For an extension activity, challenge students to create other types of buildings, such as a school, using the same principles of symmetry and stability.
Making a ‘Balance Wheel’ with the help of Kidversity Level 2 Kit.
Next Generation Science Standards
K-PS2-1.
Plan and conduct an investigation to compare the effects of different strengths or different directions of pushes and pulls on the motion of an object.
K-2-ETS1-2.
Develop a simple sketch, drawing, or physical model to illustrate how the shape of an object helps it function as needed to solve a given problem.
National Curriculum of England
ELG: Self-Regulation
Give focused attention to what the teacher says, respond appropriately even when engaged in the activity, and show an ability to follow instructions involving several ideas or actions.
ELG: Building Relationships
Work and play cooperatively and take turns with others
ELG: Word Reading
Read words consistent with their phonic knowledge by sound-blending
Engineering Connection
To create a balance wheel using the Kidversity kit.
To use spatial reasoning to understand the location and position of each piece in the diagram.
To create symmetrical shapes to balance the wheel.
To evaluate the design and rebuild where necessary.
To share ideas and solutions with peers.
Common Core Math Standards
K.G.A.1
Describe objects in the environment using names of shapes, and describe the relative positions of these objects using terms such as above, below, beside, in front of, behind, and next to.
CC.K.R.F.2.e
Add or substitute individual sounds (phonemes) in simple, one-syllable words to make new words.
K.G.A.2
Correctly name shapes regardless of their orientations or overall size
Objective:
Lesson Plan: Balance Wheel (Project 3)
Week 1: Introduction and Brainstorming
Introduce the concept of a balanced wheel with symmetrical shapes. Foster creativity and problem-solving skills. Develop fine motor skills through manipulation of kit components.
Duration: 45 minutes
S# Phase Duration Details
1 Introduction 10 minutes
2 Brainstorming and Sketching 20 minutes
3 Sharing Ideas 10 minutes
• Explain the project's goal: creating a balanced wheel with symmetrical shapes.
• Show images of wheels and discuss the importance of balance.
• Discuss the concept of a "Balance Wheel."
• Ask students to sketch their idea of a balanced wheel design.
• Encourage them to think about symmetrical placement of shapes.
• Invite a few students to share their wheel sketches.
• Discuss how symmetry contributes to balance.
Week 2: Building the Balance Wheel
Objective:
Engage students in hands-on construction of the balanced wheel. Explore concepts of symmetry and balance.
Duration: 45 minutes
S# Phase Duration Details
1 Building the Balance Wheel 30 minutes
2 Testing and Balancing 10 minutes
3 Reflection 5 minutes
• Distribute the Kidversity Level 2 Kit components to each group.
• Guide students in constructing the balance wheel based on their sketches.
• Emphasize the need for symmetrical shapes on both sides.
• Ask students to observe if their wheel can balance on a flat surface.
• Discuss how symmetry contributes to the wheel's balance.
• Prompt students to reflect on the building process.
• Discuss any challenges faced and how they were resolved.
Week 3: Evaluation and Sharing
Objective:
Assess student understanding of symmetry and balance.
Develop communication skills through sharing and presentation.
Duration: 45 minutes
S# Phase Duration Details
1 Evaluation 20 minutes
2 Sharing and Presentation 20 minutes
3 Feedback and Reflection 5 minutes
• Distribute evaluation questions.
• Students work individually to answer the questions.
• Each student presents their balanced wheel to the class.
• Discuss the role of symmetry in achieving balance.
• Invite classmates to provide feedback on the presentations.
• Students reflect on what they learned and enjoyed during the project.
Answer Key
Q# Answer
1 Most students might use hexagons for the symmetrical shapes.
2 The hardest part could vary, but it might involve achieving perfect balance.
3 Symmetry ensures that the weight is distributed evenly on both sides.
4 Balance is achieved by placing symmetrical shapes equidistant from the center.
5 Share:
Encourage students to experiment with their balance wheels, adjusting the position of shapes to observe how it affects balance.
6 Extension:
For an extension activity, challenge students to create a larger balance wheel using a variety of shapes from the kit.
Making a ‘Model Robot’ with the help of Kidversity Level 2 Kit.
Next Generation Science Standards
K-2-ETS1-1.
Ask questions, make observations, and gather information about a situation people want to change to define a simple problem that can be solved through the development of a new or improved object or tool.
K-PS2-2.
Analyze data to determine if a design solution works as intended to change the speed or direction of an object with a push or a pull.
National Curriculum of England
ELG: Self-Regulation -
Give focused attention to what the teacher says, responding appropriately even when engaged in activity, and show an ability to follow instructions involving several ideas or actions.
ELG: Building RelationshipsWork and play cooperatively and take turns with others.
ELG: Word ReadingRead words consistent with their phonic knowledge by sound-blending.
Engineering Connection
To create a robot using the Kidversity kit.
To use spatial reasoning to understand the location and position of each piece in the diagram.
To create a symmetrical robot.
To evaluate the design and rebuild where necessary.
To share ideas and solutions with peers.
Common Core Math Standards
K.G.B.5
Model shapes in the world by building shapes from components (e.g., sticks and clay balls) and drawing shapes.
K.G.A.2
Correctly name shapes regardless of their orientations or overall size.
K.MD.B.3
Classify objects into given categories; count the numbers of objects in each category and sort the categories by count.
Objective:
Lesson Plan: Model Robot (Project 4)
Week 1: Introduction and Brainstorming
Introduce the concept of building a robot with symmetry and movement. Foster creativity and problem-solving skills. Develop fine motor skills through manipulation of kit components.
Duration: 45 minutes
S# Phase Duration Details
1 Introduction 10 minutes
2 Brainstorming and Sketching 20 minutes
3 Sharing Ideas 15 minutes
4 Building the Lion Model 15 minutes
• Explain the project's goal: creating a robot with symmetry and movement.
• Show images of different types of robots and discuss their features.
• Discuss the concept of a "Model Robot."
• Ask students to sketch their idea of a robot design.
• Encourage them to think about symmetrical placement of shapes and adding features for movement.
• Invite a few students to share their robot sketches.
• Discuss the importance of symmetry in robot design and how movement can be incorporated.
• Distribute the kit materials.
• Guide students in constructing their lion models.
Week 2: Building the Model Robot
Objective:
Engage students in hands-on construction of the model robot. Explore concepts of symmetry and movement in design.
Duration: 45 minutes
S# Phase Duration Details
1 Building the Model Robot 30 minutes
• Distribute the Kidversity Level 2 Kit components to each group.
• Guide students in constructing the robot based on their sketches.
• Emphasize the need for symmetrical features and movable parts.
2 Testing and Movement 10 minutes
3 Reflection 15 minutes
• Ask students to explore how the robot's movable parts work.
• Discuss how movement enhances the robot's design.
• Prompt students to reflect on the building process.
• Discuss any challenges faced and how they were overcome.
Week 3: Evaluation and Sharing
Objective:
Assess student understanding of symmetry, movement, and design. Develop communication skills through sharing and presentation Duration: 45 minutes
S# Phase Duration Details
1 Evaluation 20 minutes
2 Sharing and Presentation 20 minutes
3 Feedback and Reflection 5 minutes
• Students work individually to answer the questions.
• Each student presents their model robot to the class.
• Discuss how symmetry and movement were integrated into the design.
• Invite classmates to provide feedback on the presentations.
• Students reflect on what they learned and enjoyed during the project.
Answer Key
Q# Answer
1 Most students might use wheels for symmetry and movement.
2 The hardest part could vary, but it might involve attaching movable parts securely.
3 Symmetry contributes to a balanced and aesthetically pleasing robot.
4 Movement adds functionality and realism to the robot design.
5 Share:
Encourage students to play with their model robots, experimenting with the movement of different parts.
6 Extension:
For an extension activity, challenge students to add additional features to their robots, such as arms or a removable head.
Making a ‘Ferris-Wheel’ with the help of Kidversity Level 2 Kit.
National Curriculum of England
K-PS2-1.
Plan and conduct an investigation to compare the effects of different strengths or different directions of pushes and pulls on the motion of an object.
K-2-ETS1-2.
Develop a simple sketch, drawing, or physical model to illustrate how the shape of an object helps it function as needed to solve a given problem.
ELG: Self-RegulationGive focused attention to what the teacher says, responding appropriately even when engaged in activity, and show an ability to follow instructions involving several ideas or actions.
ELG: Building RelationshipsWork and play cooperatively and take turns with others
ELG: Creating with MaterialsShare their creations, explaining the process they have used;
To create a model of a ferris-wheel using magnetic blocks.
To use spatial reasoning to understand the location and position of each piece in the diagram.
To create a 3D representation of the different parts of a ferris-wheel.
To evaluate the design and rebuild where necessary.
To share ideas and solutions with peers.
Model shapes in the world by building shapes from components (e.g., sticks and clay balls) and drawing shapes.
Classify objects into given categories; count the numbers of objects in each category and sort the categories by count.
Correctly name shapes regardless of their orientations or overall size. K.G.A.2
Engineering Connection
K.G.B.5
K.MD.B.3
Objective:
Lesson Plan: Ferris-Wheel (Project 5)
Week 1: Introduction and Brainstorming
Introduce the concept of a Ferris wheel and its components. Foster creativity and problem-solving skills. Develop fine motor skills through manipulation of kit components.
Duration: 45 minutes
S# Phase Duration Details
1 Introduction 5 minutes
2 Brainstorming and Sketching 10 minutes
3 Sharing Ideas 15 minutes
• Explain the project's goal: constructing a Ferris wheel with an axle.
• Show images of Ferris wheels and discuss their features.
• Discuss the concept of a "Ferris-Wheel."
• Ask students to sketch their idea of a Ferris wheel design.
• Encourage them to think about symmetry and the need for an axle.
• Invite a few students to share their Ferris wheel sketches.
• Discuss the importance of symmetry and the role of the axle.
Week 2: Building the Ferris-Wheel
Objective:
Engage students in hands-on construction of the Ferris wheel. Explore concepts of symmetry, rotation, and balance.
Duration: 45 minutes
S# Phase Duration Details
1 Building the Ferris-Wheel 30 minutes
• Distribute the Kidversity Level 2 Kit components to each group.
• Guide students in constructing the Ferris wheel based on their sketches.
• Emphasize the need for symmetrical seats and a central axle.
2 Testing and Rotation 10 minutes
3 Reflection 215 minutes
• Ask students to observe how the Ferris wheel rotates around the axle.
• Discuss the concept of rotation and balance.
• Prompt students to reflect on the building process.
• Discuss any challenges faced and how they were resolved.
Week 3: Evaluation and Sharing
Objective:
Assess student understanding of symmetry, rotation, and balance.
Develop communication skills through sharing and presentation.
Duration: 45 minutes
S# Phase Duration Details
1 Evaluation 20 minutes
2 Sharing and Presentation 20 minutes
3 Feedback and Reflection 5 minutes
• Distribute evaluation questions.
• Students work individually to answer the questions.
• Each student presents their Ferris wheel to the class.
• Discuss how symmetry and rotation were integrated into the design.
• Invite classmates to provide feedback on the presentations.
• Students reflect on what they learned and enjoyed during the project.
Answer Key
Q# Answer
1 Most students might use hexagons for the Ferris wheel structure.
2 The hardest part could vary, but it might involve ensuring smooth rotation around the axle.
3 Symmetry ensures an even distribution of weight, contributing to stability.
4 The axle allows the Ferris wheel to rotate smoothly.
5 Share:
Encourage students to take turns rotating their Ferris wheels and discussing how the axle contributes to the movement.
6 Extension:
For an extension activity, challenge students to create a more complex Ferris wheel with additional seats and features.
Making
a ‘Plane’ with the help of Kidversity Level 2 Kit.
Next Generation Science Standards
National Curriculum of England
Engineering Connection
Common Core Math Standards
K.G.A.1
Ask questions, make observations, and gather information about a situation people want to change to define a simple problem that can be solved through the development of a new or improved object or tool.
K-2-ETS1-2.
K-2-ETS1-1. Develop a simple sketch, drawing, or physical model to illustrate how the shape of an object helps it function as needed to solve a given problem.
ELG: Managing SelfBe confident to try new activities and show independence, resilience and perseverance in the face of challenge
ELG: Fine Motor SkillsHold a pencil effectively in preparation for fluent writing – using the tripod grip in almost all cases
ELG: Creating with MaterialsShare their creations, explaining the process they have used;
To create a plane using the Kidversity kit.
To use spatial reasoning to understand the location and position of each piece in the diagram.
To test the plane to see if it can travel.
To evaluate the design and rebuild where necessary.
To share ideas and solutions with peers.
Describe objects in the environment using names of shapes, and describe the relative positions of these objects using terms such as above, below, beside, in front of, behind, and next to.
CC.K.R.F.2.e
Add or substitute individual sounds (phonemes) in simple, one-syllable words to make new words.
K.G.A.2
Correctly name shapes regardless of their orientations or overall size
Objective:
Lesson Plan: Plane (Project 6)
Week 1: Introduction and Brainstorming
Introduce the concept of building a plane with specific parts.
Foster creativity and problem-solving skills.
Develop fine motor skills through manipulation of kit components
Duration: 45 minutes
S# Phase Duration Details
1 Introduction 10 minutes
2 Brainstorming and Sketching 20 minutes
3 Sharing Ideas 10 minutes
• Explain the project's goal: constructing a plane with wings, rudder, and cockpit.
• Show images of different types of planes and discuss their components.
• Discuss the concept of a "Plane."
• Ask students to sketch their idea of a plane design.
• Encourage them to think about wings, a rudder, and a cockpit.
• Invite a few students to share their plane sketches.
• Discuss the importance of each component in a plane's design.
Week 2: Building the Plane
Objective:
Engage students in hands-on construction of the plane. Explore concepts of structure and design.
Duration: 45 minutes
S# Phase Duration Details
1 Building the Plane 30 minutes
• Distribute the Kidversity Level 2 Kit components to each group.
• Guide students in constructing the plane based on their sketches.
• Emphasize the need for wings, a rudder, and a cockpit.
2 Testing and Play 10 minutes
3 Reflection 5 minutes
• Ask students to observe how their plane stands and discuss its features.
• Discuss how the components contribute to flight.
• Prompt students to reflect on the building process.
• Discuss any challenges faced and how they were overcome.
Week 3: Evaluation and Sharing
Objective:
Assess student understanding of plane components and design. Develop communication skills through sharing and presentation.
Duration: 45 minutes
S# Phase Duration Details
1 Evaluation 20 minutes
2 Sharing and Presentation 20 minutes
3 Feedback and Reflection 5 minutes
• Students work individually to answer the questions.
• Each student presents their plane to the class.
• Discuss how the components work together for flight.
• Invite classmates to provide feedback on the presentations.
• Students reflect on what they learned and enjoyed during the project.
Answer Key
Q# Answer
1 Most students might use triangles for the wings, a rectangle for the cockpit, and a square for the rudder.
2 The hardest part could vary, but it might involve attaching components securely.
3 Wings provide lift, the rudder controls direction, and the cockpit houses the pilot.
4 The components need to be well-balanced for the plane to stand and fly.
5 Share: Encourage students to explore their planes' features and experiment with balance.
6 Extension: For an extension activity, challenge students to design a landing gear for their planes.
Making
a ‘Boat’ with the help of Kidversity Level 2 Kit.
Next Generation Science Standards
K-2-ETS1-1.
Ask questions, make observations, and gather information about a situation people want to change to define a simple problem that can be solved through the development of a new or improved object or tool.
K-2-ETS1-2.
Develop a simple sketch, drawing, or physical model to illustrate how the shape of an object helps it function as needed to solve a given problem.
National Curriculum of England
ELG: Self-RegulationGive focused attention to what the teacher says, responding appropriately even when engaged in activity, and show an ability to follow instructions involving several ideas or actions.
ELG: Building RelationshipsWork and play cooperatively and take turns with others
ELG: Creating with MaterialsShare their creations, explaining the process they have used.
Engineering Connection
To create a model of a boat using magnetic blocks.
To use spatial reasoning to understand the location and position of each piece in the diagram.
To create a 3D representation of the different parts of a boat.
To evaluate the design and rebuild where necessary.
To share ideas and solutions with peers.
Common
K.G.B.5
Model shapes in the world by building shapes from components (e.g., sticks and clay balls) and drawing shapes.
Describe objects in the environment using names of shapes, and describe the relative positions of these objects using terms such as above, below, beside, in front of, behind, and next to.
K.G.A.2
K.G.A.1 Correctly name shapes regardless of their orientations or overall size.
Objective:
Lesson Plan: Boat (Project 7)
Week 1: Introduction and Brainstorming
Introduce the concept of building a sailboat with specific parts. Foster creativity and problem-solving skills.
Develop fine motor skills through manipulation of kit components.
Duration: 45 minutes
S# Phase Duration Details
1 Introduction 10 minutes
2 Brainstorming and Sketching 20 minutes
3 Sharing Ideas 10 minutes
• Explain the project's goal: constructing a sailboat with a hull and mast.
• Show images of sailboats and discuss their components.
• Discuss the concept of a "Sailboat."
• Ask students to sketch their idea of a sailboat design.
• Encourage them to think about a hull and mast.
• Invite a few students to share their sailboat sketches.
• Discuss the importance of each component in a sailboat's design.
Week 2: Building the Sailboat
Objective:
Engage students in hands-on construction of the sailboat.
Explore concepts of structure, balance, and buoyancy.
Duration: 45 minutes
S# Phase Duration Details
1 Building the Sailboat 30 minutes
• Distribute the Kidversity Level 2 Kit components to each group.
• Guide students in constructing the sailboat based on their sketches.
• Emphasize the need for a hull and a mast.
2 Testing and Buoyancy 10 minutes
3 Reflection 5 minutes
• Ask students to observe how their sailboat floats in water (if possible).
• Discuss how the shape of the hull affects buoyancy.
• Prompt students to reflect on the building process.
• Discuss any challenges faced and how they were resolved.
Week 3: Evaluation and Sharing
Objective:
Assess student understanding of sailboat components and design.
Develop communication skills through sharing and presentation.
Duration: 45 minutes
S# Phase Duration Details
1 Evaluation 20 minutes
2 Sharing and Presentation 20 minutes
3 Feedback and Reflection 5 minutes
• Distribute evaluation questions.
• Students work individually to answer the questions.
• Each student presents their sailboat to the class.
• Discuss how the components work together for floating.
• Invite classmates to provide feedback on the presentations.
• Students reflect on what they learned and enjoyed during the project.
Answer Key
Q# Answer
1 Most students might use rectangles for the hull and cubes for the mast.
2 The hardest part could vary, but it might involve ensuring stability in water.
3 The hull provides buoyancy, and the mast holds the sail.
4 Share: If possible, provide a basin of water for students to test their sailboats' buoyancy.
5 Extension:
For an extension activity, challenge students to create a small flag for their sailboats' masts.
Making a ‘Bridge’ with the help of Kidversity Level 2 Kit.
Next Generation Science Standards
K-ESS3-1.
Use a model to represent the relationship between the needs of different plants and animals (including humans) and the places they live.
K-2-ETS1-2.
Develop a simple sketch, drawing, or physical model to illustrate how the shape of an object helps it function as needed to solve a given problem.
National Curriculum of England
ELG: Self-RegulationGive focused attention to what the teacher says, responding appropriately even when engaged in activity, and show an ability to follow instructions involving several ideas or actions.
ELG: Building RelationshipsWork and play cooperatively and take turns with others.
ELG: Creating with MaterialsShare their creations, explaining the process they have used;
To create a model of a bridge using magnetic blocks.
To use spatial reasoning to understand the location and position of each piece in the diagram.
To create a 3D representation of the different parts of a bridge.
To evaluate the design and rebuild where necessary.
To share ideas and solutions with peers.
K.G.B.5
Model shapes in the world by building shapes from components (e.g., sticks and clay balls) and drawing shapes.
K.G.A.1
Describe objects in the environment using names of shapes, and describe the relative positions of these objects using terms such as above, below, beside, in front of, behind, and next to.
K.G.A.2
Correctly name shapes regardless of their orientations or overall size.
Engineering Connection
Lesson Plan: Bridge (Project 8)
Week 1: Introduction and Brainstorming Objective:
Introduce the concept of building a bridge with specific shapes. Foster creativity and problem-solving skills. Develop fine motor skills through manipulation of kit components.
Duration: 45 minutes
S# Phase Duration Details
1 Introduction 10 minutes
2 Brainstorming and Sketching 20 minutes
3 Sharing Ideas 10 minutes
• Explain the project's goal: constructing a bridge using specific shapes.
• Show images of different types of bridges and discuss their features.
• Discuss the concept of a "Bridge."
• Ask students to sketch their idea of a bridge design.
• Encourage them to think about stability and weight distribution.
• Invite a few students to share their bridge sketches.
• Discuss the importance of stability and support in a bridge's design.
Week 2: Building the Bridge
Objective:
Engage students in hands-on construction of the bridge. Explore concepts of structure, support, and stability.
Duration: 45 minutes
S# Phase Duration Details
1 Building the Bridge 30 minutes
• Distribute the Kidversity Level 2 Kit components to each group.
• Guide students in constructing the bridge based on their sketches.
• Emphasize the need for strong supports and a stable base.
2 Testing and Stability 10 minutes
3 Reflection 15 minutes
• Ask students to observe how their bridge supports weight.
• Discuss the importance of a strong base and balanced supports.
• Prompt students to reflect on the building process.
• Discuss any challenges faced and how they were overcome.
Week 3: Evaluation and Sharing Objective:
Assess student understanding of bridge components and design. Develop communication skills through sharing and presentation.
Duration: 45 minutes
S# Phase Duration Details
1 Evaluation 20 minutes
2 Sharing and Presentation 20 minutes
3 Feedback and Reflection 5 minutes
• Distribute evaluation questions.
• Students work individually to answer the questions.
• Each student presents their bridge to the class.
• Discuss how the components work together for support.
• Invite classmates to provide feedback on the presentations.
• Students reflect on what they learned and enjoyed during the project.
Answer Key
Q# Answer
1 Most students might use cubes for supports and rectangular prisms for the bridge deck.
2 The hardest part could vary, but it might involve ensuring stability under weight.
3 Supports prevent the bridge from collapsing, and a strong base provides stability.
4 Share:
Encourage students to test their bridges with small lightweight objects to understand stability.
5 Extension: For an extension activity, challenge students to design a bridge with multiple levels.
Making a ‘3D Addition Sign’ with the help of Kidversity Level 2 Kit.
Next Generation Science Standards
K-2-ETS1-1.
K-2-ETS1-2. Ask questions, make observations, and gather information about a situation people want to change to define a simple problem that can be solved through the development of a new or improved object or tool.
Develop a simple sketch, drawing, or physical model to illustrate how the shape of an object helps it function as needed to solve a given problem.
National Curriculum of England
ELG: Self-RegulationGive focused attention to what the teacher says, responding appropriately even when engaged in activity, and show an ability to follow instructions involving several ideas or actions.
ELG: Building RelationshipsWork and play cooperatively and take turns with others
ELG: Word ReadingRead words consistent with their phonic knowledge by sound-blending
Engineering Connection
To create a 3D addition sign using the Kidversity kit.
To use spatial reasoning to understand the location and position of each piece in the diagram.
To test the 3D sign to see if it can stand on the ground.
To evaluate the design and rebuild where necessary.
To share ideas and solutions with peers.
K.G.B.5
Model shapes in the world by building shapes from components (e.g., sticks and clay balls) and drawing shapes.
K.G.A.2
Correctly name shapes regardless of their orientations or overall size
K.MD.B.3
Classify objects into given categories; count the numbers of objects in each category and sort the categories by count.
Objective:
Lesson Plan: 3D Addition Sign (Project 9)
Week 1: Introduction and Brainstorming
Introduce the concept of building a 3D addition sign. Foster creativity and problem-solving skills. Develop fine motor skills through manipulation of kit components.
Duration: 45 minutes
S# Phase Duration Details
1 Introduction 10 minutes
2 Brainstorming and Sketching 20 minutes
3 Sharing Ideas 10 minutes
• Explain the project's goal: constructing a 3D addition sign using shapes.
• Discuss the concept of addition and its importance.
• Discuss the concept of a "3D Addition Sign."
• Ask students to sketch their idea of a 3D addition sign.
• Encourage them to think about the shapes needed for each numeral.
• Invite a few students to share their 3D addition sign sketches.
• Discuss the importance of using the correct shapes for each numeral.
Week 2: Building the 3D Addition Sign
Objective:
Engage students in hands-on construction of the 3D addition sign. Reinforce number recognition and addition skills.
Duration: 45 minutes
S# Phase Duration Details
1 Building the 3D Addition Sign
30 minutes
2 Testing and Observing 10 minutes
• Distribute the Kidversity Level 2 Kit components to each group.
• Guide students in constructing the 3D addition sign based on their sketches.
• Emphasize the importance of using the correct shapes for numerals.
• Ask students to observe their 3D addition signs and identify the numerals.
• Discuss how addition works using numerals. Reflection 5 minutes
• Prompt students to reflect on the building process.
• Discuss any challenges faced and how they were overcome.
Week 3: Evaluation and Sharing
Objective:
Assess student understanding of numeral recognition and 3D shapes.
Develop communication skills through sharing and presentation.
Duration: 45 minutes
S# Phase Duration Details
1 Evaluation 20 minutes
2 Sharing and Presentation 20 minutes
3 Feedback and Reflection 5 minutes
• Students work individually to answer the questions.
• Each student presents their 3D addition sign to the class.
• Discuss the importance of numerals in addition.
• Invite classmates to provide feedback on the presentations.
• Students reflect on what they learned and enjoyed during the project.
Answer Key
Q# Answer
1 Students might use various combinations of shapes to create numerals.
2 The hardest part could vary, but it might involve assembling shapes to form numerals.
3 Shapes are used to represent numerals in a visually engaging way.
4 Share:
Encourage students to use their 3D addition signs to practice simple addition problems.
5 Extension:
For an extension activity, challenge students to create a subtraction sign using shapes.
Making a ‘Star’ with the help of Kidversity Level 2 Kit.
Next Generation Science Standards
K-2-ETS1-1.
Ask questions, make observations, and gather information about a situation people want to change to define a simple problem that can be solved through the development of a new or improved object or tool.
National Curriculum of England
ELG: Managing SelfBe confident to try new activities and show independence, resilience and perseverance in the face of challenge
ELG: Fine Motor SkillsHold a pencil effectively in preparation for fluent writing – using the tripod grip in almost all cases
ELG: Creating with MaterialsShare their creations, explaining the process they have used;
Engineering Connection
To create a star using the Kidversity kit.
To use spatial reasoning to understand the location and position of each piece in the diagram.
To evaluate the design and rebuild where necessary.
To share ideas and solutions with peers.
Common Core Math Standards
K.G.B.5
Model shapes in the world by building shapes from components (e.g., sticks and clay balls) and drawing shapes.
K.MD.B.3
Classify objects into given categories; count the numbers of objects in each category and sort the categories by count.
K.G.A.2
Correctly name shapes regardless of their orientations or overall size.
Objective:
Lesson Plan: Star (Project 10)
Week 1: Introduction and Brainstorming
Introduce the concept of building a star using specific shapes. Foster creativity and problem-solving skills.
Develop fine motor skills through manipulation of kit components.
Duration: 45 minutes
S# Phase Duration Details
1 Introduction 10 minutes
2 Brainstorming and Sketching 20 minutes
3 Sharing Ideas 15 minutes
• Explain the project's goal: constructing a star using specific shapes.
• Show images of different types of stars and discuss their characteristics.
• Discuss the concept of a "Star."
• Ask students to sketch their idea of a star design.
• Encourage them to think about the arrangement of points.
• Invite a few students to share their star sketches.
• Discuss the importance of symmetry in a star's design.
Week 2: Building the Star
Objective:
Engage students in hands-on construction of the star. Explore concepts of symmetry and shape arrangement.
Duration: 45 minutes
S# Phase Duration Details
1 Building the Star 30 minutes
• Distribute the Kidversity Level 2 Kit components to each group.
• Guide students in constructing the star based on their sketches.
• Emphasize the importance of symmetric arrangement of points.
2 Observing Symmetry 10 minutes
3 Reflection 15 minutes
• Ask students to observe their stars and identify lines of symmetry.
• Discuss the concept of symmetry in shapes.
• Prompt students to reflect on the building process.
• Discuss any challenges faced and how they were overcome.
Week 3: Evaluation and Sharing
Objective:
Assess student understanding of symmetry and shape arrangement.
Develop communication skills through sharing and presentation.
Duration: 45 minutes
S# Phase Duration Details
1 Evaluation 20 minutes
2 Sharing and Presentation 20 minutes
3 Feedback and Reflection 5 minutes
• Students work individually to answer the questions.
• Each student presents their star to the class.
• Discuss the concept of symmetry in star design.
• Invite classmates to provide feedback on the presentations.
• Students reflect on what they learned and enjoyed during the project.
Answer Key
Q# Answer
1 Students might use triangles or squares to create a star's points.
2 The hardest part could vary, but it might involve achieving symmetric arrangement.
3 Symmetry creates balance and aesthetic appeal in the star.
4 Share: Encourage students to explore symmetry in nature by observing plants and animals.
5 Extension: For an extension activity, challenge students to create a larger star using additional kit components.
Making a ‘Rocket’ with the help of Kidversity Level 2 Kit.
Next Generation Science Standards
K-2-ETS1-1.
K-2-ETS1-2. Ask questions, make observations, and gather information about a situation people want to change to define a simple problem that can be solved through the development of a new or improved object or tool.
Develop a simple sketch, drawing, or physical model to illustrate how the shape of an object helps it function as needed to solve a given problem.
National Curriculum of England
ELG: Managing SelfBe confident to try new activities and show independence, resilience and perseverance in the face of challenge
ELG: Fine Motor SkillsHold a pencil effectively in preparation for fluent writing – using the tripod grip in almost all cases
ELG: Creating with MaterialsShare their creations, explaining the process they have used;
Engineering Connection
To create a rocket using the Kidversity kit.
To use spatial reasoning to understand the location and position of each piece in the diagram.
To evaluate the design and rebuild where necessary.
To share ideas and solutions with peers.
Common Core Math Standards
Describe objects in the environment using names of shapes, and describe the relative positions of these objects using terms such as above, below, beside, in front of, behind, and next to.
Model shapes in the world by building shapes from components (e.g., sticks and clay balls) and drawing shapes.
K.G.A.1
K.G.B.5
Objective:
Lesson Plan: Rocket (Project 11)
Week 1: Introduction and Brainstorming
Introduce the concept of building a rocket using specific shapes. Foster creativity and problem-solving skills.
Develop fine motor skills through manipulation of kit components.
Duration: 45 minutes
S# Phase Duration Details
1 Introduction 10 minutes
2 Brainstorming and Sketching 20 minutes
3 Sharing Ideas 15 minutes
• Explain the project's goal: constructing a rocket using specific shapes.
• Show images of different types of rockets and discuss their features.
• Discuss the concept of a "Rocket."
• Ask students to sketch their idea of a rocket design.
• Encourage them to think about the arrangement of shapes.
• Invite a few students to share their rocket sketches.
• Discuss the importance of symmetry and aerodynamic design in rockets.
Week 2: Building the Rocket
Objective:
Engage students in hands-on construction of the rocket.
Explore concepts of symmetry, shape arrangement, and aerodynamics.
Duration: 45 minutes
S# Phase Duration Details
1 Building the Rocket 30 minutes
• Distribute the Kidversity Level 2 Kit components to each group.
• Guide students in constructing the rocket based on their sketches.
• Emphasize the importance of a streamlined design for flight.
2 Observing Design 10 minutes
3 Reflection 5 minutes
• Ask students to observe their rockets and identify symmetrical features.
• Discuss the concept of aerodynamics and its importance in rocket flight
• Prompt students to reflect on the building process.
• Discuss any challenges faced and how they were overcome.
Week 3: Evaluation and Sharing
Objective:
Assess student understanding of symmetry, aerodynamics, and design. Develop communication skills through sharing and presentation.
Duration: 45 minutes
S# Phase Duration Details
1 Evaluation 20 minutes
2 Sharing and Presentation 20 minutes
3 Feedback and Reflection 5 minutes
• Students work individually to answer the questions.
• Each student presents their rocket to the class.
• Discuss the principles of aerodynamics and symmetry in rocket design.
• Invite classmates to provide feedback on the presentations.
• Students reflect on what they learned and enjoyed during the project.
Answer Key
Q# Answer
1 Students might use cylinders for the body and triangular prisms for fins.
2 The hardest part could vary, but it might involve achieving a balanced design.
3 Symmetry and aerodynamics ensure stable flight in a rocket.
4 Share:
Discuss the importance of rockets in space exploration and scientific research.
5 Extension: For an extension activity, challenge students to design a payload for their rocket.
Making a ‘Plant’ with the help of Kidversity Level 2 Kit.
Next Generation Science Standards
National Curriculum of England
Engineering Connection
Common Core Math Standards
K.G.B.5
Use observations to describe patterns of what plants and animals (including humans) need to survive.
K-ESS3-3.
K-LS1-1. Communicate solutions that will reduce the impact of humans on the land, water, air, and/or other living things in the local environment.
ELG: Self-RegulationGive focused attention to what the teacher says, responding appropriately even when engaged in activity, and show an ability to follow instructions involving several ideas or actions.
ELG: Building RelationshipsWork and play cooperatively and take turns with others.
ELG: Creating with MaterialsShare their creations, explaining the process they have used.
To create a model of a plant using magnetic blocks.
To use spatial reasoning to understand the location and position of each piece in the diagram.
To create a 3D representation of the different parts of a plant.
To evaluate the design and rebuild where necessary.
To share ideas and solutions with peers.
Model shapes in the world by building shapes from components (e.g., sticks and clay balls) and drawing shapes.
K.G.A.1
Describe objects in the environment using names of shapes, and describe the relative positions of these objects using terms such as above, below, beside, in front of, behind, and next to.
K.G.A.2
Correctly name shapes regardless of their orientations or overall size.
Objective:
Lesson Plan: Plant (Project 12)
Week 1: Introduction and Brainstorming
Introduce the concept of building a plant using specific shapes. Foster creativity and problem-solving skills.
Develop fine motor skills through manipulation of kit components.
Duration: 45 minutes
S# Phase Duration Details
1 Introduction 10 minutes
2 Brainstorming and Sketching 20 minutes
3 Sharing Ideas 10 minutes
• Explain the project's goal: constructing a plant using specific shapes.
• Show images of different parts of plants and discuss their functions.
• Discuss the concept of a "Plant."
• Ask students to sketch their idea of a plant design.
• Encourage them to think about the arrangement of parts.
• Invite a few students to share their plant sketches.
• Discuss the importance of different parts in a plant's function.
Week 2: Building the Plant
Objective:
Engage students in hands-on construction of the plant. Explore concepts of symmetry and shape arrangement.
Duration: 45 minutes
S# Phase Duration Details
1 Building the Plant 30 minutes
• Distribute the Kidversity Level 2 Kit components to each group.
• Guide students in constructing the plant based on their sketches.
• Emphasize the importance of replicating different parts.
2 Observing Parts 10 minutes
3 Reflection 5 minutes
• Ask students to observe their plant and identify different parts.
• Discuss the functions of various parts in a plant's growth.
• Prompt students to reflect on the building process.
• Discuss any challenges faced and how they were overcome.
Week 3: Evaluation and Sharing
Objective:
Assess student understanding of plant parts and functions. Develop communication skills through sharing and presentation.
Duration: 45 minutes
S# Phase Duration Details
1 Evaluation 20 minutes
2 Sharing and Presentation 20 minutes
3 Feedback and Reflection 5 minutes
• Students work individually to answer the questions.
• Each student presents their plant to the class.
• Discuss the importance of different plant parts for survival.
• Invite classmates to provide feedback on the presentations.
• Students reflect on what they learned and enjoyed during the project.
Answer Key
Q# Answer
1 Students might use rectangles for the stem, triangles for leaves, and circles for flowers.
2 The hardest part could vary, but it might involve arranging different parts.
3 Different parts in a plant serve specific functions for growth and reproduction.
4 Share: Discuss the role of plants in our environment and their importance for oxygen production.
5 Extension: For an extension activity, challenge students to create a labeled diagram of a plant.
Making a ‘tall tower’ with the help of Kidversity Level 2 Kit.
National Curriculum of England
Engineering Connection
K-2-ETS1-1.
K-2-ETS1-2. Ask questions, make observations, and gather information about a situation people want to change to define a simple problem that can be solved through the development of a new or improved object or tool.
Develop a simple sketch, drawing, or physical model to illustrate how the shape of an object helps it function as needed to solve a given problem.
ELG: Self-RegulationGive focused attention to what the teacher says, responding appropriately even when engaged in activity, and show an ability to follow instructions involving several ideas or actions.
ELG: Creating with MaterialsShare their creations, explaining the process they have used;
ELG: WritingSpell words by identifying sounds in them and representing the sounds with a letter or letters.
To create a model of a tall tower using magnetic blocks.
To use spatial reasoning to understand the location and position of each piece in the diagram.
To create a 3D representation of the tower.
To evaluate the design and rebuild where necessary.
To share ideas and solutions with peers. Common
Correctly name shapes regardless of their orientations or overall size.
Isolate and pronounce the initial, medial vowel, and final sounds (phonemes) in three-phoneme (consonant-vowel-consonant, or CVC) words. (This does not include CVCs ending with /l/, /r/, or /x/.
Model shapes in the world by building shapes from components (e.g., sticks and clay balls) and drawing shapes.
K.G.A.2
K.G.B.5
RF.K.2.D
Objective:
Lesson Plan: Tall Tower (Project 13)
Week 1: Introduction and Brainstorming
Introduce the concept of building a tall tower using specific shapes. Foster creativity and problem-solving skills.
Develop fine motor skills through manipulation of kit components.
Duration: 45 minutes
S# Phase Duration Details
1 Introduction 10 minutes
2 Brainstorming and Sketching 20 minutes
3 Sharing Ideas 15 minutes
• Explain the project's goal: constructing a tall tower using specific shapes.
• Show images of different types of tall structures and discuss their purposes.
• Discuss the concept of a "Tall Tower."
• Ask students to sketch their idea of a tower design.
• Encourage them to think about the arrangement of shapes.
• Invite a few students to share their tower sketches.
• Discuss the importance of stability and design in tall structures.
Week 2: Building the Tower
Objective:
Engage students in hands-on construction of the tower. Explore concepts of stability and shape arrangement.
Duration: 45 minutes
S# Phase Duration Details
1 Building the Tower 30 minutes
• Distribute the Kidversity Level 2 Kit components to each group.
• Guide students in constructing the tower based on their sketches.
• Emphasize the importance of a stable base for height.
2 Testing Stability 10 minutes
3 Reflection 5 minutes
• Ask students to carefully place their towers on the ground.
• Discuss how a strong base ensures stability in tall structures.
• Prompt students to reflect on the building process.
• Discuss any challenges faced and how they were overcome.
Week 3: Evaluation and Sharing
Objective:
Assess student understanding of stability and design in tall structures. Develop communication skills through sharing and presentation.
Duration: 45 minutes
S# Phase Duration Details
1 Evaluation 20 minutes
2 Sharing and Presentation 20 minutes
3 Feedback and Reflection 5 minutes
• Students work individually to answer the questions.
• Each student presents their tower to the class.
• Discuss the principles of stability and design in tall structures.
• Invite classmates to provide feedback on the presentations.
• Students reflect on what they learned and enjoyed during the project.
Answer Key
Q# Answer
1 Students might use cubes, cuboids, or prisms for the tower's base.
2 The hardest part could vary, but it might involve achieving stability in height.
3 Stable bases ensure tall structures can withstand external forces.
4 Share:
Discuss famous tall structures around the world, such as the Eiffel Tower and skyscrapers.
5 Extension: For an extension activity, challenge students to collaborate on building a group tower.
Making a ‘Tree’ with the help of Kidversity Level 2 Kit.
Next Generation Science Standards
National Curriculum of England
ELG: Self-Regulation -
Engineering Connection
To create a model of a tree using magnetic blocks.
Common Core Math Standards
K.G.B.5
Use observations to describe patterns of what plants and animals (including humans) need to survive.
K-ESS3-3.
K-LS1-1. Communicate solutions that will reduce the impact of humans on the land, water, air, and/or other living things in the local environment.
Give focused attention to what the teacher says, responding appropriately even when engaged in activity, and show an ability to follow instructions involving several ideas or actions.
ELG: Building RelationshipsWork and play cooperatively and take turns with others.
ELG: Creating with MaterialsShare their creations, explaining the process they have used.
To use spatial reasoning to understand the location and position of each piece in the diagram.
To create a 3D representation of the different parts of a tree.
To evaluate the design and rebuild where necessary.
To share ideas and solutions with peers.
Model shapes in the world by building shapes from components (e.g., sticks and clay balls) and drawing shapes.
K.G.A.1
Describe objects in the environment using names of shapes, and describe the relative positions of these objects using terms such as above, below, beside, in front of, behind, and next to.
K.G.A.2
Correctly name shapes regardless of their orientations or overall size.
Objective:
Lesson Plan: Tree (Project 14)
Week 1: Introduction and Brainstorming
Introduce the concept of building a tree using specific shapes. Foster creativity and problem-solving skills.
Develop fine motor skills through manipulation of kit components.
Duration: 45 minutes
S# Phase Duration Details
1 Introduction 10 minutes
2 Brainstorming and Sketching 20 minutes
3 Sharing Ideas 10 minutes
• Explain the project's goal: constructing a tree using specific shapes.
• Show images of different parts of trees and discuss their functions.
• Discuss the concept of a "Tree."
• Ask students to sketch their idea of a tree design.
• Encourage them to think about the arrangement of parts.
• Review the drawings and discuss different types of pendulums and their uses.
Week 2: Building the Tree
Objective:
Engage students in hands-on construction of the tree. Explore concepts of symmetry and shape arrangement.
Duration: 45 minutes
S# Phase Duration Details
1 Building the Tree 30 minutes
• Distribute the Kidversity Level 2 Kit components to each group.
• Guide students in constructing the tree based on their sketches.
• Emphasize the importance of replicating different parts.
2 Observing Parts 10 minutes
3 Reflection 5 minutes
• Ask students to observe their tree and identify different parts.
• Discuss the functions of various parts in a tree's growth.
• Prompt students to reflect on the building process.
• Discuss any challenges faced and how they were overcome.
Week 3: Evaluation and Sharing
Objective:
Assess student understanding of tree parts and functions.
Develop communication skills through sharing and presentation.
Duration: 45 minutes
S# Phase Duration Details
1 Evaluation 20 minutes
2 Sharing and Presentation 20 minutes
3 Feedback and Reflection 5 minutes
• Students work individually to answer the questions.
• Each student presents their tree to the class.
• Discuss the importance of different tree parts for growth.
• Invite classmates to provide feedback on the presentations.
• Students reflect on what they learned and enjoyed during the project.
Answer Key
Q# Answer
1 Students might use rectangles for the trunk, triangles for leaves, and circles for fruits.
2 The hardest part could vary, but it might involve arranging different parts.
3 Different parts in a tree serve specific functions for growth and reproduction.
4 Share:
Discuss the importance of trees in our environment, including oxygen production and providing habitats.
5 Extension:
For an extension activity, challenge students to create a labeled diagram of a tree's lifecycle.
Making a ‘Table and Chair’ with the help of Kidversity Level 2 Kit.
Next Generation Science Standards
K-2-ETS1-1.
K-2-ETS1-2. Ask questions, make observations, and gather information about a situation people want to change to define a simple problem that can be solved through the development of a new or improved object or tool.
Develop a simple sketch, drawing, or physical model to illustrate how the shape of an object helps it function as needed to solve a given problem.
National Curriculum of England
ELG: Managing SelfBe confident to try new activities and show independence, resilience and perseverance in the face of challenge
ELG: Fine Motor SkillsHold a pencil effectively in preparation for fluent writing – using the tripod grip in almost all cases
ELG: Creating with MaterialsShare their creations, explaining the process they have used;
Engineering Connection
To create a table and chair using the Kidversity kit.
To use spatial reasoning to understand the location and position of each piece in the diagram.
To evaluate the design and rebuild where necessary.
To share ideas and solutions with peers.
Common Core Math Standards
Describe objects in the environment using names of shapes, and describe the relative positions of these objects using terms such as above, below, beside, in front of, behind, and next to.
Correctly name shapes regardless of their orientations or overall size.
K.G.A.1
K.G.A.2
Objective:
Lesson Plan: Table and Chair (Project 15)
Week 1: Introduction and Brainstorming
Introduce the concept of building a table and chair using specific shapes. Foster creativity and problem-solving skills.
Develop fine motor skills through manipulation of kit components.
Duration: 45 minutes
S# Phase Duration Details
1 Introduction 10 minutes
2 Brainstorming and Sketching 20 minutes
3 Sharing Ideas 5 minutes
• Explain the project's goal: constructing a table and chair using specific shapes.
• Show images of different types of tables and chairs and discuss their functions.
• Discuss the concept of a "Table and Chair."
• Ask students to sketch their idea of a table and chair design.
• Encourage them to think about the arrangement of shapes.
• Invite a few students to share their table and chair sketches.
• Discuss the importance of comfort and stability in furniture design.
Week 2: Building the Table and Chair
Objective:
Engage students in hands-on construction of the table and chair. Explore concepts of stability and shape arrangement.
Duration: 45 minutes
S# Phase Duration Details
1 Building the Table and Chair
30 minutes
2 Testing Functionality 20 minutes
3 Reflection 5 minutes
• Distribute the Kidversity Level 2 Kit components to each group.
• Guide students in constructing the table and chair based on their sketches.
• Emphasize the importance of stability and function in furniture.
• Ask students to test sitting on the chair and placing items on the table.
• Discuss the importance of functionality in furniture design.
• Prompt students to reflect on the building process.
• Discuss any challenges faced and how they were overcome.
Week 3: Evaluation and Sharing
Objective:
Assess student understanding of stability and design in furniture. Develop communication skills through sharing and presentation.
Duration: 45 minutes
S# Phase Duration Details
1 Evaluation 20 minutes
2 Sharing and Presentation 20 minutes
3 Feedback and Reflection 5 minutes
• Students work individually to answer the questions.
• Each student presents their table and chair to the class.
• Discuss the principles of stability and design in furniture.
• Invite classmates to provide feedback on the presentations.
• Students reflect on what they learned and enjoyed during the project.
Answer Key
Q# Answer
1 Students might use cubes or cuboids for the table and chair.
2 The hardest part could vary, but it might involve achieving stability and comfort.
3 Functional furniture should serve its purpose and be comfortable.
4 Share:
Discuss the importance of well-designed furniture in our daily lives.
5 Extension:
For an extension activity, challenge students to design and build a complete room layout with furniture.