
TEACHER GUIDE
Preface
Welcome to the STEM Innovators Handbook! This comprehensive guide is designed to ignite the spark of curiosity and empower young learners to become the problem-solvers and innovators of the future. Built upon the foundation of the Cambridge Science Curriculum, Next Generation Science Standards, and Common Core Mathematics, this handbook seamlessly integrates science, technology, engineering, and mathematics to provide a holistic learning experience.
In today's rapidly changing world, it is crucial for students to develop a strong foundation in STEM disciplines and cultivate the skills necessary to tackle the complex challenges facing humanity. By exploring STEM principles in a hands-on and practical manner, students can reinforce their classroom learning and connect it to real-world problems. Each project presented in this handbook has been carefully crafted to reinforce core concepts learned in the classroom. From building circuits to constructing models, from coding programs to designing experiments, these projects provide a platform for learners to engage in experiential learning and develop a maker mindset.
Furthermore, this handbook goes beyond traditional subject boundaries by connecting the projects to the United Nations Sustainable Development Goals (SDGs). By fostering an understanding of the SDGs and encouraging learners to reflect on their projects, we aim to instil a sense of purpose and inspire young innovators to create solutions that contribute to a sustainable future. The projects in this handbook encourage learners to think critically about the societal and environmental challenges we face and how their innovative ideas can make a positive impact.
One of the key objectives of this handbook is to develop technological literacy. By engaging with technology and exploring its applications, learners gain essential skills for the digital age. Through coding, robotics, data analysis, and other technological tools, students develop the confidence and competence to navigate the ever-evolving technological landscape. As learners progress through the projects in this handbook, they will develop problemsolving skills, critical thinking abilities, collaboration, and creativity. The process of designing, testing, and iterating will become second nature, empowering students to approach challenges with resilience and adaptability.
We invite educators, parents, and students to embark on this exciting journey of exploration and innovation. Together, let us nurture the STEM innovators of tomorrow equipped with the knowledge, skills, and passion to shape a sustainable future for all. May this handbook be your guide to unlocking the vast potential within each young mind and inspiring them to make a difference in our world.
Happy innovating!
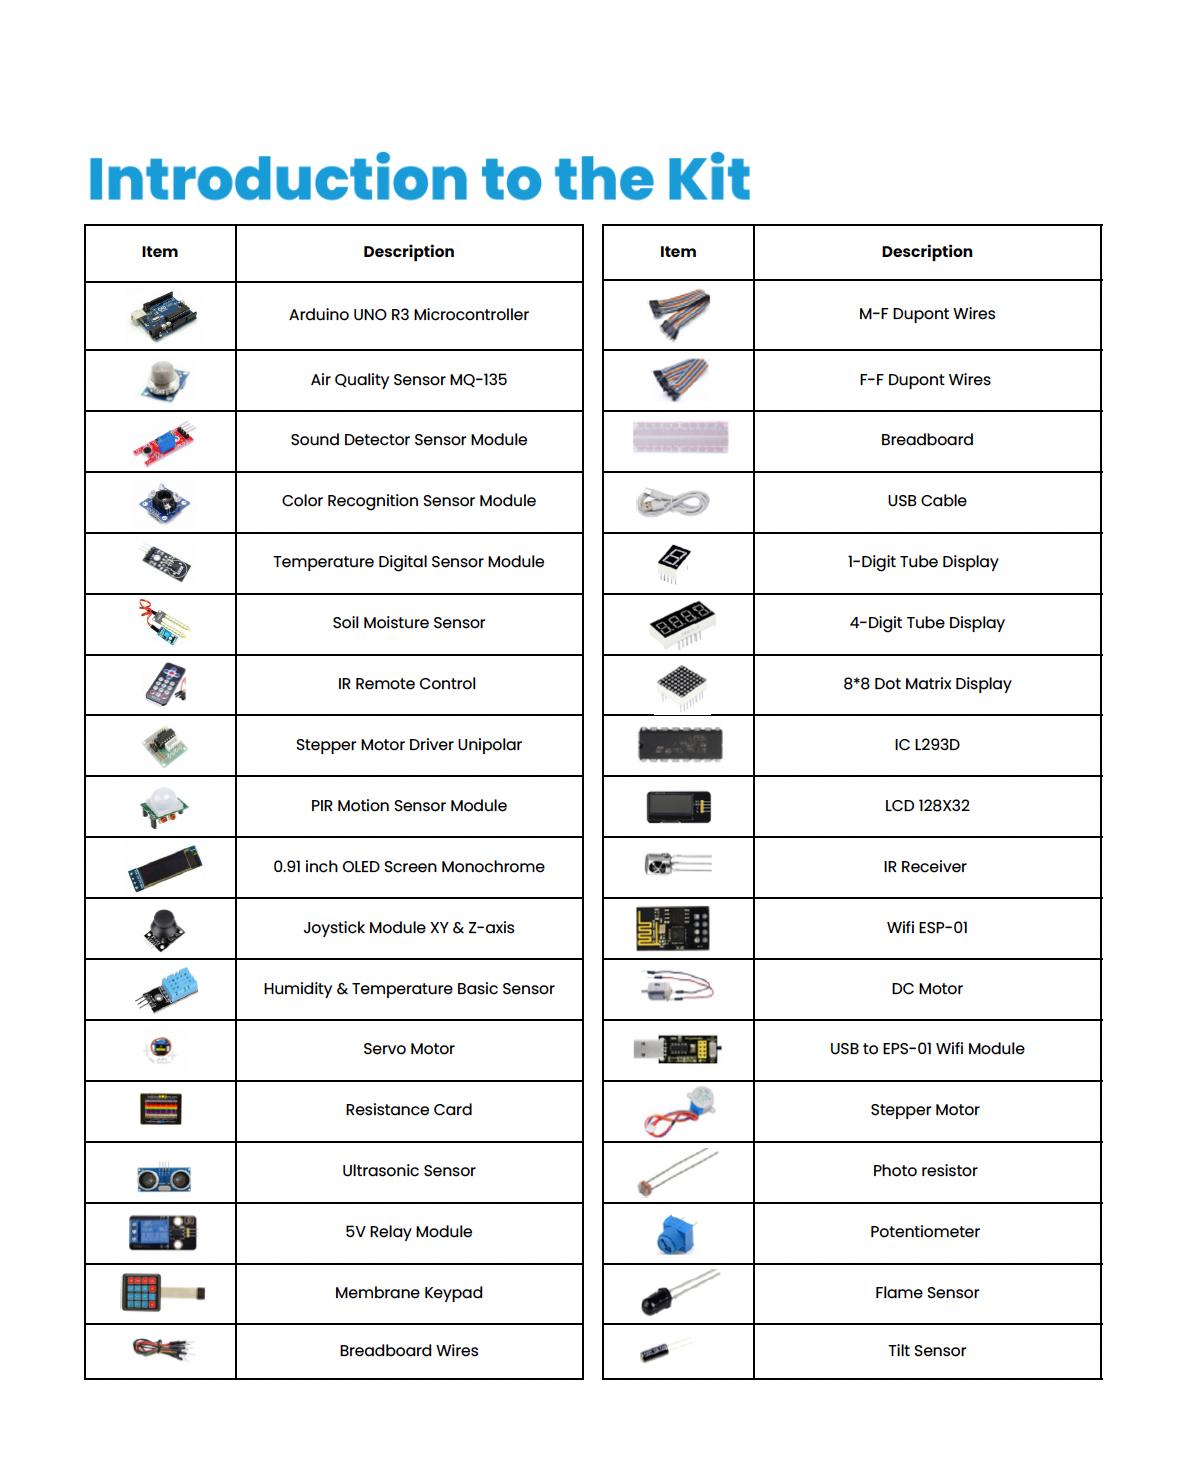
Introduction to the Kit
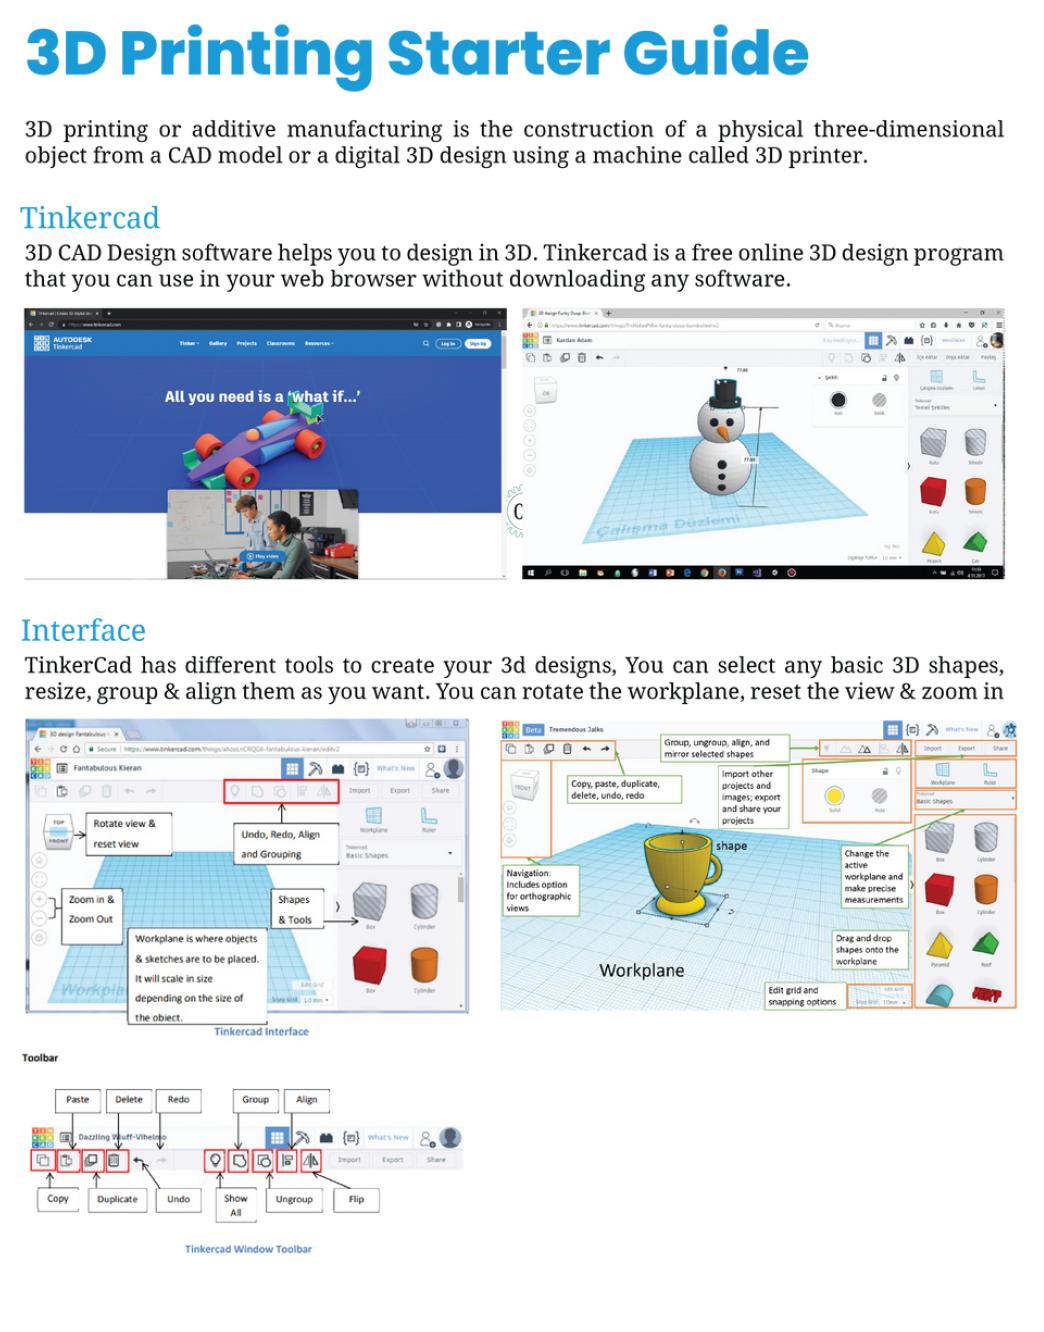
3D Printing Starter Guide
App


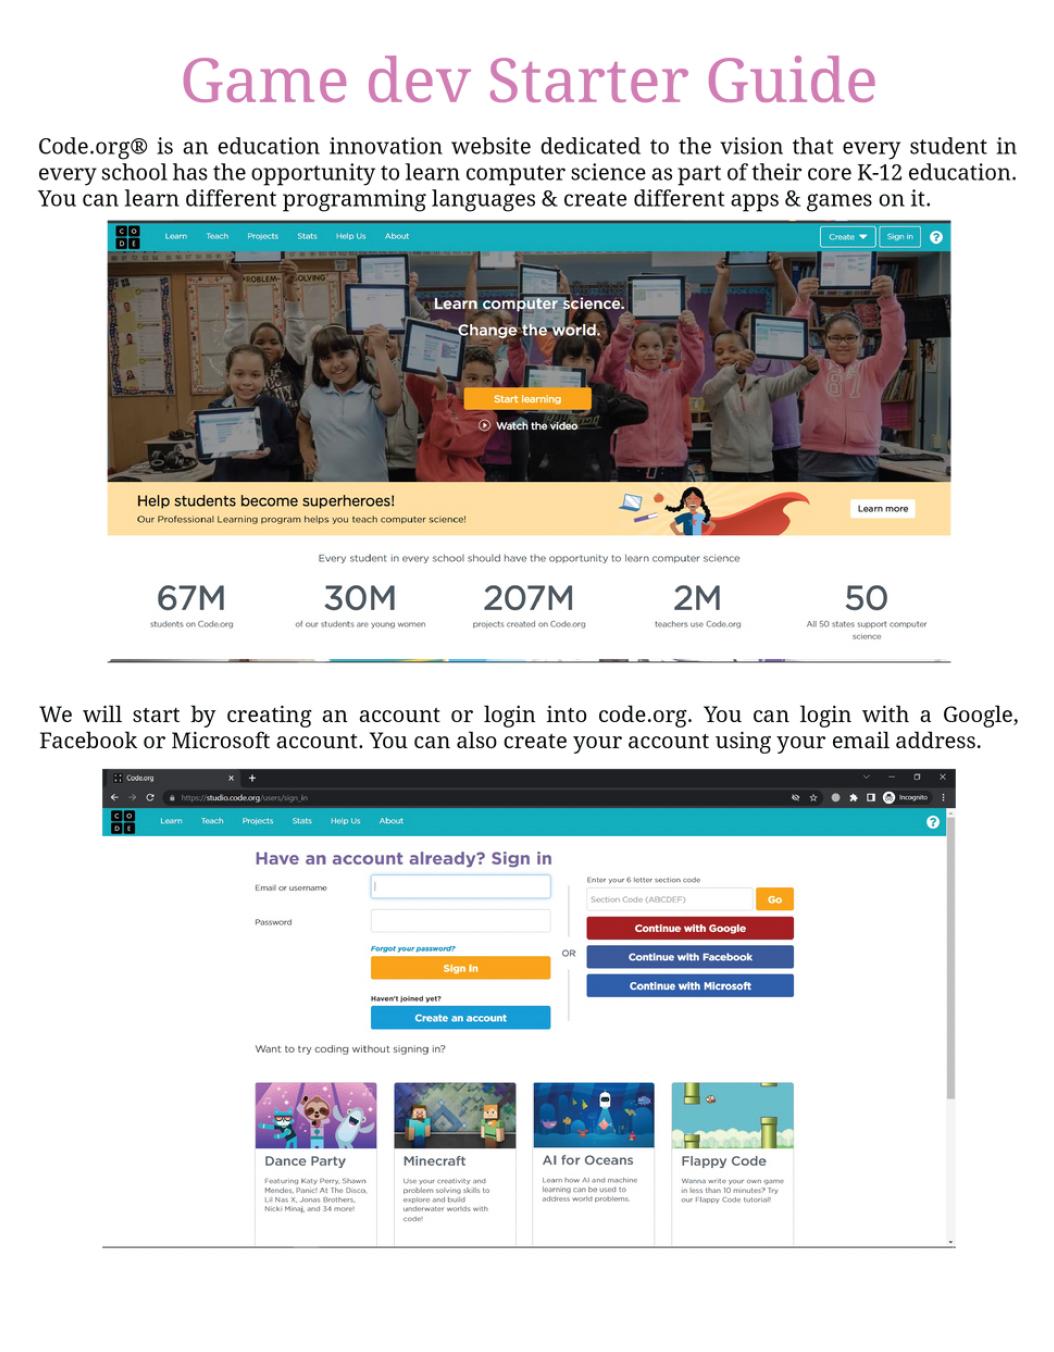
Game Development Starter Guide
Understanding the Structure of the Project
Alignment with the Sustainable Development Goals

NGSS Curriculum Linkage
Cambridge Science Curriculum Linkage
Technology Connection
Engineering Connection
Common Core for Mathematics Curriculum Linkage

Learning tools to use of the project.
Learning outcomes of the project.
Introduction to the project.

List of Materials requirement to complete the project.
Steps to follow to complete the project.


Curricular assessment for reinforcing core concepts.
Reflection is for the student to link back their learning to solving this particular sustainable development goal.

Alignment of Sustainable Development Goals
Sustainable Development Goals (SDGs) are a set of 17 global goals adopted by all United fic targets to be achieved by being for all at
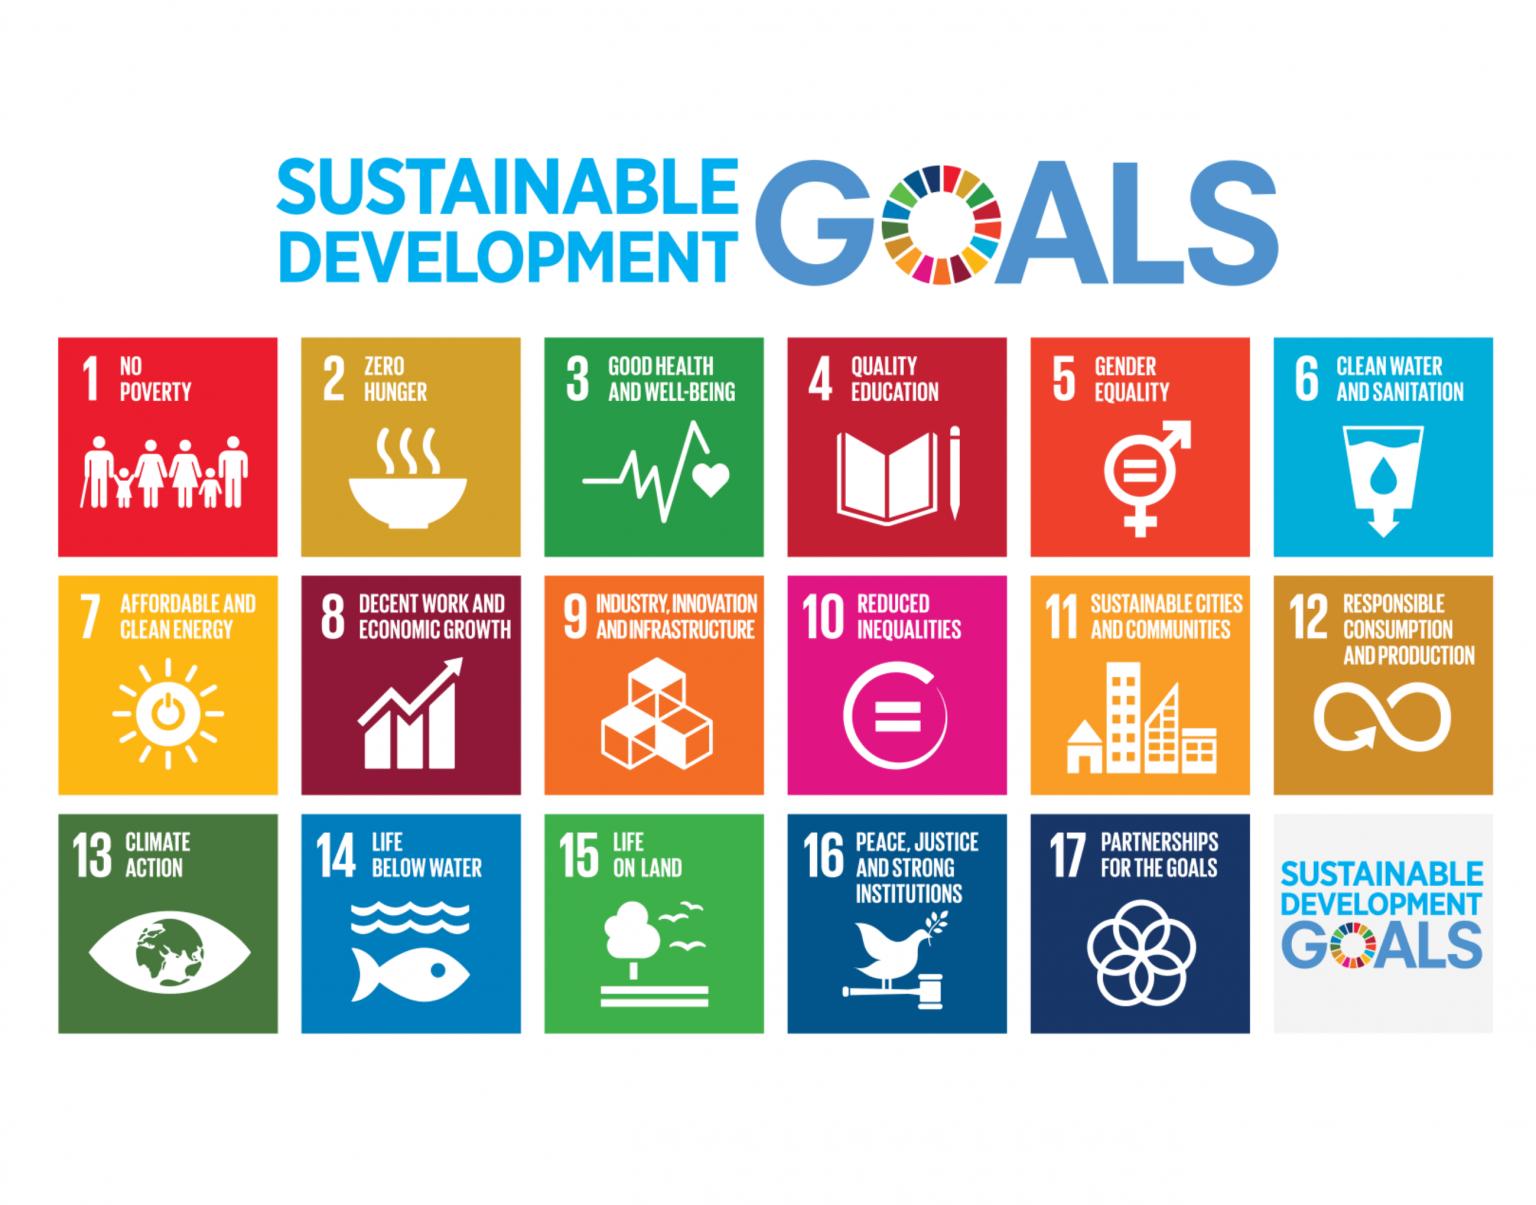
Ensure inclusive and equitable quality education and promote lifelong learning opportunities for all. empower all women and
Ensure access to affordable, reliable, sustainable, and
Promote sustained, inclusive, and sustainable economic growth, full and productive employment,
Build resilient infrastructure, promote inclusive and nable industrialization, and foster innovation.
Take urgent action to combat climate change and its urces for sustainable development.
Protect, restore, and promote sustainable use of terrestrial ecosystems, halt deforestation, and combat desertification and biodiversity loss.
peaceful and inclusive societies for sustainable development, provide access to justice for all, and build effective, accountable, and inclusive institutions at all levels.
Partnerships for Strengthen the means of implementation and revitalize the Global Partnership for Sustainable Development.
Now, let's see how the students' projects can be linked to these SDGs:
When students design projects using Arduino, Tinkercad, MIT App Inventor, and code.org for game development, they can focus on creating solutions that tackle real-world problems related to sustainable development. For example, they could create smart home systems that conserve energy (SDG 7 - Affordable and Clean Energy) or design a game that educates players about sustainable consumption and production (SDG 12 - Responsible Consumption and Production).
In DIY science materials projects, students can explore eco-friendly materials and develop alternatives to single-use plastics or other harmful materials, contributing to SDG 12 (Responsible Consumption and Production) and SDG 14 (Life Below Water).
Linking their projects to specific SDGs requires critical thinking and understanding of the global challenges we face today. For instance, students could create an app that helps raise awareness about endangered species and the importance of biodiversity conservation (SDG 15 - Life on Land).
Students can also focus on projects that address local community needs and align them with relevant SDGs. For instance, they might develop a water monitoring system to improve access to clean water in their community, which supports SDG 6 (Clean Water and Sanitation).

Encouraging students to consider the SDGs when designing their projects will help them understand the broader context of their work and how their technological and scientific skills can contribute to building a more sustainable and equitable world. This approach also empowers them to become responsible global citizens who actively engage with the challenges facing our planet.
Requirements for the makerspace
Creating an effective makerspace for conducting the STEM Innovators handbook projects requires careful consideration of the necessary equipment and space requirements. Here's a list of the essential items and recommended space allocation for the makerspace:

Computers
Internet Access
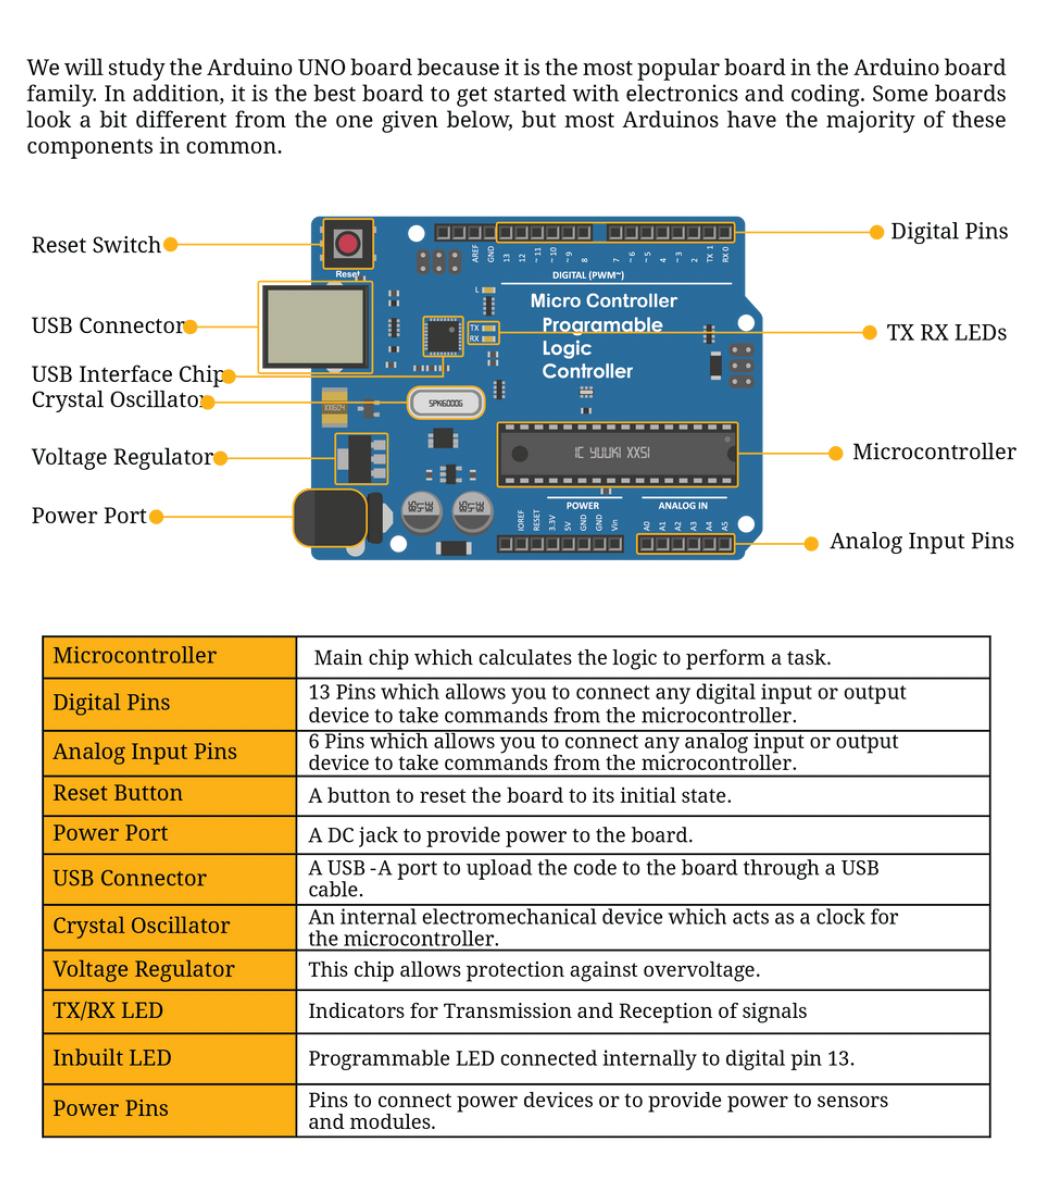
Arduino Kits
3D Design Tools
App Development Tools
The makerspace should be equipped with an adequate number of computers to support the use of digital tools like Tinkercad, MIT App Inventor, and code.org for game development. Depending on the number of students participating simultaneously, a computer-tostudent ratio of 1:3 or 1:4 is recommended.
A reliable internet connection is crucial for accessing online resources, software updates, and project research. Ensure that the internet connection is fast and stable to accommodate multiple users.
Since the projects involve using Arduino, it's essential to have a sufficient number of Arduino kits and accessories, such as sensors, motors, and breadboards. Aim for a ratio of at least 1 Arduino kit per 3-4 students to facilitate collaborative work.
For 3D design using Tinkercad, students will need access to design software and a 3D printer. Make sure the 3D printer(s) are in good working condition and capable of handling the complexity of the students' designs.
Provide access to computers and mobile devices for app development using MIT App Inventor. If possible, offer Android and iOS devices to allow students to test their apps on both platforms.
Game Development Tools
Tables and Chairs
Multimedia Resources
Storage Solutions
Safety and Prototyping Area
Access to computers and internet-enabled devices will be required for game development using code.org.
Arrange sturdy tables and comfortable chairs that accommodate individual and group work. Adjustable chairs are preferred, as they cater to students of different heights.
Install multimedia resources, such as projectors or smartboards, to facilitate presentations and demonstrations during project sharing and discussions.
Incorporate storage areas or cabinets to organize the tools, equipment, and student projects properly.
Allocate a designated space for hands-on work, prototyping, and experimenting. This area should have safety equipment, like safety goggles and fire extinguishers, as well as tools for cutting, soldering, and assembling projects.
Recommended Space Allocation:
The ideal size of the makerspace depends on the number of students and the available budget. However, a general guideline is to allocate at least 20-30 square feet per student. For example, if the makerspace is intended to accommodate 20 students, the total space required would be approximately 400-600 square feet.
Additionally, consider the layout to ensure an open and flexible environment that promotes collaboration and creativity. Create different zones for different activities, such as a computer station, 3D printing area, and prototyping space. Also, leave some space for group discussions and project presentations.
Lastly, consider the availability of power outlets and proper ventilation to support the equipment and ensure the comfort of the students and teachers in the makerspace.
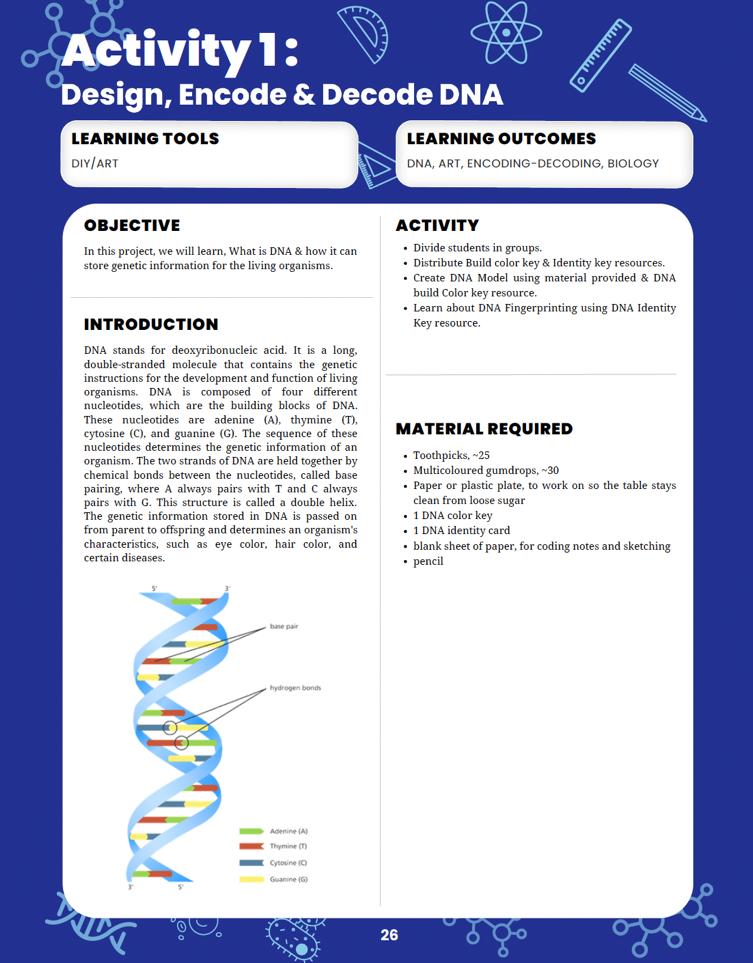
Introduce the concept of DNA and its structure. Students build a simple DNA model using toothpicks and gumdrops following the color key. Discuss the function of DNA and how it stores and transmits genetic information. Studentsfunction relationship in their
Explore the diversity of DNA sequences. Students calculate the number of different DNA sequences possible with 24 nucleotides and the four possible bases (A, T, C, G).
Introduce the project and the use of Arduino. Students set up the
Understandin g the conservation of mass, analyzing experimental data.
Weighing scale, vinegar, baking soda, balloon, graduated cylinder.
Session 3: Discuss the implications of eco-friendly choices and how the AIbased product identifier contributes to climate action.
Session 1: Introduce the concept of the conservation of mass. Students set up the experiment to determine if water conserves mass during a phase shift.
Session 2: Conduct the experiment, measure and record the weight changes of water during phase changes.
Session 3: Analyze the data and discuss how understanding weight changes in water during phase changes contributes to sustainable water management.
Session 1: Introduce the concept of concentration and its measurement. Students design a device using a smartphone to measure the concentration of fruit juice.
Session 2: Collect data on juice concentration using the device and analyze the
Discuss the understanding concentration and its relation to healthy choices and sustainable
Introduce the color sorting machine project. Students learn about color sensors and their function in color
Build the color sorting machine using TCS3200 color sensor and
Test and optimize the color sorting machine, analyze its performance, and discuss its impact on
sustainable industry and innovation.
Session 1: Introduce the concept of magnetic linear accelerators. Students build a Gauss rifle.
Session 2: Investigate the interactions of magnetic fields in the Gauss rifle and analyze the projectile's acceleration.
Session 3: Discuss gender equality in STEM and encourage equal participation in innovative projects.
Session 1: Introduce the gesture-controlled RGB desk lights project. Students learn about proximity sensors and their function.
Session 2: Build the gesturecontrolled RGB desk lights using Arduino and proximity sensor.
Session 3: Test and optimize the device, discuss its contribution to inclusivity and equal access to technology for individuals with disabilities.
Session 1: Introduce the catapult machine project. Students learn about the principles of motion and forces.
3D design software, TinkerCad.
Weights, weight balance model.
Session 2: Design the catapult machine using TinkerCad and explore different modifications to enhance its performance.
Session 3: Analyze the results of the catapult's performance and discuss the use of sustainable materials in the construction process.
Session 1: Introduce the concept of balanced forces and weight balance models. Students set up the weight balance model.
Session 2: Explore how different weight placements affect the balance and motion of the model.
Develop the resistance calculator app
Discuss the role of resistance in electrical circuits and how the app assists users in calculating
Introduce the Space Invader game project. Students learn about game development tools and amming concepts.
Design and develop the Space Invader game, incorporating space
Test and play the game, discuss how it promotes innovation and
Curriculum Mapping
S # Project
1 Project 1: DNA & GENES
The project aims to introduce students to DNA's structure and function, gene encoding, and genetic diversity.
MS-LS1-1 (Structure and Function)Students will explore the structure of DNA and its role in storing genetic information.
Structure and FunctionThis project aligns with the curriculum' s focus on understand ing the structure and function of biological systems.
8.NS (Number System)Students may analyze nucleotide combinatio ns and calculate the number of possible DNA sequences.
15 (Life on Land)Students will reflect on how understandi ng genetic information contributes to biodiversity conservatio n and preservatio n.
2 Project 2: BIOTECHNOL OGY
Students will design a pulse oximeter using Arduino to detect oxygen levels in blood, promoting health awareness.
MS-ETS1-3 (Engineering Design)This project emphasizes the engineering process to develop a pulse measuring device.
Life ProcessesThe project aligns with the curriculum' s focus on understand ing the human body's functions.
8.NS (Number System)Students may analyze and compare pulse data to assess the device's accuracy.
3 (Good Health and Well-being) - Students will reflect on how the pulse measuring device contributes to promoting good health.
3 Project 3: ECOLOGY
Students will develop an AI-based product identifier to differentiat e between ecofriendly products
MS-ETS1-4 (Engineering Design)This project involves iterative testing and refining of an AI-based product identifier.
Life ProcessesThe project aligns with the curriculum' s focus on ecosystems and environme ntal awareness.
8.NS (Number System)Students may analyze data to calculate the percentage of correctly identified products.
13 (Climate Action)Students will reflect on how the product identifier addresses climate change challenges.
4
5
Project 4: STATES OF MATTER
and pollutants.
Students will investigate the principle of conservati on of mass during a phase change of water.
MS-PS1-4 (Chemical Reactions)Students explore the conservation of matter during changes in states of matter.
Changes to MaterialsThe project aligns with the curriculum' s focus on changes in states of matter.
8.EE (Expression s and Equations)Students may calculate the weight of water after a phase change.
6 (Clean Water and Sanitation)Students will reflect on how understandi ng weight changes of water contributes to clean water goals.
6
Project 5: CHEMICAL REACTIONS
Students will design a device to measure the concentrat ion of a juice using a smartphon e and light interaction
MS-PS1-2 (Chemical Reactions)The project emphasizes analyzing properties of substances.
Properties of MaterialsThe project aligns with the curriculum' s focus on properties of materials.
8.EE (Expression s and Equations)Students may analyze concentrati on-related data.
4 (Quality Education)Students will reflect on how the device promotes education and awareness about healthy choices.
7
Project 6: LIGHT & WAVE
Students will create a color sorting machine using Arduino and a color sensor TCS3200.
MS-ETS1-1 (Engineering Design)This project involves designing a color sorting machine with constraints.
Properties of MaterialsThe project aligns with the curriculum' s focus on light and color.
8.EE (Expression s and Equations)Students may analyze data related to color sorting success rate.
9 (Industry, Innovation, and Infrastructu re)Students will reflect on how the color sorting machine contributes to sustainable industry and innovation.
Project 7: MAGNETISM
Students will build a MS-PS2-5 (Forces and Electricity and 8.F (Functions) 5 (Gender Equality) -
8 Project 8: GESTURE DEVICE
magnetic linear accelerator and explore the interaction of magnetic fields.
Motion)Students will understand the interaction between magnets and projectiles.
Magnetism - The project aligns with the curriculum' s focus on magnetism. - Students may graph the relationship between distance and the number of magnets. Students will reflect on promoting equal opportuniti es for both genders in STEM.
9 Project 9: MOTION
Students will create a gesturecontrolled RGB desk light using Arduino and proximity sensor.
Students will 3D design a catapult machine using TinkerCad and investigate its performan ce.
1 0 Project 10: BALANCED FORCES Students will use materials to create a balanced weight model and explore its stability.
PS4.A (Waves and Electromagn etic Radiation)Students will explore how the proximity sensor detects gestures.
MS-ETS1-2 (Engineering Design)This project involves iterative design improvemen ts for the catapult.
MS-PS2-2 (Forces and Motion)Students will understand the forces acting on the weight balance model.
Light and Sound - The project aligns with the curriculum' s focus on light and color.
8.EE (Expression s and Equations)Students may explore the principles of color addition and subtraction . 10 (Reduced Inequality)Students will reflect on how the device promotes inclusivity and equal access to technology.
Forces and EnergyThe project aligns with the curriculum' s focus on forces.
8.G (Geometry) - Students may calculate angles of projectile launch. 12 (Responsibl e Consumptio n and Production) - Students will reflect on using sustainable materials in 3D modeling.
Forces and EnergyThe project aligns with the curriculum' s focus on forces.
8.G (Geometry) - Students may solve equations to balance weight distribution . 11 (Sustainable Cities and Communitie s)Students will reflect on how the weight balance model
1 1
Project 11: ENERGY
Students will explore potential and kinetic energy by designing a paper plane launcher.
MS-PS3-1 (Energy)The project involves understandi ng energy transformati on during launch.
Planet Earth - The project aligns with the curriculum' s focus on energy.
8.NS (Number System)Students may analyze flight data.
contributes to sustainabilit y.
7 (Affordable and Clean Energy)Students will reflect on how the paper plane launcher promotes clean energy.
1 2
1 3
Project 12: AGRICULTUR AL TECHNOLOGY
Students will create a smart plant monitor using Arduino to monitor temperatu re, humidity, and soil moisture.
MS-LS2-1 (Ecosystems)
- The project emphasizes understandi ng interactions in ecosystems.
Structure and
FunctionThe project aligns with the curriculum' s focus on plant structures and functions.
8.SP (Statistics and Probability) - Students may analyze data collected by the plant monitor.
15 (Life on Land)Students will reflect on how the plant monitor contributes to sustainable land use.
Project 13: PRESSURE IN FLUIDS
Students will design a waterpowered rocket to explore fluid pressure principles.
MS-PS2-5 (Forces and Motion)The project involves understandi ng fluid pressure's impact on rocket motion.
Forces and EnergyThe project aligns with the curriculum' s focus on forces.
8.SP (Statistics and Probability) - Students may analyze rocket flight data.
7 (Affordable and Clean Energy)Students will reflect on how the waterpowered rocket promotes clean energy.
1 4
Project 14: RESISTANCE
Students will create a resistance calculator
MS-PS2-3 (Forces and Motion)The project involves Electricity and Magnetism - The project
8.EE (Expression s and Equations)Students 9 (Industry, Innovation, and Infrastructu re) -
app to calculate resistor values based on color codes. understandi ng electrical resistance. aligns with the curriculum' s focus on electrical properties. may explore algebraic expressions for resistance calculations . Students will reflect on how the app promotes innovation in electronics.
1 5 Project 15: SPACE PHYSICS Students will develop a space invader game to explore space physics concepts.
MS-ESS1-3 (Earth in Space) - The project involves understandi ng celestial objects' impacts on gameplay dynamics.
Earth in Space - The project aligns with the curriculum' s focus on celestial objects.
8.SP (Statistics and Probability) - Students may analyze game accuracy data.
9 (Industry, Innovation, and Infrastructu re)Students will reflect on how the game promotes technologic al advanceme nt and inclusive access to entertainm ent.
As a teacher, you can use this detailed curriculum mapping to plan and structure your lessons, ensuring alignment with the NGSS, Cambridge Science Curriculum, and Common Core Mathematics standards. Additionally, encourage students to reflect on each project's connection to Sustainable Development Goals, fostering an understanding of the real-world applications and impacts of their STEM projects. Use formative and summative assessments to gauge students' understanding and progress throughout the projects. Finally, provide opportunities for students to collaborate, experiment, and iterate on their designs, fostering a holistic and enriching STEM learning experience.
Project-Wise Lesson Plan and Answer key
DNA&GENES

OBJECTIVES
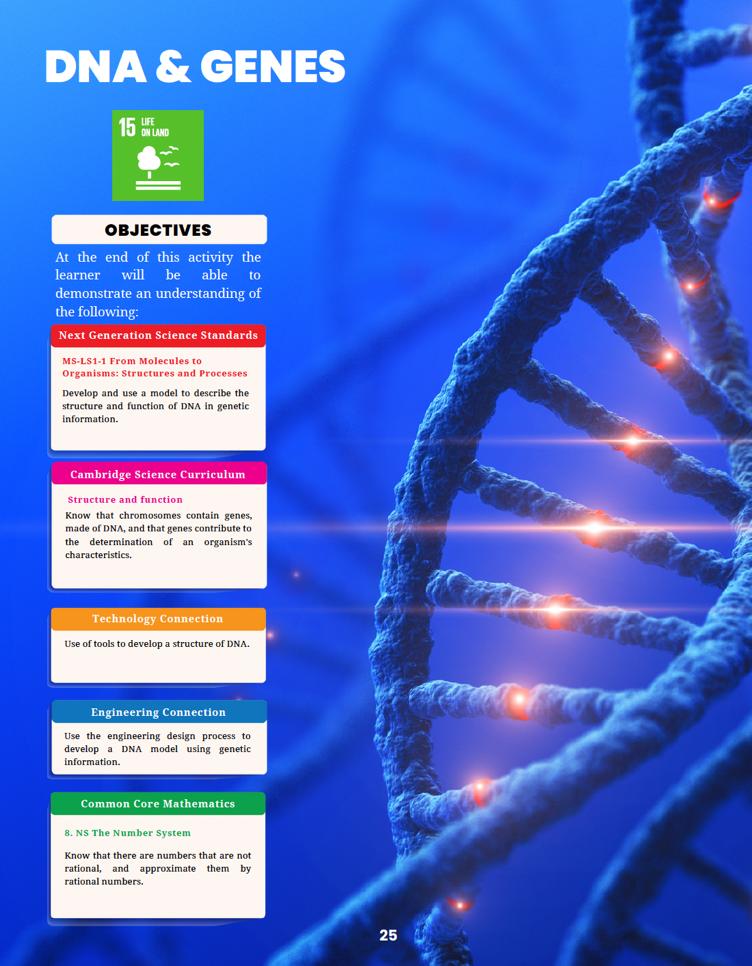
At the end of this activity the learner will be able to demonstrate an understanding of the following:
Next Generation Science Standards
MS-LS1-1 From Molecules to Organisms: Structures and Processes
Develop and use a model to describe the structure and function of DNA in genetic information.
Cambridge Science Curriculum
Structure and function
Know that chromosomes contain genes, made of DNA, and that genes contribute to the determination of an organism's characteristics.
Technology Connection
Use of tools to develop a structure of DNA.
Engineering Connection
Use the engineering design process to develop a DNA model using genetic information.
Common Core Mathematics
8 NS The Number System
Know that there are numbers that are not rational, and approximate them by rational numbers.
Lesson Plan: DNA & GENES (Project 1)
Week 1 - Introduction & Model Building
Objective: Understand the structure of DNA and begin the construction of a DNA model. Duration: 45 minutes
S# Phase Duration Details
1 Introduction 10 minutes
2 Discussion 5 minutes
3 Activity: Building DNA Model 25 minutes
4 Wrap up 5 minutes
5 Homework
• Introduce the importance of DNA in living organisms.
• Show a simple video or illustration of DNA's structure and function.
• Engage students with the question: "Why is DNA sometimes called the blueprint of life?"
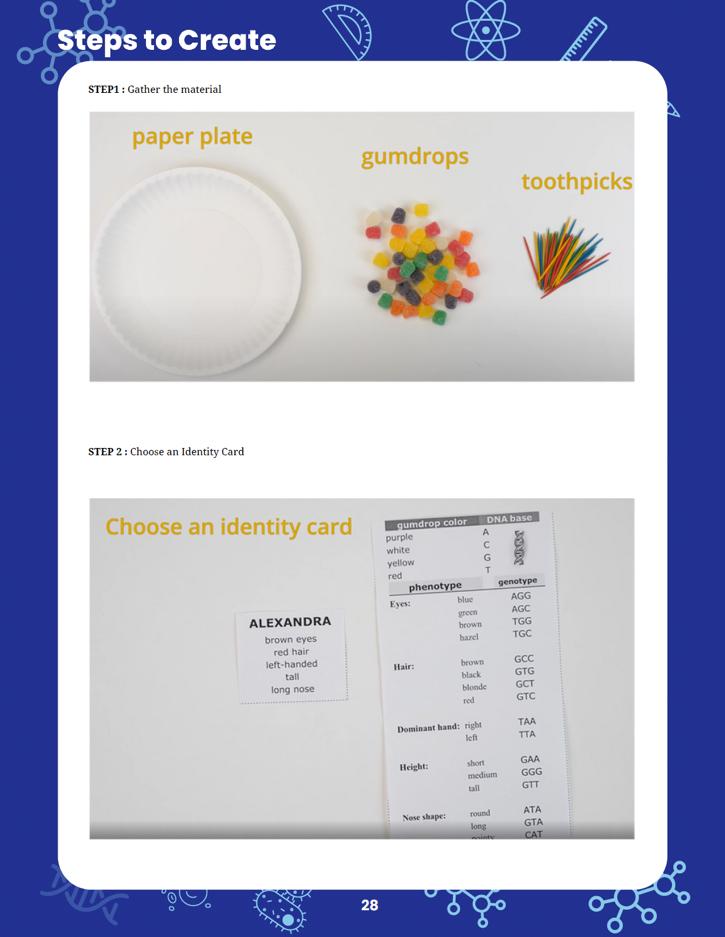
• Distribute materials.
• Explain the DNA color key and how the four bases (A, T, C, G) pair up.
• Start building the DNA model using toothpicks and gumdrops.
• Note: If students do not finish, they can continue in the next session.
• Discuss the importance of getting the base pairs right and how errors can lead to mutations.
• Research more about DNA's role in determining the unique characteristics of an organism.
Week 2 - Analysis & Mathematics
Objective: Analyze the built DNA model and explore the mathematical combinations possible with the model.
Duration: 45 minutes
S# Phase Duration Details
1 Activity Continued 10 minutes
2 Discussion & Analysis 10 minutes
3 Mathematics of DNA 20 minutes
• Allow students to finish their DNA models if they haven't already.
• Engage students with the first evaluation question, encouraging them to observe their model and discuss the structure-function relationship.
• Introduce the concept of permutations.
• Using the provided mathematical standard, guide students through the process of calculating how many different DNA sequences can be formed with 24 nucleotides and four possible bases.
• Discuss the importance of this diversity in DNA sequences.
4 Wrap up 5 minutes
5 Homework
• Review the importance of accurate DNA replication.
• Prepare a reflection on the importance of understanding DNA for biodiversity and ecosystems.
Week 3 - Reflection & Presentation
Objective: Reflect on the role of DNA in biodiversity and prepare for a presentation. Duration: 45 minutes
S# Phase Duration Details
1 Reflection Discussion 10 minutes
• Begin with the reflection question. Discuss in groups of 3-4 and share insights.
• Draw the connection between genetic diversity and the Sustainable Development Goal 15 (Life on Land).
2 Presentation Preparation 25 minutes
• Guide students in preparing a brief presentation on their DNA models.
• Ensure students highlight:
o The process of building their model.
o Their answers to the evaluation questions.
o Connection to the sustainable development goals.
3 Mock Presentations 5 minutes
4 Wrap up 5 minutes
5 Homework
Q# Answer
• If time allows, let 1 or 2 groups present to give others an idea and receive feedback.
• Discuss the importance of public speaking and taking constructive feedback positively.
• Finalize presentations for next week.
Answer Key
1 The structure of DNA with its double helix allows it to protect the genetic code within. The bases (A, T, C, G) pair up in specific combinations, which ensures accurate replication. This structure also allows DNA to be packed efficiently into chromosomes.
2 The information in the genes (specific sequences of A, T, C, G) directly determines the proteins an organism will produce. These proteins play a vast range of roles and determine the organism's traits and characteristics.
3 If each nucleotide can be one of four bases, then the number of possible sequences for a chain of 24 nucleotides is 4^24 = 2.8 x 10^14 different sequences.
4 Reflection:
Understanding DNA's role helps us appreciate the importance of genetic diversity in preserving ecosystems. Genetic diversity allows populations to adapt to changes in their environment, ensuring long-term survival. This ties directly into SDG 15, emphasizing the importance of conserving biodiversity for the health of the planet.
BIOTECHNOLOGY

OBJECTIVES
At the end of this activity the learner will be able to demonstrate an understanding of the following:
Next Generation Science Standards
MS-ETS1-3 Engineering Design
Analyze data from tests to determine similarities and differences among several design solutions to identify the best characteristics of each that can be combined into a new solution to better meet the criteria for success.
Life processes
8Bp.03
Discuss how human growth, development and health can be affected by lifestyle, including diet and smoking.
Use of Arduino and pulse sensor to develop a device.
Use the engineering design process to develop a device that can measure pulse of a human body.
Cambridge Science Curriculum Technology Connection Engineering Connection Common Core Mathematics
8 NS The Number System
Know that there are numbers that are not rational, and approximate them by rational numbers.
Lesson Plan: BIOTECHNOLOGY (Project 2)
Week 1 - Understanding and Planning
Objective: Introduce students to the concepts of pulse, oxygen levels, and infrared technology. Begin the planning stage for the Arduino-based pulse-measuring device. Duration: 45 minutes
S# Phase Duration Details
1 Introduction 10 minutes
2 Pulse & Oxygen Level 10 minutes
3 Infrared Technology & Pulse Oximetry 10 minutes
4 Brainstorming & Planning 15 minutes
5 Homework
• Brief the students about the project's objectives and its alignment with the mentioned curriculums.
• A short video/presentation explaining how oxygen levels in the blood are related to pulse and why they are important health indicators.
• Explanation of how infrared light can detect oxygen levels in blood.
• Divide students into groups and let them brainstorm on the project requirements and planning. They should make a list of required materials and sketch a simple design of their Arduino-based pulse measuring device.
• Students are to research about Arduino and pulse oximeter, and come up with a rough prototype design.
Week 2 - Designing and Building
Objective: Start building the Arduino-based pulse measuring device.
Duration: 45 minutes
S# Phase Duration Details
1 Review 5 minutes
2 Building Session 25 minutes
3 Feedback and Improvement 5 minutes
4 Homework
Week
• Brief recap of last week's lesson.
• Students, in their groups, will begin building their designs using Arduino, infrared sensors, and other necessary components. Teacher moves around to guide and assist.
• Quick feedback session on the day’s progress.
• Finalize their designs and test the basic functionality of their device.
3 - Testing, Evaluating, and Reflecting
Objective: Test the created device, compare it to existing methods, and evaluate its efficiency.
Duration: 45 minutes
S# Phase Duration Details
1 Testing Session 15 minutes
2 Evaluation 10 minutes
3 Reflection 15 minutes
4 Closing 5 minutes
5 Homework
Q# Answer
• Students test their devices by measuring their pulse and compare with a manual pulse measurement.
• Discuss the given evaluation questions in the classroom.
• Question 4: Guide students to convert BPM to BPS by dividing by 60. For 80 BPM, it is = 1.33 BPS.

• Engage in a class discussion about the importance of good health and how their device promotes it by providing data on an individual's health.
• Appreciate students' efforts and encourage them to think of other STEM applications that align with the Sustainable Development Goals.
• Write a short essay on the entire project experience, challenges faced, and how they believe their device contributes to promoting good health.
Answer Key
1 Students should compare their device's results with other methods. They should mention if the results are close to manual measurement or commercial pulse monitors. They should also discuss the possible error margins.
2 Possible improvements can be a more ergonomic design, longer battery life, easy-toread display, wireless data transfer, and integration with mobile apps for tracking.
3 Data from the device can indicate heart health. Lifestyle factors like diet and smoking have direct effects on heart rate and oxygen levels in the blood. A consistent deviation from the average could indicate health issues that are influenced by these factors.
4 1.33 BPS.
5 Reflection:
Students should discuss how continuous monitoring can help in early detection of possible health issues, creating awareness, and emphasizing the importance of maintaining good health. 80 60
ECOLOGY

OBJECTIVES
At the end of this activity the learner will be able to demonstrate an understanding of the following:
Next Generation Science Standards
MS-ETS1-4 Engineering Design
Develop a model to generate data for iterative testing and modification of a proposed object, tool, or process, such as the AI-based product identifier, to ensure it meets criteria for success.
Cambridge Science Curriculum
Life processes
8Bp.03
Discuss how human growth, development and health can be affected by lifestyle, including diet and smoking.
Technology Connection
Use of Artificial Intelligence to develop a eco-friendly product identifier.
Engineering Connection
Use the engineering design process to develop a device that can identify a ecofriendly products.
Common Core Mathematics
8 NS The Number System
Know that there are numbers that are not rational, and approximate them by rational numbers.
Lesson Plan: ECOLOGY (Project 3)
Week 1 - Introduction & Data Collection
Objective: Understand the basics of AI, classifiers, and the need for accurate data collection.
Duration: 45 minutes
S# Phase Duration Details
1 Introduction to AI 10 minutes
2 Introduction to the project 5 minutes
3 Exploration of classifier.appinventor.mit.edu 10 minutes
4 Data Collection 15 minutes
• Brief overview of AI.
• How AI can differentiate between various items.
• Brief about the system students will develop.
• The importance of eco-friendly products.
• How to use the platform.
• Understand the concept of training a classifier.
• Brainstorm with students about what characteristics make an item eco-friendly vs. a pollutant.
• Discuss the importance of a balanced dataset. Students should understand the need to have data for both eco-friendly products and pollutants.
• Begin data collection. This could be pictures or descriptions of products.
5 Wrap up 5 minutes
5 Homework
• Discuss the importance of AI.
• Continue collecting data for the AI system. Try to gather at least 10 examples of each type.
Week
2 - AI Training & Testing
Objective: Familiarize students with the training process of AI and test the initial version of their product identifier.
Duration: 45 minutes
S# Phase Duration Details
1 Data Review 5 minutes
2 Training the AI 10 minutes
• Discuss the data students have collected.
• Emphasize the importance of diverse and unbiased data.
• Using classifier.appinventor.mit.edu, students will upload their collected data.
• Walk students through the training process.
3 Testing the AI 15 minutes
4 Group Discussion 5 minutes
5 Wrap-up 5 minutes
4 Homework
• Initial testing of the product identifier.
• Make notes of where the AI correctly identifies and where it makes mistakes.
• Discuss the initial results.
• Emphasize that AI systems need refinement and may not be perfect initially.
• Encourage students to think about the questions that will be evaluated next week.
• Refine data collection based on testing results. Remove any ambiguous or unclear data and add more clear examples.
Week 3 - Evaluation & Reflection
Objective: Evaluate the effectiveness of the AI-based product identifier and reflect on its impact regarding sustainable development goals.
Duration: 45 minutes
S# Phase Duration Details
1 Review & Final Testing 15 minutes
2 Evaluation 15 minutes
3 Reflection 10 minutes
4 Wrap-up & Forward Thinking 5 minutes
• Discuss any refinements made during the previous week.
• Conduct final testing of the AI system with a new set of products.
• Discuss the questions:
o Data collection and iterative testing.
o Promotion of healthier lifestyle choices and relation to pollutants.
o Calculate percentage of correctly identified products.

• Discuss how the AI-based product identifier contributes to addressing climate change and sustainable consumption.
• Importance of Climate Action in daily life.
• Encourage students to think of other applications of AI in promoting sustainability.
• Conclude the lesson, emphasizing the importance of sustainable choices and technological solutions.
Answer Key
Q# Answer
1 Data Collection & Analysis: Students should discuss the iterative process of collecting clear images, refining based on AI feedback, and making necessary improvements.
2 Promoting Healthier Choices:
The AI system helps in making informed decisions about product consumption, reducing exposure to pollutants, and encouraging the use of eco-friendly products.
3 Percentage of Correctly Identified Products:
4 Reflection:
Students should highlight the role of AI in promoting awareness about climate change and driving behavior towards sustainable consumption. They should emphasize the potential impact on larger scale applications.
STATESOFMATTER

OBJECTIVES
At the end of this activity the learner will be able to demonstrate an understanding of the following:
Next Generation Science Standards
MS-PS1-4 Matter and its Interactions
Develop a model to describe that the total weight of matter is conserved when it undergoes a change in state, such as water changing from a solid to a liquid or a gas.
Cambridge Science Curriculum
Changes to materials
Know that some processes and reactions are endothermic or exothermic, and this can be identified by temperature change.
Technology Connection
Use tools to experiment with the change in the state of matter.
Engineering Connection
Use the engineering design process to experiment change in mass due to change in the state of matter.
Common Core Mathematics
8 EE Expressions and Equations
Analyze and solve linear equations and pairs of simultaneous linear equations.
Lesson Plan: STATES OF MATTER (Project 4)
Week 1: Introduction to the Principle of Conservation of Mass and Experimental Setup
Objective: Introduce the concept of conservation of mass and set up the experiment. Duration: 45 minutes
S# Phase Duration Details
1 Introduction to Conservation of Mass 10 minutes
2 Setup of Experiment 30 minutes
3 Wrap-up 5 minutes
4 Homework
• Briefly explain the principle of conservation of mass.
• Discuss why this principle is important in science and real-world applications.
• Distribute materials to students.
• Guide students to weigh an initial amount of water using the weighing scale and record its weight.
• Place this water in the freezer to change its state to solid.
• Set up a second sample for later conversion to gas using the vinegar and baking soda reaction inside the balloon.
• Ask them to find real-world examples where the conservation of mass is crucial.
• Assign students to research on states of matter and phase changes, especially focusing on the conversion between solid, liquid, and gas.
Week 2: Performing the Experiment and Data Collection
Objective: Observe the phase changes and record the data.
Duration: 45 minutes
S# Phase Duration Details
1 Discussion on States of Matter 10 minutes
2 Performing the Experiment 25 minutes
3 Reflection 10 minutes
• Students share their findings from the homework assignment.
• Briefly review the different states of matter.
• Retrieve the frozen water (now ice) and allow it to melt.
• After complete melting, weigh the water and record the weight.
• Initiate the vinegar and baking soda reaction to introduce gas into the balloon. Measure the weight before and after the reaction to infer the gas weight.
• Discuss and note any temperature changes observed during the phase changes.
• Discuss initial observations and findings.
• Set up the foundation for the next session's evaluations.
Week 3: Analysis, Evaluation, and Reflection
Objective: Analyze the data, evaluate the findings, and reflect on the implications of the experiment.
Duration: 45 minutes
S# Phase Duration Details
1 Analysis 15 minutes
2 Evaluation 20 minutes
3 Reflection 10 minutes
• Discuss the principle of conservation of mass in light of the experimental results.
• Answer the third evaluation question as a group: If the weight of a sample of water before its phase change is 500 grams and it decreases by 15% after the phase change, the weight of the water after the phase change is 425 grams. (15% of 500 grams is 75 grams, and 500 grams - 75 grams = 425 grams).
• Engage students in a discussion to answer the first two evaluation questions.
• Emphasize the real-world implications of their findings.
• Discuss the importance of understanding the weight changes of water during a phase change in relation to ensuring clean water and sanitation (Sustainable Development Goal 6).
• Encourage students to think about how their knowledge can be applied to real-world situations to benefit society.
Answer Key
Q# Answer
1 The experiment shows that the weight of water remains constant (or close to constant, barring experimental errors) when it undergoes a phase shift, which supports the principle of conservation of mass.
2 If there's a change in temperature during the phase change, it indicates that energy is either being absorbed (endothermic) or released (exothermic) during the phase change.
3 425 grams.
4 Reflection:
Understanding the weight changes of water during phase changes can inform processes and technologies that manage water resources, purification systems, and waste treatment. This understanding ensures efficient and sustainable practices that can contribute to the goals of clean water and sanitation.
CHEMICALREACTIONS

OBJECTIVES
At the end of this activity the learner will be able to demonstrate an understanding of the following:
Next Generation Science Standards
MS-PS1-2 Matter and its Interactions
Analyze and interpret data on the properties of substances before and after they interact to determine if a chemical reaction has occurred.
Cambridge Science Curriculum
Properties of materials
8Cp.01 Understand that the concentration of a solution relates to how many particles of the solute are present in a volume of the solvent.
Connection
Use Arduino App to measure the contration in solutions.
Use the engineering design process to develop a device which can measure the concentration of solutions.
8 EE Expressions and Equations
Analyze and solve linear equations and pairs of simultaneous linear equations.
Lesson Plan: CHEMICAL REACTIONS (Project 5)
Week 1: Introduction and Set-up
Objective: Familiarize students with the project, its objectives, and materials. Get started with setting up the experiment.
Duration: 45 minutes
S# Phase Duration Details
1 Introduction 10 minutes
• Brief overview of the project.
• Introduce the scientific concept of concentration, solubility, and light interaction with substances.
• Connect the project to the specific standards (NGSS MS-PS1-2, Cambridge Science Curriculum, and Common Core Mathematics 8. EE) and Sustainable Development Goal 4.
2 Material Exploration 15 minutes
3 Experimental Set-up 15 minutes
4 Homework
• Display and introduce each material to students.
• Discuss the purpose of each item in the context of the project.
• Demonstrate how to set up the smartphone, torch, and the drinking glasses.
• Show how to dilute the fruit juice to various concentrations using the cooking jug and spoon.
• Explain the use of the green filter in the experiment.
• Research and jot down notes about light's interaction with solutions of varying concentrations.
Week 2: Data Collection and Interpretation
Objective: Guide students to conduct the experiment and gather data. Begin interpretation of results.
Duration: 45 minutes
S# Phase Duration Details
1 Review 5 minutes
2 Data Collection 25 minutes
• Quick recap of Week 1.
• Address any questions about homework.
• Allow students to shine the torch through glasses with different juice concentrations, noting observations on the Science Journal app.
• Guide students to measure and note the changes in light intensity or any color shifts when light passes through different concentrations.
3 Data Interpretation 10 minutes
4 Homework
• Discuss what they observed.
• Introduce the relationship between concentration and the number of solute particles.
• Attempt to answer the first three evaluation questions based on the data collected.
Week 3: Analysis and Reflection
Objective: Dive deeper into analysis, address evaluation questions, and reflect on the broader implications.
Duration: 45 minutes
S# Phase Duration Details
1 Mathematics Integration 15 minutes
2 Group Discussion 15 minutes
3 Reflection 10 minutes
4 Homework
• Discuss the mathematical concept of concentration (percentage) and its application to real-world situations.
• Solve the problem: "The concentration of a fruit juice sample is 30%. If you have 250 milliliters of the juice, how many milliliters of the juice are actual solute particles?"
• Group students and let them discuss and share their answers to the evaluation questions.
• Encourage groups to challenge each other's conclusions for a comprehensive understanding.
• Discuss the Sustainable Development Goal 4.
• Guide students to reflect on how the device can contribute to promoting quality education and awareness about healthy choices.
• Write a detailed report about the entire project including objectives, methodology, findings, analysis, and reflection.
Answer Key
Q# Answer
1 The device uses the light from the torch and observes how it passes through the juice. A change in concentration could affect the amount of light passing through. Observations may include differences in brightness or color intensity.
2 This interaction helps understand the properties of substances, specifically how they interact with light. Based on measurements, one could infer that higher concentration solutions might allow less light to pass through or change the color intensity.
3 Concentration refers to the amount of solute (in this case, juice particles) present in a solution. A higher concentration means more solute particles are present in the liquid.
4 30% of 250 milliliters is 0.30 × 250, which equals 75 milliliters. So, 75 milliliters of the juice are actual solute particles.
5 Reflection:
The device, by measuring juice concentration, can provide valuable data regarding the authenticity and quality of fruit juices. This directly contributes to quality education by teaching students about health, nutrition, and the importance of making informed decisions regarding their food and drink choices. It also emphasizes the importance of transparency and awareness in food production, leading to healthier societies.
LIGHT&WAVE

OBJECTIVES
At the end of this activity the learner will be able to demonstrate an understanding of the following:
Next Generation Science Standards
MS-ETS1-1 Engineering Design
Define the criteria and constraints of a design problem with sufficient precision to ensure a successful solution, taking into account relevant scientific principles and potential impacts on people and the natural environment.
Cambridge Science Curriculum
Properties of materials
8Ps.04 Describe how colours of light can be added, subtracted, absorbed and reflected.
Technology Connection
Use Arduino and colour sensor to differentiate object by colour.
Engineering Connection
Use the engineering design process to develop a colour sorting device.
Common Core Mathematics
8 EE Expressions and Equations
Analyze and solve linear equations and pairs of simultaneous linear equations.
Lesson Plan: LIGHT & WAVE (Project 6)
Week 1: Introduction and Understanding the Colour Sensor
Objective: Understand the basics of color absorption, reflection, and introduce the TCS3200 sensor, Arduino, and their functionalities.
Duration: 45 minutes
S# Phase Duration Details
1 Introduction 10 minutes
2 Color Theory 10 minutes
3 Understanding the TCS3200 Color Sensor 15 minutes
4 Overview of the Components 5 minutes
5 Assignment 5 minutes
• Briefly introduce the project: color sorting machine.
• Highlight the relevance of Sustainable Development Goal 9.
• Explain the basics of color: primary and secondary colors.
• Introduce the concepts of color absorption and reflection.
• Introduction to the sensor: how it functions and detects color.
• Practical: Show a pre-set color sensor in action.
• how and explain each component: TCS3200, servo motors, and Arduino board.
• In pairs or groups, students should start brainstorming and sketching the design of their color sorting machine.
Week 2: Building the Machine
Objective: Assemble the color sorting machine and begin coding with Arduino. Duration: 45 minutes
S# Phase Duration Details
1 Group Discussion 10 minutes
2 Hands-on Building 20 minutes
3 Introduction to Arduino Coding 10 minutes
4 Homework
• Discuss designs sketched during the previous session.
• Finalize the design and assemble components.
• Guide students to build the color sorting machine using the TCS3200 sensor, servo motors, and Arduino board.
• Basic introduction to the Arduino environment.
• Show pre-set code for sorting colors.
• Students should finalize the assembly at home (if feasible) or gather and save their progress for next week.
Week 3: Finalizing and Evaluating
Objective: Finalize coding, test the machine, and evaluate based on set criteria.
Duration: 45 minutes
S# Phase Duration Details
1 Finalizing Arduino Code 15 minutes
2 Machine Testing 15 minutes
3 Discussion & Evaluation 10 minutes
4 Reflection 5 minutes
• Guide students to finalize coding for their color sorting machine.
• Discuss calibration and testing of the sensor.
• Each group tests their color sorting machine with a mix of colored balls.
• Observe, note discrepancies, and make necessary adjustments.
• Reflect on the test results and answer evaluation questions.
• Discuss the machine's contribution to Sustainable Development Goal 9.
Answer Key
Q# Answer
1 Students should highlight the efficiency and speed of the machine, reducing human error and speeding up the sorting process. They should consider energy consumption, potential waste produced by wrongly sorted items, and the machine's long-term durability.
2 The TCS3200 sensor contains photodiodes with filters that allow it to detect red, green, blue, and no filter (clear). It measures the intensity of reflected light of each color, allowing it to differentiate between colors.
3 When a colored ball is placed under the sensor, it reflects light. Depending on the ball's color, it will absorb some wavelengths (colors) and reflect others. The sensor detects these reflected wavelengths, allowing it to determine the ball's color.
4 75% of 120 balls = 0.75 × 120 = 90 balls were sorted correctly.
5 Reflection:
The color sorting machine aids in promoting sustainable industry by automating and improving efficiency in sorting tasks, reducing human error and resource waste. It showcases innovation in combining various technologies (sensors, microcontrollers, motors) for practical applications. The machine's adaptability and potential for scale signify the strength of infrastructure.
MAGNETISM

OBJECTIVES
At the end of this activity the learner will be able to demonstrate an understanding of the following:
Next Generation Science Standards
MS-PS2-5 Motion and Stability: Forces and Interactions
Conduct an investigation and evaluate the experimental design to provide evidence that fields exist between objects exerting forces on each other even though the objects are not in contact.
Cambridge Science Curriculum
Electricity and magnetism
8Pe.01 Describe a magnetic field, and understand that it surrounds a magnet and exerts a force on other magnetic fields.
Technology Connection
Use tools to create a prototype of magnetic linear accelerator.
Engineering Connection
Use the engineering design process to develop a magnetic linear accelerator.
Common Core Mathematics
8 F Functions
Use functions to model relationships between quantities.
Lesson Plan: MAGNETISM (Project 7)
Week 1: Understanding Magnetism and Introduction to the Gauss Rifle
Objective: Introduce the concept of magnetism, and familiarize students with the parts and basic function of a Gauss rifle (magnetic linear accelerator).
Duration: 45 minutes
S# Phase Duration Details
1 Introduction to Magnetism 10 minutes
2 Demo of Gauss Rifle 5 minutes
3 Parts of a Gauss Rifle 10 minutes
4 Group Discussion 10 minutes
5 Hands-on Activity 10 minutes
6 Homework
• Brief lecture on magnetism, covering north and south poles, and how like poles repel while opposite poles attract.
• Showcase a pre-made Gauss rifle and demonstrate its function.
• Neodymium Earth Magnets
• Steel Balls
• Tape
• Scale (for measuring distance traveled)
• Ask students to hypothesize how the Gauss rifle works.
• Let students experiment with the Neodymium Earth Magnets and Steel Balls, observing their interactions.
• Research on how magnetic fields interact and the concept of a magnetic linear accelerator.
Week 2: Building the Gauss Rifle and Observing its Function
Objective: Equip students with the knowledge and skills to build their own Gauss rifle, and begin preliminary experiments.
Duration: 45 minutes
S# Phase Duration Details
1 Step-by-Step Building of Gauss Rifle 20 minutes
2 Experimentation 15 minutes
3 Graphing Discussion 5 minutes
• Provide each student or group with materials.
• Guide them through the process of arranging magnets and steel balls to create a basic Gauss rifle.
• Students test their Gauss rifles, using different numbers of magnets.
• Encourage students to note how the number of magnets affects the distance the steel ball travels.
• Introduce the idea of plotting their results on a graph.
• Briefly explain the relationship between variables (number of magnets vs. distance traveled).
4 Wrap-up and Homework Assignment
• Students are to collect data on the relationship between the number of magnets used and the distance the projectile travels.
• Plot their findings on a graph for next week’s session.
Week 3: Evaluating, Reflecting, and Addressing SDG 5
Objective: Review and discuss students' findings, answer evaluation questions, and delve into a reflection on gender equality in STEM fields.
Duration: 45 minutes
S# Phase Duration Details
1 Discussion of Results 15 minutes
2 Evaluation Q&A 10 minutes
3 Reflection on SDG 5 15 minutes
4 Wrap-up 5 minutes
• Students present their graphs.
• Discuss patterns observed, leading into the answer to the evaluation question 1.
• Address the two evaluation questions, drawing from students' experiences and observations. Teachers can refer to the answer key provided below for guidance.
• Introduction to Sustainable Development Goal 5: Achieve gender equality and empower all women and girls.
• Class discussion: How can we ensure equal opportunities in STEM for all genders?
• Encourage students to think about how they might make STEM fields more welcoming to everyone.
• Recap the main points from the project.
• Encourage students to further explore magnetism and other STEM fields, emphasizing the importance of inclusion and diversity.
Answer Key
Q# Answer
1 The magnetic field of the magnets in a magnetic linear accelerator attracts the steel ball (projectile). As the projectile approaches the magnet, it accelerates. When it hits the magnet, this energy is transferred through the chain of magnets and balls until it reaches the end, launching the final ball at a higher speed. This demonstrates the conservation of energy.
2 The graph should be a linear or near-linear increase in distance traveled with the addition of more magnets. This shows the cumulative effect of magnetic acceleration. However, after a certain point, there may be diminishing returns as other factors like friction come into play.
Reflection:
Promote environments where both genders are given equal encouragement, resources, and opportunities to participate. Challenge gender stereotypes and biases that may deter girls from engaging in STEM. Ensure that curriculum and teaching methods are inclusive, and encourage collaborative projects that foster teamwork and mutual respect.
GESTUREDEVICE

OBJECTIVES
At the end of this activity the learner will be able to demonstrate an understanding of the following:
Next Generation Science Standards
PS4.A: Wave Properties
Develop and use a model to describe that waves are reflected, absorbed, or transmitted through various materials.
Cambridge Science Curriculum
Light and sound
8Ps.04 Describe how colours of light can be added, subtracted, absorbed and reflected.
Technology Connection
Use Arduino to create a gesture control device.
Engineering Connection
Use the engineering design process to develop a device that can convert gestures into light energy.
Common Core Mathematics
8 EE Expressions and Equations
Analyze and solve linear equations and pairs of simultaneous linear equations.
Lesson Plan: GESTURE DEVICE (Project 8)
Week 1: Introduction to Gesture Control & Setting Up the Device
Objective: Introduce students to the concept of gesture control and provide a foundation for how RGB LEDs work.
Duration: 45 minutes
S# Phase Duration Details
1 Introduction 10 minutes
2 Explanation of RGB LEDs 10 minutes
3 Hands-on Activity 20 minutes
4 Conclusion 5 minutes
• Explanation of the project and its objectives.
• Discuss gesture control and its real-world applications.
• How Red, Green, and Blue LEDs can mix to produce different colors.
• Demonstrate color addition and subtraction principles.
• Students start building the base of their gesture-controlled desk light using Arduino.
• Initial setup: Connecting the Arduino, the RGB LED, and the proximity sensor.
• Summarize what they've learned.
• Assign readings/homework about the principles of light and sound from the Cambridge Science Curriculum.
Week
2: Programming and Mathematical Integration
Objective: Introduce students to the programming required for gesture control and integrate mathematical concepts.
Duration: 45 minutes
S# Phase Duration Details
1 Introduction to Programming 10 minutes
2 Hands-on Activity: Programming 20 minutes
3 Integration of Math 10 minutes
4 Conclusion 5 minutes
• Quick overview of the Arduino programming environment.
• Introduction to the code that reads gestures from the proximity sensor and how it can be used to control RGB LEDs.
• Students will input the code to their Arduino setups.
• They will test their code, seeing if swiping their hand over the proximity sensor changes the LED color.
• Introduce the expression 3n + 2.
• Students calculate how many gestures are required for different numbers of lights.
• Discuss how the mathematical expression helps in real-world scenarios, like controlling larger setups.
• Assign a reading/homework on NGSS PS4.A.
Week 3: Evaluation and Reflection
Objective: Evaluate the students' projects and reflect on its broader societal impacts.
Duration: 45 minutes
S# Phase Duration Details
1 Group Presentations 20 minutes
2 Discussion 10 minutes
3 Reflection on UN SDG 10 10 minutes
4 Conclusion 5 minutes
• Students present their projects to the class.
• They explain how the proximity sensor converts gestures to electrical signals and subsequently controls the LEDs.
• Discuss principles of color addition, subtraction, absorption, and reflection demonstrated in their project.
• Discuss how such gesture-controlled devices can promote inclusivity and equal access to technology for individuals with disabilities or limited mobility.
• Reiterate the importance of such technological innovations.
• Encourage students to think of other applications for the technologies they've learned.
Answer Key
Q# Answer
1 The proximity sensor uses infrared light to detect objects (like a hand) nearby. When an object comes near, the sensor outputs a varying voltage, which the Arduino reads. The Arduino then converts this signal into a command to change the RGB LED's color.
2 Principles Demonstrated:
• Addition: Combining different color LEDs (Red, Green, Blue) can produce new colors, like purple, yellow, and cyan.
• Subtraction: Removing one color (e.g., turning off the blue LED) from white light produces different colors.
• Absorption: When LED light hits a surface, certain colors might be absorbed, changing the color appearance.
• Reflection: Shiny or white surfaces will reflect most of the LED light, maintaining its color.
3 Given 3n + 2 where n = 10 lights, the expression becomes 3(10) + 2 = 30 + 2 = 32 gestures.
4 Reflection:
The gesture-controlled device can be particularly beneficial for those with disabilities or limited mobility as they may struggle with traditional methods of device interaction. By reducing the reliance on fine motor skills and replacing it with broad gestures, technology becomes more accessible. This aligns with UN SDG 10 by
reducing inequalities and ensuring that technological advancements benefit everyone in society.
MOTION

OBJECTIVES
At the end of this activity the learner will be able to demonstrate an understanding of the following:
Next Generation Science Standards
MS-ETS1-2 Engineering Design
Evaluate competing design solutions using a systematic process to determine how well they meet the criteria and constraints of the problem.
Forces and energy
Identify and calculate turning forces (moment = force x distance).
Cambridge Science Curriculum Technology
Use 3D designing tools to create a catapult.
Use the engineering design process to develop a catapult using the principle offorce and motion.
8 G Geometry
Solve real-world and mathematical problems involving volume of cylinders, cones, and spheres.
Lesson Plan: Motion (Project 9)
Week 1: Introduction and Basics of Catapult Design
Objective: Understand the concept of catapults, their history, and relevance in terms of forces and energy.
Duration: 45 minutes
S# Phase Duration Details
1 Introduction 10 minutes
2 Catapult Dynamics 15 minutes
3 Tinkercad Basics 15 minutes
4 Assignment 5 minutes
5 Homework
• Brief students on the project.
• Discuss the historical significance of catapults.
• Describe the basic physics behind catapults. Introduce the concepts of tension, moment, and force.
• Show a few examples of different types of catapult designs (trebuchet, onager, ballista).
• Introduce students to Tinkercad.
• Demonstrate basic operations: creating objects, scaling, rotating, and combining shapes.
• Ask students to sketch a basic design of a catapult on paper.
• Begin researching sustainable materials that can be used in a real-world construction of a catapult.
Week 2: Designing the Catapult in Tinkercad
Objective: Begin the 3D design of the catapult in Tinkercad. Understand the importance of the angle of elevation for launching a projectile.
Duration: 45 minutes
S# Phase Duration Details
1 Recap 5 minutes
2 Designing the Catapult 30 minutes
3 Assignment 10 minutes
• Review the principles discussed in the previous class.
• Discuss any findings from their homework on sustainable materials.
• Students will begin their 3D designs on Tinkercad.
• Remind students to consider the launching mechanism and angle of elevation.
• Circulate the classroom, assisting students and providing feedback.
• Ask students to finalize their design and to consider what materials they'd use if it were to be made in real life.
4 Homework
• Research the UN SDG 12 (Responsible Consumption and Production) to prepare for the reflection in week 3.
Week 3: Evaluation, Calculations, and Reflection
Objective: Evaluate the designs, understand the dynamics of the catapults, and reflect on sustainable production.
Duration: 45 minutes
S# Phase Duration Details
1 Evaluation 15 minutes
• Discuss the evaluation questions:
o Modifications or improvements for their designs.
o Comparison of their design to existing ones.
• Introduce the concept of 'moment' or turning force produced by tension.
2 Calculations 15 minutes
3 Reflection 10 minutes
4 Feedback and Closing 5 minutes
5 Homework
• Introduce the formula for calculating the angle of elevation using trigonometry.
• Given a height and horizontal distance (which can be hypothetical or based on a test launch of a virtual projectile), students calculate the angle.
• Discuss UN SDG 12 and its goals.
• Students reflect on how their catapult design, if made using sustainable methods and materials, can contribute to the goals.
• Appreciate students for their efforts.
• Provide feedback on notable designs and ideas.
• Write a brief report (1-2 pages) summarizing their experience, what they learned, and how they see the role of sustainable design in future projects.
Answer Key
Q# Answer
1 Answers will vary but might include streamlining the design, adjusting the tension mechanism, or optimizing the launching base for stability.
2 Answers will vary based on individual designs. Ideal answers should discuss accuracy, distance, and stability with reference to existing catapult designs.
3 The moment or turning force in the catapult arm is due to the tension in the elastic or string. As this tension is released, it provides the force necessary to launch the projectile.
4 Students use trigonometric ratios (tanθ = opposite/adjacent) to determine the angle of elevation. Given a height (opposite) and horizontal distance (adjacent), the angle θ can be calculated using an arctan function.
Reflection:
The Using sustainable materials ensures a reduction in waste, conservation of natural resources, and less environmental impact. Producing catapults, or any product, sustainably can significantly contribute to responsible consumption and production, a key aspect of UN SDG 12.
BALANCEDFORCES
OBJECTIVES
At the end of this activity the learner will be able to demonstrate an understanding of the following:
MS-PS2-2 Motion and Stability: Forces and Interactions
Plan an investigation to provide evidence that the change in an object’s motion depends on the sum of the forces on the object and the mass of the object.
Next Generation Science Standards Cambridge Science Curriculum
Forces and energy
8Pf.03 Describe the effects of balanced and unbalanced forces on motion.
Use tools to create a balance.
Use the engineering design process to develop a a weight balance using the principles of force.
8 G Geometry
Solve real-world and mathematical problems involving volume of cylinders, cones, and spheres.
Lesson Plan: BALANCED FORCES (Project 10)
Week 1 - Understanding the Basics of Balanced
Forces
Objective: To introduce students to the concept of balanced forces and how weight distribution affects the balance.
Duration: 45 minutes
S# Phase Duration Details
1 Introduction 10 minutes
2 Demonstration 15 minutes
3 Hands-On Activity 15 minutes
4 Conclusion 5 minutes
• Discuss the concept of forces, specifically balanced forces.
• Explain how forces can act in opposite directions and how they can balance each other out.
• Show a simple balance and demonstrate placing weights on either side. Emphasize how equal weights lead to a balanced state.
• Provide students with materials (e.g., a ruler, string, small weights) to create a rudimentary balance.
• Students will experiment by placing different weights on each side and observe the resulting motion or lack thereof.
• Review the importance of understanding balanced forces in real-world situations.
• Introduce the assignment for the next session: Come prepared with 2-3 examples from daily life where balanced forces are in play.
Week 2 - Forces in Motion and Mathematical Representation
Objective: To analyze the effects of disrupting a balance and introduce algebraic expressions representing weight.
Duration: 45 minutes
S#
1 Review & Share 10 minutes
2 Disruption Demonstration 10 minutes
3 Mathematical Representation 15 minutes
• Quick recap of the previous session.
• Students share the examples of balanced forces they found in daily life.
• Using the balance from the previous session, show what happens when weights are added or removed. Discuss the forces at play.
• Introduce the algebraic expressions representing weights.
• Provide students with the expressions 2x + 5 and 3x - 2.
4 Conclusion 10 minutes
• Ask students to form pairs or small groups and work on finding the value of x that balances the weights.
• Review the importance of math in representing real-world situations.
• Introduce next week's focus on the connection between balanced forces and sustainable cities.
Week 3 - Linking Balanced Forces to Sustainable Development Goals
Objective: To establish a connection between the weight balance model and the principles of UN SDG 11.
Duration: 45 minutes
S# Phase Duration Details
1 Introduction 10 minutes
2 Group Discussion 15 minutes
3 Presentation 15 minutes
4 Conclusion 5 minutes
• Discuss UN SDG 11 and its goal towards sustainable cities and communities. Highlight the importance of balance in city planning, infrastructure, and population distribution.
• Ask students to discuss in small groups how their weight balance model can metaphorically relate to creating balanced, sustainable cities.
• Some topics for discussion: balanced resource distribution, equal access to amenities, fair housing and infrastructure distribution, etc.
• Invite a few groups to share their ideas with the class.
• As a teacher, link their ideas to real-world examples of cities or communities that exemplify these balancing principles.
• Sum up the importance of balance in both physical and societal constructs.
• Encourage students to always think of how classroom lessons can connect to broader world issues.
Answer Key
Q# Answer
1 The placement of weights on each side of the balance model directly affects its stability. If the weights are equal, there will be no motion, resulting in a balanced model. If unequal, the heavier side will move downwards.
2 Disrupting the balance by adding or removing weights changes the forces acting on the model. The side with increased weight will experience a greater downward force, causing it to lower, while the other side rises.
3 For the balance to be in equilibrium:
2x + 5 = 3x - 2
=> x = 7
4 Reflection:
The model demonstrates the importance of balance. In the context of cities, this balance can be interpreted as fair resource distribution, adequate housing, and infrastructure for all residents. A balanced city ensures sustainability by preventing areas of extreme deprivation or excessive consumption, aligning with the principles of UN SDG 11.
ENERGY

OBJECTIVES
At the end of this activity the learner will be able to demonstrate an understanding of the following:
Next Generation Science Standards
MS-PS3-1 Energy
Construct and interpret graphical displays of data to describe the relationships of kinetic energy to the mass of an object and to the speed of an object.
Cambridge Science Curriculum
Planet Earth
8ESp.02 Identify renewable resources (including wind, tidal and solar power, and bioplastics) and non-renewable resources (including fossil fuels), and describe how humans use them.
Technology Connection
Use tools to develop a plane launcher.
Engineering Connection
Use the engineering design process to develop a paper plane and a launcher using the principles of energy transfer.
Common Core Mathematics
8 NS The Number System
Know that there are numbers that are not rational, and approximate them by rational numbers.
Lesson Plan: Energy (Project 11)
Week 1: Understanding Energy Types and Conversions
Objective: Introduce the concept of potential and kinetic energy, and how they get converted.
Duration: 45 minutes
S# Phase Duration Details
1 Introduction 10 minutes
2 Discussion 10 minutes
3 Activity: Basic Paper Plane Launcher 15 minutes
4 Wrap-up 10 minutes
• Begin with a short video or presentation illustrating different forms of energy (e.g. roller coaster at the peak versus during descent, a bow and arrow, a wound-up toy).
• Briefly explain NGSS MS-PS3-1, Cambridge Science Curriculum Planet Earth, and Common Core Mathematics 8. NS objectives related to the lesson.
• What is Potential Energy? Define and give examples.
• What is Kinetic Energy? Define and give examples.
• How are potential and kinetic energy related?
• Use a rubber band and cardboard to create a simple plane launcher.
• Fold a paper plane and place it on the cardboard.
• Stretch the rubber band, release, and observe the plane launch.
• Discuss what just happened in terms of energy conversion.
• Introduce the upcoming week's activity - a more intricate launcher design and understanding energy transfer better.
Week 2: Factors Affecting Kinetic Energy & Paper Plane Launcher Enhancement
Objective: Explore factors affecting kinetic energy transfer and enhance the paper plane launcher.
Duration: 45 minutes
S# Phase Duration Details
1 Discussion 10 minutes
2 Activity: Enhancing the Plane Launcher 20 minutes
• Revisit the energy concepts from Week 1.
• Introduce factors that can influence kinetic energy like angle and force.
• Discuss ways to modify the launcher for better distance or accuracy.
3 Group Discussion 10 minutes
4 Wrap-up 5 minutes
• Using paper clips, tape/stapler, and other available materials, encourage students to modify their launchers.
• Launch paper planes using varying angles and force to see changes in distance.
• Share observations.
• Discuss which launcher design and launch angle seemed the most effective.
• Discuss the implications of their findings in terms of energy conversion.
• Preview next week's session: connecting the project with sustainable practices and math concepts.
Week 3: Sustainability, Math Integration & Reflection
Objective: Understand the importance of renewable resources, apply math concepts, and reflect on the project in the context of UN SDG 7.
Duration: 45 minutes
S# Phase Duration Details
1 Discussion 10 minutes
2 Math Activity 15 minutes
3 Reflection Activity 15 minutes
4 Wrap-up 5 minutes
• Discuss renewable vs. non-renewable energy sources.
• Introduce Sustainable Development Goal 7: Ensure access to affordable, reliable, sustainable, and modern energy for all.
• Present the question: If the paper plane launcher has a range of 50 feet and each foot is divided into 12 equal parts, how many equal parts does the paper plane travel if it lands 30 feet away?
• Allow students time to solve, then review the solution together.
• How does your paper plane launcher contribute to the promotion of affordable and clean energy?
• Reflect on the entire project - what they learned, its real-world applications, and its significance in the context of sustainability.
• Summarize the project's learning outcomes.
• Encourage students to continue exploring energy concepts and sustainable practices in their daily lives.
Answer Key
Q# Answer
1 Potential energy is stored in the stretched rubber band. When the rubber band is released, this potential energy gets converted into kinetic energy, propelling the paper plane forward. This is an example of energy transformation - from potential to kinetic.
2 The angle of launch will affect the trajectory of the plane - a steeper angle might result in a higher flight, but might not cover as much distance. The force applied affects how much potential energy is stored in the launcher - more force can mean a faster or farther launch. Both these factors together influence the distance the plane travels.
3 Using renewable resources, such as solar or wind power, reduces emissions and environmental harm associated with non-renewable resources like fossil fuels. For the plane launcher, if it was powered by a mechanism running on electricity, using renewable sources would make it more sustainable.
4 Each foot is divided into 12 equal parts, so 30 feet would be 30 x 12 = 360 equal parts.
5 Reflection:
The paper plane launcher, while manually operated, represents the idea of energy conversion, which is a fundamental concept in creating efficient energy systems. By understanding how to optimize energy use and transfer, we can develop systems that make the most out of sustainable energy sources, aligning with the principles of UN SDG 7.
AGRICULTURALTECHNOLOGY

OBJECTIVES
At the end of this activity the learner will be able to demonstrate an understanding of the following:
Next Generation Science Standards
MS-LS2-1 Ecosystems: Interactions, Energy, and Dynamics
Analyze and interpret data to provide evidence for the effects of resource availability on organisms and populations of organisms in an ecosystem.
Cambridge Science Curriculum
Structure and function
Describe the pathway of water and mineral salts from the roots to the leaves in flowering plants, including absorption in root hair cells, transport through xylem and transpiration from the surface of leaves.
Technology Connection
Use Arduino to develop a smart plant monitoring system.
Engineering Connection
Use the engineering design process to prototype a plant monitering system.
Common Core Mathematics
8 SP Statistics and Probability
Investigate patterns of association in bivariate data.
Lesson Plan: AGRICULTURAL TECHNOLOGY (Project 12)
Week 1: Introduction to the Project and Setting up the Arduino
Objective: Understand the basics of agricultural technology and the importance of monitoring plant health. Introduce students to Arduino, Bluetooth module, and the necessary sensors (temperature, humidity, and soil moisture). Begin setting up the Arduino with the sensors.
Duration: 45 minutes
S# Phase Duration Details
1 Introduction 10 minutes
2 Understanding the Tools 15 minutes
3 Practical Session 15 minutes
4 Assignment 5 minutes
• Brief on Agricultural Technology and its relevance in the modern world.
• Introduce the objectives of the project.
• Show and explain the components: Arduino, Bluetooth module, and the sensors.
• Demonstrate how each sensor works individually.
• Students will begin by connecting their Arduino to their computers.
• Introduce them to basic Arduino programming and get them to upload a basic sketch to ensure their setups are functioning.
• Ask students to research and make notes on how temperature, humidity, and soil moisture affect plant growth.
Week 2: Gathering Data and Analyzing Its Impact
Objective: Collect real-time data using the Arduino setup. Understand the significance of each data point in relation to plant health.
S#
1 Data Collection 15 minutes
Duration: 45 minutes
• Guide students on how to collect data from the sensors.
• Ensure that all students have successfully collected some data to analyze.
2 Discussion 15 minutes
3 Practical Analysis 10 minutes
• Open a discussion based on the research assignment from the previous session. Discuss the role of temperature, humidity, and soil moisture in plant growth.
• Highlight the significance of the data they're collecting in understanding the health of plants and the ecosystem.
• Using the data collected, guide students on how to interpret it.
4 Assignment 5 minutes
• Students can make initial observations based on their data.
• Ask students to research the pathway of water absorption in plants and its transport to leaves.
Week 3: Application of Data and Reflection
Objective: Understand the deeper implications of the collected data. Reflect on the project and its contribution to SDG 15.
Duration: 45 minutes
S# Phase Duration Details
1 Data Application 15 minutes
2 Mathematical Analysis 10 minutes
3 Reflection 15 minutes
4 Assignment 5 minutes
• Dive deeper into how the data can be used to predict changes in the ecosystem.
• Discuss water absorption in root hair cells and transport through the xylem.
• Guide students to calculate the average soil moisture level from their data. Discuss its significance.
• Compare the average moisture level to a specified threshold and discuss the results.
• Open a discussion about UN SDG 15 and how this project aligns with its principles.
• Allow students to share their thoughts on how their plant monitors can promote conservation and sustainable use of terrestrial ecosystems.
• Ask students to write a brief report on the entire project, detailing their experiences, results, and reflections.
Answer Key
Q# Answer
1 Temperature, humidity, and soil moisture are essential factors determining plant health. Proper temperature ensures optimal metabolic activity, humidity affects transpiration and hydration, and soil moisture ensures nutrient and water uptake. Understanding these can provide insights into the internal and external interactions of an ecosystem.
2 The collected data can show trends and help predict future ecosystem changes. For instance, decreasing soil moisture over time might indicate a coming drought. Such changes can affect other organisms, as plants are primary producers and influence the food web.
3
Soil moisture directly impacts how root hair cells absorb water. This water moves through the xylem to the leaves, ensuring the plant receives essential nutrients. Proper soil moisture ensures optimal water and nutrient flow.
4 [For teachers: You'll need actual data here. Once the data is provided, calculate the average and compare it to a known threshold for optimal plant health.]
5 Reflection:
The smart plant monitor directly aligns with UN SDG 15 by promoting methods to monitor and ensure the health of terrestrial ecosystems. Regular monitoring can prevent over-watering or under-watering, leading to sustainable agricultural practices and conservation of resources.
PRESSUREINFLUIDS

OBJECTIVES
At the end of this activity the learner will be able to demonstrate an understanding of the following:
Next Generation Science Standards
MS-PS2-5 Motion and Stability: Forces and Interactions
Conduct an investigation and evaluate the experimental design to provide evidence that fields exist between objects exerting forces on each other even though the objects are not in contact.
Cambridge Science Curriculum
Forces and energy
8Pf.05 Explain that pressure is caused by the action of a force, exerted by a substance, on an area (pressure = force / area).
Technology Connection
Use tools to create a water powered launcher.
Engineering Connection
Use the engineering design process to develop a model of a renewable energy powered launcher.
Common Core Mathematics
8 SP Statistics and Probability
Investigate patterns of association in bivariate data.
Lesson Plan: PRESSURE IN FLUIDS (Project 13)
Week 1: Understanding the Basics of Fluid Pressure and Preliminary Design
Objective: To introduce the principles of fluid pressure, action-reaction, and the concept of a water-powered rocket.
Duration: 45 minutes
S# Phase Duration Details
1 Discussion 10 minutes
2 Demonstration 10 minutes
3 Group Activity 20 minutes
4 Wrap Up 5 minutes
• Introduction to the principle of fluid pressure and its real-world applications.
• A simple demo using a balloon filled with water and air to show the difference in pressure.
• In groups, brainstorm designs for a waterpowered rocket.
o What shape will the rocket be?
o How will the water be forced out?
o Predict how far it might travel based on the design.
• Discuss the connection between fluid pressure and Sustainable Development Goal: 7 (Affordable and Clean Energy).
Week 2: Building the Rocket
Objective: To build a functioning water-powered rocket using the principle of fluid pressure.
Duration: 45 minutes
S# Phase Duration Details
1 Review 5 minutes
2 Building Phase 30 minutes
3 Testing Phase 5 minutes
4 Wrap Up 5 minutes
• Quick recap of the principles discussed in the previous session.
• Follow step-by-step instructions to build the water-powered rocket.
o Ensure to wear safety goggles during drilling or cutting.
o Encourage students to be creative but follow safety guidelines.
• Perform a quick ground test to ensure the cork fits snugly and there are no leaks.
• Recap the day's activities and prep for next week's launches and evaluations.
Week 3: Rocket Launch and Data Collection
Objective: To understand the working of the water-powered rocket and gather data on its flight.
Duration: 45 minutes
S# Phase Duration Details
1 Rocket Launch 20 minutes • Launch rockets in an open space. Students take turns launching their rockets.
o Ensure safety precautions are followed.
o Measure the distance traveled by each rocket.
2 Data Collection and Analysis 20 minutes • Students record the flight distances.
• Create a dot plot or histogram to display data.
• Calculate mean and median flight distances.
3 Reflection and Discussion 5 minutes • Reflect on the whole project, the learning objectives achieved, and how the waterpowered rocket promotes the principles of UN SDG 7.
4 Assignment 5 minutes • Ask students to write a brief report on the entire project, detailing their experiences, results, and reflections.
Answer Key
Q# Answer
1 The rocket's motion is explained by Newton's third law of motion - every action has an equal and opposite reaction. When the pressurized water is forced out of the nozzle, it pushes the rocket in the opposite direction (upwards).
2 Water pressure, nozzle design, and rocket mass play pivotal roles. Increasing water pressure increases thrust, but too much can cause the rocket to explode. The nozzle's size influences the water's ejection speed; a smaller nozzle might increase the thrust. Rocket mass affects flight; a lighter rocket may travel further but can be less stable.
3 The force exerted by the pressurized water pushes against the rocket’s inner walls, creating a thrust in the opposite direction. As water is ejected downwards, the rocket moves upwards.
4 [Based on student data collection]. The mean represents the average flight distance, while the median provides a middle value. Analyzing these can offer insights into the rocket's consistent performance and any outliers.
5 The water-powered rocket uses the principle of harnessing energy through water pressure, promoting the idea of using clean and affordable sources for energy purposes, in line with UN SDG 7.
RESISTANCE

OBJECTIVES
At the end of this activity the learner will be able to demonstrate an understanding of the following:
Next Generation Science Standards
MS-PS2-3 Motion and Stability: Forces and Interactions
Ask questions about data to determine the factors that affect the strength of electric and magnetic forces.
Cambridge Science Curriculum
Electricity and magnetism
Calculate resistance (resistance = voltage / current) and describe how resistance affects current.
Technology Connection
Use App development tools to create calulate resistance through colour.
Engineering Connection
Use engineering design process to prototype an app that calculates resistance.
Common Core Mathematics
8 EE Expressions and Equations
Analyze and solve linear equations and pairs of simultaneous linear equations.
Lesson Plan: RESISTANCE (Project 14)
Week 1: Introduction to Resistor Color Coding & Ohm’s Law
Objective: Understand resistor colour coding. Introduction to Ohm's law.
Duration: 45 minutes
S# Phase Duration Details
1 Discussion 10 minutes
2 Resistor Color Code 20 minutes
3 Ohm's Law 10 minutes
4 Reflection 5 minutes
5 Homework
• Begin by discussing the importance of resistance in electronic circuits. Provide a simple explanation about resistors.
• Introduce the chart displaying resistor color codes. Give students resistor samples and ask them to decode the resistance using the chart.
• Introduce the formula: Resistance = Voltage / Current.
• Discuss its importance in circuits.
• Ask students to think about how resistors and resistance are important for designing sustainable electronic devices.
• Read about resistor color coding and Ohm’s law in the STEM Innovators handbook.
Week 2: Developing the Resistance Calculator App using MIT App Inventor
Objective: Understand the basics of MIT App Inventor. Develop the resistance calculator app.
Duration: 45 minutes
S# Phase Duration Details
1 MIT App Inventor Introduction 10 minutes
2 Designing the App Interface 15 minutes
3 App Development 15 minutes
4 Testing 5 minutes
5 Homework
• Brief overview of the platform and its interface.
• Guide students in creating a user-friendly interface for entering resistor colors, voltage, and current.
• Help students to set the color codes to specific resistance values and incorporate the Ohm's law formula.
• Allow students to test their apps with different resistor color codes.
• Finish and refine the resistance calculator app.
Week 3: Evaluation & Reflection
Objective: Evaluate the resistance calculator app. Reflect on the importance of the app in line with Sustainable Development Goal 9.
Duration: 45 minutes
S# Phase Duration Details
1 App Presentation 20 minutes • Ask students to present their apps, showcasing how it decodes the resistor color codes and calculates resistance using voltage and current.
2 Group Discussion 15 minutes • Discuss the evaluation questions:
o How does the app decode the resistor color codes?
o The role of resistance in a circuit.
o Using the app to determine resistor values.
o Algebraic expression for resistance calculation.
3 Reflection 10 minutes • Discuss how the app contributes to promoting sustainable and resilient infrastructure, emphasizing the UN SDG 9.
4 Homework • Write a reflection on the importance of understanding resistance for the sustainable development of technology and infrastructure.
Answer Key
Q # Answer
1 Each color on a resistor represents a specific number. Combining these color bands, the resistance value of the resistor is decoded. The app provides an interface for users to select the colors, then internally translates these colors to their numerical values and calculates the resistance.
2 Resistance opposes the flow of electrical current. It's vital for controlling the amount of current in a circuit. By knowing the resistance value, users can select the correct resistor to ensure the circuit functions correctly and safely.
3 The app offers a feature where users can input voltage and current measurements. By applying Ohm’s law (Resistance = Voltage / Current), the app calculates the resistance value.
4 5 The app helps in the precise selection of resistors which can lead to better and efficient circuit designs. Efficient circuits contribute to energy saving and long-lasting devices, aligning with the principles of sustainable and resilient infrastructure as per UN SDG 9.

SPACEPHYSICS

OBJECTIVES
At the end of this activity the learner will be able to demonstrate an understanding of the following:
Next Generation Science Standards
MS-ESS1-3. Earth's Place in the Universe
Analyze and interpret data to determine scale properties of objects in the solar system.
Cambridge Science Curriculum
Earth in space
8ESs.01 Describe a galaxy in terms of stellar dust and gas, stars and planetary systems.
Technology Connection
Use game development tools to create a game on space physics.
Use the engineering design process to develop a game involving solar system and celestial objects.
8 SP Statistics and Probability
Investigate patterns of association in bivariate data.
Lesson Plan: SPACE PHYSICS (Project 15)
Week 1: Introduction to Space Physics and Game Design
Objective: Understand the basics of space physics and how they relate to gameplay mechanics.
Duration: 45 minutes
S# Phase Duration Details
1 Introduction 10 minutes
2 Game Concept 10 minutes
3 Connection to Space Physics 15 minutes
4 Homework Assignment 5 minutes
5 Wrap-up 5 minutes
• Discuss the celestial objects in space and their movements.
o What are celestial objects?
o How do they move in space?
• Explain the Space Invader game.
o Introduce the characters: spaceship and alien.
o Explain the game mechanics: shooting the alien, moving the spaceship.
• Discuss how celestial objects like planets and stars can influence game mechanics.
• How would the presence of a planet affect the movement of the spaceship or alien? Consider gravity and other forces.
• Ask students to sketch a basic layout of their game screen. They should decide where to place any celestial objects, the spaceship, and the alien.
• Recap what they learned and what to expect next week.
Week 2: Game Development & Data Collection
Objective: Develop the game and understand the importance of data collection.
Duration: 45 minutes
S# Phase Duration Details
1 Game Development 25 minutes
• Students start developing their game on code.org.
• Implement spaceship and alien movements.
• Implement the shooting mechanism.
2 Introducing Data Collection 10 minutes
3 Setting up Data Collection 5 minutes
• Discuss the importance of data in evaluating gameplay.
• How can data help improve a game or understand player behavior?
• Show students how to set up a basic spreadsheet to record the number of shots taken and the number of hits.
4 Homework Assignment 5 minutes
• Students continue developing their game and start collecting data on the accuracy of their shots.
Week 3: Data Analysis & Reflection
Objective: Analyze gameplay data and reflect on the project's connection to UN SDG 9. Duration: 45 minutes
S# Phase Duration Details
1 Data Analysis 20 minutes
2 Class Discussion 15 minutes
3 Reflection on UN SDG 9 5 minutes
4 Conclusion and Feedback 5 minutes
• Instruct students on how to calculate mean and median in their spreadsheet software.
• Students calculate the mean and median accuracy percentages of their shots.
• Students share their findings.
• Discuss the significance of mean and median accuracy in evaluating player performance.
• How did the presence of celestial objects impact gameplay?
• Discuss the principles of UN SDG 9: innovation, technological advancement, and inclusive access to digital entertainment.
• How does their game align with these principles?
• Recap the three-week project and gather feedback from students on what they liked and what could be improved in future projects.
Answer Key
Q# Answer
1 The presence and arrangement of celestial objects can affect gameplay dynamics in several ways:
• The gravitational pull of a nearby planet might influence the trajectory of the spaceship's shots or the movement pattern of the aliens.
• Stars could serve as obstacles, making navigation and aiming more challenging.
• Planets or other celestial bodies could be used as strategic cover or bouncing points for shots.
2
3
• Mean accuracy = (Total number of hits / Total number of shots) x 100%
• Median accuracy: Sort the accuracy percentages in ascending or descending order and find the middle value.
• The game promotes innovation by allowing students to integrate space physics into a digital game format.
• The use of code.org for game development demonstrates technological advancement.
• By ensuring that the game is accessible and playable on various platforms, students align with the principles of inclusive access to digital entertainment.


OL21 i TEMac entatio chools can j0in the worl