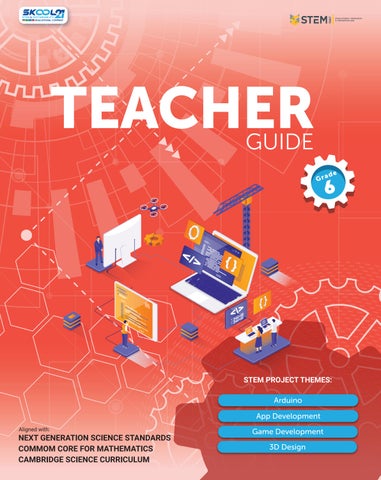
Aligned with:
Welcome to the STEM Innovators Handbook! This comprehensive guide is designed to ignite the spark of curiosity and empower young learners to become the problem-solvers and innovators of the future. Built upon the foundation of the Cambridge Science Curriculum, Next Generation Science Standards, and Common Core Mathematics, this handbook seamlessly integrates science, technology, engineering, and mathematics to provide a holistic learning experience.
In today's rapidly changing world, it is crucial for students to develop a strong foundation in STEM disciplines and cultivate the skills necessary to tackle the complex challenges facing humanity. By exploring STEM principles in a hands-on and practical manner, students can reinforce their classroom learning and connect it to real-world problems. Each project presented in this handbook has been carefully crafted to reinforce core concepts learned in the classroom. From building circuits to constructing models, from coding programs to designing experiments, these projects provide a platform for learners to engage in experiential learning and develop a maker mindset.
Furthermore, this handbook goes beyond traditional subject boundaries by connecting the projects to the United Nations Sustainable Development Goals (SDGs). By fostering an understanding of the SDGs and encouraging learners to reflect on their projects, we aim to instil a sense of purpose and inspire young innovators to create solutions that contribute to a sustainable future. The projects in this handbook encourage learners to think critically about the societal and environmental challenges we face and how their innovative ideas can make a positive impact.
One of the key objectives of this handbook is to develop technological literacy. By engaging with technology and exploring its applications, learners gain essential skills for the digital age. Through coding, robotics, data analysis, and other technological tools, students develop the confidence and competence to navigate the ever-evolving technological landscape. As learners progress through the projects in this handbook, they will develop problemsolving skills, critical thinking abilities, collaboration, and creativity. The process of designing, testing, and iterating will become second nature, empowering students to approach challenges with resilience and adaptability.
We invite educators, parents, and students to embark on this exciting journey of exploration and innovation. Together, let us nurture the STEM innovators of tomorrow equipped with the knowledge, skills, and passion to shape a sustainable future for all. May this handbook be your guide to unlocking the vast potential within each young mind and inspiring them to make a difference in our world.
Happy innovating!
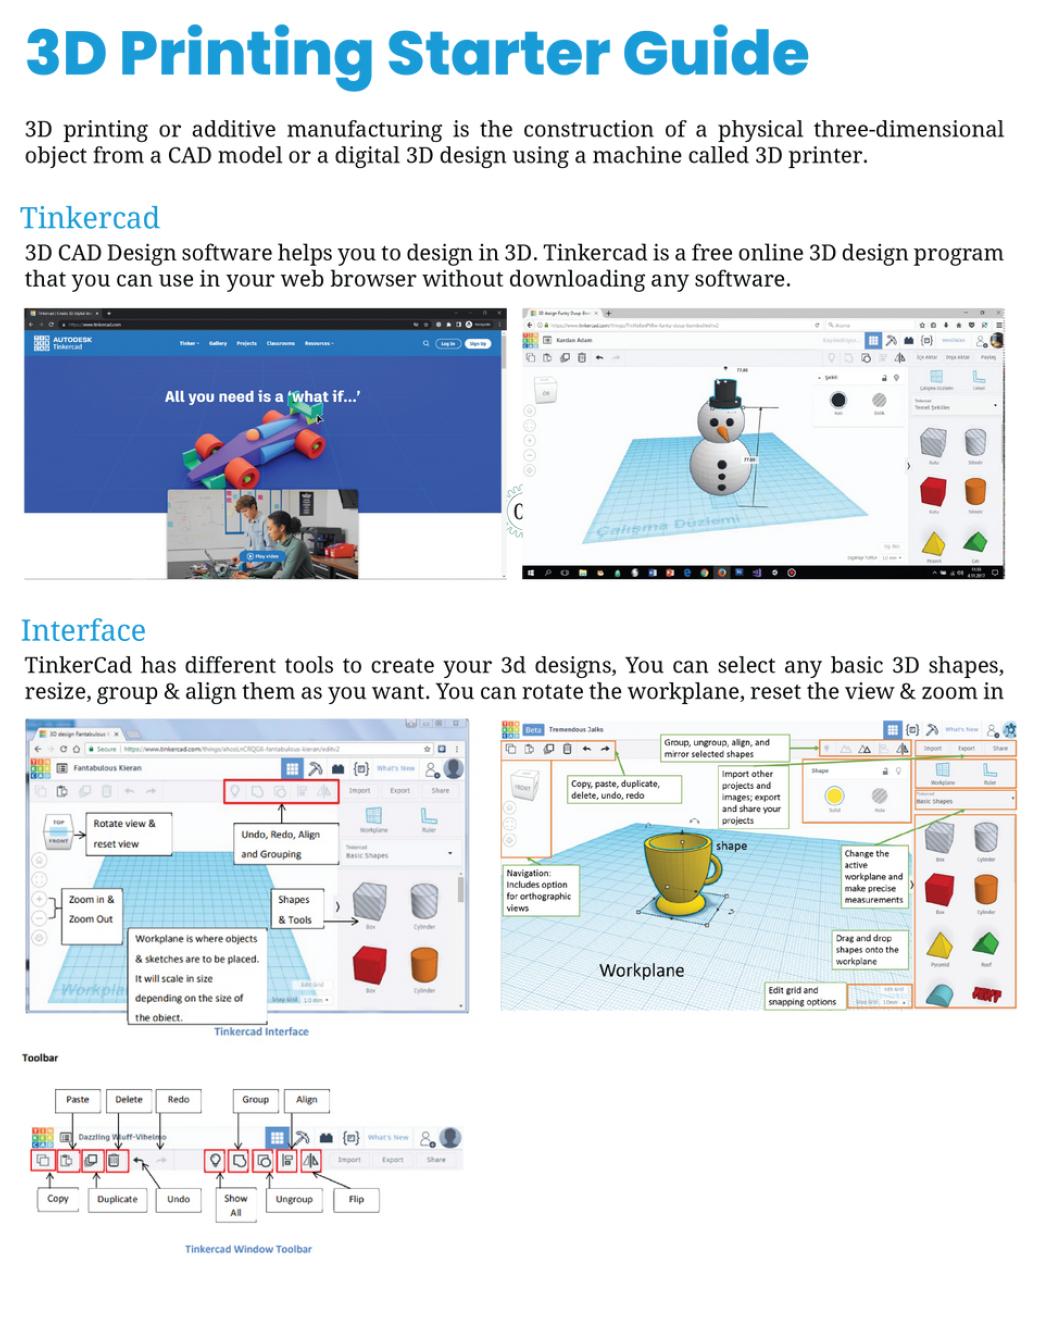
3D Printing Starter Guide

Alignment with the Sustainable Development Goals

NGSS Curriculum Linkage
Cambridge Science Curriculum Linkage
Technology Connection
Engineering Connection
Common Core for Mathematics Curriculum Linkage


Learning tools to use of the project.
Learning outcomes of the project.
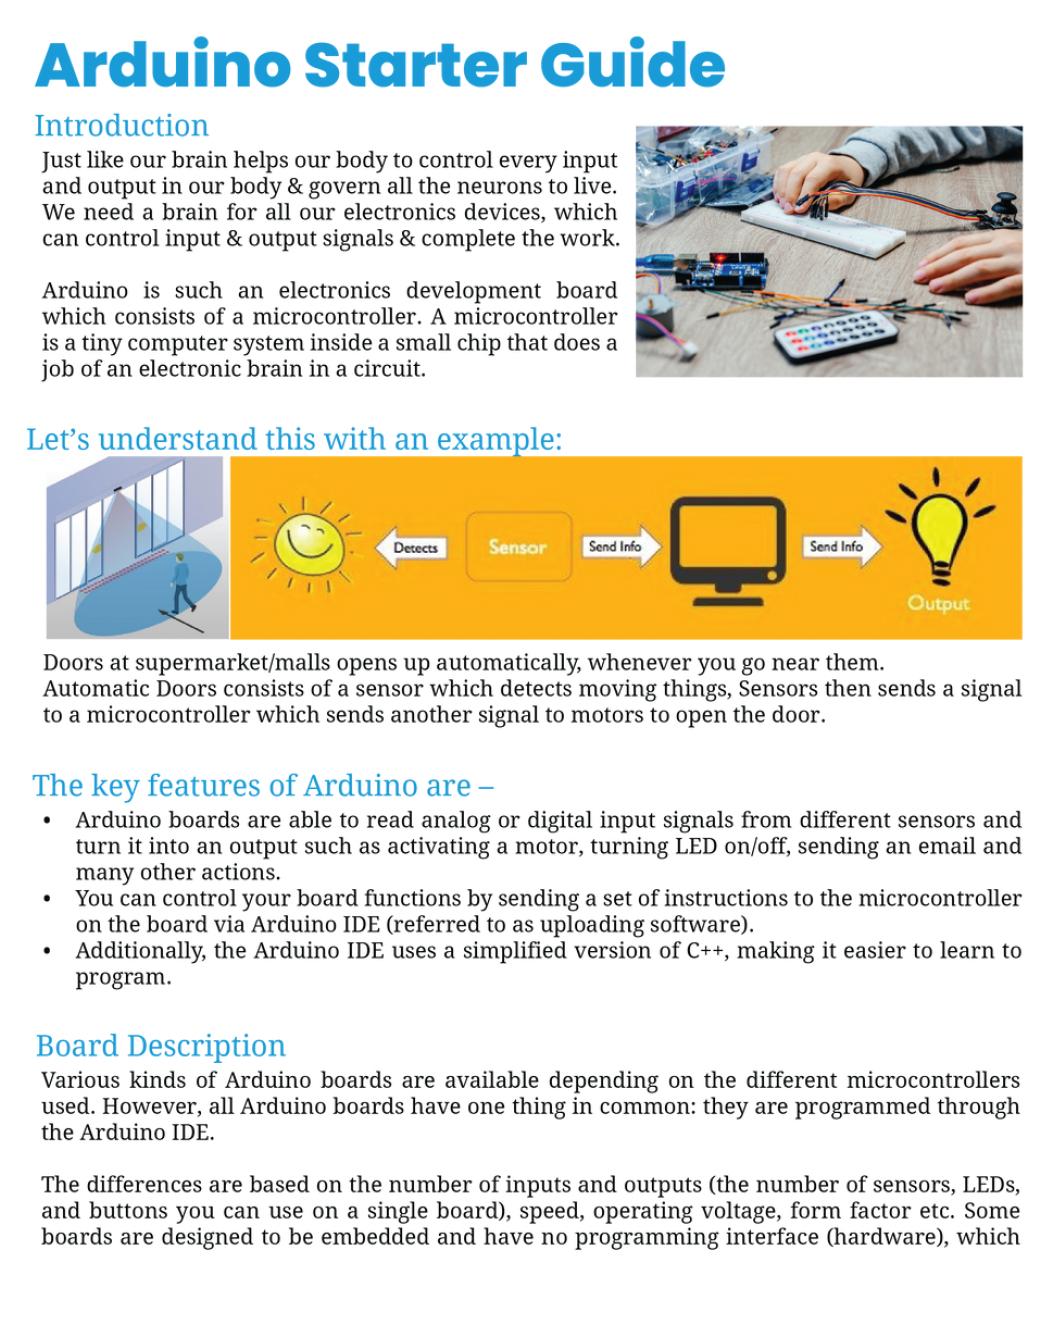
Introduction to the project.

List of Materials requirement to complete the project.
Steps to follow to complete the project.


Curricular assessment for reinforcing core concepts.
Reflection is for the student to link back their learning to solving this particular sustainable development goal.

Sustainable Development Goals (SDGs) are a set of 17 global goals adopted by all United better and more sustainable future for all. Each goal has specific targets to be achieved by being for all at
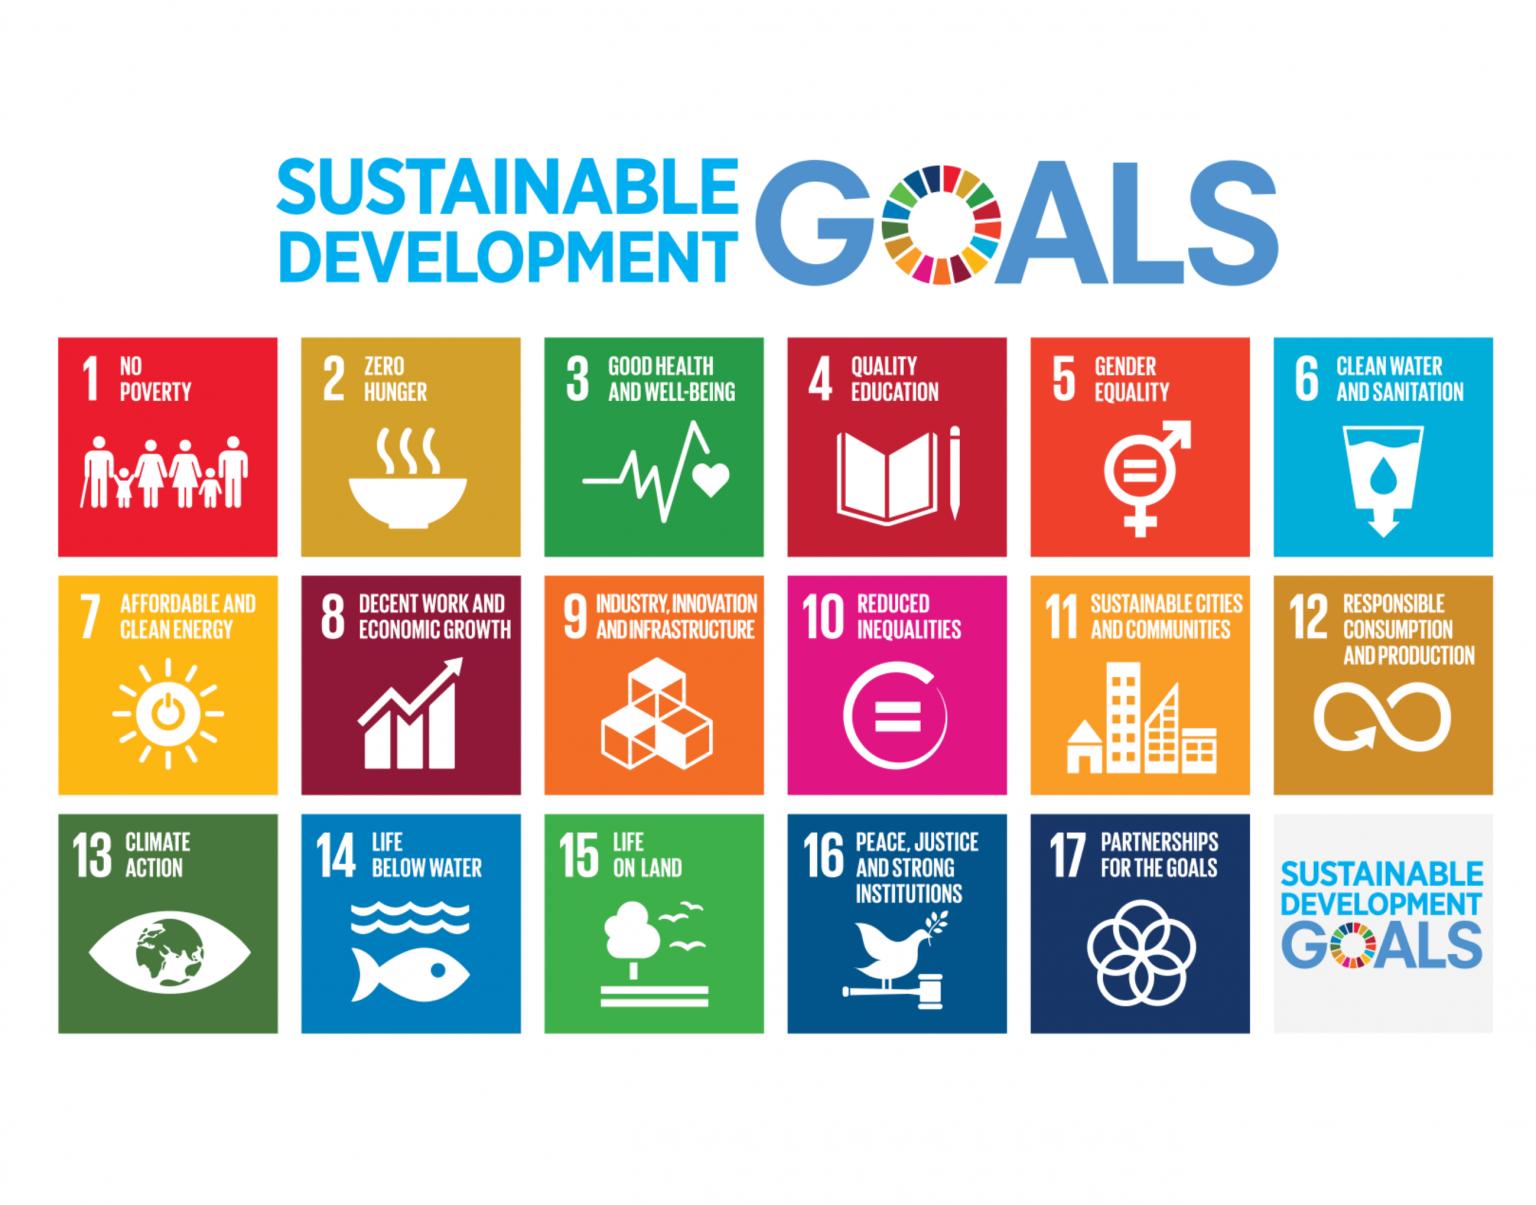
equitable quality education and promote lifelong learning opportunities for all.
Achieve gender equality and empower all women and
Ensure access to affordable, reliable, sustainable, and
Promote sustained, inclusive, and sustainable employment,
Build resilient infrastructure, promote inclusive and sustainable industrialization, and foster innovation.
action to combat climate change and its
marine resources for sustainable development.
Protect, restore, and promote sustainable use of ecosystems, halt deforestation, and combat desertification and biodiversity loss.
Promote peaceful and inclusive societies for sustainable development, provide access to justice for all, and build effective, accountable, and inclusive institutions at all levels.
Partnerships for Strengthen the means of implementation and revitalize the Global Partnership for Sustainable Development.
Now, let's see how the students' projects can be linked to these SDGs:
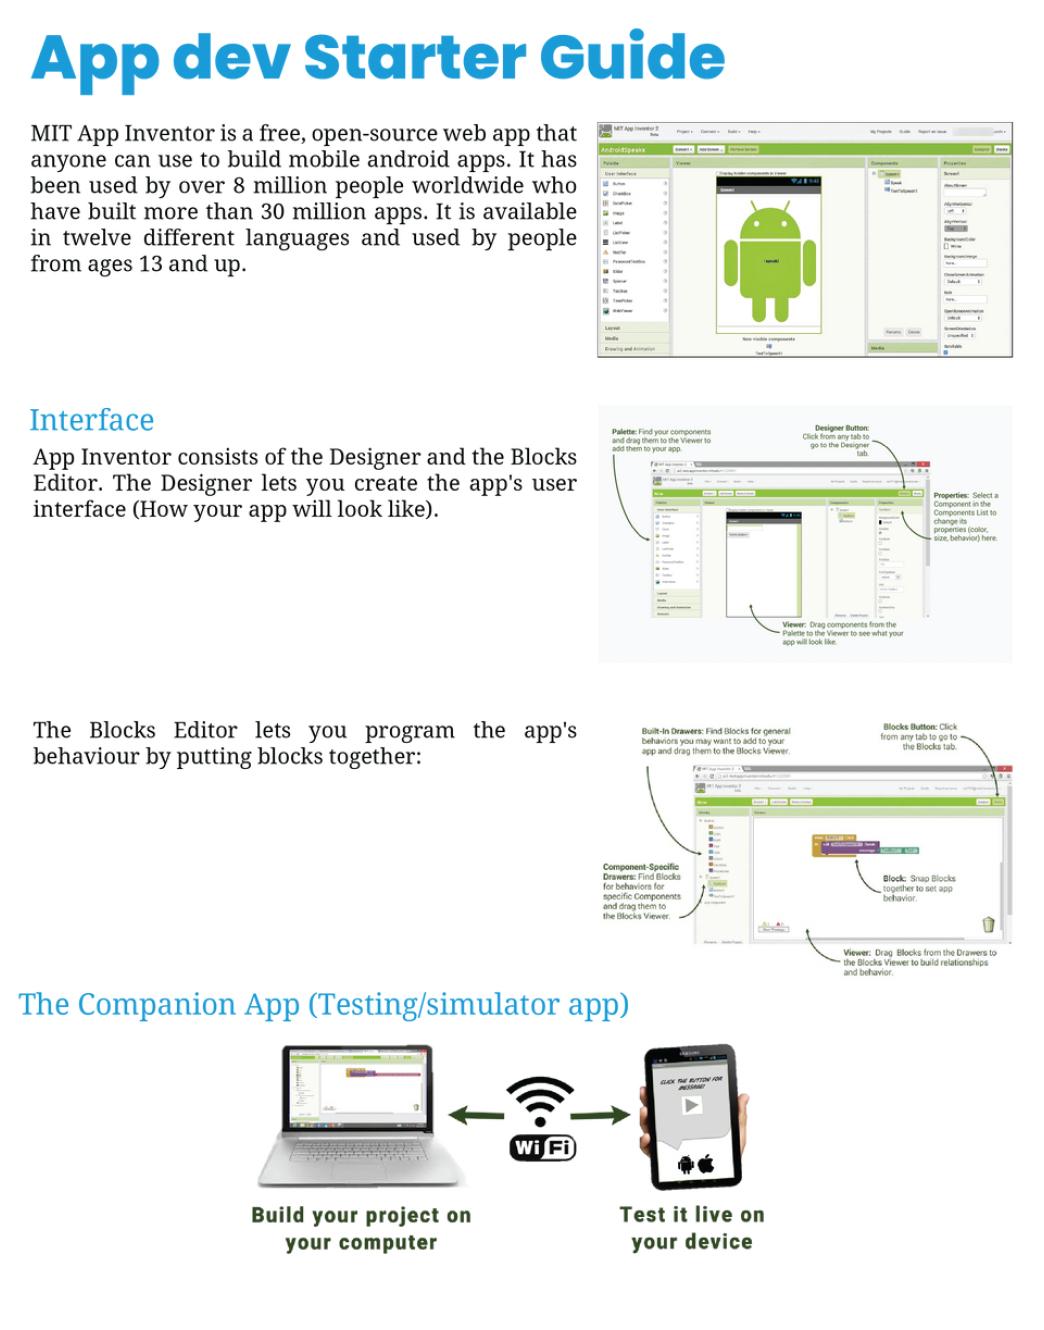
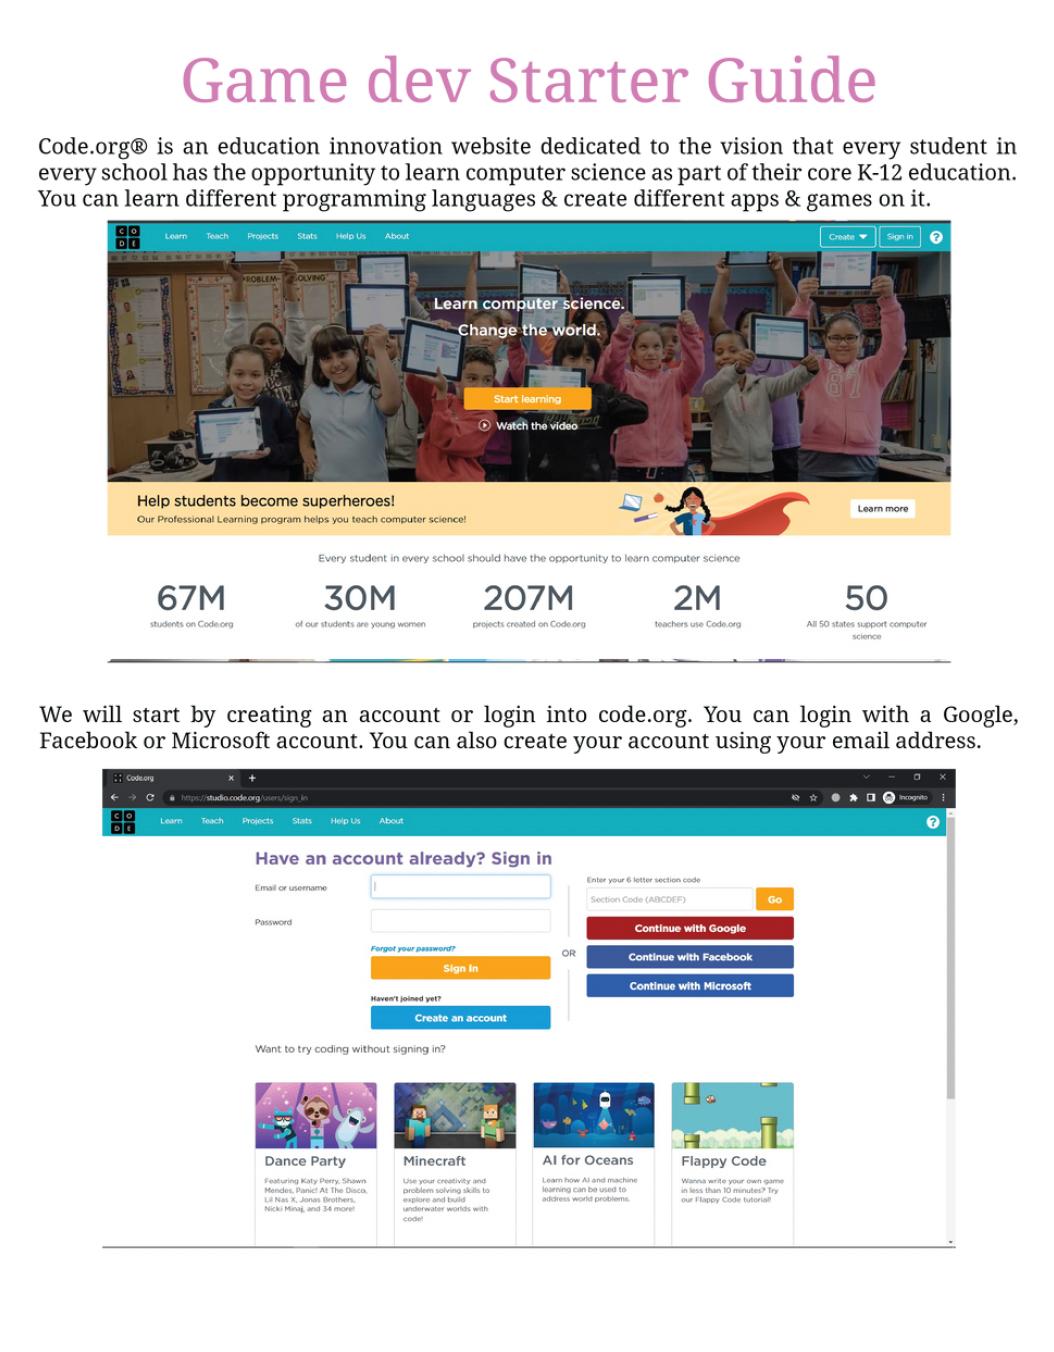
When students design projects using Arduino, Tinkercad, MIT App Inventor, and code.org for game development, they can focus on creating solutions that tackle real-world problems related to sustainable development. For example, they could create smart home systems that conserve energy (SDG 7 - Affordable and Clean Energy) or design a game that educates players about sustainable consumption and production (SDG 12 - Responsible Consumption and Production).
In DIY science materials projects, students can explore eco-friendly materials and develop alternatives to single-use plastics or other harmful materials, contributing to SDG 12 (Responsible Consumption and Production) and SDG 14 (Life Below Water).
Linking their projects to specific SDGs requires critical thinking and understanding of the global challenges we face today. For instance, students could create an app that helps raise awareness about endangered species and the importance of biodiversity conservation (SDG 15 - Life on Land).
Students can also focus on projects that address local community needs and align them with relevant SDGs. For instance, they might develop a water monitoring system to improve access to clean water in their community, which supports SDG 6 (Clean Water and Sanitatio

Encouraging students to consider the SDGs when designing their projects will help them understand the broader context of their work and how their technological and scientific skills can contribute to building a more sustainable and equitable world. This approach also empowers them to become responsible global citizens who actively engage with the challenges facing our planet.
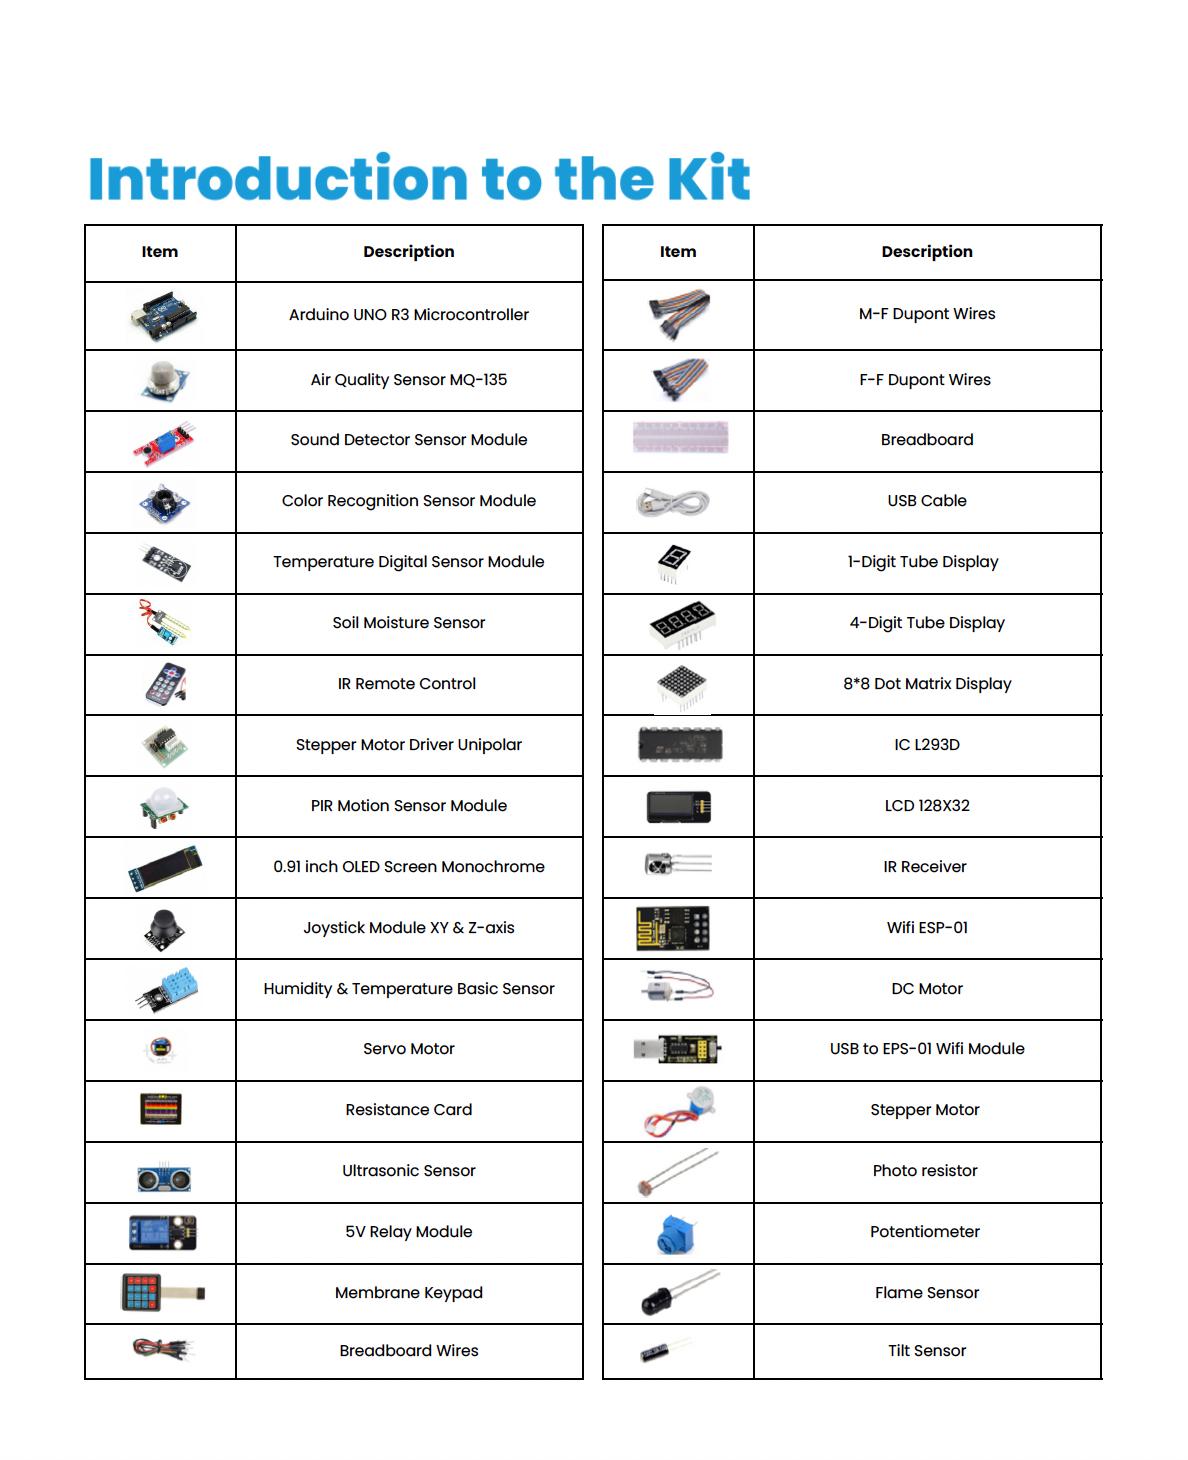
Creating an effective makerspace for conducting the STEM Innovators handbook projects requires careful consideration of the necessary equipment and space requirements. Here's a list of the essential items and recommended space allocation for the makerspace:
Internet Access
Arduino Kits
App Development Tools
The makerspace should be equipped with an adequate number of computers to support the use of digital tools like Tinkercad, MIT App Inventor, and code.org for game development. Depending on the number of students participating simultaneously, a computer-tostudent ratio of 1:3 or 1:4 is recommended.
A reliable internet connection is crucial for accessing online resources, software updates, and project research. Ensure that the internet connection is fast and stable to accommodate multiple users.
Since the projects involve using Arduino, it's essential to have a sufficient number of Arduino kits and accessories, such as sensors, motors, and breadboards. Aim for a ratio of at least 1 Arduino kit per 3-4 students to facilitate collaborative work.
For 3D design using Tinkercad, students will need access to design software and a 3D printer. Make sure the 3D printer(s) are in good working condition and capable of handling the complexity of the students' designs.
Provide access to computers and mobile devices for app development using MIT App Inventor. If possible, offer Android and iOS devices to allow students to test their apps on both platforms.
Game Development Tools
Tables and Chairs
Multimedia Resources
Storage Solutions
Safety and Prototyping Area
Access to computers and internet-enabled devices will be required for game development using code.org.
Arrange sturdy tables and comfortable chairs that accommodate individual and group work. Adjustable chairs are preferred, as they cater to students of different heights.
Install multimedia resources, such as projectors or smartboards, to facilitate presentations and demonstrations during project sharing and discussions.
Incorporate storage areas or cabinets to organize the tools, equipment, and student projects properly.
Allocate a designated space for hands-on work, prototyping, and experimenting. This area should have safety equipment, like safety goggles and fire extinguishers, as well as tools for cutting, soldering, and assembling projects.
Recommended Space Allocation:
The ideal size of the makerspace depends on the number of students and the available budget. However, a general guideline is to allocate at least 20-30 square feet per student. For example, if the makerspace is intended to accommodate 20 students, the total space required would be approximately 400-600 square feet.
Additionally, consider the layout to ensure an open and flexible environment that promotes collaboration and creativity. Create different zones for different activities, such as a computer station, 3D printing area, and prototyping space. Also, leave some space for group discussions and project presentations.
Lastly, consider the availability of power outlets and proper ventilation to support the equipment and ensure the comfort of the students and teachers in the makerspace.
Week 1: Introduction to Cells and Organelles Introduction to animal cells and their importance.
Overview of key organelles: nucleus, cytoplasm, mitochondria, cell membrane.
Use Thinkercad for 3D designing
Assign students to research the functions of each organelle.
Week 2: Constructing the Animal Cell
Detailed instructions on using Thinkercad for 3D designing. Students construct an animal cell model in
Assessment: Students answer questions about organelle functions and cell
Week 3: Surface Area Calculation and
Calculate the surface area of the cell model
Class discussion on the significance of cell
connection between understanding cell biology and UN SDG 3 (good health and well-
Week 1: Introduction to Nutrition and BMI
importance, and their
Health and Hunger
Reflect on how the BMI app promotes health (SDG 3).
technology can address the issue of hunger (SDG 2) by promoting healthy
Week 1: Introduction to Plant Reproduction
Introduction to plant reproduction methods (sexual and asexual). Discussion on the role of flowers in plant
ntroduction to game development using
Week 2: Developing Reproduction Game code.org's game development tools. Students create a around plant reproduction. Assessment: Students present their games and explain the reproductive processes.
Week 3: Biodiversity and Reflection
Discussion on the importance of understanding plant reproduction for biodiversity (SDG 15). Reflect on how conserving plant reproduction contributes to achieving SDG 15.
Week 1: Introduction to Atomic Structure
Introduction to atoms as the building blocks
protons, neutrons,
Thinkercad for 3D
Week 2: Building the
Detailed instructions on using Thinkercad for atom structure. Students design an
Assessment: Students describe the key components of their
Discussion on how understanding atom structure contributes to technology and innovation (SDG 9). Reflect on the role of atom understanding in achieving SDG 9.
Week 1: Introduction to Physical Changes
Introduction to physical changes in matter.
Explanation of the temperature device experiment.
Overview of required DIY materials.
Week 2: Conducting the Temperature Device Experiment
Step-by-step instructions for constructing the temperature device. Students conduct the experiment and record data. Assessment: Students analyze the experiment results.
Week 3: Reflection on Experiment and Education
Reflect on how building the temperature device contributes to achieving SDG 4 (quality education). Discuss the importance of
(affordable and clean energy).
Reflect on the importance of renewable energy sources.
Week 1: Introduction to Pulley Systems
Introduction to pulley systems and their
Explanation of the tower crane project. Overview of required
Week 2: Building the
constructing the
Students build their
Assessment: Students demonstrate their pulley crane's lifting
Reflection on Renewable Energy
Discuss the role of renewable energy (solar, wind) in crane
Reflect on how the crane design could incorporate renewable energy sources.
Week 1: Introduction to Light Reflection
Arduino kits, light intensity measurement experiments, Arduino basics.
Introduction to light waves and reflection. Explanation of the Arduino-based light reflection project. Overview of Arduino basics.
Week 2: Conducting Light Reflection
Experiments
Step-by-step guide for using Arduino to measure light levels. Students conduct experiments on light reflection.
Apply principles of force and motion to design a 3D printed car.
Tinkercad software, principles of force and motion.
Assessment: Students analyze the data and its relation to light intensity.
Week 3: Reflection on Technology and Innovation
Discuss how advancements in technology contribute to achieving SDG 5 (gender equality and empowering women and girls).
Reflect on the role of technology in promoting gender equality.
Week 1: Introduction to Force and Motion
Introduction to force, motion, and their relationship.
Explanation of the 3D printed car project.
Overview of Tinkercad for 3D design.
Week 2: Designing and 3D Printing the Car
Step-by-step guide for designing the car using Tinkercad.
Students design and 3D print their cars.
Assessment: Students measure the speed of their cars.
Week 3: Reflection on Responsible Consumption
Discuss how building a car using 3D printing technology contributes to achieving SDG 12 (responsible consumption and production).
Reflect on sustainable production practices.
Explore forces and apply principles to construct a
DIY materials for the hydraulic lift project,
Week 1: Introduction to Forces
Introduction to different types of forces.
principles of forces. Explanation of the hydraulic weight lift project.
Overview of required DIY materials.
Week 2: Building the Hydraulic Weight Lift Step-by-step guide for constructing the hydraulic lift. Students build their hydraulic lifts
Assessment: Students explain the operation of the hydraulic system.
Week 3: Reflection on Sustainable Communities
Discuss how building a hydraulic lift contributes to achieving SDG 11 (sustainable cities and communities).
Reflect on the importance of
Week 1: Introduction to Sound Waves
Introduction to sound waves and their
Explanation of the based sound visualization project. Overview of Arduino
Week 2: Exploring Sound Visualization step guide for creating a sound uino and sensors. Students experiment with different sound sources and analyze the visualizations.
Assessment: Students present their findings and interpretations.
Week 3: Reflection on
Innovation
Discuss how the use of sound visualizers contributes to achieving SDG 9 (industry, innovation, and infrastructure).
Reflect on the role of technology in advancing industry and innovation.
Explore electrical currents and resistance using a DIY potentiometer.
DIY materials for the potentiometer project, principles of electric currents and resistance.
Week 1: Introduction to Sound and Light Introduction to sound waves and their characteristics.
Explanation of the Arduino-based sound visualization project. Overview of Arduino and sensors.
Week 2: Building the Light-Controlled Sound Device
Step-by-step guide for creating a sound device controlled by light intensity. Students build their light-controlled sound devices.
Assessment: Students explain the relationship between light intensity and sound pitch.
Week 3: Reflection on Reducing Inequalities
Discuss how the sound device contributes to achieving SDG 10 (reducing inequalities).
Reflect on the role of technology in promoting inclusivity and accessibility.
Week 1: Introduction to Electric Current Introduction to electric currents, conductivity, and resistance.
Explanation of the potentiometer project.
Overview of required DIY materials.
Week 2: Building the DIY Potentiometer
Step-by-step guide for constructing the DIY potentiometer using everyday materials. Students build their potentiometers.
Assessment: Students explain the concept of resistance and its role in the potentiometer.
Week 3: Reflection on Responsible Consumption
Discuss how building a circuit using a potentiometer contributes to achieving SDG 12 (responsible consumption and production).
Reflect on the significance of understanding static charge in technology. Discuss real-world applications of static electricity. Present the static electricity experiment project and its contribution to Sustainable Development Goal 8.
Week 1: Introduction to Space Physics
Introduction to space celestial
Explanation of the development project.
code.org's game development tools.
Week 2: Building the step guide for creating a space-
Students design and develop their space
Assessment: Students present their games and explain the
Week 3: Reflection on Technology and
advancements in space technology
achieving SDG 9 (industry, innovation, and infrastructure). Reflect on the role of technology in space exploration and innovation.
1
Project 1: CELL & ORGANISMS
Construct an animal cell model using 3D Designing to understand its structure and function.
MS-LS1-2Develop and use a model to describe the function of a cell's parts in an animal cell.
Understan d the structure and functions of cells in living organisms.
Solve realworld and mathematic al problems involving area, surface area, and volume.
Sustainable Development Goal: 3Ensure healthy lives and promote well-being for all at all ages.
2 Project 2: NUTIRENT & DIGESTION
Develop a mobile application using App Developmen t tools to calculate and track Body Mass Index (BMI) for promoting health awareness.
NGSS: MSLS2Develop a model to describe the cycling of matter and flow of energy among living and nonliving parts of an ecosystem
Understan d the interaction s between living things and their environme nt, including nutrient cycles.
Expressions and EquationsApply and extend previous understandi ngs of arithmetic to algebraic expressions.
Sustainable Development Goal: 3Ensure healthy lives and promote well-being for all at all ages.
Sustainable Development Goal: 2 - End hunger, achieve food security, improve nutrition, and promote sustainable agriculture.
3
Project 3: PLANTS REPRODUCTI ON
Create a game using Game Developmen t tools to educate about plant reproduction and its significance
MS-LS1-4Use argument based on empirical evidence and scientific reasoning to support
Understan d plant reproducti on and its role in maintainin g biodiversit y.
Number SystemApply and extend previous understandi ngs of multiplicatio n and division to
Sustainable Development Goal: 15Sustainably manage forests, combat desertificatio n, and halt
4
Project 4: PARTICLES OF MATTER
in biodiversity. an explanatio n for how characteris tic animal behaviors and specialized plant structures affect the probability of successful reproducti on.
Utilize 3D Design to create an atom structure model to comprehend the composition and arrangement of matter.
MS-PS1Develop models to describe the atomic compositio n of simple molecules and extended structures.
Understan d material properties , including the structure of atoms.
divide fractions by fractions. biodiversity loss.
5
Project 5: MATTER PHYSICAL CHANGES
Construct a temperature device using DIY science materials to explore physical changes in matter and their effects.
MS-PS1-4Develop a model that predicts and describes changes in particle motion, temperatu re, and state of a pure substance when thermal energy is added or removed.
Understan d material properties , including rocks, and physical changes in matter.
Expressions and EquationsApply and extend previous understandi ngs of arithmetic to algebraic expressions.
Sustainable Development Goal: 9Build resilient infrastructur e, promote sustainable industrializati on, and foster innovation.
GeometrySolve realworld and mathematic al problems involving area, surface area, and volume.
Sustainable Development Goal: 7Ensure access to affordable, reliable, sustainable, and modern energy for all.
7
Project 6: ENERGY
Create a balloonpowered car using DIY science materials to demonstrate energy conversion and clean energy concepts.
MS-PS3-1Construct and interpret graphical displays of data to describe the relationshi ps of kinetic energy to the mass of an object and to the speed of an object.
Understan d forces and motion, including the principles of energy transfer.
Expressions and EquationsApply and extend previous understandi ngs of arithmetic to algebraic expressions.
Sustainable Development Goal: 7Ensure access to affordable, reliable, sustainable, and modern energy for all.
8
Project 7: ENERGY TRANSFER
Construct a tower crane using DIY science materials to explore the principles of pulleys, energy transfer, and efficiency.
MS-PS2-2Plan an investigati on to provide evidence that the change in an object's motion depends on the sum of the forces on the object and the mass of the object.
Understan d forces and motion, including the principles of energy transfer.
Expressions and EquationsApply and extend previous understandi ngs of arithmetic to algebraic expressions.
Sustainable Development Goal: 9Build resilient infrastructur e, promote sustainable industrializati on, and foster innovation.
Project 8: LIGHT & WAVE
Use Arduino to explore the reflection of light and understand its behavior using handson experiments.
MS-PS4-2Develop and use a model to describe that waves are reflected, absorbed, or Understan d light and sound, including the behavior of light waves
Statistics and ProbabilityInvestigate chance processes and develop, use, and evaluate
Sustainable Development Goal: 5Achieve gender equality and empower all women and girls.
9 Project 9: Motion
Utilize 3D Design tools to construct a car based on force and motion principles, and analyze its speed and distance.
transmitte d through various materials. probability models.
MS-PS2-2Plan an investigati on to provide evidence that the change in an object's motion depends on the sum of the forces on the object and the mass of the object.
Understan d forces and motion, including the principles of energy transfer.
Expressions and EquationsApply and extend previous understandi ngs of arithmetic to algebraic expressions.
Sustainable Development Goal: 12Ensure sustainable consumption and production patterns.
1 0 Project 10: FORCES
Construct a hydraulic weight lift using DIY science materials to understand the principles of pressure, pulleys, and mechanical advantage.
MS-PS2-2Plan an investigati on to provide evidence that the change in an object's motion depends on the sum of the forces on the object and the mass of the object.
Understan d forces and motion, including the principles of mechanica l advantage .
Number SystemApply and extend previous understandi ngs of multiplicatio n and division to divide fractions by fractions.
Sustainable Development Goal: 11Make cities and human settlements inclusive, safe, resilient, and sustainable.
1 1 Project 11: ENERGY & WAVE Use Arduino and sensors to visualize sound waves, exploring the relationship
MS-PS4-2Develop and use a model to describe that waves are Understan d light and sound, including the behavior
Ratios and Proportiona l Relationship sUnderstand ratio
Sustainable Development Goal: 9Build resilient infrastructur e, promote
1 2 Project 12: SOUND WAVES
between sound intensity, frequency, and their visual representati ons. reflected, absorbed, or transmitte d through various materials. of sound waves. concepts and use ratio reasoning to solve problems. sustainable industrializati on, and foster innovation.
Create different notes of sound with varying pitch using light, using Arduino and sensors to explore the relationship between light intensity and sound.
MS-PS4-2Develop and use a model to describe that waves are reflected, absorbed, or transmitte d through various materials.
Understan d light and sound, including the behavior of sound waves.
Number SystemApply and extend previous understandi ngs of multiplicatio n and division to divide fractions by fractions.
Sustainable Development Goal: 10Reduce inequality within and among countries.
1 3
Project 13: CURRENT
Create a potentiomet er using DIY materials to demonstrate the concept of electrical resistance and its role in current flow.
1 4 Project 14: Static Electricity Explore static electricity using DIY materials to understand its behavior and effects through
MS-PS4-2Develop and use a model to describe that waves are reflected, absorbed, or transmitte d through various materials.
MS-PS4-2Develop and use a model to describe that waves are reflected, absorbed, or
Understan d electricity and magnetis m, including electrical circuits.
Number SystemApply and extend previous understandi ngs of multiplicatio n and division to divide fractions by fractions.
Understan d electricity and magnetis m, including static electricity.
GeometrySolve realworld and mathematic al problems involving area, surface area, and volume.
Sustainable Development Goal: 12Ensure sustainable consumption and production patterns.
Sustainable Development Goal: 8Promote sustained, inclusive, and sustainable economic growth, full and
1 5 Project 15: SPACE PHYSICS
hands-on experiments. transmitte d through various materials. productive employment, and decent work for all.
MS-ESS1-1
Create an educational game using Game Developmen t tools to explore space physics concepts, celestial bodies, and space technology.
- Develop and use a model of the Earthsun-moon system to describe the cyclic patterns of lunar phases, eclipses of the sun and moon, and seasons.
Understan d Earth in space, including celestial bodies and their interaction s.
GeometrySolve realworld and mathematic al problems involving area, surface area, and volume.
Sustainable Development Goal: 9Build resilient infrastructur e, promote sustainable industrializati on, and foster innovation.
This detailed curriculum mapping provides teachers with a comprehensive guide to align the objectives and concepts of each STEM project with NGSS, Common Core Mathematics, Cambridge Science Curriculum, and the Sustainable Development Goals. Teachers can adapt and expand upon this mapping to ensure a seamless integration of the STEM projects into their grade 6 science and mathematics curriculum, promoting interdisciplinary learning and addressing real-world challenges.

At the end of this activity the learner will be able to demonstrate an understanding of the following:
Next Generation Science Standards
MS-LS1-2 From Molecules to Organisms: Structures and Processes
Develop and use a model to describe the function of a cell as a whole and ways parts of cells contribute to the function.

Cambridge Science Curriculum
Cells and organisms
Identify the structures present in plant and animal cells as seen with a simple light microscope and/or a computer microscope
Technology Connection
Use 3D Designing to construct an animal cell.
Engineering Connection
Use the engineering design process to develop an animal cell prototype.
Common Core Mathematics
6 G Geometry
Solve real-world and mathematical problems involving area, surface area, and volume.
Week 1: Introduction to Cells and Tinkercad
Objective: Introduce students to the basic structure of an animal cell and familiarize them with the Tinkercad platform.
Duration: 45 minutes
S# Phase Duration Details
1 Introduction 20 minutes
2 Tinkercad Tutorial 20 minutes
3 Homework/ Assignment 5 minutes
• Brief discussion on cells as the building blocks of life.
• Introduction to animal cell parts and their general functions.
• Brief introduction to Tinkercad.
• Guided tutorial for basic functions like navigating the workspace, adding, scaling, and positioning shapes.
• Research on the parts of an animal cell (in preparation for Week 2).
Objective: Students will start the construction of their animal cell model using Tinkercad. Duration: 45 minutes
S# Phase Duration Details
1 Discussion 10 minutes
2 Tinkercad Animal Cell Project 30 minutes
3 Homework/ Assignment 5 minutes
• Discuss the different parts of an animal cell (from the previous week's homework).
• Highlight their functions, sizes, and significance.
• Guided tutorial on how to design an animal cell using Tinkercad.
• Students begin their cell designs, focusing on key components like the nucleus, cytoplasm, cell membrane, and mitochondria.
• Continue to refine and complete the cell model on Tinkercad.
Objective: Complete the cell design and answer evaluation questions. Duration: 45 minutes
S# Phase Duration Details
1 Review and Finalizing Design 20 minutes
2 Evaluation 15 minutes
3 Reflection Discussion 10 minutes
• Students present their cell models.
• Discuss and finalize the models on Tinkercad.
• Teacher provides the evaluation questions listed above.
• Students answer questions individually.
• Facilitate a class discussion about the reflection question: the link between
understanding cell biology and the UN's Sustainable Development Goal of good health and well-being.
Answer Key
Q # Answer
1 What is cytoplasm?
Answer: The cytoplasm is a gel-like substance inside the cell that contains the organelles and provides a medium for cellular processes.
2 Describe the function of the nucleus.
Answer: The nucleus controls cell activity, holds the cell's DNA, and is responsible for the cell's growth and reproduction.
3 What do mitochondria produce?
Answer: Mitochondria produce energy for the cell in the form of adenosine triphosphate (ATP).
4 What is a cell membrane?
Answer: The cell membrane is a protective barrier that surrounds the cell, controls the entry and exit of substances, and maintains the cell's internal environment.
5 Calculate the surface area of your cell model.

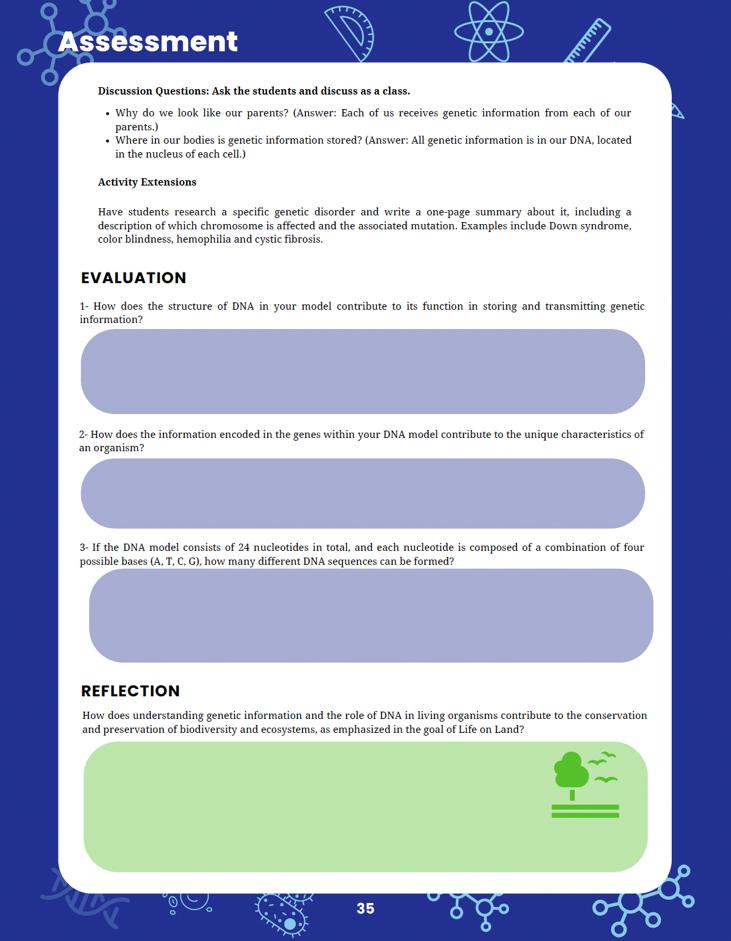
6 Reflection:
Understanding cell biology can help in diagnosing and treating diseases, understanding body functions, and even in drug design and delivery. Achieving good health and well-being is directly connected to understanding our body at the cellular level. Advanced knowledge in cell biology can pave the way for medical breakthroughs, contributing to the UN's goal.

At the end of this activity the learner will be able to demonstrate an understanding of the following:
Next Generation Science Standards
MS-LS2 Ecosystems: Interactions, Energy, and Dynamics
Analyze and interpret data to provide evidence for the effects of resource availability on organisms and populations of organisms in an ecosystem.
Cambridge Curriculum
Living things in their environment
Explore and construct food chains in a particular habitat
Technology Connection
Use App Development to construct a Body Mass Index.
Engineering Connection
Use the engineering design process to develop a BMI app prototype.
Common Core Mathematics
6 ee Expressions and Equations
Reason about and solve one-variable equations and inequalities.
Objective:
Week 1: Introduction to Body Mass Index and App Inventor
Understand the concept and importance of BMI
Introduction to MIT App Inventor and basic components
Duration: 45 minutes
S# Phase Duration Details
1 Introduction to BMI 15 minutes
2 MIT App Inventor Introduction 15 minutes
3 Start of BMI App 15 minutes
4 Homework
• What is BMI?
• Importance of BMI in relation to health.
• Real-life examples of how knowing one’s BMI can influence dietary and exercise choices.
• Introduction to the MIT App Inventor interface.
• Creating a new project.
• Overview of basic components: Buttons, Labels, Textboxes.
• Students layout a basic interface with fields for "Height" and "Weight", and a "Calculate" button.
• Explore MIT App Inventor. Try creating a simple interface on their own.
Week 2: Coding the BMI Calculator and Understanding its Implications
Objective:
Code the BMI calculation function in MIT App Inventor
Introduction to the relationship between BMI and health Duration: 45 minutes
S# Phase Duration Details
1 Coding the BMI Calculation 20 minutes
2 Implications of BMI Results 15 minutes
3 Discussion and Q&A 10 minutes
4 Homework/Assignment
• Introducing the formula:

• Coding behind the "Calculate" button: Using the formula to determine BMI from the height and weight input.
• What various BMI ranges mean (Underweight, Normal weight, Overweight, Obesity).
• Relation of BMI to health risks and benefits.
• Clarifying doubts about the coding process.
• Addressing misconceptions about BMI.
• Enhance the app by adding labels that show if the calculated BMI falls into
underweight, normal, overweight, or obese categories.
Week 3: Reflection and Understanding the Sustainable Development Goals (SDGs)
Objective:
Reflect on the implications of the BMI app in real-world scenarios
Relate the project to SDGs
Duration: 45 minutes
S# Phase Duration Details
1 BMI App Testing 10 minutes
2 Reflection on SDGs 20 minutes
3 Group Discussion & Sharing 15 minutes
4 Homework
• Students test their apps with various height and weight combinations.
• Sharing feedback on any improvements or changes.
• Introducing Sustainable Development Goals 3 (Good Health & Well-being) and 2 (Zero Hunger).
• Discuss:
o How the development and use of a BMI application can contribute to promoting good health and wellbeing.
o How a BMI application can influence eating habits and potentially reduce hunger.
• Students discuss in small groups and then share their insights about the relationship between their projects and the mentioned SDGs.
• Write a brief essay on the potential impact of widespread use of BMI tracking apps on global health and nutrition, keeping the SDGs in focus.
Q# Answer
1 The development and use of a BMI application promotes good health and well-being (SDG 3) by creating awareness of one's health status. By understanding if one is underweight, overweight, or within the normal range, individuals can make informed decisions about their diet, physical activity, and overall lifestyle. Moreover, tracking BMI over time can motivate individuals to maintain or achieve a healthy weight, reducing the risks of associated diseases.
2 A BMI application can contribute to addressing the issue of hunger (SDG 2) by emphasizing the importance of proper nutrition. While BMI does not measure nutritional status directly, individuals who are underweight might be encouraged to seek nutritious food sources to reach a healthy weight. Similarly, those who are overweight might be encouraged to adopt healthier eating habits, which can
indirectly promote the consumption of nutritious and balanced meals over junk and processed foods. By highlighting the importance of a balanced diet and proper nutrition, the app indirectly promotes the goal of zero hunger and proper nutrition.

At the end of this activity the learner will be able to demonstrate an understanding of the following:
Next Generation Science Standards
MS-LS1-4 From Molecules to Organisms: Structures and Processes
To explain how animal behaviors and plant structures impact successful reproduction, use empirical evidence and scientific reasoning as your argument.
Cambridge Curriculum
Plants
Recognise the positions, and know the functions of the major organs of flowering plants, e.g. root, stem, leaf
Technology Connection
Use Game Development to construct a game based on the reproduction of plants.
Engineering Connection
Use the engineering design process to develop a game prototype for plant reproduction process.
Common Core Mathematics
6 nS The Number System
Apply and extend previous understandings of multiplication and division to divide fractions by fractions.
Week 1: Introduction and Theoretical Foundation
Objective: Introduce students to the basic concepts of plant reproduction and its relation to Sustainable Development Goal 15.
Duration: 45 minutes
S# Phase Duration Details
1 Introduction 10 minutes
2 Discussion 15 minutes
3 Game Conceptualization 15 minutes
4 Assignment 5 minutes
• Briefly introduce the concept of plant reproduction.
• Discuss the Sustainable Development Goal 15 (Life on Land) and how plants play a critical role in sustaining life on land.
• Discuss the basic needs of plants.
• Explain how green plants produce their food through photosynthesis.
• Discuss the role of flowers in plant reproduction.
• Brainstorm ideas for a game that could illustrate the plant reproduction process.
• Task students to sketch a simple game flow on paper based on their brainstorming, to be developed in the coming weeks on code.org.
Week 2: Game Development and Mathematics Integration
Objective: Begin developing the game on code.org and integrate Common Core Mathematics 6.nS.
Duration: 45 minutes
S#
1 Game Development on code.org 30 minutes
2 Math Integration 10 minutes
3 Reflection and Discussion 5 minutes
• Start by creating a basic interface.
• Incorporate elements representing plants, seeds, and flowers.
• Introduce obstacles or challenges in the game that relate to the needs of plants and the process of photosynthesis.
• Introduce Sarah's scenario.
• Ask students to solve the problem: if a flower produces 8 seeds, and Sarah collects seeds from 5 flowers, how many potential new plants can she grow? Discuss the multiplication concept.
• Briefly discuss the development so far.
• Encourage students to think about how their game can reflect real-life scenarios related to plant reproduction.
Week 3: Game Finalization, Evaluation, and Reflection
Objective: Finalize the game, evaluate students' understanding, and reflect on the larger implications of plant reproduction.
Duration: 45 minutes
S# Phase Duration Details
1 Game Finalization on code.org 20 minutes
• Allow students to add final touches to their games.
• Encourage peer-to-peer testing for feedback.
2 Evaluation 15 minutes • Revisit the questions:
o What are the basic needs of plants?
o How do green plants produce their food?
o What is the purpose of flowers in the process of plant reproduction?
• Answer the math problem from Week 2 together.
3 Reflection 10 minutes • Discuss the importance of understanding the reproduction process of plants in relation to biodiversity and Sustainable Development Goal 15.
• Encourage students to share their insights on the role of plants in sustaining life on land.
Q# Answer
1 The basic needs of plants are sunlight, water, carbon dioxide, soil nutrients, and a suitable temperature.
2 Green plants produce their food through a process called photosynthesis, where they use sunlight, carbon dioxide, and water to produce glucose and release oxygen.
3 The primary purpose of flowers in the process of plant reproduction is to produce seeds. They do this through a process where pollen from one flower fertilizes the ovules of another, leading to the formation of seeds.
4 8 seeds/flower×5 flowers=40 seeds or 40 potential new plants.
5 Reflection:
Understanding the reproduction process of plants helps in conserving biodiversity because when we recognize the importance and intricacy of these processes, we are more likely to value and protect diverse plant species. By ensuring diverse plant life, we can contribute to sustainable ecosystems, which play a crucial role in sustaining life on land (SDG 15).

At the end of this activity the learner will be able to demonstrate an understanding of the following:
Next Generation Science Standards
MS-PS1 Matter and its Interactions
Develop models to describe the atomic composition of simple molecules and extended structures.
Cambridge Curriculum
Material properties
Describe the structure of an atom and learn about the methods and discoveries of Rutherford.
Technology Connection
Use 3D Design to construct an atom structure.
Engineering Connection
Use the engineering design process to 3D Design an atom prototype.
Common Core Mathematics
6 ee Expressions And Equations
Apply and extend previous understandings of arithmetic to algebraic expressions.
Objective:
Week 1: Introduction to Atoms and 3D Modeling with Tinkercad
Introduce the concept of atoms.
Understand the basic components of atoms: electrons, protons, and neutrons. Familiarize students with Tinkercad.
Duration: 45 minutes
S# Phase Duration Details
1 Introduction to Atoms 15 minutes
2 Tinkercad Introduction 25 minutes
3 Homework/ Assignment 5 minutes
Objective:
• Discussion: What are atoms? Why are they important?
• Explanation: Basics of atom structureprotons, neutrons, and electrons.
• Walk students through creating an account.
• Basic navigation and tools.
• Simple practice design activity.
• Read more about the atom structure.
• Explore Tinkercad and design a simple shape.
Week 2: Deep Dive into Atom Structure and Tinkercad Modeling
Understand the detailed structure of an atom and how electrons affect the properties of elements.
Create a basic 3D design of an atom in Tinkercad.
Duration: 45 minutes
S# Phase Duration Details
1 Atoms and Electrons 20 minutes
2 3D Design of an Atom in Tinkercad 20 minutes
3 Discussion 5 minutes
• Explanation: Detailed structure of atomshells, electron arrangement, and how it affects properties.
• Activity: Use colored balls or other objects to represent different parts of the atom.
• Guide students to start designing their atom.
• Encourage them to consider the number of protons, neutrons, and electrons, and how electrons are arranged.
• How is the 3D model helping you understand the atom better?
Week 3: Evaluation, Mathematical Representation, and Reflection
Objective:
Evaluate and refine the 3D model designs.
Connect the understanding of atomic structure to mathematical notation. Reflect on the importance of understanding atoms in technology and innovation.
Duration: 45 minutes
S# Phase Duration Details
1 Model Refinement and Evaluation 20 minutes
2 Mathematical Representation 10 minutes
3 Reflection 15 minutes
• Students present their models and explain.
• Peer feedback session: Students critique and praise their peer's models.
• Teach the students to represent atomic structures in mathematical notations.
• Activity: Using the example (8 protons, 10 neutrons), students represent the nucleus in mathematical notation.
• Discussion: How does understanding atoms play into advancements in technology? Link to Sustainable Development Goal 9.
• Homework: Write a short reflection on the project's overall learning experience.
Q# Answer
1 Model Representation
The model should have a central nucleus with protons (positively charged) and neutrons (neutral). Around the nucleus, there should be orbits or shells with electrons (negatively charged).
2 Atoms & Matter
Atoms are the basic units of matter. All objects are made up of atoms. They are the tiny particles that make up matter.
3 Electrons & Properties
Electrons revolve around the nucleus in orbits or shells. The outermost shell's electron configuration determines the element's chemical properties. Elements with similar electron configurations often have similar properties.
4 Mathematical Notation
5 Reflection:
Understanding the structure of atoms is fundamental to advancements in technology and innovation. By grasping the atomic structure, scientists and engineers can manipulate materials at the atomic and molecular levels to create new materials, electronics, and more. This supports Sustainable Development Goal 9 as we innovate to build resilient infrastructure, promote inclusive and sustainable industrialization, and foster innovation.

At the end of this activity the learner will be able to demonstrate an understanding of the following:
Next Generation Science Standards
MS-PS1-4 Matter and its Interactions
Develop a model that predicts and describes changes in particle motion, temperature, and state of a pure substance when thermal energy is added or removed.
Cambridge Curriculum
Materials, including rocks, and physical change
6Cp.01 Know that the temperature at which a substance changes state is a property of the substance.
Technology
Use a laptop to research temperature. Keep document evidence of your changes in temperature through a camera.
Use the engineering design process to develop a temperature device.
6 G Geometry
Solve real-world and mathematical problems involving area, surface area, and volume.
Objective:
Week 1: Introduction to Matter and Physical Changes
Introduce students to the concept of matter and physical changes using DIY science materials. Lay the groundwork for building a temperature device. Duration: 45 minutes
S# Phase Duration Details
1 Introduction 10 minutes
2 DIY Temperature Device Concept 25 minutes
3 Activity: Drawing & Predictions 10 minutes
4 Discussion & Reflection 10 minutes
• Briefly explain the NGSS, Cambridge Science, and Common Core Mathematics standards.
• Introduction to the UN Sustainable Development Goal 7. Discuss the importance of sustainable energy.
• Discuss the basic concept of how temperature can cause physical changes in matter.
• Show a basic temperature device, explaining its main parts: bottle, water, straw, etc.
• Explain how the device will be used over the next weeks.
• Have students draw a rough sketch of their temperature device.
• Ask students to write down predictions about what they think will happen for each of the evaluation questions.
• How do you think changes in temperature will affect water?
• What other materials might show physical changes with temperature shifts?
Week 2: Building the Temperature Device & Initial Observations
Objective:
Students will build their temperature device and begin making initial observations. Duration: 45 minutes
S# Phase Duration Details
1 DIY Building Session 25 minutes
2 Initial Observations 10 minutes
• Provide students with the necessary materials: bottle, straw, bowl, clay, water, etc.
• Guide them step-by-step in creating their temperature device.
• Fill the bottle with water and insert the straw, ensuring the upper part of the straw is above the water but still inside the bottle.
• Allow the students to adjust the water to the various temperatures (20°C, 30°C, 40°C) and note the water level.
3 Evaluation Questions Discussion 5 minutes
4 Homework Assignment 5 minutes
• Discuss observations as a class.
• Discuss the first evaluation question and record student responses.
• Ask students to make predictions about the remaining evaluation questions for next week’s class.
Objective:
Students will experiment with their temperature devices and reflect on the project's implications for Sustainable Development Goal 4.
Duration: 45 minutes
S# Phase Duration Details
1 Experimentation 25 minutes
• Divide the class into small groups.
• Have each group change one variable at a time (amount of water, width of the straw, size of the bottle, etc.) and record their observations.
• Allow students to discuss and compare results within their groups.
2 Class Discussion 10 minutes
3 Reflection on SDG 4 10 minutes
• Come together as a class and discuss findings for each of the evaluation questions. Use the initial predictions from Week 1 to drive the discussion.
• Talk about any unexpected results or interesting observations.
• Discuss how understanding the properties of water and temperature contributes to quality education (SDG 4).
• How can understanding these basic principles lead to innovations in other areas, like sustainable energy (SDG 7)?
• Reflect on the importance of hands-on learning and experimentation.
Q# Answer
1 The water level will rise as temperature increases due to expansion of water molecules.
2 Changing the amount of water in the bottle will affect the starting point of the water in the straw but the general principle of expansion with temperature remains the same.
3 Changing the width of the straw affects the rate of rise and descent of the water. A wider straw might show quicker and more visible changes.
4
Changing the size of the bottle changes the volume of water and might affect the sensitivity/responsiveness of the temperature device.
5 Closing the upper opening of the straw with clay will trap air inside, and depending on the tightness of the seal, it might either hinder the movement of water or create pressure that affects the water’s behavior.
6 Changing the height of the bowl doesn’t directly affect the temperature reading but might affect the visibility and stability of the setup.
7 Reflection:
Understanding and observing the properties of water and its physical changes with temperature give students a foundational understanding of basic scientific principles. By building a device and conducting experiments, they experience handson learning, which is often more effective than theoretical learning. This type of education, which encourages critical thinking, problem-solving, and real-world application, aligns with the UN's SDG 4 for quality education. Not only are they understanding the basic science, but they are also thinking about larger global issues like sustainable energy.
At the end of this activity the learner will be able to demonstrate an understanding of the following:
Next Generation Science Standards
MS-PS3-1 Energy
Construct and interpret graphical displays of data to describe the relationships of kinetic energy to the mass of an object and to the speed of an object.
Cambridge Curriculum
Forces and motion
Understand the notion of energy in movement
Technology Connection
Use a laptop to research Balloon powered cars. Keep document evidence of your changes in energy transfer.
Engineering Connection
Utilize the engineering design process to create a car that is powered by a balloon.
Common Core Mathematics
6 EE Expressions and Equations
Represent and analyze quantitative relationships between dependent and independent variables.
Objective:
Week 1: Introduction and Material Familiarization
Introduce the concept of forces, motion, and energy. Discuss the importance of renewable resources and SDG 7. Familiarize students with the DIY materials for the project.
Duration: 45 minutes
S# Phase Duration Details
1 Introduction 10 minutes
2 NGSS: MSPS3-1 Discussion 15 minutes
3 Material Familiarization 15 minutes
4 Homework/ Assignment 5 minutes
• Briefly discuss energy, the difference between renewable and non-renewable energy.
• Introduce Sustainable Development Goal 7: Affordable and clean energy. Discuss the importance of clean energy sources in today's world.
• Explore the concept of potential and kinetic energy. Discuss how a balloon car utilizes these energies.
• Present and discuss the purpose of each material that will be used in the project: bottle caps, wooden skewer, balloon, straws, tape, rubber band, scissors.
• Ask students to bring any recycled materials from home that they think might be useful for the project. This promotes creativity and sustainability.
Objective:
Guide students through the process of building their balloon-powered cars.
Duration: 45 minutes
S# Phase Duration Details
1 Building Guide 25 minutes
• Step 1 : Cut a straw into two equal pieces and tape them parallel to each other on a flat surface (like a cardboard piece).
• Step 2 : Take the wooden skewer and cut it into two equal halves. These will act as the axles.
• Step 3 : Pierce the bottle caps in the center and slide them onto the skewer ends. These will act as wheels.
• Step 4 : Insert each skewer (with bottle caps attached) through the straws, ensuring the wheels spin freely.
• Step 5 : Inflate the balloon slightly and fit it over one end of the remaining straw. Secure
2 Initial Testing 10 minutes
it with a rubber band without letting the air out.
• Step 6 : Attach the balloon and straw assembly to the cardboard (or platform) so that the straw end is pointing to the rear of the car.
• Step 7 : The car is now ready for testing.
• Students can inflate the balloon through the straw, pinch the straw end, place the car on a flat surface, and release to see the car move.
Objective:
Evaluate the performance of the balloon-powered car.
Reflect on the lessons learned and relate the project to SDG 7.
Duration: 45 minutes
S# Phase Duration Details
1 Evaluation 25 minutes
2 Reflection 15 minutes
• Each student will inflate their balloon car and release it on a marked track.
• Question 1 : Observe if the car moves when the balloon is released.
• Question 2 : Measure and record the distance the car travels.
• Discuss factors affecting the car's distance and speed, such as the amount of air in the balloon, friction, and car design.
• Open discussion on the question: "How can building a car using renewable resources contribute to achieving the UN Sustainable Development Goal 7 of affordable and clean energy?"
• Discuss how utilizing renewable resources (like air in this case) can reduce our dependency on non-renewable fuels.
• Highlight the broader perspective: If simple projects like this can utilize renewable energy, imagine the possibilities on a larger scale.
3 Homework/ Assignment 5 minutes
• Write a short essay on their experience, what they learned, and how they envision the future of renewable energy.
Answer Key
Q# Answer
1 The car should move forward when the balloon is released due to the force of the air escaping the balloon.
2 The distance will vary depending on the student's design and amount of air in the balloon. The answer here is subjective, but students should be able to measure the distance using a ruler or measuring tape.
3 Reflection:
Guide your students to think critically about the project in relation to Sustainable Development Goal 7. Encourage them to consider the significance of renewable energy sources, like the air in their balloon cars, and their potential impact on reducing reliance on non-renewable energy. Pose questions such as, "How does the simple act of powering a car with air reflect larger possibilities for renewable energy?" and "Why is it crucial to find sustainable alternatives to traditional energy sources?" By connecting the balloon car's basic principle to larger environmental goals, students will gain a broader understanding of the importance of sustainable innovation in our world.

At the end of this activity the learner will be able to demonstrate an understanding of the following:
Next Generation Science Standards
MS Forces and Interactions
MS-PS2-2. Plan an investigation to provide evidence that the change in an object’s motion depends on the sum of the forces on the object and the mass of the object.
Cambridge Curriculum
Forces and motion
Describe the effects of forces on motion, including friction and air resistance
Technology Connection
Utilise a laptop to research the tower crane. Keep a record of the input force and its corresponding output result.
Engineering Connection Common Core Mathematics
Use the engineering design process to create a tower crane.
6 EE Expressions and Equations
Represent and analyze quantitative relationships between dependent and independent variables.
Objective:
Week 1: Introduction the principles
Introduction to the principles of energy transfer and the basics of a pulley system. Duration: 45 minutes
S# Phase Duration Details
1 Introduction 10 minutes
2 Activity 20 minutes
3 Group Task 10 minutes
4 Wrap-Up 5 minutes
• Discuss the importance of energy transfer in daily life.
• Introduce students to the concept of a pulley and how it can make lifting weights easier.
• Show a simple pulley system and demonstrate how it works.
• Have students discuss how the pulley might be used in various real-life scenarios.
• Divide the students into groups.
• Give each group a set of the materials listed.
• Ask them to brainstorm how they can use the materials to build a simple crane with a pulley system.
• Ask groups to share their ideas briefly.
• Assign homework: Students should sketch their crane designs and note down the materials they plan to use.
Objective:
Build the crane and understand the principles of energy transfer in a hands-on manner.
Duration: 45 minutes
S# Phase Duration Details
1 Introduction 5 minutes
2 Activity 30 minutes
3 Discussion 5 minutes
4 Wrap-Up 5 minutes
• Briefly review the concept of energy transfer and pulley systems.
• Ask students to display their sketches.
• Allow groups to start building their cranes based on their sketches.
• Encourage peer-to-peer learning, where students can help out each other and exchange ideas.
• Discuss the math problem related to the pulley system.
• Guide students to determine how much distance will the load be lifted if the pulley is turned only 2 times, given it takes 4 complete turns of the pulley to lift a load by 20 centimeters.
• Have students set aside their projects safely.
• Assign homework: Research on Sustainable Development Goal 9.
Objective:
Evaluate the effectiveness of the crane and link the project to sustainable development goals.
Duration: 45 minutes
S# Phase Duration Details
1 Introduction 5 minutes
2 Activity 20 minutes
3 Discussion 10 minutes
4 Reflection 5 minutes
5 Wrap-Up 5 minutes
• Review the homework on Sustainable Development Goal 9.
• Allow groups to finish their cranes (if they haven't already).
• Test the crane's efficiency by lifting objects.
• Reflect on the evaluation questions.
• Discuss as a class, addressing each question and noting down students' responses.
• Discuss how building a pulley crane contributes to achieving the UN Sustainable Development Goal 9.
• Congratulate students on their work.
• Discuss potential improvements to the crane and encourage them to think about how they can incorporate sustainable energy in future projects.
Q# Answer
1 Pulley System: The pulley system distributes the weight of the object across multiple sections of the rope, reducing the force required to lift the object. Mechanical advantage gained by the pulley system allows for heavier objects to be lifted with less effort.
2 Friction: Friction can be both helpful and detrimental. In the crane’s operation, friction at the point where the rope contacts the pulley can reduce efficiency as it causes resistance. However, friction can also prevent the rope from slipping off the pulley.
3 Incorporate Renewable Energy: Possible modifications include attaching a solarpowered motor to turn the pulley automatically or using a wind turbine system that, when wind passes through, turns the pulley.
4 Distance Calculation: Given 4 turns lift 20 centimeters, 1 turn will lift 5 centimeters. So, 2 turns will lift 10 centimeters.
5 When reflecting on how building a pulley crane can contribute to the UN's Sustainable Development Goal 9 (Industry, Innovation, and Infrastructure), students should consider the broader implications of their project. This goal emphasizes resilient infrastructure, sustainable industrialization, and fostering innovation. By building a crane, students are engaging in the innovative process, designing a tool
that aids in construction or industry. Pulley systems are foundational in many largescale constructions and infrastructural projects. Moreover, when students consider modifications, like incorporating renewable energy, they're aligning with sustainable industrial practices. Encourage students to think about how simple tools can evolve into larger, more complex systems that are essential for a developing society, and how sustainability can be incorporated at every stage of design and implementation.

At the end of this activity the learner will be able to demonstrate an understanding of the following:
Next Generation Science Standards
MS-PS4-2 Waves and their Applications in Technologies for Information Transfer
Develop and use a model to describe that waves are reflected, absorbed, or transmitted through various materials.
Cambridge Curriculum
Light and sound
6Ps.02 Describe how a ray of light changes direction when it travels through different mediums and know that this is called refraction.
Technology Connection
Exploring the reflection of light using Arduino.
Engineering Connection
Develop a prototype for the reflection of light.
Common Core Mathematics
6 SP Statistics and Probability
Develop an understanding of statistical variability.
Summarize and describe distributions.
Week 1: Introduction to Light and Activity 1 - Reading Light and Darkness
Objective:
Familiarize students with the concept of light reflection and introduce them to the Arduino light sensor.
Duration: 45 minutes
S# Phase Duration Details
1 Introduction 10 minutes
2 Demonstration and Hands-on Activity
30 minutes
3 Wrap-up 10 minutes
• Briefly explain the importance of light in our daily lives.
• Introduce NGSS: MS-PS4-2, the Cambridge Science Curriculum on light and sound, and Common Core Mathematics: 6.SP.
• Distribute the Arduino/sensor setup to students.
• Guide students through Activity 1, step by step. Ensure every student is able to perform each action.
• Facilitate discussion by asking questions after each step to encourage students to think critically about their observations.
• Recap what students have learned about the reflection of light and how different angles can impact light levels.
• Assign a brief reflection assignment: Write a paragraph about one real-world situation where the reflection of light affects your daily life.
Week 2: Activity 2 - Casting Shadows
Objective:
Help students understand the principles behind casting shadows and the impact of different light sources.
Duration: 45 minutes
S# Phase Duration Details
1 Introduction 5 minutes
2 Demonstration and Hands-on Activity 25 minutes
• Recap previous week's lesson on light reflection.
• Introduce the concept of shadows and how they are formed.
• Guide students through Activity 2. Discuss how different distances and light sources affect shadows.
• Encourage students to experiment with different objects and light sources. Allow time for them to explore and make observations.
3 Wrap-up 5 minutes
• Conduct group discussions about their observations and findings.
• Emphasize key learning points from the session.
• Assign a brief homework task: Ask students to draw or take pictures of interesting shadows they observe at home and write a short description.
Week 3: Activity 3 - Investigating Transparency and Reflection on SDG 5
Objective:
To understand how different materials allow varying amounts of light to pass through and to introduce the link between technology, innovation, and gender equality.
Duration: 45 minutes
S# Phase Duration Details
1 Introduction 10 minutes
2 Hands-on Activity 25 minutes
3 Reflection on Sustainable Development Goal 5 10 minutes
• Recap on shadows from the previous lesson.
• Introduce the concept of transparency, translucency, and opacity.
• Guide students through Activity 3, assisting them in testing various materials.
• Foster a group discussion where students can share their findings and insights.
• Initiate a discussion on gender equality and empowering women and girls.
• Ask students how technology and innovation can be tools to promote gender equality.
• Encourage students to think about ways in which the project's themes can be applied to support Sustainable Development Goal 5.
Answer Key
Q# Answer
1 Activity 1:
b. The measurement will vary depending on the direction the phone screen is facing.
d. Most humans can detect changes in light but might not detect subtle differences.
e. The sensor is more sensitive than the human eye and might detect larger differences.
f. Tilting the phone changes the amount of light the sensor is exposed to.
g. By keeping the phone's screen in a constant direction where light doesn't vary much.
2 Activity 2:
D. The shadow becomes more defined and larger as the hand gets closer to the table.
E. The sharper shadows will be under direct light.
F. Using multiple light sources can create multiple shadows.
G. Shadows can differ due to the properties of different light sources.
3 Activity 3:
D. Transparent materials will have higher lux values, while opaque materials will have lower values.
5 Reflection:
Increasing access to technology and promoting innovation can help women and girls have equal opportunities in education and the workforce. This can lead to more women in STEM fields, helping break gender barriers, and empowering women and girls globally.
At the end of this activity the learner will be able to demonstrate an understanding of the following:
Next Generation Science Standards
MS-PS2-2 Motion and Stability: Forces and Interactions
Plan an investigation to provide evidence that the change in an object’s motion depends on the sum of the forces on the object and the mass of the object.
Cambridge Curriculum
Forces and energy
6Pf.02
Describe the effect of gravity and know that when gravity changes, the weight of an object changes but the mass does not.
Technology Connection
Use 3D Design tools to construct a car using the principles of force and motion.
Engineering Connection
Follow the engineering design process to construct a 3D model with the ability to move.
Common Core Mathematics
6 EE Expressions and Equations
Represent and analyze quantitative relationships between dependent and independent variables.
Objective:
Week 1: Introduction to Motion & 3D Design
Familiarize students with the fundamental concepts of force and motion. Introduce students to Tinkercad as a 3D design tool.
Encourage brainstorming and preliminary sketching for their car designs in relation to principles of force and motion.
Duration: 45 minutes
S# Phase Duration Details
1 Introduction 10 minutes
2 Tinkercad Exploration 15 minutes
3 Brainstorm & Sketch 15 minutes
4 Reflection & Wrap-Up 5 minutes
• Introduction to the concepts of force and motion.
• Brief overview of Sustainable Development Goal 12: Responsible Consumption and Production.
• Introduction to Tinkercad and its features.
• Show some basic shapes and how they can be combined to create complex structures.
• Ask students to brainstorm ideas for their car design.
• Sketch their design on paper, labeling parts that help it move and any features they feel would make it eco-friendly.
• Discuss the day's activity and what students learned about motion and 3D design.
Week 2: Car Design in Tinkercad & Introduction to 3D Printing
Objective:
Equip students with the skills to translate their paper sketches into digital 3D designs using Tinkercad, ensuring they adhere to the principles of force and motion. Introduce students to the technology and processes behind 3D printing, emphasizing its potential impact on sustainable consumption and production.
Duration: 45 minutes
S# Phase Duration Details
1 Recap 5 minutes
2 Designing in Tinkercad 25 minutes
3 Introduction to 3D Printing 10 minutes
• Recap the previous lesson and what was learned.
• Guide students through creating their car design in Tinkercad.
• As they work, walk around and offer guidance, ensuring they're incorporating principles of force and motion in their designs.
• Explain how 3D printers work.
• Discuss the benefits and challenges, especially in the context of sustainable consumption and production.
4 Reflection & Wrap-Up 5 minutes
• Reflect on the skills learned so far and prepare students for the printing and testing phase in the next session.
Objective:
Allow students to experience the 3D printing process and understand the practical aspects of translating digital designs into physical objects.
Engage students in testing their car designs, collecting data, and calculating speed, thereby applying their knowledge from the Common Core Mathematics 6.EE.
Encourage reflection on how 3D printing can be used in the context of Sustainable Development Goal 12, promoting responsible consumption and production.
Duration: 45 minutes
S# Phase Duration Details
1 3D Printing 20 minutes
• Demonstrate the 3D printing process.
• Start printing the students' car designs. (Note: Depending on the number of students and printers available, you might need to start this before the class and only demonstrate the process.)
2 Testing the Car 10 minutes
3 Data Analysis 10 minutes
4 Reflection & Wrap-Up 5 minutes
• Using a ramp or flat surface, let students test their cars.
• Record the time taken and the distance traveled by the car.
• Guide students to calculate the speed using the formula:

• Discuss the relevance of the Common Core Mathematics 6.EE in this calculation.
• Revisit Sustainable Development Goal 12.
• Ask students to reflect on how using 3D printing technology can contribute to responsible consumption and production.
Q# Answer
1 Customization: 3D printing allows for customization, meaning products can be tailored to specific needs, potentially reducing the number of discarded products.
Eco-friendly Material Utilization: 3D printing allows for precise use of materials, reducing waste. Using biodegradable or recycled materials can further promote responsible consumption.
Reduced Mass Production: On-demand 3D printing can reduce the need for mass production, resulting in less waste and overproduction.
Education: Using 3D printing in education teaches students about sustainable technologies and encourages them to think about innovative solutions to global challenges.

At the end of this activity the learner will be able to demonstrate an understanding of the following:
Next Generation Science Standards
MS-PS3-5 Energy
Construct, use, and present arguments to support the claim that when the kinetic energy of an object changes, energy is transferred to or from the object.
Cambridge Curriculum
Forces and energy
6Pf.01 Describe the difference between mass, measured in kilograms (kg), and weight, measured in newtons (N).
Technology Connection
Utilise a laptop to research hydraulics. Keep a record of the input force and its corresponding output result.
Engineering Connection
Use the engineering design process to create a hydraulic weight lift.
Common Core Mathematics
6 NS The Number System
Understand the concept of a unit rate and use ratio and rate reasoning to solve realworld problems.
Objective:
Week 1: Introduction to Hydraulics and Beginning the Project
Understand the concept of hydraulics and begin building the hydraulic weight lift. Duration: 45 minutes
S# Phase Duration Details
1 Introduction 10 minutes
2 Activity: Building the Base 25 minutes
3 Discussion 5 minutes
4 Homework 5 minutes
• Brief explanation of hydraulics and how they're used in real-world applications.
• Introduction to the materials to be used.
• Step 1: Cut a rectangle from the cardboard to form the base.
• Step 2: Use the aluminium can as the main support. Glue it upright in the center of the cardboard.
• Step 3: Start designing the arm structure using cardboard strips. Don't attach yet.
• Discuss the relationship between force, pressure, and area in hydraulic systems.
• Gather thoughts on how hydraulic systems work.
• Research a bit on Sustainable Development Goal 11: Sustainable Cities and Communities.
Week 2: Assembling the Crane and Understanding Mechanics
Objective:
Finish building the hydraulic weight lift and introduce the mechanics involved.
Duration: 45 minutes
S# Phase Duration Details
1 Activity: Completing the Crane Assembly 30 minutes
2 Discussion 10 minutes
• Step 1: Continue building the arms (60 cm and 90 cm) and attach them to the aluminium can.
• Step 2: Connect the syringes using the pipe. One syringe will act as the controller and the other will be attached to the crane for lifting.
• Step 3: Use the zip tie, nuts, and toothpicks to reinforce connections and provide pivot points for the arms.
• Discuss the concept of leverage and how the different lengths of the crane arms affect lifting capability.
• Introduce the mathematics concept: ratio, in preparation for the evaluation question.
3 Reflection 5 minutes
• How does the hydraulic system make it easier to lift weights?
Objective:
Evaluate students' understanding of the project and reflect on its broader implications. Duration: 45 minutes
S# Phase Duration Details
1 Evaluation 20 minutes
2 Reflection 15 minutes
• Question 1: Discuss in groups and then share with the class: "What role does the pressure of the hydraulic fluid play in the operation of your crane?"
• Question 2: Calculate the ratio of the lengths of the crane arms. Introduce and explain the concept of simplified fractions.
• Engage in a group discussion: "How can building a hydraulic crane contribute to achieving the UN Sustainable Development Goal 11 of sustainable cities and communities?"
• Encourage students to think about how construction and infrastructure projects, facilitated by tools like cranes, play a role in building sustainable cities.
3 Conclusion 5 minutes
• Recap the importance of understanding forces, hydraulics, and the role of STEM in addressing global challenges.
• Encourage students to explore more DIY projects to understand complex concepts.
Q# Answer
1 The pressure of the hydraulic fluid allows for force to be transmitted from one point to another, enabling the crane to lift weight. When you push the fluid in one syringe, the pressure increases, which pushes the fluid to move and hence move the other syringe, lifting the crane arm.
2 The ratio of the longer arm (90 cm) to the shorter arm (60 cm) is 90:60. Simplifying the fraction by dividing both numbers by their greatest common divisor (30), we get 3:2.
3 Reflection:
Building a hydraulic crane can be related to Sustainable Development Goal 11 in various ways. Cranes are essential in constructing high-rise buildings and infrastructure in cities, which can maximize land use, reduce urban sprawl, and help create sustainable urban environments. They can be used in constructing green buildings, public transport infrastructure, and more. Furthermore, understanding
how cranes work can lead to innovations that make construction more efficient and environmentally friendly.

At the end of this activity the learner will be able to demonstrate an understanding of the following:
Next Generation Science Standards
MS-PS4-2 Waves and their Applications in Technologies for Information Transfer
Develop and use a model to describe that waves are reflected, absorbed, or transmitted through various materials.
Cambridge Curriculum
Light and sound
Explain echoes in terms of the reflection of sound waves.
Technology Connection
Use Arduino and Sensors to visualise sound.
Engineering Connection
Construct a prototype of a sound visualiser.
Common Core Mathematics
6.RP Ratios and Proportional relationships
Understand ratio concepts and use ratio reasoning to solve problems.
Objective:
Week 1: Introduction to Sound and Arduino Basics
Introduce the basic properties of sound.
Provide an overview of Arduino and sensors.
Duration: 45 minutes
S# Phase Duration Details
1 Discussion on Sound 15 minutes
2 Introduction to Arduino 20 minutes
3 Setting up Arduino 5 minutes
Objective:
• Introduction to sound, its properties and factors determining its loudness.
• Brief discussion on how sound travels through different mediums.
• Show and tell: Introduction to the Arduino board and its components.
• Overview of the sensors that will be used to visualize sound.
• Connecting the Arduino to a computer.
• Basic setup using the Arduino IDE.
Week 2: Exploring Sound Visualization with Arduino
Understand the practical application of how sound can be visualized with the use of Arduino and sensors.
Duration: 45 minutes
S# Phase Duration Details
1 Hands-on Activity with Arduino and Sound Sensor 15 minutes
2 Visualizing Sound 20 minutes
3 Discussion 5 minutes
• Connecting a sound sensor to Arduino.
• Simple coding to get readings from the sensor.
• Understand how the Arduino can help visualize sound.
• Play different pitches and volumes of sound and observe sensor readings.
• Discuss observations about how different sounds were visualized.
• Introduction to the concept of frequency, pitch, and amplitude.
Objective:
Answer the evaluation questions.
Reflect on the potential contributions of the project to Sustainable Development Goal 9.
Duration: 45 minutes
S# Phase Duration Details
1 Evaluation 25 minutes
• What factors determine the loudness or volume of a sound?
2 Reflection 15 minutes
3 Wrap-up 5 minutes
• How does the medium through which sound travels affect its speed?
• How does the frequency of a sound wave affect the pitch we perceive?
• Problem-solving: Calculate the visual height for a sound wave with an amplitude of 6 units.
• Group discussion on how the sound visualizer can contribute to achieving the UN Sustainable Development Goal 9 of industry, innovation, and infrastructure.
• Share personal insights and potential applications in real-world scenarios.
• Recap the major takeaways from the three weeks.
• Encourage further exploration and tinkering with the Arduino and sensors.
1 Loudness/Volume of Sound: The loudness or volume of a sound is determined by its amplitude. Other factors can include the energy or intensity of the sound wave and the distance from the sound source.
2 Medium and Sound Speed: Sound travels at different speeds in different mediums. For instance, sound travels faster in solids than in liquids, and faster in liquids than in gases. This is because molecules in a solid are closer together than in a liquid or a gas, allowing sound waves to transmit more efficiently.
3 Frequency and Pitch: The frequency of a sound wave determines the pitch we perceive. Higher frequency sound waves are perceived as higher pitched sounds, while lower frequency sound waves are perceived as lower pitched sounds.
4 Visualization and Amplitude: If a sound wave with an amplitude of 4 units produces a visual height of 8 centimeters, then it has a ratio of 2:1 (8cm/4 units). Using this proportion, a sound wave with an amplitude of 6 units would have a visual height of 12 centimeters (6 units x 2 = 12 cm).
5 Reflection - SDG 9:
Sound visualizers can contribute to Sustainable Development Goal 9 by:
• Industry: Enhancing industrial processes where sound measurement is crucial.
• Innovation: Paving the way for new technologies or solutions that rely on sound measurement or manipulation.
• Infrastructure: Assisting in infrastructure monitoring (e.g., detecting faults in pipelines or structures through sound analysis).

At the end of this activity the learner will be able to demonstrate an understanding of the following:
Next Generation Science Standards
MS-PS4-2 Waves and their Applications in Technologies for Information Transfer
Develop and use a model to describe that waves are reflected, absorbed, or transmitted through various materials.
Cambridge Curriculum
Light and sound
Explain echoes in terms of the reflection of sound waves.
Technology Connection
Use Arduino and Sensors to visualise sound.
Engineering Connection
Construct a prototype of a sound visualiser.
Common Core Mathematics
6 NS The Number System
Compute fluently with multi-digit numbers and find common factors and multiples.
Objective:
Week 1: Introduction and Setup
Understand the concept of sound waves and their relation with light. Duration: 45 minutes
S# Phase Duration Details
1 Introduction 10 minutes
2 Discussion 15 minutes
3 Hands-On 5 minutes
4 Conclusion 5 minutes
• Briefly discuss the nature of sound waves and how sound is produced.
• Introduce students to the Sustainable Development Goal 10 and discuss its significance.
• Talk about the relationship between sound waves and light. How can light possibly affect the pitch of a sound?
• Discuss the principle of Arduino and sensors in manipulating sound waves.
• Introduction to Arduino setup.
• Get students to connect a basic circuit with an Arduino and a buzzer.
• Homework assignment: Students to research different ways light can be used to manipulate sound.
Objective:
Use Arduino and sensors to manipulate sound waves based on light intensity. Duration: 45 minutes
S# Phase Duration Details
1 Setup 10 minutes
2 Building 25 minutes
3 Testing 5 minutes
4 Discussion 5 minutes
• Distribute materials: Arduino, light sensors, buzzers, and necessary cables.
• Step-by-step guide on connecting the light sensor to Arduino and using the buzzer to produce sound.
• Introduce the code to interpret light intensity and convert it to sound frequency.
• Get students to upload the code to their Arduino.
• Allow students to test their devices using different light sources.
• Discuss initial observations. How is light intensity affecting the pitch of the sound?
Week 3: Evaluation and Reflection
Objective:
Evaluate the device's function and reflect on its implications related to the Sustainable Development Goal.
Duration: 45 minutes
S# Phase Duration Details
1 Evaluation 20 minutes
• Discuss and answer the following questions:
o How does the change in light intensity affect the pitch of the sound produced by your device?
o What factors determine the pitch of a sound wave, and how does your device manipulate these factors?
o How could you modify your sound device to produce different ranges of pitch based on different ranges of light intensity?
o The sound device you built changes its pitch based on changes in light intensity. Suppose the light intensity is represented on a scale from 0 to 100, with 0 being the lowest intensity and 100 being the highest intensity. The pitch increases by 10 units for every 20-unit increase in light intensity. What would be the pitch for a light intensity of 60?
2 Reflection 15 minutes
3 Conclusion 10 minutes
• Discuss the broader implications of their sound device.
• Discuss how it can contribute to achieving the UN Sustainable Development Goal 10 of reducing inequalities. Possible discussion points include how technology can bridge gaps in society, offer accessibility solutions, etc.
• Reflect on the entire project. Discuss potential modifications and improvements.
• Assign a reflection essay on the entire process and its relation to Sustainable Development Goals.
Answer Key
Q# Answer
1 As light intensity increases, the pitch of the sound produced by the device also increases.
2 The factors that determine the pitch of a sound wave are its frequency and wavelength. The device manipulates the frequency based on light intensity to change the pitch.
3 By altering the code to produce different frequencies at different light intensities or by using a different type of sensor, we could modify the device's sound pitch range.
4 For a light intensity of 60, which is three intervals of 20 units, the pitch would increase by 3 x 10 units = 30 units.
5 Reflection - SDG 9:
Students can discuss how technology can be used to design tools that are adaptable and accessible to various groups. For instance, this sound device can be used as an aid for visually impaired individuals to detect light levels in their environment. This can bridge a gap, providing a sense of equality for differently-abled individuals. The broader aspect is how STEM can be an enabler to address societal challenges and reduce inequalities.

At the end of this activity the learner will be able to demonstrate an understanding of the following:
Next Generation Science Standards
MS-PS4-2 Waves and their Applications in Technologies for Information Transfer
Use the principles of wave behavior and wave interactions with matter to transmit information.
Cambridge Curriculum
Electricity and magnetism
Use diagrams and conventional symbols to represent, make and compare circuits that include cells, switches, lamps and buzzers.
Technology Connection
Use a multimeter to build and calculate circuits.
Engineering Connection
Use the engineering design process to develop and construct a circuit using a multimeter and pencil.
Common Core Mathematics
6 NS The Number System
Understand the concept of a unit rate and use ratio and rate reasoning to solve realworld problems.
Objective:
Week 1: Introduction & Basic Concepts
Understand the basic concepts of electricity, magnetism, and resistance.
Duration: 45 minutes
S# Phase Duration Details
1 Introduction 10 minutes
2 Demonstration 10 minutes
3 Hands-on Activity 20 minutes
4 Reflection 5 minutes
• Introduction to the concept of current, resistance, and how a potentiometer works.
• Brief explanation of the sustainable development goal 12: responsible consumption and production.
• Demonstrate the use of a regular potentiometer and explain how it resists the flow of current.
• Students sketch a simple circuit diagram including a potentiometer.
• Use the 6b pencil to shade a line on the paper. The darker and wider the shade, the better.
• Attach alligator clips to either end and measure the resistance using a multimeter.
• Initial thoughts on how resistance can be controlled using simple tools and how it can be linked to sustainable consumption.
Week 2: Building the Potentiometer
Objective:
Design and create a functional potentiometer using the given materials.
Duration: 45 minutes
S# Phase Duration Details
1 Discussion 10 minutes
2 Hands-on Activity 30 minutes
• Review the concepts of resistance and potentiometers.
• Discuss the importance of sustainable solutions in technology.
• Guide the students through the process of creating their potentiometer using the 6b pencil:
o Shade a longer line (using the 6b pencil) on a paper.
o Measure the length of the shaded area.
o Attach alligator clips to different parts of the pencil-shaded area.
3 Review & Reflection 5 minutes
Objective:
o Measure the resistance at different parts using a multimeter to see how it changes.
• Discuss the observations and highlight the importance of resistance in circuits.
Week 3: Application & Linking to SDG
Understand the application of potentiometers in real-life scenarios and link it to SDG 12.
Duration: 45 minutes
S# Phase Duration Details
1 Discussion 10 minutes
2 Group Activity 20 minutes
3 Presentation & Sharing 10 minutes
4 Reflection & Closing 5 minutes
• Brainstorm practical applications of potentiometers.
• Discuss the benefits of using simple, repurposed materials in technological solutions.
• Divide the students into groups.
• Each group should come up with a way the potentiometer they built can be used in real-life applications, keeping in mind the sustainable development goal.
• Groups present their ideas.
• Discuss the potential impacts of their ideas on responsible consumption and production.
• Reiterate the importance of using simple, everyday materials in STEM projects.
• Reflect on the importance of innovation in contributing to sustainable development goals.
Answer Key
Q# Answer
1 Reflection:
Building a circuit using a potentiometer can contribute to achieving the UN Sustainable Development Goal 12 of responsible consumption and production in the following ways:
Economical Use of Resources: Using simple materials like pencils to replace more expensive and resource-intensive materials reduces waste and promotes responsible consumption.
Promotion of Sustainable Tools: Demonstrating that functional tools can be made from everyday objects promotes the idea that we don't always need to produce new items; we can repurpose what we already have.
Educational Impacts: By teaching younger generations about responsible production using hands-on projects, we are nurturing a mindset of sustainability from an early age.
Innovation: Using non-traditional materials to solve problems encourages innovation and thinking outside the box, essential for the challenges posed by sustainable development goals.

At the end of this activity the learner will be able to demonstrate an understanding of the following:
Next Generation Science Standards
MS-PS4-2 Waves and their Applications in Technologies for Information Transfer
Use the principles of wave behavior and wave interactions with matter to transmit information.
Cambridge Curriculum
Electricity and magnetism
Use diagrams and conventional symbols to represent, make and compare circuits that include cells, switches, lamps and buzzers.
Technology Connection
To observe and study the variation of static charge, using a range of materials.
Engineering Connection
Test different materials to create a static charge.
Common Core Mathematics
6.RP Ratios and Proportional relationships
Understand ratio concepts and use ratio reasoning to solve problems.
Objective:
Week 1: Introduction and Setup
To introduce the concept of static electricity and guide students to set up the first experiment.
Duration: 45 minutes
S# Phase Duration Details
1 Introduction to Static Electricity 10 minutes
2 Discussion on the Materials 5 minutes
3 Setup of Experiment 1 20 minutes
4 Discussion and Journaling 10 minutes
• What is static electricity?
• Real-world examples: getting a shock when touching a doorknob, hair standing on end when removing a hat, etc.
• Overview of the provided materials and how each will be used.
• Distribute materials to each group.
• Guide students through the steps 1-4 of Experiment 1, ensuring that they understand and follow each step correctly.
• Allow students to discuss their observations.
• Have students start a journal where they note down their observations, predictions, and questions.
Week 2: Experiment 1 Completion and Experiment 2 Setup
Objective:
To complete the first experiment and set up the second.
Duration: 45 minutes
S# Phase Duration Details
1 Review 5 minutes
2 Continuation of Experiment 1 15 minutes
3 Setup of Experiment 2 15 minutes
4 Discussion and Continuation of Journaling 10 minutes
Objective:
• Quick recap of last week's lesson and any observations made.
• Guide students through steps 5-8.
• Ensure students record their observations in their journals.
• Guide students through steps 1-6 of Experiment 2, emphasizing the importance of accurate timing and observation.
• Discuss initial observations from Experiment 2.
• Add to journals.
Week 3: Conclusion and Reflection
To complete the experiments, reflect on findings, and understand the connection to Sustainable Development Goal 8.
Duration: 45 minutes
S
1 Completion of Experiment 2 10 minutes
2 Discussion on Static Electricity 10 minutes
3 Reflection 20 minutes
• Complete the remaining steps of Experiment 2.
• Allow students to discuss and share their findings.
• Why does static electricity occur?
• How does the rubbing generate static charge?
• Which materials are most effective in creating static electricity and why?
• Guide students to reflect on the experiments.
• Engage in a class discussion on how conducting an experiment on static charge can contribute to achieving the UN Sustainable Development Goal 8. Ideas include innovation in electronics, safety in workplaces related to electronics, potential economic growth from technological advancements, etc.
• Allow students to share their thoughts and journal entries.
4 Wrap-up 5 minutes
Q# Answer
• Recap the project's objectives and the importance of understanding scientific principles.
• Discuss potential next steps or further experiments students could conduct at home or in future classes.
Answer Key
Experiment 1
1 Yes, the balloon should attract some pepper.
2 The closer the balloon, the more pepper it picks up.
3 Rubbing more should increase the amount of pepper attracted due to an increase in charge.
4 Rubbing back and forth may reduce the amount of static built up because of friction in opposite directions.
5 Rubbing one way (same direction) consistently creates a stronger static charge.
Experiment 2
1 The balloon should stick to the wall due to static charge.
2 More rubbings usually result in the balloon sticking longer due to a stronger static charge.
3 Different materials will produce different results. Hair is often a strong producer of static electricity.
Reflection
1 Reflection
Conducting an experiment on static charge helps students understand fundamental physics. This knowledge can drive innovation in electronics and other fields. Understanding these principles can potentially drive technological advancements, leading to economic growth. Moreover, safety protocols related to static electricity in workplaces can be established, ensuring decent work conditions.

At the end of this activity the learner will be able to demonstrate an understanding of the following:
Next Generation Science Standards
MS-ESS1-1 Earth's Place in the Universe
Analyze and interpret data to determine scale properties of objects in the solar system.
Cambridge Curriculum
6ESs.01 Describe the relative position and movement of the planets, the Moon and the Sun in the Solar System.
Technology Connection
Open TinkerCad & start with the half sphere. Click and
Engineering Connection
Open TinkerCad & start with the half sphere. Click and
Common Core Mathematics
6.G Geometry
Solve real-world and mathematical problems involving area, surface area, and volume.
Objective:
Week 1: Introduction and Understanding Space Physics
Introduce students to space physics and the challenges astronauts face in space. Discuss the various celestial bodies found in our solar system.
Duration: 45 minutes
S# Phase Duration Details
1 Introduction to Space Physics 10 minutes
2 Challenges Astronauts Face 20 minutes
3 Celestial Bodies 10 minutes
4 Setting up for the Game Development 5 minutes
Objective:
• Show a brief video or slide presentation to provide students with an overview of space physics.
• Discuss the importance of studying space and the benefits it brings to Earth.
• Group discussion: Ask students what they believe the challenges are for astronauts living and working in space.
• Provide information about these challenges, e.g., microgravity effects on human health, cosmic radiation, isolation, etc.
• Discuss how games could be used to simulate these challenges.
• Introduction to the different celestial bodies: planets, asteroids, comets, etc.
• Use a poster or digital presentation to visualize the celestial bodies within our solar system.
• Introduction to code.org and brief overview of the upcoming project.
Week 2: Game Development and Understanding Gravity
Introduce students to game development on code.org. Understand the concept of gravity and its effect on space travel.
S#
1 Getting Started with Game Development 10 minutes
2 Game Design 25 minutes
Duration: 45 minutes
• Brief tutorial on using the game development tools on code.org.
• Discuss how the game will simulate challenges astronauts face and incorporate celestial bodies.
• Students will work on creating their games, specifically focusing on developing the main mission of destroying the UFO.
• Incorporate celestial bodies from our solar system into the game backdrop.
3 Introduction to Gravity 10 minutes
• A short video or presentation on how gravity works and its importance in space.
• Discuss how gravity varies across different planets and celestial bodies.
Objective:
Apply the Common Core Mathematics concepts in understanding the relationships between planets.
Reflect on the role of space technology in achieving the UN Sustainable Development Goal 9.
Duration: 45 minutes
S# Phase Duration Details
1 Planetary Math Problem 15 minutes
2 Continued Game Development 20 minutes
3 Reflection 10 minutes
• Reiterate the problem about Planet A and Planet B.
• Allow students time to solve and discuss the solution in groups.
• Allow students to refine their games, incorporating concepts of gravity and ensuring it aligns with the project's objectives.
• Encourage them to think about how their game addresses or simulates the challenges astronauts face in space.
• Pose the reflection question to the students.
• Engage in a class discussion about the advancements in space technology and its contribution to industry, innovation, and infrastructure.
Q# Answer
1 Challenges include microgravity, cosmic radiation, isolation, muscle atrophy, bone density loss, etc. The game could address these by having levels or challenges where players must ensure astronaut health, safety, or deal with ship malfunctions due to space's challenges.
2 Celestial bodies include planets, moons, asteroids, comets, dwarf planets, and the sun. The game could have different levels or backgrounds representing various celestial bodies.
3 Gravity is the force that attracts two objects towards each other. It impacts space travel as it dictates the movement of spacecrafts, satellites, and any object in space. The strength of the gravitational force depends on the mass and distance between objects.
4
Reflection:
Advancements in space technology can pave the way for improved global connectivity, advanced technological solutions for Earth's problems, a boost in global cooperation, and the development of new industries, fulfilling the objectives of Sustainable Development Goal 9.