The projects in the STEM Resource Book reinforce the following concepts using Early Electronics Kit:
Energy
Electricity
Measurement & Data
Numbers & Operations
Engineering Design
Operations & Algebraic Thinking
Waves and their Applications
Matter and Its Interactions
ALIGNED WITH THE NATIONAL CURRICULUM OF ENGLAND NEXT GENERATION SCIENCE STANDARDS
COMMOM CORE FOR MATHEMATICS
Preface
Education has always existed since the inception of the human race. However, it was informal in the beginning but took a more formal and structured shape later. The objective remained the same: to prepare the inquisitive learners of today for the challenges of tomorrow. Now, we are in the 21st century, where dynamic curriculum, engaging pedagogy, and performance-based assessments are the essential elements for an impactful education system, where integration of technology is indispensable and inseparable due to the extensive exposure of learners to media and information. These circumstances make the establishment of engaging and relevant education a true challenge for educators.
It is an open fact that the challenges of the 4th industrial revolution cannot be encountered through conventional educational approaches. Our STEM education model, based on STEM Resource books and makerspace, is developed according to the Science, Technology, Engineering, Mathematics (STEM) approach, inter-disciplinary and integrated learning that engages learners in learning, inculcates skills development and enhances problem-solving abilities.
STEM challenges in this book are developed by STEM-certified educators, based on Next Generation Science Standards, The National Curriculum of England and the Common Core for Mathematics. These challenges were then reviewed by international STEM experts & organizations, including STEM.org, an eminent research & accrediting body in the United States. These challenges and pedagogy were put to the test in a long & robust process of prototyping on students & their teachers for their feedback on learning attainment and experience.
Expert teachers appreciate and endorse the systematic initiative of STEM programs in schools, through which learners are challenged to solve problems of real-world situations and emerge as innovators and inventors. Apart from developing collaboration and communication skills, students choose their career paths and achieve their goals in life.
Introduction to the Kit
Understanding the Structure of the Lesson
Requirements for the project
Team Roles in the Team
Alignment with the Sustainable Development Goals
NGSS Curriculum Linkage
Cambridge Science Curriculum Linkage
Technology Connection
Engineering Connection
Common Core for Mathematics Curriculum Linkage
After brainstorming Learners create their model.
Evaluation is the phase where learners reflect on the performance of their model and link it to their classroom learning.
Learners write about the project they are building
Learners sketch their model and label as many parts for clarity in execution.
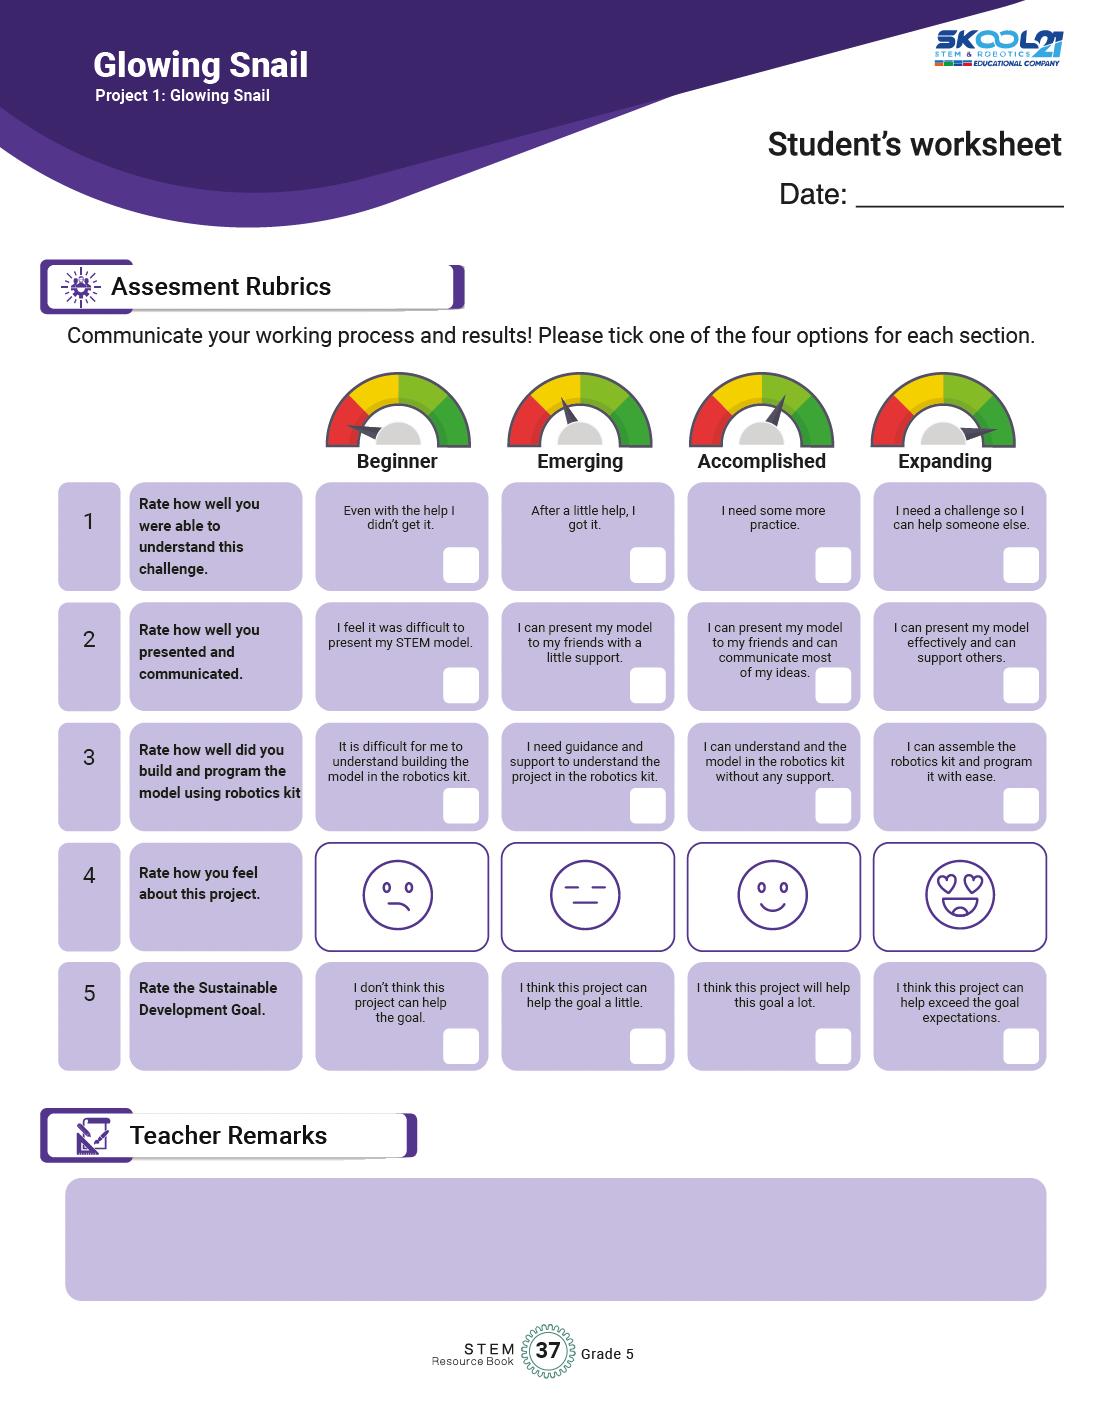
Assessment rubrics is a grid for teachers and learners to reflect on their progress in each of the project.
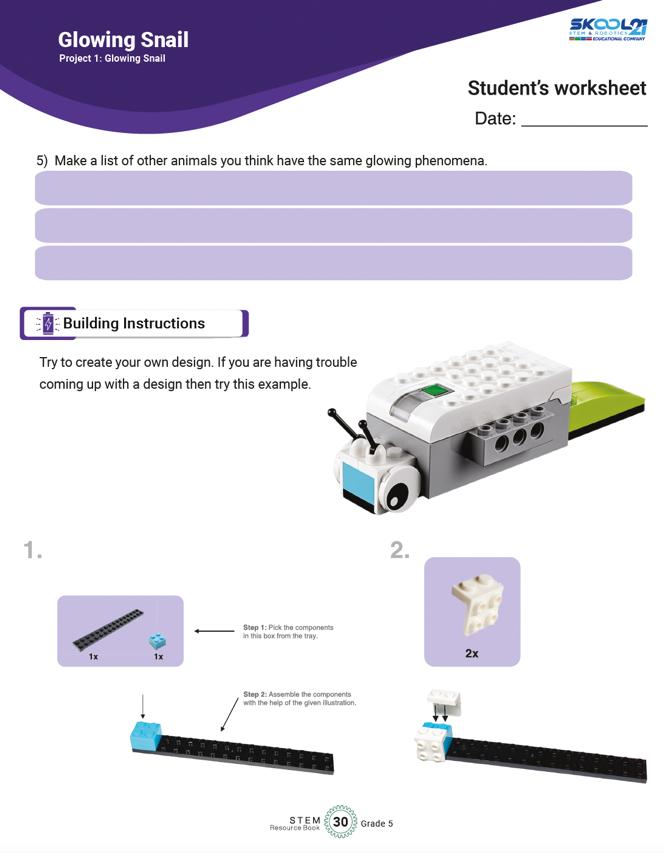
Building instructions are also provided to help learners get started, If they struggling in the first phase.
This space is for teachers to provide any remarks if needed on the participation of the learner in each of the project.
Alignment with the Sustainable Development Goals
Sustainable Development Goals (SDGs) are a set of 17 global goals adopted by all United Nations Member States in 2015 as part of the 2030 Agenda for Sustainable Development. be achieved by being for all at
Ensure inclusive and equitable quality education and promote lifelong learning opportunities for all. l women and
Ensure access to affordable, reliable, sustainable, and
Promote sustained, inclusive, and sustainable economic growth, full and productive employment, Build resilient infrastructure, promote inclusive and ndustrialization, and foster innovation.
Take urgent action to combat climate change and its stainable development.
Protect, restore, and promote sustainable use of terrestrial ecosystems, halt deforestation, and combat desertification and biodiversity loss.
inclusive societies for sustainable development, provide access to justice for all, and build effective, accountable, and inclusive institutions at all levels.
Partnerships for Strengthen the means of implementation and revitalize the Global Partnership for Sustainable Development.
Now, let's see how the students' projects can be linked to these SDGs:
When students design projects using STEM Resource Book and Wedo 2.0 Kit, they can focus on creating solutions that tackle real-world problems related to sustainable development. For example, they could create smart home systems that conserve energy (SDG 7Affordable and Clean Energy) or design a production (SDG 12
Linking their projects to specific SDGs requires critical thinking and understanding of the global challenges we face today. Students can also focus on projects that address local community needs and align them with relevant SDGs.
Encouraging students to consider the SDGs when designing their projects will help them understand the broader context of their work and how their technological and scientific contribute to building a more sustainable and equitable world. This approach also empowers them to become responsible global citizens who actively engage with the
Connection Reflection
The "Detect that Stone" project aligns with Sustainable Development Goal 12 (Responsible Consumption and Production) by encouraging students to design a magnet detection device for body inquiries. It encourages students to consider how their design choices, problemsolving approaches, and project outcomes align with Sustainable
Through thoughtful component selection, waste minimization, and problemsolving, students practice efficient resource utilization and responsible production.
The "Emergency Switch" project aligns with SDG 12 by emphasizing responsible consumption and production. Through efficient circuit design and component selection, students create an emergency alert system that serves its purpose without waste. This mirrors SDG 12's
Development Goal 12's principles of responsible consumption and production.
The reflection question prompts students to relate their project to sustainable consumption. By evaluating their design's efficiency, resource use, and real-world applicability, students recognize
relates to SDG 11 by ressing the need for sustainable and resilient cities. Designing a doorbell system enhances security and convenience, contributing to
question prompts students to consider how their doorbell design enhances the functionality and safety of urban
Project 3:
the overall safety and efficiency of urban spaces. This aligns with SDG 11's focus on making cities and human settlements inclusive, safe, resilient, and sustainable.
environments. By reflecting on the role of technology in creating safer communities, students are encouraged to think about ways to contribute to sustainable urban development.
reflecting on how their project supports infant wellbeing, students gain insights into their potential role in promoting better health outcomes. The reflection question encourages students to think about the role of safe and reliable electrical
sustainable industrialization. Designing a circuit to measure systems in various industries. By reflecting on the significance of their project in ensuring occupational safety and efficient infrastructure, students gain an understanding of their contribution to sustainable development.
ie" project aligns with SDG 16 by addressing the honesty, which contributes to promoting peace, justice, and strong institutions.
The "Turn on the Radio" project relates to SDG 17 by highlighting the importance of ips to achieve sustainable development. Designing a simple radio receiver touches upon the role of communication technology in fostering collaboration, sharing knowledge, and promoting sustainable solutions.
The "How Telegraph Works" project aligns with SDG 17 by emphasizing the importance of global partnerships for
The reflection question prompts students to explore the ethical implications of their lie detector project. By reflecting on the role of technology in fostering trust and accountability, students consider how their project aligns with the principles of a just and peaceful society.
The reflection question encourages students to think about the role of communication in achieving global goals. By reflecting on how their radio project can facilitate information sharing and collaboration, students consider their contribution to building effective partnerships.
The reflection question prompts students to explore the significance of
sustainable development. Understanding the functioning of a telegraph reflects the historical and technological aspects of communication, which are vital for achieving the global goals. communication systems in connecting people and societies. By reflecting on their project's role in historical and modern
11
Project 11: Light up the Museum
by peaceful societies. Designing a megaphone for a tourist guide supports the goals of SDG 16.
The "Secure Your Home"
The reflection question encourages students to consider how their project can enhance communication and information sharing. By reflecting on how their megaphone design can contribute to effective communication in public spaces, students recognize their role in promoting peaceful and inclusive societies.
The reflection question prompts students to consider the role of technology in making homes and cities safer. By reflecting on how their security system project can contribute to community wellents recognize their impact on building sustainable societies. land use.
The reflection ion prompts students to think about the broader implications of their project on ecosystem sustainability. By considering how their moisture detection system can contribute to the care and management of
plants and soil, students reflect on their role in protecting and restoring terrestrial ecosystems.
The Engineering Design Process
The Engineering Design Process is a systematic approach used by engineers and designers to solve problems and create innovative solutions. It provides a structured framework for developing new products, processes, or systems by following a series of well-defined steps. This process is not only applicable in engineering but is also widely used in various STEM disciplines to tackle challenges and develop creative solutions.
The typical steps of the Engineering Design Process are: Icons Phases
Define the Problem
Brainstorm Ideas
Design and Plan
Details
• Present the project's objectives and requirements to students, such as building a model, attaching it to the smarthub, and programming it.
• Encourage students to understand the purpose of the project, its context, and what they need to achieve.
• Engage students in brainstorming sessions where they envision and sketch possible solutions.
• Encourage creativity and diverse ideas, allowing students to explore various design options.
• Guide students to describe their chosen model's structure and function in detail.
• Help them plan how to use STEM Kit components effectively to build their models.
• Facilitate discussions on how they intend to program the model to perform specific
Build and Create
Test and Evaluate
Iterate and Improve
Communicate and Share
actions.
• Provide assistance as needed while students assemble their models.
• Encourage hands-on exploration, experimentation, and iteration as they build and refine their designs.
• Support students in testing their models and programming, providing guidance for troubleshooting.
• Ask questions to help them critically assess whether the model meets the specified requirements.
• Encourage students to identify areas for improvement based on testing outcomes.
• Guide them in making iterative changes to their designs to enhance performance and functionality.
• Organize opportunities for students to present their projects to peers or the class.
• Encourage them to explain their design choices, programming logic, and problemsolving strategies.
Fostering Social Skills
The STEM projects outlined in the "STEM Resource Book" provide opportunities for students to develop important social skills alongside their technical knowledge. These social skills are crucial for effective collaboration, communication, and engagement in real-world scenarios. Here's a brief introduction to some of the key social skills covered in these projects:
S# Social Skills
1 Collaboration
Details
Working together is a fundamental skill across all projects. Students learn to cooperate, share ideas, delegate tasks, and contribute collectively to achieve project goals. They experience the benefits of pooling strengths and perspectives to create more comprehensive and innovative solutions.
2 Communication Effective communication is vital in sharing ideas, presenting findings, and troubleshooting challenges. Through the projects, students practice articulating their thoughts clearly, listening actively to peers, and engaging in meaningful discussions that promote understanding.
3 ProblemSolving
4 Empathy and Respect
Engaging in the engineering design process exposes students to various challenges. They learn to approach problems analytically, brainstorm solutions, evaluate alternatives, and make decisions collaboratively. These skills are applicable beyond STEM and are valuable in everyday decision-making.
Encouraging students to appreciate different viewpoints, respect diverse ideas, and consider the feelings of their peers fosters a positive and inclusive learning environment. These skills promote effective teamwork and strengthen relationships within the group.
5 Critical Thinking
6 Time Management
As students work on designing, building, testing, and refining their projects, they enhance their critical thinking abilities. They learn to analyze situations, make informed judgments, and consider implications and consequences of their choices.
Working on projects requires efficient time management. Students develop skills in setting priorities, allocating time to tasks, meeting deadlines, and juggling multiple responsibilities –all of which are valuable in academic and professional contexts.
7 Conflict Resolution Collaboration can sometimes lead to disagreements or conflicts. Through open discussions and respectful negotiations, students learn how to address conflicts, find common ground, and work towards mutually satisfactory solutions.
8 Presentation Skills
9 Reflection
Sharing their projects with peers and instructors hones students' presentation skills. They practice structuring their thoughts, speaking confidently, and using visuals effectively to convey complex information.
After completing each project, students reflect on their experiences, successes, challenges, and lessons learned. This practice encourages self-awareness, self-assessment, and the
ability to apply insights from one project to others.
By incorporating these social skills into STEM projects, educators prepare students not only for academic success but also for success in their future careers and personal lives. These skills empower students to collaborate effectively, contribute meaningfully to teams, and navigate the complexities of a rapidly changing world.
S# Project
1 Project 1: Detect the Stone
2 Project 2: Emergency Switch
3 Project 3: Power up the Toys
Core - Social Skills
• Collaboration: Students collaborate to design a magnet detection device, sharing ideas and working together.
• Communication: Students discuss device components, brainstorm ideas, and present their solutions.
• Problem-Solving: Students troubleshoot circuit issues and optimize their magnet detection device.
• Empathy and Respect: Designing a device for a sensitive context (body inquiry) requires empathy and respect for ethical considerations.
• Time Management: Working within a given timeframe encourages students to manage their time during the project.
• Presentation Skills: Students practice presenting their solutions, enhancing their communication skills.
• Reflection: Reflection prompts students to consider how their technical skills can contribute to sustainable consumption.
• Collaboration: Students collaborate to design an emergency switch, incorporating different ideas for effective functionality.
• Communication: Students discuss circuit designs, share insights, and present their solutions.
• Problem-Solving: Students troubleshoot circuit issues to ensure the emergency switch's effectiveness.
• Empathy and Respect: Designing for emergency situations shows empathy for potential users' safety.
• Time Management: Working within a given timeframe encourages students to manage their time.
• Presentation Skills: Presenting solutions enhances students' communication skills.
• Reflection: Reflection prompts students to consider how their design contributes to sustainable consumption in emergency scenarios.
• Collaboration: Students collaborate in groups to design and test electronic toy circuits, sharing ideas and working together to achieve a common goal.
• Communication: Students must communicate their
design choices, circuit connections, and results to their group members, promoting effective information sharing.
• Problem-Solving: Students identify challenges in circuit design, troubleshoot issues, and find solutions together, fostering critical thinking and innovation.
• Empathy and Respect: Collaborative discussions encourage understanding of peers' perspectives, promoting empathy and respectful interactions.
• Critical Thinking: Students evaluate different circuit configurations, make informed decisions, and assess the impact of design choices on the toy's performance.
• Time Management: Planning and implementing the project within a specified timeframe requires students to manage their time effectively.
• Presentation Skills: Students present their toy prototypes and findings to their classmates, enhancing their presentation and public speaking skills.
• Reflection: The reflection component encourages students to think critically about their project and their role in the group, enhancing self-awareness and selfassessment.
• Collaboration: Students collaborate to design a doorbell circuit, combining their ideas and technical skills to create an effective solution.
• Communication: Effective communication is crucial for explaining design choices, circuit connections, and the functioning of the doorbell system.
• Problem-Solving: Students troubleshoot circuit issues, design challenges, and potential interference, fostering critical thinking and creativity.
• Empathy and Respect: Collaborative discussions promote understanding of diverse perspectives, contributing to respectful interactions.
• Critical Thinking: Students evaluate different design components, considering factors like sound quality, ease of use, and integration into the house.
• Time Management: Planning, building, and presenting the doorbell project within a timeframe encourages students to manage their time effectively.
• Presentation Skills: Students present their doorbell prototypes and solutions to their peers, enhancing their presentation abilities.
• Reflection: The reflection question encourages students to relate their project to Sustainable Development Goal 11 (Sustainable Cities and Communities), prompting
4 Project 4: Ring the Bell
5
6
them to consider how their doorbell system can enhance safety and convenience in urban environments.
• Collaboration: Students collaborate to design a fishshaped LED bait, combining their creativity and circuit knowledge to create an innovative solution.
• Communication: Effective communication is vital for sharing design ideas, explaining circuit connections, and discussing the integration of the LED bait into fishing scenarios.
• Problem-Solving: Students troubleshoot circuit issues, devise ways to waterproof the LED, and optimize the design for effective fish attraction.
• Empathy and Respect: Collaborative discussions foster understanding of each other's viewpoints, leading to respectful interactions.
• Critical Thinking: Students assess the combination of water-activated LED and fish shape, considering how it mimics natural prey and attracts fish.
• Time Management: Planning, building, and presenting the LED bait within a timeframe encourage students to manage their time effectively.
• Presentation Skills: Students present their fish-shaped LED bait and its functionality to peers, improving their presentation skills.
• Reflection: The reflection question prompts students to connect their project with Sustainable Development Goal 2 (Zero Hunger), encouraging them to think about the potential applications of their LED bait in addressing food security challenges.
• Collaboration: Students collaborate to design a wet diaper alarm, combining their knowledge to create a practical and effective solution.
• Communication: Effective communication is crucial for sharing design concepts, explaining circuit connections, and discussing the alarm's functionality.
• Problem-Solving: Students troubleshoot circuit issues, consider appropriate moisture detection mechanisms, and optimize the alarm's performance.
• Empathy and Respect: Collaborative discussions promote understanding of different viewpoints, fostering respectful interactions.
• Critical Thinking: Students evaluate different components for moisture detection, considering sensitivity, reliability, and comfort for babies.
• Time Management: Planning, building, and presenting the wet diaper alarm within a timeframe encourages
Project 5: Night Fishing
Project 6: Wet Diaper Alarm
7
effective time management.
• Presentation Skills: Students present their wet diaper alarm prototype and its features to peers, enhancing their presentation abilities.
• Reflection: The reflection question prompts students to relate their project to Sustainable Development Goal 3 (Good Health and Well-being), encouraging them to think about the potential impact of their alarm on infant care.
• Collaboration: Students collaborate to design a current measuring circuit, sharing ideas and working together.
• Communication: Students discuss circuit designs, brainstorm ideas, and present their solutions.
• Problem-Solving: Students troubleshoot circuit issues and optimize their current measurement circuit.
• Empathy and Respect: Students consider safety implications and potential hazards, showing empathy for users.
• Time Management: Working within a given timeframe encourages students to manage their time during the project.
• Presentation Skills: Students practice presenting their solutions, enhancing their communication skills.
• Reflection: Reflection encourages students to consider how safety measures align with their design choices.
• Empathy and Respect: Students explore ethical implications of lie detection technology, fostering empathy for privacy concerns.
• Communication: Ethical discussions around lie detection prompt students to communicate their viewpoints effectively.
• Problem-Solving: Students analyze how lie detectors function and consider their societal impact.
• Empathy and Respect: Ethical discussions foster respectful consideration of differing viewpoints.
• Time Management: Working within a given timeframe encourages students to manage their time.
• Presentation Skills: Presenting solutions allows students to communicate their ethical and technical analysis.
• Reflection: Reflection prompts students to consider the broader ethical context of lie detection technology.
• Collaboration: Students collaborate to design a functional radio project, incorporating different ideas.
• Communication: Students discuss radio system components, sharing insights during the design process.
• Problem-Solving: Students troubleshoot circuitry and
Project 7: Safety First
8 Project 8: Don’t Lie
9 Project 9: Turn on the Radio
10
11
Project 10: How Telegraph Works
12
Project 11: Light up the Museum
components, enhancing problem-solving abilities.
• Empathy and Respect: Consideration of users' needs shows empathy and respect for the audience.
• Time Management: Working within a given timeframe encourages students to manage their time.
• Presentation Skills: Presenting radio solutions enhances students' ability to explain technical concepts.
• Reflection: Reflection encourages students to consider the importance of communication systems like radios.
• Communication: Students discuss and illustrate how telegraphs function, improving communication skills.
• Problem-Solving: Students work through the process of designing a telegraph system, honing problem-solving skills.
• Critical Thinking: Students analyze the historical and technical aspects of telegraphs.
• Empathy and Respect: Discussion around telegraph impact fosters empathy for historical communication challenges.
• Time Management: Working within a given timeframe encourages students to manage their time.
• Presentation Skills: Presenting their telegraph solutions improves communication abilities.
• Reflection: Reflection prompts students to consider the implications of telegraph technology in modern contexts.
• Collaboration: Students collaborate on designing effective lighting for museum artifacts.
• Problem-Solving: Students troubleshoot lighting design to optimize museum exhibits.
• Empathy and Respect: Thoughtful lighting choices show empathy for the viewer's experience.
• Communication: Discussing lighting impacts enhances communication skills.
• Time Management: Working within a timeframe encourages students to manage their time.
• Presentation Skills: Presenting lighting solutions enhances communication abilities.
• Reflection: Reflection prompts students to consider the impact of lighting on viewers' experiences.
Project 12: Backstage Laughter
• Collaboration: Students collaborate on designing a laughter effect project, sharing ideas for effective implementation.
• Problem-Solving: Students troubleshoot and optimize their laughter effect circuits.
• Empathy and Respect: Ethical discussions around laugh
13 Project 13: Help the Tourist Guide
tracks encourage respectful consideration of media impact.
• Time Management: Working within a timeframe encourages students to manage their time.
• Presentation Skills: Presenting their laughter effect solutions enhances communication abilities.
• Reflection: Reflection prompts students to consider the role of laugh tracks in media.
• Collaboration: Students collaborate to design a functional megaphone, incorporating different ideas.
• Problem-Solving: Students troubleshoot and optimize their voice amplification circuits.
• Empathy and Respect: Thoughtful design of the megaphone shows empathy for users' needs.
• Time Management: Working within a timeframe encourages students to manage their time.
• Presentation Skills: Presenting megaphone solutions enhances communication abilities.
• Reflection: Reflection prompts students to consider the importance of communication tools.
• Collaboration: Students collaborate on designing effective room cooling solutions.
• Problem-Solving: Students troubleshoot and optimize their air conditioning circuits.
• Communication: Ethical discussions around energy consumption encourage effective communication.
14
Project 14: Hotel Room Air Conditioning
• Empathy and Respect: Thoughtful design of energyefficient systems shows respect for environmental concerns.
• Time Management: Working within a timeframe encourages students to manage their time.
• Presentation Skills: Presenting air conditioning solutions enhances communication abilities.
• Reflection: Reflection prompts students to consider the implications of energy-efficient cooling.
• Collaboration: Students collaborate on designing a moisture detection system for plants.
• Empathy and Respect: Thoughtful design for plant care fosters empathy for living organisms.
15 Project 15: Plant Watcher
• Problem-Solving: Students troubleshoot and optimize the moisture detection system.
• Empathy and Respect: Consideration of plant needs shows empathy for the natural world.
• Time Management: Working within a timeframe
encourages students to manage their time.
• Presentation Skills: Presenting moisture detection solutions enhances communication abilities.
• Reflection: Reflection prompts students to consider the importance of ecosystems and sustainability.
By guiding students through these projects, educators can help them develop a diverse range of social skills that are essential for effective collaboration, communication, problemsolving, empathy, critical thinking, time management, conflict resolution, presentation skills, and reflection. These skills equip students with the ability to work effectively in teams, adapt to various challenges, and navigate complex scenarios, preparing them for success in both academic and real-world contexts.
Makerspace
What is a Makerspace?
A makerspace is a collaborative workspace inside a school, library, or public/private facility for making, learning, exploring, and sharing. Here, students have the tools and resources to design, experiment, build, and invent. Makerspaces typically include a variety of materials and equipment, ranging from high-tech to no-tech, all aimed at fostering creativity, problem-solving, and critical thinking.
Features of an Ideal Makerspace
1. Space: The ideal makerspace should be spacious enough to accommodate groups of students working on projects. It should be well-lit and have areas for both individual and group work.
2. Furniture:
• Flexible Seating: Chairs and tables that are easily movable and can be reconfigured for different tasks.
• Storage Units: Shelves and drawers for organizing tools, materials, and student projects.
• Workbenches: Sturdy surfaces for hands-on activities.
• Display Boards: Walls or boards to showcase projects, ideas, or instructions.
3. Equipment Needed:
• Electronics STEM Kits: A core tool for the Grade 5 makerspace, these kits integrate hardware and software to produce a comprehensive learning tool.
• Computers or Tablets: For programming and accessing digital resources.
• General STEM Tools: Rulers, protractors, magnifying glasses, and basic lab equipment.
• Safety Equipment: Safety goggles, first aid kit, gloves, etc.
4. STEM Resource Book: This will guide students and educators in carrying out projects aligned with NGSS, the National Curriculum of England, and the Common Core State Standards for Mathematics.
Importance of a Makerspace in Schools
1. Enhanced Learning: Makerspaces enable hands-on learning, making complex concepts more accessible.
2. Fosters Creativity: Provides an environment where students can freely express and test out their ideas.
3. Teamwork: Students learn to collaborate, delegate tasks, and work towards a common goal.
4. Problem-solving: Tackling real-world challenges makes students more adept at thinking critically.
5. Prepares for the Future: Engaging with technology and tools prepares students for future job roles and challenges.
Executing STEM Activities in the Makerspace
1. Planning: Begin with the end in mind. Identify the learning outcomes you aim to achieve from the activity.
2. Group Formation: Divide students into small groups to encourage collaboration.
3. Introduction: Introduce the Electronics STEM Kit and how it can be used. Brief students on the activity using the STEM Resource Book.
4. Hands-on Activity: Allow students to build, experiment, and iterate using the kits. Ensure that they refer to the STEM Resource Book for guidance.
5. Reflection: Post-activity, allow students to discuss their findings, challenges faced, and what they learned.
6. Showcase: Encourage students to display their projects, explaining the science and math concepts they applied.
7. Safety: Always stress the importance of following safety guidelines, especially when using tools and equipment.
Standard Operating Procedure (SOP) for a Makerspace
1. Objective:
Provide a safe, organized, and productive environment for students to explore, invent, and learn using various tools and materials available in the makerspace.
2. Scope:
This SOP applies to all students, educators, and visitors within the makerspace area.
3. Responsibilities:
• Educators/Staff: Supervise activities, ensure the safety and proper use of tools/equipment, provide necessary training, and maintain equipment.
• Students: Comply with all guidelines, work safely, and respect all equipment and fellow makers.
4. Access:
• Makerspace access should be limited to authorized personnel and students during scheduled times.
• All users must sign in and out of the makerspace, noting their purpose of visit.
5. Safety:
• Before using any tool or equipment, students must receive proper training.
• Safety equipment like goggles, gloves, and aprons should be worn as required.
• No food or drink is allowed in the makerspace.
• First aid kits and fire extinguishers should be easily accessible.
6. Equipment Usage:
• All equipment should have clear, written instructions posted nearby.
• Users must report any damage or malfunction immediately.
• After use, equipment must be returned to its designated place and left in a clean and usable state for the next user.
7. Materials:
• All materials must be stored in their designated areas.
• Users must log materials used for inventory and restocking purposes.
• Waste should be disposed of properly in the provided bins.
8. Conduct:
• Respect fellow makers; do not interrupt or hinder someone else’s project.
• Clean up after completing a project or task.
• Notify staff of any issues, concerns, or suggestions.
• Always ask if unsure about equipment use or any makerspace procedure.
9. Training:
• Regular workshops should be held to train students on the use of new equipment or software.
• New users should undergo an orientation session before accessing the makerspace.
10. Maintenance:
• A routine check of all tools and equipment should be carried out to ensure they are in good working condition.
• Expired or worn-out materials should be discarded and replaced.
• Cleaning routines must be established to maintain the hygiene and tidiness of the makerspace.
11. Project Storage:
• Designate a space where students can store ongoing projects.
• All projects should be labeled with the student's name, class, and date.
12. Showcase:
• A dedicated space should be available for showcasing exemplary projects.
• Educators can rotate the showcased projects based on relevance, innovation, and educational value.
13. Continuous Improvement:
• Collect feedback regularly from users to understand what can be improved.
• Explore new tools, materials, and technologies to keep the makerspace updated.
14. Emergency Procedures:
• Clearly display emergency procedures, including evacuation routes.
• Train staff and students on how to respond to emergencies like fires, electrical failures, or injuries.
15. Periodic Review:
• This SOP should be reviewed at least annually to ensure its relevance and effectiveness.
In conclusion, a well-structured SOP ensures that the makerspace remains a hub of creativity while being safe and organized. Adhering to these procedures ensures that the makerspace is beneficial for all and remains a vital resource for students for years to come.
Scheme of Work
Learning Objective
Understand the principles of electricity and magnetism.
Design and build a magnet detection device.
Present the solution to peers.
Resources
Activity
Week 1: Introduction and Brainstorming
Introduction to the project and SDG 12. Brainstorming on magnet detection device design.
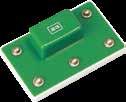
Electronics Kit (Circuit Kit:
Magnetically Activated Lamp)
Pencil STEM Resource Book – Grade 4
Week 2: Circuit Building and Prototype
Understand circuit instructions. Build the magnet detection circuit. Create a prototype with the circuit inside.
Week 3: Presentation and Reflection
Present the prototype to peers. Discuss how the project relates to sustainable consumption (SDG 12). Reflect on the learning journey and sustainable practices.
Week 1: Introduction and Circuit Concepts
Explore different circuit connections (series and parallel).
Design and build an emergency switch.
Present the solution to peers.
Electronics Kit (Circuit Kit:
Magnetically Activated Lamp)
Pencil STEM Resource Book – Grade 4
Introduction to the project and SDG 12. Understanding circuit connections (series and parallel).
Week 2: Circuit Building and Prototype
Design and build the emergency switch circuit.
Create a prototype with the circuit inside.
Week 3: Presentation and Reflection
Present the prototype to peers.
Discuss how the project relates to sustainable consumption (SDG 12). Reflect on the learning journey and
Discuss how the project relates to peace, justice, and strong institutions (SDG 16).
Reflect on the learning journey and sustainable practices.
Week 1: Introduction and Radio Receivers
Introduction to the project and SDG 17. Understanding the principles of radio receivers.
Week 2: Circuit Building and
solution to peers.
STEM Resource Book – Grade 4
Timer or phone with timer
Prototype Design and build the radio receiver circuit. Create a prototype with the circuit inside.
Week 3: Presentation and Reflection
Present the prototype to peers. Discuss how the project relates to partnerships for the goals (SDG 17). Reflect on the learning journey and sustainable practices.
Week 1: Introduction and Telegraph Basics Introduction to the project and SDG 17. Exploring the concept of telegraphs and communication.
Week 2: Circuit Building and Prototype Design and build the telegraph simulation circuit.
Create a prototype with the circuit inside.
Week 3: Presentation and Reflection
Timer or phone with timer LEDs and photoresistors.
Create a prototype with the circuit inside, showcasing its energysaving features.
Week 3: Presentation and Reflection
Present the prototype to peers.
Discuss how the project relates to affordable and clean energy (SDG 7).
Reflect on the learning journey and sustainable practices.
8).
Reflect on the learning journey and sustainable practices.
Week 1: Introduction and Sound Amplification
Introduction to the project and SDG 16.
Understanding the importance of clear
prototype circuit within a megaphone shape.
Present the solution to peers.
Pencil STEM Resource Book – Grade 4
Timer or phone with timer communication in public spaces.
Week 2: Circuit Building and Prototype Design and build the megaphone circuit for sound amplification. Create a prototype with the circuit inside, showcasing its
reate a prototype with the circuit inside, demonstrating its
Week 3: Presentation prototype
Discuss how the project relates to affordable and clean
Reflect on the learning sustainable practices.
Week 1: Introduction and Soil Moisture
44
45
detection system using an electrolytic capacitor.
Build a prototype circuit for soil moisture detection.
Present the solution to peers.
Kit: Magnetically Activated Lamp)
Pencil STEM Resource Book – Grade 4
Timer or phone with timer
Detection
Introduction to the project and SDG 15. Understanding the significance of monitoring soil moisture for plant health.
Week 2: Circuit
Building and Prototype
Design and build the moisture detection circuit using an electrolytic capacitor. Create a prototype with the circuit inside, showcasing its moisture detection capability.
Week 3: Presentation and Reflection
Present the prototype to peers. Discuss how the project relates to life on land (SDG 15). Reflect on the learning journey and sustainable practices.
Curriculum Mapping
1 Project 1: Detect that Stone
Understand the concept of magnetism and its practical applications. Investigate the function of a simple electric circuit. Demonstrate the ability to construct and modify circuits using Snap Circuits. Understand the connection between electricity and everyday scenarios.
4-PS3-4: Apply scientific ideas to design, test, and refine a device that converts energy from one form to another.
Electricity: Investigate the effects of changing the component s in a circuit and use results to test a hypothesis.
4.NF.C.6: Use decimal notation for fractions with denominator s 10 or 100.
Sustainable Development Goal 12: Responsible Consumption and Production.
2 Project 2: Emergency Switch
Explore the concept of emergency alert systems. Investigate the differences between series and parallel circuits. Design and construct an emergency alert system using Snap Circuits. Understand the role of electrical circuits in safety devices.
4-PS3-4: Apply scientific ideas to design, test, and refine a device that converts energy from one form to another.
Electricity: Describe the way that a switch opens and closes a circuit, and associate this with whether or not a lamp lights in a simple series circuit.
4.MD.A.3: Apply the area and perimeter formulas for rectangles in real-world and mathematica l problems.
Sustainable Development Goal 12: Responsible Consumption and Production.
Electrical Engineer: Design, develop, and test electrical systems and components.
3 Project 3: Power Up the Toys
Explore the concept of electrical power and its practical applications. Investigate series and parallel connections of batteries. Design and construct a circuit to power electronic toys. Understand the
4-PS3-4: Apply scientific ideas to design, test, and refine a device that converts energy from one form to another.
Electricity: Construct simple series circuits and compare them with parallel circuits.
4.NF.C.6: Use decimal notation for fractions with denominator s 10 or 100.
Sustainable Development Goal 7: Affordable and Clean Energy.
Firefighter: Utilize emergency alert systems to ensure safety during critical situations. Emergency Management: Design and implement systems for alerting and responding to emergencies.
Mining or Logistics Engineer: Design efficient energy delivery systems for various applications.
Materials Scientist: Study and develop new materials for batteries and electronic components.
4
Project 4: Ring the Bell
impact of different circuit configurations on power delivery.
Explore the concept of electrical signaling and its applications. Investigate different methods of generating alarms. Design and construct a doorbell system using Snap Circuits. Understand how electrical circuits can be used for communication
4-PS3-4: Apply scientific ideas to design, test, and refine a device that converts energy from one form to another.
Electricity: Construct circuits with a switch to make a lamp light in a series circuit, and in a parallel circuit, to make two lamps light.
4.MD.A.1: Know relative sizes of measuremen t units within one system of units, including km, m, cm; kg, g; lb, oz.; l, ml; hr, min, sec.
Sustainable Development Goal 11:
Sustainable Cities and Communities.
Electrical Engineer: Design signaling systems for various applications, including doorbells and alarms.
Corporate Security Officer: Implement and manage security systems in commercial settings.
5 Project 5: Night Fishing
Explore the concept of light emission and its use in attracting fish. Investigate water-activated circuits. Design and construct a fish-shaped LED bait for night fishing. Understand the role of light in aquatic environments.
4-PS3-4: Apply scientific ideas to design, test, and refine a device that converts energy from one form to another.
Electricity: Use recognised symbols when representin g a simple circuit in a diagram.
4.OA.C.5: Generate a number or shape pattern that follows a given rule.
Sustainable Development Goal 2: Zero Hunger. Fisheries Restoration Biologist: Study aquatic environments and their ecosystems. Environmental Specialist: Develop eco-friendly solutions for outdoor activities.
6 Project 6: Wet Diaper Alarm
Explore the concept of moisture detection and its practical applications. Investigate how moisture can trigger an electrical response. Design and construct a wet diaper alarm using Snap Circuits. Understand how sensors can be used for monitoring.
4-PS3-4: Apply scientific ideas to design, test, and refine a device that converts energy from one form to another.
Electricity: Use recognised symbols when representin g a simple circuit in a diagram.
4.MD.A.2: Use the four operations to solve word problems involving distances, intervals of time, liquid volumes, masses of objects, and money, including problems involving simple fractions or decimals.
Sustainable Development Goal 3: Good Health and Well-being.
Astronaut: Utilize sensors and monitoring systems for life support in space.
Fighter Pilot: Incorporate moisture detection systems in aircraft.
Project 7: Safety First
Explore the concept of current measurement and its importance in safety. Investigate how different circuits affect current flow. Design and construct a current measurement tool using Snap Circuits. Understand the connection between electrical safety and current measurement.
4-PS3-4: Apply scientific ideas to design, test, and refine a device that converts energy from one form to another.
Electricity: Use recognised symbols when representin g a simple circuit in a diagram.
4.MD.A.2: Use the four operations to solve word problems involving distances, intervals of time, liquid volumes, masses of objects, and money, including problems involving simple fractions or decimals.
Sustainable Development Goal 9: Industry, Innovation, and Infrastructure
Occupational Safety Manager: Ensure electrical safety in workplaces and environments. Human Resources Manager: Implement safety protocols and training for employees.
8 Project 8: Don't Lie
Explore the concept of lie detection using physiological signals. Investigate how physiological signals can be measured using circuits. Design and construct a simple lie detector using Snap Circuits. Understand the connection between physiological responses and truthfulness.
4-PS3-4: Apply scientific ideas to design, test, and refine a device that converts energy from one form to another.
Electricity: Use recognised symbols when representin g a simple circuit in a diagram.
4.MD.A.2: Use the four operations to solve word problems involving distances, intervals of time, liquid volumes, masses of objects, and money, including problems involving simple fractions or decimals.
Sustainable Development Goal 16: Peace, Justice, and Strong Institutions.
Police Officer: Utilize lie detection techniques during investigations. University President: Implement technology for security and integrity.
9 Project 9: Turn on the Radio
Explore the concept of radio receivers and transmission. Investigate how tuning capacitors affect signal reception. Design and construct a simple radio receiver using Snap Circuits. Understand the role of radio waves in
4-PS3-4: Apply scientific ideas to design, test, and refine a device that converts energy from one form to another.
Electricity: Identify the effects of changing the number of bulbs or batteries in a series or parallel circuit.
4.MD.A.2: Use the four operations to solve word problems involving distances, intervals of time, liquid volumes, masses of objects, and money, including problems involving simple fractions or
Sustainable Development Goal 17: Partnerships for the Goals.
Electrical Engineer: Design and optimize radio communication systems. Communication Specialist: Manage and maintain radio transmission equipment.
1 0
Project 10: How Telegraph Works
communication decimals.
Explore the concept of telegraphy and Morse code. Investigate how signals can be transmitted over long distances. Design and construct a basic telegraph circuit using Snap Circuits. Understand the historical significance of telegraphy.
4-PS3-4: Apply scientific ideas to design, test, and refine a device that converts energy from one form to another.
Electricity: Use recognised symbols when representin g a simple circuit in a diagram.
4.OA.C.5: Generate a number or shape pattern that follows a given rule.
1 1 Project 11: Light up the Museum
Explore the concept of energyefficient lighting and its applications. Investigate the use of LEDs and photo-resistors in lighting systems. Design and construct a lighting project for a museum using Snap Circuits. Understand the importance of energy conservation in public spaces.
4-PS3-4: Apply scientific ideas to design, test, and refine a device that converts energy from one form to another.
Electricity: Investigate the effects of changing the component s in a circuit and use results to test a hypothesis.
4.NF.C.7: Compare two decimals to hundredths by reasoning about their size.
Sustainable Development Goal 17: Partnerships for the Goals.
Electrical Engineer: Develop communication systems and signaling technologies. Telecommunication s Operator: Manage and maintain telecommunication networks.
1 2 Project 12: Backstage Laughter
Explore the concept of sound effects and their role in entertainment. Investigate the integration of sound and lighting systems. Design and construct a laughter effect project for a television show using Snap Circuits. Understand the relationship between sound
4-PS3-4: Apply scientific ideas to design, test, and refine a device that converts energy from one form to another.
Electricity: Use recognised symbols when representin g a simple circuit in a diagram.
4.NF.A.1: Explain why a fraction a/b is equivalent to a fraction (n × a)/(n × b) by using visual fraction models.
Sustainable Development Goal 7: Affordable and Clean Energy.
Electrical Engineer: Design energyefficient lighting systems for various applications. Museum Curator: Implement sustainable lighting solutions to preserve artifacts. Lighting Specialist: Develop innovative lighting technologies for architectural spaces.
Sustainable Development Goal 8: Decent Work and Economic Growth.
Sound Engineer: Design and implement sound effects for various media.
Electrical Engineer: Develop circuitry for sound and lighting synchronization. Television Producer/Director: Utilize sound and lighting effects for engaging content.
1 3
1 4
Project 13: Help the Tourist Guide
and entertainment production.
Explore the concept of amplification and its applications. Investigate how megaphones can assist in crowd control and communication
Design and construct a megaphone with an amplifier circuit using Snap Circuits. Understand the role of technology in enhancing public safety and communication
4-PS3-4: Apply scientific ideas to design, test, and refine a device that converts energy from one form to another.
Electricity: Use recognised symbols when representin g a simple circuit in a diagram.
4.NF.A.1: Explain why a fraction a/b is equivalent to a fraction (n × a)/(n × b) by using visual fraction models.
Sustainable Development Goal 16: Peace, Justice, and Strong Institutions.
Tourist Office Manager: Utilize communication technology for providing information to tourists.
Electrical Engineer: Design amplification systems for various applications.
Police Officer/Crowd Controller: Implement technology for crowd management and safety.
1 5
Project 14: Hotel Room Air Conditionin g
Explore the concept of logical operators and their applications. Investigate how logical elements can control electrical systems. Design and construct a simulated hotel room air conditioning system using Snap Circuits. Understand the significance of energyefficient systems in the hospitality industry.
Project 15: Plant Watcher
4-PS3-4: Apply scientific ideas to design, test, and refine a device that converts energy from one form to another.
Electricity: Use recognised symbols when representin g a simple circuit in a diagram.
4.OA.A.1: Interpret a multiplicatio n equation as a comparison.
Sustainable Development Goal 7: Affordable and Clean Energy.
Hotel Manager: Implement energyefficient systems to reduce environmental impact.
Heating and Air Conditioning
Technician: Install and maintain HVAC systems for optimal performance.
Construction Engineer: Integrate electrical systems into building infrastructure.
Explore the concept of moisture detection and its applications
4-PS3-4: Apply scientific ideas to design, Electricity: Use recognised symbols when
4.OA.A.1: Interpret a multiplicatio n equation as a
Sustainable Development Goal 15: Life on Land.
Botanist: Utilize technology to monitor and improve plant health.
in plant care. Investigate how electrolytic capacitors can sense moisture levels. Design and construct a moisture detection system for potted plants using Snap Circuits. Understand the importance of technology in supporting sustainable agriculture.
test, and refine a device that converts energy from one form to another. representin g a simple circuit in a diagram. comparison.
Electrical Engineer: Develop sensor systems for precision agriculture. Agricultural Scientist: Study and develop sustainable farming practices.
Project-wise Lesson Plan and Answer Key
Detect that Stone
Project 1 : STEM Challenge
Magnets are natural materials or objects that create a magnetic field. This magnetic field is not seen by the eyes but its effect can be observed when it uses a force that pulls on materials, such as iron, steel, nickel, cobalt, etc. Magnets are frequently used in daily life from
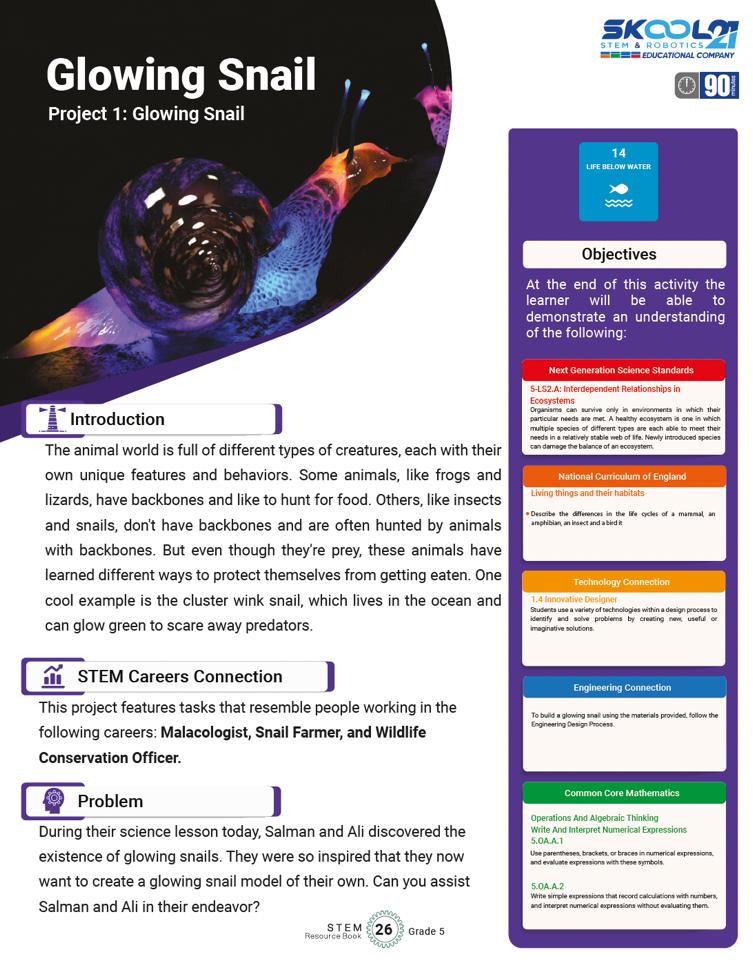
At the end of this activity the learner will be able to demonstrate an understanding of the following: Objectives
This project features tasks that resemble people working in the Problem
Imagine that there are lodestone (natural magnet) thieves in your city. These thieves steal natural lodestones to sell in the market in an illegal way. The police are calling for projects from the local citizens to simply detect the lodestone while making body inquiries.
Objective:
Lesson Plan: Detect that Stone (Project 1)
Week 1: Introduction to Magnet Detection and Project Planning
Introduce the concept of magnet detection and its applications. Understand the project's objectives, design requirements, and learning outcomes. Begin brainstorming ideas for the magnet detection device.
Duration: 45 minutes
S# Phase Duration Details
1 Introduction 15 minutes
2 Exploring Magnetism 15 minutes
3 Project Planning and Brainstorming 15 minutes
• Present the project's context: designing a magnet detection device for police investigations.
• Explain the NGSS, National Curriculum of England, Common Core Math, and SDG connections.
• Highlight the STEM Career Connection: Electrical Engineer.
• Discuss basic concepts of magnetism and its properties.
• Show real-life examples of magnet applications.
• Distribute STEM Resource Book - Grade 4 to students.
• Explain the design requirements and show examples of magnet detection devices.
• In pairs or small groups, students brainstorm device names and discuss design properties.
Week 2: Circuit Building and Prototyping
Objective:
Understand the components of the circuit kit and their functions. Construct the magnet detection circuit using Snap Circuits. Analyze the circuit's functionality and troubleshoot any issues.
Duration: 45 minutes
S# Phase Duration Details
1 Introduction to Electronics Kit 10 minutes
2 Circuit Building and Prototyping 30 minutes
3 Testing and Troubleshooting 5 minutes
• Familiarize students with the components in the Magnetically Activated Lamp Circuit Kit.
• Provide step-by-step instructions for building the circuit based on the project requirements.
• Assist students as they construct the circuit on the Snap Circuits board.
• Discuss the role of each component and how they interact to detect magnets.
• Guide students in testing the circuit's
functionality with a magnet.
• Troubleshoot and address any issues that arise.
Week 3: Presentation and Reflection
Objective:
Create a prototype of the magnet detection device. Present the device's design and functionality to peers. Reflect on the learning outcomes and connections to sustainability.
Duration: 45 minutes
S# Phase Duration Details
1 Prototyping and Design 20 minutes
2 Presentation Preparation 15 minutes
3 Presentations and Peer Feedback 10 minutes
4 Reflection and Discussion 10 minutes
• Provide materials for students to create a prototype of their magnet detection device.
• Encourage creativity in designing the appearance of the device.
• In pairs or individually, students prepare a presentation about their device.
• Include information about the design, components used, and how it works.
• Students present their magnet detection devices to the class.
• Peers provide feedback and ask questions about the device's functionality.
• Guide a class discussion on the students' learning experience throughout the project.
• Connect the project to the concepts of sustainable consumption and SDG 12.
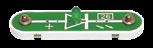
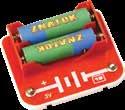
2.5V
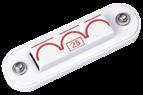
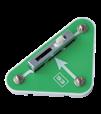
6 Reed switches are magnetically sensitive components that change their state when exposed to a magnetic field. In the circuit, when a magnet is brought close to the reed switch, it closes the circuit and allows current to flow, lighting up the bulb. This happens because the magnetic field of the magnet causes the reed switch to physically close.
7 Reflection:
Students can respond with their understanding of sustainable consumption, such as reducing energy waste, using resources efficiently, and making environmentally conscious choices.
Emergency Switch
Project 2 : STEM Challenge
Introduction
Emergency alert systems can help save the lives of many people. So, emergency plans are very important for the places where crowds are usually hosted. Airports, bus stations, hospitals, concert saloons, and sports halls are some of these places.
STEM Careers Connection
This project features tasks that resemble people working in the following careers: Firefighter, Emergency Management, and Electrical Engineer.
Problem
Imagine that you are working in the design team of a sports hall building. Your duty is to build the emergency switch electric system. You are asked to try the series and parallel connection of the lamp and the motor before making your decision. At the end of this activity the learner will be able to demonstrate an understanding of the following: Objectives
Objective:
Lesson Plan: Emergency Switch (Project 2)
Week 1: Introduction and Exploration
Introduce students to the concept of an emergency switch.
Familiarize students with the electronics kit (Magnetically Activated Lamp) and STEM Resource Book.
Explore different types of circuit connections and understand their implications.
Duration: 45 minutes
S# Phase Duration Details
1 Introduction 10 minutes
2 Discussion on Circuit Connections 15 minutes
3 Circuit Exploration 20 minutes
• Briefly explain the project: designing an emergency switch to help the police during a body inquiry.
• Discuss the objectives, NGSS standards, curriculum connections, and STEM career possibilities.
• Show the electronics kit and explain its components.
• Distribute the STEM Resource Book to each student.
• Engage students in a discussion about circuit connections (series and parallel).
• Discuss the advantages and disadvantages of each connection type.
• Ask students to think about which connection type might be suitable for the emergency switch.
• In groups, allow students to explore the electronics kit and its components.
• Provide them with time to experiment with circuit connections and observe the behavior of the components.
• Encourage them to document their observations in their STEM Resource Book
•
Week 2: Design and Prototype
Objective:
Guide students in designing the emergency switch.
Help students create a prototype circuit based on their design.
Introduce the concept of connection type based on testing.
Duration: 45 minutes
S# Phase Duration Details
1 Design Planning 15 minutes
• Instruct students to choose a circuit connection type for their emergency switch.
• Ask them to explain their choice and reasoning in their STEM Resource Book.
2 Prototype Construction 20 minutes
3 Testing and Reflection 10 minutes
• Emphasize the importance of designing a circuit that continues working even if one component fails.
• Guide students through building the circuit based on their chosen connection type.
• Remind them to include the Magnetically Activated Lamp and the switch in their design.
• Encourage them to follow circuit building instructions provided and document their progress.
• Have students test their prototype circuit to ensure it functions as expected.
• Ask them to reflect on their testing results: Does the circuit work perfectly? Does it meet the design requirements?
Week 3: Presentation and Reflection
Objective:
Provide students with the opportunity to present their emergency switch designs. Encourage students to think about the real-life applications of their circuit. Reflect on sustainable consumption practices.
Duration: 45 minutes
S# Phase Duration Details
1 Presentation Preparation 15 minutes
• Have each group prepare a presentation about their emergency switch design.
• In their presentations, students should explain their circuit connection choice, how the switch works, and its potential applications.
2 Group Presentations 20 minutes
3 Reflection and Discussion 10 minutes
• Allow each group to present their designs to the class.
• Encourage questions and discussions after each presentation.
• Lead a group discussion about the various purposes that series and parallel circuits can be used for in real life.
• Discuss the concept of sustainable consumption and how the emergency switch project relates to it.
Answer Key
Q# Answer
1 Were you able to make your own circuit or did you use the instructions? (Own / Instructions) Answer: Own.
2
Try it. Does your circuit work perfectly? (Yes / No)
Answer: The students should test their circuit and provide their observation.
3 Does the circuit continue working even if the lamp or the motor stops working? (Yes / No)
Answer: No.
4 Would the circuit you created be able to be placed inside a sports hall wall? (Yes / No)
Answer: Yes.
5 Use a ruler or tape measure to measure the area of one of the circuits to see how much room will be needed on the sports hall wall to place the circuit. Answer: Students should measure and provide their findings.
6 How do the lamp and the motor help alert? Make a group discussion and take notes. Answer: Students should discuss how the lamp and motor can be used as emergency alerts and document their discussion.
7 Suggest other purposes in real life that series and parallel circuits can be used. Answer: Students should brainstorm and suggest various applications of series and parallel circuits.
8 Reflection Question Guide:
Based on your new learning, how can you practice sustainable consumption?
Guide students to reflect on the project's focus on designing a functional circuit that conserves energy.
Encourage them to think about how using efficient components and designing circuits that avoid unnecessary energy consumption contribute to sustainable practices.
Highlight the connection between their project and Sustainable Development Goal 12: Responsible Consumption and Production.
Power up the Toys
Project 3 : STEM Challenge
Introduction
Toys are very important for children to grow up well. They can make children have fun and learn at the same time. There are different types of toys such as science kits, educational toys, stuffed toys, modeling clays and electronic toys.
STEM Careers Connection
This project features tasks that resemble people working in the following careers: Mining or Logistics Engineer, Materials Scientist, and Inorganic Chemist.
Problem
Imagine that you are working in a toy company. They asked your team to place the batteries in the toys. You are asked to try the series and parallel connection of the batteries before making your decision.
Objective:
Lesson Plan: Power up the Toys (Project 3)
Week 1: Introduction to Battery Connections
Introduce students to the concept of battery connections in electronic circuits. Familiarize students with the electronics kit (Magnetically Activated Lamp) and STEM Resource Book.
Understand the differences between series and parallel battery connections.
Duration: 45 minutes
S# Phase Duration Details
1 Introduction 10 minutes
2 Battery Connections Discussion 15 minutes
3 Series and Parallel Battery Testing 20 minutes
• Explain the project: testing series and parallel battery connections to power up electronic toys.
• Discuss the objectives, NGSS standards, curriculum connections, and STEM career possibilities.
• Introduce the electronics kit and its components.
• Distribute the STEM Resource Book to each student.
• Lead a discussion about different ways to connect batteries: series and parallel.
• Explain the advantages and disadvantages of each connection type.
• Help students understand how battery connections affect voltage and current.
• In groups, allow students to experiment with series and parallel battery connections using the electronics kit.
• Guide them to build circuits and test the brightness of the Magnetically Activated Lamp in different configurations.
• Encourage them to record their observations in their STEM Resource Book.
Week 2: Toy Design and Prototype
Objective:
Guide students in designing an electronic toy powered by batteries. Help students create a prototype circuit based on their design.
Understand the implications of battery connections in real-world applications.
Duration: 45 minutes
S# Phase Duration Details
1 Toy Design Planning 15 minutes
• Instruct students to design a simple electronic toy using the Magnetically Activated Lamp.
• Ask them to choose a battery connection type (series or parallel) based on their
2 Prototype Construction 20 minutes
3 Testing and Reflection 10 minutes
testing results.
• Emphasize the importance of battery longevity in the toy's design.
• Guide students through building the electronic toy circuit using the chosen battery connection.
• Remind them to integrate the Magnetically Activated Lamp and the switch into their toy design.
• Encourage them to follow circuit building instructions and document their progress.
• Have students test their toy prototype and observe how the chosen battery connection affects its performance.
• Ask them to reflect on their testing results and consider the battery configuration's impact on the toy's functionality.
Week 3: Presentation and Reflection
Objective:
Provide students with the opportunity to present their electronic toy designs. Encourage students to think about the real-life applications of series and parallel battery connections. Reflect on sustainable energy practices.
Duration: 45 minutes
S# Phase Duration Details
1 Presentation Preparation 15 minutes
• Have each group prepare a presentation about their electronic toy design.
• In their presentations, students should explain their battery connection choice, how the toy works, and potential applications.
2 Group Presentations 20 minutes
3 Reflection and Discussion 10 minutes
• Allow each group to present their designs to the class.
• Encourage questions and discussions after each presentation.
• Lead a group discussion about the various purposes that series and parallel battery connections can be used for in real life.
• Discuss the importance of energy efficiency and sustainable energy practices.
Answer Key
Q# Answer
1 Were you able to make your own circuit or did you use the instructions? (Own / Instructions) Answer: Own.
2
Try it. Does your circuit work perfectly? (Yes / No)
Answer: The students should test their circuit and provide their observation.
3 Would the circuit you created be able to be placed inside a toy? (Yes / No)
4
Answer: Yes.
What is the voltage of the circuit with batteries connected in series? Write it as a decimal and a fraction.
Answer: The students should measure and provide their findings.
5 What is the voltage of the circuit with batteries connected in parallel? Write it as a decimal and a fraction.
Answer: The students should measure and provide their findings.
6 What is the difference between series and parallel-connected batteries? Make a group discussion and take notes.
Answer: Students should discuss the differences and similarities between these two types of battery connections.
7 Suggest other purposes in real life that series and parallel circuits can be used.
Answer: Students should brainstorm and suggest various applications of series and parallel battery connections.
8 Reflection Question Guide: How can you help work towards Sustainable Development Goal 7: Affordable and Clean Energy?
Guide students to reflect on the importance of efficient battery connections in conserving energy.
Encourage them to think about how their understanding of series and parallel connections can contribute to the development of clean and affordable energy solutions.
Discuss the significance of using energy-efficient devices in everyday life.
Ring the Bell
Project 4 : STEM Challenge
Introduction
Doorbells are devices that work with electric current. When someone presses a simple doorbell, the circuit inside the bell is completed, the current flows and we hear the sound of the bell. There are also complex doorbells with cameras that let you make video chat with the visitors of the house
STEM Careers Connection
This project features tasks that resemble people working in the following careers: Electrical Engineer, CCTV Security Camera Technician, and Corporate Security Officer.
Problem
Imagine that the complex doorbell system of your house got out of order. You need a simple solution until the doorbell is fixed. You decided to build a simple doorbell system for your house.
At the end of this activity the learner will be able to demonstrate an understanding of the following: Objectives
Objective:
Lesson Plan: Ring the Bell (Project 4)
Week 1: Introduction to Doorbell Design
Introduce students to the concept of designing a simple doorbell system.
Familiarize students with the electronics kit (Magnetically Activated Lamp) and STEM Resource Book.
Understand the components required for a doorbell system.
Duration: 45 minutes
S# Phase Duration Details
1 Introduction 10 minutes
2 Doorbell Components Discussion 15 minutes
3 Circuit Building Basics 20 minutes
• Explain the project: designing a doorbell system.
• Discuss the objectives, NGSS standards, curriculum connections, and STEM career possibilities.
• Introduce the electronics kit and its components.
• Distribute the STEM Resource Book to each student.
• Lead a discussion about the components required for a simple doorbell system.
• Discuss the role of the Magnetically Activated Lamp and the switch in the circuit.
• Explain the concept of manually activating the doorbell.
• In groups, guide students to build a basic circuit using the Magnetically Activated Lamp and a switch.
• Demonstrate how the circuit works when the switch is pressed.
• Encourage students to record their observations in their STEM Resource Book.
Week 2: Doorbell Prototype Design
Objective:
Assist students in designing a prototype for a simple doorbell system.
Understand the process of how a doorbell rings.
Incorporate the circuit into the prototype.
Duration: 45 minutes
S# Phase Duration Details
1 Prototype Design Planning 15 minutes
• Instruct students to design a simple doorbell prototype using the Magnetically Activated Lamp.
• Emphasize the need for a manual activation mechanism.
• Encourage them to think about the placement of the doorbell and its
2 Prototype Construction 20 minutes
3 Testing and Reflection 10 minutes
appearance.
• Guide students through incorporating the circuit into their doorbell prototype.
• Ensure that the circuit functions as intended when the prototype is activated.
• Encourage them to follow circuit building instructions and document their progress.
• Have students test their doorbell prototype and observe how the circuit works in the prototype.
• Ask them to reflect on their testing results and consider the doorbell's design and functionality.
Week 3: Presentation and Reflection
Objective:
Provide students with the opportunity to present their doorbell prototype designs. Encourage students to think about the applications of simple doorbell systems. Reflect on the importance of safety and security.
Duration: 45 minutes
S# Phase Duration Details
1 Presentation Preparation 15 minutes
• Have each group prepare a presentation about their doorbell prototype design.
• In their presentations, students should explain how the doorbell works and its potential applications.
2 Group Presentations 20 minutes
3 Reflection and Discussion 10 minutes
• Allow each group to present their designs to the class.
• Encourage questions and discussions after each presentation.
• Lead a group discussion about the various purposes that simple doorbell systems can serve in real life.
• Discuss the importance of safety and security measures in homes and public spaces.
Answer Key
Q# Answer
1 Were you able to make your own circuit or did you use the instructions? (Own / Instructions) Answer: Own.
2 Try it. Does your circuit work perfectly? (Yes / No) Answer: The students should test their circuit and provide their observation.
3 Would the circuit you created be able to be placed inside a house? (Yes / No) Answer: Yes.
4
How does your doorbell prototype work? Explain the process in your own words. Answer: The students should explain how pressing the switch activates the circuit, causing the Magnetically Activated Lamp to light up.
5 Reflection Question Guide:
How can you help work towards Sustainable Development Goal 11: Sustainable Cities and Communities?
Guide students to reflect on the importance of safety measures in communities and homes.
Encourage them to think about how their understanding of simple doorbell systems can contribute to creating safer living environments.
Discuss the significance of community awareness and preparedness for emergency situations.
Night Fishing
Project 5 : STEM Challenge
Introduction
Fishing is the activity of trying to catch fish or other animals that live inside water bodies. There are different techniques for fishing. One of these techniques is using a fishing rod that has live or fake bait attached to it.
STEM Careers Connection
This project features tasks that resemble people working in the following careers: Fisheries Restoration Biologist, Environmental Specialist and Fish Hatchery Owner.
Problem
Imagine that you are working in a company that produces fishing materials. Your team was asked to design a fake bait for night fishing that gives the light in the water to attract the fish. The company does not want that the bait gives light outside the water. At the end of this activity the learner will be able to demonstrate an understanding of the following: Objectives
Objective:
Lesson Plan: Night Fishing (Project 5)
Week 1: Introduction to Fish-Shaped LED Bait
Introduce students to the concept of designing a fish-shaped LED bait for night fishing. Familiarize students with the electronics kit (Water Activated LED) and STEM Resource Book.
Understand the requirements of creating a bait that emits light underwater.
Duration: 45 minutes
S# Phase Duration Details
1 Introduction 10 minutes
2 Fish-Shaped Bait Discussion 15 minutes
3 Circuit Building Basics 20 minutes
• Explain the project: designing a fish-shaped LED bait for night fishing.
• Discuss the objectives, NGSS standards, curriculum connections, and STEM career possibilities.
• Introduce the electronics kit and its components.
• Distribute the STEM Resource Book to each student.
• Lead a discussion about the concept of using LED lights to attract fish at night.
• Discuss the need for a water-activated LED circuit.
• Highlight the importance of understanding fish behavior and light attraction.
• In groups, guide students to build a basic water-activated LED circuit using the Water Activated LED kit.
• Demonstrate how the LED lights up when submerged in water.
• Encourage students to record their observations in their STEM Resource Book.
Week 2: Fish-Shaped Bait Prototype Design
Objective:
Assist students in designing a prototype for a fish-shaped LED bait.
Understand the process of using light to attract fish.
Incorporate the water-activated LED circuit into the prototype.
Duration: 45 minutes
S# Phase Duration Details
1 Prototype Design Planning 15 minutes
• Instruct students to design a fish-shaped LED bait prototype.
• Emphasize the need for the LED circuit to work only when submerged in water.
• Encourage creative designs that mimic real fish.
2 Prototype Construction 20 minutes
3 Testing and Reflection 10 minutes
• Guide students through incorporating the water-activated LED circuit into their fishshaped bait prototype.
• Ensure that the LED lights up when the prototype is submerged in water.
• Encourage them to follow circuit building instructions and document their progress.
• Have students test their fish-shaped LED bait prototype by submerging it in water.
• Ask them to reflect on how the LED light attracts fish and the effectiveness of the prototype.
Week 3: Presentation and Reflection
Objective:
Provide students with the opportunity to present their fish-shaped LED bait prototype designs.
Discuss the potential applications of light attraction in aquatic environments. Reflect on the importance of sustainable fisheries.
Duration: 45 minutes
S# Phase Duration Details
1 Presentation Preparation 15 minutes
2 Group Presentations 20 minutes
3 Reflection and Discussion 10 minutes
• Have each group prepare a presentation about their fish-shaped LED bait prototype design.
• In their presentations, students should explain how the LED bait works and its potential applications.
• Allow each group to present their designs to the class.
• Encourage questions and discussions after each presentation.
• Lead a group discussion about the potential benefits of using light attraction in fishing and aquatic environments.
• Discuss the importance of sustainable fishing practices and conserving fish populations.
Answer Key
Q# Answer
1 Were you able to make your own circuit or did you use the instructions? (Own / Instructions) Answer: Own.
2 Try it. Does your circuit work perfectly? (Yes / No) Answer: The students should test their circuit and provide their observation.
3 If your LED fish bait could catch a fish that is 16.5 feet away, How many yards is that? Answer: Convert 16.5 feet to yards (1 yard = 3 feet) and calculate the answer.
How does the LED give light with water? Explain the process in your own words. Answer: The students should explain how the water-activated LED circuit completes the circuit when water allows the flow of electricity.
4 Reflection Question Guide:
Based on your new learning, how can you suggest actions to promote Sustainable Development Goal 2: Zero Hunger?
Guide students to reflect on the potential impact of innovative fishing techniques on addressing hunger and food insecurity.
Encourage them to think about sustainable fishing practices and their role in ensuring food availability and nutrition for communities.
Wet Diaper Alarm
Project 6 : STEM Challenge
Introduction
A baby diaper is a kind of underwear that allows the baby to urinate without using a toilet. It keeps the waste products to prevent other clothes from becoming dirty. When diapers become wet, they need to be changed. If they are not changed, the baby can have skin problems around the area covered by the diaper.
STEM Careers Connection
This project features tasks that resemble people working in the following careers: Astronaut and Fighter Pilot.
Problem
Imagine that a wearable technology company works on baby diapers. The company asks for tiny electric circuits that give an alarm when the diaper is wet. They ask for this type of diaper to make it possible to change the wet diaper in a short time and keep the skin of the babies more healthy. At the end of this activity the learner will be able to demonstrate an understanding Objectives
Objective:
Lesson Plan: Wet Diaper Alarm (Project 6)
Week 1: Introduction to Wet Diaper Alarm
Introduce students to the concept of designing a wet diaper alarm. Familiarize students with the electronics kit (Water Activated LED) and STEM Resource Book.
Understand the requirements of creating an alarm that detects wetness in a diaper.
Duration: 45 minutes
S# Phase Duration Details
1 Introduction 10 minutes
2 Wet Diaper Alarm Discussion 15 minutes
3 Circuit Building Basics 20 minutes
• Explain the project: designing a wet diaper alarm.
• Discuss the objectives, NGSS standards, curriculum connections, and STEM career possibilities.
• Introduce the electronics kit and its components.
• Distribute the STEM Resource Book to each student.
• Lead a discussion about the importance of detecting wetness in baby diapers.
• Discuss the challenges parents face in ensuring timely diaper changes.
• Highlight the potential benefits of using a wet diaper alarm.
• In groups, guide students to build a basic water-activated LED circuit using the Water Activated LED kit.
• Demonstrate how the LED lights up when exposed to moisture.
• Encourage students to record their observations in their STEM Resource Book.
Week
2: Wet Diaper Alarm Prototype Design
Objective:
Assist students in designing a prototype for a wet diaper alarm.
Understand the process of using moisture to trigger the alarm. Incorporate the water-activated LED circuit into the prototype.
Duration: 45 minutes
S# Phase Duration Details
1 Prototype Design Planning 15 minutes
• Instruct students to design a wet diaper alarm prototype.
• Emphasize the need for the alarm to be triggered by moisture.
• Encourage creative designs that are practical for diaper usage.
2 Prototype Construction 20 minutes
3 Testing and Reflection 10 minutes
• Guide students through incorporating the water-activated LED circuit into their wet diaper alarm prototype.
• Ensure that the LED lights up when moisture is applied.
• Encourage them to follow circuit building instructions and document their progress.
• Have students test their wet diaper alarm prototype by exposing it to moisture.
• Ask them to reflect on how the alarm can be useful for parents and caregivers.
Week 3: Presentation and Reflection
Objective:
Provide students with the opportunity to present their wet diaper alarm prototype designs.
Discuss the potential benefits of using a wetness detection alarm for baby care. Reflect on the significance of improving infant care and well-being.
Duration: 45 minutes
S# Phase Duration Details
1 Presentation Preparation 15 minutes
2 Group Presentations 20 minutes
3 Reflection and Discussion 10 minutes
• Have each group prepare a presentation about their wet diaper alarm prototype design.
• In their presentations, students should explain how the alarm works and its potential benefits.
• Allow each group to present their designs to the class.
• Encourage questions and discussions after each presentation.
• Lead a group discussion about the potential benefits of using a wet diaper alarm for infant care.
• Discuss how such an alarm could contribute to infant comfort and health.
Answer Key
Q# Answer
1 Were you able to make your own circuit or did you use the instructions? (Own / Instructions) Answer: Own.
2 Try it. Does your circuit work perfectly? (Yes / No) Answer: The students should test their circuit and provide their observation.
3 Use the timer to record how long the LED stays lit. Record your answer.
Answer: Students should use a timer to measure the duration the LED remains lit when exposed to moisture.
4
5
How does your circuit measure the flow of moisture? Explain the process in your own words.
Answer: The students should explain how the water-activated LED circuit detects moisture and completes the circuit.
Reflection Question Guide:
Based on your new learning, how can you suggest actions to promote Sustainable Development Goal 3: Good Health and Well-Being?
Guide students to reflect on the significance of improved infant care and the potential benefits of wet diaper alarms for ensuring baby health and comfort. Encourage them to think about ways in which technology and innovation can contribute to better health and well-being for infants and young children.
Safety First
Project 7 : STEM Challenge
Occupational safety and health is a multidisciplinary field interested in the safety, health, and welfare of people at work. So, occupational safety and health experts examine the workplace for factors that could affect the health, safety, comfort, and performance of the workers
STEM Careers Connection
This project features tasks that resemble people working in the following careers:
Occupational Safety Manager and Human Resources Manager.
Problem
Imagine there is an occupational health and safety expert in a factory. He or she is making routine controls to avoid any accidents and injuries. He or she measures the current of some electric systems to ensure their safety.
Objective:
Lesson Plan: Safety First (Project 7)
Week 1: Introduction and Conceptualization
Introduce students to the concept of measuring electric current. Familiarize students with the electronics kit (Water Activated LED) and STEM Resource Book.
Understand the importance of current measurement in ensuring safety.
Duration: 45 minutes
S# Phase Duration Details
1 Introduction 10 minutes
2 Current Measurement Discussion 15 minutes
3 Circuit Building Basics 20 minutes
• Explain the project: designing a circuit that measures electric current.
• Discuss the objectives, NGSS standards, curriculum connections, and STEM career possibilities.
• Introduce the electronics kit and its components.
• Distribute the STEM Resource Book to each student.
• Lead a discussion about the importance of measuring electric current in various applications.
• Highlight the role of current measurement in ensuring safety in electrical systems.
• Discuss real-life scenarios where accurate current measurement is crucial.
• In groups, guide students to build a basic current measurement circuit using the Water Activated LED kit.
• Demonstrate how the LED responds to changes in current.
• Encourage students to record their observations in their STEM Resource Book.
Week 2: Current Measurement Prototype Design
Objective:
Assist students in designing a prototype for a circuit that measures current.
Understand the process of using a component to measure electric current. Incorporate the current measurement circuit into the prototype.
Duration: 45 minutes
S# Phase Duration Details
1 Prototype Design Planning 15 minutes
• Instruct students to design a prototype for a circuit that measures electric current.
• Explain the role of an ammeter in measuring current and its importance for safety.
• Encourage creative designs that incorporate the ammeter component.
2 Prototype Construction 20 minutes
3 Testing and Reflection 10 minutes
• Guide students through incorporating the ammeter component into their current measurement circuit prototype.
• Ensure that the ammeter accurately measures the current in the circuit.
• Encourage them to follow circuit building instructions and document their progress.
• Have students test their current measurement circuit prototype by adjusting the current and observing the ammeter reading.
• Ask them to reflect on how accurate current measurement contributes to safety.
Week 3: Presentation and Reflection
Objective:
Provide students with the opportunity to present their current measurement circuit prototype designs.
Discuss the significance of accurate current measurement for safety in electrical systems. Reflect on the role of electrical engineers in ensuring safety in various applications.
Duration: 45 minutes
S# Phase Duration Details
1 Presentation Preparation 15 minutes
2 Group Presentations 20 minutes
3 Reflection and Discussion 10 minutes
• Have each group prepare a presentation about their current measurement circuit prototype design.
• In their presentations, students should explain how the circuit works and its importance for safety.
• Allow each group to present their designs to the class.
• Encourage questions and discussions after each presentation.
• Lead a group discussion about the role of accurate current measurement in ensuring safety in electrical systems.
• Discuss how electrical engineers play a crucial role in designing safe electrical circuits.
Answer Key
Q# Answer
1 Were you able to make your own circuit or did you use the instructions? (Own / Instructions) Answer: Own.
2 Try it. Does your circuit work perfectly? (Yes / No) Answer: The students should test their circuit and provide their observation.
3
Record the different measurements you observe using the ammeter.
Answer: Students should use the ammeter to measure and record different current values in their circuit.
4 Reflection Question Guide:
Based on your new learning, how can you promote Sustainable Development Goal 9: Industry, Innovation, and Infrastructure?
Guide students to reflect on the importance of accurate current measurement in ensuring safe and reliable infrastructure and technologies. Encourage them to think about how electrical engineers contribute to designing and maintaining safe electrical systems in various applications, such as buildings, transportation, and manufacturing.
Don’t Lie
Project 8 : STEM Challenge
Introduction
Lie detectors are machines that help detect people that tell lies. They use different measurements of the human body such as blood pressure, pulse or respiration. They make these measurements when people are answering questions.
STEM Careers Connection
This project features tasks that resemble people working in the following careers: Police Officer, Military, and University President.
Problem
Imagine that a psychology department of a university will do an inquiry on telling lies. They are calling for projects that detect lying people. The lie detector needs to make different measurements at the same time.
At the end of this activity the learner will be able to demonstrate an understanding of the following: Objectives
Objective:
Lesson Plan: Don't Lie (Project 8)
Week 1: Introduction to Lie Detector Circuit
Introduce students to the concept of a lie detector circuit.
Familiarize students with the electronics kit (Water Activated LED) and STEM Resource Book.
Understand the basic working principle of a lie detector.
Duration: 45 minutes
S# Phase Duration Details
1 Introduction 10 minutes
2 Lie Detector Discussion 15 minutes
3 Circuit Building Basics 20 minutes
• Explain the project: designing a simple lie detector circuit.
• Discuss the objectives, NGSS standards, curriculum connections, and STEM career possibilities.
• Introduce the electronics kit and its components.
• Distribute the STEM Resource Book to each student.
• Lead a discussion about the importance of lie detectors in various applications.
• Highlight the basic working principle of a lie detector based on physiological responses.
• Discuss real-life scenarios where lie detectors are used.
• In groups, guide students to build a basic lie detector circuit using the Water Activated LED kit.
• Explain how physiological changes can be detected using the circuit.
• Encourage students to record their observations in their STEM Resource Book.
Week 2: Lie Detector Prototype Design
Objective:
Assist students in designing a prototype for a lie detector circuit.
Understand the process of using physiological changes to detect lies.
Incorporate the lie detector circuit into the prototype.
Duration: 45 minutes
S# Phase Duration Details
1 Prototype Design Planning 15 minutes
• Instruct students to design a prototype for a simple lie detector circuit.
• Explain the physiological changes (e.g., sweating) that the circuit can detect.
• Encourage creative designs that incorporate physiological sensors.
2 Prototype Construction 20 minutes
3 Testing and Reflection 10 minutes
• Guide students through incorporating the physiological sensor and lie detector circuit into their prototype.
• Ensure that the circuit responds to physiological changes accurately.
• Encourage them to follow circuit building instructions and document their progress.
• Have students test their lie detector circuit prototype by simulating physiological changes and observing the LED response.
• Ask them to reflect on how lie detectors can be useful in certain situations.
Week 3: Presentation and Reflection
Objective:
Provide students with the opportunity to present their lie detector circuit prototype designs.
Discuss the significance and ethical considerations of lie detectors. Reflect on the role of technology in addressing complex social issues.
Duration: 45 minutes
S# Phase Duration Details
1 Presentation Preparation 15 minutes
2 Group Presentations 20 minutes
3 Reflection and Discussion 10 minutes
• Have each group prepare a presentation about their lie detector circuit prototype design.
• In their presentations, students should explain how the circuit works and its potential applications.
• Allow each group to present their designs to the class.
• Encourage questions and discussions after each presentation.
• Lead a group discussion about the significance and ethical considerations of lie detectors.
• Discuss the role of technology in addressing complex social issues, such as trust and honesty.
Answer Key
Q# Answer
1 Were you able to make your own circuit or did you use the instructions? (Own / Instructions) Answer: Own.
2 Try it. Does your circuit work perfectly? (Yes / No)
Answer: The students should test their circuit and provide their observation.
3 Use the timer to record how long the LED stays lit. Record your answer.
Answer: Students should measure and record the duration the LED stays lit.
4 Reflection Question Guide:
Based on your new learning, how can you promote Sustainable Development Goal 16: Peace, Justice, and Strong Institutions?
Guide students to reflect on the role of lie detectors in promoting truthfulness and transparency.
Encourage them to consider how technology can be used to support justice systems and institutions while addressing ethical concerns related to privacy and human rights.
Turn on the Radio
Project 9 : STEM Challenge
Radio is an older communication technology since the 1880s when compared to television or computers. People can listen to music, learn about the daily news and even listen to a theater play
At the end of this activity the learner will be able to demonstrate an understanding of the following: Objectives
Electrical Engineer, Communication Specialist,
Imagine that the Internet and television broadcast goes out in your country. Only radio signals work well. You are going to design a radio
Act as an electric engineer, who designs or manages electricity systems. Design a simple radio project for communication. After making a thorough inquiry on your project, build your circuit, draw your prototype and present your solution to your friends.
Objective:
Lesson Plan: Turn on the
Radio (Project 9)
Week 1: Introduction to Radio Receiver Circuit
Introduce students to the concept of a radio receiver circuit.
Familiarize students with the electronics kit (Water Activated LED) and STEM Resource Book.
Understand the basic working principle of a radio receiver.
Duration: 45 minutes
S# Phase Duration Details
1 Introduction 10 minutes
2 Radio Receiver Discussion 15 minutes
3 Circuit Building Basics 20 minutes
• Explain the project: designing a simple radio receiver circuit.
• Discuss the objectives, NGSS standards, curriculum connections, and STEM career possibilities.
• Introduce the electronics kit and its components.
• Distribute the STEM Resource Book to each student.
• Lead a discussion about the significance of radio communication and radio receivers.
• Explain the concept of radio waves and how radio receivers decode them.
• Discuss real-life applications of radio communication.
• In groups, guide students to build a basic radio receiver circuit using the Water Activated LED kit.
• Explain how the circuit can detect and decode radio signals.
• Encourage students to record their observations in their STEM Resource Book.
Week 2: Radio Receiver Prototype Design
Objective:
Assist students in designing a prototype for a radio receiver circuit. Understand the process of receiving and decoding radio signals. Incorporate the radio receiver circuit into the prototype.
Duration: 45 minutes
S# Phase Duration Details
1 Prototype Design Planning 15 minutes
• Instruct students to design a prototype for a simple radio receiver circuit.
• Explain the process of receiving and demodulating radio signals.
• Encourage creative designs that incorporate components like antennas.
2 Prototype Construction 20 minutes
3 Testing and Reflection 10 minutes
• Guide students through incorporating the radio receiver circuit and antenna into their prototype.
• Ensure that the circuit is capable of receiving and decoding radio signals.
• Encourage them to follow circuit building instructions and document their progress.
• Have students test their radio receiver circuit prototype by tuning in to radio stations.
• Ask them to reflect on the significance of radio communication in different contexts.
Week 3: Presentation and Reflection
Objective:
Provide students with the opportunity to present their radio receiver circuit prototype designs.
Discuss the role of radio communication in modern society. Reflect on the impact of technology on communication.
Duration: 45 minutes
S# Phase Duration Details
1 Presentation Preparation 15 minutes
2 Group Presentations 20 minutes
3 Reflection and Discussion 10 minutes
• Have each group prepare a presentation about their radio receiver circuit prototype design.
• In their presentations, students should explain how the circuit receives and decodes radio signals.
• Allow each group to present their designs to the class.
• Encourage questions and discussions after each presentation.
• Lead a group discussion about the significance of radio communication in various fields.
• Discuss how radio technology has evolved and its role in communication today.
Answer Key
Q# Answer
1 Were you able to make your own circuit or did you use the instructions? (Own / Instructions)
Answer: Own.
2 Try it. Does your circuit work perfectly? (Yes / No)
Answer: The students should test their circuit and provide their observation.
3 Measure and record the perimeter of the circuit you built.
Answer: Students should measure and record the perimeter of their circuit.
Reflection Question Guide:
Based on your new learning, how can your challenge solution be implemented in the real world?
Guide students to reflect on the role of radio communication in different sectors. Encourage them to consider how radio technology is utilized for broadcasting, emergency communication, and remote areas with limited connectivity. Discuss potential future advancements in radio technology and its impact on communication.
How Telegraph Works
Project 10 : STEM Challenge
Introduction
A telegraph is not a popular technology today in modern life. It was the first technology that made long distance communication possible. Telegraph used a special code called Morse that has a set of dots and dashes to each letter of the English alphabet.
STEM Careers Connection
This project features tasks that resemble people working in the following careers: Electrical Engineer, Communications Specialist, and Telecommunications Operator.
Problem
Imagine that a company creates a documentary on the historical development of telecommunication tools. They are calling for different demonstrations to explain the working principle behind a telegraph.
Challenge
Act as an electric engineer, who designs or manages electricity systems. Design an electric circuit that shows how a telegraph works. After making a thorough inquiry on your project, build your circuit, draw your prototype and present your solution to your friends.
At the end of this activity the learner will be able to demonstrate an understanding of the following: Objectives
Objective:
Lesson Plan: How Telegraph Works (Project 10)
Week 1: Introduction to Telegraph Circuit
Introduce students to the concept of a telegraph circuit.
Familiarize students with the electronics kit (Water Activated LED) and STEM Resource Book.
Understand the basic working principle of a telegraph.
Duration: 45 minutes
S# Phase Duration Details
1 Introduction 10 minutes
2 Telegraph Discussion 15 minutes
3 Circuit Building Basics 20 minutes
• Explain the project: designing an electric circuit that simulates how a telegraph works.
• Discuss the objectives, NGSS standards, curriculum connections, and STEM career possibilities.
• Introduce the electronics kit and its components.
• Distribute the STEM Resource Book to each student.
• Lead a discussion about the historical significance of telegraphs and their role in communication.
• Explain the basic principle of encoding and decoding messages using Morse code.
• Discuss the impact of telegraph technology on society.
• In groups, guide students to build a basic telegraph circuit using the Water Activated LED kit.
• Explain how the circuit can be used to simulate Morse code communication.
• Encourage students to record their observations in their STEM Resource Book.
Week 2: Telegraph Prototype Design
Objective:
Assist students in designing a prototype for a telegraph circuit.
Understand the process of encoding and decoding messages using Morse code.
Incorporate the telegraph circuit into the prototype.
Duration: 45 minutes
S# Phase Duration Details
1 Prototype Design Planning 15 minutes
• Instruct students to design a prototype that demonstrates how a telegraph circuit works.
• Explain the basics of Morse code and how it's used for communication.
• Encourage creative designs that incorporate Morse code indicators.
2 Prototype Construction 20 minutes
• Guide students through incorporating the telegraph circuit into their prototype.
• Ensure that the circuit is capable of sending and receiving Morse code signals.
• Encourage them to follow circuit building instructions and document their progress.
3 Testing and Reflection 10 minutes
• Have students test their telegraph circuit prototype by sending and decoding Morse code messages.
• Ask them to reflect on the historical importance of telegraph communication.
Week 3: Presentation and Reflection
Objective:
Provide students with the opportunity to present their telegraph circuit prototype designs. Discuss the role of communication technologies in different eras. Reflect on how technology has influenced communication methods.
Duration: 45 minutes
S# Phase Duration Details
1 Presentation Preparation 15 minutes
2 Group Presentations 20 minutes
3 Reflection and Discussion 10 minutes
• Have each group prepare a presentation about their telegraph circuit prototype design.
• In their presentations, students should explain how the circuit encodes and decodes Morse code.
• Allow each group to present their designs to the class.
• Encourage questions and discussions after each presentation.
• Lead a group discussion about the evolution of communication technologies.
• Discuss how the telegraph revolutionized long-distance communication and paved the way for modern technologies.
Answer Key
Q# Answer
1 Were you able to make your own circuit or did you use the instructions? (Own / Instructions) Answer: Own.
2 Try it. Does your circuit work perfectly? (Yes / No) Answer: The students should test their circuit and provide their observation.
3 The following is a Morse Code Chart. List as many different math patterns or sequences of 6 symbols that you can find.
Answer: Students should list various Morse code patterns.
4 Reflection Question Guide:
Based on your new learning, how can your challenge solution be implemented in the real world?
Guide students to reflect on the historical significance of the telegraph and its impact on communication.
Encourage them to consider how Morse code principles have influenced modern communication systems.
Discuss the role of efficient and quick communication in various sectors such as emergency response, military, and technology development.
Light up the Museum
Project 11 : STEM Challenge
Introduction
Museums are the places where art, history or science artifacts are kept, protected or exhibited. Lighting is an important part of museums, it should match with the museum environment and show the crafts very well.
STEM Careers Connection
This project features tasks that resemble people working in the following careers: Electrical Engineer, Museum Curator, and Lighting Specialist.
Problem
Imagine that a museum in your city is planning to renew its lighting system. They are calling for projects from the local citizens. The directors of the museum ask for an energy saving lighting system that shows the artifacts in the best way possible.
Challenge
Act as an electric engineer, who designs or manages electricity systems. Design a lighting project for the museum in your city. After making a thorough inquiry on your project, build your circuit, draw your prototype and present your solution to your friends.
At the end of this activity the learner will be able to demonstrate an understanding of the following:
Objective:
Lesson Plan: Light up the Museum (Project 11)
Week 1: Introduction to Museum Lighting
Introduce students to the concept of energy-efficient lighting for museums. Familiarize students with the electronics kit (Water Activated LED) and STEM Resource Book.
Understand the importance of energy conservation in cultural spaces.
Duration: 45 minutes
S# Phase Duration Details
1 Introduction 10 minutes
2 Museum Lighting Discussion 15 minutes
3 Circuit Building Basics 20 minutes
• Explain the project: designing an energyefficient lighting system for a museum.
• Discuss the objectives, NGSS standards, curriculum connections, and STEM career possibilities.
• Introduce the electronics kit and its components.
• Distribute the STEM Resource Book to each student.
• Lead a discussion about the role of lighting in museums and cultural spaces.
• Explain the importance of energy-efficient lighting to preserve artifacts and reduce costs.
• Discuss the concept of photo-resistors and their role in adjusting light levels.
• In groups, guide students to build a basic lighting circuit using the Water Activated LED kit.
• Explain how photo-resistors work and their use in the context of energy-efficient lighting.
• Encourage students to record their observations in their STEM Resource Book.
Week 2: Museum Lighting Prototype Design
Objective:
Assist students in designing a prototype for an energy-efficient museum lighting system. Understand the concept of using photo-resistors to adjust light levels. Incorporate the lighting circuit into the prototype.
Duration: 45 minutes
S# Phase Duration Details
1 Prototype Design Planning 15 minutes
• Instruct students to design a prototype that demonstrates energy-efficient lighting for a museum.
• Emphasize the use of LED bulbs and the role of photo-resistors in adjusting light intensity.
2 Prototype Construction 20 minutes
3 Testing and Reflection 10 minutes
• Encourage creative designs that showcase the benefits of energy-efficient lighting.
• Guide students through incorporating the lighting circuit into their prototype.
• Ensure that the circuit is capable of adjusting light levels based on the ambient light intensity.
• Encourage them to follow circuit building instructions and document their progress.
• Have students test their museum lighting prototype by varying the ambient light intensity.
• Ask them to reflect on the significance of energy-efficient lighting in preserving artifacts.
Week 3: Presentation and Reflection
Objective:
Provide students with the opportunity to present their museum lighting prototype designs.
Discuss the broader impact of energy-efficient lighting in various contexts. Reflect on the role of technology in preserving cultural heritage.
Duration: 45 minutes
S# Phase Duration Details
1 Presentation Preparation 15 minutes
2 Group Presentations 20 minutes
3 Reflection and Discussion 10 minutes
• Have each group prepare a presentation about their museum lighting prototype design.
• In their presentations, students should explain the benefits of LED bulbs and photoresistors in energy conservation.
• Allow each group to present their designs to the class.
• Encourage questions and discussions after each presentation.
• Lead a group discussion about the broader impact of energy-efficient lighting.
• Discuss the role of technology in preserving cultural heritage and reducing energy consumption.
Answer Key
Q# Answer
1 Were you able to make your own circuit or did you use the instructions? (Own / Instructions) Answer: Own.
2
Try it. Does your circuit work perfectly? (Yes / No)
Answer: The students should test their circuit and provide their observation.
3 The following chart shows how much it costs (in dollars) to buy and use each kind of light for 3 hours a day for a year. Fill in the totals, then choose which kind of light is cheaper to use in your model.
Answer: Students should calculate and compare the costs for different types of lights.
4 Reflection Question Guide:
Based on your new learning, why is it important to provide access to affordable, reliable, sustainable, and modern energy for all?
Guide students to reflect on the importance of energy-efficient lighting in cultural spaces.
Encourage them to consider the impact of energy conservation on reducing costs and environmental impact.
Discuss how access to sustainable energy contributes to cultural preservation and accessibility.
Backstage Laughter
Project 12 : STEM Challenge
A great number of people work for television shows. People who watch the TV shows only see the people at the front stage such as presenters or guests. There are also people at the back stage that
At the end of this activity the learner will be able to demonstrate an understanding of the following: Objectives
This project features tasks that resemble people working in the following careers: Sound Engineer, Electrical Engineer, Television Producer, Television and Movie Director.
Problem
Imagine that you are working in a television studio. A television show is in progress and you are asked to design a system to make a laughter sound effect during the show.
Challenge
Act as an electric engineer, who designs or manages electricity systems. Design a laughter effect project for the television show. After making a thorough inquiry on your project, build your circuit, draw your prototype and present your solution to your friends.
Objective:
Lesson Plan: Backstage Laughter (Project 12)
Week 1: Introduction to Laughter Effect
Introduce students to the concept of creating a laughter effect for television shows. Familiarize students with the electronics kit (Water Activated LED) and STEM Resource Book.
Understand the role of sound amplification in entertainment. Duration: 45 minutes
S# Phase Duration Details
1 Introduction 10 minutes
2 Laughter in Entertainment 15 minutes
3 Circuit Building Basics 20 minutes
• Explain the project: designing a laughter effect button for a television show.
• Discuss the objectives, NGSS standards, curriculum connections, and STEM career possibilities.
• Introduce the electronics kit and its components.
• Distribute the STEM Resource Book to each student.
• Lead a discussion about the importance of sound effects in television shows and entertainment.
• Discuss the role of laughter tracks and live audience reactions.
• Introduce the concept of sound amplification.
• In groups, guide students to build a basic sound amplification circuit using the Water Activated LED kit.
• Explain the use of a microphone and loudspeaker in sound amplification.
• Encourage students to record their observations in their STEM Resource Book.
Week 2: Laughter Effect Prototype Design
Objective:
Assist students in designing a prototype for a laughter effect button.
Understand the concept of sound amplification using a microphone and loudspeaker. Incorporate the sound amplification circuit into the prototype.
Duration: 45 minutes
S# Phase Duration Details
1 Prototype Design Planning 15 minutes
• Instruct students to design a prototype that produces a laughter sound effect.
• Explain the concept of using a microphone to capture sound and a loudspeaker to amplify it.
2 Prototype Construction 20 minutes
3 Testing and Reflection 10 minutes
• Encourage creative designs that showcase the entertainment value of the laughter effect.
• Guide students through incorporating the sound amplification circuit into their prototype.
• Ensure that the microphone and loudspeaker are properly connected.
• Encourage them to follow circuit building instructions and document their progress.
• Have students test their laughter effect prototype by speaking into the microphone and observing the loudspeaker's response.
• Ask them to reflect on the impact of sound amplification in entertainment.
Week 3: Presentation and Reflection
Objective:
Provide students with the opportunity to present their laughter effect prototype designs. Discuss the broader impact of sound amplification in various contexts. Reflect on the role of technology in enhancing entertainment experiences.
Duration: 45 minutes
S# Phase Duration Details
1 Presentation Preparation 15 minutes
• Have each group prepare a presentation about their laughter effect prototype design.
• In their presentations, students should explain the components used for sound amplification and its entertainment value.
2 Group Presentations 20 minutes
3 Reflection and Discussion 10 minutes
• Allow each group to present their designs to the class.
• Encourage questions and discussions after each presentation.
• Lead a group discussion about the broader impact of sound amplification in entertainment.
• Discuss how technology enhances audience experiences and creates immersive environments.
Answer Key
Q# Answer
1 Were you able to make your own circuit or did you use the instructions? (Own / Instructions) Answer: Own.
2 Try it. Does your circuit work perfectly? (Yes / No) Answer: The students should test their circuit and provide their observation.
3
A survey of television shows with laugh tracks found that 80 of 320 people thought that shows with laugh tracks were funnier than shows without. What fraction of people thought the shows with laugh tracks were funnier?
Answer: 80/320 = 1/4
4
Reflection Question Guide:
Based on your new learning, how can STEM professionals promote inclusive work for all?
Guide students to reflect on the role of technology and sound amplification in creating inclusive entertainment experiences. Encourage them to consider how sound technology can cater to diverse audiences and enhance accessibility.
Discuss the potential of STEM professionals in designing solutions that address different needs within the entertainment industry.
Help the Tourist Guide
Project 13 : STEM Challenge
group can hear him or her.
STEM Careers Connection
This project features tasks that resemble people working in the following careers: Tourist Office Manager, Electrical Engineer, Police Officer and Crowd Controller.
Problem
Imagine that you are working in the municipality of your city. The tourism office of the municipality asks your department for help. You are asked to design a megaphone to help the tourist guide in the office speak louder.
Challenge
Act as an electric engineer, who designs or manages electricity systems. Design a megaphone for the tourist guide to have a louder voice. After making a thorough inquiry on your project, build your circuit, draw your prototype and present your solution to your friends.
At the end of this activity the learner will be able to demonstrate an understanding of the following: Objectives
Objective:
Lesson Plan: Help the Tourist Guide (Project 13)
Week 1: Introduction to Megaphone Design
Introduce students to the concept of designing a megaphone for a tourist guide. Familiarize students with the electronics kit (Water Activated LED) and STEM Resource Book.
Understand the principles of sound amplification.
Duration: 45 minutes
S# Phase Duration Details
1 Introduction 10 minutes
2 Principles of Sound Amplification 15 minutes
3 Circuit Building Basics 20 minutes
• Explain the project: designing a megaphone for a tourist guide.
• Discuss the objectives, NGSS standards, curriculum connections, and STEM career possibilities.
• Introduce the electronics kit and its components.
• Distribute the STEM Resource Book to each student.
• Explain how a megaphone amplifies sound using a funnel-shaped design.
• Discuss the challenges faced by tourist guides in crowded places.
• Emphasize the importance of clear communication.
• In groups, guide students to build a basic circuit using the Water Activated LED kit.
• Discuss the components of the circuit, including switches and LEDs.
• Encourage students to record their observations in their STEM Resource Book.
Week 2: Megaphone Prototype Design
Objective:
Assist students in designing a prototype for a megaphone.
Understand the concept of sound amplification using a funnel-shaped design. Incorporate the circuit into the prototype.
Duration: 45 minutes
S# Phase Duration Details
1 Prototype Design Planning 15 minutes
• Instruct students to design a prototype of a megaphone.
• Explain the concept of a funnel-shaped design for sound amplification.
• Encourage creative designs that are userfriendly for tourist guides.
2 Prototype Construction 20 minutes
• Guide students through incorporating the circuit into their megaphone prototype.
• Ensure that switches, LEDs, and other components are properly connected.
• Encourage them to follow circuit building instructions and document their progress.
3 Testing and Reflection 10 minutes
• Have students test their megaphone prototype by speaking into it and observing the amplification effect.
• Ask them to reflect on how the funnelshaped design enhances sound.
Week 3: Presentation and Reflection
Objective:
Provide students with the opportunity to present their megaphone prototype designs. Discuss the broader impact of sound amplification in communication and public speaking. Reflect on the role of technology in enhancing communication experiences.
Duration: 45 minutes
S# Phase Duration Details
1 Presentation Preparation 15 minutes
• Have each group prepare a presentation about their megaphone prototype design.
• In their presentations, students should explain the principles of sound amplification and its practical application.
2 Group Presentations 20 minutes
3 Reflection and Discussion 10 minutes
• Allow each group to present their designs to the class.
• Encourage questions and discussions after each presentation.
• Lead a group discussion about the broader impact of sound amplification in communication.
• Discuss how technology enhances public speaking and enables effective communication in various settings.
Answer Key
Q# Answer
1 Were you able to make your own circuit or did you use the instructions? (Own / Instructions) Answer: Own.
2 Try it. Does your circuit work perfectly? (Yes / No) Answer: The students should test their circuit and provide their observation.
3 The botanist planted 11 rose bushes in the botanical garden and her assistant planted 4 times as many rose bushes as the botanist. How many rose bushes did the assistant plant? Answer: Assistant planted 4 * 11 = 44 rose bushes.
Reflection Question Guide:
Based on your new learning, how can STEM professionals promote inclusive work for all?
Guide students to reflect on the role of technology in designing solutions that cater to diverse needs.
Encourage them to explore how megaphones and sound amplification can aid inclusivity, such as in addressing communication challenges for tourist guides. Discuss how STEM professionals can contribute to creating tools that enhance accessibility and communication for different groups.
Hotel Room Air Conditioning
Project 14 : STEM Challenge
Introduction
Air conditioning is a process of taking the fresh air from outside to inside of a closed place to have a more comfortable environment. This process is very important for the breathing of the people in this place especially where people stay for a long time.
STEM Careers Connection
This project features tasks that resemble people working in the following careers: Hotel Manager, Electrical Engineer, Heating and Air Conditioning Technician, Construction Engineer.
Problem
Imagine that you are working on a hotel construction project. You are asked to try the “or” and “and” logic elements in order to decide how to connect the LED and motor in the rooms for air conditioning.
Challenge
Act as an electric engineer, who designs or manages electricity systems. Design an air conditioning project for the hotel room. After making a thorough inquiry on your project, build your circuit, draw your prototype and present your solution to your friends.
Lesson Plan: Hotel Room Air Conditioning (Project 14)
Week 1: Introduction to Air Conditioning Design
Objective:
Introduce students to the concept of designing an air conditioning system for a hotel room. Familiarize students with the electronics kit (Water Activated LED) and STEM Resource Book.
Understand the principles of logical elements "and" and "or."
Duration: 45 minutes
S# Phase Duration Details
1 Introduction 10 minutes
2 Principles of Air Conditioning 20 minutes
3 Circuit Building Basics 15 minutes
• Explain the project: designing an air conditioning system for a hotel room.
• Discuss the objectives, NGSS standards, curriculum connections, and STEM career possibilities.
• Introduce the electronics kit and its components.
• Distribute the STEM Resource Book to each student.
• Explain the purpose of air conditioning in hotel rooms for guest comfort.
• Discuss the challenges faced by hotel managers in maintaining room temperature.
• Introduce the concepts of logical elements "and" and "or."
• In groups, guide students to build a basic circuit using the Water Activated LED kit.
• Introduce logical elements "and" and "or" in the context of circuit connections.
• Encourage students to record their observations in their STEM Resource Book.
Week 2: Air Conditioning Prototype Design
Objective:
Assist students in designing a prototype for hotel room air conditioning. Understand the application of logical elements "and" and "or" in circuit design. Incorporate the circuit into the prototype.
Duration: 45 minutes
S# Phase Duration Details
1 Prototype Design Planning 15 minutes
• Instruct students to design a prototype of an air conditioning system for a hotel room.
• Explain how logical elements "and" and "or" can be used to control the system based on conditions.
• Encourage creative designs that ensure guest comfort and energy efficiency.
2 Prototype Construction 20 minutes
3 Testing and Reflection 10 minutes
• Guide students through incorporating the circuit with logical elements into their air conditioning prototype.
• Ensure that switches, LEDs, and other components are properly connected.
• Encourage them to follow circuit building instructions and document their progress.
• Have students test their air conditioning prototype by simulating temperature changes.
• Ask them to observe how the logical elements affect the circuit's behavior.
Week 3: Presentation and Reflection
Objective:
Provide students with the opportunity to present their air conditioning prototype designs. Discuss the broader impact of energy-efficient technologies in hospitality and residential settings.
Reflect on the role of technology in improving energy consumption practices.
Duration: 45 minutes
S# Phase Duration Details
1 Presentation Preparation 15 minutes
2 Group Presentations 20 minutes
3 Reflection and Discussion 10 minutes
• Have each group prepare a presentation about their air conditioning prototype design.
• In their presentations, students should explain the principles of logical elements in controlling the system.
• Allow each group to present their designs to the class.
• Encourage questions and discussions after each presentation.
• Lead a group discussion about the broader impact of energy-efficient air conditioning in hospitality.
• Discuss how technology contributes to sustainable energy consumption practices.
Answer Key
Q# Answer
1 Were you able to make your own circuit or did you use the instructions? (Own / Instructions) Answer: Own.
2 Try it. Does your circuit work perfectly? (Yes / No)
Answer: The students should test their circuit and provide their observation.
3 ¼ of the hotel rooms will have a switch on them that will help with energy consumption. If there are 2,504 hotel rooms that will be built in all the hotels. How
many rooms will have the special switch?
Answer: ¼ * 2504 = 626 rooms will have the special switch.
4 Reflection Question Guide:
Based on your new learning, why is it important to provide access to affordable, reliable, sustainable, and modern energy for all?
Guide students to reflect on the significance of energy-efficient technologies in promoting sustainable practices.
Encourage them to explore the importance of energy access and its role in ensuring equitable and modern living standards.
Discuss how technology can contribute to addressing energy challenges and promoting sustainable development goals.
Plant Watcher
Project 15 : STEM Challenge
water to grow well. At the same time, it is important to use water in an economical way and not waste it when watering the plants.
STEM Careers Connection
This project features tasks that resemble people working in the following careers:
Botantist and Electrical Engineer.
Problem
Imagine that you are working in a botanical garden. You are asked to design a system to detect the moisture of the soil. The botanical garden needs this system to watch the plants carefully and use the water in an economical way.
Challenge
Act as an electric engineer, who designs or manages electricity systems. Design a moisture detection system for the soil of the plants. After making a thorough inquiry on your project, build your circuit, draw your prototype and present your solution to your friends.
At the end of this activity the learner will be able to demonstrate an understanding of the following: Objectives
Objective:
Lesson Plan: Plant Watcher (Project 15)
Week 1: Introduction to Moisture Detection System
Introduce students to the concept of designing a moisture detection system for plants. Familiarize students with the electronics kit (Water Activated LED) and STEM Resource Book.
Understand the application of an electrolytic capacitor in a moisture detection circuit. Duration: 45 minutes
S# Phase Duration Details
1 Introduction 10 minutes
2 Importance of Moisture Detection 20 minutes
3 Circuit Building Basics 15 minutes
• Explain the project: designing a moisture detection system for plant soil.
• Discuss the objectives, NGSS standards, curriculum connections, and STEM career possibilities.
• Introduce the electronics kit and its components.
• Distribute the STEM Resource Book to each student.
• Explain the significance of maintaining proper soil moisture for plant health.
• Discuss challenges faced by botanists and gardeners in monitoring soil moisture.
• Introduce the concept of an electrolytic capacitor and its role in the circuit.
• In groups, guide students to build a basic circuit using the Water Activated LED kit.
• Explain how the electrolytic capacitor functions as a moisture sensor.
• Encourage students to record their observations in their STEM Resource Book.
Week 2: Moisture Detection Prototype Design
Objective:
Assist students in designing a prototype for the moisture detection system.
Understand the application of the electrolytic capacitor in a soil moisture detection circuit.
Incorporate the circuit into the prototype.
Duration: 45 minutes
S# Phase Duration Details
1 Prototype Design Planning 15 minutes
• Instruct students to design a prototype of a moisture detection system for plant soil.
• Explain how the electrolytic capacitor can measure soil moisture levels.
• Encourage creative designs that ensure proper plant care.
2 Prototype Construction 20 minutes
3 Testing and Reflection 10 minutes
• Guide students through incorporating the circuit with the electrolytic capacitor into their prototype.
• Ensure that the capacitor, LED, and other components are properly connected.
• Encourage them to follow circuit building instructions and document their progress.
• Have students test their moisture detection prototype by varying soil moisture levels.
• Ask them to observe how the LED's brightness changes based on soil moisture.
Week 3: Presentation and Reflection
Objective:
Provide students with the opportunity to present their moisture detection prototype designs.
Discuss the broader impact of technology in sustainable agriculture and environmental conservation.
Reflect on the role of technology in improving plant care practices.
Duration: 45 minutes
S# Phase Duration Details
1 Presentation Preparation 15 minutes
2 Group Presentations 20 minutes
3 Reflection and Discussion 10 minutes
• Have each group prepare a presentation about their moisture detection prototype design.
• In their presentations, students should explain the functioning of the electrolytic capacitor as a moisture sensor.
• Allow each group to present their designs to the class.
• Encourage questions and discussions after each presentation.
• Lead a group discussion about the broader impact of technology in sustainable agriculture.
• Discuss how moisture detection systems can contribute to efficient water use and plant care.
Answer Key
Q# Answer
1 Were you able to make your own circuit or did you use the instructions? (Own / Instructions) Answer: Own.
2 Try it. Does your circuit work perfectly? (Yes / No)
Answer: The students should test their circuit and provide their observation.
3 The botanist planted 11 rose bushes in the botanical garden and her assistant
4
planted 4 times as many rose bushes as the botanist. How many rose bushes did the assistant plant?
Answer: 11 * 4 = 44 rose bushes were planted by the assistant.
Reflection Question Guide:
Based on your new learning, how can you protect, restore, and promote sustainable use of terrestrial ecosystems?
Guide students to reflect on the importance of maintaining healthy ecosystems and the role of technology in achieving this goal.
Encourage them to explore how moisture detection systems can contribute to sustainable agriculture, conserve water resources, and promote environmental conservation.
Discuss the potential benefits of technology in addressing ecological challenges and supporting sustainable development goals.
Cambridge Curriculum Alignment:
Scientific Enquiry:
Engage students in hands-on investigations related to electricity and magnetism using the Snap Circuits kit. Encourage students to apply scientific ideas to design and test circuits that convert energy from one form to another, aligning with the NGSS objective.
Electricity and Circuits:
1 Project 1: Detect that Stone
Explore the effects of changing components in an electrical circuit.
Develop skills in modifying and constructing circuits using Snap Circuits, fostering an understanding of the practical applications of magnetism and electricity.
Hypothesis Testing:
Use results from circuit experiments to test hypotheses related to the effects of changing circuit components.
Scientific Enquiry:
Engage students in practical investigations related to electrical circuits and safety devices.
Encourage students to apply scientific ideas to design, test, and refine an emergency alert system using Snap Circuits, aligning with the NGSS objective.
Electricity and Circuits:
2 Project 2: Emergency Switch
3 Project 3: Power Up the Toys
Describe the way a switch opens and closes a circuit, associating this with whether or not a lamp lights, which aligns with the National Curriculum of England objective. Investigate the differences between series and parallel circuits, particularly as they relate to the design and functioning of the emergency alert system.
Safety and Electrical Circuits:
Promote an understanding of the role of electrical circuits in safety devices, specifically in the context of emergency alert systems.
Scientific Enquiry:
Engage students in hands-on investigations related to electricity, circuits, and power.
Encourage students to apply scientific ideas to design, test, and refine circuits that convert energy from one form to another, aligning with the NGSS objective.
Electricity and Circuits:
4 Project 4: Ring the Bell
5 Project 5: Night Fishing
Investigate series and parallel connections of batteries, exploring different circuit configurations. Develop skills in designing and constructing circuits to power electronic toys, fostering an understanding of the practical applications of electrical power.
Comparative Analysis:
Construct simple series circuits and compare them with parallel circuits to understand how different circuit configurations impact power delivery, aligning with the National Curriculum of England objective.
Scientific Enquiry:
Engage students in hands-on investigations related to electrical signaling and communication using Snap Circuits. Encourage students to apply scientific ideas to design, test, and refine a device (doorbell system) that converts energy from one form to another, aligning with the NGSS objective.
Electric Circuits and Components:
Construct electrical circuits, including switches, to understand how they work.
Investigate different methods of generating alarms using electrical circuits.
Design and construct a doorbell system using Snap Circuits, demonstrating practical applications of electrical signaling.
Scientific Enquiry:
Engage students in investigations related to light emission and its practical applications in attracting fish, aligning with the NGSS objective.
Electricity and Circuits:
Encourage students to explore water-activated circuits as part of the project.
Use recognized symbols to represent a simple circuit in a diagram, in line with the National Curriculum of England objective.
Design and Technology:
Promote design thinking and hands-on construction skills as students design and construct a fish-shaped LED bait for night fishing.
Environmental Science:
Foster an understanding of the role of light in aquatic environments, connecting the project to real-world contexts.
Project 6: Wet Diaper Alarm
Scientific Enquiry:
Engage students in hands-on investigations related to electricity and moisture detection using Snap Circuits. Encourage students to apply scientific ideas to design and test a device that converts energy from one form to another, aligning with the NGSS objective.
Electricity and Circuits:
Utilize recognized symbols to represent a simple circuit diagram, aligning with the National Curriculum of England objective.
Investigate how moisture can trigger an electrical response and how sensors can be used for monitoring.
Practical Applications:
Explore the practical applications of moisture detection, such as designing and constructing a wet diaper alarm using Snap Circuits.
Foster an understanding of how scientific concepts can be applied to solve real-world problems.
Electricity and Circuits:
Explore the concept of current measurement and its importance in electrical safety, aligning with the NGSS objective.
Investigate how different circuits affect current flow and its implications for safety.
7 Project 7: Safety First
8 Project 8: Don't Lie
Practical Skills:
Design and construct a current measurement tool using Snap Circuits, applying scientific ideas to create a device for measuring electrical current.
Symbolic Representation:
Use recognized symbols when representing a simple circuit in a diagram, fostering the ability to communicate electrical circuit designs effectively.
Scientific Enquiry:
Engage students in a hands-on investigation related to the concept of lie detection using physiological signals. Encourage students to apply scientific ideas to design and test a device (lie detector) that converts physiological signals into measurable outputs, aligning with the NGSS objective.
Electricity and Circuits:
Introduce students to the use of circuits as a means to measure physiological signals.
9 Project 9: Turn on the Radio
10 Project 10: How Telegraph Works
11 Project 11: Light up the Museum
Provide opportunities for students to design and construct a simple lie detector using Snap Circuits, fostering an understanding of circuitry and its applications.
Symbol Usage:
Teach students to use recognized symbols when representing a simple circuit in a diagram, aligning with the National Curriculum of England objective.
Scientific Enquiry:
Engage students in hands-on investigations related to radio receivers, transmission, and the role of tuning capacitors. Encourage students to apply scientific ideas to design and construct a simple radio receiver using Snap Circuits, which involves converting energy from one form to another, aligning with the NGSS objective.
Electricity and Circuits:
Investigate how changes in circuit components (e.g., tuning capacitors) affect signal reception in a radio receiver. Explore the effects of changing the number of components (batteries or bulbs) in a circuit.
Communication and Radio Waves:
Develop an understanding of the role of radio waves in communication and their use in radio receivers. Encourage students to explore the practical aspects of designing and building a radio receiver.
Scientific Enquiry:
Engage students in an exploration of telegraphy, Morse code, and the transmission of signals over long distances. Encourage students to design and construct a basic telegraph circuit using Snap Circuits, applying scientific ideas to create a device that converts energy from one form to another, in line with the NGSS objective.
Electricity and Circuits:
Use recognized symbols to represent a simple circuit in a diagram, aligning with the National Curriculum of England. Investigate and understand the components and principles behind a basic telegraph circuit.
Historical Significance:
Explore the historical significance of telegraphy and its role in long-distance communication.
Scientific Enquiry:
Engage students in hands-on investigations related to energy-efficient lighting using Snap Circuits.
12
Project 12: Backstage Laughter
13 Project 13: Help the Tourist Guide
Encourage students to apply scientific ideas to design and test a lighting project that converts energy efficiently, aligning with the NGSS objective.
Electricity and Circuits:
Explore the effects of changing components in an electrical circuit, particularly the use of LEDs and photo-resistors in lighting systems.
Develop skills in designing and constructing a lighting project for a specific application, such as a museum.
Hypothesis Testing:
Use results from circuit experiments to test hypotheses related to energy-efficient lighting and the use of specific components.
Energy Conservation:
Promote an understanding of the importance of energy conservation, particularly in public spaces like museums.
Scientific Enquiry:
Engage students in hands-on investigations related to sound effects and their role in entertainment.
Encourage students to apply scientific ideas to design and test a device that converts energy from one form to another, aligning with the NGSS objective.
Electricity and Circuits:
Use recognized symbols to represent a simple circuit in a diagram, aligning with the National Curriculum of England objective.
Investigate the integration of sound and lighting systems, fostering an understanding of the relationship between sound engineering and entertainment production.
Practical Skills:
Design and construct a laughter effect project for a television show using Snap Circuits, demonstrating the ability to modify and create circuits for entertainment purposes.
Scientific Enquiry:
Engage students in hands-on investigations related to amplification and technology.
Encourage students to apply scientific ideas to design and test devices that convert energy from one form to another, aligning with the NGSS objective.
Electricity and Circuits:
14 Project 14: Hotel Room Air Conditioning
Introduce students to recognized symbols used to represent simple circuits in diagrams, as per the National Curriculum of England objective. Provide opportunities for students to design and construct an amplifier circuit within the megaphone using Snap Circuits.
Technology and Communication:
Explore the role of technology, such as megaphones, in enhancing public safety and communication. Investigate how megaphones can assist in crowd control and communication, emphasizing practical applications.
Scientific Enquiry:
Engage students in hands-on investigations related to electrical systems and logical operators using Snap Circuits. Encourage students to apply scientific ideas to design and construct a device that converts energy from one form to another, aligning with the NGSS objective.
Electricity and Circuits:
Utilize recognized symbols when representing a simple circuit in a diagram, aligning with the National Curriculum of England objective. Explore the use of logical elements to control electrical systems, such as a simulated hotel room air conditioning system.
Energy Efficiency:
Foster an understanding of the significance of energyefficient systems, particularly in the context of the hospitality industry.
Encourage students to consider the energy-saving features and design principles in their simulated air conditioning system.
Scientific Enquiry:
15 Project 15: Plant Watcher
Engage students in hands-on investigations related to electricity and moisture detection using Snap Circuits. Encourage students to apply scientific ideas to design and test a moisture detection system, aligning with the NGSS objective.
Electricity and Circuits:
Use recognized symbols to represent a simple circuit in a diagram, as required by the National Curriculum of England.
Explore the use of electrolytic capacitors to sense moisture levels, linking this concept to the practical application of technology in supporting sustainable agriculture.
Hypothesis Testing:
Design and construct a moisture detection system for potted plants using Snap Circuits, allowing students to apply their scientific knowledge to create a functional device.