5 minute read
F 7.0 Maintenance – Track


1 Maintenance – running gear
Intervals
Maintenance
Maintenance during run-in period
- Idlers, guide rollers, drive wheels - Check the torque at the bolts
- Idlers, guide rollers, drive wheels - En- sure proper torque for bolts
- Guide rollers - check straight running
- Guide rollers - straight running, setting
- Guide rollers - ensure the adjusting bolts are tight
- Guide rollers - tighten the adjusting bolts
- Planetary gear
Check the oil level
- Planetary gear - fill with oil
- Planetary gear oil change
- Gear- guide rollers frontGrease them
1.2 Instructions for undercarriage maintenance
In order to avoid a disclaimer of responsibility by the manufacturer or dealer and to extend the life of the rubber parts, the directives below should be strictly adhered to.
Check and maintain the track and undercarriage as specified. Although the rubber itself needs little daily maintenance, the metal parts of the undercarriage are very sophisticated, therefore they require frequent checking. Ensure that they have no visible damage and that the drive wheels, idlers and guide rollers are properly secured to the vehicle. The drive wheels, idlers and rollers should not show evidence of unusual wear and tear (on the tread, on the driven surface and at the driving gears).
New drive wheels, idlers and guide rollers tend to become sticky. This is a normal consequence of the vulcanizing procedure. Generally, these parts work better if the sticky layer is removed. Therefore, we recommend coating each new drive wheel, idler and roller with chalk or similar non-corrosive material in order to make them work more smoothly. To do this, simply put a thin layer of this material on the driven surface of the drive wheel, idler or roller and turn on the drive for a very short period. This serves to remove the sticky layer and provides optimal “biting” for the gear and the drive wheel, idler and rollers. Pre-treatment of these parts is necessary only when they are new.
The wheels, idlers or guide rollers should not come into contact with grease, oil, benzene, gasoline or other corrosive chemicals. These attack the rubber and in case of contact they should be immediately removed. When greasing the machine and/or the gear, strictly avoid grease or oil on the drive wheels, idlers and guide rollers. Frequently check for hydraulic oil leaks. Hydraulic oil making contact with the rubber should be avoided. Do not wash or treat the machine with gasoline or other fuels; use only appropriate cleaning materials instead (i.e. soft soap and water). Discuss use of other separating agents with your machine dealer
If necessary, exchange the left and right side drive wheels with each other. In certain applications, wheel abrasion may differ. By exchanging the right and left wheels with each other, their lifetime can be prolonged
In this chapter you shall find all information regarding lubrication materials required for maintenance of the undercarriage
2.1 Long-term effect of parked machines
If the machine is not used for a long period, observe the following directives
Avoid exposing the machine to direct sunlight
Over a period of time, the direct UV radiation may cause the drive wheels, idlers or guide rollers to become porous. They become rigid and tiny ruptures may appear. For these reasons, the machine should be stored under a roof or in a protected area when it is possible. If the machine must be stored outdoors, please cover the tracks, drive wheels, idlers and guide rollers with non-transparent canvas.
Avoid excessive humidity. Longer contact with water may attack the drive wheels, idlers or guide rollers
Do not store the machine in standing water. The machine must be stored under a roof or in a protected area whenever it is possible. If the machine must be stored outdoors, please cover the tracks, drive wheels, idlers and guide rollers with watertight canvas
Separate directives apply to long/term storage for the drive wheels, idlers and guide rollers! Consult with the Dynapac, USA customer center for these directives
2.2 Maintenance
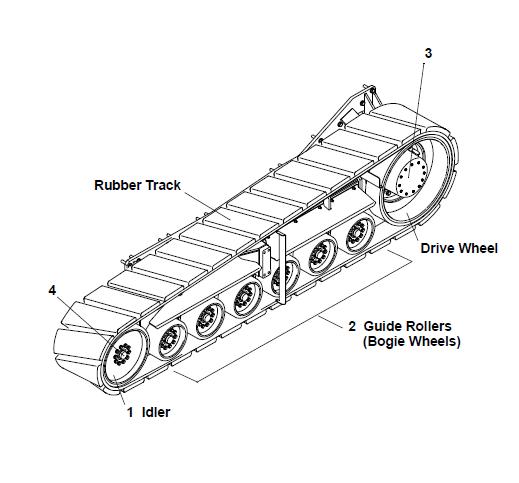
Idlers, guide rollers, drive (1)
Check / tighten the mounting bolts
Mounting bolts for all idlers, guide rollers and drives should be checked and tightened if necessary!
The mounting bolts should be tightened to the following torque values:
- Guide rollers (A) - (12 rollers): 105 ft. lbs / 142.4 Nm
- Idlers (B) - (2 idlers): 314 ft. lbs / 425.7 Nm
- In addition to this, all mounting bolts on the drive wheel (C) should be checked and re-torqued if necessary!
- Drive wheels - (2 drive wheels): 375 ft. lbs / 508.4 Nm
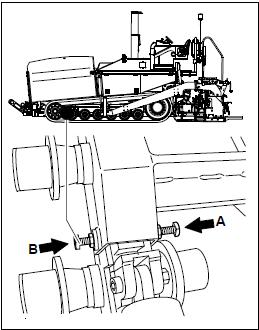
Guide rollers – straight running secure the adjustment bolts (2)
The adjustment bolts are located in the front part of the drives and at the regulator links of the guide rollers
If the wheels and rollers run outwards or inwards or are not centered on the two guide rollers, side ward tilt of the guide rollers should be adjusted
Check whether the adjusting bolts and counter nuts are properly tightened and retighten them if necessary
Guide rollers runs excessively inwards:
- Loosen the counter-nuts of both adjusting bolts (A) and (B).
- Loosen the inner adjusting bolt (A).
- Retighten the outer adjusting bolt (B).

Never turn the adjusting bolts more than a half turn!
If the guide rollers run excessively outwards, you should adjust the guide rollers in the opposite direction!
- Move the machine forward and check to see if the rollers are running straight. Repeat the adjustment if necessary.
When checking the adjustments, drive the machine until the drive wheels make two complete turns
The adjustment is correct if the teeth of the rollers run in the middle between the idlers and the front / rear guide rollers!
- Tighten the counter-nuts on the adjusting bolts (A) and (B) on a regular basis!
- Move the machine forward and backward to check if the rollers are running straight!
The rollers running straight is very important and directly affects their life cycle!
Planetary gear (3)


Care must be taken to ensure fluids are contained during performance of inspection, maintenance, testing, adjusting and repair of the paver. Be prepared to collect the fluid with suitable containers before opening any compartment or disassembling any component containing fluids. Dispose of fluids according to local regulations and mandate
To check the oil level in the Planetary Gearbox:
- Position the planetary gearbox so that the oil drain (B) is vertical at its lowest point (about the 6 o’clock position). The oil filler plug (A) should then be on the Left or Right outside of the planetary middle.
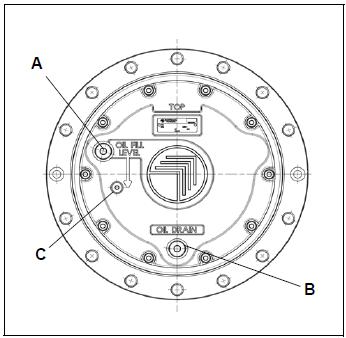
- Clean the area around the check plug (C) and fill plugs and the drain plug
- Place an oil collection container underneath the planetary gearbox
- Remove the oil level check plug (C). The oil level should be at the oil level check port.
- If the level is low, add oil through the fill plug (A).
- If the oil looks contaminated, drain the oil completely
- Insert the drain plug (B) and tighten
Gearbox must be filled with fresh, clean oil.
- Fill with oil until the level has reached the oil level check port (C). Insert check and fill plugs and then tighten
Hot oil or components can burn. Oil must be at normal operation temperature when draining. Avoid contact with hot oil or components
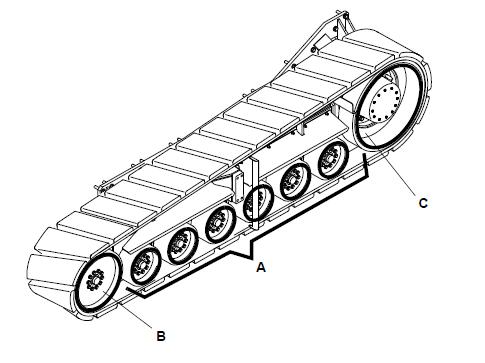
Idler rollers, front (4)

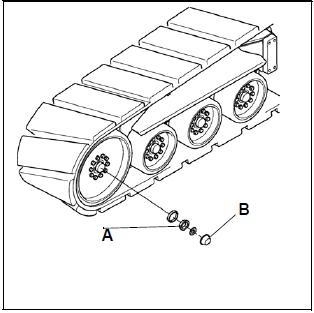
Tracks that are not adjusted properly can cause rapid wear at the idler bearings and can put extra stress on the undercarriage while wasting horsepower and causing higher fuel consumption.
Check the drive idler bearing (A) for wear and ensure they are filled with grease
To re-grease the idler bearings:
- Remove protective cap (B).
- Clean any used grease from the bearing assembly (A) and replace the old grease with the proper amount of new grease by packing the grease into the bearing.
- Return protective cap (B).
Ensure no contaminants or foreign materials enter into the bearing.
3 Gear – lubrication materials (5)
3.1 Lubrications and fuels
NOTE: Use only lubricants listed or the equivalent quality lubricants. Use only clean containers for adding oil or fuel.
Take into account the filling volumes (see the section “Filling volumes”)
Low quality oil or lubricant causes faster wear and the failure of the machine.
Mixing of synthetic and natural oils is explicitly prohibited!