8 minute read
D 4.0 Operation


1 Preparation of operation
Required equipment and tools
To avoid delays on site, check before starting work whether or not the following equipment and tools are present
- Wheel loader for transporting heavy extendable parts.
- Diesel fuel.
- Engine oil and hydraulic oil, lubricants
- Separating agents (emulsion) and manual injector.
- Shovel and broom
- Scraper (shovel or scoop) for cleaning the auger and the hopper intake area.
- Necessary parts for extending the auger
- Necessary parts for extending the screed
- Percentage spirit level and leveling rail, 4 yards (4 m) long
- Leveling wire
- Protective clothing, signal vest, gloves, hearing protection
Before starting work
(In the morning or when starting paving).
- Follow the safety instructions.
- Check personal protective equipment
- Take an inspection walk around the paver and check for leaks and damages.
- Install parts removed for transportation or for the night.
- Perform the check according to the “Checklist for the machine operator” given below.
Checklist for the machine operator
Check! How?
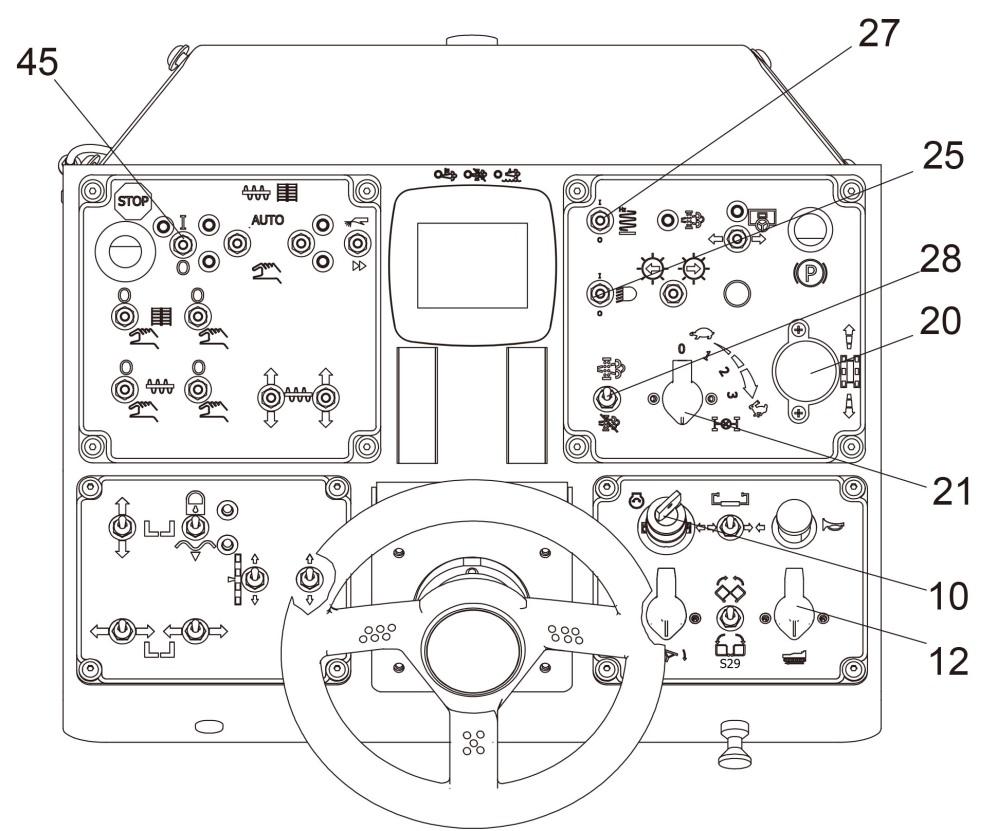
Emergency stop button
- on the operating panel
- on both remote control units
Steering
Horn
- on the operating panel
- on both remote control units
Lights
Push in the button
The diesel engine and all running drives must stop immediately.
Button must be pulled out to start machine again.
The paver must follow every movement of the steering wheel. Check straight running.
Briefly press the horn button. The horn must sound.
Switch on (with the paver started), walk around the paver and inspect it, then switch off again.
Auger covers
Check! How?
For larger working widths, the walkway plates must be extended and the auger tunnels must be covered.
For larger working widths, the walkway plates must be extended.
Screed covers and walkways
Hinged walkway plates must be swung down.
Check that the side shields, the side plates and the covers are securely seated.
Screed transport safeguard
Hopper transport safeguard
Miscellaneous:
- Engine hood
- Lateral flaps
Accessories:
- First-aid kit
When the screed is lifted, the operator must be able to engage both screed transport safeguards.
When the hopper is closed, the operator must be able to engage both hopper transport safeguards.
Check that the hoods and flaps are closed and secured.
The accessories must be in the pro- vided holders.
1.1 Starting the paver
Before starting the paver
Before starting the diesel engine and beginning operation, the following steps must be performed.
- Daily maintenance of the paver (see chapter F)
Check the operating hours counter to determine whether or not additional maintenance work (such as monthly or yearly maintenance) must be performed.
- Check the safety devices and protective devices.
“Normal” starting
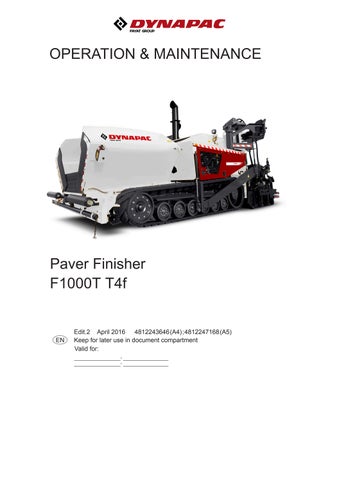
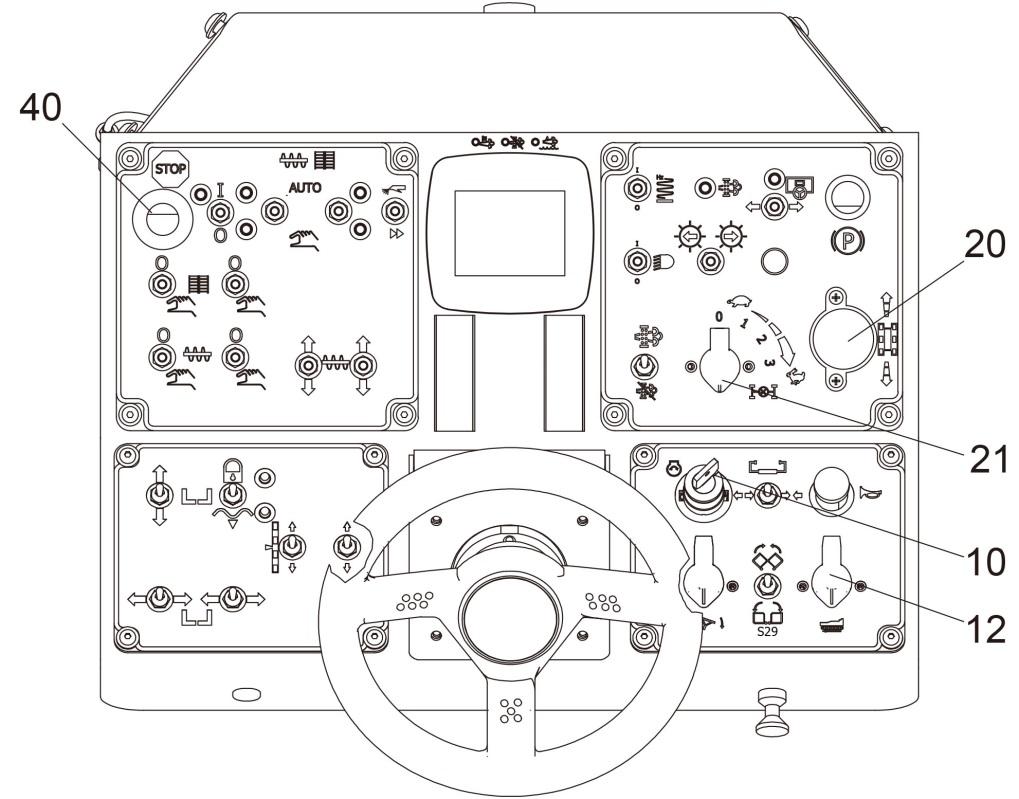
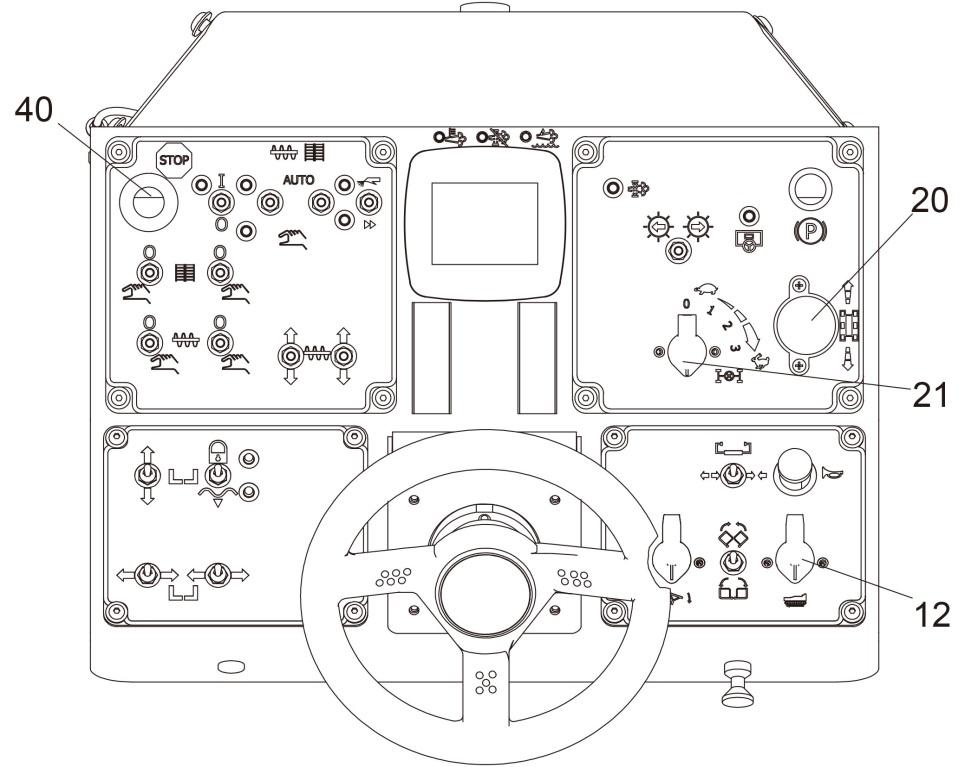
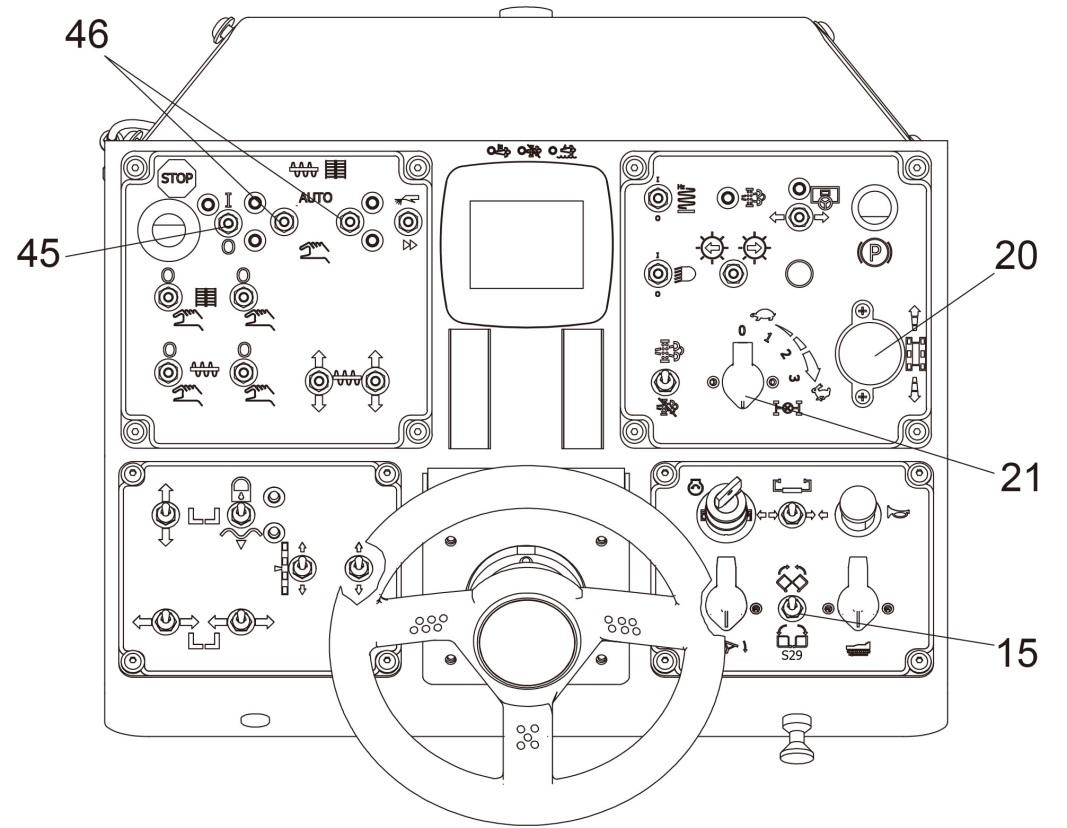
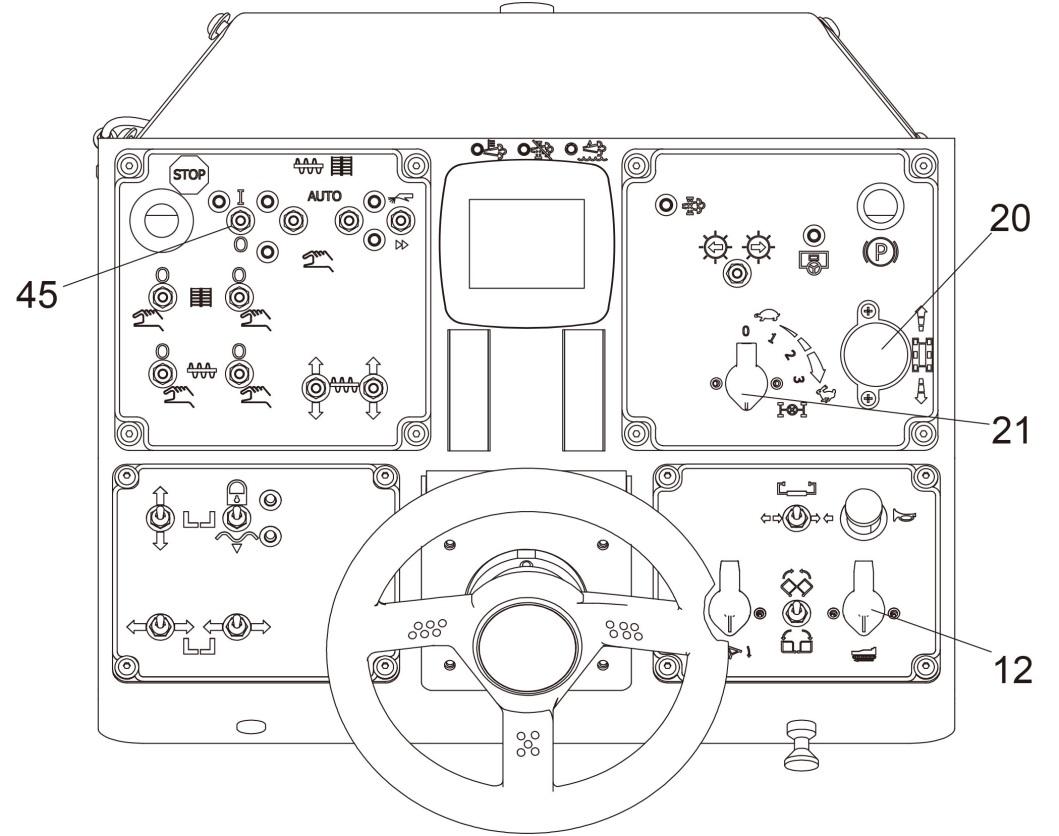
- Set the drive lever (20) to the center position and the speed preselector (12) and the selector (21) for traction drive / engine to minimum
- Insert the ignition key (10) in position “0”. The lights should be switched off during starting to reduce the current drain on the battery
Starting is not possible if the drive lever is not in the central position or if the emergency stop button (40) is depressed
- Turn the ignition key (10) into position 3 to start the engine. Once engine has started, release the key and it will spring-return to the “On” position. Do not let the starter run continuously for more than 20 seconds; wait 1 minute before turning the starter again
Jump starting
The engine can be started with the help of an external power source if the batteries are low and the starter no longer turns
Suitable power sources are:
- Other vehicles with a 24V system
- Additional 24V battery
- Start device that is suitable for jump starting (24V / 90A).
Standard 12V chargers or quick chargers cannot be used for jump starting.
To jump start the engine:
- Set the drive lever (20) to the center position. Set the speed preselector (12) and the selector (21) for traction drive / engine to minimum.
- Insert ignition switch (10) to position “0” to turn on the ignition.
- Connect the power source with the appropriate cables
Check for proper polarity! Always connect the negative cable last and remove it first!
- Turn the ignition key (10) completely to the right to start the engine. Once the engine starts, release the key and it will spring-return to the “ON” position. Do not let the starter run for more than 20 seconds; wait 1 minute after every attempt before turning the starter again!
After starting
To increase the engine speed:
- Set selector (21) for traction drive / engine to position 2.
Let the paver warm up for about 5 minutes if the engine is cold.
Read and follow Chapter D2 of this manual for possible warnings on the graphical terminal!

1.2 Transport Operation
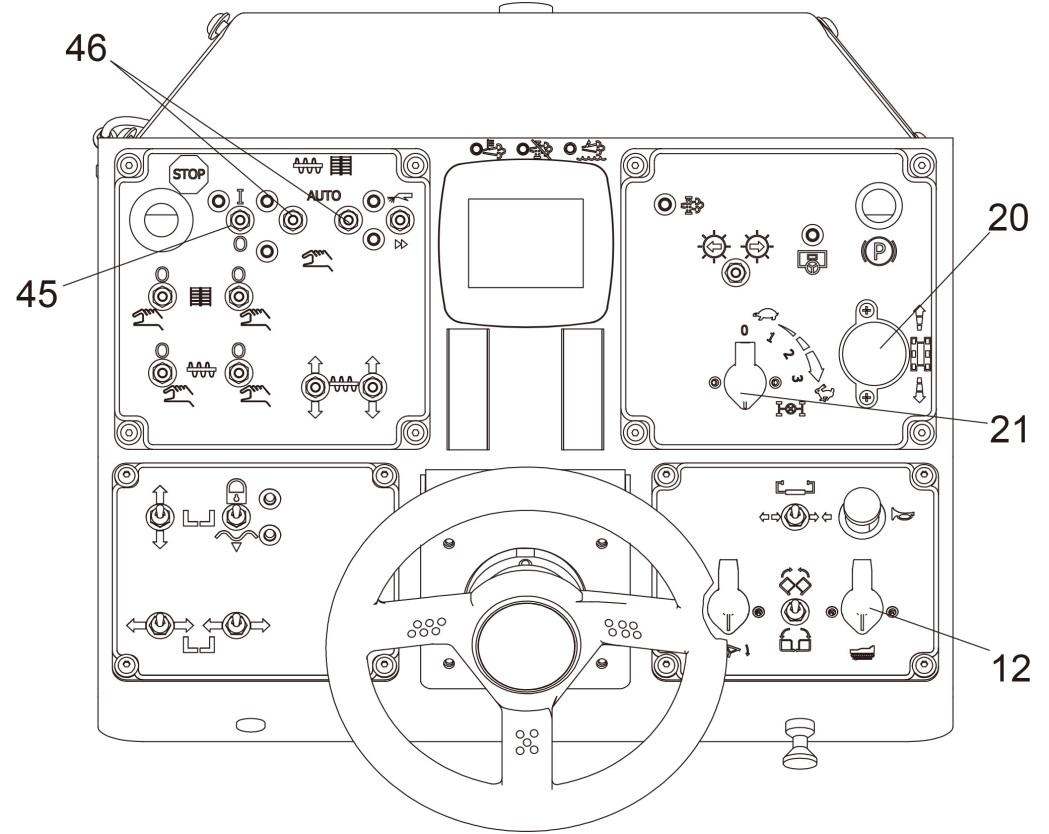
Lifting and securing the screed
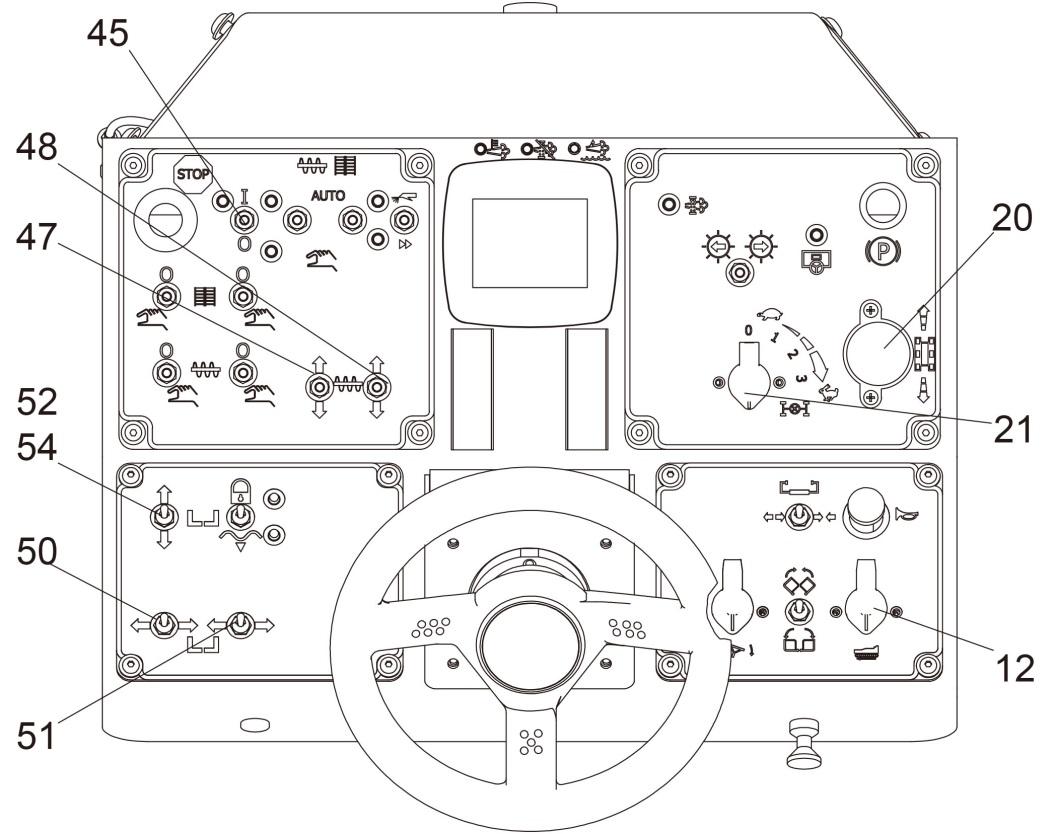
- Raise the screed using switch (52).
- Center the leveling cylinders using the switches (54) / (55).
The remote control must be connected and this function must be set to “Manual“.
- Raise the auger crossbeam using switches (47) / (48).
Engage both screed transport safeguards to secure the screed in the raised position
Driving and stopping the paver
- Set the selector (21) for traction drive / engine to position 3
- Set the preselector (12) for traction drive to approx. 50%
- To start driving, carefully tilt the drive lever (20) forward or backward according to the drive direction desired
In case of an emergency, press the emergency stop button (40)!
- To stop the vehicle, move the drive lever (20) into its center position
Switching off and securing the paver
- Lower the screed using switch (52)
- Turn off the engine by turning the ignition key (10) to the “0“position. Pull the key out of the switch
The battery may become drained if the paver stands still for long periods of time even though the ignition is not switched on
1.3 Preparation for paving
Releasing agent

Spray the parts coming into contact with asphalt (hopper, screed, auger, push roller) with a separator emulsion.
Do not use diesel fuel as it dissolves the bitumen.
Screed heater
Switch the screed heater “On” for about 15–30 minutes (depending on the ambient temperature before paving begins. Warming up prevents the material from sticking to the screed plates
Direction marks

To ensure straight paving, a direction mark must be present or established (road edge, chalk lines or similar).
- Slide the operating panel to the desired side and secure it
- Pull the alignment indicator out of the bumper (see arrow) and adjust it accordingly
Loading / distributing material
- Open the hopper with switch (15). Have the truck back short of the paver and pull the paver against the truck tires. Guide the truck driver when dumping the material mix
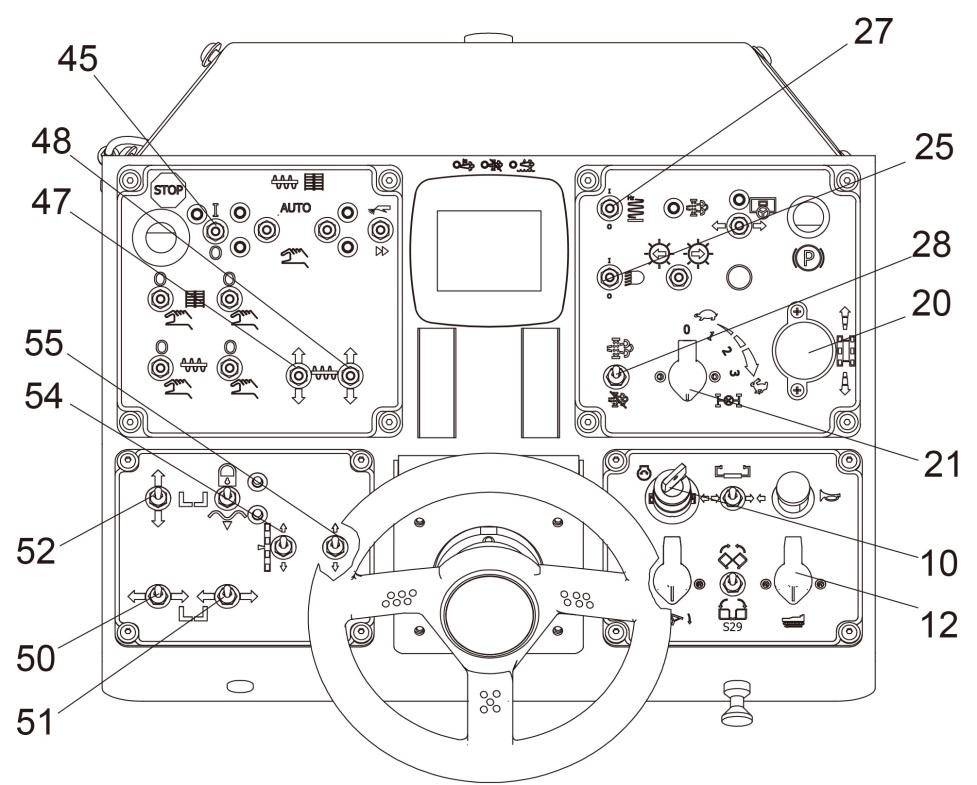
- Set the switch (45) of the auger and conveyor to the “ON” position.
- Set both switches (46) of the auger and conveyor to “AUTO “position
- Set the appropriate auger switch on the remote control and conveyor switch (if applicable) to “AUTO “position.
- Set the selector (21) for traction drive / engine to position 1 and push the drive lever (20) forward (away from operator)
The limit sensors for the conveyors and augers must switch off the function when the material has reached the height limit in the area beneath the auger crossbeam (conveyor sensors) or at the auger ends (auger sensors).
Check that the material is being conveyed properly
- If the material is not being conveyed properly, switch conveyor and auger to “MAN UAL“ by using switch (46) until a sufficient amount of material lies in front of the screed.
- Switch conveyor and auger to “AUTO “using switch (46).

1.4 Starting for paving
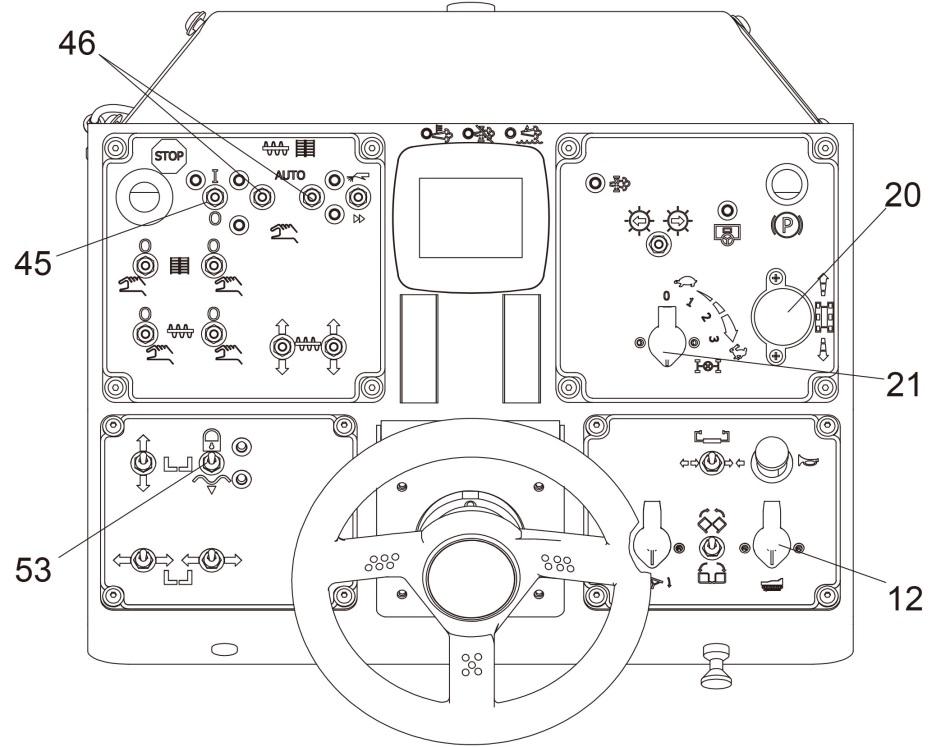
Set the switches, levers and controls listed below to the specified positions when the screed has reached its operating temperature and a sufficient amount of material lies in front of the screed:
Item Switch Position
21 Selector position 1
12 Preselector approx. 50%
53 Screed position to floating position.
27 Vibration ON
45 Auger + Conveyor ON
46 Auger + Conveyor AUTO
- Push the drive lever (20) to its forward position and start driving. Screed floating position is activated now.
- Observe the distribution of the material and adjust the limit sensors if necessary.
- Set the compaction elements (vibration and/or tamper) according to the required compaction ratio.
- Let the paving supervisor check the layer thickness after 15-20 feet (5-6 meters) and correct if necessary.
Carry out the check in the area of the drive chains or wheels as the screed tends to level an uneven ground. The reference points for the layer thickness are the drive chains or wheels.
The basic screed setting must be corrected when the actual layer thickness deviates significantly from the value needed for the job requirement (see the operating instructions for the screed).
1.5 Checking during paving
The following points must be constantly observed during paving:
Paving function
- Screed heater
- Vibration and / or tamper
- Engine oil and hydraulic oil temperature
- The screed parts must be retracted and extended in time when obstacles are in the way.
- Uniform material transport and distribution or supply to the screed; may require corrections to settings of the material switches for conveyor and auger.
NOTE:
See the section D4 “Malfunctions” when paver functions fails.
Quality of the layer
- Mat thickness
- Slope
- Evenness in the driving direction and at right angles to it (check with a level)
- Surface structure / texture behind the screed
NOTE:
See section D4 “Malfunctions, Problems during paving” if the paving quality is poor.
1.6 Interrupting / terminating operation
During breaks (i.e. the material supply truck is late)
- Determine the approximate duration
- When the material’s temperature drops below the minimum paving temperature, run the paver empty and create an edge like the end of a layer
- Set the drive lever (20) to the center position.
Screed will be switched into “STOP “function automatically.
During extended interruptions (i.e. lunch break)
- Turn drive lever (20) to center position. Move the preselector (12) and selector (21) to minimum position.
Screed will be switched into “STOP “function automatically
- Switch off conveyor + auger (45), vibration (27), lights (25) and exhaust system (28).
- Switch ignition (10) off.
- Switch screed heater (system) off.
The screed must be heated up to the correct paving temperature before paving can be resumed.
When work is finished
- Run the paver empty, then bring it to a stop.
- Turn drive lever (20) to the center position. Move the preselector (12) and selector (21) to minimum position.

- Switch off conveyor + auger (45), vibration (27), and lights (25).
- Lift the screed by using switch (52).
- Retract the screed parts to the basic screed width with switches (50) and (51).
- Use switch (47) and (48) to lift the auger.

- Where applicable, completely extend the leveling cylinders by using switches (54) and (55).
- Insert the mechanical screed transport safeguard (74) on both screed lifting cylinders.
- While operating the tampers at a low speed, let any material residue drop out.
Switch the ignition (10) off
- Switch screed heater (system) off.
- Remove the leveling units and stow them away in their boxes and close the boxes.
- Remove all parts that extend beyond the paver width. Secure them if the paver is to be transported over public roads on a low-bed trailer.
Do not turn the main switch off until 100 seconds after the ignition has been turned off!
T he engine electron ics require this length of time to back up data, and such device can prevent the engine’s electronic control module (ECM) from sustaining damage and battery discharging.
- Read and check the operating hour meter to determine whether maintenance work must be performed (see chapter F).
- Cover and lock the operation pane l, so as to restrain unauthorized persons from starting and operating the machine.
- Remove material residue from the screed and the pa ver and spray all parts with release agent fluid.