3 minute read
F 3.0 Maintenance – Conveyor and Hopper


1 Maintenance – Conveyor and hopper
Maintenance during break-in period
- Checking the tension of the conveyor chain
- Adjusting the tension of the conveyor chain
- Conveyor chain - Check chain
- Conveyor chain - Replace chain
- Clean Conveyor chain supports
- Conveyor tensioning sprocketLubricate grease zert
- Conveyor bearing - Lubricate grease zert
- Conveyor drive bearingsLubricate grease zert
- Conveyor drive / drive chains
Check chain tension
- Conveyor drive / drive chains
Set chain tension
- Conveyor drive - planetary gear
- Oil level check
- Conveyor drive - planetary gear
- Fill with oil
- Conveyor drive - planetary gear
Oil change ( indicates initial break-in period)
- Check conveyor chain guards, conveyor plates
- Replace conveyor chain guards, conveyor plates
- Hopper cylinders - Lubricate grease zerts
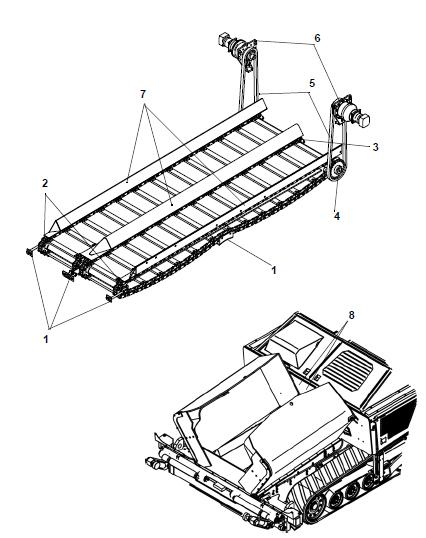
1.2 Points of maintenance


Chain tension of the conveyor (1)
Checking the track tension:
For daily inspection look straight through under the bumper. The chain must not hang below the bottom edge of the bumper. Should readjustment be necessary, measure the slack unloaded from the bottom edge of the floor plate to the bottom edge of the chain (see the figure). Also conveyor chain supports should be inspected daily and can be seen by looking straight through under the bumper. Clean the support every 1000 hours of operation and before adjusting the tension.
The chains should not be too tight or too slack. If the chain is too tight, material between the chain and the sprocket wheel can lead to stoppage or breakage
If the chain is too slack, it may get stuck in the protruding objects and be damaged
With the paver resting on a level surface the sag of both portions should be a minimum of 11 inches!
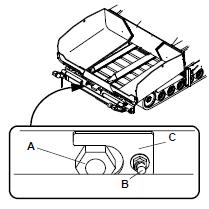
Checking the chain tension:
Chain tension can be adjusted with 4 tensionscrews (A) The tension-screws are located at the front of the crossbeam
- Loosen the bolts (B) and remove the locking clamp (C).
- Set the necessary chain tension by turning the tension-screws (A).
- Remount the locking clamp (C) with the bolt (B).
Check / replace chain:
When the conveyor chains (A) have stretched so far that they can no longer be adjusted, they must be replaced.
Chain links must not be removed to shorten the chain!
Shortening the chains would lead to the destruction of the drive sprockets! Adjust the tensioning instead!
If components have to be replaced as a result of wear, the following components should always be re- placed in sets:
- Conveyor chain

- Conveyor chain guards
- Conveyor chain tensioning sprockets
- Conveyor gear drive sprockets

Contact your Dynapac customer service representative for support during maintenance, repair and the replacement of worn parts!
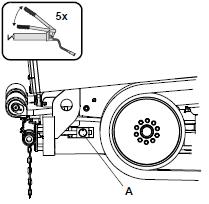
Conveyor tensioning sprocket bearings (2)
The tensioning sprocket bearings for the conveyors are lubricated at the grease zerts (A) located behind the crossbeam
The center bearings are lubricated at the outer lubricating grease zerts
Pump 5 strokes of grease with a grease gun!
Conveyor bearing block (1)
The center conveyor bearing block is lubricated with the grease zert (B) located inside the rear crossbeam, r. h. side.
Pump 5 strokes of grease with a grease gun!
Conveyor drive bearing (4)
The conveyor drive bearings are lubricated with grease zerts (C) located inside the front and rear crossbeam, r. h. and l. h. side.
Pump 5 strokes of grease with a grease gun!
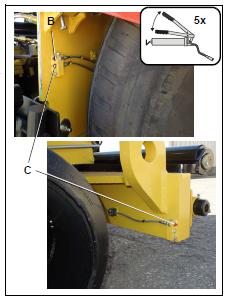
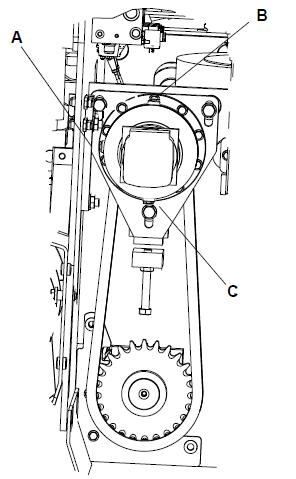
Conveyor drive – (5) drive chains
Checking for chain tension:
- In normal conditions, the chain has to have approximately .4 to .6 inch (10 – 15 mm) of play.

To set the chain tension:
- Loosen the locking bolts (A) and the lock-nut (B).
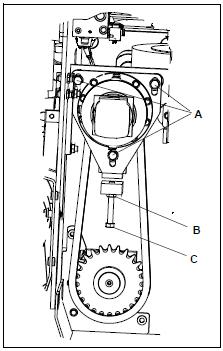
- Set the necessary chain tension with the tension-screw (C).
- Tighten the locking bolts (A) and lock-nut (B) again
Conveyor drive – (6) planetary drive (Left/right)
- To check the oil level, unscrew the inspection plug (A).
NOTE:
For proper oil level, the oil must be at the lower edge of the inspection port or a little oil flows from the hole.
To add oil:
- Check oil at oil level site glass (A).

- Fill with oil of the correct specification through port (B) until the oil level reaches the middle of the oil level site glass (A). Use only recommended oil.
Oil change:
NOTE:
Change the oil when the engine is at operating temperature.
- Remove the filling plug (B) and the drain plug (C).
- Drain the oil.
- Return plug (C).
- Fill oil through the filling port until the oil level reaches the middle of the oil level site glass (A).
- Replace the plug at the filling port (B).
Make sure that no pollution or foreign matter gets into the drive
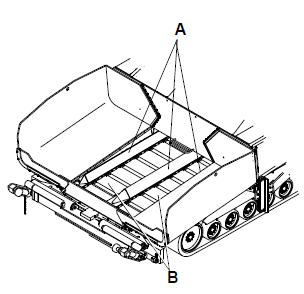
Conveyor chain guards / conveyor plates (7)
NOTE: When the lower edges of the conveyor chain guards (A) are worn or reveal holes, they must be replaced.
The conveyor chain is not protected when the conveyor chain guards are worn!
- Remove conveyor chain guard bolts.
- Remove the conveyor chain guards from the material tunnel.
- Install new conveyor chain guards with new bolts.
NOTE: The conveyor plates (B) must be replaced when the wear limit of .2 inch (5 mm) in the rear area beneath the chain has been reached.
If components have to be replaced as a result of wear, the following components should always be replaced in sets:
- Conveyor chain
- Conveyor chain guards
- Conveyor plates
- Conveyor chain tensioning sprockets
- Conveyor gear drive sprockets

Contact your Dynapac customer service representative for support during maintenance, repair and the replacement of worn parts!