14 minute read
1.24 Seats


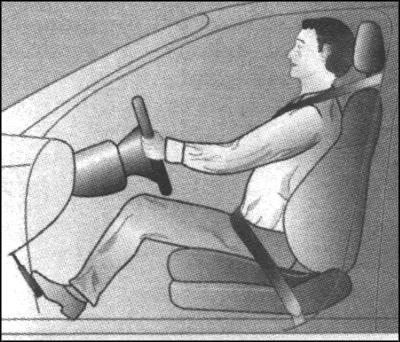
The seats, headrests, seat belts and airbags protect people in the car. When planting in the car to adjust the head restraint so that the tip of the head restraint is at the top of the head. Do not install the front seats too close to the control panel. The driver must hold the steering wheel, so that his hands were in the points corresponding to 10 and 2 h on the dial clock, and elbows were slightly bent. The legs should also be slightly bent, the driver had the opportunity to press the pedal until it stops. Seat belt must pass through the center of the shoulder. Belt should tightly enfold hips, not stomach. Slide the front passenger seat back as far as possible. Seat backs should not be too rejected. Recommend installing seat-back angle of about 25 °.
Fig. 1.161. Proper Planting on vodi telsom seat Shift Seats forward, backward and up
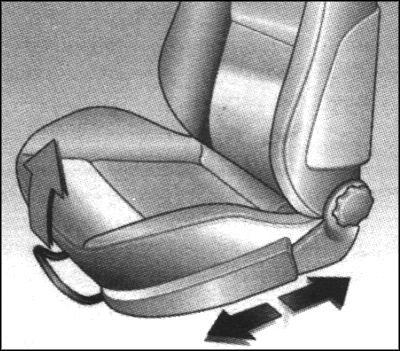
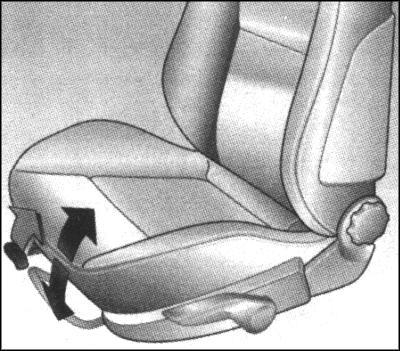
Fig. 1.162. Moving Seats For-ward, backward and up
To adjust the seat pull up the lever located on the outer front edge of the base seat. Letting go of the lever, push the seat to ensure the reliability of fixing the latch. Adjust the height of the seat with a lever located on the outer side of the seat cushion.
NOTICE Prohibited move seats in time drive. When elongated ry-chage they may suddenly shear o.s. Adjustment angle torso Seat
Turn the knob located on the outer side of the seat cushion. If the seats are shifted all the way forward, the seat backs can be thrown back in full.

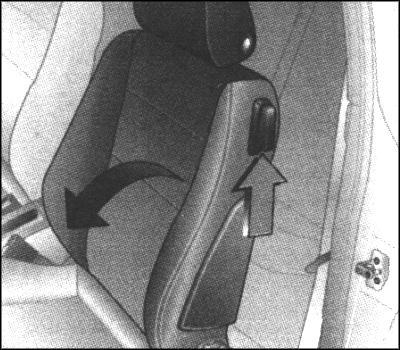
Fig. 1.163. Adjustment angle torso Seat
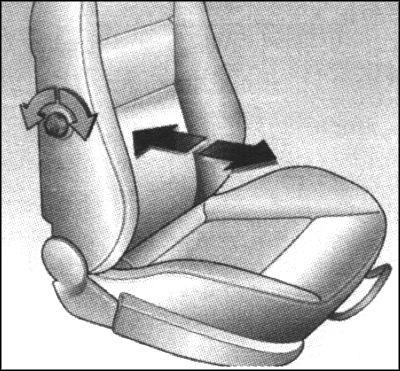
Fig. 1.164. Adjustment lumbar support
To increase the protrusion lumbar support seat forward pull lever on the side of the seat back. To reduce the protrusion pull the lever back.
Adjustment Seat height driver
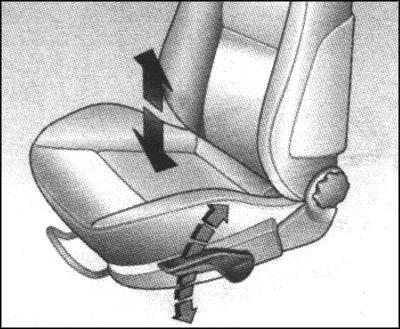
Fig. 1.165. Adjustment height driver's seat
Adjust the height of the seat with a lever located on the outer side of the seat cushion. To lift the seat a few times pull the lever up until it reaches the desired height. For lowering the seat a few times to push the lever until it reaches the desired height. Each lever seat rises or falls at low altitude.
Adjustment slope front Seats
Fig. 1.166. Adjustment tilt before-them Seats
To adjust the internal pull the lever in the front seat, adjust the desired tilt and release the lever. Secure the seat until it clicks. Changes in the tilt of gravity achieved by the movement of the body.
To fold backs of the front Seats
In order to fold the seat back, pull up release lever, tilt the back forward and secure. Slide the seat forward.
To raise the back, move the seat all the way back, pull the release lever up and lift the back. You move back the front seats with memory function of the electron of the seat is fixed in the previous situation. Front seat without this feature when you move back to lock in the desired position.
NOTE On Opel Astra cars with panoramic set glass before скла-dyvaniem Seat lower down headrests and fold sun up visors. Front seat head restraints
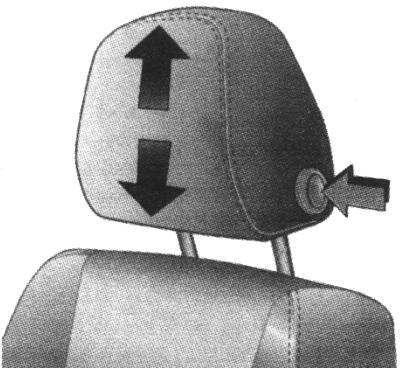
Fig. 1.168. Adjustment HR ne-rednego Seat
Adjust the head restraint so that the tip of the head restraint is at the top of the head. To adjust the height pull the headrest up or click on the lock and push the head restraint down. Make sure that the headrest is fixed. To remove the head restraint, press the lock and pull the headrest up (Fig. 1.169). For head restraints in place, click on the button and push the head restraint down.
Headrests rear seat
To raise the head restraint, pull it up to install the required position. For lowering, click the lock and push the head restraint down.
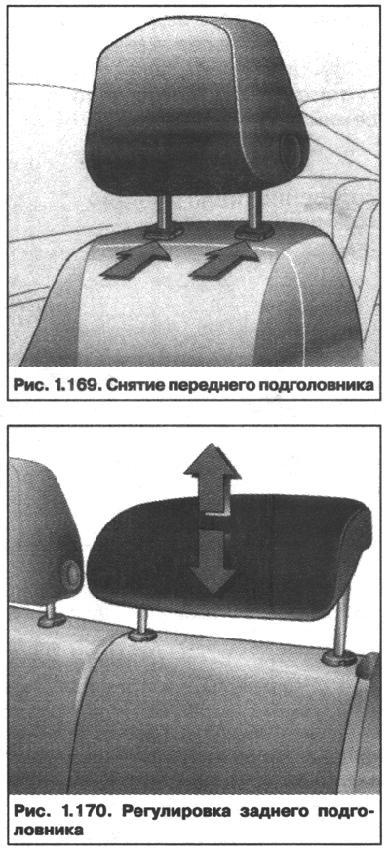
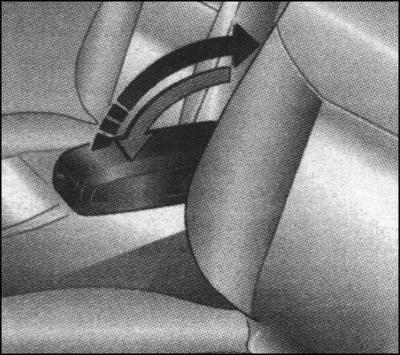
Fig. 1.171. Adjustment anterior mean-kotnika driving Seat
Press the raised armrest down, overcoming resistance, and lower it. By raising the armrest, it can be gradually set in one of several fixed positions (Fig. 1.171).
Adjusting the rear row of seats
Lift the handle under the pillow and slide number of seats in the desired position. Lower the handle and fix a number of seats until it clicks (Figure 1.172).
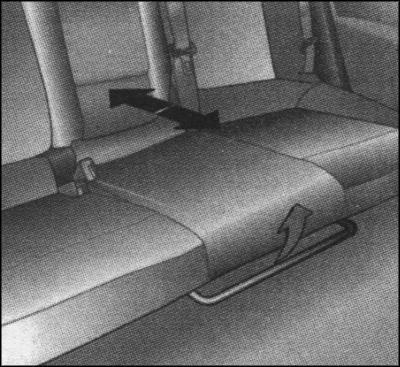
Fig. 1.172. Adjustment rear number of seats
Armrest on the rear seat back
Raise the front armrest, pull the loop down diagonally (at an angle of 45 °) (Fig. 1.173). When using the rear middle seat or a folding rear seat back, set up armrest.

Fig. 1.173. Armrest on back postero th Seat
NOTE For armrests is per-slonka aperture luggage department-tion for transportation long narrow subjects. Increase Trunk space ( «Limousine»)
Fold the rear seat back. Rear headrests completely omit or dismantled. Move slightly forward front seats. Rear seat back, whole or split, and unlock button and fold on the seat cushion. Slide the front seats back in the desired position (Fig. 1.174).
To fold average back back Seat
Fully lower the head restraint down. Loosen the back, pulling the handle and put it on the seat cushion. Folded average folding back seat allows you to load long items. The ends of the seat can be applied to passengers (see Figure 1.175).

Fig. 1.175. Folding average back back Seat
NOTE Cargo not must interfere parking management brake and lever switch transmission. Installing the rear seat back in upright position
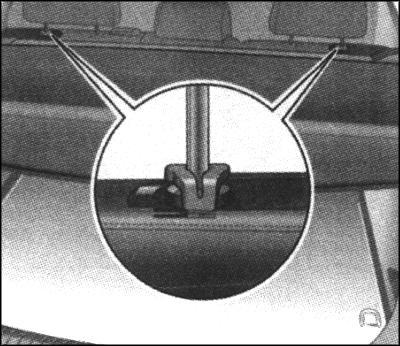
To protect against damage to miss the safety belt through the side of the holder (Fig. 1.176).
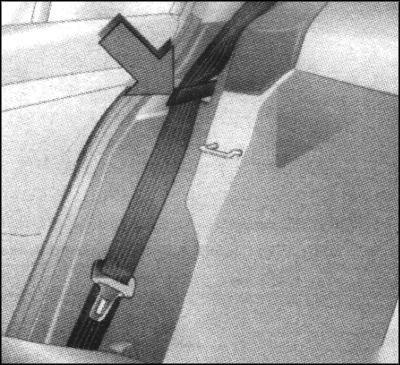
Fig. 1.176. Side holder belt Be-zopasnosti
To install the back of the rear seats in the upright position, you should fix the blockade until it clicks. Three-point safety belt in the middle and rear seats can be withdrawn from the traction device only if the fixed rear seat back.
Increase Trunk space model «Caravan» without moving number of rear Seats
Put the rear seat back on the pillow (Fig. 1.177). Fully lower down, or disassemble the rear headrests. Remove the hooks of the luggage enclosure with head restraints. Move slightly forward front seats. Rear seat back, whole or split, and unlock button and put it on the seat cushion.
Fig. 1.177. Moving back rear seat
Move the front seat back to the desired position. Pull the loop on the seat cushion and lift the rear seat cushion (whole or split) (Fig. 1.178).
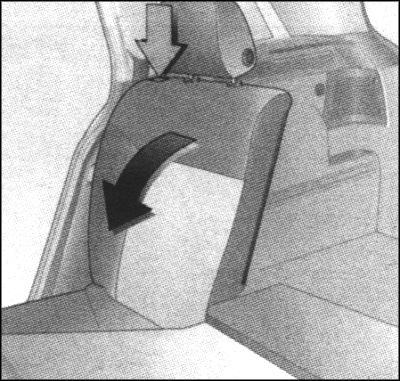
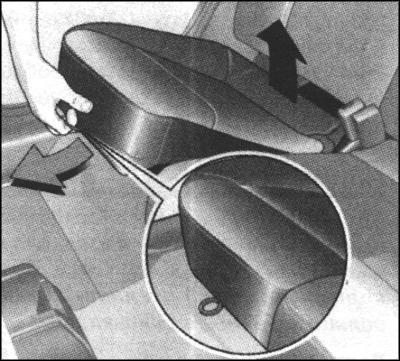
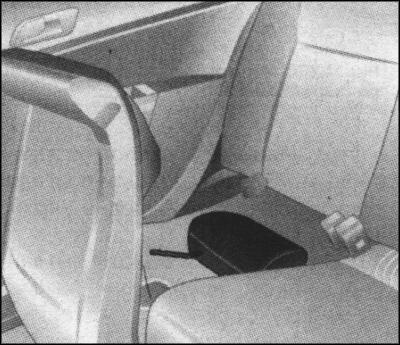
Fig. 1.179. Bays - pallets for Storage restraints
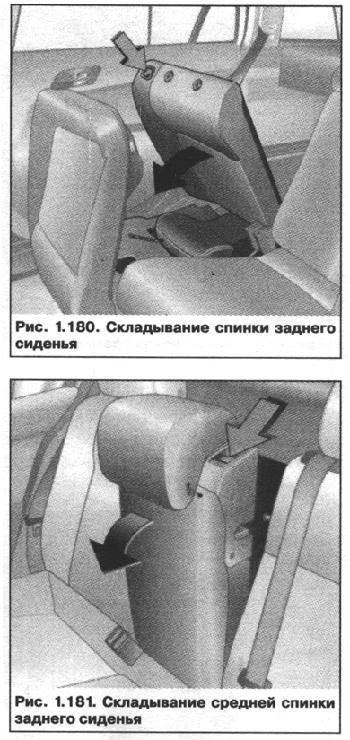
Release the back seat (whole or split) by pressing the button latches, fold it and secure it (Fig. 1.180).
To fold average back back Seat model «Caravan»
Fully lower the head restraint down. Unlock the back, pulling the handle and put it on the seat cushion, or, if raised rear seat cushion, put it forward until it clicks (Figure 1.181).
NOTE Cargo not must interfere parking management brake and lever switch transmission. Installing the rear seat back in upright position or lowering the rear seat cushion
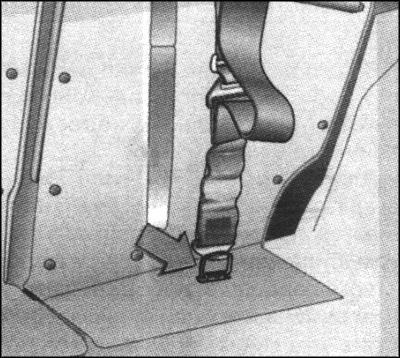
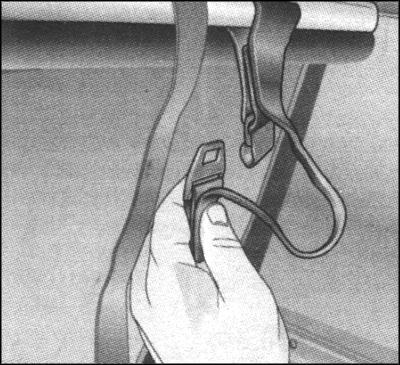
To protect against damage to miss the safety belt through the side of the holder (Fig. 1.182). To install the seat back in upright position, should raise them up to do this, click the button on the backside. Backs in the upright position fix with a noticeable click.
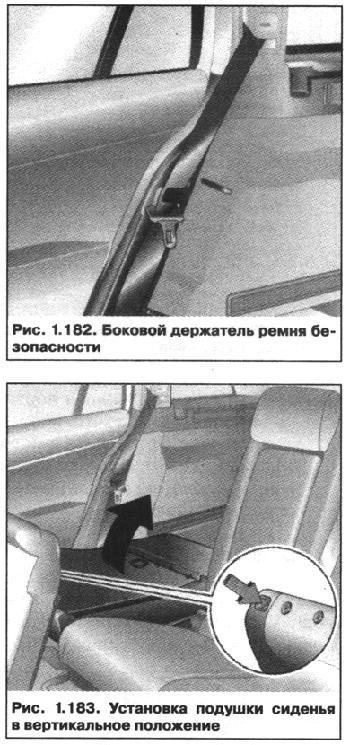
Lift the seat cushion (Fig. 1.183). Insert the headrests in the rear seat, and adjust their position. Lower the seat cushion, with a note on the correct position locks of safety belts. Fasten the hooks on the headrest shell luggage.
NOTE Three-point Strap áåçîïàñíîñ-ti on average and back Opel Astra car seat can pull of tensioner mouthtotal employment only at fixed-term back rear seat. Increased luggage space model «Caravan» with moving near the rear seats
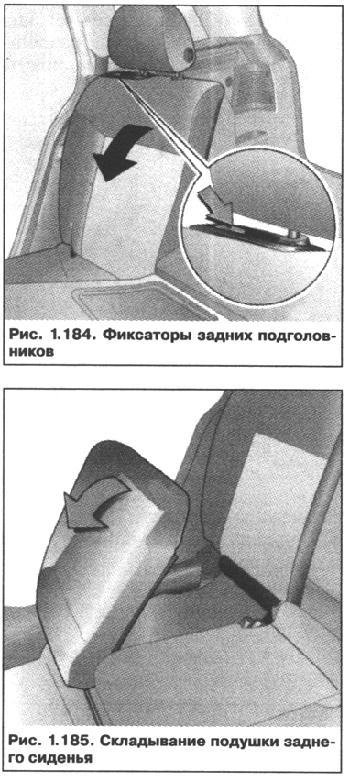
Fully lower down or disassemble the rear head restraints (Fig. 1.184). Remove the hooks of the luggage enclosure with head restraints. Move slightly forward front seats. Back seat, whole or split, razblokiriruyte with flaps and fold on the seat cushion. Move the front seat back to the desired position. Lift the rear seat cushion and fold the seat backs (Fig. 1.185).
Lift the rear seat cushion (whole or split). Remove the hooks of the luggage enclosure with head restraints. Remove the outer rear head restraints, and the average HR is lower all the way down. Dismantled headrests put in compartments, trays under the raised seat cushion (Fig. 1.186).
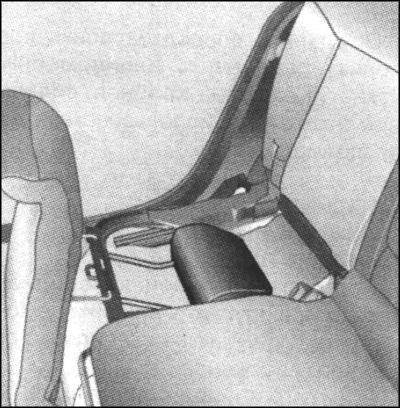
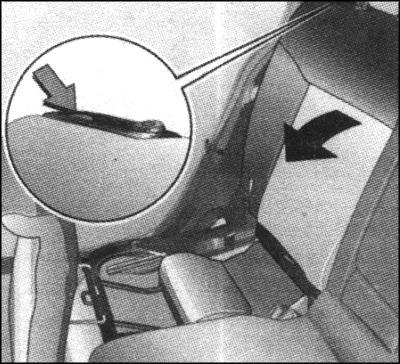
Fig. 1.187. Folding back rear seat Ability Downloads for armrests on back back Seat
Raise the front armrest, pull the loop down diagonally (at an angle of 45 °). Pull the handle and lower the front flap (Fig. 1.188).
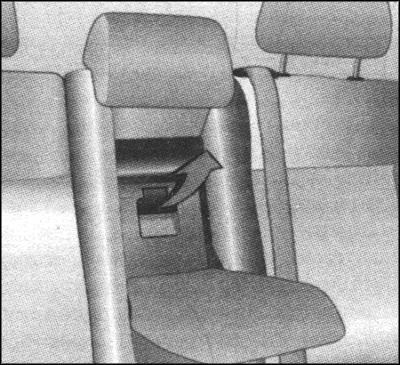
Fig. 1.188. Handle flap rear Sub-stays
Either forward flap allows you to carry lengthy narrow objects. The ends of the seat can be applied to passengers.
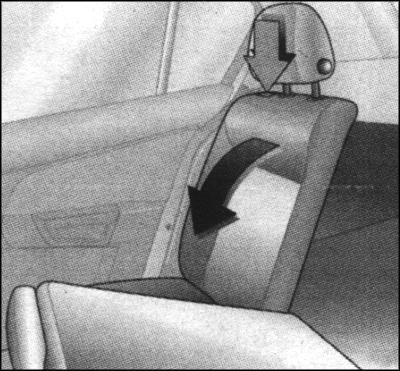
To fold back front passenger
Headrest front passenger seat lower down or dismantled. Slide back the front passenger seat. Lower the front seat back, raising unlock lever (Fig. 1.189).
Fig. 1.189. Folding back front passenger
To set back in upright position, press the release lever forward, set the front passenger seat back in upright position and secure it with a noticeable click.
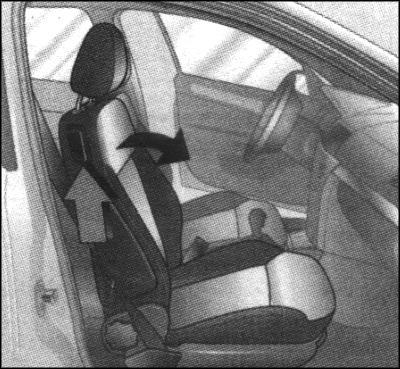

Fig. 1.190. Withdrawal housing luggage
Installing the place is in the reverse order of removal.
Casing luggage ( «Caravan»)
Click the handle housing luggage down jacket folds automatically (Figure 1.191). Pull the shell luggage back, it locks itself in position.
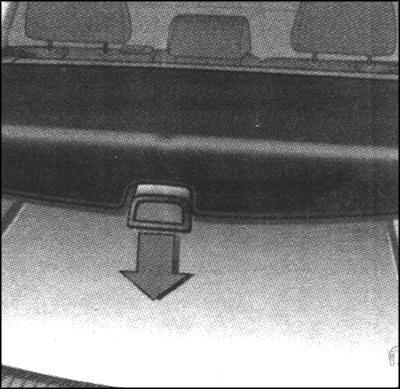
Fig. 1.191. Removing the shell luggage
NOTE Not put on housing items with OS-trymi edges and large weight.
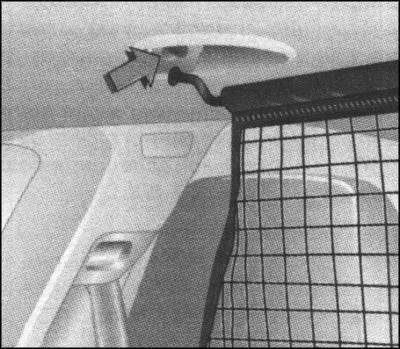
To close the gap between the hood and trunk back of the rear seat of the tape set Regiment. Both the hook to attach the shelves in guiding head restraints installed in the barrier grid hooks pass through its cell lattice (Fig. 1.192).
Dismantling housing
To dismantle, open the trunk and remove the cover hooks to the head restraints. Turn the release lever on the right side of the trunk lining up (Fig. 1.193). Lift sheeting on the right and pull it out of seizures.
Fig. 1.193. Lever release housing ba-gazhnika
In order to mount the luggage cover, insert it into the left mounting, turn the release lever on the right side up, set the luggage cover in the right mount, secure, and lower the lever down. Then fasten the hooks on the headrest.
Ofaditelnaya lattice ( «Caravan»)
Fencing bars can be installed behind the rear seats or, with folded and raised the rear seat cushions for them. Expand the fence bars. In the frame of the roof are two mounting holes. Supports lattice hang in the mounting holes, first with one, and then the other side and lock forward movement (Fig. 1.194).
Fig. 1.194. Setup barrier lattice
If a car Opel Astra is equipped with not moving near the rear seats to fit the length of the belt barrier bars, should pass a top hooks and eyelets straps to keep them in the lug on the floor left and right (Fig. 1.195). If installed in a car moving a number of rear seats to fit the length of the belt barrier bars, should pass a top hooks and eyelets straps to keep them in the lug on the back of the rear seat backs left and right.

Installation barrier lattice for front seats
Lift the rear seat cushion. Expand the fence bars. In the frame of the roof over the front seats are two mounting holes. Supports lattice hang in the mounting holes, first with one, then the other side and secure it to move forward. If the number is not moving the rear seats to fit the length of the belt barrier grilles, should be removed from the upper hooks and eyelets straps to keep them in the lug on the floor left and right (Fig. 1.196).
Fig. 1.196. Fastening belts fence-tion lattice
If the number of moving the rear seats to fit the length of the belt barrier grilles, should be removed from the upper hooks and eyelets straps to keep them in the right and left of the bracket under the seat cushions raised (Fig. 1.197).
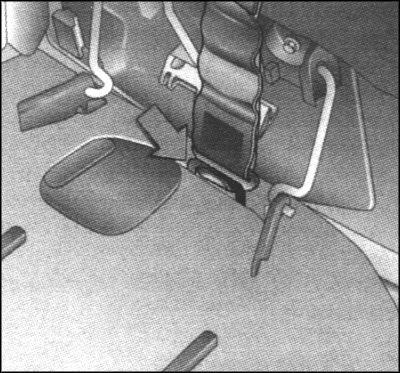
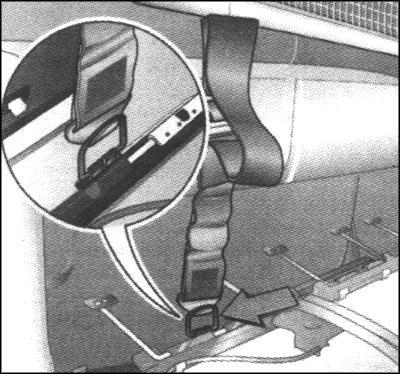
Fig. 1.197. Fastening belts fence-tion lattice
Then unmount the outer rear seat head restraints and seat backs folded forward.
Dismantling barrier lattice
Remove the hinge stretch belt barrier lattice, lifting knob length (Fig. 1.198).
Support barrier grid remove from mounting in the frame of the roof, roll up grille and styan belt-strap.
Guides and hooks trunk ( «Caravan»)
At the sidewalls of the boot is on the two guides. Insert the hook in the guide in the desired position to do so, set the hook in the top notch guide and slide into the lower groove (Fig. 1.199).
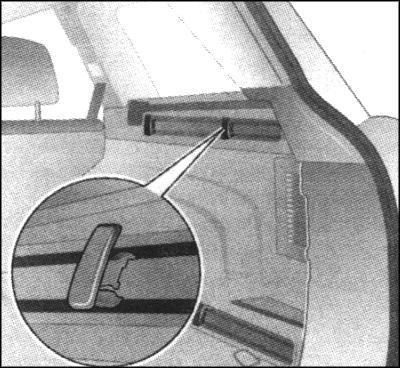
Fig. 1.199. Installation guide hooks in trunk
Pull the hooks to be removed.
The system of organization of space luggage «Rex Organizer» model «Caravan»
Universal mounting system for the separation of luggage space and stowage in the performance «Caravan» consists of the following elements: - Adapters - Adjustable net; - Mesh bags on the side walls; - Hooks in the trunk. The components are mounted in two guides on each side wall of the trunk with the help of an adapter or hooks (Fig. 1.200).
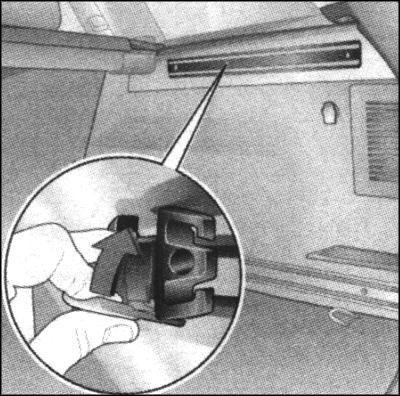
Fig. 1.200. Mounting Adapters system-we «Flex Organizer »
Adjustable net
Select one adapter for each guide, lift the latch, insert the adapter into the upper or lower guide groove and move the guide in position (Fig. 1.201).
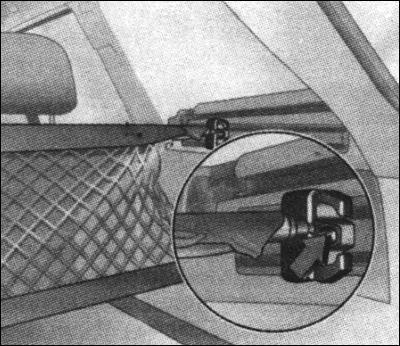
To lock the adapter, lift up the tongue. Lightly squeeze the support of the separation grid and insert into the holes adapters. A leg length should be inserted into the upper adapter.
Hooks and mesh bags
Insert the hook in the desired position on the guide. To do this, set the hook into the upper groove guide and slide into the lower groove. On the hook you can hang a mesh bag (Fig. 1.202).
Fig. 1.202. Setup net Bags
To remove the hooks, squeeze the bearing walls and remove them from the adapter. To remove the adapter, lift the flap, and unlock the adapter into the bottom groove and pull it from the top groove. Unlock the hooks on the rails.
Fixing lugs
The lugs are designed for secure mounting in the boot straps and nets for luggage.
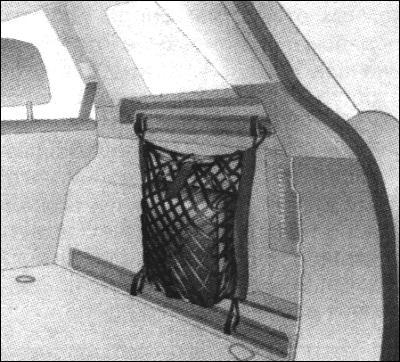
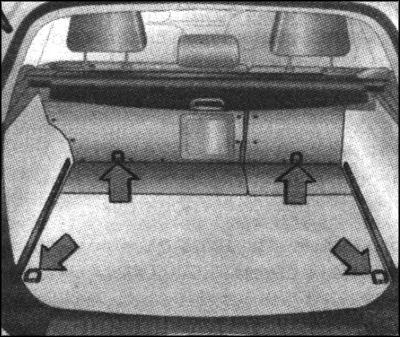
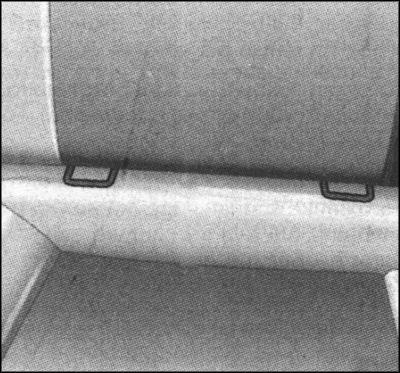
Fig. 1.203. Fastening eyelets Staples for fastening system to ensure children's safety ISO-FIX
Staples, located between the backrest and seat cushion, used to mount the system to ensure children's safety ISO-FIX (Fig. 1.204).