8 minute read
7.21 Care body car Opel Astra


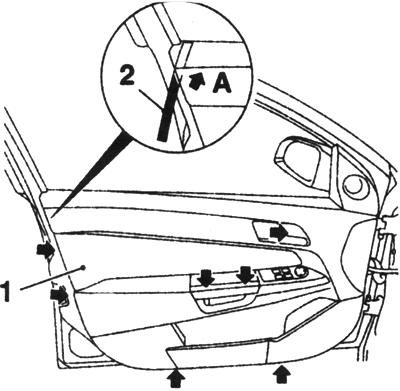
Fig. 8.28. Fastening bolts (indicated by arrows) Upholstery Sidebar Doors:
1 - the outer lining front speaker; 2 - lining arm Disconnect the draft door lock and remove the upholstery. When removing the rear door upholstery, there are a few features - it is necessary to delete the rear glass door, window lifts off the handle (with appropriate configuration) and unscrew the 4 fixing screws: 2 screws at the door armrests, one bolt on the inside door handle and bottom upholstery. Installation is performed in reverse order of removal. If necessary, replace damaged locks with new ones.
Removing small scratches
If you scratch the surface and does not affect the metal body panels, its repair is extremely simple. To remove particles peeling paint and wax coating lightly rub scratched area fine grinding paste. Rinse the treated surface with clean water. Little brush paint scratch paint used for exterior body panels meet. Continue to apply paint layer by layer until, until its surface scratches inside it reaches the level of the surrounding surface refinishing panel. Give the new paint polymerization to be treated for at least two weeks, then abrade the surface of the transition is flush with the surface covering the rest of the panel using very fine grinding paste. Then cover the treated surface with wax. If the scratch has penetrated through the layer of paint, reaching a metal body and causing its corrosion, you should use a different technology repair. Knife scrape from scratch powdered rust, then treat the surface of the corrosion inhibitor, to avoid the development of pockets of corrosion in the future. Rubber or plastic spatula cover the damaged area inhibitor-treated fillers. If necessary, and this is especially useful when puttying narrow scratches, to form a fine paste putty can be diluted with a solvent. Before the putty hardens within the scratches, wrap the tip of the thumb of a smooth cotton cloth. Then, soak your finger in a solvent, quickly spend it along the putty surface scratches. This will make the surface slightly concave. Now, after setting filler treated with a scratch can be painted in accordance with the instructions given for cases where the scratch does not affect the metal.
Repair dents
When repairing dents priority is extension of the deformed surface in order to launch it to the initial level. Attempts to achieve one hundred percent of the original does not make sense, since it is still impossible because of violations of the internal structure of the metal body panels on impact. The best is to remove the concave surface to a level of approximately 3 mm below the surface of the surrounding undamaged area of the body panel. If the dent is not deep, its full extension has no meaning. In the case where a concave portion can be reached from the back of the panel should try to dent the inside-peen hammer with the busiest of soft material (rubber, plastic). Tapping dent, tightly to her face of the mallet to absorb the shock pulse in order to avoid excessive bending outwards deformed metal panels. If the crater formed on the two-layer section of panel, or access to it from the reverse side is not possible for any other reason, you should use a different method of extraction. Make a concave area panel several small holes, hoping that they were buried in most areas of bruising. Then screw the long screws into the holes, leaving their heads sticking out so that for them it was possible to grasp pliers. Now start pulling out dented forceps for screws.
At the next stage of processing dents should be removed from the damaged surface and the section width of approximately 3 cm around the remnants of paint coating. This work is best done with a wire stripping nozzles or disc in the chuck electric drills, but no less effective, and manual processing of sandpaper. The final phase of preparations for puttying is scratching paint peeled from the metal dents with a screwdriver or a fragment file or drilling small holes in it to ensure maximum adhesion of adhesives to the metal surface. Then you can begin to implement the procedures puttying and painting.
Repair of cross-cutting corrosion damage and leaks
With the grinding disc or wire attachments, caught in the chuck electric drill, remove all traces of paint from the damaged area and the section width of about 3 cm around it. In the absence of the possibility of using an electric drill can be accomplished as effectively by hand with sandpaper. After removal of paint can estimate the extent of damage to metal corrosion and determine whether it makes sense to start would be wiser to repair or replace the entire panel (if it is in principle possible). The new panels can be purchased is not as expensive, as many motorists. Often, much faster and even more economical to install a new panel than to repair the extensive damage to the body. Remove the damaged panel, all the elements of body decoration, except for those that can serve as a guide to recreate the original shape of the deformed areas (such as lining the block-corrector, etc.). Using scissors or Blades remove all dangling freely, weakly attached and hopelessly corroded metal parts. Then bend the hammer inside edge of the hole for the formation of depressions, which will be filled with putty material. Use wire brush to remove the damaged metal powdered rust. If you have access to the back of the damaged area, process it, the corrosion inhibitor. Before puttying hole must be plugged. This can be riveted or privernuv to the damaged section of the back of his hand a piece of tin or blocking the hole with wire mesh. Once the hole is closed, the damaged section can be plastered and painted.
Puttying and color
Make many types of body fillers, however, it should be noted that for this type of work best suited attached to a set of body panels to repair putty paste with hardener. In order to achieve the smoothness and accuracy of the contour surface of the putty, paste should be applied flexible plastic or nylon spatula. Strictly following the manufacturer's instructions fillers (violation may lead to incorrect pour putty) implicated a small number of filler on a clean wooden or cardboard surface (carefully use the hardener). Spatula apply putty on a pre-prepared surface of the damaged section of body panels. To achieve the desired contour surface and the level of filler, each swab spatula must pass through the entire repair area. Once the contour of the surface will be plastered close to the desired, stop cause plaster, as it hardened, will begin to Scallawags spatula, forming clumps and leaving Wyry-you to the workpiece. Continue to apply layers of pasta with intervals of about 20 minutes to as long as the level of plastered surface becomes slightly protrude from the surrounding metal panels. After freezing putty, remove excess files. Next phase begins zashkuriva-tion and grinding plastered surface. It is best suited for this purpose waterproof sandpaper. Starting with a coarse-grained paper number 180 and then successively reducing the grain, finish number 600. In order to achieve adequate flatness of the workpiece, the paper pre-wrap around the bar of solid rubber (wood or foam) or stick to it. Processing the paper regularly and frequently moistened with water. This technology allows to reach the absolute smoothness and evenness of the workpiece at the final stage. As a result, the treated surface should be surrounded by a ring of pure metal. Rinse the treated surface with clean water, washing away from it all, formed during the grinding dust. From the aerosol can with a thin layer of lotion to the treated surface a light coat, so-called Processing Layer. This will identify all violations committed during polishing defects, which can be eliminated by applying a new layer of putty. Repeat zashkurivanie and grinding. Repeat puttying, processing, and priming the surface to obtain a satisfactory (according to the quality of the surface) result. After rinse the treated surface water and dry it. Now the surface is ready for painting. Apply the paint from an aerosol spray in a dry room. If circumstances compel to the body paint in the open air should take seriously the choice of suitable weather conditions. If one is painting a car body panels, cover the surrounding undamaged panel. This precaution will minimize the effect of slight differences in the colors of old and new colors. Elements such as chrome decorative trim strips, door handles, etc., should also cover (and better-off altogether). For the protection of non-paint surfaces, use a special adhesive tape (painter's "tape") and old newspapers stacked in several layers. Before you begin to paint from an aerosol spray can, shake it thoroughly, then apply the paint on the surface of a test, practicing the technique of staining. Cover the prepared surface to paint primer in several stages. Do not spare the water, waterproof abrasive paper number 600, process primed surface, seeking its absolute smoothness. Before proceeding to the final paint, let the primer dry completely. Apply a coat of paint, again achieving the required thickness by the multiple of its application. Streaking, start from the repaired area, making hand with spray circular motion. Increase the radius, spiraling up until not have covered all the damaged area and part of the old paint coating on the width of about five centimeters. After 10-15 minutes (not later, not to damage the edge of a start-freeze fresh paint) after applying the last layer of paint covering the separate body panels surrounding the newspaper and tape. The paint will cure completely in about two weeks, after which, to smooth the transition from fresh paint to spray before, treat the recovered very thin surface grinding paste. Finally, apply a protective layer on the panel means with wax.
Repair with considerable damage to the body
Repair of serious damage to the body has to take place in a specialized workshop, at the disposal of which has all the necessary equipment.


