Table of Contents Welcome Login/Password Creation Getting Your Campaign Started Dashboard Caregiver Email Blast and How to send messges Uploading Video Manage Troops and Girl Scouts Product Pickup Manage Girl Scouts Tab Paper Order Entry Project Thank You Banking & Payments Manage ACH Payments Girl Payments Reports Online Girl Delivered Items Special Reports Tab Summary Report Delivery Tickets and Reciepts Rewards and Patches Opt-Out Reward Delivery Tickets Personalized Patches Accessing M2OS During the Sale M2OS - Girls/Caregivers Setting up the Girl Scout’s Profile Creating the Girl’s Avatar Designing the Personalized Storefront Girl’s Campaign Sales Report Fun Stuff
2
3 4 5 6 9 10 10 11 12 13 13 14 14 15 16 17 17 18 19 20 21 21 22 22 23 24 25 26 27 29 30 31
WELCOME Dear Troop Fall Product Manager, This guide will take you through what you as a troop fall product manager will see and do in the M2 Ordering System (M2OS), as well as the caregiver/girl experience. You will receive an email from Girl Scouts of West Central Florida @mail.gsnutsandmags.com. The email will ask you to create a password to gain access to M2OS by following the link contained within. You will only be given access once you have completed training and submitted online your Troop Fall Product Manager Agreement. If you provided this info by September 20th, you were uploaded into the M2OS prior to the start date. Girls registered as of September 20th will be uploaded into M2OS by the product program department prior to the opening of the system to volunteers. For M2OS, you can send an email to each caregiver so that their Girl Scout can set up her personalized avatar, import or enter her email address contacts, and participate in the online portion and to enter the paper order card sales of the Fall Product Program. If a Girl Scout was registered after girls were uploaded to the system, the caregiver will add her name as part of the account set up process.
Remind caregivers they should make sure they enter in the troop’s 5 digit troop number and search for their Girl Scout’s name as she was registered in MyGS. For example, if the girl’s goes by Mandy Lewis but the membership system has her name Amanda Smith-Lewis, the caregiver should look for Amanda Smith-Lewis before deciding her Girl Scout is not listed and adding her (as Mandy Lewis).
3
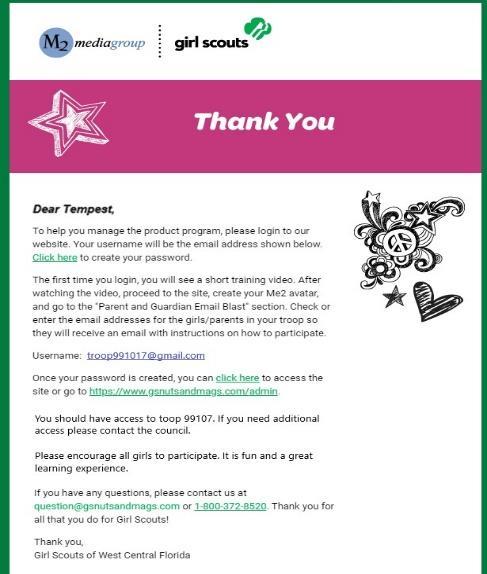
Log In/Password Creation Once you have been added to the M2OS system, you will receive an email from Girl Scouts of West Central Florida. It contains a link to where you will create a password, and after logged in, create your avatar, launch an email to the girls/caregivers in your troop and monitor your nut and chocolate sales throughout the Fall Product Program. Bookmark/favorite this link – www.gsnutsandmags.com/gswcf - in your browser as you will use the same link to log in to M2OS each time. Upon clicking the link in the email, you will see the Set Your Password screen as shown at left. Enter your email address and create a password. If you are a caregiver for a girl you can set up your troop and caregiver access using the same email and password for each access.
Once you have created your password, you are ready to log in. Select the Login to Administration Site button. Then enter your email address and your newly created password and click Login.
Note: If you ever forget your password click on “Forgot your password?” to enter your email to request a reset link emailed to you
4
Welcome To Your Campaign When you first log in you may have 3 things to do. 1) Watch a training video • Click “Play” icon to wach video - After watching button will be shaded saying “Please Watch Video Before Proceding” will change to “Continue” click to go on. • If you need to watch later you can from the dashboard.
2) Update your profile (Your address and gender) – this where if you earn a patch from your troop’s sales,
it will be mailed to. 3) Choose delivery site & date/time - You can choose or skip till later – You may not see if another troop person has logged in already and chosen for your troop. • Click dropdowns to see “Delivery sites” and “Pickup Date/Time” • Click “Save and Continue” or “Skip Step” if you need to decide at a later date.
You will see the Welcome to Your Campaign screen with quick links to creating your avatar, and Caregiver and Guardian Email Blast. We will cover them in more detail.
5
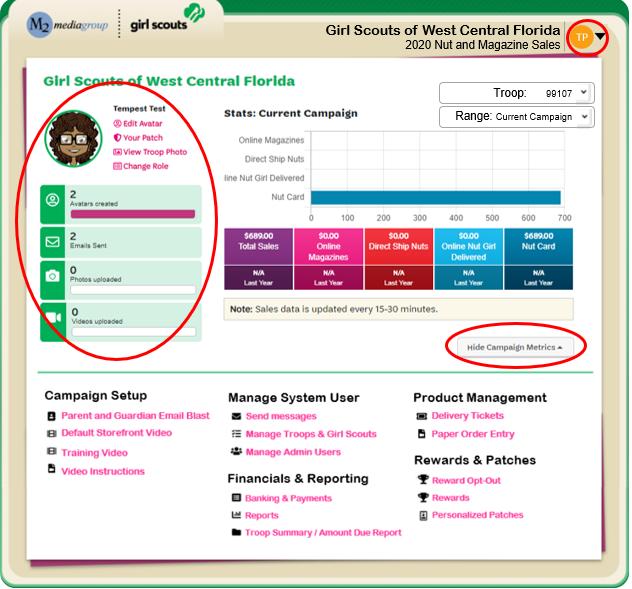
Dashboard The Dashboard, is where you will manage your troop. This Dashboard provides info about participation and sales for the troop(s). • If you manage more than one troop, select troop # from drop down at upper right for troop you want to view. • Stats: Current Campaign graphs your sales as well as the specific data points - Total Sales, Online Magazines, Direct Ship Nuts and more. These data points are updated in near real time (refresh your screen to see updates). • If you want to hide or show info on the dashboard click “Hide or Show Campaign Metrics”.
In the upper right, there is an icon labeled TP (for Troop). • Click “Change Role” between Troop and SUFPM • Click “Edit Avatar” – to edit avatar to your likeness • Click “Profile” – change your password or gender of your avatar • Click “Visit Campaign Area” - to see your girl’s site • Click “Logout” of M2 System At the upper left under your name on dashboard: • Click “Edit Avatar” – edit avatar to your likeness • Click “Your Patch” to enter your mailing address • Click “View Troop Photo” - to view your troop’s avatars • Click “Change Role”- between Troop and SUFPM or to previous season Track the activities of the girls: Avatars Created, Emails Sent, Photos & Videos uploaded.
Change Role • Click “Change Role” to switch between SU or Troop FPM or change to a previous season if you had access to that that previous season or role.
6
Setting Up Your Avatar • • •
Click “Edit Avatar” -- you will be able to create your own personalized avatar! Click “Your Patch” - To enter mailing address info for your own personalized patch. Earn if your troop has $1300 in sales. Click “View Troop Photo” – to view all the avatars created by the girls in your Troop.
Note: You can download your avatar and troop photo to print or share. In the Girls/Caregivers section of this guide we talk about a girl’s M2 Awards (virtual rewards)
Dashboard Links We will dive deeper into each item on the lower half of the dashboard, but let’s preview where each of these links leads:
Note:
Any time you you see the “Home” Icon on a page click on it to return to the Dashboard.
Or Click “Show Quick Dashboard links” to view the Dashboard Links, if shown at the top of a page.
7
Campaign Setup You can add the email addresses of the caregivers in your troop via Caregiver and Guardian Email Blast; Use to send an email to the caregivers that includes a link to M2OS to get started. Plus, it is from here that you can upload a troop video by clicking Default Storefront Video. Video Instructions provides safety and other tips as well as a sample script to use to record your video. Training Video provided by M2 generic (default) video system training. Please visit www.gswcf.org/fpp or gsLearn for council specific training videos. Manage System Users Is where you can Send Messages to the caregivers in your troop and Manage Troops & Girl Scouts. Verify girls, see girl’s sales and choose pickup delivery site and date/time. Financials & Reporting Banking & Payments is where you will enter/verify your Troop’s banking information, you will see information for the ACH debit council makes in December, and where you will enter payments received by your girls. Reports will take you to your sales reports. Troop Summary/Amount Due Report is snapshot view of your troop’s financials for the program. Product Management The Paper Order Entry link allows you to enter any order card orders that were not already entered by the caregiver. The Delivery tickets you will print out to pick up your products at the delivery site and delivery tickets to pick up rewards from you SUFPM. You can also use for when cargivers givers pickup product or rewards. Rewards & Patches If your troop is J/C/S/A who can opt-out by clicking Rewards Opt-Out. Click Rewards to see which rewards your girls have earned; click Personalized Patches to see the girls who have earned the avatar patch and if there are any pending actions needed (generally an action is needed when the mailing address is missing).
8
Caregiver and Guardian Email Blast
• Click “Caregiver and Guardian Email Blast” link. This process is similar to what girls see when sending their emails. • Click “Add Contacts” to upload the email addresses of the caregivers (or guardians) in your troop or manually enter them if they are any missing. Click “Send and Close” after you add email addresses. • To correct an incorrect email - Click on the incorrect email and enter correct email. Click “Update”, to update the email address and click on the “resend icon” to send out an email to caregiver/guardians with the link to participate in the Fall Product Program (www.gsnutsandmags.com/gswcf).
• • •
Addresses for emails added before the program start date will not be sent until the program start date (Oct. 5th). Click View Email to review the message being sent. You will be able to track the status – did they open it, read it, did it bounce, etc. You can add new caregivers and send additional launch emails throughout the sale. The launch messages are different from the Messages feature where you can customize the content you send to caregivers to remind them of important dates and deadlines
Send Messages You can send a general email to all the caregivers/ participants who have set up a “storefront”. • Choose from one of the options - need to communicate with girls who need to choose a reward action? Choose that topic and customize message. • Or you can send a generic message. Enter a subject that is meaningful, so it will be read – include reference to the Fall Product Program and troop number in that subject. A single word “hello” might get missed, but “Fall Product Troop 99999 - deadlines” will be more noticeable. • Next enter or edit the text of your message. For longer messages and those that require attachments, you will need to use your regular email program. • Once you are ready to send it, click Send. You can also post a note to appear in upper right corner of girl’s dashboard in M2 system. • Enter message in Message box, set dates for it to show • Click “Post Note”
9
Uploading a Video
• Click “Video Instructions” for safety and other tips as well as a sample script to use to record your video. • Click “Default Storefront Video” link on your Dashboard to watch the default or replace with troop video. • Click ”Choose File” to browse your computer for your video file. Click “Upload” When it is finished uploading, click “Close”. If a girl uploads a video to her storefront, her customers will see that video and not the troop or default video. If a girl does not add her own video, her customers will see your troop video. If there is no troop video and no girl video, that customer will see the generic (default) video available.
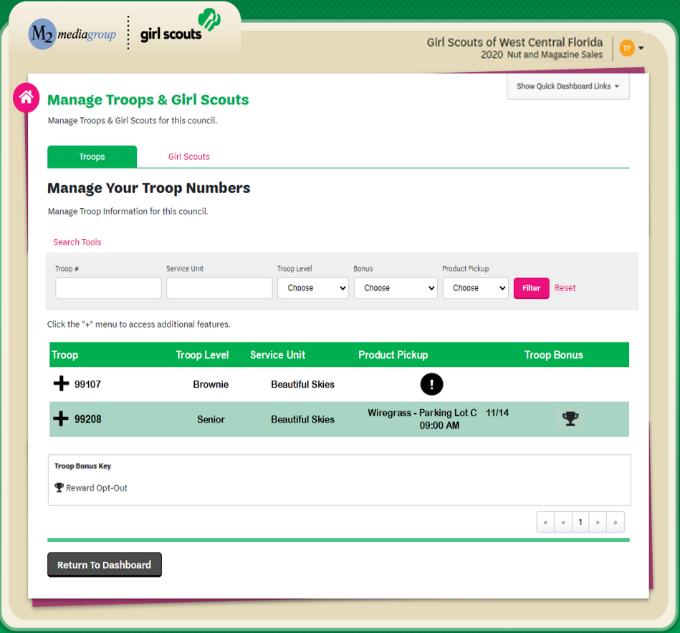
Manage Troops and Girl Scouts Manage Troops and Girl Scouts allows you to manage your girls and your troop. After clicking on Manage Troops and Girl Scouts, the default page is Troops Tab. Here you will see your troop(s) listed. You can you the “Search Tools” to look for a specfic troop. • Click the “+” next to your troop number to reveal options: • View Sales Report (short cut to Reports) • Product Pickup – select/edit delivery site & time • View Payments (short cut to Banking & Payments) • Manage ACH (short cut to Manage ACH info) – troop bank account info • View Troop Photo
Note:
If you see an exclamation icon it means that something should be looked at.
10
Product Pickup You will want to make sure that you select a delivery site and time slot to pick up your fall product items. You will be picking up all items from the paper order cards and any items ordered online for girl delivery to issue out to the girls/caregivers. If you need to choose or edit your product pickup site or time. Use link “Manage Troops and Girl Scouts” • Click “+” next troop number to reveal options • Click “Product Pickup” • Click on “delivery site” drop down to chose the location you are looking for. • Click on “pick-up date/time” slot from drop down. • Click “Save”
If no time is chosen, one will be chosen for you. If there are no more time slots at a location you will need to choose another location or you will be moved to another pickup location & time.
Note: You will be able to print out your delivery ticket from the “Product Management” link.
11
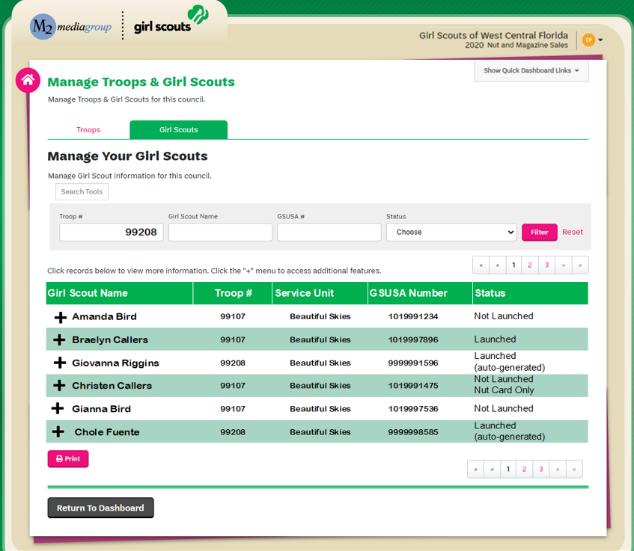
Manage Girl Scouts Tab Use the “Manage Troop and Girl Scouts” link to then Click the “Girl Scouts” tab at the top, you will see a list of the girls in your troop. You can use the “Search Tools” to look for specfic troop of girls or name of girl. You will be able to see who have logged into the system.
Girls Scouts
• Click on “+” next to a girl’s name to reveal options: • View Sales Report, which will take you to the Reports section, • View Payments, which will take you to the Banking & Payments section • View Avatar photo - which allows you to see a girl’s avatar.
If you click on the row containing the girl’s name, you will be able to see when she registered and when she launched her campaign (sent at least one email), as well as her caregiver’s (or guardian’s) name and email address. The last column contains a girl’s Status. Launched signifies the girl was able to find her troop and her name when she first logged into M2OS (girls council has uploaded). Launched (auto-generated) means the girl either found her troop number but did not find her name or did not find her troop number, and therefore also not her name. In either case, added herself to the system. Not Launched means the girl has not created her “store front”
Missing girl If you are missing girl(s) who was not uploaded, please use the missing girl form www.gswcf.org/fppmissinggirlform to request her to be added. Please make sure that the girl is registered for the 2020-2021 Girl Scout Membership year. Parents can go into the M2 system to create their girl and add them to your troop. Council will verify the girl and get her GSUSA ID corrected to her correct one.
12
Paper Order Entry Paper Order Entry refers to any in-person orders taken via the girl order card. You should enter each girl’s orders or, ideally, have your caregivers enter for their Girl Scout. If the caregiver does enter the order please ask them to send you a picture of the order card to verify what is entered is correct in the system. If you or your caregivers have already entered order card items, these products will show here. The troop will only have access to enter the paper orders from Oct. 23 – 26th. • Click “Paper Order Entry” link • Choose troop # from drop down if you have more than one troop. • Click on Girls Name • Click on Quanity box you want to enter or change. This will be the total of the item on the paper order card. • Click “Update” if changes made or “Cancel” if no changes made. If a girl’s name does not appear, you can add her by clicking “Add Girl Scout”. Only time you should add a girl is not going to create an online storefront at all and her name doesn’t appear on the list. Once added, you’ll enter her order items and click “Update”. Note: You will not be able to make changes Oct. 23rd until Oct 26th for troops. SUFPM are locked out on Oct.27th. We cannot guarantee any additional items will be available after delivery. If you have question about the paper order click on “mail” icon to send a email message to the caregiver. Important Tip: If you asked your girls’ caregivers to make the entries, you should still ask them to send you a copy of the order card so that you can confirm the entries (you want to make sure it’s accurate). Also Also, orders that were taken through M2OS with the "girl delivery" option selected, will already be entered to the girls – they cannot be changed. They will automatically be included in your order, so you will need to verify what girls have “girl delivery” items. These items will need to be distributed to girls/caregivers for delivery to their customers. You will want to make sure caregivers are aware and have not double entered items that were placed by customers online. Note: Project Thank You items are recorded under “Project Thank You” customers do not choose the item for donation. They are purchasing an item that Product Program will distribute.
13
Banking & Payments All monies you are collecting from caregivers will be deposited into your troop bank account with GSWCF doing an ACH sweep for payment to council. ACH/Banking Information All troops who participated in the 2020 Girl Scout Cookie Season will have their Banking info uploaded into the M2OS. Only NEW troops or troops who changed bank info will need to enter their troop’s bank account number into the M2OS. If you need to manually enter your banking information, this is required by Oct. 26th. If you are a new troop and do not have by Oct. 26th please contact your SUFPM to let them know, otherwise you will not be able to pick up your troop’s order. • Click “Banking & Payments” link. • Click “+” next to troop number you are selecting. • Click on option “Manage ACH” • Box will open for your to enter or verify the last 4 digits of the troop bank account # • Click “Save ACH” ” after any changes Note: After the account number is entered only the last 4 digits of your account number will be visible. Only the troop and council are permitted to see your banking info. SUFPM will only see on their report Yes/No if bank info is entered. Please see example of check to the left to help you find the your routing # and account #. Do not use deposit slip for routing number or debit card for account #.
Important Tip: Council will send out an email invoice on Dec. 4th to the troop leader to let them know the amount of the ACH swept on Dec. 11th . Make sure you have sufficient funds available for withdrawal from your troop account before the sweep date.
14
Payments Using “Banking & Payments” link you will be able to see how your gross sales, amount of online payments, troop proceeds, amount owed to council, total payments (ACH Sweep payment) and balance. The M2OS automactically calculates in any onlne customer payments so the amount listed under “Total Owed” is the amount that is still outstanding. If you see under the Total Owed a positive amount in black ex. $542.92 that is the amount that is owed to council and would be taken by ACH sweep payment on Dec. 11th. If you see a red amount in parthense ex. ($21.20) your troop has overpaid to council and will be getting a refund on Dec. 11th.
To see how council calculates the amount owed, please see below or summary report.
$911.00 -$236.00 Gross Sales
$ Collected Online
-$132.10 = $542.90 Total Proceeds
Total Owed
Within the Banking & Payments section, when you click on troop # in the row, you will see a section labeled Troop Deposits. Here you will see the results of the council’s ACH sweep as a positive amount listed if money was paid to council or negative amount listed if money was paid to the troop.
15
Girl Payments From this Troop deposits from the Banking & Payment section of M2OS, you can also see the amount girls/caregivers owe and record the payments (Cash, Credit - Clover or Cheddar Up) you have received from the girls/caregivers in your troop. We recommend you use this feature. Recording this information here helps you if you find girls/caregivers falling behind in making payments. Better to address this issue immediately than wait until long after the sale has ended. Important Tip: Remember that girls/caregivers should be turning in collected funds to you promptly and frequently so you can make deposits promptly and frequently into your troop’s bank account. The deadline to submit outstanding caregivers is Dec. 1st, please use the online outstanding parent form at www.gswcf.org/fppoutstandingparent A troop should never pay for a parent who owes money. Do not wait to submit a parent even if they promise to pay before the ACH sweep date. Council will not accept outstanding parent forms after the deadline. It is better to submit the parent then if they the troop, you will need to let council know. See your Troop Guide for money handling guidelines. How do you enter the girl’s payment? Having selected Banking & Payments from the dashboard, click on your troop number. Below the troop deposit section, is the Girl Payments section. • Click “Add Girl Scout Payment” • Select the girl from drop down • Enter “payment details” o Enter “Amount” o Enter “Payment Date” o Enter “Form of Payment” from dropdown o Enter “Comments” - Receipt # or if payment was a combination of types, was it through Clover or Cheddar Up. Or any other relevant info. • Click “Record Payment”
Important Tip: Remember, online orders (direct shipped and girl delivery) and magazines are paid for by the customer when they place their order. you won’t be recording any of those payments here.
16
Note: You can also get to this panel by clicking on girl from the list and clicking on the “Add Girl Scout Payment” button; in doing so, you would only need to add the payment details and then click Record Payment.
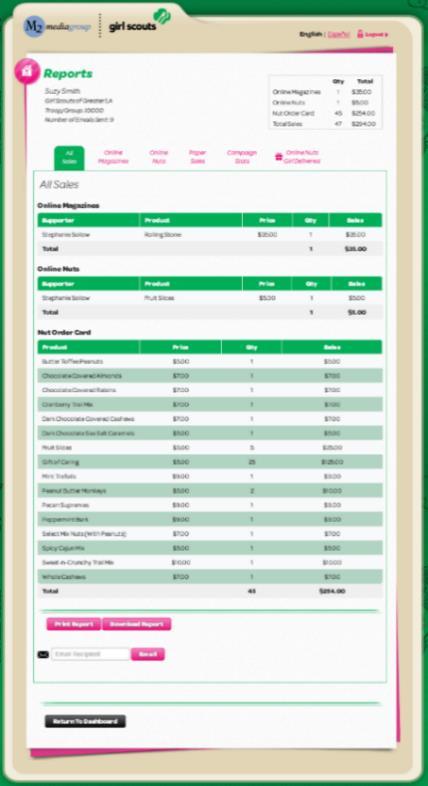
Reports Sales reports can be found by selecting the “Reports” link. You can see the data in several ways depending on the tab chosen: - View “All Sales” tab (default) to see an overview of each of your girls’ sales (magazines and nuts). - View just “Magazine Sales” tab - View just “Direct Ship Nuts” tab - View just “Nut Order Card” orders tab - View just “Online Nuts Girl Delivered” tab - View “Special Reports” tab - View “Troop Summary Report” The top will show the totals sales for each type of product. You can drill down to see more specific data. Below that it will show you your girls (Participants). • Click on the Girl’s name in row to give you breakdown of by category of what that girl sold.
Online Nuts Girl Delivered It is important for you to check to see if any girls have “Online Nut Girl Delivered” orders. •
Click on the “Online Nuts Girl Delivered” tab - show which girls have online girl delivery, Make sure that you and the caregiver are aware that you will be picking these items up to give to the girl/caregiver to deliver to the customer who purchased them.
•
Click on the “girl”to see details about each supporter and what they ordered, by variety. And, guess what! Caregivers have access to these same reports for their Girl Scout! They will be able to see exactly who ordered online, and what they ordered. (The report will be emailed to
Please Check Online Girl Delivered on Oct. 26th to see if you need to set up a Pickup date/time even if your troop doesn’t have paper card orders.
the caregiver, but you can email to them also!)
17
At the bottom of this report page – in all views --you can select: Print Report (which prints the report as it appears on screen), Download PDF (which generates a PDF version of the report), Export Excel (in an Excel format, as many like to sort and filter their data) and Email Report (want to share the report with the Troop Leader, you can email it to her straight from M2OS). As mentioned, you have these options for each view, so if you wanted to email a copy of a particular girl’s data to the caregiver, you could.
In the “All Sales view”, you can also see how many emails a girl has sent. Click the “+” next to a girl’s name to see shortcuts to “View Paper Orders” (if your data entry deadline hasn’t passed, you can enter/edit the order here).
Note: when navigating through from Troop to Girl Scout and you want to go back to troop info, you can clicking on navigating bar as seen below.
Special Reports Tab The “Special Reports” tab will take you to a screen to where you are able to download some of reports in an excel form. (Will not have supportor info.) • Troop Orders • Troop Products & Financials • Troop Rewards • Troop Summary • Girl Scout Orders • Girl Scout Products & Financials • Girl Scout Rewards • Girl Scout Summary
18
Summary Report Gives you a summary of troop sales in a easy to read format. • Click the “Troop Summary /Amount Due Report” link or “Summary Report” tab on the Reports Screen. • Choose troop from dropdown if you have more than one troop. • The “Total Sales” Section shows • “Total $ sold” – is the total of all sales • “Collected online” – is all money paid from customer online • “Collected from Customers” – is the amount of money to be collected from customers (is the amount caregivers should be paying the troop), • “Troop Proceeds” Amount troop earned from program • “Amount due council” – amount owed/overpaid • “Payments Made to Council” – Troop payments made to council • “Balance Due Council” – amount still owed to council – If in () troop due refund. •
Imporant Tip: You need to download/print the troop summary PDF at the end of the sale after the ACH sweep to keep with your troop’s financial records.
19
Delivery Tickets As a troop, you can print a variety of Delivery Tickets. The button won’t appear on your dashboard until after the council has submitted all orders to Trophy Nut Company. Once the button is available to you, click the button and you will see a screen similar to that the right. Print Troop Product Delivery Ticket • Click “Delivery Tickets” – then under the Product Delivery Tickets – “Troop Tickets” • Select Troop # from dropdown • Toggle “Include Financials” (optional)– if you want to include financial information. • Click “Create Ticket” - PDF will be created/downloaded to print • Bring with you to the pick up site to use to verify what items you are picking up. Below, you will see full cases (12 items) listed on the left column and single itmes listed on the right column. So in the example below you would get 1 case - 12 items plus 77 single items for a total of 89 items. Remember you will not pickup Project Thank You items.
Print Girl Product Delivery Tickets • • •
Click “Delivery Tickets” – then under the Product Delivery Tickets – “Girl Scout Tickets” Select “All” or select girl name from dropdown Toggle “Include Financials” – if you want to include financial information. Click “Create Ticket” - PDF will be created/downloaded to print Important tip: Use an itemized receipt for everything, so be sure to have your caregivers sign a receipt, whether you print one of the pre-printed delivery tickets from M2OS or use the receipt book you received after training.
Note: The financials on delivery tickets do not update to show payments received from troops or caregivers, it will only show online payments into the M2OS.
20
Rewards And Patches Here you can track the rewards your girls are earning throughout the sale.
Reward Opt-Out Older girl troops (Girl Scout Juniors and up) are eligible to opt-out of rewards, and instead earn an additional 2% in troop proceeds. This choice affects all girls in the troop and must be 100% agreed upon by all girls. This should be done as soon as possible to remove the reward choices from showing being earned and chosen by girls in the M2 system. Girls will still earn patches, but none of the rewards. Remember to submit a picture of the signed Opt-Out form found at www.gswcf.org/fpp to your SUFPM. • Click “Reward Opt-Out” will open the Reward Opt-Out. • Slide toggle to the left to turn off physical rewards. Toggle will turn colors. • Click “Update” Note: Once rewards are turned off, they cannot be reinstated by you. Please contact product program dept. to help you.
• Click the “Rewards” link from your dashboard and you will see a screen where you can “Manage Earners.” • Select a girl from your list of girls to see what rewards she has earned to date. • Or use “Search” feature to filter by troop if you have multiple troops or girl name.
For reward levels with options – ex. t-shirt • Make the choice option selection • Click “Update”. If there are no changes to be made, just click “Cancel”. If you need to contact her caregiver by click the Email link (envelope) and send an email message.
21
Reward Delivery Tickets Just like product delivery tickets you can download and print out Reward Delivery Tickets for the troop or for girls just be aware that they may be 2 pages per girl(It will list all rewards offered not just earned rewards). Save and download by Dec 1st to have ready for when rewards are picked up from the SUFPM in Jan. 2021. Troop Reward Delivery Ticket – Used to show what your troop earned and picking up from SUFPM (Council Dough will be mailed directly to girl). • Choose “Troop” from dropdown • Click “Create Ticket” – to create PDF Girl Scout Tickets • Choose “Troop” to select troop • Under Girl Scout - Choose “All” or choose specfic girl from dropdown • Click “Create Ticket” – to create PDF Note: You can also print out the excel sheet on the “Special Reports” instead, to save paper it will list the whole troop’s info not just by single girl as per delivery tickets.
Personalized Patches Just as with the other rewards, you can see which of your girls earned the Personalized Patch (avatar patch) by creating their avatar, sending 15 or more valid emails, and have sales of at least three magazines and 30 nut/chocolate items. You will also be able to see the status -- Action Required means there is no mailing address included. Remember, the patch is being mailed directly to the girl once she earns it.
When you click on the girl, it will open the Shipping Details panel, showing you the girl’s avatar patch selection, and the address. You can either go back one screen and send an email to the caregiver or, if you know for sure where the patch should be sent • Enter the girl’s address information • Click “Save” • Or click “Return to Earners”
22
Accessing M2OS During The Sale To conclude our overview of M2OS – before covering the caregiver/girl’s M2OS experience – let’s review how you will return to M2OS during the sale. If you have not bookmarked or favorited the link www.gsnutsandmags.com/gswcf in your browser. You can also get there by first going to GSWCF’s website at www.gswcf.org/fpp 1. Click on the “Cookies+” tab at the top of the page 2. Select under the “Sweets and Treats” then “Fall Product Seller” from the menu at the left of the screen. 3. You will then see the Fall Product Program page, shown at left. You can then either click the text link “Access Your Sweets & Treats Online Store” below the graphic, which is the link to M2OS. Once you click the link, you will be taken to a “pre-login” page (your caregivers will as well). Clicking the “Go To Campaign Site” button will take your caregivers (and you as caregiver) to this log in screen. Clicking the M2OS login button on our website also takes you to this screen. To get back to the login screen with the Login to Administration Site button, click the “Volunteer” button here. Important tip: You still only have to have one username (email) and password for both roles. Bookmark the page, by the way, means that if you need to access M2OS after the sale is over and we’ve disabled the M2OS button on our website, you can still get in to view data and print reports.
23
M2OS - Girls/Caregivers As we mentioned at the outset, your girls will be using M2OS to manage their sale. Each girl will set up her own “campaign” – her “storefront” – by creating her avatar, uploading a video, sending her emails, and then managing her sale. You should have received a flier at training that you gave to each girl. On it was the web address to be used to create an account and log in – www.gsnutsandmags.com/gswcf . You should also send an email using the “Parent and Guardian Email Blast” to your caregivers through the M2OS. The link will also be on our council website at www.gswcf.org/fpp (as covered in Accessing M2OS During The Sale earlier, go to Cookies+ and then Sweets & Treats Select Fall Product Sellers from the menu.
Log In/Password Creation
• Once the girl/caregiver follows the link or enters the web address in their browser, they will be taken to a login page. If they were in M2OS last year, their existing user ID and password are still valid. If they are brand new, they can register a new account. We will follow the steps for a new user. Step 1: When they click “Register”, a form will open where the caregiver will enter their zip code. This way the system will know she is in the correct council area -- she will then be able to find the troop her Girl Scout is registered with and her Girl Scout’s name, provided both troop and girl were registered by September 20th.
Step 2: Next the caregiver will enter her first and last name, her email address, and create a password. Both caregiver and Girl Scout should read the Safety Pledge and then check the box acknowledging that they have both read and agree to it. Then click “Register”.
24
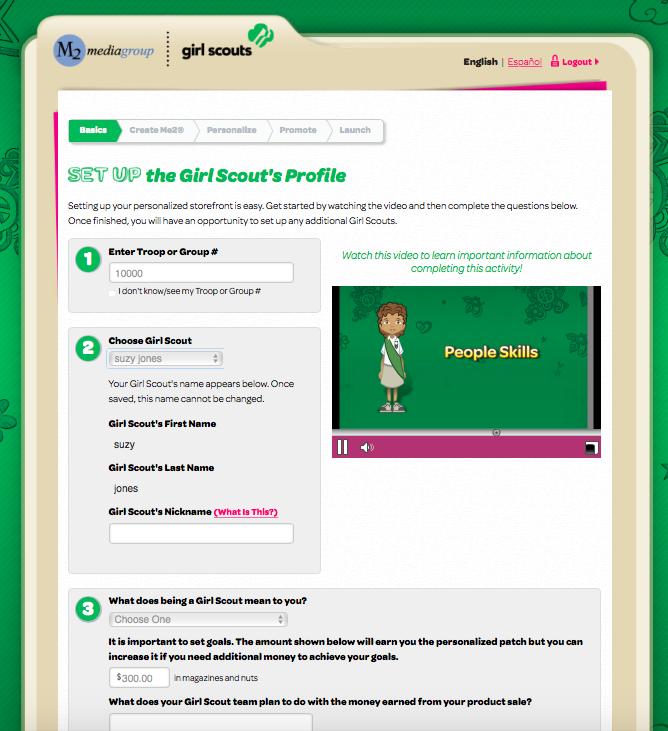
Setting Up the Girl Scout’s Profile Next they will set up the Girl’s Profile (troop number, name, setting a goal, etc.). There is a video to watch that will go over the steps and covers the 5 Skills (Goal Setting, Decision Making, Money Management, People Skills and Business Ethics). The girl’s answers to the goalrelated questions in section 3 will be part of her email message to her potential customers. Step 1: As a troop number is entered it will offer suggestions -- enter a 1, for example, and all the troops that begin with a 1 will display… enter next a 2 and troops that begin with a 12 will display and so forth. If she does not see her troop number, or she does not know her troop number, she will check the box below the field (Council will later verify her membership and link her to her troop). Important Tip: It is important to make sure the girls and caregivers in your troop know the troop number. M2OS uses 5 digit troop number, if your troop is 9928 in Hillsborough County then the leading number is 3, so girls/caregivers will enter 39928. Search for their Girl Scout’s name as she was registered in MyGS. For example, if the girl’s goes by Mandy Lewis but the membership system has her name Amanda Smith-Lewis, the caregiver should look for Amanda Smith-Lewis before deciding her Girl Scout is not listed and adding her (as Mandy Lewis). Step 2: If the girl/caregiver knows the troop number and the troop number is in the system (appears in the drop down), but she doesn’t see her name, it means she was not a registered Girl Scout as of September 19. She can add her name where indicated on this form. Once finished, click Next. (Note: if she hasn’t registered as a Girl Scout, she must register in order to participate; she can do so through MyGS via our website – www.gswcf.org ). The message pop-up acove will appear, giving the girl/caregiver a chance to confirm what has been entered. In other parts of the system, they will get other “Before You Proceed” messages to confirm actions and/or data entered. If a change needs to be made, click “Go Back” to return to the previous action. Click “Proceed” to go to the next action.
25
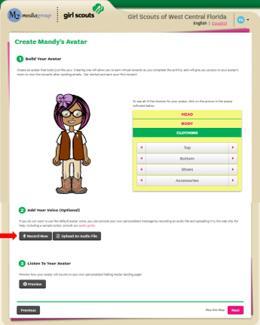
Creating the M2 Avatar That next step is setting up the girl’s M2 Avatar. Choose skin tone, hair style, hair color, eyes, shoes and more! The girl should customize so her avatar represents her. It will appear in the emails she sends to her potential customers and will appear on her storefront. Plus, if she also sends 15+ valid emails, three magazines and 30 Nut/chocolate items As her avatar will talk, using her own voice, the girl, with her caregiver, can either directly record through M2OS the message she wants her customers to hear or she can upload a file recorded outside M2OS. To record from M2OS, she would click on the “Record Now” button. A message from the web browser (Chrome, Firefox, etc.) will ask her to give M2OS permission to use her microphone – click Yes (or Allow). The recording window will open (see inset at right). Then she clicks the red Record button to record. When finished recording, she clicks Stop (which appears while recording is active). She can then preview her recorded voice. She can rerecord if needed by clicking Record again. Or she can click Close to save her recording. If she does not have a microphone available, she can record her message by logging into her storefront using her smartphone (or caregiver’s smartphone) and following all the same steps as above. Or, she can record it outside of M2OS, save it and upload the file. She may want her caregiver’s help with recording her avatar’s voice -- although, we all know kids are so tech savvy now, it’s the caregivers that need help with technology; nevertheless, the caregiver should be involved so she knows what her Girl Scout is recording. The message that she records will be included (via a link) in the email she sends to her family and friends. As this is an optional feature, she can also leave the default recording in place. Important tip: Encourage all your girls to set up their avatars. She will only earn her personalized patch (avatar patch) if she sends 15+ valid emails, in addition to selling 3 magazines and 30 or more in nut/chocolate items). When done, click Next (she can go back later and change things, if she wishes). After clicking Next, a Congratulations message appears. Different actions a girl takes in setting up her storefront and later managing her sale will earn her virtual rewards that will display in her “room.”
26
We cover these actions on the succeeding pages, but after earning each virtual reward, she will receive a “congratulations” message.
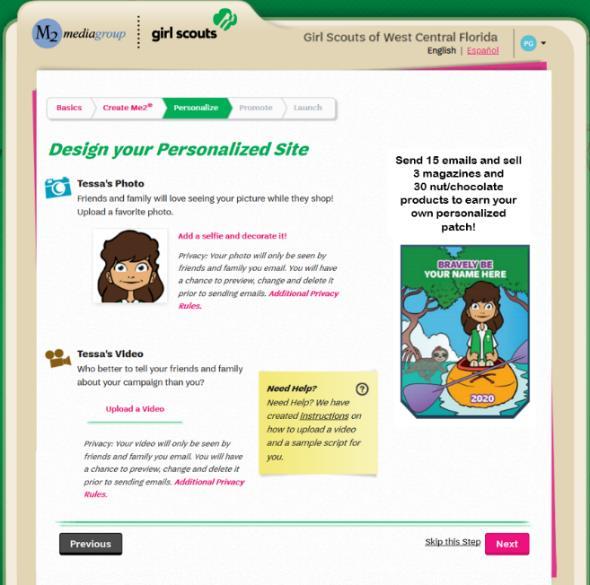
Designing the Personalized Storefront The storefront is what the customer will see when they click on the email she sends out. Here she can personalize that storefront - she can Upload A Selfie and decorate it a bit (add stars, for example), or leave the avatar image and decorate that a bit. Or not, and just leave the picture or avatar otherwise unadorned. The girl can Upload A Video. This video would override any video your troop has uploaded, so be sure your caregivers/girls know if you intend all girls in the troop to use the troop video or if each girl is to use her own. Completion of these tasks will earn the girl a “virtual reward.”
Promote the Campaign Next, the girl needs to Promote Her Campaign. Here she will import or manually add the email addresses of those family and friends she wishes to “ask.” Addresses can also be imported. Once her contacts are entered, she is ready to launch her campaign. She will be able to Preview the email that her customers will receive. When she is ready, she should click Launch Your Campaign. She will also be able to share her storefront with her friends and family via Facebook and Twitter.
Once she has everything set up, she’ll see a screen like that shown at left. From here a caregiver can visit their daughter’s storefront (Your Store is Live!), open and download girl business cards and a magazine flier (Helpful Sales Tools, also available from her dashboard) and manage her campaign, which includes adding another daughter if the caregiver needs to (Manage Your Campaign).
27
Managing the Campaign This is the girl’s dashboard (see image at right). On each subsequent login, this is the page she will see and it is from here that she can track her sales, send/resend emails, view her Me2 room, and more. You can view the top tier of icons as the business part of her Campaign, the second tier (Fun Stuff) as … well, the fun stuff, and then the third tier (not shown) is where the caregiver will make changes. If she has a second daughter, she can go through the second set up process here by selecting Add Another Participant; this will allow her to manage both accounts with one log in! The girl can also track her distance to her goal), see her progress towards the avatar patch (emails sent and sales; right side). Below that, she can see the top sellers in her Council and the top sellers in her troop (first names only, not amount sold).
Update Girl Scout Details If the girl/caregiver clicks the link labeled Update Girl Scout Details under her avatar image or selfie picture, she can update information she entered when she set up her account – maybe she wants to change her goal, for example, or what the troop plans to do with their proceeds. She can also click the Change Photo link to update her picture or add a picture if she hadn’t earlier.
The most important element, however, is for the caregiver to enter a mailing address (if it wasn’t entered upon registration) so the avatar patch, if the girl earns it, can be directly sent to her. Yes, that’s right, it’s not coming to you, but to the caregiver directly (only to you if you ARE the caregiver).
28
[Girl’s] Campaign • In this section, there are five links – Manage Paper Orders, Emails (here labeled Girl Name’s Emails), Sales Reports, Personalized Sales Flyer Tess’s Campaign Video and Business Cards.
Manage Paper Orders When the caregiver/girl has the order card items ready, they will click to enter the sum total of her daughter’s order card orders (only those from the order card; remember, all online orders will be entered automatically as the customer places their order). This form is similar to the one you as troop fall product manager have. Taking the bottom-line totals from the order card, the caregiver/girl will enter the total of each variety, including GOC, and click Update to save the order. She will be able to adjust/update the order through Oct. 25th. The last day for troops to verify/update is Oct. 26th. Be sure to request from each caregiver a copy of the order card so you can double check what was entered. Emails (View & Send) By clicking her Email link, the girl can track the progress of her emails as well as add more customers. Has the customer received the email or did it bounce? (We hope it was received.) Did they receive it, but not open it? All that can be seen by the girl. Click +Add Contacts to add more recipients. (If an email “bounced,” you can update the email address to the correct email and click Resend. You can also resend any other email by clicking Resend.)
29
Sales Report Click on Sales Report to view a report of her sales. The report can be printed, downloaded and/or emailed. She can see All Sales, Magazine Sales, Direct Shipped Nuts, Nut Order Card, and Online Nuts Girl Delivered by chooseing the tabs at the top to view by type. Have them click on the Online Nuts Girl Delivered Tab to view their supportors info. Girls and caregivers should visit here often to see how her sale is going and to see if she has girl delivered orders she will need to deliver.
Important Tip: Remember you can email the supportor info also from the troop reports for each girl.
Personalized Sales Flyer and Business Cards We’ll cover the Personalized Sales Flyer and Business Cards together. As the girl is walking her neighborhood with her order card, she can bring along copies of her Personalized Sales Flyer, shows a sampling of the magazines available online. The customer can enter the link from the flyer, enter the unique code printed on the flyer (which links the order to the girl). She can also bring along her Business Cards. These work the same way, except these are for both nut and magazine orders. The customer enters the link to her storefront that is printed on the card, then, when prompted, enters her unique code. Either is ideal for the customer who may not want to preorder nut product but is willing to go online later and pay by credit card to help support the girl and her troop.
30
Fun Stuff In this section she can add or update her Campaign Video, update/change her M2 Avatar, enter her room (M2 Awards) and see what physical rewards (those on the order card) she has earned or is close to earning. We’ve shown how to upload a video; it works the same for the girls. And we’ve covered creating the avatar; how a girl makes changes to her avatar works the same. What we haven’t seen yet is the girl’s “room” with all her virtual rewards, so … let’s step inside. M2 Awards Click on the M2 Awards link, and the girl will see her “room”. There are places she can click on (they’ll initially have a “?”) to see how she can earn that virtual reward (add a video, for example, if she didn’t). When she earns the reward, it shows in her room. Plus, in the upper left is a “troop photo” showing her the avatars of each girl in her troop. And if you recall, we mentioned when you were creating your avatar, that your avatar would also be part of her “troop photo.” She can open it to see it larger and at the end of the sale, print out a “troop picture.” Physical Rewards The Physical Rewards link is where the girl can see how close to a physical reward (those on the order card) she is. A girl can click on the item to enlarge the picture. Note: Rewards have to be updated by Nov. 22nd, 2020 by the caregiver or the TFPM.
Caregiver or Guardian’s Information Here the caregiver/guardian can Share on Social Media that their Girl Scout is selling nuts, candy, and magazine subscriptions – if they hadn’t before. Note: girls/caregivers cannot post on retail/resale sites and should only post through social media that restricts access to family and friends. Your Girl Scouts Accounts allows the caregiver to manage their daughter(s)’s account(s) – clicking View will launch the girl’s dashboard. Although they will only need to select this section if they have more than one Girl Scout that they wish to toggle between, from here they can also create an account for a second daughter (or more). But she/he can also Add Another Participant directly – clicking the link opens the Setting Up the Girl Scout’s Profile screen. Lastly, she/he can Update Their Profile (basically, change their password, if they need or wish to).
31