

User Guide Version 07.05.2016 1439 17 Ave SE Calgary AB T2G 1J9 403-243-8110 www.pathwayconnect.com

This full manual is on Cognito with hyperlinks between topics. Press for Hint Overlays, then to get the on-line version of this manual. There is a WWW version and a PDF version of this manual on www.pathwayconnect.com
Operational Questions and Problem Reports support@pathwayconnect.com forums.pathwayconnect.com
Fixture Library Support fixtures@pathwayconnect.com
Software Updates and Current Fixture Library Downloads www.pathwayconnect.com/downloads/cognito
4:30pm
1. Snap the correct wall plug adaptor (North American twin blade or European model) onto the 24V power supply that came with Cognito.
2. Plug the barrel connector into the DC IN port on the rear of the console.
3. Plug the power adaptor into an AC power outlet (90-240VAC, 50/60Hz).
4. After applying the power, the Power Button near the top of the console should be pulsing blue indicating it's ‘stand-by’ mode. Press it once to turn the console on. The LEDs backlighting the bump buttons will flash red and a splash screen will appear. In about 20 seconds the console will be ready for operations and DMX will become active.
If regulations require it, ground the console to earth ground using the grounding nut.
If you lose power when operating the console, it will boot automatically when it's plugged in.
If you fully shut down the console, when you plug it in you will need to power it up by pressing the Power Button
1. Plug the male end of an XLR cable into DMX Output A (Cognito Starter) or two XLR cables into DMX Outputs A and B (Cognito Pro).
2. Plug female end of the XLR cable to the DMX distribution or directly to the dimmers and lights you wish to control.
When Cognito is used with DMX-over-Ethernet networks, an Ethernet cable is plugged into the RJ45 port on the rear of the console. The Ethernet cable connects Cognito to DMX gateways, such as Pathports®, via an Ethernet switch.
The data connection may also provide power, by supplying Power-overEthernet (PoE) to the console in which case the 24V power supply is not needed.
Power-over-Ethernet may be used simultaneously with the 24VDC power supply.
Cognito outputs data to the Ethernet connection simultaneously with the DMX512 ports as determined by Setup Input/Output
1. Press the Help button to the right of the screen to get contextsensitive help overlays.
2. Amber overlays will point out and describe different controls on screen. You can continue to operate the console as normal. As the screens change, the overlays may update to show new controls. If you press Help button again, different overlays about other controls will be shown.
3. While in the Help overlays, touch the Question Mark icon in the upper left hand corner to open the full on-line manual which provides greater detail on programming and operational topics. To close the on-line manual, press in the top right hand corner of the screen.
For further information on operating Cognito, visit our YouTube video library at www.youtube.com/pathwayconnectivity or use this QR code.
Questions may be emailed to support@pathwayconnectivity, or use this QR code.


Each time Cognito starts, the last show is automatically loaded.
To create a new show, or restore a different show:
Press the Power Button
Press Setup
Press Show File
4. Choose from the options to create a new show, restore a backup, or restore a previous show.
If restoring from USB, plug the USB thunb drive into any port, and the option to restore from USB will appear
The current show file name appears at the top of the screen when you select Show File from the left. You can also read the current show file name when press the Power button once.
To patch a light you must know the light’s manufacturer, its model type, its operating mode, and its DMX start address.
1. Select the position in the Fixture Grid where you wish to patch the light. The cell’s outline will turn red.
2. At the bottom of the screen, touch Settings.
3. Touch Light Type on the Advanced Tools bar.
4. Use the red wheel to locate the light’s manufacturer, then the green wheel to locate the light’s model type and operating mode.
5. Touch Apply
6. The screen will shift to the DMX grid and the DMX Addr icon on the Advanced Tools bar will be highlighted. Each cell on the DMX grid represents one DMX slot.

The small number at the top of each cell is the DMX slot number. The large number in the middle of each cell is the number of the light patched to that slot, and at the bottom of each cell is a brief description of the attribute that the DMX slot controls. Use the red or green wheels to locate the cell corresponding to your light’s DMX start address.
7. Touch the cell to ‘patch’ your light to that starting channel. Touch Apply .
You will find many generic color-changing LED lights under the Manufacturer "Generic". Generic is at the top of the alphabetically sorted list of manufactures on the left hand side for convenience.
To patch several lights of the same time at the same time, select multiple lights on the SLECT task before selecting the light’s type. Select the location of the DMX start address of the first fixture, and the remaining lights will automatically be patched sequentially.
You can press the blank spaces between the Up and Down arrows in the list to jump through the list faster than just using the arrow buttons or wheels.
1. Select a light in the Grid by touching it. The cell’s outline will turn red.
2. From the Task Bar at the bottom of the screen, touch the Control icon.
3. Touch the Intensity icon to access the Intensity tool bar and various tools.
Wheels: Use the green wheel to set a level as a percentage.
Libraries: Select from standard intensity levels.
IRGB: Use the on-screen faders to adjust intensity and RGB values. (Applicable only if you light has color mixing attributes.)
Effect: See How to Set an Effect
As well as Intensity, the CONTROL task will display up to three other attribute families depending on the capabilities of the selected light. Only attributes supported by the selected light are shown.
1. Select a light in the Grid by touching it. The cell’s outline will turn red.
2. From the Task Bar at the bottom of the screen, touch the Control icon.
3. If not grayed out, touch one of
Color
Position
Shape
4. The Toolbar will show various methods of altering the attributes.
Touch Color to adjust the light’s color mix, using one of the following:
Wheels : Use the wheels to set RGB levels as percentages or work in other Color Spaces.
Libraries : Select from standard gel swatch book colors, or userrecorded colors
Picker : Touch the screen to select from the color space shown.
Touch Position to adjust where the light is pointing, using one of the following:
Wheels : Use the wheels to set pan and tilt in degrees.
Libraries : Recall previously user-recorded positions.
Joystick : Touch the screen to move the light relative to its current position.
Bullseye : Touch the screen to move the light relative to its home position.
Touch Shape to adjust attributes that affect the light’s beam, such as gobo wheels and rotation, barrel zoom, and shutters.
Wheels : Select Wheels to access attributes supported by the light.
Libraries : Recall previously user-recorded shape libraries
There are Advanced tools for each of Intensity , Color , Position and Shape . See Advanced Tools for more information on locking, releasing, defaulting and knocking out attributes.
Effects can be added to attributes. See How to Set an Effect
After selecting the lights, you can just press or or or if lit to skip steps 2 and 3 above.
If you are using the Wheels tool and there are multiple Wheel Banks, you can press the hard console button (such as ) to switch Wheel Banks.
To quickly jump between the SELECT and CONTROL task hold down both SHIFT at the same time.
Select a light (or lights) in the Fixture Grid by touching it. The cell’s outline will turn red.
From the Task Bar at the bottom of the screen, touch the Control icon.
If not grayed out, touch one of
4. After setting an initial value, touch Effects then “New Effect”
5. The available effects will be shown. Select the one you want.
Use the wheels to change how the lights behave. Some of the effect attributes may include:
Rate : Affects the speed of the effect.
Size : Affects the variance or height of the effect. For example, the size of a ballyhoo effect determines how far a light will move from where it was pointed when the effect began.
Offset : Affects where each light starts following the effect function. For example, in a rainbow color effect, if the offset is zero degrees, all lights will be the same color because they are all following the exact same function at the same time. As the offset increases, adjacent lights will be different colors. When the offset reaches 180 degrees, adjacent lights will be at the top and bottom of the effect curve.
Repeat : Affects how many lights start along the effect function at one time. For example, in a marquee effect, if repeat is set to 1, only one light out of the selection will be “on” at any given time.
To end an effect in SELECT, touch “Stop Effect” or use the Release button.
When the effect is recorded in a Cue, a change must be recorded to the attribute controlled by the effect in a subsequent Cue to end it. Otherwise the effect will remain running in the background (also called ‘tracking through’).
The order that lights are selected is important when planning the effect. For example, when running a marquee effect on six lights, if the lights are selected 1,2,3,4,5,6 the effect will appear to move from left to right. If the lights are selected 123-654 instead, the effect will appear to move toward the center. (If you make the Repeat 2 in this case, it's even more affective.)
you want by giving lights an Intensity and setting their Color, Position
for later
the
you may want to record the look to a
The next time you press Record, the Record Memory button will already be active and the next available empty Memory location will be highlighted in red. If you're happy with the default Name and timing, just press Done.
After recording one Memory, to record the next Memory with default a default name and timing, just press .
Regardless of which Record Task is shown after pressing Record, if you push the bump button below the fader where you want the Memory located, it will be recorded there with its default name and timing.
After setting the scene you want by giving lights a Intensity and setting their Color, Position or Shape attributes you may want to record it as a cue for sequential recall from a Playlist.
1. Touch the Record icon to open the RECORD tasks.
2. Touch the Record Cue icon.
3. If necessary, touch the Playlist you want to record to in the red Select Playlist toolbar.
4. The last cue in the Playlist should have a green bar below it. If you want to record it elsewhere, touch an existing cue and use the or icons to move the green bar.
If you want to overwrite a cue, just touch it to highlight it in red. The green bar will disappear.
5. Touch Done to record the cue with default timings, and you will be returned to your previous CONTROL task. The attributes will be released and under control of the new cue, but the lights will still be selected allowing you to alter them further if desired.
If you don't edit the Cue Properties, default timing will be used. See Tasks Record Cue for more information of recording Cues.
Once a cue is recorded, pressing the Record button twice in succession will record to the next available cue location, using default timings.
To see more Memories saved in the current page, use the Left and Right arrows.
Change Memory Pages by selecting a new Memory Page in the green toolbar.
Press the associated bump button to recall the Memory using the time assigned to it.
3. The currently assigned Playlist's name will be on the very left of the green
Toolbar. If necessary, touch Select Playlist from the right hand side of the Toolbar and select the desired Playlist. The Status Bar also shows which Playlist is assigned.
4. The cue that is ready to run will have a green arrow to the left of its name.
5. From the green Play toolbar select Transport then touch the Go icon that appears on the Transport cluster of icons above the toolbar. You can also press the appropriate (left or right) Go button on the console.
The first cue is selected by default, or double tap the cue you wish to run. A green arrow will appear inside the cue cell. Press the “Go” button to execute the cue in recorded time.
Triple tapping on a Cue will go to that cue immediately.
Cue that are presently fading are green. Cues that are active but not fading are yellow.
Touch the Up/Down arrow icons next to the cue list to move through the cues. To scroll the view to the top of the Playlist, press and hold Shift , then touch the Up arrow icon . To go to the bottom of the Playlist, press and hold the Shift key, then touch the Down arrow icon
Cues that are indented and have this icon will follow on from the previous cue automatically. You won't press Go to run these cues.
To pause a running cue, press Pause above the Playlist fader. To cut back to the previous cue, press the Pause button a second time.
1. Touch the Play icon to open the PLAY task.
2. Touch the L Playback icon or the R Playback icon to edit Cues or the Memory icon to edit Memories.
3. Press Edit .
4. A ‘do-not-enter’ icon will appear on each cue or memory. Touching it will rotate it vertically and a DELETE button will appear. Touch to delete it or press again to cancel the delete.
5. Use the wheels to change Memory timings and bump button
operation. For Cues, use the Up/Down arrow icons to page through the timing and other cue properties.
6. To move a cue or memory, touch the ‘hamburger’ icon , then drag the selection to a new location and drop. To copy a cue or memory, press and hold the Shift button before touching the hamburger icon, then drag and drop to the new location.
7. Press Edit to complete the Edit action.
See Play Mixed Mode to move and copy Cues and Memories between Playlists and Memory Pages or Cue Timings and Placement
Cognito automatically saves all changes to a non-volatile memory. If you wish to back up to USB, insert a Fat32 formatted USB thumb drive into any USB port on Cognito.
1. Press the Power button once.
2. Touch .
3. Touch Showfile on the left hand side of the screen.
4. Select “Save to USB”.
5. Press Exit to return to programming once the Save to USB icon changes from red to grey again. It's then safe to remove you thumb drive.
You will not see Save To or Open From USB options until a USB thumb drive is inserted into your console.
Arc fixtures require special steps to start, or ‘strike’, the ballast to turn the light on. Most moving lights have a similar setting that will reset, or recalibrate, the fixture’s pan, tilt and other attributes.
1. Select the light that requires the ballast strike, or requires a reset. Several lights may be selected at the same time, but remember that the fixture attributes displayed by Cognito are determined by the first light selected.
2. From the bottom of the screen, touch the Control icon .
3. Touch the Intensity icon to access the Intensity tool bar.
4. Touch the Wheels icon .
5. Use the Red Wheel to set the Control option to “Lamp On” or “Lamp Off”, to strike or unstrike the arc light, or to “Reset” to force a moving light to run its recalibration routine.
6. After seven seconds, change the option back to “Idle” or simply Release the lights.
1. Press the Power Button near the top of the console.
2. Press the Power Off icon.
Once the console shuts down, the Power Button should be pulsing blue indicating it's in ‘stand-by’ mode.
You can also press the Power Button twice to shut down the console. If you want to escape from the Power Off screen and return to programming, you can press the Release Button .
Warn anyone on stage before that all lights may be turned off (blackout).
From the Select task, press the Release button to the right of the touch screen until “Release all active Cues and Memories?” appears on screen. Press

Ensure all lights/memories are off by placing the twenty sliders across the top of the console are at the bottom of their travel. (see Setup|System| Sliders always run memories)
Set the four sliders at the bottom of the console (two on either side) are at the top of their travel. These are the Grand Master, the Memory Master and the Left and Right Playback Masters.
Select one light (any light) and press Info Screen then press Locks and see if any lights are locked that shouldn't be. Press to leave this screen.
Release to release the lights.
Execute the first cue or memory look of the show.
Cognito consists of two interrelated work surfaces. A 7” touch screen provides the main programming interface, while the surrounding backlit hardware controls, consisting of 24 sliders, four wheels and various buttons to provide programming support and playback control.

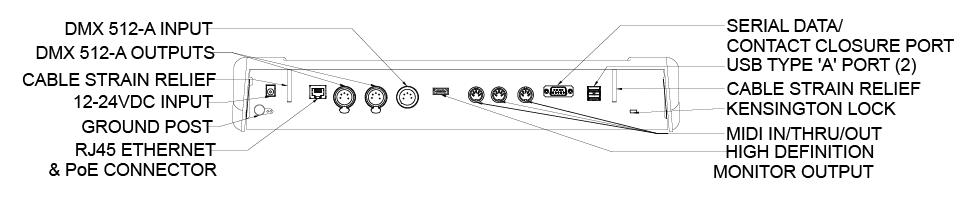
See Data Connections for DB9 pinouts. There is a small pinhole in the "i" of the Cognito logo which may be depressed with a paperclip during powerup to default to factory settings. This should only be done with the advice of technical support staff.

Cognito is designed to operate on a regulated 24VDC input received through the 2.5mm, center-positive barrel connector, or on Power-over-Ethernet as supplied by an IEEE 802.1af compliant source such an Ethernet switch. The wall transformer supplied with the Cognito may be connected to a mains voltage ranging from 90-240VAC at 50/60Hz. When operating on PoE Cognito is a Class 3 device for purposes of power consumption.
Plug the DC power supply into the DC plug on the far left side of the rear panel.
The rear panel indicator LED will steadily glow amber/green. Alternately, a Power-over-Ethernet (PoE) source may be plugged into the Ethernet port. The indicator LED next to the DC jack will steadily glow red whenever the console is using PoE. Both a DC supply and a PoE source may be connected at the same time.
When the console is connected to power, the Power Button near the top of the console will pulse blue, indicating ‘stand-by’ mode. Press the Power Button once to start the console.
For normal shut down, press the Power Button once.
Touch the Power Off icon to confirm shut down of the console.
• For quick shutdown, press the Power Button twice in succession. The console will shut down after three seconds.
• Should the console become unresponsive, press and hold the Power Button for six seconds to force the console to power down.
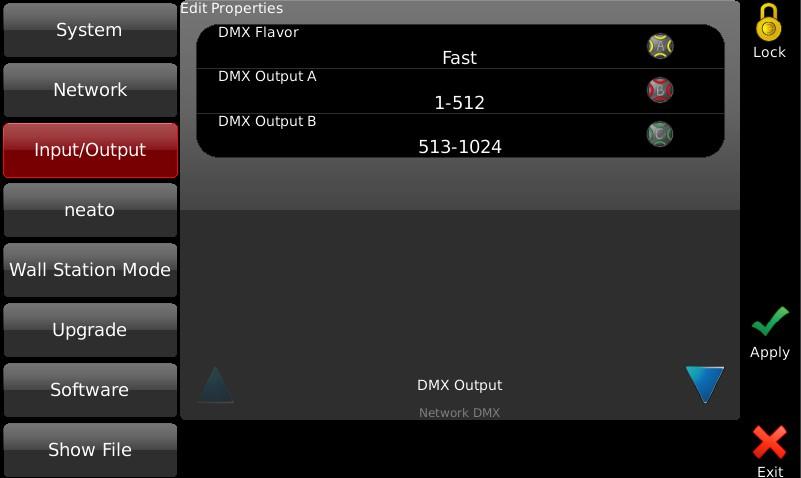
Cognito has two DMX512 output ports and one DMX In. The output ports transmit DMX control data to the lights and other equipment capable of receiving and responding to DMX. Setup which port is assigned to which range of DMX slots in the patch in SETUP | INPUT / OUTPUT | DMX OUTPUT.
You can also set the DMX Flavor. Typically you should use Fast, but some legacy DMX products may perform better with Medium or Slow speeds. Newer LED products perform best on Maximum.
The DMX512 Input allows Cognito to receive DMX from another source to run Memories and Actions. See DMX In in Show Control.
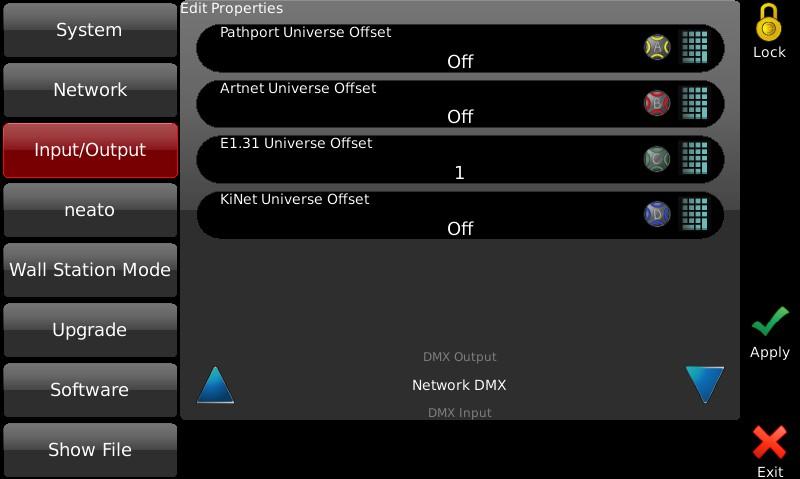
Cognito also supports DMX-over-Ethernet protocols. These protocols transmit the same DMX information as the XLR ports, at the same time, through the Ethernet port. The Starter model supports only Pathport Protocol, while the Pro models also support the Art-Net, E1.31 sACN and KiNet. Additional hardware, such as a Pathport gateway, is required to convert this signal to DMX512.
Each protocol may be turned off, or its base universe offset changed, from SETUP | INPUT/OUTPUT | NETWORK DMX. If more than one protocol is active, identical DMX values are transmitted on each.
MIDI ports are enabled on Pro models.
MIDI Show Control (MSC) commands can link two Cognitos together so that a Go on one desk triggers a Go on the backup console. Many other lighting console manufacturers and other show control devices can send and receive MSC. See MSC - Midi Show Control.
Cognito can receive Timecode from other devices and Playlists can be synchronized to chase that timecode. See Midi Timecode
Cognito can send user-specific MIDI Notes, data or MSC strings whenever a cue is triggered, using Actions
The serial port is enabled on Pro models. You may use RS232 to control the console through its API. See the Show Control chapter for details.
The Contact Closures are enabled on Pro models. The same DB9 port provides three dry contact interface to trigger Memory bump buttons.
NOTE: You can add up to 16 Actions to any Memory to perform many different functions from running a cue, disabling outputs to even shutting down the console. This is the pinout for the three contact closures:

To assign a Memory to contact closure, go to SETUP | INPUT/OUTPUT | CONTACT INPUT.
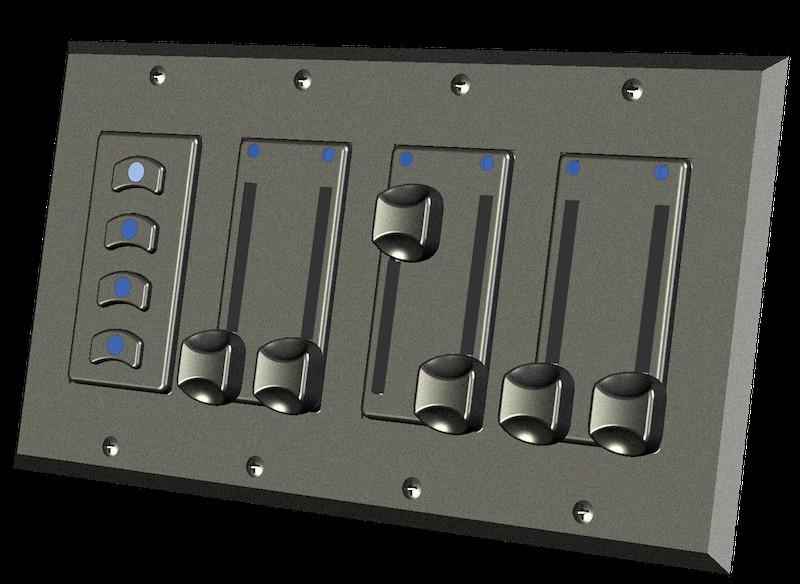
Twenty sliders, also called subs, faders or pots, stretch across the top of the console in two groups of ten.
By default in the SELECT task, any given slider controls the intensity of the corresponding light in the Fixture Grid. To do this you must have Sliders Always Run Memories set to "No" in SETUP | SYSTEM.
Set this way, when you are in the SELECT task, the Pin Button is red and Slider 1 controls Light 1's intensity, and so on. If there are more than 20 lights in the SELECT view, use the Left and Right arrows on the touch screen to page to the desired light. If there are more than 20 lights
Below each slider is a bump button . Press and hold the button to ‘bump’ the intensity of the associated light to full. Press and hold the Shift key and press a button to latch that light’s intensity at full. The intensity and color of the button’s backlight reflects the intensity and color of the light being controlled.
You can add color to non-color-changing lights (i.e. a gel) in SELECT | SETTINGS | PROPERTIES.
In the PLAY task, sliders are used to recall Memories, sometimes called submasters or presets. The Pin button will glow blue. In PLAY, if a Memory has been recorded into a slider, the bump button’s backlight will glow blue. When a Memory is recorded, the bump button can be given different functions, including fade times. See RECORD for more information.
When in the PLAY task, sliders play back Memories. The default may be changed so that sliders always play Memories regardless of the current task. Go to SETUP | SYSTEM | GENERAL and change Sliders Always Run Memories to ‘yes’.
Located at the bottom left of the console, the Grand Master controls the overall intensity of all lights at all times, regardless of how a light’s intensity has been set. Normally, the Grand Master is at full (the top of the fader’s travel). The Grand Master’s level in percentage is show in the Status Bar in the top left hand corner of the touch screen. When the Grand Master is at less than 100%, the level is shown in red as a warning.
Above the Grand Master is the Dead Black Out button. Normally, the button is backlit blue. If the Grand Master is not at its highest position, the Dead Black Out button will glow red.
When pressed, the Dead Black Out button will flash red and all lights will go dark (output intensity falls to zero percent). The intensity levels on the touch screen will be show with a red line above their values.
The Grand Master level will turn red and read [DBO] Press the button again to restore lights to their previous intensity.
Always warn everyone present before turning off all the lights (blacking out the stage).
If you set a Memory's Priority to 1, intensity levels from that recorded (and active)
Memory will not be affected by the Grand Master.
Below the Grand Master is a Shift button The Shift button accesses short cuts and special features which are described in Other Features Shift Key Magic.
The Memory Master is located at the bottom right of the console. The Memory Master controls the overall intensity of the lights recorded into Memories while those lights are active. The Memory Master’s level in percentage is show in the Status Bar in the top right hand corner of the touch screen. When the Memory Master is at less than 100%, the level is shown in red as a warning.
Playlist cues and individual lights controlled by sliders (from SELECT mode) are not affected by the Memory Master.
Above the Memory Master is the Memory Black Out button . Normally, the button is backlit blue. If the Memory Master is not at its highest position, the Memory Black Out button will glow red.
When pressed, the Memory Black Out button will flash red, and all lights being played back within Memories will go dark (output intensity goes to zero percent). Press the button again to restore lights to their previous intensity.
If you set a Memory's Priority to 2, intensity levels from that recorded (and active) Memory will not be affected by the Memory Master.
Below the Memory Master is a Shift button . The Shift button accesses short cuts and special features which are described in Other Features Shift Key Magic
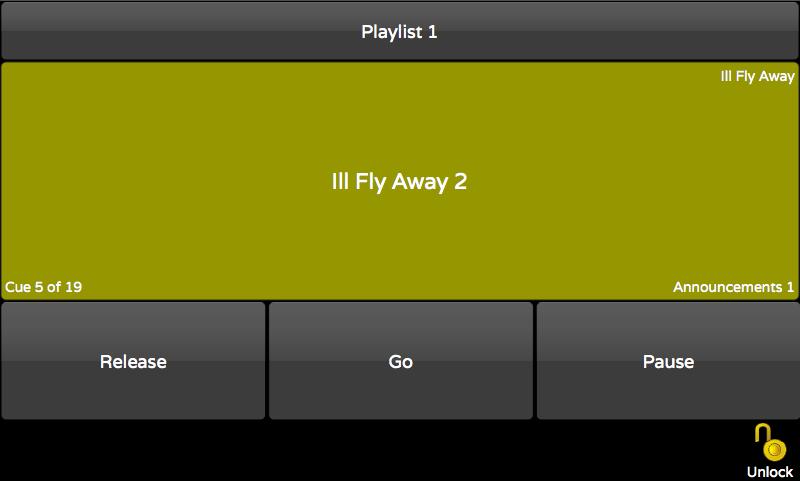
Cognito provides two Playbacks, one located beside the Grand Master and one beside the Memory Master. Each Playback consists of a Go button, a Playback Master, and a Pause/Back button. Any Playlist may be assigned to either Playback. A Playlist is a series of cues or ‘looks’ that have been previously recorded. Although there are only two physical playbacks, you may have as many Playlists active at a time as desired.
Once a Playlist is loaded (see Playback Cues), press the Go button to advance the Playlist to the next cue. The Go button flashes green when a cue is running, and glows solid green when the cue is complete.
Above the Go button is the Playback Master, which sets the overall intensity of any light levels controlled by the active Playlist.
Above the Playback Master is a Pause/Back button. Pressing the Pause button while a cue is running will cause the fade to stop and the Pause button will flash yellow. To resume a paused cue, press the Go button again.
While resting in a cue, press the Pause/Back button to fade back to the previous cue.
To force a Playback to release (exit) a Playlist, press and hold the Shift button then press the Playlist’s Pause/Back button.
Immediately to the left of the touch screen are four attribute family shortcut buttons.
Whenever a light is selected, these buttons act as shortcuts to the related CONTROL tasks.
Not all lights support all attributes. Only the buttons for attributes supported by the selected light will be active, as shown by the button’s backlight. If a group of lights are selected, the buttons will reflect the available attributes of the first light chosen.
See CONTROL for details on attributes and their associated tools.
While in CONTROL | WHEELS, pressing the associated button will move you between Wheel Banks (i.e., from Gobo Wheel 1 to Gobo Wheel 2 etc).
Holding down SHIFT and pressing an attribute family shortcut button will move you backwards through the Wheel banks.

Immediately to the right of the touch screen are four function buttons:
The buttons are backlit when a given function is available, and flash when that function has been selected.
In SELECT or CONTROL, pressing the Release button progressively reverts or clears any changes made to the lights, in the following order: revert a selected light to its last state; clear the selection group; clear all changes made to all lights since the last Cue or Memory was saved; release all active Cues and memories (blackout).
In PLAY, pressing the Release button will ask if you want to release all active Cues and Memories (blackout). Any lights captured in SELECT will not be released.
Always warn everyone present before turning off all lights (black out the stage)
Press the Help button once to launch Hints. The touch screen under Hints is still active – you can keep Hints up on the screen while programming. Continue to press the Help button to cycle through the Hints. To dismiss Hints, touch the Exit icon in the upper right hand corner of the screen, or press and hold Shift
then press the Help button. Press to access the hyperlinked version of the full manual.
When in PLAY, press the Edit button to change Cue or Memory names, fade times and other properties. Copy, deletion or rearrangement of Cues and Memories is also accessed using Edit. In the Select task, Edit is used to copy attributes between lights. Edit is not active in the Play | Mixed task, or in Record task.
Press the Record button once as a shortcut to RECORD. If Memory was the last recording method used, press the Record button a second time to record the current stage look into the next available Memory. If Cues was the last recording method used, press the Record button a second time to record the current stage look into the next available cue. Default times and other cue properties will be applied. See the Record Cue task for details on setting fade times.
Four encoder wheels are spaced around the touch screen, each with a
specific color and an associated button The wheels’ actions depend on the Task currently active on the touch screen.
Wheels are used to directly adjust some attributes of a light, such as intensity or pan, or to present choices of gobos, color wheel slots or other fixture attributes.
To select from a list of fixed attributes on the chosen light, press the wheel button to see the choices, then use the wheel to scroll through the list.
Roll the wheel to move the highlighted item and accept it by touching the screen or pressing the wheel’s button again.
Shift may be used in combination with a wheel to allow for finer control. For example, when adjusting a light’s pan attribute, holding down the Shift key will
move the light using fine control, instead of full degrees. On color wheels, holding down shift while rolling the wheel may give you split colors. Similarly, you may adjust cue times in tenths of a second, instead of full seconds.
When in CONTROL | WHEELS, use Shift in combination with the ABCD buttons to quickly set the attribute associated with a particular wheel to its default value or extents.
Holding down SHIFT and pressing an attribute family shortcut button like will move you backwards through the Wheel banks.
Located just below the Cognito badge between the fader banks, the Pin button provides a simple method of transitioning between lighting looks when in SELECT or PLAY.
With a lighting look activated by using the sliders or manual control, press the Pin button to hold the look (i.e. pin it to the stage). Intensity levels or other attributes may now be readjusted, without the look onstage being affected. Press the Pin button again to transition (crossfade) to the newly set look.
To change the Pin crossfade time, press the Shift button plus the Pin button. The Edit Pin Crossfade Time box will appear. Touch the keypad icon or use the B wheel to change the default time. Timing may be changed on the fly between uses of the Pin button.
When in SELECT, if the Pin button is red moving a slider will change the cooresponding light's intensity only. If the Pin button is blue , the slider is mapped to a recorded Memory
See Also: Slider Setup in Cognito Hardware | Sliders
There are a total of four USB ports on the console: two on the top surface, and two on the rear panel. Any port may be used for a mouse, keyboard or USB thumb drive. The top ports are also suitable for a USB-powered work light.
The USB ports are fully functional, including charging, even when Cognito is running on Power-over-Ethernet (PoE).
The USB ports are capable of charging a cell or mobile phone, but not a tablet device.
USB thumb drives used for show backup and software upgrades should be formatted FAT32 (not NTFS or HFS+).
When used on DMX-only lighting systems, Cognito should require little or no configuration to start controlling lights. On Ethernet-based networks, some changes may be required to match an existing network.
SETUP allows certain defaults to be changed to personalize the console to match an operator’s style or preferences.
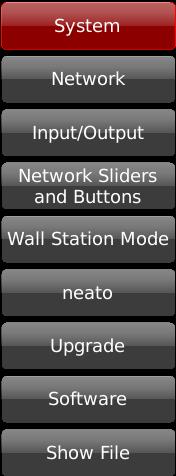
To reach Setup, with the console powered, press the Power Button once, then touch the Setup icon. A list of options will appear on the left side of the screen, including System, Network, Input / Output, Network Sliders & Buttons, Wall Station Mode, Upgrade, Software and Showfile.
System preferences are divided into General, Display, Time Zone, Astronomical and Advanced sections, along with the following options:
By default, sliders raise and lower the intensity of the lights in the Light Grid, and only play back Memories when PLAY is active. Change the “Sliders Always Run Memories” option to ‘Yes’ if you want sliders to play back Memories at all times and in all tasks, including SELECT. This option is useful for ‘busking’-style operation, when the operator wants to layer recorded looks, while having quick access to individual lights.
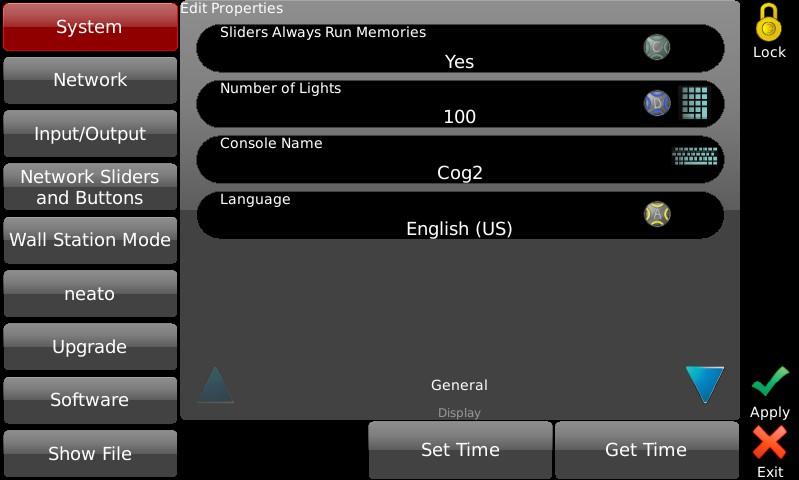
This option sets the size of the SELECT grid. The maximum number of lights is 600, regardless of fixture type. Setting the number of lights to match the number used in the show is recommended.
Allows the user to set a unique name for the console. This name will be shown in Pathport Manager and be the name displayed by the neato™ iOS app.
Allows you to change the user interface language. A reboot will be necessary.
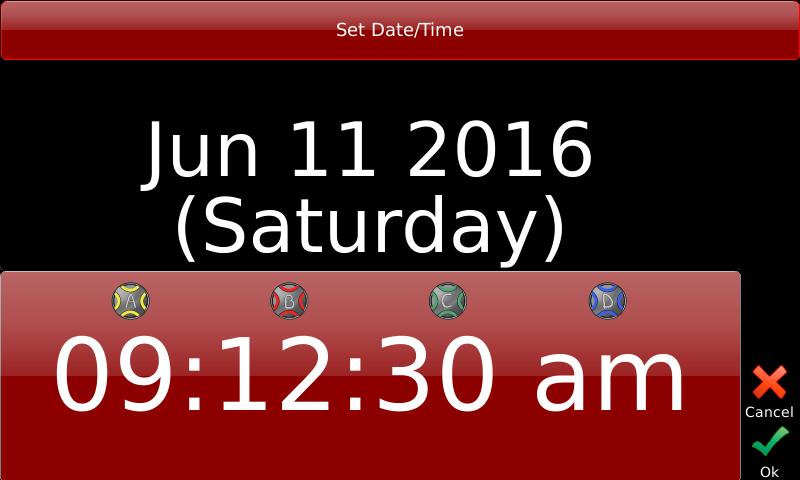
Allows you to manually set the date and time on the console.
Touch the upper half of the screen (background will turn red), then use the wheels to set the date. Touch the bottom half of the screen (background will turn red) and use the wheels to set the time. Changing the time zone (see below) will change the time accordingly. Daylight savings time is applied automatically, if applicable in the chosen time zone.
Allows Cognito to retrieve the current time from an Internet-based clock service. This only works if the console is connected to the Internet. Changing the time zone (see below) will change the time accordingly. Daylight savings time is applied automatically, if applicable to the chosen time zone.
Valid backlight brightness levels are between 5% and 100%. When the screen saver is active, the backlight is lowered to 20% of this value.
Choose the correct resolution for the monitor connected to the back of Cognito or choose Off. System performance is increased when the display is off.
Set the value in minutes. The minimum value is 1 minute. Below that there is an option to Never show the screen saver.
If the value is not set, just touching the screen will turn off the screen saver. If you set a password, touching the screen will present you with a keyboard to enter the password. Cues, Scheduled events and other show control triggers will still function when the screen saver is active.
If you forget your password, contact Technical Support.
By default the screen saver text is "Cognito". You can change it to whatever you'd like here.
Select from a list of geographic areas and coordinated universal time (UTC) zones. The selection here affects which Regions are made available in the next selection.
Choose from a list of zones, regions or cities, dependent on the Continent selection. The selection sets the time zone Cognito uses when displaying time, either as set by the user or as retrieved from an Internet time service. The Region also determines whether or not Cognito will apply Daylight Savings Time as required.
Sets the geographic location where the console is being used. These settings are used by the Play Scheduled task.
Choose from Africa, Asia & Middle East, Australia & Oceania, Caribbean, Europe, North America or South America.
Set your country. For some countries, a state, province or territory may also be chosen.
Choose from a list of cities and towns located in the specified region.
You may also set your location by specifying your exact latitude and longitude. This method may be necessary if your city is not listed.
Cognito normally records the current on-stage “look”, so that a Cue or Memory captures all active intensities and other attributes. However, some situations (and some operators) prefer that only any updated or altered attributes are recorded in
a Cue or Memory. If more than one Playlist is in use at one time, this feature records updates to that Playlist without including information from other Playlists or active Memories.
Write down your existing settings and values before making any changes to these settings.
These settings are used when data is sent to your lights using the Ethernet port. Data sent using the DMX port(s) alone is not affected.
The following descriptions assume a basic knowledge of Ethernet networking terms, concepts and practices.
Network Mode: Determines the method Cognito uses to obtain a network IP address and subnet mask.
Pathport: Sets the IP address using the standard Pathport method. IP address is generated in the 10.x.x.x range, using the serial number of the console. Subnet mask is always set to Class A, or 255.0.0.0. Not editable.
Static: The user enters a specific IP address and subnet mask. Care must be taken that no other device on the network uses the same IP address.
Automatic: Cognito waits to be assigned an IP address by an on-line service such as a DHCP server. If no server is found, Cognito will use the last address assigned to it. Not editable.
Advanced (default): To determine its IP address and subnet mask, Cognito will: a) seek an address from a DHCP server; b) utilize an IP generated using the standard Pathport rules; c) auto-generate an IP address in the 169.254.x.x range using Avahi.
While in Advanced, you may also set the Base Address determination mode to be Dynamic, Static or Off; turn the Pathport method on or off; or enable or disable Avahi auto-generation. With the exception of Avahi, the Advanced option simply provides simultaneous access to the methods shown individually under the other option headings.
If more than one IP address is assigned, Cognito will send Ethernet eDMX using all valid addresses.
This option accesses four pages of settings for the console. NOTE: Cognito PC shows only two because of hardware only available on the console.
See Cognito Hardware Data Connections for a full description of the I/O connectivity and functionality including 5-Pin DMX512 out of the back of Cognito, Network DMX, DMX512 Input, Serial RS232 control, Contact Closures and MIDI Timecode/MIDI Show Control.
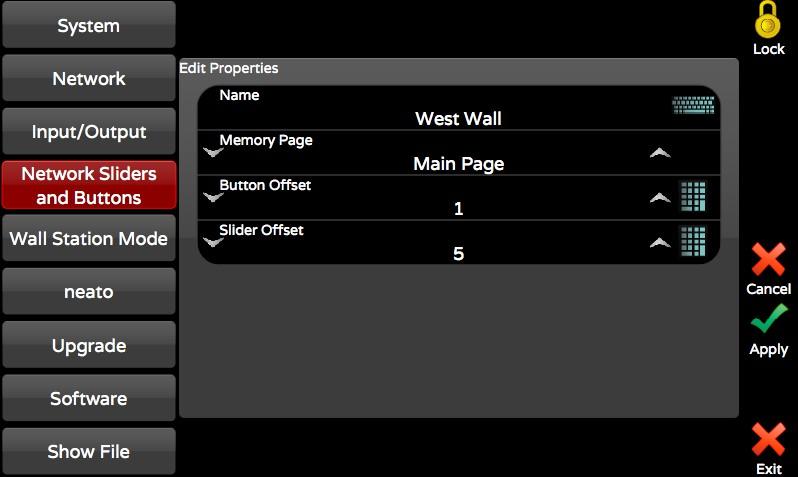
Press Add Station to discover any Choreo NSB stations on your system.
After adding the station, press EDIT to name the station, assign which Memory Page it's going to drive, then set the Button Offset and Slider Offset. Buttons and Sliders will use contiguous Memories for the number of buttons or sliders discovered on the station.
You can add up to 16 Actions to any Memory to perform other functions such as going to cues or disabling outputs etc.
Pressing the Power button once, then touching Lock will turn the touch screen into a screen saver, virtual button/slider station or into a dedicated Playlist playback.
When in Wall Station mode, the Cognito's programming functions are disabled. To restore programming functions, touch Unlock .
Touch the keyboard icon to enter a password that will be required to exit Wall Station mode. By default, the password is blank. If no password has been entered here, simply touching Unlock will return you to normal operation. Passwords are NOT case-sensitive.
Selecting Wall Station mode also affects the response of Cognito's hardware. In Button Station mode the Bump buttons below the sliders on the console will behave the same as the virtual icon ‘buttons’. In Playlist mode, the left GO button will also trigger the next cue in the Playlist.
Limits Cognito to cue playback only. Once the parameters are set, touch the Lock icon to enter Playlist mode. Release, GO and Pause buttons appear at the bottom of the screen. You can also use the left Go and Pause buttons to control the playlist, but the Playback Master slider is disabled Shift + Pause will release the Playlist To exit, touch Unlock and enter the password (if set).
Use the red wheel to scroll through available Playlists.
This option turns the Cognito into a virtual button/slider station. The number of Memories shown, the Memory Page associated with those buttons and password protection may be set. Once the parameters are set, touch the Lock icon to enter station mode.
Use the red wheel to scroll through available Memory pages. The very first entry is not a name of a Memory page, but says "Allow Paging". When selected, Wall Station Mode will have arrows in its title bar allowing you to select the active page. Memories that are active on the current page will remain active when you page to another Memory page.
Use the green wheel select from 2, 4, 8, or 20 button virtual stations. In Slider mode, you can choose 4 or 8 Sliders with or without buttons for each. You can also choose to include a Memory Page master slider or not. The layouts recall recorded Memories from the selected Memory Page, starting from left of the Memory Page. For example, 8-button mode associates the first eight Memory only. Banking to addition memories within a Memory Page is not permitted.
The on-screen icon reflects the operating mode of the bump button associated with each Memory. Single dot means the icon will act as a momentary. A slot indicates the icon will behave as a toggle. Three dots indicate the icon belongs to a radio group. A timed momentary (fade up, wait, fade down) has a clock. With some planning, Memories and button icons can be arranged by function into rows or columns, and by toggle or radio group.
Shift is still active in Wall Station mode. Shift + Wall Station Mode button will change a toggle to a momentary, a momentary to a toggle, and release (clear) a radio group.
The Cognito logo will displayed when the Lock icon is touched. A password may be set by touching the keyboard icon and entering a password.
You can import a custom screen image. Put a BMP or PNG file on a USB thumb drive and select IMPORT CUSTOM LOGO. Suggested resolution is 800x410, but any image will scale to fit the screen. If a custom loga has been added, there will be a DELETE CUSTOM LOGO button.
When in Logo mode, the console hardware and touch screen are inactive. However, Playlists operating from PLAY | Schedule will be run, and the playback may still be triggered from Serial RS232 contact closures, LUA or Telnet scripts, and Midi Show Control commands.
The level of the console’s current license key (Starter, Pro512, Pro1024, Pro1536 or Pro2048) may be confirmed here. This screen allows you to upgrade your Cognito Starter or Pro512, to increase channel count or to add I/O support. Follow the instructions accompanying your upgrade certificate.
Information is shown on the software version being run by the console as well as the current authorization level and Fixture Definitions installed. Pressing Shift prior to touching SOFTWARE will display a more detailed list of software, hardware and library version numbers.
Should you require support and you are asked to provide the operational and error log files, this option allows you to save these logs to a USB drive. With a thumb drive inserted into one of the USB ports, simply touch the Copy Logs to USB icon. Once the operation is complete, you may then send the logs to your support contact. Insert the USB drive into a Mac or Windows computer with an Internet connection, and select the appropriate CLICK TO SEND action provided.
If your console is connected to the Internet, rather than copying the logs to USB, you can opt to just send the logs directly. Depending on the size of your show files and your upload speed, this may take from one minute to several minutes.
From time to time, software updates will be issued for Cognito. A link to these update is posted on the Controls product page on the Pathway Connectivity website (www.pathwayconnect.com) or on the Pathway product forums (forums.pathwayconnect.com). You may also download directly from www.pathwayconnect.com/downloads/cognito. There will be a README.TXT in the zip file with these instructions.
1. Using any computer, unzip the downloaded software update file to the root directory of a portable USB drive formatted Fat32. A file ending in .CogSys (or .CogUpd for the original Cognito consoles) will now be present on the USB drive.
2. Plug the USB drive into any of the USB ports on the console.
3. Press the Power button once, then choose Setup from the onscreen options.
4. Touch the Software icon, then ‘Update System’ at the bottom of the screen.
5. Touch Choose a File. The filename of the update will be shown. If more than one update is present on the USB drive, then a list of releases will be shown. Use the red wheel to choose the release you wish to install –typically the one with the most recent date will be shown at the top of the list.
6. Press Start Update.
7. At the end of the update, touch OK to reboot. (Note: Original Cognito consoles will reboot automatically).
The Cognito fixture library includes well over 2000 lights. However, with new lighting fixtures being introduced all the time, updating the library may occasionally be necessary.
In the event your fixture is not in the existing Fixture Library, first ensure the latest fixture library is installed on your Cognito by visiting pathwayconnect.com/downloads/cognito. The latest library will be posted here and marked by date. To check the date of the library installed press the Power Button once, choose Setup, then Software. The Fixture Library date will be shown near the bottom of the list.
To request a new fixture definition, please send a pdf of the fixture’s manual, including all DMX assignment charts, to fixtures@pathwayconnect.com. We will send you a new library in two business days or less. Please keep in mind that for all fixtures without Position or Shape attributes, there should be a generic profile that will operate the light correctly. Many lights offer operating modes that duplicate functions more easily accessed and programmed using Cognito's interface.
1. Use any computer to unzip the fixture update file to the root directory of a USB drive. The filename will be Cognito2Fixtures-xx-xxxx.CogFxd (or CognitoFixture-<date>.CogUpd for the original Cognito console).
2. Plug the USB drive into any of the USB ports on the console.
3. Press the Power button once.
4. Choose Setup from the onscreen options.
5. Touch the Software icon.
6. Touch Update Fixtures at the bottom of the screen.
7. The filename of the update will be shown. If more than one update is present on the USB drive, then a list of releases will be shown. Use the red wheel to choose the release you wish to install – typically the one with the most recent date will be shown at the top of the list.
8. To complete the process, touch OK .
The options shown will change when a USB drive is plugged into the console. Some options are not shown on Cognito PC or the Off Line Editor.
This button is only shown when USB thumb drive is present. Touching this button opens a list of shows saved on the USB drive. Use the wheels to select a show file, then touch OK. The show file will be copied to your console and be opened ready for further work.
This button is only shown when a USB thumb drive is present. Touching this button copies the current show to the USB drive using the same name. The show that is open for editing is still the local one on the console.
Clears the patch and all playlists and memories. You will be asked for a name for the new show. A new show has 100 lights of type Dimmer patched to the first 100 DMX slots.
Shows a list of showfiles, different from the existing show, internally stored on Cognito.
Shows a list of archived show files, internally saved by Cognito. Every time you modify the show (i.e., record a cue, change a time, label a memory) a serialized backup is made of your show. This option allows you to go back to a previous version of the show, even if nothing has been saved to USB.
In this case, working on a show named "Othello", the backup highlighted in red was the third time the show was modified and it happened 1 minute and 44 seconds ago. If you open this file, your current show file name will be "Othello00003". If desirable, you can then rename it again with Save Current Show As and you might use a name like "Othello Recoverd" or just "Othello".
Occasionally you have elements from one show you want to include in another show. Use this option to make a copy of the current show using a new name. Then
continue editing or adding to the new show with the assurance you have a copy of the original show to revert to. During longer productions you may want to do this every day of rehearsals. i.e., Othello (Monday); Othello (Tuesday) ...
Cognito has ample room to store show files with different names, but occasionally you may want to clean things up to free up space or just make the list of shows and backups more manageable. When you delete a show file, all the backups of that show file are deleted too. i.e., if you delete "Othello", all "Othello00001"; "Othello00002"; etc. will be removed as well.
You can check the amount of space on the internal drive using the Info Screen MEDIA button.

The touch screen has four distinct displays, each corresponding to a specific programming task: SELECT, CONTROL, RECORD and PLAY Each task is shown on the Task Bar at the bottom of the screen. Enter a task screen by touching its icon. When a task is chosen, (in this case SELECT), addition options are available. In this case they are TYPE, GROUPS, TOOLS, RECENT and SETTINGS. Touching one of those will change the tools in the toolbar located just above the task bar.
 These are examples of the four task screens.
SELECT is used to choose lights for programming. Pick lights by touching them individually, multi-selecting with the Shift key, or by using Groups. SELECT also accesses tools to patch lights into the Fixture Grid, set each light’s DMX start address, label individual lights and, optionally, associate a light with a specific gel. You can also see detailed information about a light, what personality is set, who is controlling it and where it's recorded by pressing the Info button.
CONTROL provides tools to change the intensity , color , position and shape attributes of the selected lights, and to activate effects. If no lights are selected in the Fixture Grid, the CONTROL icon will be grayed out (inactive).
RECORD stores lighting looks into Memories or Cues. RECORD also allows specific lights or their attribute details to be saved as separate Groups or Libraries for reuse.
PLAY recalls stored looks, either through sliders (Memories) or Playlists (Cues). PLAY also provides access to BLIND editing of saved looks and to the editing of the name, timing and other attributes of Memories and Cues. PLAY | SCHEDULE allows automated Playlist operation using the clock or astronomical events such as sunset, based on locale and time.
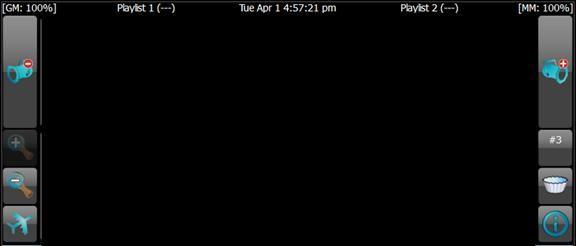
Across the top of the screen in every task is the status bar. It shows:
1. On the very left, the level of the Grand Master which inhibits all intensity levels including levels of captured lights, from Playlists and any Memory with a Priority over 2. If the level is not 100%, the text will be red. If the Dead Black Out button is active, the text will be [DBO].
2. The very right is the level of the Memory Master which inhibits any levels coming from your Memory with a Priority over 3. If the level is not 100%, the text will be red. If the Memory Black Out button is active, the text will be [BO].
3. The current day of the week, date and time of day is shown in the center of the Status Bar. Set the time of day and time zone in SETUP | SYSTEM. When you are editing a Cue or a Memory in Blind, the status bar turn blue and current item's name will be shown in red.
If you are Copying Attributes the Status Bar will be green prompting you to select lights to copy attribute to. If the Outputs are disabled, the time will be periodically replaced with the red text .
4. The name of the Playlist currently loaded in each of the right and left playbacks; and the name of the current cue is in parenthesis. If the Playlist is Released, you will see the text "(---)".
On either side of the main display are navigation icons. Not all methods of navigation are available on all pages. Icons are grayed out when not in use.
The Left and Right Arrow icons allow you to reach additional pages of lights, Memories or swatch colors, for example. Pressing the Shift button in SELECT will change the Arrow icons to
+/- Par Can icons . Touching the Par Can icon moves the red Selection Indicator to the next higher or next lower light in the current selection set or in the Fixture Grid. The Par Can icon is also available in each CONTROL task, allowing you to ‘round robin’ quickly between the lights in the selection set.
The Magnifying Glass icons, located below the Left Arrow, change the number of lights shown in the Fixture Grid. You may view the Fixture Grid with as few as ten lights or as many as 100 lights at one time.
The Airplane icon, located below the Magnifying Glass icons, allows you to quickly switch between different pages of lights. The size of the pages is determined by the zoom level set with the Magnifying Glass icons.
The Number icon box located below the Right Arrow reports how many lights are currently selected. If only one light is selected, its Fixture number will be shown with a number sign (for example "#1"). If more than one light is selected the box indicates how many light are selected (example "4"). When a change has been made to the selected lights, but not yet recorded, the icon’s background changes to red, and CAPT (‘captured’) appears as a warning. Captured lights are not affected by the PLAY task until recorded or released. Touching this icon will release the selected lights.
The Filter icon, also located below the Right Arrow, allows you to reduce the lights shown on the Fixture Grid based on certain criteria, such as ‘only lights selected’ or ‘only lights in use’ (intensity above zero). The icon turns red when filtering is in use. Only lights that meet the Filter criteria are shown in SELECT.
The Information icon toggles the Fixture Grid to show further information about each light. If no lights are selected, touching the icon will show the DMX start address in the lower left corner (where intensity is normally shown) for all lights. If one or more lights are selected, a chart with the fixture’s usage will be shown.
Lights may be manually selected or deselected by touching the cell of each light as needed. To select or deselect a range of lights, touch the cell of the first fixture, press and hold the Shift button then touch the cell of the last fixture in the range. The order lights are selected is used by the color picker, fanning and effects.
Often, certain groups of lights are selected repeatedly for programming. The following tools may speed those operations.
The Type tool allows quick selection such as All Lights, No Lights or by fixture types. Cognito automatically creates Standard groups of identical lights, as the lights are patched into the Fixture Grid.
These tools allow for dynamic selection of lights based on the current state of the system.
Looks at each light in your show and only select those that have a level, either from CONTROL, an active Cue or a Memory. Desk Locked levels are not considered.
If you have used CONTROL or Double Tapped to Set Intensity on any light, it is
considered Captured and you will see CAPT in this icon . Pressing the Captured SELECT tool will select all lights that have any attributes captured.
During a cueing session, before recording a cue, you may bounce back and forth between two lights or two groups of lights. Pressing Invert will deselect your currently selected lights and select any other lights that have captured attributes.
These tools are handy when you grab a group of lights and set them to one color, then want to grab every other one and change them to a complimentary color.
Often when doing a rotating breakup gobo on the stage you might set them all rotating at the correct speed clockwise, then select the odd ones and change their direction to counterclockwise.
The order in which you select lights or the order they were originally selected before recording a group is retained when using a group. If you want to randomize the selection order for the purposes of Fanning, Effects or applying a Rainbow with the Color Picker, select the lights then touch this icon. The SELECT screen will not change, but when you go into Control the new selection order is used.
Remainder Dim is useful when you are starting a new look. Select the new lights and set their level, then touch RemDim. All other lights that have a level greater than zero will be forced out.
The Groups tool allows rapid selection of show-specific or user-defined groups of lights. Grouping reduces the number of lights that must be individually chosen manually. To set up a Group, select the lights you wish to include, then use RECORD | GROUP. The order in which lights were selected is also stored and is used by the color picker, fanning and effects. Groups can (and should) be labeled.
The Recent tool provides a list of recently selected lights, which can be useful when repetitively adjusting small selections of lights. The number in parentheses is the number of lights in the selection. For instance, the first selection in the bar above are 10 lights including 1 through 10.
By default, SELECT displays your lights. The Grid consists of cells, each one representing a single light in the show. Each cell can have varying amounts of information depending on the zoom level describing the current state of that light. Here are the details at the highest zoom level.
1: Light Number. The number in the upper left hand corner of each cell identifies each light in the show. The Light number is not the same as the light’s DMX address.
2: Color Indicator. For color-changing lights, the background of the circle provides an indication of the light’s current color. If a gel has been associated with a traditional dimmer, the gel color will be shown.
3: Attribute Indicator. Icons indicate whether Intensity , Color , Position or Shape attributes have recently changed, whether from manual manipulation in the CONTROL task or from running cues in Playlists
4: Label. By default, the model of light that each cell represents appears in the lower right hand corner of each cell. If a label has been assigned using SELECT | SETTINGS | PROPERTIES, that label will appear in place of the model.
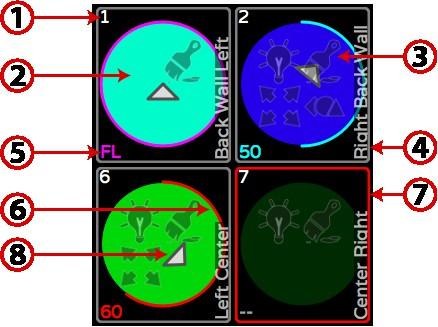
5: Intensity Level. The current intensity of the light is shown as a percentage, in the lower left hand corner. “FL” indicates the light is at full. When no lights are
DMX start address. With a light or multiple lists selected, pressing will show more detail on what is controlling the lights' attributes.
The color used to display the light's intensity also provides information about where it was set from or why it changed.
■ Gray Default level (normally 0%)
■ Yellow Level controlled by a Memory
■ Red Captured in SELECT
■ Magenta Level unchanged in last Cue
■ Cyan Level increased in last Cue
■ Green Level decreased in last Cue
6: Intensity Indicator. The circular, colored line within each cell (red in the example above) provides a quick indication of the light’s current intensity. The color also indicates how the intensity was set and if it’s currently changing. See Information for descriptions.
7: Select Indicator. The border around each cell turns red when the light has been chosen for programming. This icon shows how many lights are selected. If there is an # in this box, only one light is selected and the number is the Light's number.
8: Orientation Indicator. For lights with position attributes, the triangular pointer at the center of the circle shows the direction the light is pointed.
From SELECT, double tap on the Light to set its intensity to full. If the Light is already at full, double tap will take it out. You can select a range of lights then double tap to set all their levels. This also works if you double tap the Light mimic between the attribute bubbles in CONTROL WHEELS for each of Intensity, Color, Position and Shape.
This is handy because you can, for example, stay in CONTROL POSITION using
NEXT and PREV to bounce through your lights, turning them on and positioning them one at a time without having to go back to CONTROL INTENSITY.
The Settings tool allows you to assign specific lights (by model) to cells in the SELECT grid, and to set or “patch” the lights’ to their required DMX start address. In order to patch a fixture, you must know the manufacturer, the model, the light’s current operating mode (often called its footprint) and its DMX start address. Generally, every light is given a unique start address.
1. Select the cell in the Fixture Grid where a light is to be patched. You can also select a range of lights.
2. Touch Settings .
3. Use Light Type to choose the light’s model and operating mode. Use the red wheel to select the manufacturer. Then use the green wheel to select the model and operating mode required (if there is more than one mode) from the Light Type column.
4. Touch Apply .
5. You will be taken to the DMX Addr screen to set the DMX start address
6. Locate and touch the desired starting address. The light or series of lights will be patched using consecutive DMX slots.
Most color-changing-only lights will match one of the Generic profiles. Lights with position or shape attributes require specific profiles. If a light doesn’t appear in the Light Type, or a required operating mode is missing, email a pdf of the light’s manual to fixtures@pathwayconnect.com to request inclusion in the fixture library.
All "All" fixture types available in the current fixture library are shown,
organized by manufacturer name. You can use the arrows or touch the space between the arrows to jump through the list quickly.
Press the star to dispaly a limited selection of fixtures, as chosen by the user. Once a light is selected, it may be added to the "Favorites" list for easy reuse by touching Add Favorite . Any light that is selected this is already in the favorite list shows Remove Favorite .
A grid of DMX start addresses is shown, in blocks of 32 DMX slots. The DMX slot number is shown in the top left hand corner of each cell.
The larger number in the middle of each cell is the Light's number. At the bottom of the cell is the attribute controlled by that slot, such as intensity, color, pan, gobo, etc. Use the red and green wheels or the arrows to scroll through the grid. To patch a light to a specific DMX slot (or range of slots for multi-attribute lights), touch the cell with the ‘starting’ DMX address number.
A single ‘light’ in the SELECT grid may be patched to include control of the light’s dimmer and the light’s accessories – for example a dimmer and a scroller, or a dimmer and a moving mirror. That means the light has two DMX start addresses.
First select the desired accessory combination from Light Type i.e. 2 Color Scroller, Gobo Rotator or I-Cue Mirror. Then, in DMX Addr touch an empty cell. You will be asked:


Choose the correct part, then touch another cell specifying the other part(s) as needed.
Some lights support more than one intensity attribute. These lights will appear in
Light Type as ‘Part 1’, ‘Part 2’, and so on, or as ‘Head 1’, ‘Head 2’ etc. In most cases, each part should be patched to consecutive, contiguous blocks of DMX slots. In some cases, when Intensity is controlled through a dimmer, the INT channel may be separated from the attribute channels.
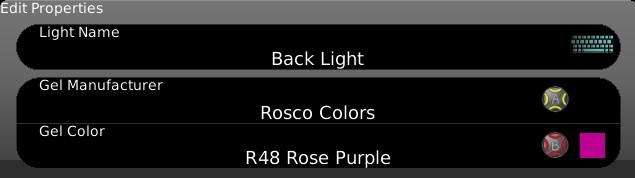
Allows you to give your light a Name which will be seen in the SELECT grid. By default, a light’s label is its fixture type. Also allows you to specify what gel color is being used by a specific light. This feature is typically used with dimmers.
When programming lights you often work with one light to get the color and maybe even position or gobos you want, then want to copy that work to a group of other lights.
1. Select the light that easily visible to you from your programming position and has the features you want to manipulate.
2. Use the CONTROL task to adjust the attributes.
3. Return to SELECT and press EDIT .
4. The status bar will change:
5. Select other lights you want to look like the first light by either touching them directly or using other SELECT tools like Groups or Dynamic Tools.
Natural Language Control makes this Copy command very powerful. Cognito can copy attributes that function very differently in one light to another. For example, if you mix a color in RGB, you can copy that to a light that uses a color wheel. Cognito will do its best to find the closest matched color in the color wheel. See Natural Language Control for further examples.
Control
CONTROL allows you to manipulate a light’s attributes. Attributes are organized into families of Intensity , Color , Position and Shape
Only those attributes supported by the selected light are shown. If lights with differing attributes are selected, the tools available are determined by the first light selected. At least one light must be selected to activate CONTROL.
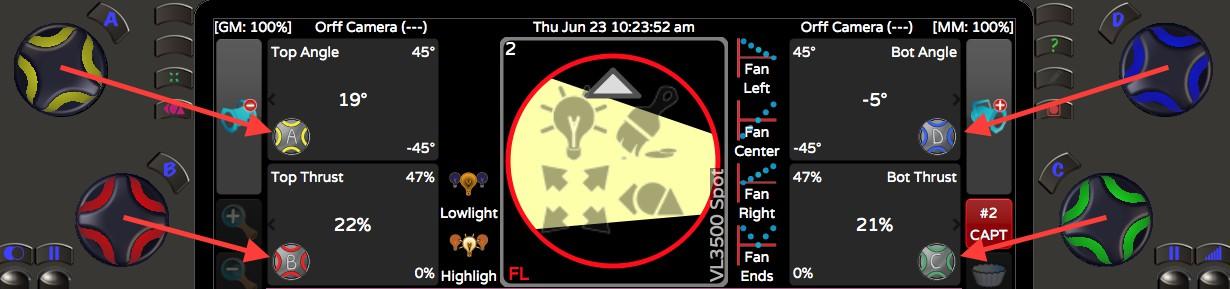
When you select a Light and go to CONTROL | WHEELS, there are four (or less) ‘bubbles’ to show you the Yellow, Red, Green and Blue wheels are controlling. In the center of the screen is a mimic of what the light is doing similar to the ones in SELECT:
This shows the Intensity as a number and graphically as ring, it shows what attribute families have recently changes with the four attribute family ghost icons
, it shows the color of the Light, where the Light is pointed and any shutter cuts that may be set. If you have multiple Lights selected, the mimic shows the state of the first Light in the selection set. There are also Fanning, Flip and Highlight and Lowlight tools that appear to the left and right of the mimic.
Intensity controls the relative brightness of a light. All lights have an Intensity attribute. (Some lights, such as discharge lamps, must first be turned on, or ‘struck’, before an intensity level can be seen.)
Wheels: Directly set a light’s intensity between 0 and 100 percent,
using the green wheel Each tick of the wheel is 1%. Hold down Shift and roll the wheel to get 1 DMX increment. Some lights have intensity effects, such as Strobe, or operating parameters, such as fan speed, that are also set here under Intensity.
Advanced: Allows you to lock or ‘park’ the intensity of selected lights. Also allows you to release recent intensity changes, or to explicitly set a light to its default intensity (typically off). 'Locked’ Intensity attribute values are not recorded into Memories or Cues. Further advanced options, including Desk Lock and Knockout, are discussed under Advanced Attribute Control.
Libraries: Choose from a list of standard intensities or use a Raise/Lower bar. Touching the top of the raise bar moves the light's intensities more quicly than touching near the bottom.
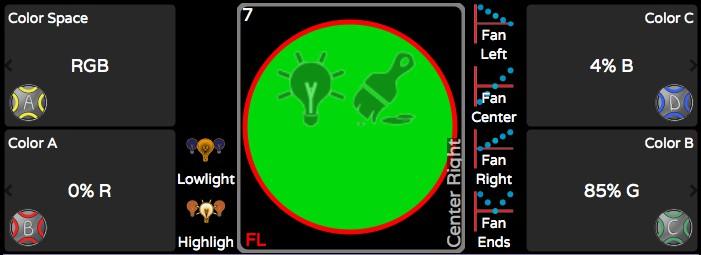
IRGB: Provides a Raise/Lower bar for Intensity and direct Red/Green/Blue (RGB) control for lights that support color mixing. When adjusting a color mixing light, if the level of a color continues to be raised by using the associated wheel or raise icon after a particular color bar has reached 100%, Cognito will automatically lower the other colors until the desired color is reached.
Effects: Shows any currently active effects on a secondary tool bar. Intensity must be higher than zero percent for an effect to be visible. Touch the New Effect icon to display a list of available Intensity effects.
Different lights may have different color abilities, such as color wheels or scrollers. Only abilities specific to the selected light are automatically added to the tool bar.
Wheels: Allow you to choose a Color Space and set RGB (default), CYM or HSV color values. Also allows direct control of scrollers, color wheels and color correction. Hold down Shift and roll the wheel for half colors or fine color adjustment. Wheel buttons provide quick access to standard entries.
Holding down Shift and one of the Wheel buttons will force default values (i.e., clear the color) and with some attributes successive presses will take the attribute to its extents. You can also work with the lights Color Correction to choose a white point when color saturation approaches zero.
Advanced: Allows you to lock or ‘park’ the color attributes of selected lights. Also allows you to release recent color changes, or to set a light to its default color (typically open white). Color attribute values that are locked are not recorded into Memories or Cues. Further advanced options, including Desk Lock and Knockout, are discussed under Advanced Attribute Control
Libraries: Use the up/down and left/right arrow icons to select colors from standard gel swatch books, or to recall custom-recorded colors saved using RECORD | LIBRARY | COLOR. Color Libraries are specific to the lights in use when recording the color. Updating a Library automatically updates any Cues and Memories that use it.
Picker: Choose a color by touching the gradient chart or by adjusting the red (hue)and green (saturation) wheels. When multiple RGB fixtures are selected - for example cyclorama lights - standard rainbow patterns may be chosen from the top of the screen or by adjusting the yellow wheel
The rainbow width can be adjusted using the tool on the left side of the screen or by adjusting the blue wheel .
Effects: Shows any currently active effects on a secondary tool bar. Intensity must be higher than zero percent, with a color selected, for effects to be visible. Touching the New Effect icon displays a list of available Color effects.
Natural Langue Control allows you to choose andfadein different color spaces:
RGB - Red Green Blue - native to most LED lights
CMY - Cyan Magenta Yellow - used with color mixing flags on discharge moving lights
HSV (Subtle) - fades Hue through the least number of colors
HSV (Rainbow) - fades Hue through as many colors as possible
From CONTROL | COLOR | WHEELS yellow wheel allows you to choose which space you want to work in. For the lights that use this space, any cues recorded then played back will fade in this color space too. This can give dramatically different looks when running the show. Fading in RGB or CMY (similar to how consoles without Natural Language Control would fade DMX) you can sometimes see a muddy or peaky tone mid fade. Fading in HSV (Subtle) fades
saturation linearly, but ensures the hue avoids color shifts that look unnatural when going from cue to cue.
Choosing colors in HSV (Subtle) and HSV (Rainbow) is identical, but if you record and play a cue or memory using HSV (Rainbow) you will see dramatic color shifts during execution. Hue is defined in degrees where 0° is red as is 360°. Cyan is at 180°.
Regardless of the color space you choose, on many lights there is also a wheel bank that deals with Color Correction. That allows you to choose the white point and also deals with the Amber and White components of RGBW, RGBA and RGBAW lights.
See NLC - Color Spaces for further explanation and graphical examples.
Although Cognito’s Natural Language Control allows you to mix colors in multiple color spaces (CMY, RGB, HSV) and specify a white point with Color Correction, most lights only utilize either RGB or CMY on the DMX wire. Some manufacturers have defined fixture profiles that expect to see Hue and Saturation in DMX slots. When running these lights on regular DMX consoles, you can run into some pretty peculiar color fades. For example, say your first cue is red defined by a hue of 2%, and your next cue is a pink defined with a DMX value of 80%, when you fade from cue to cue, you will see almost every color in the rainbow before pink. This is normally quite undesirable. Natural Language Control allows you to drive native HSI lights with the DMX they expect, but fade from cue to cue in any color space to produces much more predictable transitions. From a DMX standpoint, that means a fade may jump from a Hue approaching 100% right down to 0% and carry on upwards - all imperceptible without you having to worry about how to get from one color to the next.
See NLC - Color Spaces for graphical examples of HSV fades.
Different lights (usually called moving lights) may have different positioning abilities.
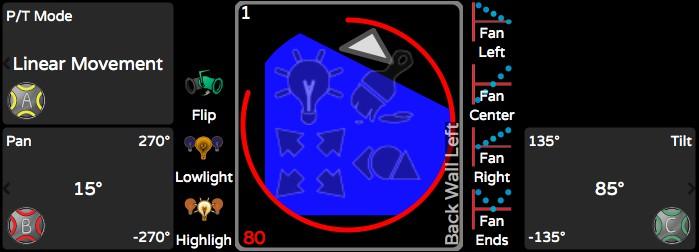
Wheels: Directly control pan and tilt values in 1° increments. Each tick of the wheel is 1°. Hold down Shift and roll the wheel to get fine control. Wheel buttons provide quick access to standard positions. Here you can also allow the choice between Polar (normal arc) and Linear movement (direct path). Holding down Shift and one of the Wheel buttons will force default values and with some attributes successive presses will take the attribute to its extents.
Advanced: Allows you to lock or ‘park’ the position attributes of selected lights. Also allows you to release recent position changes, or to set a light to its default position (when hung, typically straight down). Position attribute values that are locked are not recorded into Memories or Cues. Further advanced options, including Desk Lock and Knockout, are discussed under Advanced Attribute Control.
Libraries: Recall custom positions saved using RECORD | LIBRARY | POSITION. Position Libraries are specific to the lights in use when recording the position. Updating a Library will automatically update any Cues and Memories that use it.
Joystick: Adjust a light’s position relative to its current position. The further from center you touch, the quicker the light will move.
Bullseye: Adjust a light’s position relative to its absolute position (typically the absolute position is pointing straight down or straight ahead).
Effects: Shows any currently active effects on a secondary tool bar. Touching New Effect displays a list of available Position effects.
Different lights may have different shape abilities, such as gobos, edge, motorized shutters or zoom. Only the abilities specific to the selected light are added to the tool bar.
Wheels: Access options for gobos, shutter, lens focus, rotation and other effects. These options normally appear on a secondary tool bar, called the Wheel Bank. Wheel buttons provide quick access to named gobos or standard zoom values. Holding down Shift and one of the Wheel buttons will force default values (i.e., clear the gobo) and with some attributes successive presses will take the attribute to its extents.
Advanced: Allows you to lock or ‘park’ the shape attributes of selected lights. Also allows you to release recent changes, or to set a light its default shape (typically open). Shape attribute values that are locked are not recorded into Memories or Cues. Further advanced options, including Desk Lock and Knockout, are discussed under Advanced Attribute Control
Libraries: Recall custom shapes saved using RECORD>Library>Shape. Shape Libraries are specific to the lights in use when recording the shape. Updating a Library will automatically update any Cues and Memories that use it.
Effects: Shows any currently active effects on a secondary tool bar. Intensity must be higher than zero percent, for effects to be visible. Touching the New Effect icon displays a list of available Shape effects.
Each CONTROL attribute offers an Advanced tool. These tools – Desk Lock, Tech Lock, Attribute Default, Attribute Release, Knockout Attribute and Knockout Light – provide a way to place lights or their individual attributes outside of normal programming flow, to remove specific changes made to a light or even to remove the light from the current cue.
Found in Control Advanced for each of Intensity , Color , Position and Shape .
When an attribute is Desk Locked, that attribute’s values are frozen or ‘parked’. Pressing the Release button will deselect the light, but the attribute will remain at the frozen level, and or the letters “DL” will appear at the bottom of the light’s cell in the SELECT grid. Although the frozen values are not included in any cues or memories subsequently recorded, if a new value is set for the light's attribute then that value will be included.
For example, if the theater’s house lights are Desk Locked at 60%, then released, those lights will remain at 60% and the 60% level will not be recorded in subsequent cues. In the SELECT grid, the house lights will be shown as deselected, with zero intensity. The bottom of the light’s cell will show the padlock icon or “DL”. If those lights (while locked) are captured and set to a level of 40%, that 40% value will be included in any record operation.
Desk Lock and Unlock can only be set from the console. The ‘locked’ intensity level is shown on the Information screen.
Available only from the Intensity tool. Freezes all attributes of the selected light(s). Individual attributes of the light may be changed and included in future cues or memories, as described above.
The Intensity of Desk-Locked lights are not affected by the Grand Master or Dead Blackout button. Even with the Grand Master at 0%, the lights with a locked level will remain ‘on’.
Tech Lock may only be set using the neato™ iOS app, available from the Apple App store. neato can remotely freeze, or lock, specific attributes of a fixture. For example, applying Tech Lock to the intensity of a fixture will allow refocusing of the light while other work proceeds, without affecting recorded levels.
The console can always override a Tech Lock, and restore direct control, by touching the unlock icon under the Tech Lock tool. A cue may include a Cue Action to release all Tech Locks, which may be a good idea at the top of a performance.
The Information screen shows how many lights are currently Tech Locked, under the “Locks” tab.
Sets and captures the selected light’s attribute to the default value. The default results are dependent on the light and will be recorded in any subsequent record operations.
Without entering CONTROL | ADVANCED , from CONTROL | WHEELS holding down Shift and one of the Wheel buttons will force default
values (i.e., clear the color) and with some attributes successive presses will take the attribute to its extents.
Releases changes made since the last RECORD action, to the chosen attribute of selected light(s).
Advanced Release is an attribute-specific equivalent of the general Release button. Allows the selective discard of the changes made to a light, unlike the general Release button which discards all changes made to the light. For example, you can discard changes to a light’s color while keeping the new position the light is using.
Applies to all attributes associated with the selected attribute family. Knockout removes the action of the last cue. The affected attributes of the light will revert to their value in the previous cue. Use Knockout to remove attributes from a cue, and allow the values set in the previous cue to “track” through. The current cue must be updated to make the changes permanent.
Only available from CONTROL | INTENSITY | ADVANCED. Removes any changes to all attributes of the light in the present cue. Allows all attribute values to track through from the previous cue. The current cue must be updated to make the changes permanent.
RECORD saves completed looks, or specific attribute information, for later recall. By default, Record captures the current output of the console, typically as a Memory or Cue. Attribute information alone may be recorded as a Library, or a selection of lights may be recorded as a Group.
Memory saves the current look into a slider. Memories are represented by rectangles across the top of the screen and are operated by the sliders
Any fader location may be chosen by touching it. The selected location is indicated by a red outline. By default, fader 1 or the next available fader is selected. Although only 20 faders are shown at one time, up to 400 memory locations are available in a single Memory Page. Use the Left and Right navigation arrows to access the additional banks within the page.
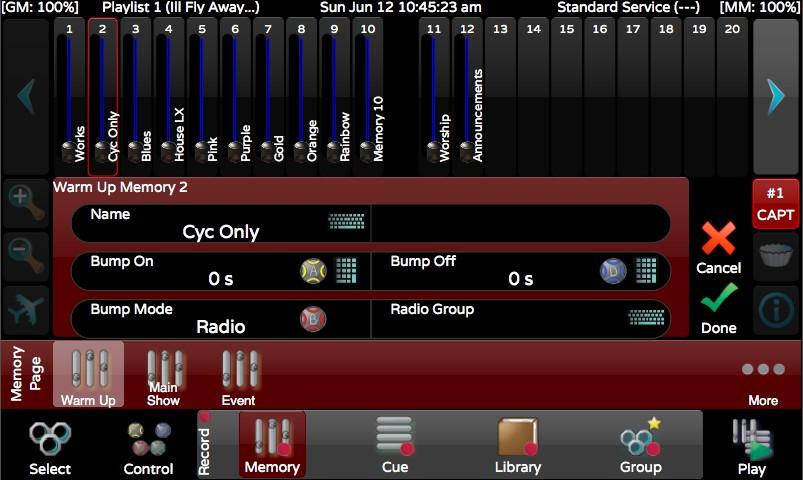
Once a fader location is selected, the Memory may be labeled by touching the keyboard icon next to Name. Bump button modes and timings may also be adjusted.
Fade up and fade down times may be associated with each bump button’s action. By default the buttons have a timing of zero seconds.
See How to Record a Memory for step by step instructions on recording Memories.
To quickly save a Memory, press the Record button twice to automatically record into the next available Memory fader, using default properties.
To quickly designate a specific location, press the Record button then the Bump button of the fader where you want the Memory stored.
See Also:
Add Memory Page
Changing Memory Pages and Banking Within a Page
Memory Priorities
How to Record a Memory
Cue saves a completed look into the current Playlist. Make a Playlist current by selecting it from the secondary toolbar. The Cues in the current Playlist are shown on the left, and details of the selected cue are shown on the right.
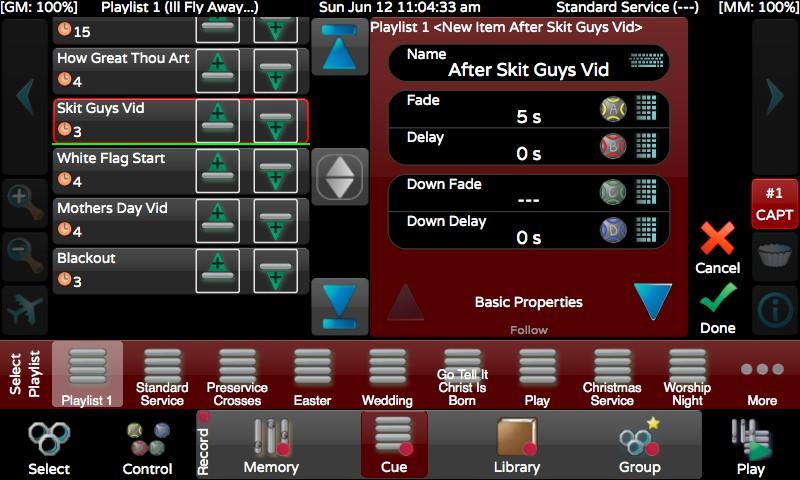
By default, a Cue is recorded into the next available location, as marked by the green bar.
If necessary use the or icons to move the green bar. Touch the keyboard icon next to Name to label the cue. A number of timing options and other properties may also be set. The properties of the recorded cue are in pages.
You can get to more properties using the up and down arrows on the right hand side
Fade: Sets a basic crossfade time. If no other timings are set, this timing will be used to govern a light’s change in Intensity, Color, Position and Shape attributes.
Delay: Sets a delay time between pressing GO and the start of the fade. Down Fade: Sets a different fade time for all lights moving to a lower intensity. If no value is set, the down time equals the Fade time.
Down Delay: Sets a delay time between pressing GO and the start of the Down Fade. Allows you to create a ‘split-crossfade’ for situations where some lights must come up before other lights go down.
Wait For Go: Default behavior. When a cue’s fade time is complete, the console requires an outside trigger (typically the operator to press GO) to advance to the next cue.
Follow On After Fade: When a cue’s fade time is complete, the playlist immediately advances to and begins to run the next cue.
Follow On In Time: The console begins the next cue after the Follow Time has elapsed. The Follow Time starts counting when the cue begins.
Follow On Immediately: The console begins the current cue and next cue at the same time. Equivalent to a Follow In Time of 0s (zero seconds).
Follow Time: Sets the time used by the Follow On In Time option above.
Link: Links the completed cue to another cue that does not immediately come after it in the Playlist. The default is to link to the next cue in the Playlist. If no Follow option has been set, the operator will still have to press GO.
“Link” and “Follow” allow for the creation of loops that will play indefinitely. Press the playlist’s Go button to exit the loop and advance to the next cue in the playlist after the link. See Playlist as a Chase for additional dynamic playback options without using Follow and Link.
Position Fade: Sets a time for a moving light’s repositioning. If no value is set, any repositioning will use the Fade time.
Position Delay: Sets a delay time between pressing GO and starting the Position Fade.
Color Fade: Sets a time for the color transition in a light. If no value is set, any color fade will use the Fade time.
Color Delay: Sets a delay time between pressing GO and starting the Color Fade.
Shape Fade: Sets a time for the shape transition, such as zooming in or changing between gobos. If no value is set, any shape transition will use the Fade time.
Shape Delay: Sets a delay time between pressing GO and starting the Shape Fade.
See How to Record a Cue for full step by step instructions.
By default, two playlists are shown. To add further Playlists, to delete existing Playlists, or to rename a Playlist, touch the More... icon at the right end of the Record Cue toolbar. The Playlist Library will be shown.
o add a Playlist, touch Add New .
Library allows you to capture certain attributes for reuse in different Cues or Memories and to aid in programming.
Capture a light’s current color. Touch the Color icon on the tool bar. Select the record location. Name the color library, if desired. Touch the Done icon to record, or the Cancel icon to start again. The saved color may only be applied to the same light(s) in use when the library was recorded.
Capture the position of a light or group of lights, for example – down stage center. Certain shape attributes, such as zoom, edge and shutter, are also captured in the position library, if those attributes are not already recorded. Touch the Position icon on the Record Library tool bar. Select the record location. Name the position, if desired. Touch the Done icon to record, or the Cancel icon to start again. The saved position may only be applied to the same light(s) in use when the library was recorded.
Capture the shape of a light or group of lights, such as gobos, shutter cuts or lens zoom. Touch the Shape icon on the tool bar. Select the record location. Name the shape, if desired. Touch the Done icon to record, or the Cancel icon to start again. The saved shape may only be applied to the same light(s) when the library was recorded.
Group allows you to record a specific selection of lights for quick recall during programming. After selecting lights in the SELECT grid, enter RECORD. Touch the Group icon, then select a record location. Name the Group, if desired. Touch Done to record, or Cancel to start again.
The selection order is also stored with the group, and is used when applying effects, Fanning and color rainbows.
Once changes are made to an existing cue, touch RECORD | CUE, then select the same cue location from the Playlist. The outline will turn red.
If you press Done you will be offered three options:
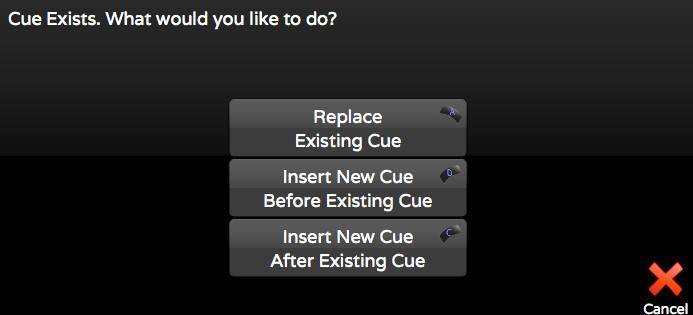
Re-records the current console ‘look’ into the current cue position.
Records the current console ‘look’ as a new cue, immediately prior to the selected cue position. Inserting a cue will not affect adjacent cues.
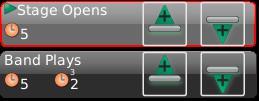
Records the current console ‘look’ as a new cue between the selected position and the immediately following cue. Inserting a cue will not affect adjacent cues.
If you have selected to Record Only Change in SETUP | SYSTEM there is a fourth option presented to Update the Existing Cue. It updates any attribute values that have changed from the previous cue but does not rerecord the entire stage look.
If you know your going to insert a cue before or after the selected cue, press the
Insert Before or Insert After icon. A green bar will show you where the new cue will go.
If you're using numbers in your cue labels, (i.e., Cue 1, Cue 2) and you insert after Cue 1, the default label will be Cue 1.5. If you're using only text labels (i.e., Boy, Girl) and you insert after Boy, the default label will be After Boy. You can label the cue anything before pressing DONE or later by editing the properties in the PLAY task.
See also Update.
Press and hold Shift then press the Record button A list of items available for update is shown. Choose to update only the current cue or an earlier cue where the value originally changed in the current Playlist.
The Shift + Update combination may also be used to update Libraries, so that the revised Library will be used wherever it’s already included in a cue or memory. Shift + Record may also be used to quickly update values into Memories which are presently at full.
PLAY recalls recorded looks, while providing information about the current and upcoming Memories and Cues. There are five playback views: MEMORY, LEFT PLAYBACK, RIGHT PLAYBACK, MIXED, and SCHEDULE. The choice of one playback method does not disable the other methods – faders will still recall stored Memories even when Left or Right Playback is the selected.
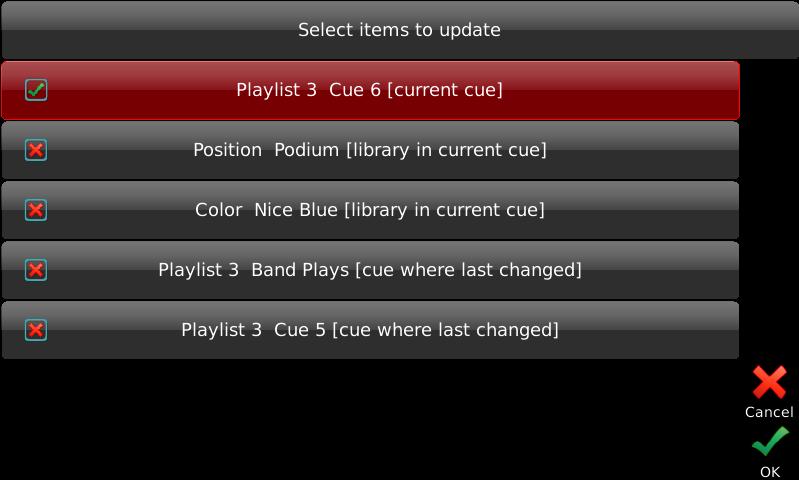
PLAY also allows easy editing of fade times and access to special Cue Actions, by pressing Edit
Touch “Edit in Blind” to make attribute changes to existing Cues and Memories, without those changes being visible on stage.
The Memories available for playback are shown across the top of the screen, as indicated by a label and a yellow level indicator.
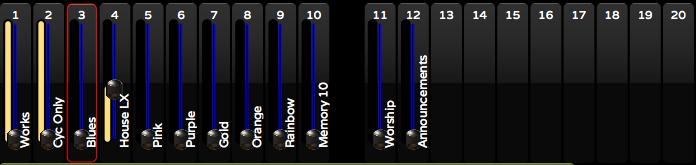
Further Memory Pages are available for selection from the tool bar. If the desired Memory Page is not see, press More...
Each Memory Page may hold up to 400 Memories which you can reach by touching the banking arrows
When a Memory location is selected, the location’s outline will turn red and the Memory’s playback timings and bump button configuration are shown in the information area below the faders. Press EDIT . Make the changes to the
Once in Edit, you may also rearrange the order of the Memories by drag-anddropping the Memory to a new location. To copy the Memory, press and hold Shift prior to dragging the Memory to its new location.
1. Select the Memory outlining it in red.
2. Press the Edit .
3. Touch the delete icon at the top of the Memory rectangle . A
second DELETE button will appear. Touch to confirm you want the Memory deleted, or the Cancel icon to back out.
By default, faders only play back Memories when the PLAY task is active. To change the default, so faders always playback Memories, go to SETUP | SYSTEM |
GENERAL and change “Sliders Always Run Memories” to ‘Yes’. Then when in SELECT, the Pin will be blue showing sliders are running Memories. When set to 'No', the sliders are capturing lights' intensities and the pin is red .
On new show files, one Memory Page is added. To add further Memory
Pages, or to delete or rename an existing Memory Page, touch More at the right end of the Memory Page bar. The Memory Page Library will be shown.
To add a Memory Page, touch Add New
From PLAY | MEMORIES you can freely change Memory Pages just by touching a new page in the green toolbar.
Each Memory Page can have up to 400 Memories recorded in it and you can always Add another Memory Page. You can only see 20 Memories at a time, but using the arrows you can bank within the page. See also Airplane View in Play Memories
Since Cognito doesn't have 'flying faders', when you bank or page, the slider may not be at the correct level. In that case, the bump button will be flashing warning you that the hardware doesn't match the current live Memory level. You must manually move the slider to match the live level before you have control over the Memory. Then the bump button will turn blue and you can freely adjust the level as you see fit. This 'matching' prevents levels jumping on stage as you page and bank.


There are five different modes for Memory Bump buttons. They can be set when you Record the Memory or by editing the Properties of a Memory in PLAY | MEMORIES. The five modes are:

The Memory is active only while the button is pressed.
Press to recall the Memory. Press again to release the Memory.
When several buttons are configured as part of a Radio Group, only one button and its Memory may be active at any time. Radio Groups may be named and each Memory Page may have multiple Radio Groups.
On press, Memory will fade in, then delay the specified amount of time before fading out.
Disables the button. The Memory is still controlled by the fader.
You can add Actions to do things like run cues or chases when a button is pressed or released.


1. Touch More at the right end of the Memory Page bar.
2. Touch the Memory Page’s current name. Do not touch .
3. An Edit Properties screen will open. Touch the keyboard icon next to the Memory Page’s name to enter a new name.
4. Touch Done .
5. Touch Done again to exit the Memory Page directory.
1. Touch More at the right end of the Memory Page bar.
2. Touch on the desired page.
3. A DELETE button will appear. Press it to delete the page (this cannot be undone) or press to remove the DELETE button .
4. Touch Done to exit the Memory Page directory.
Similar to how pressing the Airplane in SELECT shows you banks of Lights, pressing Airplane in PLAY | MEMORIES shows you all 20 banks of memories on the current Memory Page and indication as to which are recorded and which are active. Blue bars are recorded memories and yellow bars are active (up) memories. If a memory is not at full, the bar will be split yellow/blue at its current level.
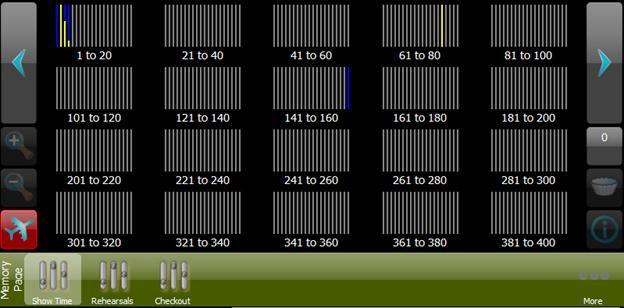
Pressing any bank of 20 will jump you to that bank. Active memories on the deselected bank will not be released. You may need to “level-match” the sliders to current levels when you switch banks. As always from PLAY | MEMORIES, you can be in any bank and press the large left/right arrows
. Remember, each Memory Page has 400 possible Memories, but you are not limited to the number of Memory Pages per show file.
See Also: Changing Memory Pages and Banking Within a Page
To make changes to a Memory while another Memory is live on-stage, select the desired Memory location. The outline will turn red. Then touch Edit in Blind.
The display will change to the SELECT task, with a blue background to indicate Blind mode. The clock on the status bar changes to ‘Blind’, followed by the label of the item being edited.
An icon in the upper right corner of each fixture cell indicates the light’s current attributes. Choose the lights you wish to adjust and follow normal CONTROL methods to adjust their attributes. Once the changes are completed, press Record to accept the changes, or Release to abandon the changes.
Each Memory can have up to 16 actions. To add an Action touch Add Action . The trigger point for each action can be any of:
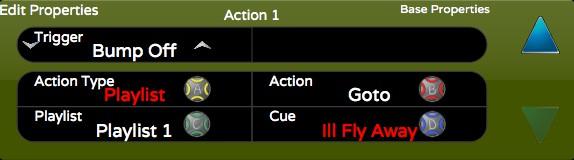
Bump On (finder down)
Bump Off (finger off)
On Value (i.e, reach 100%)
Value (i.e, move from 0%)
both
Change (may result in may events)
If you add more than one Action to a Memory, use the arrows to edit the additional actions. Press Done when you've finished editing the Actions. See also Contact Closures
When you edit the properties of a Memory, you can adjust its Priority which determines the pecking order of who 'wins' when multiple controls are attempting to set an attribute. The highest priority is 1. The lowest is 10. The default priority when you record a Memory is 7.
Grand Master
Memory Master
Captured (Control Task)
So, if you record a level into a Memory and set its Priority to 1, when the Memory is active, the Grand Master cannot affect it. If a Memory is setting a light using Priority 3, you will not be able to control the light in the Control Task (i.e, you won't be able to capture it). If you match the priority, the last control affecting the attribute will win.
To change Playlists on a Playback press Select Playlist ... on the right of the toolbar. There you will be given the grid of all the Playlists in the show files. Touch one to select it. Once selected, you will see its name on the very left hand side of the toolbar. (In the case above, it’s “Orff Lightst”.) The small green arrow below the name indicates that it is a regular Playlist and you go from cue to cue by pressing the Go button or in this case with Timecode. If it were a chase, the Go icon would be replaced with the appropriate chase icon:
A green arrow next to the cue name indicates the next cue to be run.
You can double click on a cue to move the arrow. Times and other properties for the currently selected cue (the one outlined in red) will appear on the right side when you press EDIT . With the Right Playback, the positions are reversed.
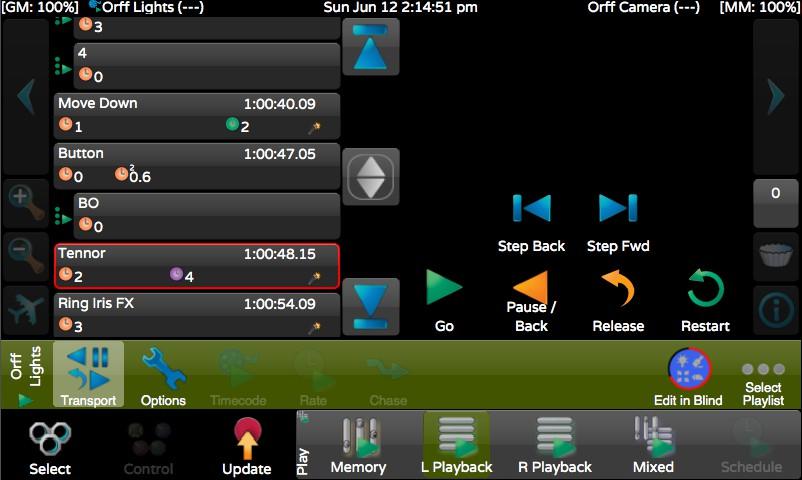
Once a Playlist is assigned to a Playback, further Playlists may be selected for that Playback without releasing the original Playlist, allowing more than two Playlists to be active at one time. To release a Playlist, press toolbar and hold Shift and Pause/Back above the appropriate Playback fader.
In PLAY | PLAYBACK | TRANSPORT there are several playback icons.

Acts identically to the Playback Go button.
Acts as a Back button, moving back to the previous cue in the list using a one second fade.
Only shown when cues are running in place of the Back button shown above.
Acts the same as the Shift button/Pause button combination, as described above, to release the current Playlist.
Cuts to the next or previous cue in the list using a one second fade, regardless of recorded times.
To scroll the playlist, use the up/down arrows . The double arrow jumps the list to the currently active cue. Press and hold Shift to change the up/down arrows to top/bottom icons . Touch the up/down icons or use any wheel to move to the top or bottom of the playlist.
One of the cue properties is to make the next cue Follow On from this one (either “Follow On In Time” or “Follow On After Fade”). If ‘Boy’ Follows On to ‘Girl’, you see ‘Girl’ indented with the Follow icon to its left. That indicates to you that stage management will call the ‘Boy’ cue, but you don’t press GO for the ‘Girl’ cue; it will happen on its own.
As the cue is running, a yellow bar shows its progress. Intensity, Color, Position and Shape timing is shown beside their appropriately colored clock icons. Amber, purple, green and pink bars show the relative placement of the cue timing.
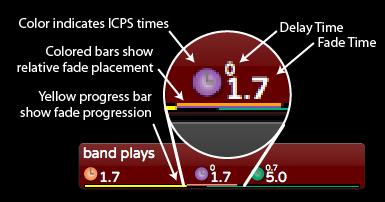
Both Playbacks may be used at the same time, operating different Playlists. Playlist assignment to either Playback may be changed at any time by selecting another Playlist from the Playlist toolbar by pressing Select Playlist...
The default tool for Playbacks is Transport.
While EDIT is not active, the Transport controls available to you are: Go - advances to the next cue in Cue time. In the following case, pressing Go would fade House to Half in 5 seconds
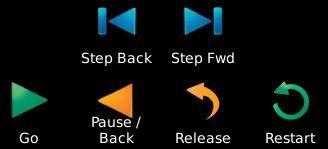
While a cue is fading, you will see . Pressing this will halt the fade. Press Go
to resume the fade. If a fade is paused or complete the icon will be which takes you to the previous cue in 1 second.
Turns off the Playlist using the time specified by Release Time in Options
. Lights will fade to whatever else had control of them last.
Goes to the first cue in the Playlist in its own cue time.
Goes to the next cue in 1 second.
Backs up a cue in 1 second. The console’s Go and Pause buttons are short cuts to Go and Pause. Shift Pause releases the Playback.
Press the Options tool to change general properties of the selected Playlist.
Touch the name bubble to change the name of your Playlist.
Use the Blue Wheel or touch to type in a new release time. Shift Wheel changes 10th of a second. This is the time the lights take to fade back to their other levels when you release the playlist.
Without Chases, if you wanted looping effects you would have to write a series of cues, then change the Follow Properties of each and manually link the last cue to the first. This would give you a Forward Chase. Is Chase acts as a toggle. When it’s down, all the Cue times and Time Code stamps are hidden in the cue bubbles because the timing is taken over by the Chase tool where you can change directions, speeds and crossfade properties.
When this toggle is active, you cannot edit the properties, delete or move cues Likewise you cannot change the other options on this screen. Note that you can change Chase and Rate properties because these are often altered when busking
a show. When a Playback is running a Playlist that is locked for editing, you will see the Lock icon in the status bar:
After opening night, use Edit Lock to prevent any accidental changes.
When this toggle is active, each time you release the Playlist, the cue pointer is set to the first cue. This is handy if you want chases to always begin at step one, but it may not be desirable when rehearsing a play and you’re in the middle of Act II and they call for a break.
When selected, this Playlist will Go when Cognito boots. If the Playlist is marked as a chase, the chase will start running, otherwise, the first cue (and any follow cues after that) will run. This is very handy in architectural situations where you way want to ensure that lights are always on in the space. You may also have Cue Actions associated with the first cue that set up other aspects of your show.
When you turn on MIDI Show Control, this Playlist will both listen to and send MSC from the back of the console. If you are sharing a MIDI Channel with other departments you may not want to flood them with MSC Go commands while you program your show. Likewise, if they’re testing things, turning off MSC prevents their GO commands from jumping you around your list inadvertently. This is handier than unplugging and re-plugging your cables. If you don’t use MIDI, leaving this option on does not hurt anything.
Cognito allows Playlists to run automatically, synchronized to one of three internal Timecode clocks. Cognito can also sync to an external source like a media player that outputs Midi Time Code (MTC).

Any Playlist can be synchronized to one of four clocks. Via the MIDI In port on the back of the desk you can set the Playlist to listen for External Midi Time Code or set the Playlist to use one of the three Internal clocks.
Shows you the current timecode for the selected source. Touch the control to manually set a specific time to start running when you press Start.
You can quickly zero any of the fields (HH, MM, SS or FF) by pressing the appropriate ABC or D button on the console.
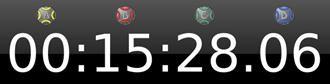
Press this toggle button if you want cues to grab the current time and stamp the cue when you press the Go button. Even after you’ve “Learned Timing” on your show, you can select individual cues, press EDIT and tweak their time, perhaps just by a frame or two, until you get the timing perfect. It’s a good idea to turn Learn TC off when you’re ready to run your show automatically from timecode.
Press this button to start the timecode running from the current time shown above. There is an Action that can do this function too so you can automate it with PLAY SCHEDULE or from another cue. This option is not shown when the Source is External.
Press this button to pause the selected internal timecode clock. Note, if other Playlists use this Internal Source, they too will be paused. There is an Action that can pause an internal clock so you can automate it with PLAY SCHEDULE or from another cue or memory button. This option is not shown when the Source is External.
Press this button to reset the selected internal timecode clock to the time
specified to the right (shown under ). You do not need to Pause a running clock to reset it. Note, if other Playlists use this Internal Source, they too will see the new time. There is an Action that can reset the clock to a specific time so you can automate it with PLAY SCHEDULE or from another cue. This option is not shown when the Source is External.
Learn
This button allows you to specify what time the clock resets to when you press the Reset button. This option is not shown when the Source is External. Note that the Timecode tool is disabled when IS CHASE is set in OPTIONS.
When a Playback is running a Playlist that is using Timecode, the status bar will indicate such by displaying the Timecode icon:

Rather than tying a series of cues together with follows and links, select
Options then press the IS CHASE property. When a Playlist is a chase all the Cue times are hidden (and ignored) because each cue becomes a step and steps advance in beat time measured in BPM. Also note in the Play toolbar (the green bar above the Select/Control/Record/Play Task Bar) that Timecode becomes inactive and the RATE and CHASE tools become active:
The left hand side of the Play toolbar showing the Playlist name will no longer have the Go icon but rather show what type of chase it is (Forward, Reverse, Bounce or Random. See Direction below).
As mentioned above, cue timing is irrelevant when a Playlist is a chase. Each cue is now a step in the chase and a beat clock will advance from one step to the next automatically without the need for setting the Follow properties in each cue.
Rate - The rate is measured in Beats Per Minute (BPM). So, if the chase is running at 60 BPM, each second will advance to a new step. Roll the blue D wheel to adjust the rate in real time or touch the control and type in a specific rate. Tap Sync - If you’re synchronizing to music and you can hear the beat, tap this button in time to adjust the rate. The rate will be updated after three taps and will show in the Rate bubble. Sometimes it’s useful to tap in time to the music for a bit, then watch the stage with your hand on the blue wheel and subtly adjust the time to get it just right. Multipliers - The bottom row of four buttons multiplies the Rate. This is useful when busking a show to give a different feel to an underlying look by doubling or halving the base time. When you touch these buttons, the Rate value shown does not change. Only one of these can be down at a time and to go back to the prescribed rate, press any active button to deactivate the multipliers.
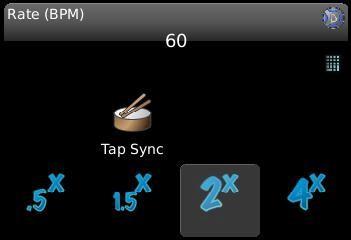
This screen can adjust (in real time) how the chase is played back and may be a good screen to stay on when busking a show. You can build the chase steps in any order but alter how they hit the stage using this screen.
Direction - The bottom four buttons change the direction of the chase, either Forward (top down), Reverse (bottom up), Bounce (down then up then down again) or Random. Only one of these options can be selected at any one time. Remember, there is no need to assign Links to any cues. The Direction will take care of figuring out which step comes next in the sequence.
Build/Solo - Chases run in either one of these modes. In regular Playlists, if you set the level of (say) Light #1 in Cue 1 and don’t do anything else when you record Cue 2, Light #1 will still be on. This “Build” (or “Tracking”) behaviour is how all Playlists work when not running as a chase. If you change to the “Solo” option, if an intensity is not explicitly recorded in a cue, the light will return to its default levels. (That may be 0% if nothing else is driving it.)
Crossfade Time - This value may be typed in or you can use the Blue wheel to adjust the value between 0% and 100%. If your beat time is 60 and Crossfade Time is 100%, each step will take one second to fade to its recorded values before directly moving to the next step. If you change the Crossfade Time to 0%, then each step will be on stage for one second before snapping to the next step in zero
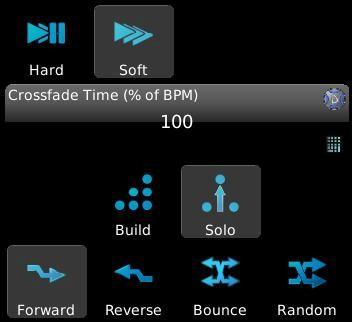
time. If you set the Crossfade Time to 50%, it will take 0.5s to fade from one step to the next, hold that level for 0.5s then move on to the next. Hard/Soft - These are shortcut keys to set Crossfade Time to 0% and 100% respectively.
Having the four directions, the crossfade options and the Build/Solo parameters really makes a single set of cues very versatile. Remember, as long as the Playlist is not Locked for Editing, you can press the EDIT (pencil) button and move the order of the cues to mix it up even more.
Single tap a cue to select it for editing. The cue will be highlighted in red.
Double tapping a cue selects the cue to run the next time the Go button is pressed.
Triple tapping a cue will immediately jump the Playlist to that cue and run it using a one second fade.
1. Single tap to Select the cue you want to change. Press and hold SHIFT to select a range of cues.
2. Press EDIT .
3. Use the arrows under the timing options to locate the option you wish to edit.
4. Use the associated wheels to make changes or press the control to enter a time. Press and hold SHIFT while rolling the wheel to adjust timings by 1/10th of a second.
5. Press EDIT to confirm the changes or RELEASE to discard them.
1. Press EDIT
2. Touch the cue’s ‘hamburger’ icon
3. Drag and drop the cue to its new location.
4. To copy a cue, press and hold SHIFT prior to dragging it to the new location.
5. Press EDIT to complete the operation.
1. Press EDIT .
2. Touch on the left of the cue label to choose it for deletion. It will rotate vertically and DEL button will appear.
3. Touch DEL to confirm you want the cue deleted or to remove the DEL button .
4. If multiple cues are chosen to be deleted, pressing any one of the DEL buttons will delete all cues marked .
5. Press EDIT to complete the operation.
To make changes to a Cue while another Cue is live on-stage:
1. Select the desired cue from the Playlist. It will be outlined in red.
2. Touch EDIT IN BLIND
3. The display will change to the SELECT task, with a blue background to indicate Blind mode. The clock on the status bar changes to ‘Blind’, followed by the label of the item being edited.
An icon with a pin in the upper right corner of each cell indicates the light’s live state.
4. Choose the lights you wish to adjust.
5. Use the normal CONTROL methods to adjust their attributes.
6. Once the changes are completed, press RECORD to accept the changes, or RELEASE to discard the changes to the cue and exit Blind.
In Mixed Playback mode, the current playback status is shown for Memories
and the left and right Playbacks. Touch or in the green Mixed Mode toolbar to change the Memory Page or Playlists shown.
By touching and dragging you can drag-and-drop (move) Memories within the Memory page or as a new cue in a Playlist. You may also move cues between Playlists or to a Memory page as a new Memory.
Press and hold Shift to copy versus moving the items.
EDIT is not available in Mixed mode.
Allows astronomical or clock based triggering of Action which can in turn run cues, play memories or automate other functions of Cognito. Two components make up event scheduling: the timing of the event, and the actions.
2. Touch the “New Event” icon
3. A New Event cell will appear on the left side of the display. Touch the new event to highlight it in red.
4. Press Edit to define or delete the event.
5. The options on the right side of the display will become active.
6. Touch the keyboard to name the event.
7. Set the other properties as described below.
2. Touch it to select one or more events for deletion. It will rotate vertically and button will appear.
3. Touch to confirm the deletion of all marked events or to remove the DEL button unmarking the event for deletion.
You may also set the TYPE from 'At Time' or 'At Sunrise' etc. to 'None'. That way the event will just be skipped until you set the Type again and you don't need to setup the actions again.
Event is disabled. Change Event Type to 'None' if you think you'll use the event in the future and want to keep it in your show file.
Set a specific start time of day for the associated action.
The associated action will begin at local sunrise, as determined by the astronomical clock setting under System Preferences.
The associated action will begin at local sunset, as determined by the astronomical clock setting under System Preferences.
The associated action will begin prior to local sunrise as determined by the offset time.
The associated action will begin after local sunrise as determined by the offset time.
The associated action will begin prior to local sunset as determined by the offset time.
The associated action will begin after local sunset as determined by the offset time.
You will either see a Time or an Offset based on the Type of event described above.
Sets the time used by “At Time” to trigger the associated event. Use the red wheel to set the time by adjusting by minutes. Shift + the red wheel
will change the time in seconds. Touch the keypad to set open a window to edit in hours, minutes and seconds plus AM and PM.
Defines the time before or after sunrise or sunset (above) when the associated action will be triggered. These astronomical events will rely on your time zone and global position as set up in SETUP | SYSTEM.
Touch the keypad icon to select which days of the week the associated action will be triggered.
See Actions for what you can trigger.
Fader-based consoles, intended for dimmer control, often used the concept of preset control, particularly when the fades were operated manually. A look, or cue, would be active on the first bank of faders, while the next cue was set up on the second bank of faders. When the cue was called, the X/Y (or sometimes the A/B) crossfaders would be moved so the look stored in second fader bank would become active onstage, allowing a new cue to be set up on the first fader bank.
When in the PLAY task , Cognito can emulate this behavior using the PIN
button. When in SELECT the sliders will control their associated lights, allowing the operator to quickly set a look onstage. Once the look is set, press the Pin button to hold the lights (i.e. pin the look to the stage). The light's attributes may be adjusted using the CONTROL task or the sliders may be used to adjust the lights' levels in anticipation of the next cue. When the cue is called, press the Pin button again for a crossfade to the new look. Once the fade is complete, Pin the stage again and set up another look.
Press and hold SHIFT and touch to adjust the crossfade time between looks.
More than twenty lights (or Memories) may be accessed and controlled by using the arrow icons to reach other fader banks. See PLAY | MEMORIES Changing Memory Pages and Banking Within a Page.
For the Pin function to crossfade the intensities of the lights while in SELECT, “Sliders Always Run Memories” must be set to ‘no’, under SETUP | System
Preferences | General. In this case, the Pin backlight color in SELECT will be red as it will capture intensities. If “Sliders Always Run Memories” is set to ‘yes’, then the Pin function will crossfade between recorded Memories in SELECT as well as PLAY. The Pin backlight color will be blue in all tasks as it will always adjust recorded Memories. The crossfade time set for Pin will override any fade times included in the Memories.
There are two Shift buttons on Cognito at the lower left and lower right. The Shift buttons may be used to select, or deselect, ranges of lights on the touch screen. Touch the first light required. Press and hold the Shift button, then touch the last light of the range desired.
The Shift buttons provide additional functions when used with other buttons on the console. Press and hold the Shift button (either one) then press the second button or icon from the list below, to access the desired action or function.
PIN Allows adjustment of Pin crossfade time.
Go Asserts cue on one second fade time.
Closes the Hints overlay (not the hyperlinked help manual).
In PLAY, updates current Cue or Memory (instead of recording to next available location).
Bump Momentary Forces the button action to latch ON (toggle).
Bump Toggle Forces the button action to bump ON (momentary).
Forces up an active radio button (clears radio group).
In SELECT, changes Arrow icons to Par Can icon. Par Can icon moves the selection indicator to the next higher or lower light.
Playlist Up & Down In PLAY, jumps the screen to the top or bottom of the Playlist
Memory Drag In PLAY, after pressing when you drag a Memory with SHIFT, it copies the Memory vs. moving it.
In PLAY, after pressing when you drag a Cue with SHIFT, it copies the Cue vs. moving it. Don't forget to rename the new Cue.
In CONTROL, when any of the A, B, C or D buttons are pressed with Shift down it sets the associated attribute to the default value. If applicable, when pressed a second time, attribute is set to its low limit; when pressed a third time, attribute is set to its high limit.
Wheel
In CONTROL | WHEELS allows fine control of current associated attribute, such as pan or tilt, or splitting of color/gobo slots.
Wheel In RECORD or PLAY | EDIT, allows 0.1s timing changes when editing fade times.
Wheel
Shortcut buttons
Shift
In PLAY | PLAYBACK, jumps to top or bottom of current Playlist.
In CONTROL | WHEELS, move backwards through available Wheel Bank tasks.
Pushing both Shift buttons returns to the previous screen.
If no lights are selected in the Fixture Grid, touching the information icon changes the light’s percentage intensity (normally shown in the lower left hand corner of each cell) to the light’s DMX start address. If the light is unpatched, the cell will gray out, and an exclamation point is shown instead of a start address.
If one or more lights are selected, touching the information icon will bring up the screen below, with comprehensive information on each light selected, as well as more global information on shows and tech or desk-locked lights.
The tabs on the left include Selected Lights (shown above), Show (number of recorded Playlists, Cues, Memory Pages and Memories), Locks (number of Tech and Desk Locked lights) and Media (internally saved shows and backups).
shows how many lights have been selected. If more than one light is selected, the +/- icons move between the individual lights. The left/right arrows (above ) page through a light’s attributes.
In the Selected Lights screen, the light is identified across the top line, starting with the light’s number, followed by any user-set label, its manufacturer, model number and DMX start address.
Shows the attributes supported by the light, in the order of how they are patched within the light’s DMX footprint.
Shows the name of the specific Playlist or Memory source of the existing attribute level.
Shows the Cue or Memory number or other source of the current attribute level. If the light’s attribute is captured, the source is CONTROL. If the value has tracked from a previous cue, the name of that cue is shown.
Shows the name of the Library used to set the attribute level. If a color is from a swatch book, the swatch name and source are shown.
Shows the current value of the attribute. The value in parentheses shows the recorded level along side the output level.
Shows the name of any current effect controlling the light
Shows the number of cues the light is used in. Can be used to identify unused lights.
Shows the number of memories the light is used in. Can be used to identify unused lights.
Shows how many libraries have been recorded with this attribute.
Shows how many groups include this light.
Shows if the light is affected by a Desk Lock or Tech Lock.
The color used to display an attribute’s value also provides information about changes made to that attribute. The colors related to Intensity changes are also shown on each light’s Intensity Indicator ring in SELECT grid.
■ Gray Default value or level
■ Yellow Level or value controlled by a Memory
■ Red Captured in SELECT
■ Magenta Value or level unchanged in last Cue All attributes
■ Cyan Level increased in last Cue Intensity only
■ Green Level decreased in last Cue Intensity only
■ Dark Blue Value or level changed in last Cue Non-Intensity attributes only
To see what’s on the internal memory, select a Light (any light) and press then select Media from the left hand side.
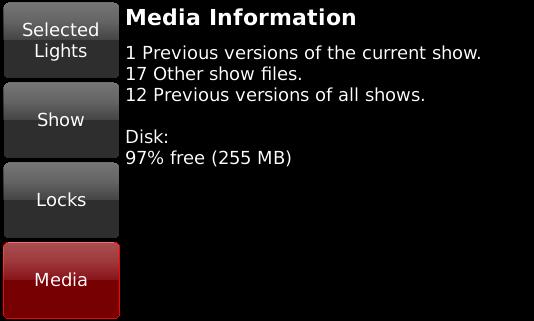
Moving head lights can reach any point on stage with two (and sometimes more) combinations of Pan and Tilt. If your lights don’t move while they’re one, the automatic Move In Black feature of Cognito will set up your lights for you and you many never find the need for this new feature. But, sometimes when you write cues and the lights do move from Point A to Point B, again, there will be two ways of getting there. In almost all cases, there is a right way and a wrong way (a shorter way and a “Why did you go across the wall?” way). When that happens, be in the second cue, select the offending Light, go to CONTROL | POSITION | WHEELS and press FLIP, then press SHIFT and then RECORD (or
SHIFT and Update which will be in the Record position of the taskbar) to update the cue.
The FLIP tool will only show when you have a moving head light selected.
There are artistic reasons for using flip too. Say you selected a range of Lights and focused them to cover the back wall of the stage and you start the color wheels rolling. They will all roll from (say) left to right. If you select the first half of the lights and FLIP them, the color roll will sweep to the insides. This looks much cooler.
When in CONTROL | WHEELS, you will see Highlight and Lowlight icons next to the light mimic.
The Highlight tool is often used in conjunction with NEXT and PREV to identify lights when a full look is on the stage already. When you turn on Highlight, regardless of the lights current intensity, it will be temporarily brought to full, it's color will be forced to white and if there are any gobos or shutters in the light, they will be opened. If you are positioning the light, you can still use the Position tools to get it in the right place, then either NEXT to the next light or turn off Highlight by touching it again. All color and shape attributes will be released to their current cue state as will the light's intensity.
The Lowlight tool is used mostly when trying to finely adjust the position of a light and you're already sitting in a cue. When you touch Lowlight, any nonselected light that is in the cue will have its intensity temporarily taken to 20% and the selected light will go to full. All color and shape attributes are not affected. It should then be easy to see the light you're working with and adjust its position.
Then either NEXT to other lights or turn off Lowlight by touching it again.
When you have a large rig of lights you often want to see them work with each other to create large, bold looks. Selecting lights individually and setting attributes manually, one by one, can be a tedious task. This tool in CONTROL WHEELS, makes setting attributes en masse a breeze.
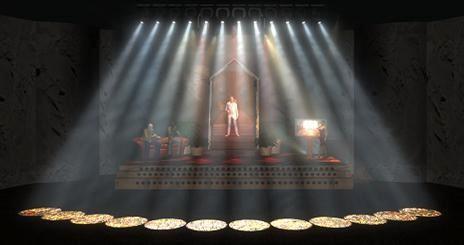
This picture shows what would happen if you selected FAN CENTER and rolled the PAN attribute. The four Fan buttons are radio buttons, i.e., only one or none can be down at any one time. Once you press one, the next time you use a Wheel, the attribute values will not be shown in their regular units, but rather a % is shown. You can roll the wheel left or right for negative or positive fanning (fan in or fan out).


If you hold down the SHIFT button when rolling the wheel, you will change the “X” or number of times the fan is repeated. By default, the entire selection set if fanned from one end to the other. If you SHIFT ROLL the wheel to 2X, you will get two fans, one from one end to the middle of the selection and a second fan from the middle to the end of the selection.
Remember that your selection order is maintained during fanning. Selecting Lights 1 through 10 is very different than selecting 1,10,2,9,3,8,4,7,5,6. Changing up the selection order can vastly increase your productivity and creativity with the same set of lights. (As an aside, the selection order is also maintained when you record Groups. You can have two groups that select the first 10 lights that produce vastly different results when fanning or applying effects.)
Any attribute can be fanned. Try “Fan Ends” with the Iris parameter to go from small to large to small across a set of lights. Or “Fan Right” for the Gobo Rotation Speed to go from Fast to Slow.
Actions may be added to Cues, Memories, or Scheduled Events. Action are grouped by type including Playlist, Memory, Cognito, and Timecode:
None: Event triggering is disabled. Default.
Playlist: Triggers cue playback action, according to these further choices.
Goto: Begins as a playlist at a specific cue, using the following: Playlist: Selects a playlist, by name.
Cue: Selects a starting cue, by name.
Pause: Pauses the selected Playlist.
Go: Starts the selected Playlist from the current cue.
Release All: Releases all active Playlists and cues.
Release: Releases, or stops playback, of the selected Playlist.
Bump Down: Activates a memory, according to the following:
Memory Page: Selects a memory page, by name.
Memory: Selects a specific Memory, by name.
Bump Up: Deactivates a memory, according to the following: Memory Page: Selects a memory page, by name.
Memory: Selects a specific Memory, by name.
Cognito: Triggers a console-level event, according to the following:
Power Off: Turns off the console
Outputs: Enables or disables DMX and eDMX output
Send MIDI: Sends a MIDI string to the MIDI OUT port
MIDI Data: Touch the keypad to enter the required MIDI string neato Lockout: Enables/disables wireless device control.
Release Locks: Releases any active Desk or Tech Locks of lights.
Release Lights: Releases any currently selected lights.
Memory Blackout: Blacks out all intensity channels currently controlled by a Memory.
DBO: Blacks out all intensity channels, excluding any Desk-locked intensities.
Stop All Effects: Terminates all effects currently running.
Timecode: Used to control the Internal Timecode clocks.
Reset Timecode: Uses the Playlist's reset time as specified by Pause Timecode: Stops an Internal Timecode clock. Start Timecode: Starts an Internal Timecode clock. Clock: Specified Internal 1, 2 or 3 for the three commands above.
Pro Cognito system can receive MTC from an external source like a Media Player and synchronize cues to trigger at specific times. See Cognito Data Connections for port locations.
From PLAY | PLAYBACK | TIMECODE, use the Blue Wheel to select External.
NOTE: The Timecode icon will be disabled if your Playlist has Is Chase turned on in Options.
Once your external media sends timecode to Cognito, follow the instructions in Playback with Timecode in the Play Task section.
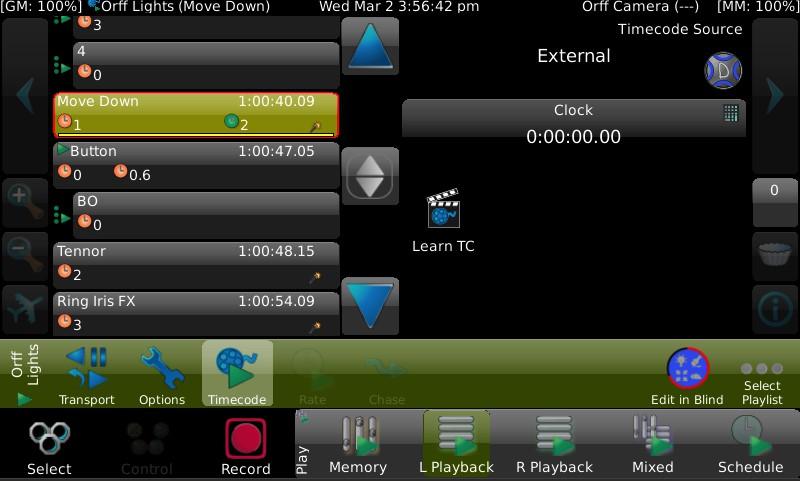
The following functionality is only available for the Pro models.
Cognito can receive and act upon standard MIDI Show Control (MSC) strings sent by show control devices, including sound consoles. Cognito can also send MIDI strings whenever a Cue, Memory or Scheduled Event is activated. To send or receive MSC, make sure you turn on Allow MSC in PLAY | PLAYBACK | OPTIONS.
MIDI communications use the MIDI standard 5-pin DIN connector. See the Rear Panel connections in Hardware Overview.
See Also: Midi Timecode
Midi Show Control (MSC) uses the following format:
All numbers are octet, hexadecimal values, sometimes denoted by the “H” symbol.
F0 7F: indicates start of System Exclusive (sysex) real-time command
Device_ID: specified which connected device should execute the command. Cognito uses 01 as its Device_ID 02: indicates ‘sentence’ is MIDI Show Control (MSC) command
Command Format: typically 01 (for “Lighting – General”)
Command: specifies the action to be taken – see below for supported commands
Data: specifies, if desired, the Cue Number to be used by the command and, optionally, the Playlist containing the Cue. Data string cannot exceed 24 bytes in length. See below for examples.
F7: indicates end of MSC ‘sentence’. Required.
Commands are stated by octet, hexadecimal numbers and may be followed by a data string with specific Cue Number and Playlist information. If no Playlist is specified, Cognito uses the first Playlist. If no Cue Number is specified, the next cue in numeric sequence or the current cue (depending on the command) will be used. Data format is described below.
01 Cue Number <optional> 00 <delimiter> Playlist <optional>
Starts the transition or fade to a cue. Equivalent to pressing the GO button. Transition time is determined by the fade time recorded in the cue.
If a Cue Number is specified in the data string, that cue will be triggered. If no Cue Number is specified, the next cue in numerical sequence will be triggered. Transitions "run" until complete. To define or override the transition time, use the TIMED_GO command instead (see below).
Note: GO Cue 0 (zero) is equivalent to Release Playlist.
02 Cue Number <optional> 00 <delimiter> Playlist <optional>
Halts all currently running transitions in the current Playlist. Equivalent to pressing the PAUSE button. A cue number may be specified, in which case only the specified cue will be halted.
03 Cue Number <optional> 00 <delimiter> Playlist <optional>
Causes any transitions halted due to a STOP command to continue running. Equivalent to pressing the GO button after pressing PAUSE. A cue number may be specified, in which case only the specified cue will be resumed.
04 hr mn sc fr ff Cue Number <optional> 00 <delimiter> Playlist <optional>
Starts a timed transition or fade to a cue using a transition time sent in the data string. The use of this command is not recommended, as all cues in Cognito have fade times.
Transition time stated using Standard Time Specification in “hr mn sc fr ff” format (hour minute second frame fractional frame). Translating time, frames and fractional frame counts to the Standard Time Specification is beyond the scope of this document.
If a Cue Number is specified in the data, that cue is triggered. If no Cue Number is specified, the next cue in numerical sequence is triggered. Transitions "run" until complete.
Is equivalent to releasing all Playlists. No data string should be sent with a reset command.
Cue numbers and Playlist numbers are stated using the hexadecimal equivalents (30H through 39H) of the ASCII values for numbers 0-9 (zero through nine).
MSC allows the use of point cues, using the hexadecimal value (2EH) for the ASCII decimal point character used to mark subsections. However, Cognito does not use point cues, regardless of how the cue is labelled. Cue numbers are always whole number (indexed from 1 at the top of the Playlist).
Selection of a specific Playlist is optional. A Cue Number must be used when a Playlist is specified. Cognito uses a 'best-match' method to determine the Playlist name based on the label. For example, a Playlist named "01-Main" would be referenced by MSC as Playlist 1 or 31H.
The hex code “00” is used to delimit between Cue Numbers and Playlist Numbers, and is only required if a Playlist is specified.
<On Device 1, GO next Cue in current Playlist> F0 F7 01 02 01 01 F7
F0 7F
(SysEx header)
01 (Cognito device ID)
02 MSC
01 (Lighting command)
<On Device 1, GO Cue 45 in Playlist 12> F0 7F 01 02 01 01 34 35 00 31 32 F7
F0 7F (SysEx header)
01 (Cognito device ID)
02 MSC
01 (Lighting command)
GO (no data)
End
<On Device 1, STOP current cue> F0 7F 01 02 01 02 F7
F0 7F 01 02 01 01
34 35 00 31 32
Playlist
You can control many of the features of Cognito from external devices like show controllers or PCs. The connection may be either through Telnet (Ethernet) or Serial RS232 but each use the same syntax and commands. When you establish a connection, you can type "help" and the following list of commands will be echoed to your terminal for convenience:
noecho
noprompt
API.AttributeFade(fixture[,attribute_name],value [,time])
API.AttributeFadeCapture(fixture[,attribute_name],value [,time])
API.Bump('page_name' | page_index , memory_number, is_down )
API.ButtonPress('page','name' or order)
API.MemoryFade('page',memorynumber,value[,seconds])
API.MemoryFadeRate('page',memorynumber,value[,seconds full scale])
API.MemoryFadeStop('page',memorynumber)
API.MemoryGetValue('page',memorynumber)
API.MidiNoteOff(channel_1_to_16,key_1_to_128[,velocity_0_to 127])
API.MidiNoteOn(channel_1_to_16,key_1_to_128[,velocity_0_to1 27])
API.MidiWrite(midi_byte[,midi_byte ...])
API.OutputsEnable( true | false)
API.PlayListAssert('playlist')
API.PlayListGotoAndExecuteFollows('playlist', cue)
API.PlayListGotoAndHalt('playlist', cue)
string' or binary_byte or table [,...])
API.SetLevel('fixture_string', 'level_string' [,fade_time_seconds])
API.SystemRestart([<maintain state>true|false])
API.SystemShutdown()
API.WriteLogMessage('message', 'category', severity_1_to_10)
All commands, including item names in the command string, are case sensitive. A carriage return <CR> must be sent to execute the command.
Execute cue 4, on ‘Playlist 1’, using any programmed fade, wait, and follow times.
API.PlayListGotoAndExecuteFollows('Playlist 1', 4) <CR>
Release ‘Playlist 1’.
API.PlayListRelease('Playlist 1’) <CR>
In addition to the above command set, Cognito supports much more advanced scripting using its built-in Lua interpreter. For more information on the Lua programming language, see www.lua.org.
The following functionality is only available for the Pro models.
Select functions of Cognito may be triggered remotely using an RS232 serial connection, using the command set detailed below. Here is the pinout for serial communications.
The other pins are not used. If controlling Cognito from a computer via RS232, a null modem serial cable is needed, with Pins 2 and 3 reversed at one end.
Connection speed and attributes are: 9600 baud, no parity, 8-Bit, 1 stop bit, no flow control (9600, N, 8, 1)
All commands, including item names in the command string, are case sensitive. A carriage return <CR> must be sent to execute the command. When you establish a connection, you can type "help" and the full list of commands in the API will be echoed to your terminal for convenience.
The following functionality is only available for the Pro models.
Select functions of Cognito can be triggered remotely using Telnet over an Ethernet connection, using the command set detailed below. The computer and Cognito must have an IP address on the same subnet. If an Ethernet switch with a DHCP server is used to connect the PC and Cognito, ensure the Cognito is configured under the Setup | Network to use Automatic. Otherwise, a static IP and subnet scheme is recommended.
Open a Telnet connection from the computer to the Cognito's IP address on port 11123. For example, if Cognito's IP address is 192.168.1.116, the following would be sent from the computer’s command window:
telnet 192.168.1.116 11123
The use of a Telnet program with scripting capabilities is strongly recommended. All commands, including item names included in the command string, are case sensitive. A carriage return <CR> must be sent to execute the command.
See The API - Application Program Interface for a list of commands or type help at the API> prompt once connected.
Externally wired contact closures can trigger Memories which in turn can trigger up to 16 Actions. You assign a contact closure to a specific recorded Memory in
SETUP | INPUTS/OUTPUTS. Using the arrow page to Contact Input 1, 2 or 3.
See Cognito Data Connections for details on how to wire the contacts.
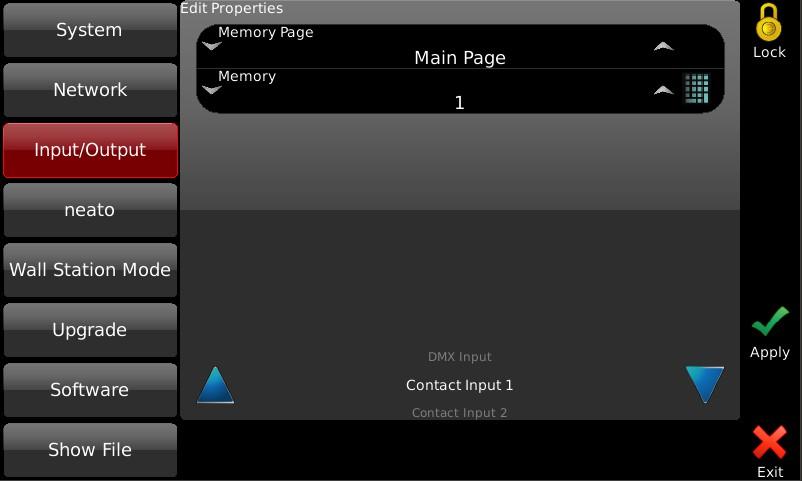
The DMX input port can receive DMX512 levels from another controller and use that information to trigger Memories. You can select which Memory Page the DMX triggers and the starting Memory number. Slot #1 from the DMX will control the first memory and subsequent memories will be controlled by the following DMX slots.
When DMX In is mapped to a Memory page and DMX is present at the In port, you cannot control the Memories manually. The DMX will always "win" and change whatever level you set on the sliders.
You need to specify what Memories you'd like to control and how.
1. From the Input/Output screen in Setup, arrow down to "DMX Input"
2. Use the Yellow Wheel to set the Input Protocol. Select DMX if you're using the 5-Pin DMX IN connector on the rear of the console.
3. Use the Green Wheel to select the Memory Page.
4. Use the Blue Wheel to select the first Memory (Memory Offset) in the selected Memory Page you want to control with the first slot of DMX.
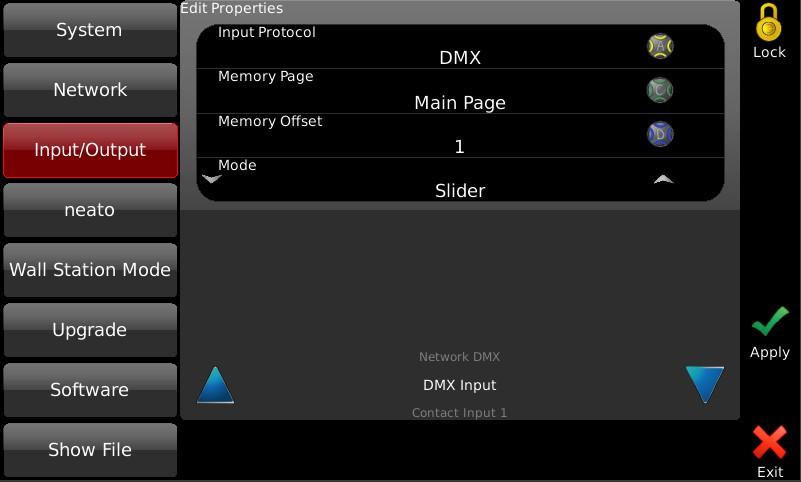
Slider control will map the incoming DMX value to the level of the Memory
Button mode will hold the button down for any non-zero DMX level. It's best to keep the Memory Bump Mode "Momentary" when using this mode.
You can also receive eDMX from controllers using the Pathport Protocol, sACN E1.31 or Art-Net by changing the Input Protocol from DMX. In that case you must choose a Universe number as well from the edit box which will appear when the Input Protocol is not DMX.
This essay explains the core technology used in Cognito's internal 'fade engine' that makes DMX512 and runs the lights and the end devices at the bits and bytes level. Reading this and understanding Natural Language Control is not necessary to operate the console, but it will give you an appreciation of how lighting control has advanced over the years. Using today's advanced lighting systems has never been easier because of Natural Language Control. Much of this document was originally published in 2005 by Horizon Control in a white paper called The Abstract Control Model. Horizon was purchased by Acuity Brands Lighting in 2011 and the entire team joined Pathway Connectivity when it too was acquired by Acuity.
Communication and the expression of ideas is central to the art of lighting. Creating great lighting is a team effort lead by the designer. The language a designer uses to communicate with the team, and specifically the console programmer, is crucial to the process of creating the art. The programmer, in turn, must then train the console in order to orchestrate the lights to ultimately relay the intent of the designer to the audience. There is ample opportunity in this process for misinterpretations to muddy the waters of communication. More recently, and at a furious pace, LEDs and multiple attribute "intelligent" lights have entered the mainstream market and the multitude of options they provide has complicated this process amplifying the opportunity for 'miscue' of intent. The simple act of positioning a fader somewhere on a 0 to 10 scale will no longer suffice.
Not surprisingly, there has been an increasing necessity to simplify the process of lighting control. Unlike the hard and fast rules that have existed for decades, a uniform language for designers and programmers to use when describing light behaviors has been non-existent. Moreover, the method used by the console to communicate to lights has never been standardized. The pioneering manufacturers of automated lighting equipment each implemented different philosophies of control. Historically it has been a challenge for some controllers to turn such lights on, get them in a color and make them move about. In all respects, these consoles were merely outputting numbers, sometimes masqueraded by words to get the job done. But now that intelligent lighting is no longer in its infancy a control system that meets the needs of 21 st-century lighting
fixtures is a welcome addition to the designers' arsenal. Cognito embraces that challenge and makes programming today's complex lighting systems simple again.
Let's go back to the advent of computer-controlled lighting to examine the issues that plagued communication in the theatre. Before computers entered the theatre, the most popular dimmer controllers were known as piano-boards. These large devices had individual handles for each dimmer and designers would ask operators to move a handle to a position to set the light level. These 'move' instructions were written down as cues and with each one executed in succession you had a show. The advantage of this system (which was only realized fully after the obsolescence of piano-boards) was that each move could be controlled at different rates and multiple moves could be executed simultaneously by different operators.
Computer control first appeared on Broadway in 1975 when Tharon Musser used the Electronics Diversified LS-8 console on A Chorus Line. This new technology allowed for unprecedented repeatability and a huge number of cues executed in record time. As processing power was very limited, decisions had to be made on how to execute these fades. The technology and code development tools of the day dictated that each channel would be recorded in each cue. This greatly simplified the process of playing back a show, or more specifically, jumping from scene to scene during rehearsals. Remember, in the old days of piano-boards, getting to any place at random in the show almost always meant starting from the beginning and executing each cue to ensure accuracy. LS-8 and others could do this with ease. Kliegl quickly followed with the Performance and Strand with Multi-Q and Broadway converted to computer control seemingly overnight. Designers were excited by the apparent new flexibility that these computers offered.
These early computer control systems did not emulate piano-boards, but rather manual preset boards. What designers eventually figured out, given a bit of experience on these consoles, was that they could not achieve the complex cue timing that two or three piano-board operators did in the past. As these preset consoles recorded every channel in every cue, they only moved from state to state. This resulted in robotic or non-organic fades. It was only when Strand introduced the Light Palette that the technological problem that plagued these early consoles was finally addressed on a computer (in North America at least).
People everywhere (and since) have praised Light Palette for marrying designers' desires and computer control by using a common language. Almost every
controller that has been accepted on Broadway since has used core concepts introduced by Light Palette. With the advent of intelligent lighting, so many more parameters have entered the equation that the language conventions which have evolved are discordant and technologically inadequate. The language must be overhauled. Conventional lighting control just worked in 2-spaces; Intensity and Time. That is not so with moving light control. There are many, many more parameters. Moving light control and solid state lighting have suffered from the lack of a common language for designers and programmers and manufacturers to use. In its infancy, intelligent lighting control stumbled along just managing to keep up with an evolving technology and never experienced the sort of watershed event that occurred in the industry with the introduction of Light Palette. The problem was compounded by that fact that industry leaders were extremely protective of their intellectual property. There was no sharing of control protocols between lights and controllers. Each manufacturer vigorously protected the methods they used to control their fixtures and automated systems were solesource. Only recently has the industry evolved to the point where it has accepted that inter-operability is a good thing and there is broad support for ANSI standards such as DMX512 and the inter-operability it enables.
The earliest forms of computer control, though digital at their core, output an analog signal, typically between 0 and 10 volts. Many architectural luminaires are still controlled this way. The control signal set the lights' output from zero to full intensity. Inside the controller, these numbers were generally stored using 8-bit words, giving 256 steps of resolution. With the advent of moving light systems, the resolution was doubled to 16-bit, providing 65536 steps of resolution. Computers then calculated fades that produced a one-to-one relationship between the 65,000 steps directly to motors that moved the light from, say, panstop to pan-stop. This concept persisted for years and, given a specific controller tied to a specific lighting system, pre-programmed shows were reproduced faithfully night after night.
The downfall of this method of control is that these numbers ([0-10], [0-255] or [0-65535]) mean very little in the real world. They are actually only significant when used with very specific equipment. When applied to other equipment, these numbers mean very little at all, and in fact are often meaningless.
Natural Language Control's objective is to provide an intuitive programming experience and a versatile control system that when played back can actually provide the operator information about the system it is controlling.
Natural Language Control does this by porting the control to an 'abstract' layer. This has a number of benefits:
1. The 'handles' you use to control LEDs and moving lights are more inline with what you would do to manipulate conventional lighting.
2. The numbers and 'words' you use to build cues will actually mean something. You will have an idea of what you can do with the lights and what is on stage by reading the display.
3. If you have mixed equipment, the methodology you use to communicate is consistent regardless of the protocols defined by the equipment manufacturers. The attribute controls are laid out the same for every and any light.
4. Building a set of looks with one group of lights in your rig can be copied to another groups, regardless of what type of lights they are.
5. The cues you have in your show file can be played back with any equipment allowing you to swap out gear at the last minute if need be.
One of the key things in Point #2 above that bears repeating is that Natural Language Control uses numbers and 'words' to control lighting. One might claim that has been done for years with the use of 'named' palettes. For example, moving lights desks can use labeled position palettes to build cues and the cue displays these 'words' to make it easier to read. Don't lose sight of the fact that palettes, like "Down Stage Center", are just placeholders for a combination of values between 0 and 65535. The words themselves do not mean anything to the desk. They are just displayed on the screen for convenience. In contrast, with Natural Language Control, the words do mean very specific things within the cue structure. Some of the words used include:
3200 Kelvin
15 degrees of pan
rotate counter clockwise at 6 RPM
strobe at 9 hertz
reset the fixture's driver
During regular operation, these 'words' need to be converted into 'values' that DMX512 lighting fixtures can use. The trick with Natural Language Control is that this conversion is done each and every time a light is selected, a Memory is
recalled or GO is pressed to start a cue (and not before). That means that the protocol, the mode, the model or the manufacturer of the lighting fixture can be changed at any time. Moreover, each and every light, regardless of who makes it, appears similar to the user, giving a more consistent experience when programming the console.
Apart from the benefits described above, this method of controlling lights is not restricted to traditional linear channels mapped to attributes on the light. A few examples below will demonstrate the intuitive nature of describing lights' attributes as opposed to traditional convoluted methods that sometimes group completely unrelated behaviors on the same control channel.
The Home position for pan and tilt on most DMX lights is 50:50 (or 32767:32767). This positions the light such that you will have maximum movement in each direction before encountering a pan-stop or tilt-stop. For a light that has a total pan range of 360 degrees, with the control channel set to half, you are sitting at 180 degrees. Taking the control channel to full will move the light 180 off axis towards a stop. So, to summarize, a value of 50% means "go to Home", and a value of 100% means "go to the pan-stop 180 degrees from Home". Figuring out that 90 degrees is half way in between those two values is easy. That would be 75%. And a 45 degree pan from Home is, again, half way between those two values or about 63%. Now it begins to get a little too complex for the programmer to calculate quickly.
To add to the complication, imagine you have another light in the rig that has a total pan range of 540 degrees.
Now the numbers you just figured out for the first light mean nothing to this one. Worse yet, if you grab them both and pan them in tandem, you would get completely differing results:
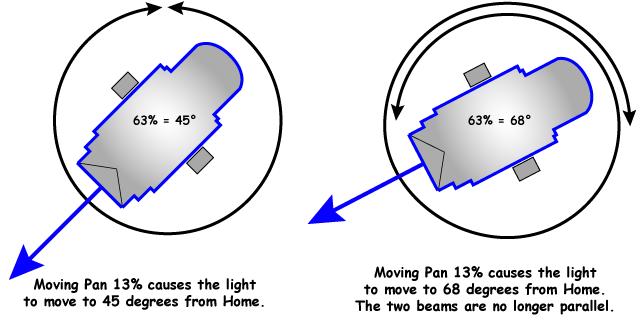
The angles of pan are completely different. The beams of light are not even close to parallel. You can see how this can be very frustrating if you have a mixed rig. With Natural Language Control, the Pan attribute is represented in real-world
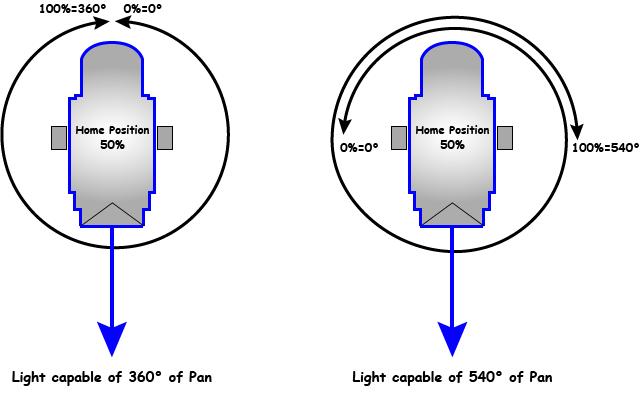
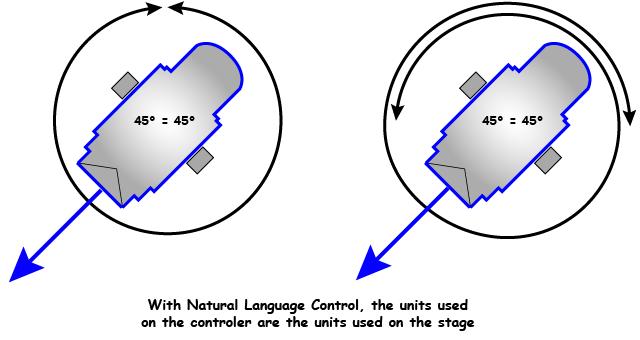
units of degrees. Therefore, when you talk to the light, you tell it to pan so many degrees:
Forty-five degrees is forty-five degrees. This makes controlling a rig that is made up of different types of lights easy to communicate with and easy to understand.
Since Natural Language Control doesn't figure out DMX values until the very last second, it can also alter the way in which the conversion is done at run-time, producing new and exciting methods of transition during the fade from cue to cue. Various attributes, such as position and color lend themselves very nicely to working in different ways. Color Space is described in detail below, but let's examine how we can move from one place to another on stage given two stored end places.
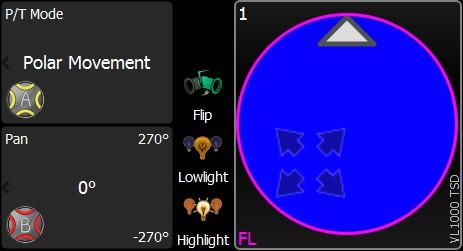
Moving lights achieve movement by physically moving the source with two motors housed within a yoke. This Pan/Tilt relationship equates to a polar coordinate system using azimuth and elevation. When you pan more than you tilt the light will move in an arc:
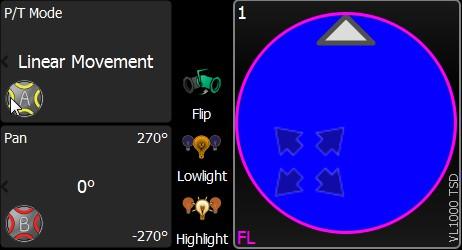
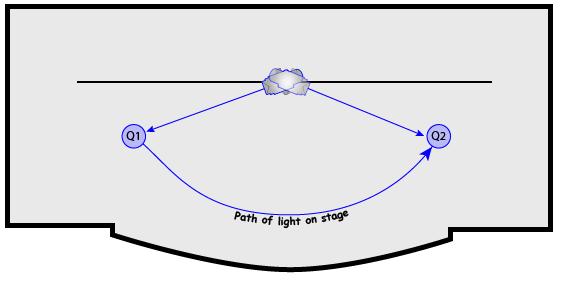
We have become used to this characteristic movement of intelligent lights. Very good moving lights that move extremely smoothly are sometimes described as moving in an organic manner or looking like they are operated by a follow-spot operator. People are quick to forgive the fact that they are always moving in this arc pattern. Natural Language Control gives you the option of how the light will move. It doesn't have to move in an arc. When a follow-spot operator moves a light from point A to point B, the light normally travels in a straight line.
Cognito has a Positon attribute called P/T Mode that alters the way fades are calculated when you advance from one position to another. If you record a memory or a cue using specific Pan and Tilt values and specify the P/T Mode to be Linear Movement, the end points of the move do not change, but the intermediate steps of Pan and Tilt needed to get from the first position to the second position do change. It becomes a transition that forces the Pan/Tilt mechanism to travel the beam of light in a straight line:
Programming lights using real-world values allows you to swap one fixture for another and get predictable results. Far more useful is the fact that the same values are used to control different types of lights in a similar fashion. Looking at the zoom attribute demonstrates this again.
It is quite common to have two or more different types of lights in today's lighting rigs. Matching beam sizes is a process of grabbing one type of light, setting its zoom, then selecting the other and tweaking it to match. You cannot grab both and crank the wheel and hope to get matching results. Natural Language Control eliminates this unnecessary practice.
Here are two lights; one that has a zoom range of 19° to 70°, the other from 10° to 50°. Cue 1 calls for the lights to use a zoom of 20 degrees:
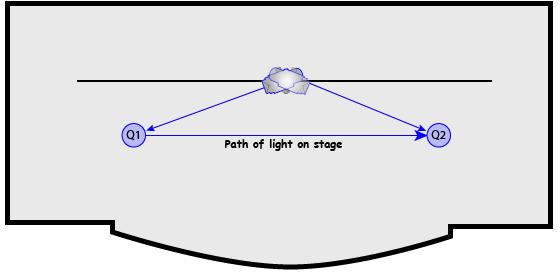
All you have to do is turn them on and Cognito defaults them to the same value of 20°; they're already the same size! Your rig looks consistent and symmetrical with no undesirable surprises and no need for manual re-translation. If you want them to match your 19° or 26° or 36° fixed lights, just set the Zoom value to the appropriate level.
If Cue 2 was written such that both lights go to 70° both lights would resize at the same rate until the one on the right has to give up mid cue:
The light on the left would complete the cue zooming all the way to 70°:
To be fair, Cue 2 could not have been written using the light on the right. This cue must have been recorded using a light that can achieve 70°. Even though in this example it was played back using a 50° light, it does not change the cue. If you later swapped it back to a 70° light, it would go to 70°. It is only when writing cues that you are limited to the physical constraints of the light currently patched.
One of the most time consuming endeavors when programming moving lights is shutter control. To achieve desirable effects, the shutter mechanisms need a lot of motors, and hence, a lot of control channels. Typically, most shutter assemblies have nine motors. There are four shutters, each using two motors to control its position within the aperture of the fixture and a ninth to rotate the entire assembly clockwise or counterclockwise. Many times these channels are labeled like this:
The oval in the image above shows how the light would fall on stage if the fixture was hung in a typical Front of House position. You can imagine that trying to make shutter cuts can be a time consuming effort of hunting and pecking for the right channel or more likely, pair of channels. That is why Natural Language Control groups related pairs together into useful names like Top, Bottom, Left and Right.
In the example shown below, the console is driving a Vari*Lite 1000 fixture. Cognito conveniently places the thrust controls on the two wheels closest to you (red and green) and the respective angle controls above those. One wheel
manipulates motors 1a and 1b in unison to Thrust the shutter into the aperture of the fixture. The yellow wheel above that adjusts the relationship between those two motors, giving you one handle for controlling the Angle of that shutter. If you rotate the yellow wheel to the right, the shutter rotates right:
Note that the Thrust is measured in percentage. Most moving lights only allow you to put the shutter part way into the field of light. Above you can see the Top Thrust for the VL1000TSD is set to 25%, but its maximum value is 80% (not 100%). That is because the VL1000 physically can only cut out 80% of the beam. The angle is limited to -35° to 35°. Conversely, the VL3500 can only push the shutters 47% of the way into the beam. By using a percentage unit to describe the
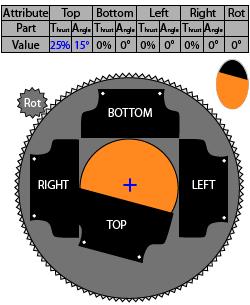
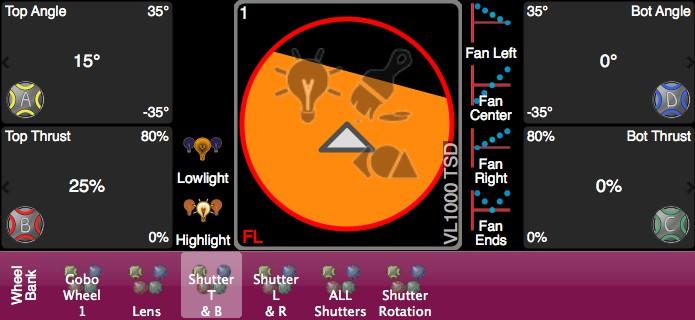
position in the aperture and degree units to describe the angle, you can copy the shape of a shutter cut from one type of moving light with one set of physical constraints to another with predictable results.
In the example below, the value of Top Thrust is set to 50% and the Top shutter is cutting the beam in half. The Right Thrust cuts 15% of the beam.
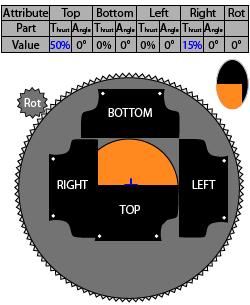
Individual moving light manufacturers' implementation of gobo control is frustratingly inconsistent. There are so many things these modern machines allow us to do, but there has never been a consistent method of describing what they do. Natural Language Control attempts to pull in the reins and consolidate on a common language of control.
The assembly that holds the entire gobo selection is called the Wheel. Wheels can Spin Forward or Reverse in Revolutions per Minute (RPMs) or can Select
individual Gobos. Gobos can be Indexed in Degrees like hands on a compass or Rotated continuously Clockwise or Counterclockwise again at a specific RPM.
Different manufacturers use a variety of control channels to achieve all of these possible behaviors. Some use lots of channels which surprisingly makes the control of the gobo wheel easier, and other insist on bunching up behaviors on only a couple of channels. The examples below are generic and are only used to show how it could be done using linear DMX512 channels compared with how it's handled using Natural Language Control.
The first of the pair of these linear channels is used to position the wheel and select a specific gobo and do one of two things with it; either Index it or Rotate it. The second channel changes modes based on the position of the first. Here the first channel is set to about 10% and Selects the Dots gobo for Indexing. The second channel is set to about 10% which indexes the gobo 15°.
Remember, the fader doesn't show you these options as selections - you need to know them in advance! In contrast, Cognito's display shows Gobo 1 Wheel Mode
(yellow wheel), Gobo Select (red wheel), Gobo Mode (blue wheel) and Gobo Index (green wheel). And, as well as showing "Dots" as the current selection, you can see that moving one 'tick' forward would give you "Pinwheel" and one tick backwards would give you "Open":
To rotate the Dots gobo continuously in the clockwise direction, the first handle must be placed at 60%. That changes the mode of the second handle and the 10% position is now meaningless. To see a rotation of 4 RPM clockwise, the channel must be set to 30%. (Where that value comes from is completely arbitrary. Truthfully, you would never get a answer even if you were to visit the factory and ask the firmware engineers!)
The same information is shown on Cognito's display like this:
Changing the direction of the rotation on a DMX based system means you must travel the second handle through a bunch of values that are of no interest to you. The gobo would slow down, then stop, then change direction and speed up again as you adjust the control channel. This can be very disconcerting for a designer who is watching the stage. None of those behaviors were asked for, but were necessary to reach the desired result.
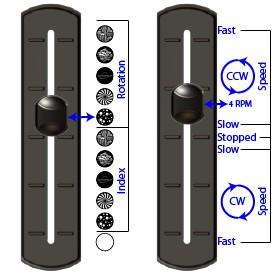
With Cognito , you just nudge the blue wheel one tick to change the value from Rot CW to Rot CCW. The green wheel, which controls the speed, is not changed. The DMX values will jump from the value for clockwise rotation at 4 RPM directly to the counterclockwise 4 RPM value (whatever that is).
Again, this is how it looks on Cognito's display when programming:
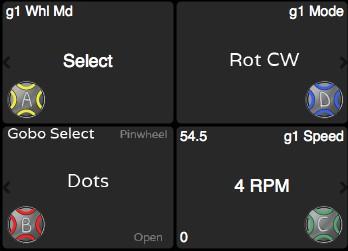
Automated lights are riddled with control parameters. In earlier days, many fixture manufacturers combined DMX512 channels to achieve separate effects in an attempt to prevent the fixture from consuming an outrageous number of channels. A common practice is to use one channel as a mode channel to modify the behavior of another. This makes life difficult for the lighting programmer as he never knows what a handle will do without first checking the state of the mode channels.
Natural Language Control eliminates this need for reference by not presenting you with controls that are ineffective on one channel because of the state of another. The Control Task separates the tools into one of four attribute families:
Intensity (amber colored tools)
Color (purple colored tools)
Position (green colored tools)
Shape (pink colored tools)
The various tools in the Control Task allow you to adjust attributes without the fear of inadvertently affecting the function of another channel. Furthermore, the Wheels tool, which is common to all attribute families, labels each control
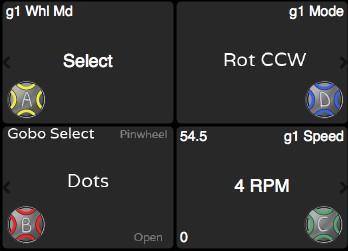
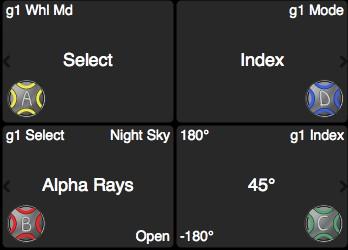
appropriately as to what it is doing at present based on the state of other attributes. Complex gobo wheels are a good example of how this is put to use.
DMX512 mapping and the number of DMX512 slots used by the light have nothing to do with how the controls are laid out to the user. In this example, Gobo 1 Wheel Mode (yellow wheel) is dialed to Select, the current Gobo Selection (red wheel) is Alpha Rays, the Gobo1 Mode (blue wheel) is set to Index and the gobo has been Indexed (green wheel) to 45°:
If the user were to adjust the control labeled Gobo 1 Wheel Mode (yellow wheel), the entire gobo wheel would Spin Forward (or Reverse). If so, displaying the control that allows you to choose the Gobo Selection would be pointless; the entire wheel is spinning through the light path, so you will see all the gobos, not one at a time. The layout is changed to reflect this:
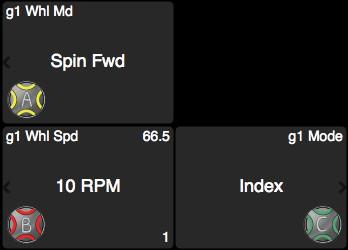
Shown on the red wheel is Gobo 1 Wheel Speed which has been set to 10 RPM, and green wheel has Gobo 1 Mode set to Index preventing the individual gobos rotating. This is where Natural Language Control keeps you out of trouble by only showing you what's possible. The planetary rotation of the larger wheel makes the individual gobos on the smaller cogs appear to rotate around the larger wheel's center axis. Mechanically, you can't prevent this from happening. That is why the Wheel Mode is Spin and the Gobo Mode is Index you are not shown the corresponding Index attribute (which was set to 45° above).
When you do want a lot of gobo action (gears turning in gears), set the Gobo 1 Mode attribute (green wheel) to Rot CW (or CCW), and appearing on the blue wheel you will see a new Gobo 1 Speed attribute (blue wheel) which is set here to 5 RPM:
Changing Gobo 1 Wheel Mode (yellow wheel) back to Select will once again allow you to choose a gobo with the lower left control and in fact Cognito has 'remembered' that the last gobo you selected was Alpha Rays:
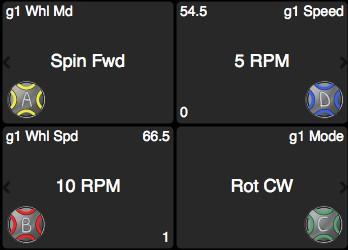
Cognito does keep the fact that you were rotating the gobos at 5 RPM, but if you set the Mode (blue wheel) to Index and Cognito will remember that Index was last set to 45° and you're back where you began:
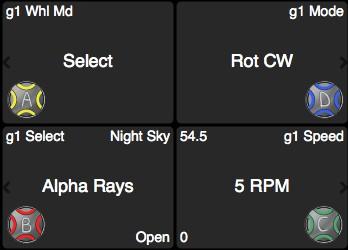
See CONTROL | COLOR and Color Correction for examples of working with lights with various methods of reaching a white point as color saturation approaches zero.
Copying and swapping attributes among lights that share scalar properties like Position and Zoom is only the tip of the iceberg when using Natural Language
Control. The real power of Natural Language Control can be seen when you start using similar, but not identical attributes and how Natural Language Control works with them. Color is a great example. There are three primary automated color systems in use today; Subtractive Color Systems like CMY, Additive Color Systems like RGB (or RGBA etc.) and Fixed Color Systems that use gel (like scrollers) or dichroic glass (like color wheels). Natural Language Control works with any combination of these three and make intelligent substitutions between them if required.
The proliferation of LED lighting has made common the RGB color space of additive color mixing. With the three primary colors you can mix them to make white or each at various levels to make colors.
More recently manufactures are using more than red, green and blue to achieve 'better' whites by adding either white or amber LEDs. We'll discuss what to do with these later on. In contrast, traditional stage lighting starts with white light and, by various mechanisms, color filters are placed in the path of the light to subtract out different wavelengths. By introducing varying amounts of filtration, a variety of colors can be produced.
Either way (additive or subtractive), the concept is to mix various colors to achieve the desired results. You can easily work with RGB and CMY simultaneously, referencing either or both in any base color space. If you copy those base color attributes to a light that doesn't have color mixing abilities, but instead has a color wheel, a suitable substitution will be made. Since the Natural Language Control Fixture Library stores a lot more data than just the name of a color, mathematical matching can be done. For example, with the color mix below on the left copied to a light which has a color wheel as shown, Slot 5 would be chosen.
By the way, the color value is not stored as Slot 5, it is stored as "Yellow" so that if it's ever applied to a different light with a different wheel (or mixing system), it would produce the correct or near correct color again.
Gobos are also problematic when using stock fixtures. Different lights use different numbers and types of gobos. If you're touring with Cognito but not with your own lights and you travel from one venue on Thursday to a different venue on Saturday, Natural Language Control can greatly reduce the amount of work needed during Saturday's focus session. Here the cues are written such that Cue 1 uses a Pinwheel gobo and Cue 2 a cloud breakup. On Thursday's rig Cue 1 would use Slot 3 and Cue 2 would fade to Slot 5. As the cues are written and stored based on what comes out of the light, not what protocol (bits and bytes) the light is expecting, we know what Cue 1 is supposed to look like. That is why on Saturday night, Cognito would produce DMX512 values to move this venue's lights to Slot 8 and then to Slot 4.
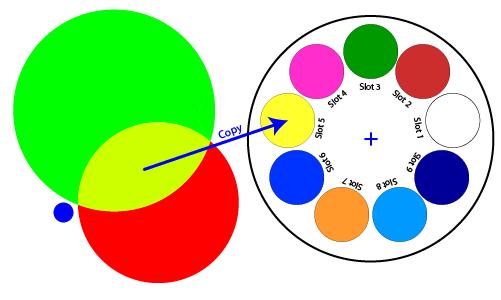
Natural Language Control's ability to provide additional attribute controls the fixture manufacturer didn't allow for makes controlling some types of lights more convenient. An ideal example of this is RGB LED fixtures. Traditionally, the only controls the users can adjust are Red, Green and Blue. Distinctly absent is an Intensity attribute. The undesirable side effect of this is that if you pull down the Grand Master, the LEDs intensities remain unchanged. To blackout the fixtures, you have to adjust three parameters rather than one. This becomes inconvenient when you just want to lower the lights' level or take them out in one cue only and restore them in the next. You must look up the RGB values from the preceding cue to restore them.
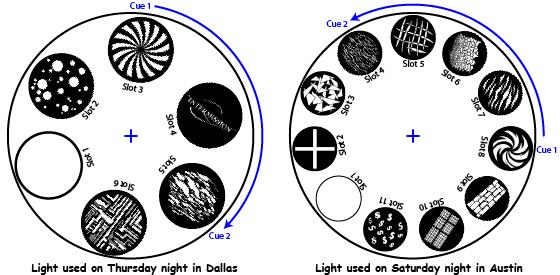
Natural Language Control adds a phantom attribute to RGB lights. This intensity attribute does not appear any different from that of any other lights, but it does control the overall brightness of the LED without affecting its Hue. Another benefit of having this attribute is that if you ever do replace an RGB fixture with another, more traditional type of fixture, the Fade Up/ Fade Down dynamics of the light are already in the cues.
Another attribute that is gaining more and more significance, especially in architectural applications is the color of white. As we know, white is made up of all the colors in the rainbow, but if one is more dominant than the others, it can tint the white towards one end of the spectrum or another. Using a Phantom Abstract
Attribute, Natural Language Control can automatically 'tune' your white or Correlated Color Temperature (CCT) when you're not mixing rich colors.

Ignoring brightness for now, there are two parameters that define the color. Saturation is the amount of color or perhaps the distance from white, and Hue is the dominant wavelength of the light defining its color. Hue is measured in degrees where 0° is red and 180° is Cyan. We measure Saturation in % where 100% is pure color and 0% is white (all the colors).
White is relative though, which is why you 'white balance' a camera or you set the white on your computer monitor. Our eyes can be fooled into believing almost anything with very little saturation (or lack of a dominant wavelength) is white. White light is defined with a combination of colors or a Correlated Color Temperature measured in Kelvin. Kelvin, like Celsius, measures temperature, and in this case, it's the temperature of a white-hot 'black body' that emits light because it's so hot. When it's not so hot, it's closer to the infrared end of the spectrum (red hot poker) and when it's really hot it's blue (like an arc welder or the sun). Household lights are about 2800K, theatrical lights are 3200K and daylight is about 5600K.
Natural Language Control presents a Phantom Abstract Attribute called CCT and its units are Kelvin. If you choose a color capable light, you can dial in the CCT you want the light to make when its Saturation is approaching zero. In this example, the CCT is set to 5600K and Cue 1 is a Blue and Cue 2 takes the light to white:
Equally you could run the cues again with the CCT set to 3200K and it might look like this:
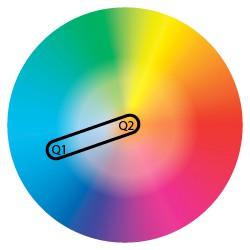
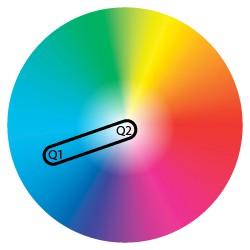
Another option offered by Natural Language Control is the ability to automatically lower the CCT when you dim the lights. This is called Dim-To-Warm. When tungsten lights are dimmed, they cool off (which makes the light 'warmer' or more red). This is appealing and we've become accustom to this behavior. Think of a restaurant at night; they dim the lights to match the intensity and color of the candles on the table. Some advanced solid state lights offer this options internally, but with Natural Language Control you can use this feature on any color capable light making your modern lighting system have the same organic and subtle feel as older dimmer systems.
Complimentary Color Spaces are basically different methods used to describe the individual components that make up what the eye perceives as color. None of them are right or wrong. They are individual and each one has its purpose. The selection of one over the other is primarily a matter of choice. Traditionally, consoles only allow you to work in the color space native to the light you are controlling. That is, if you have Red, Green and Blue LED lights, you would be working in the additive RGB space. If you have RGBW lights, you'd need to work with four colors. Working with five or even more sources can get out of hand quickly when we're all used to a tristimulus world. White-sourced lights mix colors with Cyan, Magenta and Yellow dichroics and work in the subtractive CMY space. Some solid state lights actually expect attribute data in Hue, Saturation and Luminance and this can be problematic when you want to fade from a hue of 5% to a hue of 80% as this will show you most of the rainbow; not very subtle! Even though some consoles have color-pickers that allow you to quickly grab any colors, at the end of the day, they generally fading from one triplet of CMY (or RGB or HSL etc.) to another when they run cues.
Natural Langue Control allows you to choose andfadein different color spaces: RGB, CMY, HSV (Subtle) and HSV (Rainbow). Having the ability to choose ANY light and work in these spaces is a real benefit because in the old days of DMX512 controllers, you would have to first pick the RGB lights and set them with your wheels, then pick the CMY lights and set them. If you mixed the two types of color systems, they 'fought' each other and doing that can quickly destroy the art on stage. Choosing a color is one thing, but fading from one scene to another in different color spaces can unify a diverse lighting rig with better synchronicity than ever before.
This is how a fade looks in the RGB space fading from purple to green. Mid way between Cue 1 and Cue 2, all of the RGB LEDs come on brighter than when producing a saturated color and the fixture 'bloom' towards white (less saturation).
When you start with white light and introduce CMY flags, midway between Cue 1 and Cue 2, most of the dichroic glass is in the lens tube sucking most of the color (and intensity) out of the light and you 'dip' toward mud.
Regardless of what color system your fixtures use, if you fade in the HSV color space from, say, purple to green where the saturation is pretty much unchanged, the only attribute that moves is Hue.
This sort of fade avoids white and mud and looks more natural on stage. Note that the Natural Language Control decides to fade clockwise around this color space. That is because going through blue seems natural when going from purple to green. We call this a Subtle fade. If we went from pink to amber, it would fade through red. It always takes the shortest path between color or the path that produces the fewest color changes.
If you want a more dynamic effect when switching colors, you might choose the HSV (Rainbow) color space. You still define Hue in degrees (for example, cyan is 180°) but when it fades it takes the 'long way' around.
For years the language and control structure used to control lighting systems has been imposed upon designers by the equipment manufacturers. This was not conducive to an enjoyable experience for anyone involved in the process. Natural Language Control defines a common language that designers and programmers can share and the complex processes of translating this language into DMX or any other control protocol is taken care of for you.
This 'language' has not been defined arbitrarily or in a vacuum. We use colloquial terms that have been used in the theatre for years and present them to the programmer with sense and order. Confusing mode channels that change the purpose of other channels have been eliminated and new and uniquely useful control handles have been added. Natural Language Control allows the designer to look at the lighting rig as a unified tool to aid in the design process. The designer will no longer need to conform to the language of the engineers and this allows them to diversify the lighting rig without the worry of adding complexity to the programming process. Every light now speaks the same language and increased communication and understanding will only lead to better lighting.
cue
56,
time
cue
140
Grand Master 23, 49,
group
hard/sof...............................................
hardware
help 3, 26, 49, 104 highlight
hints 26 hold stage
HSI
HSV 62, 63, 153
ICPS
indexing a gobo 140 information 49, 106 inhibitive 23 input / output
insert a cue
intensity................................................
intensity color on screen.......................54 intensity on
internal storage
timecode
inventory
address
IRGB
70,
55,
32, 61, 62, 65, 66, 106 lock playlist 88 lock screen 38 logo 38
42 loop.......................................................
lowlight.................................................
lua121, 122, 123
115, 121, 123 magnifying glass 49 manual control 29, 103 memory.................................................10, 12, 22, 37, 69, 83, 84
Memory Black Out 24, 49 Memory Master 24, 49, 84 memory page 78, 79, 81 MIDI 19, 37, 88, 116, 117 midi timecode 90 mixed 98 momentary bump buttons 80 move cue...............................................74, 96 move memory....................................... 98 moving head 110 MSC 88, 117 MTC 90, 116
N network 19, 36 network sliders and buttons.................. 37 next -
49, 55, 104, 106 NSB 37 number of lights 32
line
of
8, 73,
72,
a light
and longitude
timing
Pathport protocol
Pathway Connectivity
clock
abstract attributes
pin22, 29, 103,
mixed
play task
25
power
movement
- next 49,
priority 23, 24,
Pro vs. Starter
properties of light
bump button................................80 rainbow
randomize
rate
recalibrate fixture
recent
record 26 record changes only
record task............................................69 reference points....................................
release 26, 49, 68 release playlist
88, 104 released locks 16 rem dim
remote button stations
remove from cue
rename show
reording
on release
sliders 22, 69 sliders always run memories 32 smart update 75 SMPTE timecode 90 sof/hard 93 sofware................................................ 42 solo........................................................93 source....................................................106 spin gobo wheel 140 stage manager panel 38 start clock 90 Starter vs. Pro 41 static IP 36 status bar 49, 88 step forward/back................................. 87 straight line movement.........................131 streaming ACN.......................................19 strike lamp 15 submaster 10, 12, 22, 69 subnet 36 subtle 63, 153 sunset 99 support 3 swap displays.........................................104 synchronize cues...................................116
T tap sync 93 task bar 47 task oriented navigation 47 tech lock 66 technical support...................................3
19, 121, 123 thumb drive 30 time event 99 time of day 32, 49, 99 time zone 32, 49 timecode 90, 116 timed bump buttons 80 toggle 104 toggle bump buttons............................. 80 tool bar..................................................47 tools 51 track back 75 triggers 115, 124, 125 two-scene preset 29, 103 type
75, 83, 97, 104 update position
update system
for go
42
14, 30,
wall station mode
wheel banks
which part
work light
wrench
Pathway Connectivity warrants to the original purchaser or retail customer that, for a period of three years from the date of shipment, its products will be free from defects in materials and workmanship under normal use and service. Pathway Connectivity’s sole responsibility under this warranty shall be to repair, replace or refund, at Pathway’s option, any units which are determined to be defective on Pathway’s inspection. Pathway Connectivity may elect to refund the cost of the device upon return, solely at Pathway Connectivity’s discretion. This warranty is contingent on the customer’s full and timely compliance with the terms of payment as set out in the “Payment Terms and Conditions”. This warranty is expressly in lieu of any and all other warranties expressed or implied, including the warranties of fitness for a particular purpose and of other obligations or liabilities on Pathway Connectivity’s part. The owner acknowledges that no other representations were made or relied upon with respect to the quality and function of the goods sold.