Teleprompter How-to Guide
Copies of various equipment manuals are available online at (https://www.fcac.org/equipment-user-manuals)
Teleprompter control options
•Before launching the program connect the CueScript teleprompter Desktop Scroll Control to the USB cable at the workstation you’re going to use
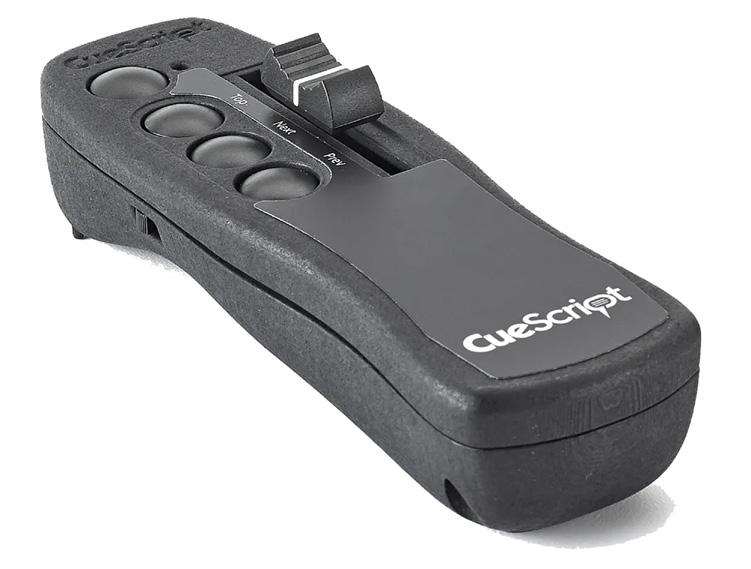
• Alternatively, talent has the option to control the script from the set while the program is in “Prompter Now” mode by using the CueScript Wireless Hand Scroll Controller (this controller can be checked-out from the equipment room)

See
See
•The teleprompter operators can also use the Cue iT on screen digital scroller. You can open the on screen scroller from the top Menu, PROMPT tab and click the Scroller icon.
This is what the icon looks like

Fairfax Public Access
v.1.2022
Fig. 1
Fig. 2 Scroller 1
How to start the teleprompter and open your script
● In the proper control room workstation, go ahead and open the teleprompter program, Cue iT. The desktop icon looks like “a purple text bubble”.

● When using the teleprompter, staff recommends the script to be formatted as a simple Word document. No fancy fonts, bolded or under lined words etc…
● However, the Cue iT teleprompter software supports the following formats:
• .txt (Text File UTF-8)
• .docx (Microsoft Word Open XML Format Document files)
• .rtf (Rich Text Format)
• .cue (native CueiT files)
● Bring the script file with you on a thumb drive or download it from an email onto the teleprompter computer workstation
● If downloading the script, save it to the desktop. It will auto deleteduring the night
● If using a thumb drive, go ahead and connect it to the telepromptercomputer station
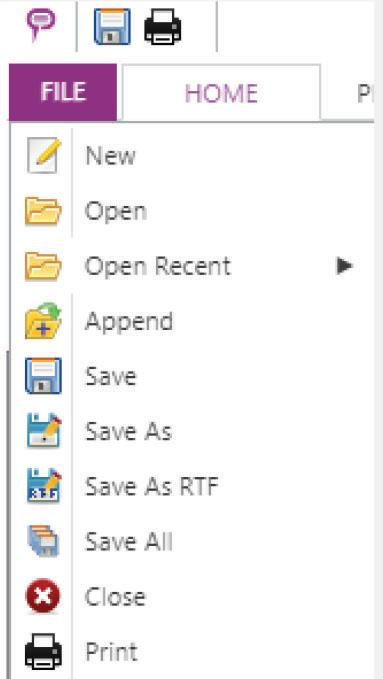
● To open your script in the program, go to the top Menu and click File, then choose Open
See
● In the new window, find your script and select to Open
● To open additional scripts, repeat the process or add additional scripts from the Runorder Panel
● In the studio set, verify that the teleprompter output monitor(s) are turned on

Fig. 3 See Fig. 4
2
How to edit your script “Story”
For each script a “Story” tab will be added in the Runorder Panel (left side of the screen). Your script will be displayed in the edit area, (body center) of the program.
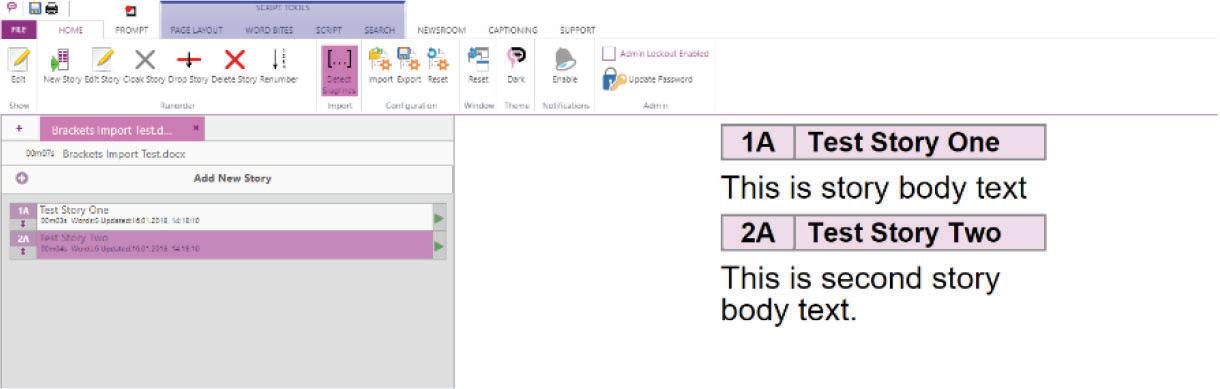
● From the Runorder Panel
See Fig. 5
you can click the purple tab area to rename your “Story”. You can preview the estimated script time in minutes and seconds. You can reorder your Stories.
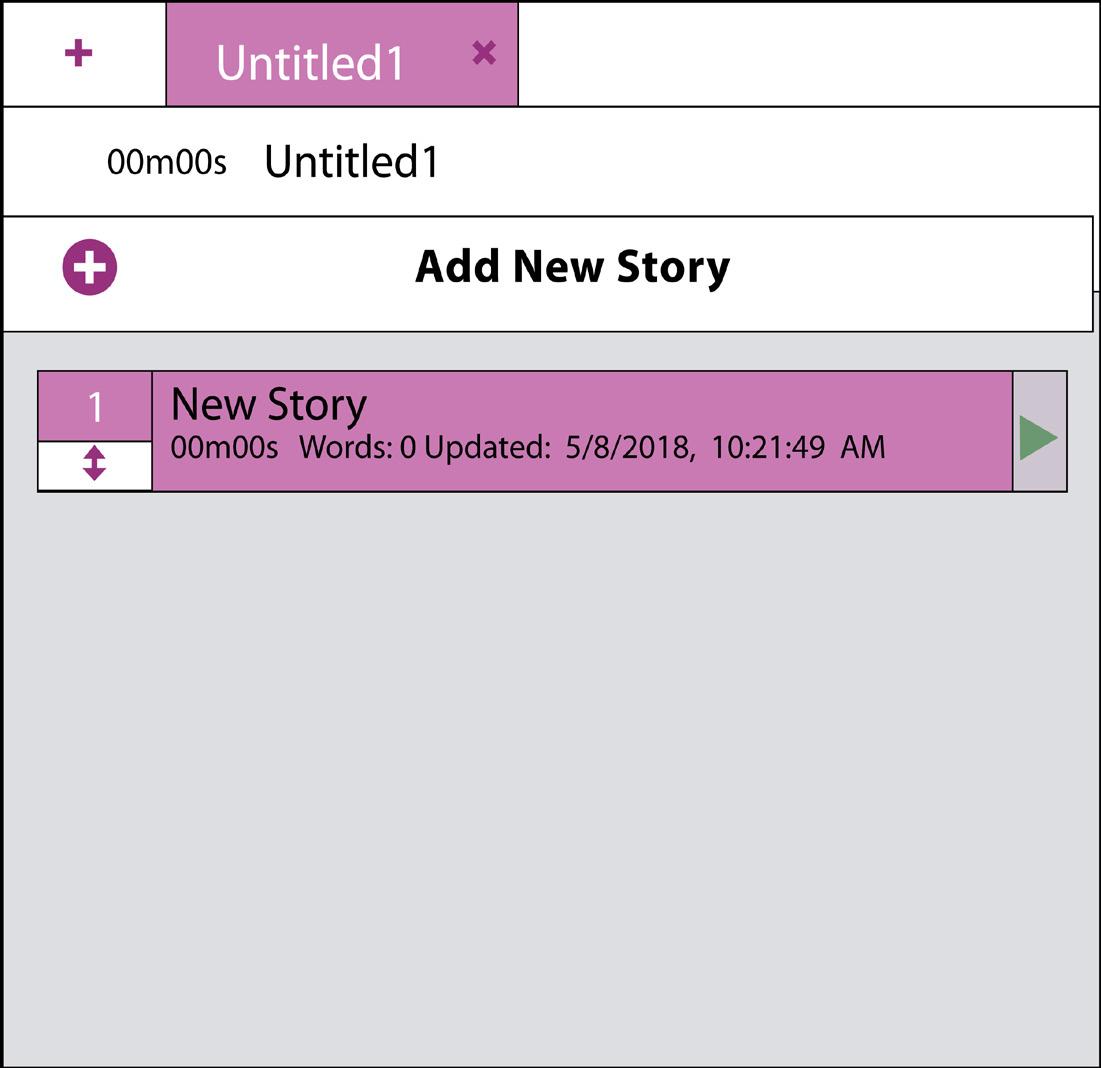
● Slugline
Each story title will display in the rundown list as a slugline. Click a slugline once to bring you to the story in the edit area.
Double click on the prompt status button to bring that story to air. To move around sluglines click and drag the slugline with the drag arrow
See Fig. 6
Having sluglines help if recording scenes out of order from how the script is written. Fig. 5 shows an example of a “Story” with sluglines.
You can add slug lines when writing your script by placing brackets on your document ahead of time.
[1A]
[2A]
This
This
Story
Story
story
Example:
Test
One
is story body text
Test
Two
is second
body text
3
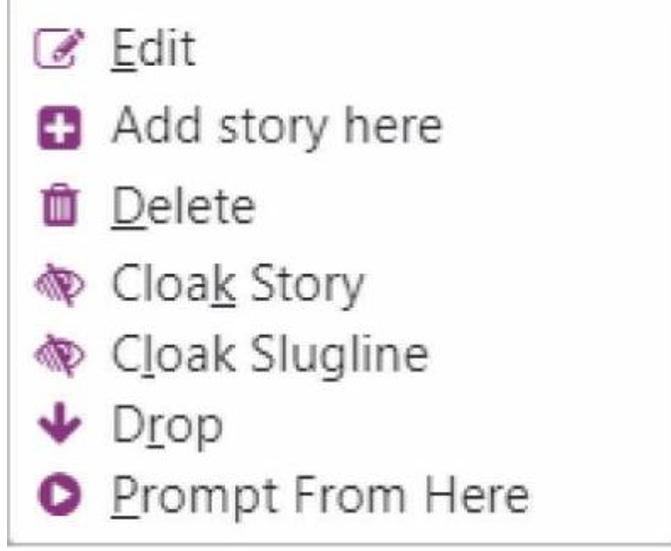
Further options are available in the Menu > Home tab or by right clicking with the mouse inside the Runorder Panel. A new window will open allowing you to add a story, delete a story, select prompt starting location and more.
Based on where your cursor is in the edit area of your script, you can create a slugline by using the shortcut key CTRK + F5 or by right-clicking with the mouse and selecting the correct option.
● Marker - a point in the script for use by the operator. This is not visible on the output tele prompter monitor at any time. However, adding a marker will allow the operator to start prompting from the marker position
Based on where your cursor is in the edit area of your script, you can create a slugline by using the shortcut key CTRK + F6 or by right-clicking with the mouse and selecting the correct option.
Based on where your cursor is in the edit area of your script, you may also add a marker by navigating to the Menu > SCRIPT Tab and clicking the green plus “Add” icon.
● Before proceeding, always double check to see if any words will be cut out in the output teleprompter monitor. You can do this by navigating to “Prompt Now” mode
Prompt Now can be selected from the Top Menu > PROMPT tab, then click the “Prompt Now” button
You may also select the “Prompt Now” from the purple Quick Controls Menu at the bottom of the program
See Fig. 7 See Fig. 8 See Fig. 9 4
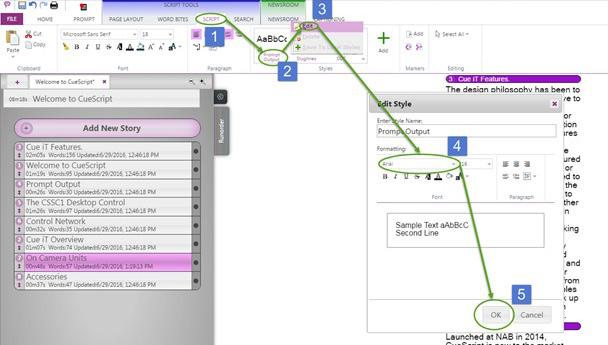
● If some words need to be formatted, the simplest method is to edit your script text by selecting the Script Tab from the top of Menu. Much like in Microsoft Word, from here you will find options to change the font type, font size, adjust the paragraph alignments and much more.
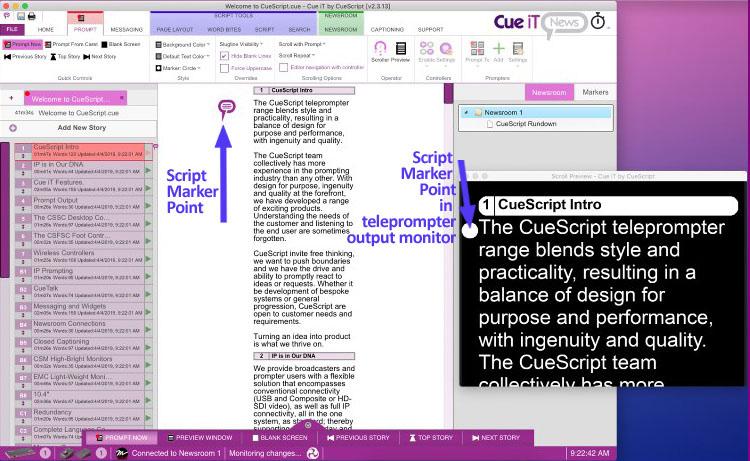
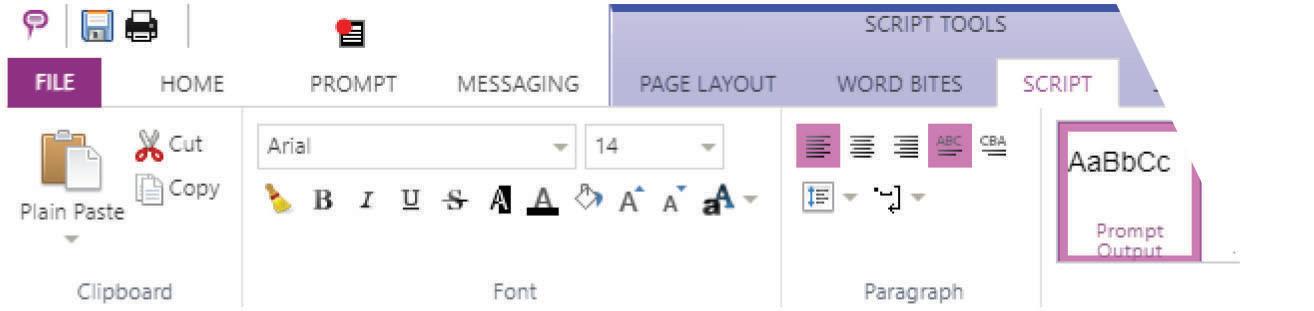
Fig. 10
Tip: Using the Prompt Now preview window adjust how you’ll like the script to look in the teleprompter monitor. You’ll find additional options in the MENU > PAGE LAYOUT tab.
Controlling the Teleprompter
● From the PROMPT table menu select the “Prompt Now” icon, to toggle prompt on or off. When the prompt is on the prompt tab will illuminate red. There is also an icon above the prompt tab which can be used as a shortcut
● Before selecting “Prompter Now” note that the location of your cursor indicates where the script will open in romper mode. In the output teleprompter monitor, the talent will see the marker as a white dot, while you will see the marker as a Cue iT text bubble ico
Fig. 11
● When using the various controllers practice dragging the prompt wheel (the fader, if using the hand controller) to initiate the prompt and scroll the script forward or backwards. You also have options to skip to the next story, previous story, pause or display a blank screen
See
See
5
Tips:
Note the differences between the two physical controllers and the on screen digital scroller. There are several shortcut button differences but the controls are mostly the same When using the wheel controllers note that the more you turn to the right the faster the text scroll speed will be
To pause, notch the wheel to the left. This will cause the scroll to stop. Moving it further to the left will reverse the scroll
As the teleprompter operator, remember that the text scroll speed should be dictated by the talent Once the talent starts reading. Keep what they are saying / reading in the middle of the monitor
To jump between sections or markers press the next button
● As the teleprompter operator depending on the production needs you will also have the option to display various messages on the teleprompter output monitor
Widget Message Options

● CueiT messaging offers the ability to add messages, timers and a clock to the prompt output by using widgets. You can have up to 4 widgets on screen at one time, and as many widgets as many widgets available to turn on at any time
● To add message(s) go to the top MENU > MESSAGING tab > then click the green plus button
See Fig. 12
● The green power button “All off” will turn all widgets off”
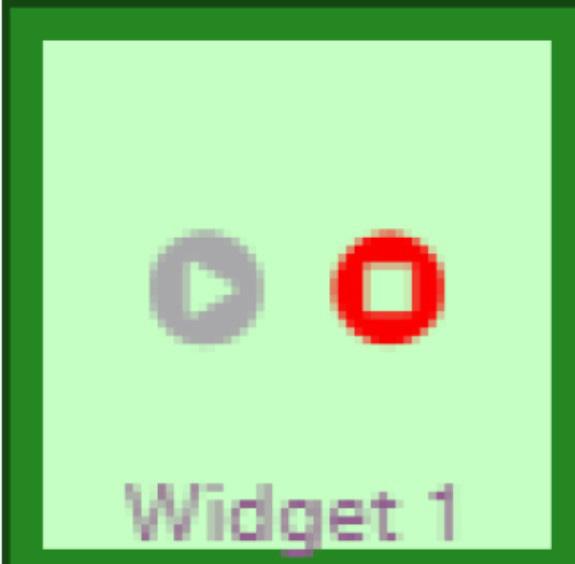
● Once you create a widget an new icon will be added in the display area. This is what the icon looks like
● Use the “play” button on the widget to start
Note: Widgets only work when prompting is enabled.
● The “stop” button will automatically stop when prompting is disabled
● Right-click on the widget to edit and or delete
● Select the Widget Settings from the Edit Messaging Widget window that appears when you add or edit the widget

6
Fig.
From the tabs you can:
• Change the name
• Select between a text, clock or timer widget
• Text Widget
• A text widget will allow a single line of text, in all positions except full screen
• When full screen is selected multiple lines of text will show
Clock Widget
o A clock widget will show a digital clock display
o Clock mode can be 12 or 24 format
o You can select or deselect which segments of the clock to customize and display
Timer Widget
o A timer widget will show a digital time count up or down
o Select “manual” for a set start and stop time
o Fill in the start and end time in the following format (HH:MM:SS)
o You can disable widget when timer is complete. This will clear the timer from the prompt output monitor when the timer reaches Stop Time
Widget Style - Widget color, font and size are determined by the Styles found in the Script Tab

Widget Position - Widget position on the output monitor is chosen by clicking on the area within the black box, highlighted by yellow, and turning green when selected
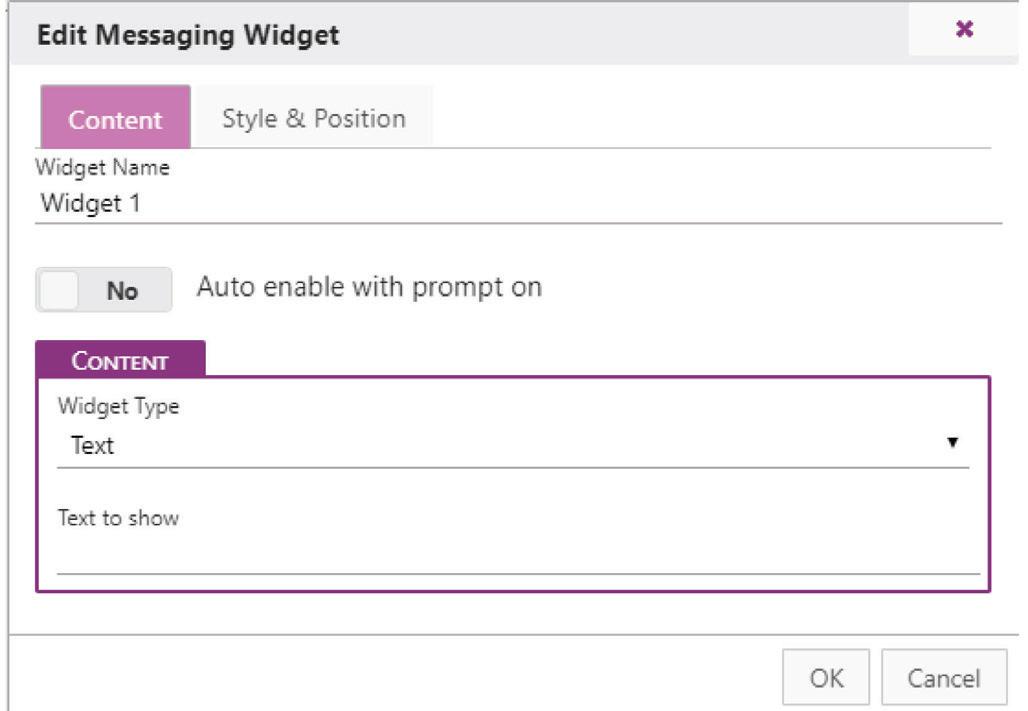
Edit Messaging Widget options include:
13 Edit Message Widget - Content tab Fig. 14 Edit Message Widget - Style & Position tab 7
Final Thoughts
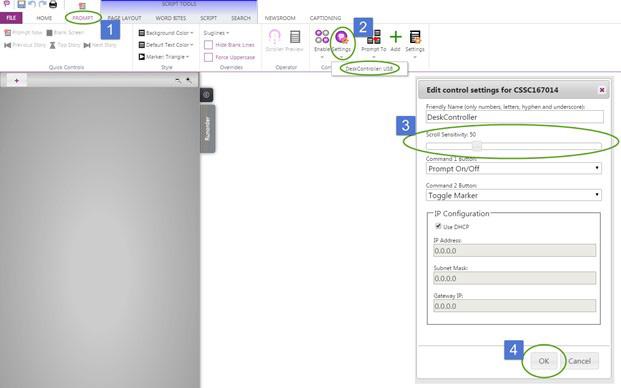
Can I change the controller sensitivity?
Controller scroll sensitivity can be changed by connecting the controller via USB interface to the PC running CueiT application. Navigate to “Prompt” > Controller section > Settings > Choose controller > Set desired sensitivity by adjusting “Scroll sensitivity” slider > Click OK to save settings. Please note that settings are saved and stored in controller internal memory.
See Fig. 15
How do I change default font for Scripts in Cue iT?
To change default formatting for all prompt output, please navigate to “Script Tab” > “Styles section”. Right-click on “Prompt Output”, choose Edit and set desired font and formatting.
See Fig. 16
How do I adjust margins on Prompt Output?
CueiT Premier Only: You can manually set margins on the prompt output by not maximizing the Prompt Output window on the secondary monitor. Rather, set your desktop background to black and adjust all 4 sides to the desired placement within the output on your secondary monitor.
8
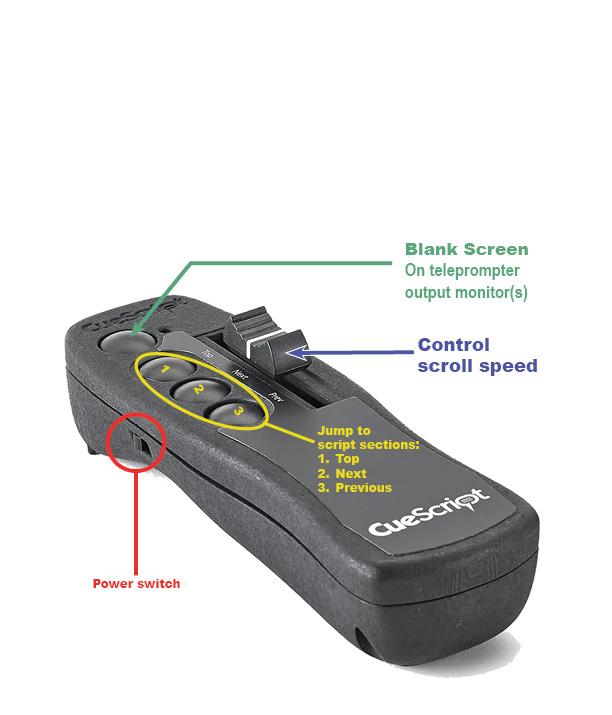
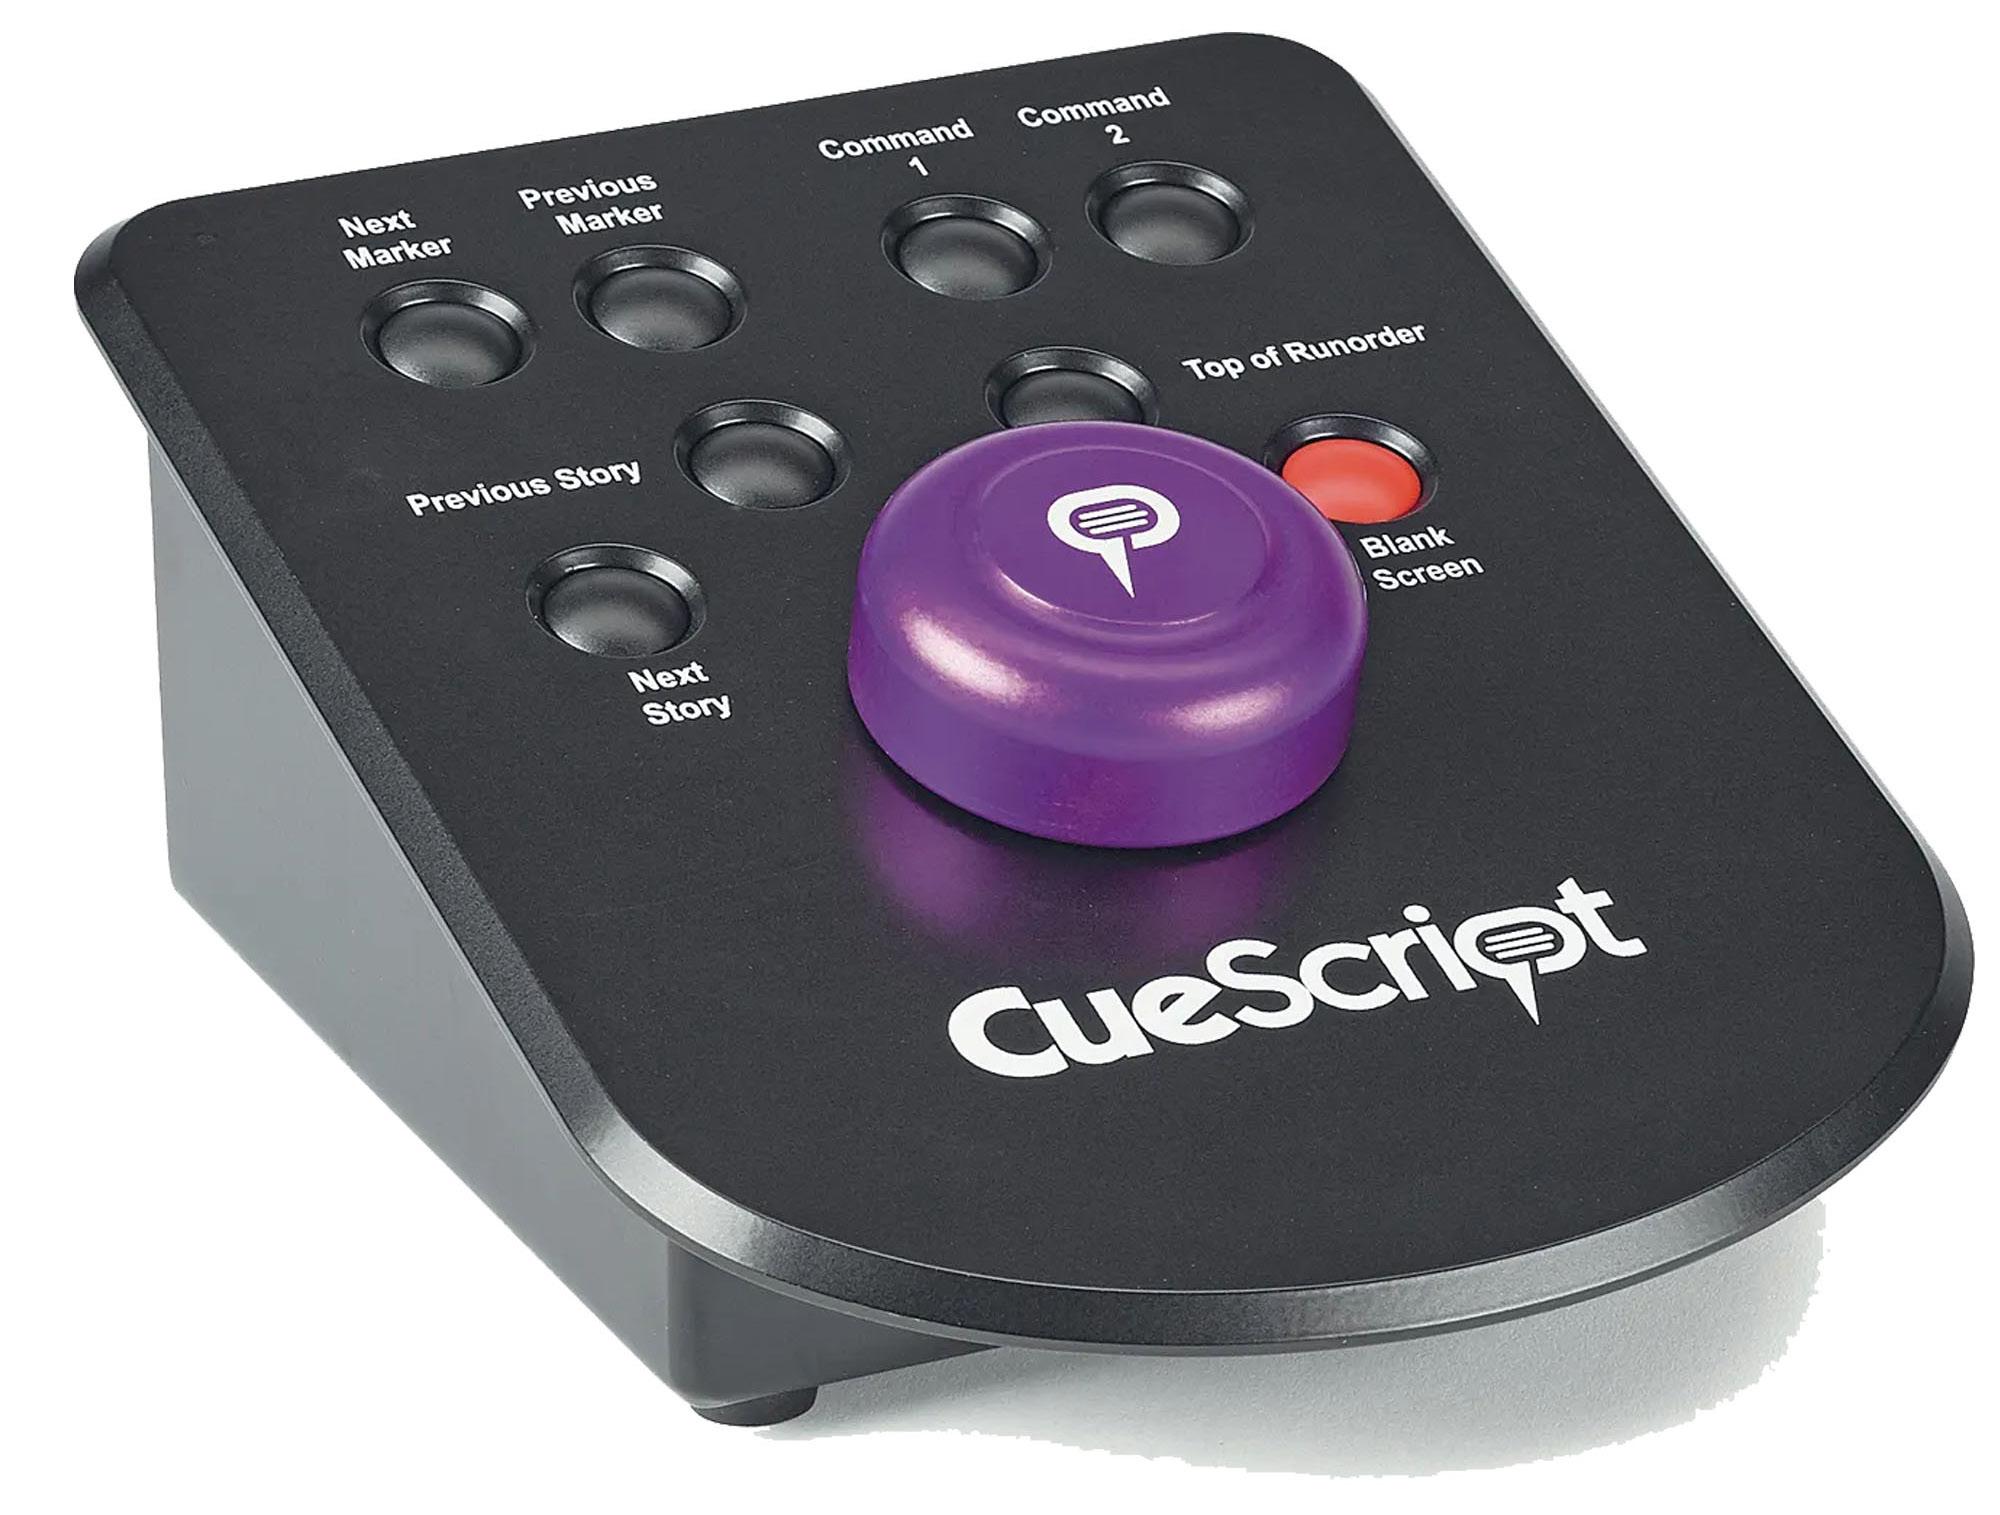
Appendix Fig. 1: CueSCript Desktop Scroll Control Fig. 2: CueScript Wireless Hand Scroll Control 9
Fig. 3: CueiT Menu – HOME Tab Fig. 4: File Menu options 10
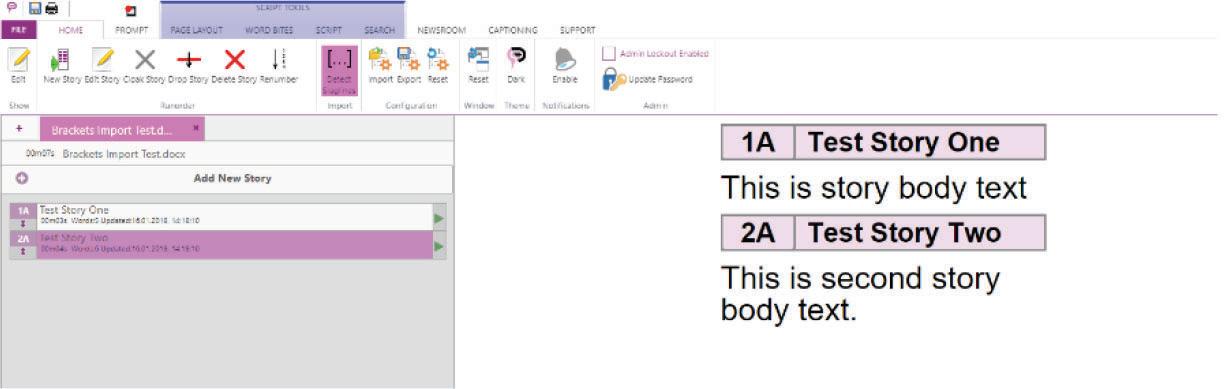
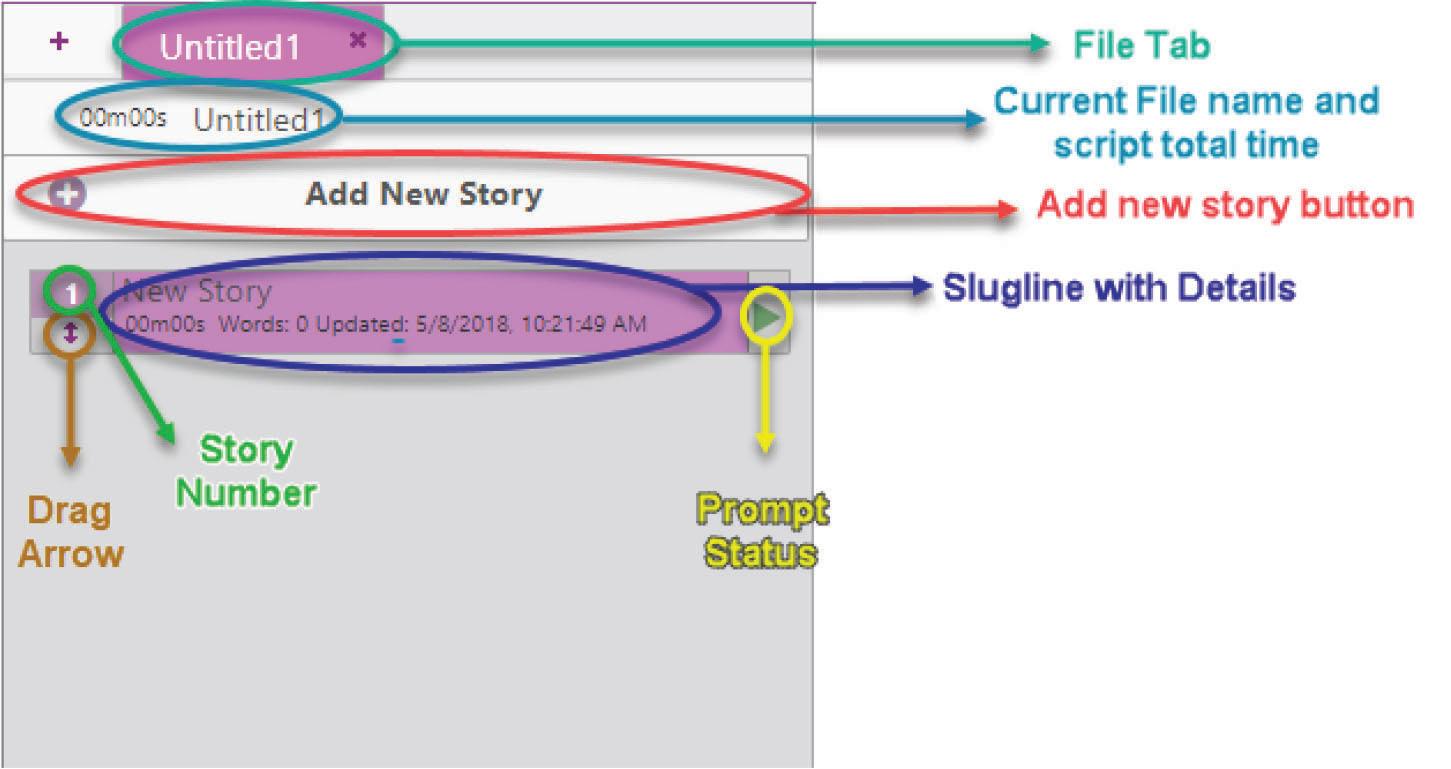
Fig. 5: HOME Tab (Sample Script Layout) Fig 6: A Close-up of the Runorder Panel 11
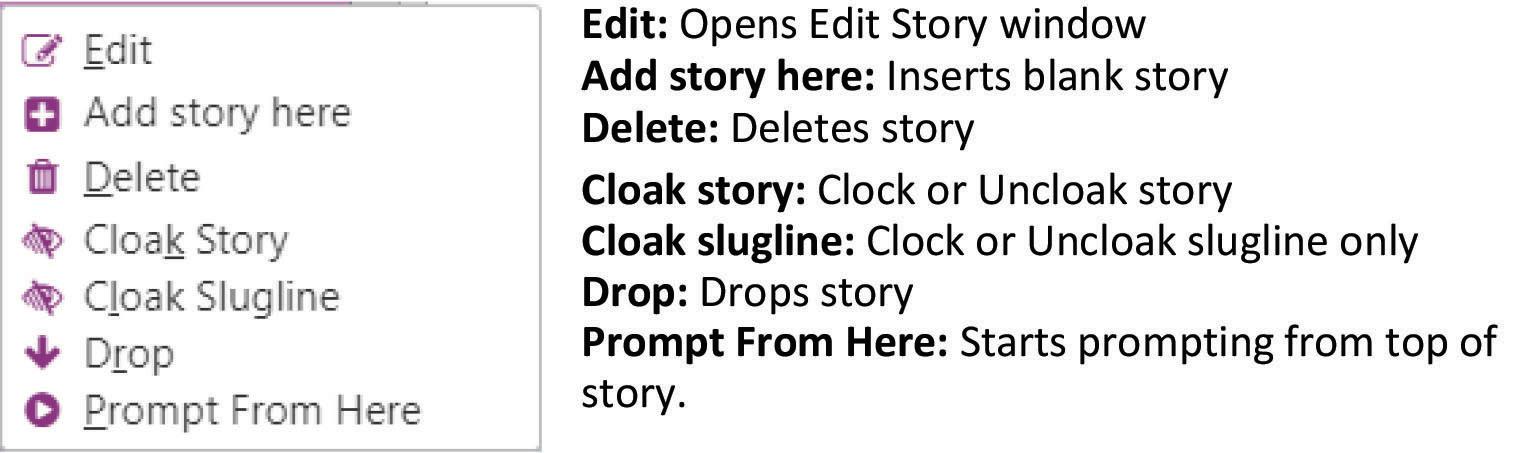
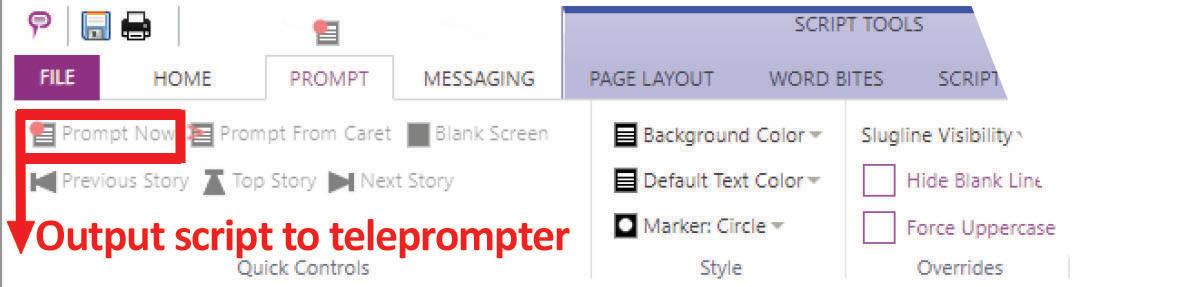
Fig. 7: Options when right clicking inside the Runorder Panel Fig. 8: CueiT Menu – PROMPT Tab Fig. 9: Quick Control Menu (located at the bottom of the program) Fig. 10: CueiT Menu – SCRIPT Tab 12
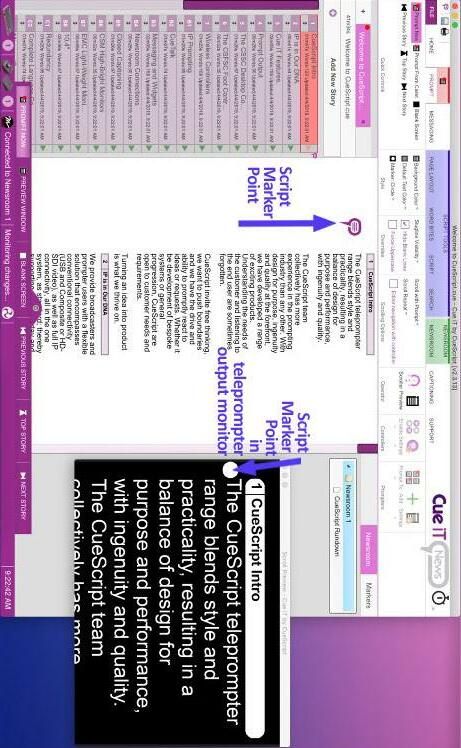
Fig. 11: Script marker Points 13
Fig.
Fig.


12: CueiT Menu – MESSAGE Tab
13: Edit Messaging Widget - Content tab 14
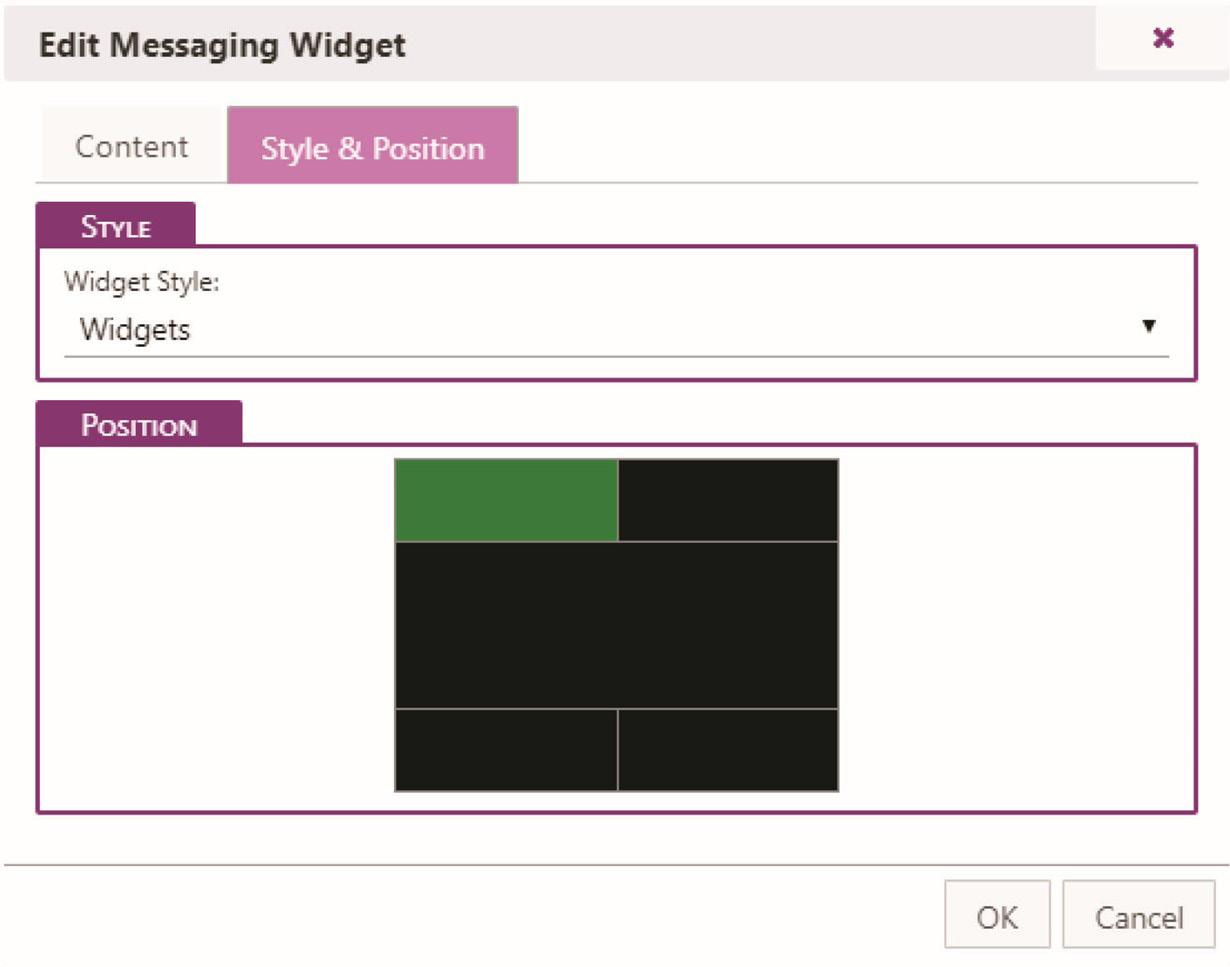
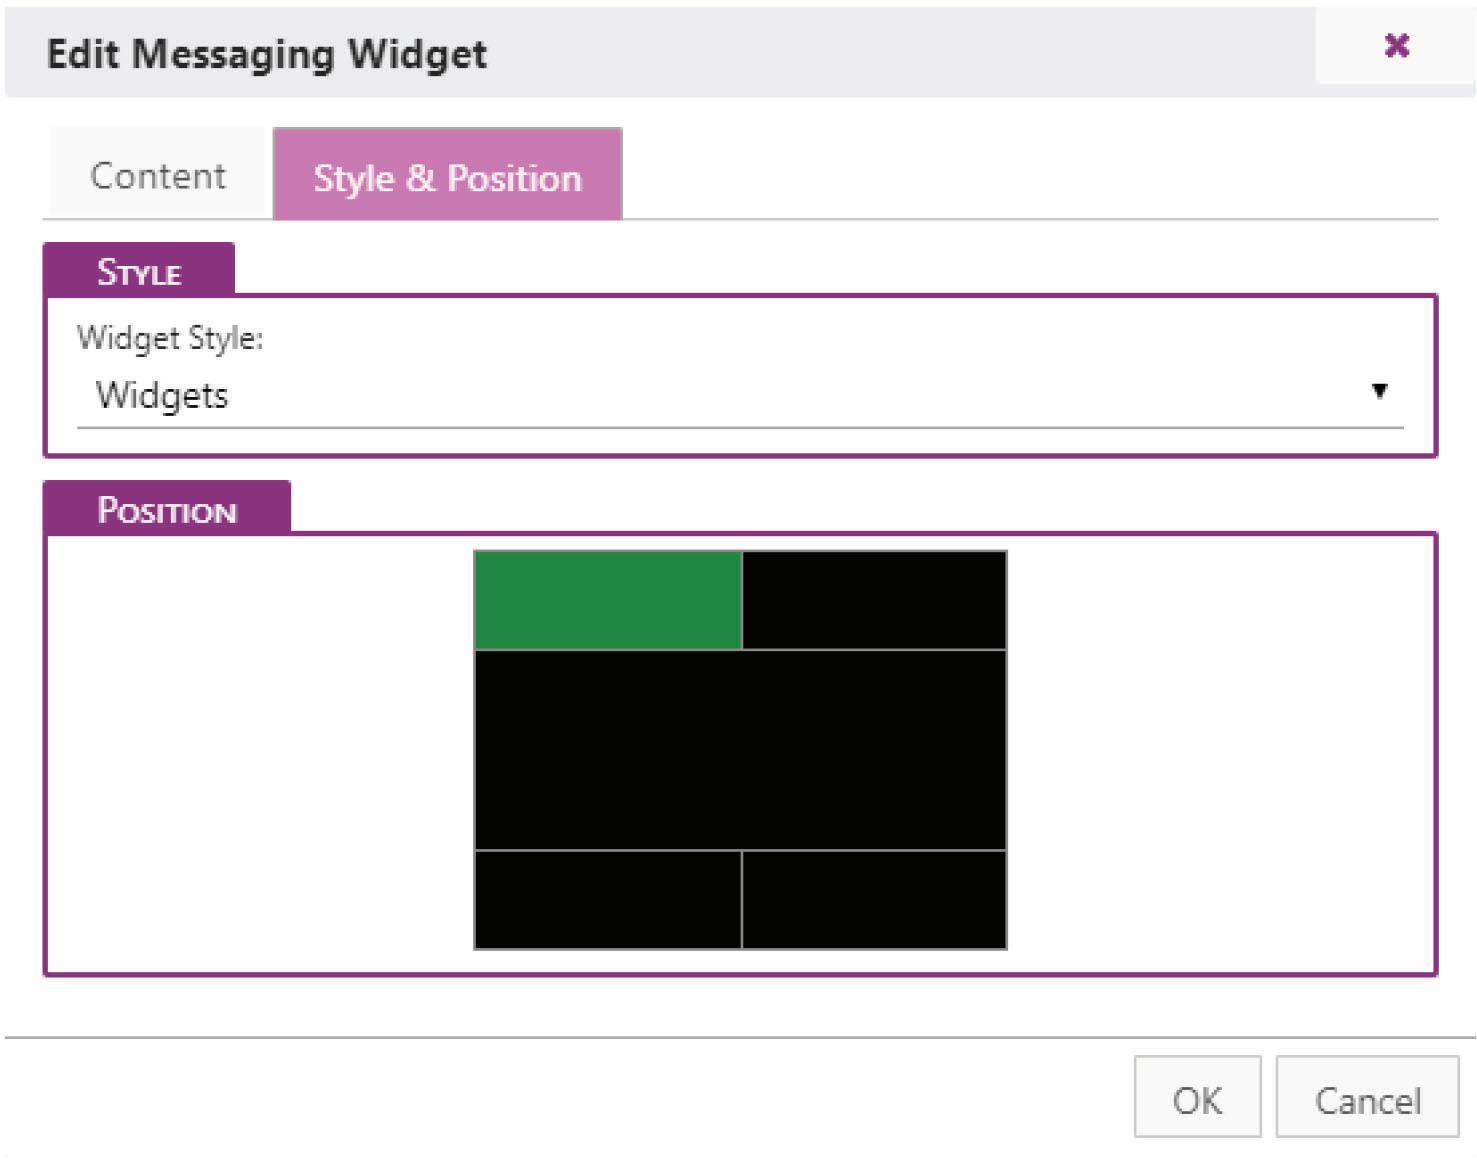
Fig. 14: Edit Messaging Widget - Style & Position tab 15
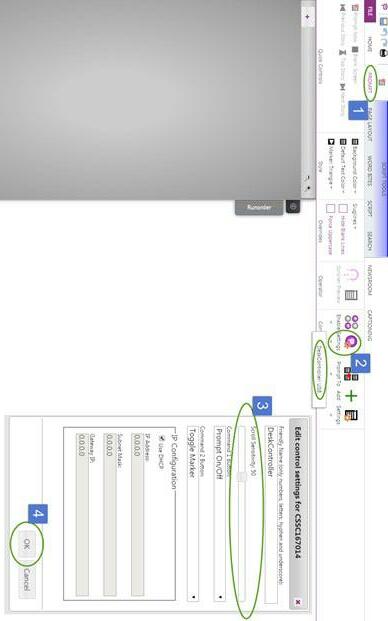
Fig. 15
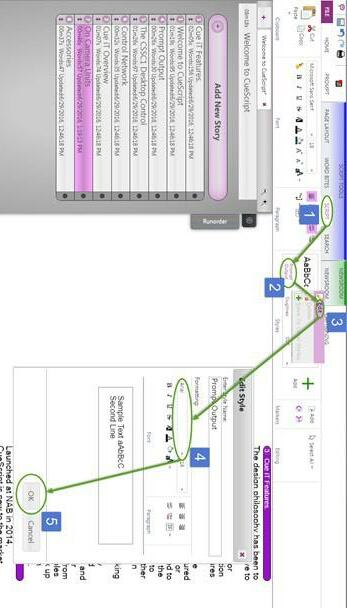
Fig. 16 16
