Building Future Innovators With Computer Science
CODE & CONNECT
GRADE 6

SCHOOL:


SCHOOL:
WizKlub Futurz is an innovation platform to build Human-only skills, that are essential to succeed in school today and in career later. Wizklub Futurz offers a research-based education program designed to develop future skills across Logical Reasoning, Critical Thinking, Problem Solving, and build Inquisitiveness. This helps nurture a creator’s mindset through Technology (coding and robotics) and achieve academic success by enhancing scientific and mathematical aptitude. Our mission is to inspire minds to think a million creative thoughts, tackle real-world challenges, and shape the future.
This is a confidential document prepared by WIZKLUB Futurz. This document, or any portion thereof, should not be made available to any persons other than the authorised and designated staff of the company/institution/vendor to which it has been submitted. No part of this document may be reproduced, stored in a retrieval system, or transmitted, in any form or by any means, electronic, mechanical, photocopying, recording, or otherwise, without the prior written permission of WIZKLUB.
Technology is evolving at a rapid pace, transforming the way we live, work, and communicate. From artificial intelligence and automation to cybersecurity and data science, advancements in technology are shaping every industry. In this rapidly changing digital era, staying updated with the latest technological trends is not just an advantage but a necessity.
Computer Science programs provide students with a strong foundation in coding, computational thinking, and real-world problem-solving. Through hands-on learning, interactive projects, and exposure to emerging technologies, we prepare students for future careers in technology and beyond. By fostering creativity, logical reasoning, and adaptability, we empower students with future-ready skills, enabling them to become not just users but creators of technology.
By the end of this program, you will be able to:
• Describe the fundamentals of computer networking and cloud storage
• Design basic web pages using HTML and CSS
• Apply foundational programming concepts using JavaScript
• Demonstrate internet safety practices and responsible web etiquette
• Develop problem-solving and analytical thinking skills through coding and web app projects
Get ready to explore, learn, and unlock the exciting world of computers!

By the end of this chapter, you will be able to,
• Define a network and its different types
• Explain how computers operate within a network
• Summarise the communication process of computers across various topologies
Let’s start with a scenario!
Imagine four students in a classroom, each working on their computer to write letters to the principal for an essay competition. There is only one printer, but all the computers are connected to it. When they want to print, each computer sends a request to the printer, which then prints each letter one by one, as shown in Figure 1.1.
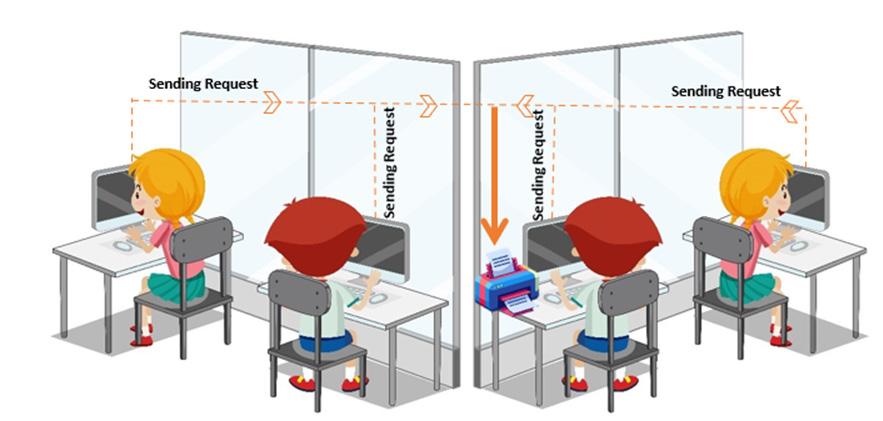
This kind of setup, where devices like computers and printers are connected to send and receive data, is called a computer network.
In this chapter, we’ll learn about computer networks, their different types, and how they work.
A network is a collection of computers and devices that are connected by communication links to share information, resources, and services. These connections can be wired or wireless. The process of communication among several network/ hardware devices is called as Networking.
Networking enables:
• Sharing files and resources
• Playing online games
• Accessing the internet from almost anywhere
• Connecting computers globally
Figure 1.2 illustrates a computer network, where different network devices are involved to set up the network.
Networking brings us a lot of benefits. Let us have a look at some of the advantages of networking before exploring it.
Advantages of Networking
Networking provides lot of advantages. Some of them are:
• Networks make sharing information and pictures quick and easy.
• People can work together on projects from different places.
• Sharing resources on a network saves money.
• Friends can play games together online from anywhere.
• Networks help keep files safe by creating backups.
Figure 1.2 showcases various networking devices used to form a network. Let us study them in brief.
I. Client - A client is a computer that can access the services and resources the server provides. Clients are also called Workstations. For example, the computer that you are using in the school system is a client.
II. Server- A server is a computer that provides required resources and services to all the clients (mostly a computer) within the network. For example, the school’s central computer that stores all student data.
III. Switch- A switch in a network is a hardware device that helps control the information flow among different devices.
IV. Router- A router is a hardware device that helps multiple devices connect to the internet and manages the flow of information. For example, at home, the router connects your family’s computers, tablets, and phones to the internet, allowing them to access websites and share data.
V. NIC- NIC stands for Network Interface Card. It is a hardware component that connects a computer with other computer networks. It is a small card in a computer system that establishes a wired or wireless network among computers.

The communication link in a network can be wired or wireless. It is also referred to as network media. Let us study wired and wireless communication and how it is used to establish a network.
A network media is a communication channel used to connect various hardware devices in a network for data transmission. Have you ever noticed how TV cables are connected to the television to broadcast different channels? Similarly, you use your remote to turn the TV on and off, change channels, and adjust settings. These are two different types of communication channels.
Types of Network Media
Network media can be classified into two types: Wired and Wireless
I. Wired Network Media:
Wired network media consists of physical cables that connect devices in a network. Some examples include:
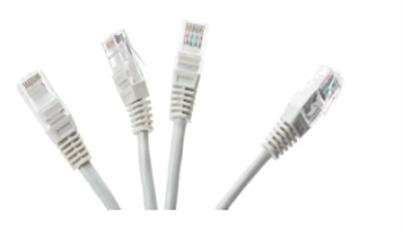
a. Ethernet Cable: This cable connects computers to routers or switches in smaller areas like a computer lab, office room, or conference room.
b. Coaxial Cable: This cable transmits high-frequency signals with minimal loss and is commonly used for cable television or broadband internet.
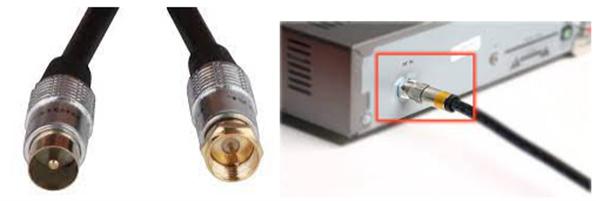
1.9: Coaxial Cable used in connection of Television setup box
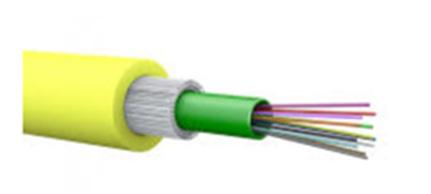
c. Fiber Optic Cable: A high-speed cable that uses light signals to transmit data, commonly used for long-distance and high-bandwidth connections.
Wireless network media uses radio waves or infrared signals to transmit data without physical cables. Some common examples include:
a. Wi-Fi: Wi-Fi (short for“Wireless Fidelity”) allows devices to connect to the internet without cables. It provides a connection within a specific range, such as connecting your mobile phone to your home network.

b. Bluetooth: Bluetooth is used for short-range connections between devices like smartphones, tablets, and wireless headphones. It typically works within a range of 10 meters.
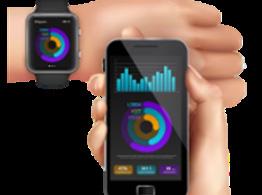
Figure 1.12: Smartwatch connected to a smartphone via Bluetooth
To get a clear understanding of the network, perform the given lab activity in your next lab session.

Visit your computer lab and observe how the computer systems are connected to each other. Investigate if all the computers have internet access and how they connect to the network. Answer the following questions based on your observations:
1. How many computers are there in the computer lab? _____________
2. How many computers are connected to each other? _____________
3. How many computer systems have internet connectivity? _____________
4. Are the computers connected to the internet using Wi-Fi or wires? _____________
5. If they are connected using wires, can you identify the type of wire used?
A computer network is classified into five types based on the size and coverage. They are:
I. PAN - PAN stands for Personal Area Network. This network is formed among devices that are available to an individual. Figure 1.14 shows the network formed between the computer system and other hardware devices in a short range of not more than 10 meters.

II. LAN - LAN stands for Local Area Network. This network is formed among devices available in a small area such as an apartment building, railway station, mall, corporate building, or school premises. Figure 1.15 shows the network formed in a local area.

III. CAN – CAN stands for Campus Area Network. This type of computer network used in places like schools or colleges, covering a limited area across multiple buildings within a campus. It has a range of 1 to 5 km.
IV. MAN - MAN stands for Metropolitan Area Network. This type of network is formed within the entire city. For example, the telephone network among cities is formed either through cables/wires or modems.
V. WAN - WAN stands for Wide Area Network. It is a large network that connects two or more LANs or MANs. This type of network is formed in a large geographical area. For example, connecting various databases, and the Internet.
Given below are some cases that utilise the above types of networks. Let’s do an activity to determine the type of network used

Read the scenarios given below and write the type of network (LAN, WAN, PAN, CAN, MAN) that will be used.
1. School computer lab where students share files and printers. ______
2. City-wide network connecting government offices. ______
3. Smartphone controlling smart devices like lights and smart watches at home.
Based on the area, networks are formed as PAN, LAN, CAN, MAN, and WAN. These networks mentioned above can be interconnected in a variety of ways. Let us learn the different types of structures in which a network is formedt.
Network topology refers to the layout or structure of how devices are connected in a network.
Think of pouring water into containers. The water takes the shape of the container.
1.19: Liquid taking the shape of the container
Similarly, a network’s shape or structure decides how devices talk to each other. This structure is called topology.
1.3.1 Types of Topologies
The infographic below showcases the types of topologies:
1.20: Types of Topologies
1. Ring Topology: Devices are connected in a circle. Information passes around the ring until it reaches the right device.
2. Mesh Topology: Every device is connected to every other device. If one path breaks, another is available.
3. Star Topology: All devices connect to a central hub. If the hub fails, the whole network stops.
4. Fully Connected Topology: All devices are connected to each other directly. It’s very reliable but uses a lot of connections.
5. Line Topology: Devices are connected one after another in a straight line. If one
connection breaks, the rest beyond it lose contact.
6. Tree Topology: Looks like branches of a tree, where smaller networks (branches) are connected to a larger central network (trunk).
7. Bus Topology: All devices share one main wire (bus). If the wire breaks, the whole network stops working.

Network - A network is a collection of devices that can send and receive data, by communication links.
Topology - Topology is the structure of a network used for communication purposes.
Networking Media - Networking media are the communication channels that are used to connect various devices. The channels can either be wired or wireless.

• A network is a group of devices or computers that are connected together and can communicate with each other.
• There are different types of networks, including LAN, WAN, CAN, MAN and PAN.
• Network media are the channels used to connect devices, including wired (Ethernet, Coaxial, Fiber Optic) and wireless (Wi-Fi, Bluetooth) connections.
• Network Topology refers to the physical or logical layout of a network, including how devices are connected and how data flows between them.
• The common types of network topologies are Bus, Star, Ring, Mesh and Tree.

I. Fill in the blanks
2. Communication is the process of exchanging ____________and ideas between individuals or groups.
3. A network is a group of ______ that are connected and can ___________ with each other.
4. Bluetooth is a _________ network technology that connects several devices in a
short range, often within ___ meters.
5. The computer or device that _______ out messages or data on a network is called a Sender or Server.
6. The Internet is the best example of ________ Area Network.
II. Choose the correct answer
1. A network is a collection of
a. Software
b. Hardware Devices
c. Memory Devices
d. Operating System
2. Networking media are
a. Only wired
b. Both wired and wireless
c. Only wireless
d. Only cables
3. LAN is an acronym for
a. Local Area Network
b. Localized Area Network
c. Long Area Network
d. Local Area Networking
4. Topology refers to
a. Functions of a network
b. Structure of a network
c. Properties of a network
d. Types of a network
III. Answer the following
1. Write a paragraph about Topology and mention its types.
2. Explain Star Topology and its working mechanism with a proper diagram.
3. How many types of networks are there? Explain any two of them with one example each. Activity Time

Form a group of four. Bring any kind of Bluetooth-enabled device, such as smartphones, digital watches, Bluetooth headphones, laptops, etc., to class. Try pairing devices with
each other; for instance, pair different types of devices, such as smartphones with laptops or tablets with headphones, for building a Bluetooth PAN at class.

Imagine your computer, tablet, or smartphone is a house, and the devices around it are your neighbours. Your task is to create a “Digital Neighbourhood” project, showcasing how devices can connect and communicate within a network.
• Draw a simple map of your“Digital Neighbourhood,”using symbols or illustrations to represent different devices.
• Label each device with its type (e.g., computer, smartphone) and give them creative names.
• Connect these devices using lines, using different colors or styles to represent various types of connections (e.g., dotted line for Wi-Fi, solid line for Bluetooth).
• Explain the symbols and line styles used in your map.
• Write short descriptions or captions for each device, explaining how they interact with others in the neighbourhood (e.g., “Tablet Tim shares photos with Laptop Laura over Bluetooth”).


By the end of this chapter, you will be able to,
• Define the concept of cloud storage
• Summarise the working principle of cloud storage
• Identify the advantages and disadvantages of using cloud storage
• Explore the types of cloud storage and their practical applications
You already know that devices like Hard Disks, RAM, and CDs are used to store our important files, like photos, homework, and videos. But these devices have some problems:
• They don’t have unlimited space.
• They can get damaged easily.
• They’re not easy to carry everywhere.
Now, imagine your computer gets damaged due to an electrical shock, and all the files you saved are lost. It would be so disturbing. Right?
But what if you had an amazing digital storage space that keeps all your files safe, even if your computer breaks? That’s the amazing thing about the cloud!
The cloud is like a giant, invisible storage room on the Internet where you can save your files. Here’s why it’s awesome:
• Your files are safe and secure
• You can access them from any device, anywhere, anytime.
• You’ll never run out of space.
This chapter will teach you about the cloud and why it’s important, the various types of available cloud storage, and how they bring benefits to people in their daily lives.
Let us get started!
Nowadays, people upload all the important files and documents in the cloud to make sure they are stored safely. But what exactly is the cloud? When you save files in the cloud, you’re saving them on powerful computers called servers. These servers are connected to the Internet, so you can open, download, or upload your files anytime and from anywhere using a device with an Internet connection.
The cloud is like a giant library of servers that does many amazing things. It provides:
• Storage space for files, photos, and videos.
• Online tools and apps to work on.
• Resources to help with big projects. You can use these services as long as you are connected to the Internet. You can upload your files to the server to keep them safe or download them whenever you need them. Many companies offer cloud services to make storing, sharing, and working with files easier.
To understand the cloud better, let’s take a closer look at cloud storage.
Cloud Storage is the process that an individual or an organisation follows to save or keep a backup of all important data in a remote database. Let us understand the working principle of cloud storage.
The cloud contains powerful computers called servers. These servers act as guardians of files, making sure they are kept safe and organised. All these servers are located in special buildings called data centres, which can be found in various places around the world.
When you save a file on the cloud, like a photo, video, or document, it is directed from your computer or phone to one of the servers in a data centre. Think of it like sending your file to a special storage room in the cloud.
Once your file is in the cloud, you can access it again whenever you want, from any device that can connect to the internet, such as a computer, tablet, or smartphone.
2.2.2
There are many cloud storage services available that allow you to store your data
safely and access it from any device. Some of the most popular cloud storage services are shown in Figure 2.4, and Table 2.1 summarises their features.
Cloud Storage Services Developer Development Year
Drop Box
Dropbox Inc. 2007
iCloud Apple Inc. 2011
Google Drive Google 2012
Microsoft OneDrive Microsoft 2007
Dropbox Inc. Box, Inc.
Description
User-friendly cloud storage service for secure file storage and sharing, with seamless synchronization across devices.
Apple’s cloud storage solution integrates with Apple devices, providing storage for files along with synchronization for photos, contacts, and more.
Apple’s cloud storage solution integrates with Apple devices, providing storage for files along with synchronization for photos, contacts, and more.
Microsoft’s cloud service is deeply integrated with Windows and Office applications, offering storage, document sharing, and collaboration.
Cloud service is known for robust security features and collaboration tools, widely used in business environments.
Important Features
- Easy file sharing
- Cross-platform compatibility
- File versioning
Device synchronization
- Seamless integration with Apple ecosystem
Real-time collaboration
- Integration with Google Workspace apps - Generous free storage capacity
- Integration with Office 365
- Real-time collaboration
- Cross-platform compatibility
- Advanced access controls
- Collaboration tools for business
- Secure file storage


All these cloud storage services come with their own set of advantages and
disadvantages. Let’s take a closer look at the benefits and drawbacks of using cloud storage.
Accessible from anywhere with an internet connection Requires internet to access files
Acts as a backup, keeping files safe if your device is damaged.
Security risks if data is not properly protected Makes file sharing and collaboration easy Can be costly, especially for large storage plans
Offers large storage capacity, often more than your device
Can be slower to access files compared to local storage, depending on internet speed
Table 2.2: Advantages and Disadvantages of cloud storage
Let’s test your knowledge in recognising the correct type of storage.

Given below are some storage service providers. Tick the correct option to which they belong. (Take help from the teacher to complete this activity.)
Cloud storage comes in three types. They are Public, Private, and Hybrid cloud storage.
Figure 2.5 shows the three types of clouds

Figure 2.5: Different types of Cloud
Now let us try to understand each type of cloud with an example. Imagine you have to reach school on time, and you have three options. Figure 2.6 shows the options.

2.3.1 Public Cloud
The Public cloud is like option 1, where all students like you can get onto the bus and use it to reach school. Similarly, the public cloud is like the school bus which is accessible to everyone, that is an individual and organisations, and is managed by a third-party service provider. The third party can be an organisation that takes full responsibility for owning, maintaining, and operating the infrastructure provided by the public cloud.
Table 2.3 shows the advantages and disadvantages of public cloud.
Cheaper due to shared resources
Accessible from anywhere with internet
No need for setup or maintenance
2.3.2
Less secure, as resources are shared
Depends on internet speed; slow connections can cause problems
Fewer customization options
Table 2.3: Advantages and Disadvantages of public cloud storage
The private cloud is like option 2, where your parents are the owners of that car, and no one is allowed to get inside the car or use the car for another purpose without their permission. Similarly, the resources provided by the cloud are dedicated to a single organisation where the resources cannot be shared with other organisation or people outside the organisation.
Table 2.4 shows the advantages and disadvantages of private cloud.
Higher security, controlled access
Large storage capacity
Full control over data
Expensive to set up and maintain
Needs a stable internet connection
Managing and configuring it can be complex
Good for storing sensitive or confidential data Requires more effort and resources to manage
Table 2.4: Advantages and Disadvantages of private cloud storage
The hybrid cloud is like option 3, where either you or a group of students can take a taxi to reach school. Similarly, the resources provided by the cloud service providers can be accessible and used by an organisation privately or be made public on special requests and permissions/requirements.
Table 2.5 shows the advantages and disadvantages of Hybrid cloud.
More storage space (combines public and private clouds)
Flexible, allows data to be stored in the best place
Backup available in two places (public and private)
Requires a good internet connection to access files from the cloud part
Security risks if not properly managed
Can be costly
Can be faster, depending on the storage choice More complex to set up and manage
Table 2.5: Advantages and Disadvantages of hybrid cloud storage
Now let us see some key differences among these types of clouds. Table 2.6 illustrates the differences with respect to accessibility (who can use), ownership (who owns and manages), examples.
Aspect Public Cloud Private Cloud Hybrid Cloud
Accessibility
Ownership
Shared by many users on the internet
Owned and operated by a third party
Example
Exclusive access for specific users
Owned and operated by a single organization
Google Cloud, AWS, Microsoft Azure company internal server
Combination of shared and exclusive access
Mix of third-party and private ownership
Using both a public cloud and private server together
Table 2.6: Differences among, public, private, and hybrid cloud storage

Perform the activity in your computer lab. With the help of your teacher, use the Google Drive, one of the cloud storages, to upload data. The data can be any picture, document, video, etc. Delete the data from your local computer after uploading to Google Drive and observe how amazing it is to access your data from cloud when it
is not available in your local computer.

Conduct a survey among your friends, seniors, neighbours, family. Write down the names of the cloud storage services that they use for their data.
Cloud storage has become an integral part of our daily lives, providing a convenient solution for managing our ever-growing digital data. Whether opting for a public, private, or hybrid approach, the cloud offers a dynamic and flexible storage solution for individuals and organisations.

Cloud- Cloud refers to the collection of servers that provide or host software and infrastructure such as storage space, working on online applications, lot of resources that can be accessed over the Internet.
Cloud storage - A method of storing data on remote servers accessed through the internet, allowing users to store and retrieve files from anywhere with an internet connection.

• Cloud storage is like a magical space on the internet where you can store your files and data.
• It’s different from local storage methods because your files are stored on remote servers, accessible from any device with an internet connection.
• Cloud storage provides advantages such as accessibility, scalability, costeffectiveness, and enhanced security.
• Cloud storage also has disadvantages like internet dependence and limited control over the servers.
• There are different types of cloud storage, including public, private, and hybrid options, each serving different purposes.

I. Fill in the blanks
1. Cloud storage is a method of storing data on ______________ servers accessed through the internet.
2. Cloud storage allows users to access their files from anywhere with an ______________ connection.
3. Traditional data storage methods involve storing files on physical devices such as hard drives or ______________.
4. Public cloud storage examples include Google Drive, Dropbox, and ______________.
Write “True” or “ False
1. Cloud storage allows users to access their files only from the device where they were originally saved.
2. Traditional data storage methods involve storing files on physical devices.
3. Cloud storage is accessible from any device with an internet connection.
4. Public cloud storage is dedicated to one organisation or person and is more secure.
1. What is cloud storage?
2. How does cloud storage differ from traditional data storage methods?
3. What are some data security measures taken by cloud service providers to protect users’ files?

Find five terms related to cloud and storage of the computer in the grid

Imagine you are the “Digital Guardian” of a magical cloud kingdom, responsible for organizing and storing digital treasures. Your task is to create a project that showcases your understanding of cloud storage. Your task is to draw containers or storage units within your Cloud Kingdom to represent different cloud storage solutions. Label each container with the name of a popular cloud service (e.g., Google Drive, Dropbox) and indicate what type of digital treasures are stored in each.


By the end of this chapter, you will be able to,
• Define computer viruses and safety rules for computer usage
• Explain various computer virus types and their threats
• Compare different safety measures for virus protection
Computers are an essential part of our daily lives, helping us learn, play, and communicate. However, computers also face some potential dangers while handling important files. One of these dangers are the “Computer Threats”. One of the most common threats is a computer virus, which is a type of malicious software (malware) designed to cause harm to the computer and its data. When we hear the word “virus”, we often associate it with getting sick. However, it’s interesting to note that computers can also become “sick” just like our bodies do. Similar to how we can catch a cold or the flu, computers can catch a virus as well.
In this chapter, you will explore various threats that infect the computer and how you can take measures to identify and keep your data safe.
A threat refers to any danger that can harm your computer or compromise the information stored on it. Threats can be intentional (like a hacker trying to steal data) or unintentional (like spilling water on your computer). They can also be caused by human actions or natural events.
There are different types of threats, like viruses, worms, Trojans, Malware, Spyware, Spam, Phishing, and Physical Damage
3.2: Computer threats
Let’s look into each type of threat one by one.
Computer Virus is a type of software program that are written with the intention of damaging data in a computer. It can duplicate and spread from computer to computer, often through email attachments or downloads from untrusted websites. Viruses can cause damage to files, slow down the computer, or steal personal information.
Figure 3.3: Full form of Virus
Computer viruses spread by attaching themselves to other computer program files.
When you exchange a file or pen drive with a virus, the virus spreads from one computer to the other. Opening an infected email attachment is the most common way to get a virus.
Let us learn about different types of viruses! for individuals and organisations.
Viruses can be classified into two major categories:
Figure 3.4: Types of Computer Viruses
I. Boot viruses: A boot virus is a harmful program that infects the boot sector of a storage device like a hard drive or floppy disk. A boot virus can prevent the computer from starting up correctly, cause errors and crashes, and even damage or delete important files.
Example: Disk killer, Stone virus
II. Program File Viruses: A program file virus is a type of computer virus that infects executable files, such as those with extension .exe, .com, etc. When the infected program is run the virus spread and can move between computers.
Examples: Cascade, Sunday
When these viruses are in a computer, it is important to understand the symptoms that they show.

Elk Cloner was the very first self-replicating computer virus to spread to personal computers. It was created in 1982 by a 15-year-old named Richard Skrenta, a high school student from the United States. Initially, it wasn’t designed to harm computers, but rather as a prank. It targeted the Apple II computers, which were quite pop-
Here are some symptoms of virus affected device:
• Unexpectedly shutdowns or restarts
• Missing or damaged files
• Frequent system crashes or error messages
• Slow computer performance due to memory usage
• Strange movements or patterns on the screen
• Unexpected pop-up windows
Here are some steps to keep your computer safe from viruses:
• Back up your files: Save important documents and files on an external drive or in the cloud.
• Update regularly: Ensure your computer and apps are regularly updated for security.
• Be cautious with links: Avoid clicking on unfamiliar or suspicious links.
• Download from trusted sources: Only download apps and files from trusted websites or app stores.
• Ask for help: Seek guidance from a trusted adult if something seems unusual online.

Picture yourself as a secret code solver! The sneaky virus has left a message. Each number matches a letter. Use the key to uncover the message: Key: 1 = A 6 = F 11 = K 16 = P 21 = U
Message: 22 9 18 21 19 1 20 20 1 3 11 5 4
What does the message say? Decode it and discover how to outsmart the Virus Villain!
You’re a fantastic code solver! The secret message guides you to the challenge page to find a clue and defeat the Virus. Awesome work!
Figure 3.6: Computer Worms
The next computer threat is computer worms. A computer worm is similar to a virus, but it can spread automatically across computers without needing any help from users. Worms can be transmitted over the internet and cause damage such as stealing personal information, deleting files, or even taking control of your computer.
Example: Conficker (2008)
Some key differences between worms and viruses are:
Spreading Method
Virus: Needs people to open and share infected files.
Worm: Travels between computers automatically.
3.1
Speed of Spread
Virus: Spreads more slowly.
Worm: Spreads quickly through networks on its own.
3.7: Trojans
Trojan is another well-known computer threat also known as a Trojan horse. It is a type of malicious software that looks like a harmless program but has a hidden harmful purpose which acts as a threat to the computer’s security. To protect your computer from Trojans, it’s important to be careful about what you download and install. Make sure to only download software from trusted sources.
Malware is a broad term for malicious software, including viruses, worms, Trojans, and spyware, designed to harm your computer or steal your personal information.
Examples:
• Bancos: A Trojan designed to steal sensitive information like bank account numbers.
• Gator: A spyware program that tracks your internet activity and displays pop-up ads.

Speak to five people who use computers and ask if they’ve ever faced problems due to computer viruses. Find out the name of the virus and what issues it caused on their computer.
Help students understand what viruses, malware, phishing attacks and other types of threats are and how they can harm their computers and personal information.
Spyware is a type of malware that secretly collects personal information, such as browsing history, passwords, and credit card numbers, and sends it back to the attacker. This threat can be installed without the user’s knowledge through downloads or email attachments.
Figure 3.9: Spam
Spam is unsolicited or unwanted email that is sent to a large number of people. It’s called “spam” because it’s like the unwanted junk mail that gets sent to your physical mailbox. Spam emails can contain ads, scams, or even malware. They can be dangerous if they contain links or attachments that can infect your computer with viruses or other types of malwares.
Mail bombing is a type of cyber attack in which an attacker sends a large number of emails to a target, with the intention of overwhelming their inbox and causing disruption.
1. No Personal Email Address: Spam messages often don’t include your email address in the “To” or “CC” fields.
2. Offensive Language or Suspicious Links: Some spam may have bad words or links to websites with inappropriate content.
3.6.2 Protection against Spam
• Use a spam filter to reduce the number of spam emails in your inbox.
• Be cautious about sharing your email address online.
• Don’t respond to spam emails or click on any links in them.
• Set up a separate email address for online accounts and subscriptions.
• Report any spam emails you receive.
Antivirus software is a type of software designed to protect computers from viruses and other types of malwares. It works by scanning files and programs on the computer for viruses, and either quarantining or deleting infected files.
Example: Norton, McAfee, Avast, Bitdefender, Kaspersky, Windows Defender, AVG, etc.






Make sure students understand why it is important to keep their software, including their antivirus software, up to date, and how to check for updates.

In your upcoming lab session, find out about the ‘Antivirus Software’ installed in your school computer system and not the name in given space.
However, it’s important to remember that antivirus software is just one component of a comprehensive security strategy. Other steps, such as keeping your operating system and other software up to date, using strong passwords, and avoiding suspicious websites and email attachments, are also important for maintaining computer security.
To keep your computer safe from viruses and malware, follow these essential safety practices:
• Use strong, unique passwords and change them regularly.
• Keep your operating system and software updated.
• Be cautious about what you download or install.
• Use antivirus software and update it regularly.
• Avoid opening email attachments from unknown senders.
• Do not click on links from suspicious websites or pop-up ads.
• Be careful when using public Wi-Fi networks.
• Backup your important files regularly.

Computer Virus - A Malicious software that can infect and harm computers, often spread through email attachments or downloads from untrusted sources.
Malware - Short for “malicious software,“ it includes various harmful software types such as viruses, Trojans, worms, and spyware, designed to harm or compromise computers and data.
Antivirus Software - Programs designed to protect computers from viruses and other types of malware by scanning, detecting, and removing or quarantining infected files.
Data Backup - The process of copying and storing important files and data in a secure location, such as an external drive or cloud storage, to prevent data loss due to damage, malware, or other issues.

• Computers are vulnerable to various types of threats that can cause harm to both the computer itself and the information it stores.
• Malware is any type of software that is designed to harm your computer or steal your personal information.
• Viruses, worms, and Trojans are some of the most common types of malicious software.
• To protect your computer, it’s important to develop good habits for safe and responsible computer use, including regular backups and software updates, being cautious about what you download and install, and using antivirus and anti-malware software.

I. Fill in the blanks
1. A __________ is a harmful program that can replicate and spread from computer to computer.
2. A __________ virus infects executable files, which contain instructions for the computer to execute a program.
3. A __________ is a type of malicious software that looks like a harmless program but has a hidden harmful purpose.
4. __________ is any type of software that is designed to harm your computer or steal your personal information.
5. __________ is a type of software that secretly collects personal information and sends it back to the attacker.
II. Match the following
Virus
Spyware
Trojans
Worms
Phishing
Malicious programs can replicate and spread from computer to computer.
Type of software that secretly collects personal information and sends it back to the attacker.
Malware looks like a harmless program but has a hidden harmful purpose.
Malware can spread from one computer to another and cause various problems.
The technique used by attackers to trick users into giving away sensitive information.
III. Answer the following questions
1. What is the purpose of using strong passwords for your accounts?
2. How can you create a strong password? Give an example.
3. Why is it important to change your passwords regularly?
4. What are some ways to keep your computer’s operating system and software up to date?
5. How can antivirus software help protect your computer from viruses and malware?

Invent creative characters and villains for your own imagined story. Design characters that represent different computer threats, and give them unique traits or powers. Think of creative ways to show the consequences of getting affected by these threats.

In this project your mission is to become experts in identifying and safeguarding against computer threats. Create a project that explores various computer threats and demonstrates how to stay safe in the digital world.
Design a poster that showcases different types of computer threats. Include visuals and brief descriptions of threats such as viruses, malware, phishing, and unauthorised access.


By the end of the chapter, you will be able to,
• Describe the advanced feature of Excel
• Analyse the formula and functions of Excel
• Demonstrate the advanced features of Excel
In the world of spreadsheets, numbers and data come to life, transforming into valuable information that helps us make decisions, analyse trends, and solve problems. But have you ever wondered how those calculations and complex tasks are managed effortlessly within those rows and columns? That’s where the magic of “Formulas and Functions” and the exciting realm of “Advanced Features of Spreadsheets” come into play!

In this chapter, you are going to unravel the mysteries behind these powerful tools that take your spreadsheet skills to the next level. Let us get started!
MS Excel is an application software, developed by Microsoft, widely used for creating, organising, and analysing data. MS Excel consists of a grid made up of rows and
columns, and each intersection of a row and a column is called a cell. Can you attempt to revise some of the basic concepts that you learned in the previous year by performing the activity? Let’s do it.

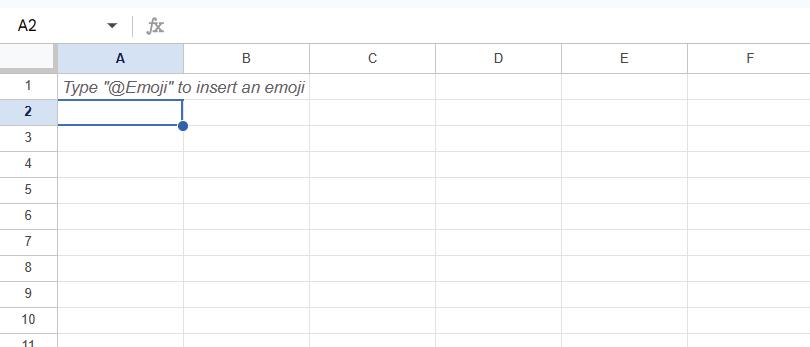
Identify the features of an Excel sheet and fill the boxes with appropriate names.
In the world of Excel, formulas and functions are the building blocks that help transform raw data into meaningful insights. Formulas are customised mathematical expressions you create, while functions are pre-defined operations built into Excel, designed to save time and simplify complex calculations. Together, they form a powerful combination that enables users to perform tasks ranging from basic arithmetic to advanced data analysis effortlessly.
Let us dive deeper into understanding how formulas and functions work and how they can enhance your spreadsheet skills.
One of the most powerful features of Excel is the ability to calculate numerical information using formulas. Excel can add, subtract, multiply, and divide using the
formulas.
To create formulas, we need mathematical operators. Excel uses standard operators in formulas, like plus (+) for addition, minus (-) for subtraction, an asterisk (*) for multiplication, forward slash (/) for division, and caret (^) for exponents. All formulas in Excel must begin with an equal sign (=) and should be inside a new cell. To create a formula, we must know what cell references mean.
A cell reference is a way to tell Excel where to find numbers in your worksheet. For example:
• Cell A1 contains the number 5, and cell A2 contains 2.
• To add them, type =A1 + A2.
If you change the numbers in A1 or A2 later, Excel will update the answer automatically!
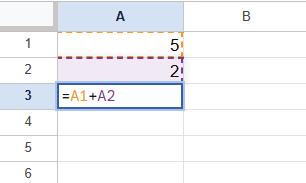
Figure 4.3: Adding two values using cell references
Let’s add two numbers using formulas:
1. Write =A1 + A2 in a blank cell, like A3.
2. Press Enter, and the answer will appear.
3. If you change A1 to 16 and A2 to 12, Excel will automatically calculate 16 + 12 = 28. Figure 4.4 shows the use of formulas in cell references.
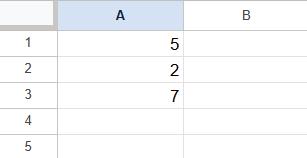
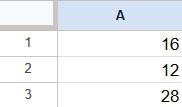
Figure 4.4: Changing cell values
Cell references allow you to refer to the values in other cells within your formulas. Table 4.1 shows some examples of common formulas used in Excel.
=A1 + A2
=C4 - 10
=E5 / F5
=N10 * 2.25
=G5^2
Adds cells A1 and A2
Subtracts 10 from cell C4
Divides cell E5 by F5
Multiplies cell N10 by 2.25
Finds the square of cell G5
Table 4.1: Various types of formulas
Note: Remember to start a formula with an equal sign (=). This tells Excel that you’re entering a formula, not a simple text or number.

In your upcoming lab session, perform the following activities in MS Excel. You need to calculate the total amount of the product purchased.
1. Create a data set as given in the figure below.
2. Select the cell that will contain the formula, here the selected cell is E2.
3. Type the equal sign (=).

4. Type the cell address of the cell you want to reference first in the formula cell
which is C2. A blue border will appear around the referenced cell.

4.7: Selecting the cell
5. Type the mathematical operator you want to use. Here it is multiplication (*).
6. Type the cell address of the cell you want to reference second in the formula: D2. A red border will appear around the referenced cell.

Figure 4.8: Type the cell address
7. Press enter on your keyboard. The formula will be calculated, and the value will be displayed in the cell. You could also see the formula used in that particular cell in the formula bar.

Figure 4.9: Calculate the formula
Figure 4.9 calculates only for one product that is toothpaste. To calculate for remaining products, you need the same formula. The result would be,

Figure 4.10: Result
A function is like a shortcut for writing formulas. Instead of typing the math yourself, you can use built-in tools like:
Function
Example Meaning
SUM =SUM(A1:A5) Adds up a range of values
AVERAGE =AVERAGE(A1:A5)
MAX =MAX(A1:A5)
MIN =MIN(A1:A5)
COUNT =COUNT(A1:A5)
Table 4.2: Function
Calculates the average of a range of values
Finds the maximum value in a range
Finds the minimum value in a range
Counts the number of cells that contain numbers in a range
Example: To add the numbers in cells ranging from A1 to A5 type =SUM (A1:A5) and press Enter.

Equal to Sign Range of cells Arguments
1. Syntax refers to the rules and structure that define the correct arrangement of words, symbols or elements in a language or system.
2. To get the current date: Ctrl+;(Semicolon)
In order to understand some more features in MS Excel it will be easier for you to understand it through activity that you have to perform in your computer lab.

For this activity, create a sample spreadsheet and work through exercises that incorporate different features such as SUM, AVERAGE, MAX, and MIN. Follow along the given steps to complete the activity.
Step 1: Open Excel and create a new blank workbook.
Step 2: Label the columns in the first row. For example, you can have the following column headers in cells
A1: Item
B1: Quantity
C1: Price
D1: Total
Step 3: Fill in the data in the subsequent rows. In this example, you can enter different items, their quantities, and prices. Let’s say you have three items, so you can enter the following data as shown in Figure 4.12.

Figure 4.12: Data on rows and columns
Step 4: Calculate the total cost for each item. In cell D2, enter the formula “=B2*C2” and press Enter. This formula multiplies the quantity (B2) by the price (C2) to calculate the total cost for the first item. Then, click on the cell D2 and drag the fill handle (a small square in the bottom right corner) down to copy the formula for the remaining items. The total cost for each item will be automatically calculated.

Figure 4.13: Calculation of total cost
Step 5: Calculate the total quantity of all items. In cell B5, enter the formula “=SUM(B2:B4)” and press Enter. This formula adds up the quantities in cells B2 to B4 and gives you the total quantity.
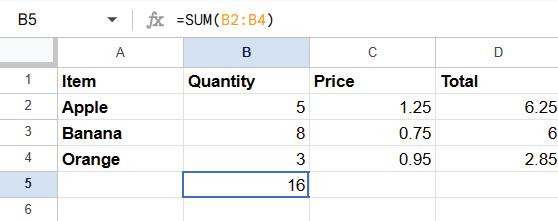
Step 6: Calculate the average price of the items. In cell C5, enter the formula “=AVERAGE(C2:C4)” and press Enter. This formula calculates the average of the prices in cells C2 to C4.
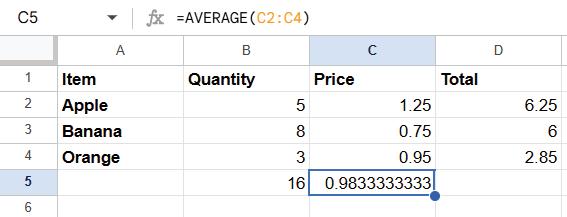
Figure 4.15: Calculation of average price using AVERAGE function
Step 7: Find the maximum and minimum prices. In cell C6, enter the formula “=MAX(C2:C4)”to find the highest price. In cell C7, enter the formula“=MIN(C2:C4)” to find the lowest price.
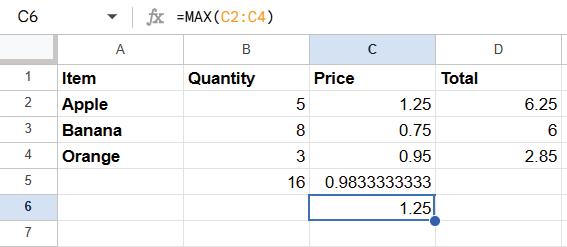
Figure 4.16: Calculation of maximum price using MAX function
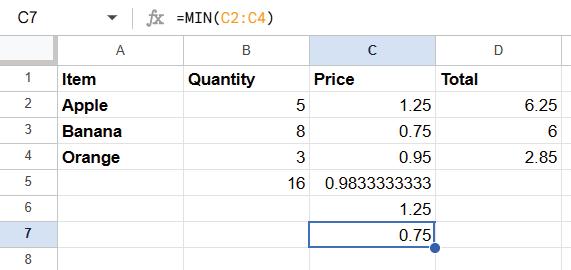
Figure 4.17: Calculation of minimum price using MIN function
You’ve created a sample spreadsheet and performed calculations using different Excel features. You can experiment with more exercises by adding additional data and applying other functions to further explore the capabilities of Excel.
By using cell references, arithmetic operators, and functions, you can perform various calculations and manage data within your Excel spreadsheets. Experimenting with different formulas and functions will help you gain a deeper understanding of their capabilities and expand your knowledge in Excel.
If you are having trouble finding the right function, the ‘Insert’ function command allows you to search for functions using keywords. The insert function command can be a powerful way to find a function quickly.
In this example, we will apply the Date function using predefined functions. The procedure is as follows:
1. Click the drop-down button of the AutoSum on the Home Tab.
2. Click on More Functions (the last option in the drop-down menu)
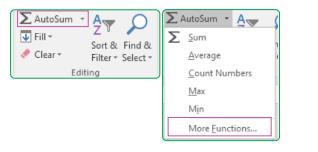
Figure 4.18: Method to insert more functions
3. The Insert Function dialog box will appear.
4. You can type the function name as ‘date’ in the Search for a function box and click GO. (Or)
5. Select a function category as the date from the Select a category drop-down list.
6. Select the function name from the Select a function list
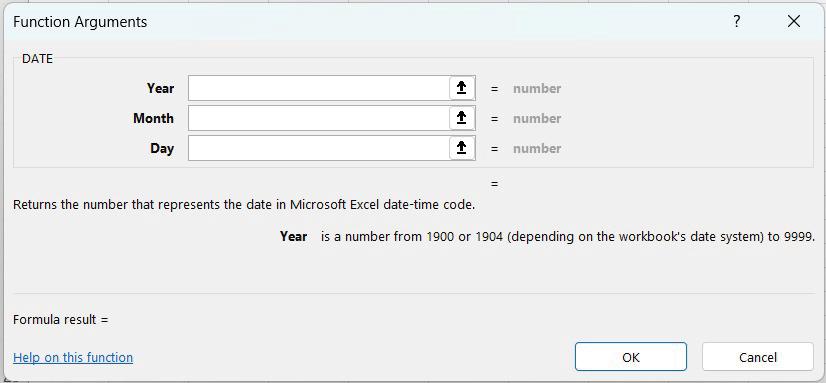
4.19: Selection of a function
7. Click on the OK button
A Function Argument Dialog Box will appear. Fill in the text box with Year, Month and Day. Click the ‘OK’ Button.
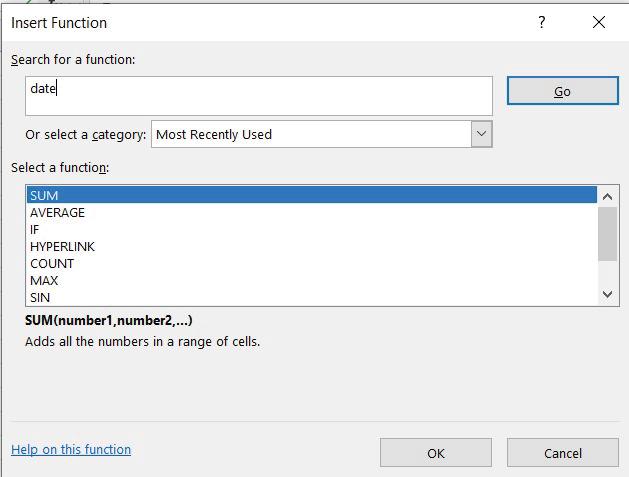
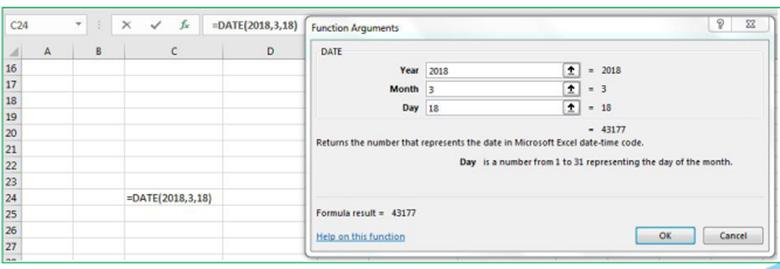
4.21:
Next up we will see more advanced features of excel. These formatting techniques can make your spreadsheet more organised and visually appealing.
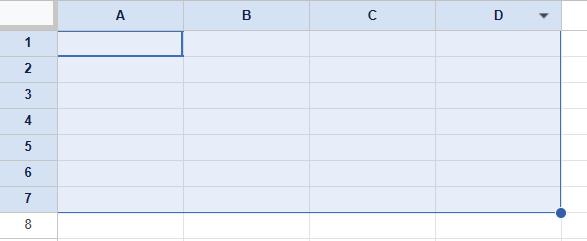
I. Adjusting Column Widths
To adjust the width of a column to fit the contents, you can do one of the following:
• Double-click the right edge of the column header. Excel will automatically adjust
the width to accommodate the widest cell content in that column.
• Manually adjust the column width by dragging the right edge of the column header to the desired width.
Drag to resize multiple columns
II. Applying Font Styles and Sizes
You can change the font style and size to enhance the readability of your data. Here’s how:
• Select the cells or range of cells that you want to format.
• In the Excel toolbar, locate the Font options. You can find options such as font style, font size, bold, italic, underline, and more.
• Choose the desired font style, size, and any other formatting options you prefer.

III. Adding Borders
Borders help separate and distinguish different sections of your spreadsheet. To add borders to cells or ranges:

• Select the cells or range of cells to which you want to add borders.
• In the Excel toolbar, locate the Borders options. You can find options to add borders to the top, bottom, left, right, or around the selected cells.
• Click on the desired border options to apply them.
You can add shading or fill colour to cells to make them stand out or group related information. Here’s how:

• Select the cells or range of cells that you want to shade.
• In the Excel toolbar, locate the Fill Colour options. You can choose from a variety of colours to apply as the background colour of the selected cells.
• Click on the desired fill colour to apply it to the selected cells. Remember to use formatting techniques consistently throughout your spreadsheet to maintain a professional and organised appearance.
Sorting and filtering data helps you organise and analyse large sets of data. Here’s how to do it:
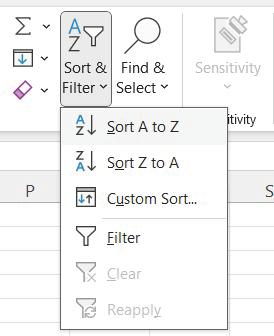
Select the range of cells containing the data you want to sort or filter.
In the Excel toolbar, locate the Sort and Filter options. Use the Sort buttons to sort data in ascending or descending order based on one or more columns. To filter data, click on the Filter button. This will add filter dropdowns to each column header, allowing you to selectively display data based on specific criteria.

Create a gradebook spreadsheet to practice advanced spreadsheet concepts, such as using functions to manage student grades. Enhance readability and visual appeal by adjusting column widths, applying font styles, and adding borders and shading. These formatting options make your data easier to understand and navigate.
Next let’s learn how to use conditional formatting to highlight data based on criteria, along with techniques like sorting, filtering, creating pivot tables, and using charts and graphs. These tools help analyse and present data effectively. Let’s dive in!
Pivot tables are useful for summarising and analysing large amounts of data. Here’s how you can create a pivot table:
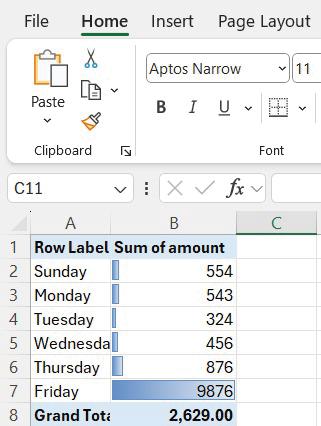
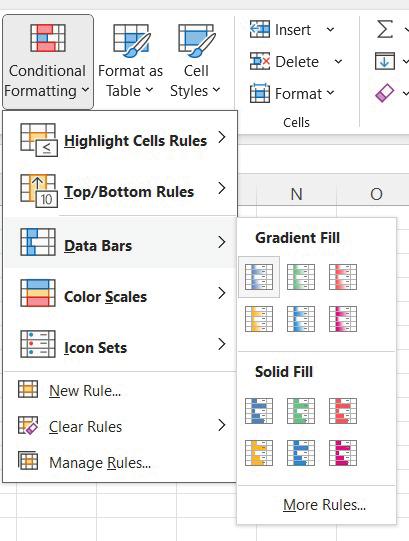
Figure 4.27: Pivot Tables
• Select the range of cells containing the data you want to analyse.
• In the Excel toolbar, locate the PivotTable options. Click on it and follow the prompts to create a pivot table.
• Choose the fields from your data that you want to include in the pivot table’s rows,
columns, values, or filters.
• Customize the layout and calculations in the pivot table to meet your analysis needs.
Charts and graphs are visual tools that will transform numbers into colourful stories and help you understand the data better. Let’s look into how charts and graphs are used in Ms-excel.
4.6.1
A chart is a graphical representation of data. It is used to compare or analyse huge amounts of data on a worksheet. Excel allows you to convert data into charts quickly & easily. You can compare the data with different types of charts - like column, line, pie, bar, area, scatter, bubble etc. Some of the popular types of charts are as follows:
I. Column Charts: Use vertical bars to compare data, like population of dolphins and whales every year.
4.29: Column Charts
II. Line Charts: Line charts also known as scatter plots track changes over time, like population pf bears, dolphins and whales over the years.
4.30: Line Charts
III. Pie Charts: Show proportions, like number of bears, dolphins and whales in particular year.
Bears Dolphins Whales
Figure 4.31: Pie Charts
IV. Bar Charts: Bar chars work just like column charts, but they use horizontal rather than vertical bars.
A graph is a type of chart. It’s like a special kind of picture that shows how different things are related.
For example, if you have data about how much you exercise and how healthy you feel each day, a graph can show if there’s a connection between exercising more and feeling healthier.
Here’s how to create a chart or graph:
• Select the data you want to include in the chart or graph.
• In the Excel toolbar, locate the Charts options. Choose the chart type that best represents your data, such as column, line, pie, or bar chart.
• Customise the chart by adding labels, titles, axes, and other formatting options to enhance its clarity and visual appeal.

Try creating a chart in Excel to visually represent data of the favourite Ice Cream Flavours Chart. Use the given data below.
Including conditional formatting, sorting and filtering data, creating pivot tables, and using charts and graphs, can help you analyse and present data in a meaningful way. Experiment with different options and formats to effectively communicate your findings and insights.
In conclusion, we learned there are more advanced techniques in Microsoft Excel. Throughout the lesson, you have acquired a deeper understanding of Excel’s features and functionalities.

Formulas - One of the most powerful features in Excel is the ability to calculate numerical information using formulas.
Cell References - A cell address used in a formula is called Cell reference.
Function - A function is a predefined formula that is available in Excel to perform calculations using specific values in a particular order.

• Excel is a computer program developed by Microsoft that is widely used for creating, organising, and analysing data in the form of spreadsheets.
• One of the most powerful features in Excel is the ability to calculate numerical information using formulas.
• Excel can Add, Subtract, Multiply and Divide using the formulas.
• A chart is a graphical representation of data. It is used to compare or analyse huge amounts of data on a worksheet.
• Conditional formatting allows you to highlight specific data based on certain conditions or criteria.

I. Fill in the blanks
1. The __________ function in Excel is used to find the average value of a range of cells.
2. Conditional formatting allows you to highlight specific data based on certain __________.
3. __________ are used in Excel to organize and summarize large amounts of data.
4. The __________ function in Excel is used to count the number of cells that contain numerical values.
5. Adjusting column widths and applying font styles are examples of __________ formatting in Excel.
True or False
1. Conditional formatting in Excel allows you to highlight cells based on specific criteria.
2. Pivot tables in Excel are used to organize and analyze large amounts of data.
3. The MAX function in Excel is used to find the lowest value in a range of cells.
4. Sorting and filtering in Excel are used to organize data in alphabetical order.
5. Functions like SUM, AVERAGE, and COUNT in Excel are used to perform calculations on numerical data.
III.Answer the following questions
1. What is Excel?
2. Write about importance of formula
3. What are functions in Excel?
4. What are the arithmetic operators?
5. List two advanced formatting in excel and briefly explain them.
Activity Time

Create a ‘Marks Data’ Worksheet in Microsoft Excel.
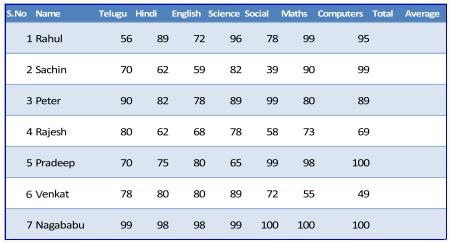
a. Enter the students’ marks details as shown above in the Excel worksheet.
b. Calculate the total marks using Sum / Function.
c. Find the Average of All the subjects using average function.
d. Format the table by applying the “Table Style Medium 2”.
e. Align the entered marks to Center.
f. Align the entered Names to right.
g. Rename the worksheet to student marks
h. Using conditional formatting

Projects
Design a “Digital Festival Budget” spreadsheet to manage and track expenses for your imaginary school festival.
Create a Budget Worksheet:
Set up a budget worksheet in Excel, including categories such as “Tickets,” “Games,” “Food,” and “Decorations.” Can you visualise your budget using an interactive pie chart? Represent each expense category as a slice of the pie, and make it visually appealing with colours and labels.


By the end of this chapter, you will be able to,
• Describe the concept of data optimisation
• Explore various data optimisation steps
• Analyse data to provide an insight to a problem
We use data in many ways every day – from checking the weather, watching YouTube videos, to keeping track of our online activities. Data comes in different forms and is essential for making informed decisions. Researchers constantly analyse large amounts of data to find solutions to various problems.

Figure 5.1: Data available on various platforms
In this chapter, you will learn about data, several techniques for analysing it, and how it may be used most effectively, as well as how we utilise and analyse it to generate insights.
Let us get started!
To begin with, let’s read the conversation between father and son.
Hello Dad! In my school, I have received a task to conduct a survey on the topic “Do you prefer Math or English?”
Wow that’s so nice. Let me help you on your project.
I did not understand the purpose of this survey and what am I going to learn through this.
Oh it’s very easy. You will collect data from all classes. This collected data will help teachers to identify which section of your grade require extra help in English or Math.
Oh nice. I wonder what data is?
Well, this survey will teach you everything about data, how it is collected, how important decisions are taken with the help of data analysis. Let’s study about data in detail.
Data refers to a collection of facts, statistics, information, or details that are gathered, recorded, or represented in a structured or unstructured form. It is the raw material from which insights and knowledge can be extracted. Data can come in various forms, such as numbers, text, images, audio, and video, and it is used to analyse patterns, make decisions, draw conclusions, and support research or problem-solving.
Figure 5.2: Different forms of Data
Data plays a very crucial role in our lives. The following points will help you understand the importance of data:
1. Better Decision-Making: Accurate data helps us make better choices.
2. Problem Solving: Data provides valuable information that helps in solving problems.
3. Revealing Patterns: Data helps us discover trends that make the world easier to understand.
4. Process Improvement: Data highlights areas for improvement, making processes more efficient.
Examples of data include weather reports, lowest and highest temperatures, forecasts, rainfall, and scoreboards of any game.
Are you ready for an awesome data collection challenge? Get ready to become a skilled data collector with this fun activity!

Choose at least five different items from your surroundings. These could be things like snacks, school supplies, toys, or anything else you find interesting.For each item you’ve chosen, create a neat and organised table. Include the following details:
• Product Name: The name of the item you selected.
• Company or Brand: The name of the company that made the item.
• Price: How much the item costs.
• Quantity: How many of these items do you have?
• Description: A brief description of the item (what it’s used for or what it looks like).
One is done for you!
Product Name
Classmate -Instrument box ITC Brand ₹150 1 Maths tool for precise shape
Lab Activity

Just like you did in activity 1, perform the same activity in your next computer lab session. Follow the steps and create the same table for the given items:
Step 1: Open Google Chrome
Step 2: Type www.google.com
Step 3: Press the Enter key to open the Google web page
Step 4: Search about the price of the following parts of the computer:
i. Keyboard
ii. Mouse
iii. Hard Disk
iv. Pen Drive
v. Microphone
Step 5: Create a table as you did in activity 1.
Share your collected data with your teacher
Data is classified into two types: Qualitative data and Quantitative data.
Types of Data
5.2.1 Qualitative data
Qualitative data is a type of data that describes qualities or characteristics. It doesn’t involve numbers. Qualitative data is often used to describe the “why” or “how” of a situation.
Example: Describing a flower
Hibiscus are colorful flowers which is known for its red colour, tart flavour, and vitamin C content. It has various medicinal uses and aids in a various health, skin & hair conditions.Figure 5.4: Qualitative data of hibiscus
In the form of sentences, the description of flower is referred to as qualitative data.
Qualitative data refers to information that describes qualities or characteristics. It focuses on subjective observations, descriptions, or opinions rather than numerical measurements. Examples of qualitative data include descriptions of appearances, behaviors, emotions, or qualities that cannot be easily measured or counted.
Let’s look at some examples of qualitative data.
• Emotions: Expressing feelings like “happy,”“excited,” or “anxious.”
• Opinions: Sharing thoughts or viewpoints, such as “I believe that” or “in my opinion.”
• Taste: Describing the taste of food as “spicy,”“sweet,” or “sour.”
• Texture: Explaining how a material feels, like “rough” or “smooth.”
• Behaviour: Observing and describing how animals interact in a certain environment.
• Personal Experiences: Sharing stories about events in your life, like a memorable vacation or a funny incident.

Think and Answer
Favourite Book: Describe the best parts of a book you love, like the exciting plot and interesting characters.
In your next lab session open a MS Word document and write a short paragraph about your dream vacation. Save the Word document with your name followed by the name of your dream vacation. For example, Ayaan_Switzerland
Quantitative data is a type of data that involves numbers and can be measured. Quantitative data answers questions like “How much?” or “How many?”
Example: Measurement of weight, distance, age, IQ, etc.
Quantitative data is information that can be measured or expressed numerically. It involves objective observations or measurements that can be counted or compared. Quantitative data provides numerical values and allows for mathematical analysis. Examples of quantitative data include measurements of length, weight, temperature, or counts of items.
Here are some examples of quantitative data:
• Age: The number of years someone has been alive, like 12 years old.
• Distance: The measurement of how far something is, like 3 kilometres or 2 miles.
• Number of Books: Counting the number of books on a shelf, like having 20 books.
• Time: Measuring the duration, such as running for 30 minutes or waiting for 2 hours.
• Money: Quantifying currency, like having Rs 50 or Rs 100.
Complete the activities to have a better understanding of data

Categorise the below given information as Qualitative or Quantitative data. Tick the correct option.
1. The teacher records each student’s roll number in the register book.
Qualitative Data
Quantitative Data
2. An Excel file with population data for all countries in numerical form.
Qualitative Data
Quantitative Data
3. As part of an assignment, the student writes an email to the teacher regarding computer multimedia.
Qualitative Data
Quantitative Data
4. Google form with information on the course a student wants to take.
Qualitative Data
Quantitative Data
Data optimisation is a technique that helps people to find the best a most effective solution to a problem. Data means information and optimisation means the action of making the best or most effective use of a situation or resource.

Figure 5.6: Data Optimisation
When we collect data from various sources such as surveys, and experiments for a particular situation, we make use of various tools and techniques to understand and identify the problem, making the best use of data. There are various steps involved in data optimisation techniques. Let us study about the processes and techniques that go on after collecting data.
Figure 5.7: Data optimisation techniques
1. Data Assessment: This step checks if the data is accurate, complete, and relevant to the situation. It helps in understanding any issues associated with data and ar-
2. Data Cleaning: After assessing the data, if data proves to be inaccurate, contains errors, and is not consistent throughout studying, then the data needs to be cleaned. This step makes data ready for analysis.
3. Data Integration: In this step, we look to establish relationships between different data elements or find a connection between data elements by merging datasets. This helps to work with consistent data.
4. Data Transformation: In this step, different mathematical and statistical operations are performed on the data obtained after assessment, cleaning, and integration, to get some important information from data.
5. Data Enrichment: Sometimes data may lack some crucial information that can help people do deep and proper analysis of a situation. In such a situation, the dataset is enhanced by adding additional information or attributes from external sources.
6. Data Validation: For any kind of work that we do, there is always a rule that we follow. In data optimisation as well, we check whether the data that is being used for analysis are following certain predefined rules. This step ensures the data is following some specific quality standards.
7. Data Storage and Management: This step is very crucial. The dataset needs to be stored and managed safely so that we can use them as many times as needed. Storage usually happens in the cloud, databases, and other storage systems.
8. Data Security and Privacy: At every step of data optimisation, securing the information is very much needed. We should ensure that the data is protected and follows every important regulation and policy designed for data optimisation.
As you have explored some new terms about data, let’s do some activities that will help you grasp the concept.
Hey Dad, the activities were helpful. I am happy to learn these steps.
Before exploring the examples, let’s test your understanding through some questions.

Think and Answer
Fill in the blanks with appropriate words.
1. Data expands our understanding by revealing ________ and ________ that help us make sense of the world.
2. The two types of data are _________________ data, and _____________ data.
We now know that data is any piece of information. Also to make the best use of the data, we have seen how various data optimising steps are used. Now when it comes to analysing the data, we need to understand the entire process of how we process the data to get crucial information from the data or to predict the future. Data processing, in simple terms, refers to the actions we take to organise, manipulate, and transform raw data into useful information. It is a series of steps that help us make sense of data and extract valuable insights from it.
Let’s look at the step-by-step methods involved in data processing.
Step 1: Define the Problem Statement
In this step you need to define the problem, to understand the purpose of data analysis.
Example: Investigating Student Preferences for English and Mathematics to Enhance Interest in Underrepresented Subjects.
Step 2: Data Collection
Data can be collected from various sources, such as surveys, experiments, observations, or even online sources.
Example: Collecting information about student’s preferences for subject. Grade 6
Step 3: Data cleaning and Organisation
Data cleaning is an important step where we review and remove any errors or inconsistencies from the collected data. This can involve checking for typos, removing duplicates, correcting invalid entries, or handling missing data.
Once we have collected the data, we need to organise it in a structured manner. This involves arranging the data in a clear and meaningful way so that it is easier to work with. As the data given has no error, we can consider the data to be organised.
Step 4: Data Visualisation
This step involves converting information collected into visual context. In this step, we create graphs and charts of the data we collect. This helps the human brain to understand the hidden insights of the data, the pattern, the trends, and relationships.
Figure 5.9: Data visualisation
The graph obtained during step 4 is used to analyse the data so that we can interpret what the data is telling us. So, in this case, we interpret the following points:
• In the English topic, Section A requires additional attention.
• Section B values both English and Mathematics equally.
• Section C students require assistance and special attention in Mathematics.
• Section D includes a higher proportion of students who prefer English, requiring greater attention in Mathematics.
• Section E of the English course requires special attention.
• Section F is equally interested in both subjects.
Data processing enables us to transform raw data into valuable information that may be used for decision-making, problem-solving, or gaining a better knowledge of a particular topic. It helps us uncover patterns, trends, and connections in data that may not be visible at first glance. We may make more informed decisions and draw meaningful conclusions from the data we collect by studying it.

Data - Data is information or facts that we collect, such as numbers, words, pictures, or measurements, which can help us learn, understand, or make decisions.
Data Optimisation - Data optimisation is a technique that helps people find the best and most effective solution to a problem.
Data Processing - Data processing, in simple terms, refers to the actions we take to organise, manipulate, and transform raw data into useful information. It is a series of steps that help us make sense of data and extract valuable insights from it.

• Data is information or facts that we collect, such as numbers, words, pictures, or measurements, which can help us learn, understand, or make decisions.
• There are different forms of data that are numbers, text, audio, and video.
• There are two different types of data that are qualitative and quantitative data. Qualitative are non-numerical and quantitative are numerical data.
• Qualitative data refers to information that describes qualities or characteristics.
• Quantitative data refers to information that can be measured or expressed numerically.
• Data optimisation is a technique that helps people find the best and most effective solution to a problem.
• There are five steps involved in data or information processing. They are defining the problem statement, data collection, data cleaning and organisation, data visualisation, data analysis, and interpretation.

1. Data is any piece of______________ that has been collected and turned into a form that computers and people can ____________.
2. Data expands our understanding by revealing __________ and trends that help us make sense of the world.
3. In data ___________, we look for a connection between data elements by merging datasets.
4. In data _______________, we check whether the data that is being used for analysis are following certain predefined rules.
5. Data ___________, refers to the actions we take to organise, manipulate, and transform raw data into useful information.
II. Match the following
1. Data Qualitative Data
2. Quantitative Data Effective Use
3. Taste Collection of facts
4. Optimisation Numbers
III. Answer the following
1. Define data optimisation.
2. Explain any two data optimisation steps.
3. What are the steps followed in information processing?
Activity Time

Find five terms related to Data Optimisation and Information Processing of the computer in the grid.
Projects

Design a spreadsheet that efficiently organizes and optimizes information about books in your school library.
Create a Book Database, set up a database in a spreadsheet (like Microsoft Excel or Google Sheets) to store information about books. Include columns for book titles, authors, genres, publication years, and availability status.


By the end of this chapter, you will be able to,
• Identify the benefits and drawbacks of the internet
• Explain how the internet helps us learn, play games, and connect with friends
• Learn safe online practices by following key rules
• Evaluate the impact of online actions on real-world situations
You’re already familiar with the exciting world of the internet, a place where you can learn new things, play games, and talk to your friends. Now, let’s explore more about how to stay safe while using the internet, why it’s important to be kind to others online, and how to communicate in a good and honest way. This chapter will help you understand the important rules for using the internet safely, teach you how to be a good online friend, and show you how to talk to people in a way that’s fair and respectful.
Let us get started!
The Internet is a vast and interconnected network of computers and servers that allows people from all over the world to communicate, share information, and access a wide range of resources. It’s like a giant web that links together websites, emails, videos, and more.
Through the Internet, you can search for information, connect with friends and family through social media, send emails, watch videos, play games, shop online, and even learn new things through online internet courses. It has transformed the way we live, work, and interact, making the world feel more connected than ever before. However, while the internet offers many benefits, it’s important to use it responsibly, be aware of online safety, and treat others with respect in digital interactions. Despite being a wonder, the internet also has some drawbacks that we need to be cautious about.
The Disadvantages of the Internet
• Online Safety Risks and Privacy Concerns: Be cautious online; never share personal information with strangers.
• False Information: Not everything online is true—always verify facts with reliable sources.
• Excessive Screen Time: Balance online activities with offline routines for a healthier lifestyle.
• Feeling Isolated: Too much time online can lead to loneliness—spend quality time with friends in person.
Just as you learn to cross the road safely or lock your front door to keep your home secure, you need to follow certain rules and guidelines to stay safe online. Let’s explore how to use it safely and responsibly.
Internet safety rules are like guidelines that help us stay safe while using the internet. They include things like not sharing personal information, being kind online, using strong passwords, and treating others with respect. Here are a few guidelines you can abide by.
Begin with the discussion about the importance of staying safe online use real life scenarios to help students recognise potential risks and teach them how to identify trustworthy online interactions.
One of the most important Internet safety rules is never to share your personal information online. This includes your full name, address, phone number, passwords, or any other details that could be used to identify or locate you. Remember, the internet is a public space, and sharing such information with strangers can put you at risk.
Cyberbullying refers to using technology, such as social media, chat rooms, or messaging apps, to harass, intimidate, or hurt others. It’s crucial to treat others with kindness and respect online, just as you would in person. Avoid engaging in cyberbullying behaviour, and if you witness someone being cyberbullied, report it to a trusted adult or authority figure.
Creating strong and unique passwords is an essential part of internet safety. A strong password typically includes a combination of uppercase and lowercase letters, numbers, and special characters. Avoid using easily guessable information like your name or birthdate. Using different passwords for each of your online accounts also helps protect your information. Remember to keep your passwords private and avoid sharing them with anyone.

Imagine you have to create a strong password for a new account. Apply what you have learnt and create a sample hack proof password below.
Many online platforms and social media networks provide privacy settings that allow you to control who can see your posts and personal information. Take the time to review and adjust these settings to ensure that only trusted individuals have access to your content. Regularly check and update your privacy settings as they may change over time.
Before sharing or posting anything online, think about the potential consequences. Once something is on the internet, it can be challenging to remove completely. Be mindful of the content you share, as it can impact your reputation, relationships, and future opportunities. It’s important to be cautious and consider carefully before sharing anything that might be harmful or inappropriate.
Not everyone you encounter online is who they claim to be. Be cautious when interacting with people you don’t know in real life. Avoid sharing personal information or meeting up with online acquaintances without the permission and supervision of a trusted adult.

Think and Answer
Mark the below statements as either public information or private information
1. Your first and last name
2. A photo of yourself
3. What sports do you play
4. Your phone number and email address
Ethics are rules that guide us to do the right thing and treat others well. They help us decide how to behave in different situations. Computer ethics are the rules for using technology responsibly. They ensure we use computers and the internet in ways that are fair, respectful, and good for everyone. Given below are some of the common ethical guidelines that we should follow while using a computer:
• Be Kind and Respectful Online: When you use computers and the internet, remember to treat others just like you would in person. Use nice words and show respect to people, even if you can’t see them face-to-face.
• Use Approved Apps: Only use websites, apps, and games that your teacher and parents recommend.
• Give Credit: If you use facts or pictures from the internet, say where you got them to be honest and fair.
• Be Original: Don’t copy someone else’s work. Use your own creativity.
• Stay Safe: Use strong passwords to protect your personal information and online accounts.
• Think Before Sharing: Only share truthful and kind content. Avoid spreading false or harmful information.
• Report Concerns: If something online makes you feel worried or upset, tell a trusted adult for help.
Technology has significantly changed the way we communicate, and it also presents new challenges for ethical behaviour. Here are some ways technology impacts communication and ethics:
• Anonymity: The internet allows people to remain anonymous, which can sometimes lead to unethical behaviour. Some individuals may feel empowered to say hurtful things or spread false information when their identity is hidden. It’s important to remember that even online, we should treat others with respect.
• Digital Footprint: Every action we take online leaves a digital footprint. This means that our online activities can be tracked and recorded. It’s essential to be mindful of our online behaviour because it can have long-term consequences.
Understanding and practising communication ethics is vital for maintaining healthy relationships and fostering a positive online environment. By following principles of truthfulness, confidentiality, and responsibility, we can promote respect, trust, and safety in our interactions, both in person and online. Let’s remember to use technology responsibly and make ethical choices that benefit ourselves and others.

Internet Safety - The measures and rules we follow to protect ourselves and our personal information while using the internet.
Internet Ethics - The guidelines or rules that help us navigate the online world with integrity, respect, and responsibility.
Communication Ethics - The principles that guide our interactions and promote honesty, respect, empathy, confidentiality, and responsibility.
Cyberbullying - Using technology to harass, intimidate, or hurt others.
Digital Footprint - The record of our online activities that can be tracked and recorded.

Recap
• The internet is a global network of connected computers that allows us to access vast amounts of information and connect with others worldwide.
• Internet safety is crucial for protecting our personal security and privacy. By following rules like avoiding sharing personal information, preventing cyberbullying, and using strong passwords, we can stay safe online.
• Internet ethics are a set of guidelines that help us navigate the online world with integrity, respect, and responsibility. They promote trust, protect privacy, and create a positive digital environment.
• Communication ethics are principles that guide our interactions, both online and in person. They include truthfulness, confidentiality, and responsibility, and help build trust, respect, and empathy in relationships.

1. Internet safety is important for protecting our _______ and _______ while using the internet.
2. _______ is the ability to understand and share the feelings of others.
3. Communication ethics promote trust, respect, and _______ in relationships.
4. One of the principles of communication ethics is _______ which means telling the truth.
5. Cyberbullying refers to using _______ to harass, intimidate, or hurt others.
1. Internet ethics are not important for maintaining positive online interactions.
2. It’s okay to share personal information with strangers online.
3. Communication ethics include principles like truthfulness and respect.
4. Our online actions can have real-world consequences.
5. Cyberbullying is a positive way to interact with others online.
1. What are the three principles of communication ethics?
2. Why is it important to protect personal information online?
3. What is the impact of technology on communication and ethical behaviour?
4. What are some guidelines for practicing internet safety?

Design a colourful ‘Internet Safety Poster’ to educate your classmates about web etiquette and staying safe online. Include catchy phrases or memorable slogans to make your internet safety messages stick in the minds of your classmates.

Design a ‘Digital Etiquette Guidebook’ that empowers your classmates with essential internet safety practices and polite online behaviours.
• Organize your guidebook into sections covering topics such as online communication, social media conduct, recognizing and reporting cyberbullying, and safeguarding personal information.
• Incorporate visual elements, such as illustrations or infographics, to make the guidebook visually appealing and easier to understand.


By the end of this chapter, you will be able to,
• List the fundamental elements of HTML
• Develop a basic HTML webpage that includes headings, paragraphs, images, and hyperlinks
• Examine different HTML elements and their attributes
Web design, as the name suggests, means designing a website. You might have heard the term ‘website’ when you surf the internet in search of any information. Have you ever thought about how these websites are created? How do various organisations such as educational institutions, corporate offices, and support centres create their website with a handful of information?
Well, that’s what this chapter will teach you.
In this chapter, you will explore how a website is designed and the language that serves as the backbone of every website.
Let us get started!
Websites are created by people called web developers and HTML is the most widely used language to design websites. It is important and useful to know some of the basic terms related to web design before you learn HTML. They are:
1. Website: A website is a collection of web pages that are hosted on a server.
2. Webpage: A webpage is a document or page written and hosted on the internet.
3. World Wide Web: The World Wide Web, often referred to as the Web or ‘www’ in short, is a vast network that connects various websites and web pages.
4. URL: URL stands for Uniform Resource Locator. Just like your home has an address to locate, a website has a web address to locate. This web address is known as a URL. It consists of a protocol and a domain. For example, http://www.example.com
5. Domain: It is a part of a website’s address. For example, on the website www. google.com, google.com is the domain name. In the URL example above, the domain is www.example.com.
6. Protocol: Protocols are the rules that computers follow to access any website on the internet. The URL example above, the protocol is “http.”
HTML (Hypertext Markup Language) is a markup language used to create webpages on the internet. It is a tag-based language, that tells web browsers how to display the content of a webpage. The hypertext in HTML means, a text which contains links to other related pieces of information or documents. The markup in HTML means a way of adding information or instructions to text to describe its structure, formatting, or behaviour.
HTML document is created in basic text editors or word processors on a computer such as Notepad, WordPad on Windows OS, and TextEdit on MacOS.
7.1.2
Tags are the basic building blocks of a web page. It is used to define elements on a webpage. They are like instructions that tell the web browser how the information has to be displayed on the web page. They are enclosed in angle brackets (“<” and “>”) and come in pairs: an opening tag and a closing tag.
• Opening Tag: Indicates the beginning of an element (e.g., <h1> for a heading).
• Closing Tag: Indicates the end of an element (e.g., </h1> for the end of the heading).
Figure 7.2: Syntax to use HTML tags
1. Container Tag: A container tag in HTML, also known as a paired tag or dual tag, consists of both an opening tag and a closing tag. These tags work together to define a specific section of content within an HTML document. Container tags are used to structure and group content, making it easier to apply styles, layout, and other effects. You will learn more about these tags in the next section.
Example: <div></div>, <p></p>, <h1></h1>
2. Empty Tag: An empty tag in HTML, also known as a self-closing tag or void element, is a tag that doesn’t require a closing tag because it doesn’t enclose any content.
Example: <br>, <img>
7.2
An HTML document should contain the structure as shown in figure 7.3:
<!DOCTYPE html> <html> <head> </head> <body> </body> </html>
Figure 7.3: HTML Document Structure
1. <!DOCTYPE html> - It is a declaration to the browser that the document is of HTML type. It is written only once at the beginning of the HTML document.
2. html tag - This tag indicates the beginning of the HTML document. It is a container tag: <html></html>. Inside this tag, all other tag elements are inserted or used.
3. head tag - This tag contains metadata. It means data about the data. Information
provided inside the head tag is not displayed on the web page but the web browsers hosting the page use this information to display the content of the web page accurately. It is a container tag: <head></head>
4. body tag - This tag contains the entire content of the page in the form of various HTML elements. It is a container tag: <body></body>.
Let us now create a webpage using HTML that describes everything about you and your hobbies. The title of the webpage will be ‘Myself’
To design a web page, you need different HTML elements. It includes the opening tag, the content, and the closing tag.
7.3.1 HTML title
It helps in giving a title to your document, that displays as the name of the webpage tab that opens in the browser. The code in figure 7.4 creates a title ‘Myself’ using the title tag. Code
Myself x + <!DOCTYPE html> <html> <head> <title> Myself </title> </head> <body> </body> </html>
Figure 7.4: HTML title
In this code, the title tag is used to give the title ‘Myself’ to the webpage. The output shown is the tab that opens on a web browser with the title.
7.3.2 HTML heading
Headings are used to give headings to a topic. HTML has six levels of headings. Those are <h1>, <h2>, <h3>, <h4>, <h5>, and <h6>. The heading levels <h1> display the heading in the biggest font size. The heading level <h6> is the smallest size.
<body>
<h1>About ME</h1>
<h2>Myself</h2>
<h2>My Favourites</h2>
<h3> Favourite Food</h3>
<h4> Favourite places to visit</h4>
<h5> Favourite hobbies </h5>
<h6> Favourite sports </h6> </body>
7.5: HTML heading
About ME
Myself My Favourites
Favourite Food
Favourite places to visit
Favourite hobbies
Favourite sports
Different types of heading tags are used to give various font sizes to headings as shown in figure 7.5. h1 tag has the biggest font size, followed by h2, h3, h4, h5, h6.

Use the h4, h5, and h6 heading tags for the given heading text. Test the following code Make sure to write the basic html document structure when you write these codes.
<h4>Profile</h4>
<h5>Address</h5>
<h6>emailid<h6>
7.3.3 HTML paragraph
Inside each heading paragraphs that describe the heading topic are written. This is done using paragraph tags. To create paragraphs of text, you can use the <p> tag. It’s used to define a block of text or a paragraph.
Code:
<h2>Myself</h2>
<p>I am Asha Gupta. I study in Loreto High School. I am currently in Grade 6. I carry my interests in various fields. </p>
I am Asha Gupta. I study in Loreto High School. I am currently in Grade 6. I carry my interests in various fields.
Figure 7.6: HTML paragraph, code and its output

Write a paragraph for the heading Favourite Food using <p></p> tags.

Lab Activity
Write a paragraph for the topics given below in your upcoming lab session.
• Favourite places to visit
• Favourite Hobbies
7.3.4 HTML lists
HTML provides two types of lists:
i. Unordered Lists (<ul>): For items with no specific order, typically displayed with bullet points.
Example: Let us list some favourite foods for Asha Gupta. To do so an <ul> tag is used, and each food item is kept inside a <li> tag as shown:
Code:
<h3> Favourite Food</h3> <p>Here are some of my favouritedishes.</p> <ul> <li>Pizza</li> <li>Sandwich</li> <li>Pasta</li> <li>Burger</li> </ul>
Here are some of my favourite dishes.
• Pizza
• Sandwich
• Pasta
• Burger
Figure 7.7: HTML unordered list, code and its output
ii. Ordered Lists (<ol>): For items where order matters, typically displayed with numbers.
Example: Let us list the shopping list for Asha Gupta. To do so an <ol> tag is used, and each item is kept inside a <li> tag as shown:
Code:
Output:
<body>
<h2>Shopping List</h2>
<ol>
<li>Shoes</li>
<li>Jeans</li>
<li>Shirts</li> </ol>
1. Shoes
2. Jeans
3. Shirts
Figure 7.8: HTML ordered list, code and its output
Note: Using one set of tags inside another set of tags is called nesting of tags and it is often practiced in HTML to create a web page.
7.3.5 HTML Attributes
HTML tags can have special information called “attributes”. Attributes give extra
instructions to the browser about how to display or behave with an element. It’s like telling the browser to do something specific with that tag. For example, the <a> tag uses the href attribute to define a link.
Example: <a href=”https://www.example.com”>Visit Example</a>
Attributes mean different types of properties that a text, a paragraph, or an image in the HTML document can have. While working with the style attribute, we define many properties to style up the content. This is done by giving a property name, followed by the property value
Syntax:
<tag_name attribute_name=”property_name: property_value;”></tag_name>
Example 1: The code below in figure 7.9 provides a powder-blue colour background on the h1 heading. The attribute name is style. The property used is backgroundcolor and the value is set to powderblue.
Code:
<h1 style=”background-color:powderblue; “>About Me</h1>
Figure 7.9: CSS background colour attribute
Output:
Figure 7.10: Output of CSS background colour attribute
Example 2: In a similar manner, to give a text colour of tomato red, color property is used in the h2 heading.
Code:
<h2 style=”color:tomato; “>Myself</h2>
Figure 7.11: CSS colour attribute
Output: Myself
Figure 7.12: Output of CSS colour attribute
Example 3: The paragraph is styled to give a border of colour solid Tomato, and a light green background colour.
Code:
<p style=”background-color:lightgreen; border: 2px solid Tomato“>I am Asha Gupta. I study in Loreto High School. I am currently in Grade 6. I carry my interests in various fields.
</p>
Output:
Figure 7.13: CSS styling of a paragraph element
Figure 7.14: Code Output
Table 7.1 shows the list of commonly used html and associated values for styling the content of a webpage.
Property name
background-color tomato
Color red border
Example values
2px solid Tomato
font-family verdana font-size 150%
text-align
Left, center, right
Table 7.1: HTML style properties and values
HTML provides tags to format the text, such as <b> for bold, <i> for italic, and <u> for underline. Just like we format in Microsoft Word or PowerPoint applications. Most of the formatting elements are empty tags. Table 7.2 shows some of the formatting elements and their corresponding meaning.
Formatting element
<b> Bold text
<strong> Important text
<i> Italic text
Meaning
<em> Emphasized text
<mark> Marked text
<small> Smaller text
<del> Deleted text
<ins> Inserted text
<sub> Subscript text
<sup> Superscript text
Table 7.2: List of formatting elements commonly used in HTML
Example:
<!DOCTYPE html>
<head>
<title>Text Styling Example</title>
</head>
<body>
<h1>Text Styling Example</h1>
<p>
This is a <b>bold</b> text.
</p>
<p>
This is a <strong>strong</strong> text.
</p>
<p>
This is an <i>italic</i> text.
</p>
<p>
This is an <em>emphasized</em> text.
</p>
<p>
This is a <mark>highlighted</mark> text.
</p>
<p>
This is a <small>small</small> text.
</p>
<p>
This is a <del>deleted</del> text.
</p>
<p>
This is an <ins>inserted</ins> text.
</p>
<p>
This is a <sub>subscript</sub> text and this is a <sup>superscript</sup> text.
</p> </body> </html>
Output:
Figure 7.15: Output of using formatting elements
7.3.8 HTML Links
HTML allows you to create clickable links to other web pages or resources. Links are created using the <a> tag, and the destination URL is specified using the href attribute and href stands for hypertext reference.
In the below given code, the link of a web page that serves as a tour guide for Jammu and Kashmir is used with the help of href attribute. Within the <a> tag, a text that will carry the link is mentioned as ‘Click here for tour guide’ is written.
Code:
<h3> Favourite places to visit</h3>
<p>The list of my preferred places to visit in order:</p> <ol> <li>Jammu and Kashmir</li>
<a href=”https://www.tourmyindia.com/states/jammu-kashmir/kashmir.html”>Click here for tour guide</a> <li>Meghalaya</li> <li>Kerala</li> <li>Kanyakumari</li> </ol>
Output:
Figure 7.16: HTML links
The list of my preferred places to visit in order:
1. Jammu and Kashmir Click here for tour guide
2. Meghalaya
3. Kerala
4. Kanyakumari
Figure 7.17: Output of HTML links
HTML provides the <img> tag, which is an empty tag (meaning it does not have a closing tag) used to display images on a webpage. The attributes of the <img> tag include:
• Src(source) attribute: This attribute is mandatory and specifies the URL (Uniform Resource Locator) of the image. It tells the browser where to find the image file.
• alt attribute: This attribute is used to provide alternative text for the image. It is displayed if the image cannot be loaded or for accessibility purposes (e.g., for users who use screen readers).
• Width and Height: These attributes specify the width and height of the image in pixels. They can be used to control the size of the displayed image.
Example:
<h3> Favourite hobbies </h3>
<p>I love to play the following displayed games in images</p>
<img src=”basketball.jpg” alt=“Kids playing basketball” style=“width: 200px;height: 200px;”>
<img src=”painting.jpg” alt=”Kids painting” style=”width: 200px;height: 200px;”>
Output:
Favourite hobbies
I love to play the following displayed games in images
7.3.10 HTML Tables
HTML tables are used to organise data in rows and columns. They are often used to display information in a structured and easy-to-read format. Here are the basic components of HTML tables:
• <table> tag: The <table> tag is used to create a table on a webpage. It acts as a container for all the table elements.
• <tr> tag: The <tr> tag is used to define a table row. It contains one or more table cells (<td> or <th>).
• <td> and <th> tags: The <td> tag is used to define a regular table cell, while the <th> tag is used to define a header cell. Header cells are often used to label or describe the content in a particular column or row.
• <caption> tag: The <caption> tag is used to provide a title or caption for the table. It is placed inside the <table> tag but outside the <tr> tags.
Example 1: Let us create a table with the heading ‘My Favourites’. This is done by defining the number of rows required in a table. The heading of the table is created using the <th> tag and a row for that heading is created using <tr> tag. In a similar manner, the next row is created with headings.
Code:
<table>
<tr>
<th>My Favourites</th>
</tr>
<tr>
<th>Dishes</th>
<th>Destinations</th>
<th> Activities</th>
<th> Colour</th>
</table>
Figure 7.20: HTML Tables using th tags
Output:
Figure 7.21: Output of HTML Tables using th tags
Example 2: After the heading, the value of the table is created for each column is created using <td> tags.
Code:
Output:
<table>
<tr>
<th>My Favourites</th>
</tr>
<tr>
<th>Dishes</th>
<th>Destinations</th>
<th> Activities</th>
<th> Colour</th>
</table>
Figure 7.22: HTML Tables using td tags
Favourites
Pasta Jammu and Kashmir BasketBall Red
Figure 7.23: Output of HTML table using td tags
Example 3: The border of the table can be given in any tag that is required using the style attribute. It can be either <table> tag, <th> tag, or in <td> tag.
Code:
Output:
<table style=”border:2px solid Tomato;”>
Figure 7.24: CSS styling of table
Favourites
Pasta Jammu and Kashmir BasketBall Red
Figure 7.25: Output of figure 7.24
Example 4: Styling using <th> tag Code:
<th style=”border:2px solid black;”>My Favourites</th>
Figure 7.26: CSS styling of th element
Output: My
Dishes Destinations Activities Colour
Pasta Jammu and Kashmir BasketBall Red
Figure 7.27: Output of figure 7.26

Lab Activity
Create a table for the same heading and continue adding 3 more rows for dishes, destinations, activities, and colour. Do it in your upcoming lab session. Before ending the chapter, here is a project for you to practice with different tags. The explanations of the tags have been mentioned below. Read the project details and design a webpage using the HTML tags given.

This project is about creating HTML forms. In your next lab session, or at your home, try to write the given codes and see the output.
HTML forms allow users to interact with a web page by entering and submitting information. Forms are often used for things like submitting feedback, filling out surveys, or creating user accounts. Here are some key components of HTML forms: <form> tag: The <form> tag is used to create a form on a webpage. It acts as a container
for all the form elements. It has an action attribute that specifies where the form data will be sent, and a method attribute that defines how the data will be sent.
Input fields: Input fields are used to collect different types of data from the user. Some common types of input fields include text fields (<input type=”text”>), checkboxes (<input type=”checkbox”>), radio buttons (<input type=”radio”>), and dropdown menus (<select> and <option>).
Labels: Labels are used to provide a text description for each input field. They help users understand what information they need to enter. Labels are associated with input fields using the for attribute and the id attribute. For example: <label for=”name”>Name:</label>
<input type=”text” id=”name” name=”name”>
Submit button: The submit button is used to send the form data to the server. It’s created using the <input> tag with the type attribute set to “submit”. For example: <input type=”submit” value=”Submit”>
Code:
<I DOCTYPE html>
<html>
<head>
<title> Grade < Feedback Form </title> </head>
<body>
<h1>Grade 6 Feedback Form</h1>
<p>We value your feedback! Please tell us about your favourite subject and any suggestions you have for improvement. </p>
<form>
<label for=”favourite-subject”> Favourite Subject:<label><br> <input type=”text” id=”favourite subject” name=”favourite subject”><br> <label for=”feedback”> Feedback and Suggestions</label><br>
<textarea id=”feedback” name=”feedback” rows=”4” cols=”50”></textarea><br>
<input type=”submit” value=”Submit”> </form> </body> </html>
Figure 7.28: HTML forms
Grade 6 Feedback Form
We value your feedback! Please tell us about your favourite subject and any suggestions you have for improvement.
Favourite Subject:
Feedback and Suggestions
Figure 7.29: Output of figure 7.28
HTML forms and tables are fundamental elements of web development. Forms allow users to interact with websites and submit data, while tables provide a structured way to display information. As you continue to learn HTML, you can explore more advanced features and styling options for forms and tables. HTML is a widely used language for web designing. It is the most interesting markup language which when used properly, can create beautiful webpages. There’s more fun waiting for you in the next chapter! You’re going to learn about CSS (Cascading Style Sheets.). It’s like giving your web pages a stylish makeover. You’ll play with colours, arrange things in cool ways, and make your pages look awesome. Remember, practice is key. Experiment with different tags, styles, and layouts to develop your skills and creativity in web development. As we wrap up this chapter about making web pages with HTML, you’ve learned how to put together text, pictures, and links to create your own corners of the internet.

Key Terms
HTML - (Hypertext Markup Language) is the language used to create webpages on the internet. It’s a special code that tells web browsers how to display the content of a webpage.
HTML Tags -Tags are the basic building blocks of a web page. It is used to define elements on a webpage. Tags are like instructions that tell the web browser how the information is to be displayed on the web page.

• A website is like a digital place on the internet where you can find information, pictures, videos, and lots of other stuff.
• Web development is the process of building and maintaining websites.
• Tags are like instructions that tell the web browser what to do with different parts of the content.
• Remember to save your HTML file with a .html extension and open it in a web browser to see the results.
• HTML tables are used to organize data in rows and columns.

1. Which of the following is the correct HTML tag for creating a heading?
a) <head>
b) <header>
c) <h1>
d) <title>
2. Which HTML tag is used to insert an image?
a) <img>
b) <picture>
c) <image>
d) <src>
3. Which attribute is used to specify the URL that a link should navigate to?
a) href
b) src
c) link
d) target
4. Which HTML tag is used to create an unordered list?
a) <ul>
b) <ol>
c) <li>
d) <list>
II. Match the following
1. List - a. HyperText Markup Language
2. <body> - b. Closing html tag
3. HTML - c. <li>
4. <tr> - d. Body tag
5. </html> - e. Table row
III. Answer the following
1. What is a web page?
2. What is web development?
3. Define HTML.
4. Write and explain about two features of HTML

Create a simple web page about your favourite animal using HTML. Include the following elements:
• A title for your web page: Choose a creative title that represents your favourite animal.
• An image: Find a picture of your favourite animal and display it on the web page.
• Brief description: Write a short paragraph describing why you like this animal and some interesting facts about it.
• Fun facts: List at least three fun facts about your favourite animal using bullet points.
• Table: Add a table which shows your favourite animals best features and in which 4 parts of the world do they live in large numbers.


By the end of this chapter, you will be able to,
• Learn the fundamental concept of CSS
• Explore CSS colour and text properties
• Apply CSS styling techniques to create well-structured web pages
Imagine your house to be a website and HTML to be the structure of the house. Now compare the Figure 8.1 and Figure 8.2. Figure 8.1 is only the structure of the house, whereas Figure 8.2 has the entire design in it such colour and modelling. Which one looks attractive?

8.1: A structure of house
8.2: A beautifully designed house
Well, it has to be the figure 8.2. Isn’t it? Just like how a plain house can seem uninteresting, a website without any decorations or colours can be dull too. To add some decoration and make the website look colourful, we use a special language called Cascading Style Sheet (CSS) that works with HTML. In this chapter, you will learn about CSS and how it helps an HTML document look presentable with its various properties and functions.
CSS stands for“Cascading Style Sheets”. It lets web designers and developers change how things like text, images, and buttons appear on a website.
CSS uses a set of rules to tell web browsers how different elements on a web page should look. These rules can be written directly in the HTML tags or in a separate CSS file. To save a html file you will use the .html extension likewise in CSS you will use .css extension to save the CSS files. When a web browser reads these rules, it knows how to display the content in a way that makes the website look nice and easy to read.
CSS uses a set of rules to define styles for HTML elements. Each rule consists of a selector and a declaration block. The selector identifies the HTML element(s) to style, and the declaration block contains the property-value pairs that define the style.
8.3: Syntax to use HTML tags
There are a few key points that you should keep in mind before working with CSS. Let us study them!
There are three ways to use CSS in an HTML document.
I. Inline CSS: Inline refers to styling that is applied directly within the HTML document, specifically within the HTML tags themselves. This is done using the style attribute. (It is the same as used in the previous chapter.)
Example: Let’s say you want to make a paragraph text red and increase its font size. You can do this using inline CSS<p style=”color: red; font-size: 16px;”>This is a red and larger text.</p>
Here CSS is used in paragraph tag.
II. Internal CSS:
The internal CSS has <style> tag in the <head> section of the HTML. This type of CSS is used to style single pages. Using internal CSS style for multiple web pages is time-consuming because we require placing the style on each web page.
Example: <head> <style> p { color: green; font-size: 18px; }
</style> </head> <body>
<p>This text is styled with internal CSS. </p> </body>
Here, the CSS tags are being used as a part of head tag in HTML file.
III. External CSS:
An external style sheet is a separate file containing CSS code that you can link to multiple HTML documents. This allows you to maintain a consistent look and feel across various pages of a website.
i. First create an HTML file (index.html):
Code:
<!DOCTYPE html> <html lang=”en”> <head>
<title>CSS Example</title>
<!-- Link to external CSS file --> <link rel=”stylesheet” type=”text/css” href=”style.css”> </head> <body>
<h1>This is a heading</h1> <p>This is a paragraph of text.</p> </body>
</html>
ii. Next Create an External CSS File:
Open your text editor and create a new file. Save it with a .css extension. For example, let’s call it style.css.
Code: /* style.css */ body { font-family: Arial, sans-serif; background-color: #f0f0f0; }
h1 { color: #333; }
Now that we know about different types of CSS, let’s get into the different properties of CSS tag. Let’s begin with font.
I am sure you might have seen the different fonts and font colours; how do the developer makes its styling.
In your HTML file, you can link to the external CSS file using the <link> tag within the <head> section.
8.1.2 CSS Comments
CSS comments are a way to write notes or explanations in your CSS code that the browser will ignore. They are helpful for adding information to your code that is meant for humans (like yourself) rather than the computer or browser. In CSS, you can create a comment by using ‘/*’ to start the comment and ‘*/’ to end it. Anything between these symbols will be treated as a comment and won’t affect how your styles are applied.

Style the h1 element using the Inline method. You can choose the value of the property as per your choice. Write the codes in the space given below:

Lab Activity
Run the code from Activity 1 in your next lab session and observe the output.
8.1.3 CSS Selectors
CSS selectors are an important concept in CSS that allows you to target and select specific HTML elements to apply styles. Selectors determine which elements on a web page will be affected by the CSS rules you define. Here are some common types of CSS selectors:
Selectors
The element selector targets specific HTML elements on a page. It selects all instances of that element type and applies the specified styles to them.
Example: <head> <style> p{ color: red; } <body>
<h2>Myself</h2>
<p>I am Asha Gupta. I study at Loreto High School. I am currently in Grade 6. I carry my interests in various fields.</p>
<h3>Favourite Food<h3>
<p>Here are some of my favourite food dishes.</p> </body>
Output:
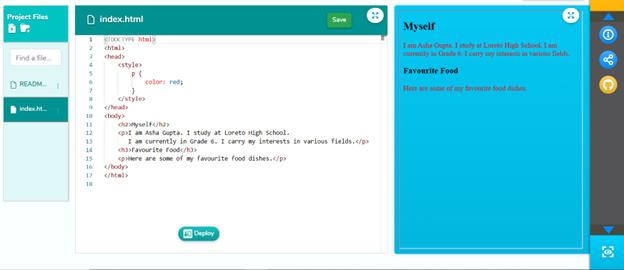
Figure 8.6: Output for element selector argets all <p> elements inside the body tag and sets their colour to red. It doesn’t select any paragraph, instead, it targets all the p elements.

Write a paragraph for the headings favourite places to visit and favourite hobbies in the space given below. Use the p selector to set the colour and font size to green and 20 px respectively.

The class selector selects elements based on the value of their class attribute. A class is like a label or identifier that you can use to group together elements that share common characteristics or styles. It acts as a label or identifier for grouping elements together.
In CSS, you can use class selectors (prefixed with a dot .) to apply styles to elements with a specific class. It allows you to apply styles to multiple elements that share the same class. Figure 8.7 shows the syntax of using the class selector.
Figure 8.7: Syntax to use class selector
Example:
<head> .highlight{ background-color: yellow; }
</head>
<h3>Favourite places to visit<h3>
<p>Here is the list of my favourite places to visit:</p> <ol class=”highlight”> <li>Jammu and Kashmir</li> <li>Meghalaya</li> </ol>
<p>Apart from the above I have a keen interest in visiting these countries abroad.</p> <ul class = “highlight”> <li>Germany</li> <li>Japan</li> <li>Singapore</li> </ul>
Output:

Figure 8.8: Applying CSS on highlight class
Explanation: The class attribute is used inside the ul and ol tags. The value of the class attribute can be as per the user’s choice. The class in the given example is .highlight
using the class selector method. The background of every element having the same class is changing to the background colour yellow.

Create a class for one element to change
The background colour to green. Use the correct syntax for using the class selector.
An ID selector is a way to target and style a specific HTML element on a web page. An ID (identifier) is a unique attribute assigned to an HTML element to make it distinct from other elements. The ID selector is denoted by the hash symbol (#) followed by the ID value assigned to the HTML element.
HTML CODE: <!DOCTYPE html> <html lang=”en”>
<head>
<title>ID Selector Example</title>
<!-- Linking the CSS file --> <link rel=”stylesheet” href=”styles.css”> </head>
<body>
<!-- An element with a unique ID --> <p id=”specialText”>This text is special!</p> </body> </html>
CSS CODE: /* CSS code targeting the element with the ID ‘specialText’ */ #specialText { color: blue; font-style: italic;
Output:

Figure 8.9: Applying CSS on special text id
The #specialText in the given css code is the ID selector .
Colour properties allow you to specify the colours of various elements on a web page.
• Text Color: The color property sets the color of the text. You can specify colors using different formats such as named colors (e.g., “red”, “blue”), hexadecimal values (e.g., “#ff0000” for red), RGB values (e.g., “RGB (255, 0, 0)” for red), or HSL values (e.g., “hsl (0, 100%, 50%)” for red).
• Background-Color: This property sets the background color of an element. It works similarly to the ‘color’ property but affects the background instead of the text.
• Border-Color: The border-color property sets the color of an element’s border. It helps to define the color of the border lines around elements like boxes and buttons.
• Opacity: This property controls how transparent an element is. It takes a value between 0 (completely transparent) and 1 (completely opaque). You can use it to make elements slightly see-through.
Now let’s see a example code including all the css color property we saw above:
HTML CODE:
<!DOCTYPE html>
<html lang=”en”> <head>
<title>Text Styling Example</title> <link rel=”stylesheet” type=”text/css” href=”styles.css”> </head> <body>
<div class=”colorExample hexColor”>Hexadecimal Color</ div>
<div class=”colorExample rgbColor”>RGB Color</div>
<div class=”colorExample hslColor”>HSL Color</div>
</body> </html>
CSS CODE: /* styles.css */ .colorExample { padding: 20px; margin: 10px; border: 2px solid #333; border-radius: 5px; opacity: 0.8; }
.hexColor { color: #ff0000; /* red color in hexadecimal */ background-color: #ffcccc; /* light red background */ border-color: #990000; /* dark red border */ }
.rgbColor { color: rgb(255, 0, 0); /* red color in RGB */ background-color: rgb(255, 204, 204); /* light red background */
border-color: rgb(153, 0, 0); /* dark red border */ } .hslColor { color: hsl(0, 100%, 50%); /* red color in HSL */ background-color: hsl(0, 100%, 90%); /* very light red background */ border-color: hsl(0, 100%, 25%); /* dark red border */ }
Output:

Figure 8.10: Application of different CSS properties

Activity 3
Let’s do an activity where you can change the text Color using CSS! Execute this code and find the output.
<html> <head> <style> /* CSS styles go here */ p { color: blue; } </style> </head> <body>
<p>This is a paragraph with blue text color.</p> </body> </html>
•
•
Font-Family: The font-family property sets the typeface or font for the text. Common font names include Arial, Times New Roman, and Verdana.
Font-Size: The font-size property sets the size of the text. You can specify the size using different units such as pixels (px), percentages (%), or relative units like em and rem.
• Font-Weight: The font-weight property sets the thickness or boldness of the text. It accepts values like normal, bold, or numeric values such as 400 or 700.
• Text-Align: The text-align property controls the alignment of the text within its container. It can be set to values like left, centre, right, or justify.
• Text-Decoration: The text-decoration property adds decorations such as underlines, overlines, or strike-through lines to the text.
Example:
h1 {color: blue; font-family: Verdana; font-size: 24;}
Output:

Let’s try one the same example with different values h1 {color: Orange; font-family: Ariel; font-size: 34;}


Your teacher has asked you to create a website showcasing your favourite animals. How can CSS help you make the website visually appealing? What CSS properties could you use to style the different elements on the page?

Your school is organizing a talent show, and you’ve been assigned to create a webpage to promote the event. What are some CSS colour properties that can be used here to create a a captivating webpage?

CSS - It stands for “Cascading Style Sheets. It lets web designers and developers change how things like text, images, and buttons appear on a website.
CSS Syntax - CSS uses a set of rules to define styles for HTML elements. Each rule consists of a selector and a declaration block. Recap

• CSS is a set of instructions that tell a web browser how to display a web page.
• HTML is responsible for defining the structure and content of the page, while CSS is used to specify how that content should look.
• The background-color property sets the background colour of an element.
• The colour property sets the colour of the text.
• Selectors determine which elements on a web page will be affected by the CSS rules you define.

I. True or False
1. CSS stands for Cascading Style Sheets.
2. CSS is used to control the appearance and formatting of HTML elements.
3. The colour property in CSS is used to set the colour of the background of an element.
4. The ID selector in CSS selects elements based on their unique ID attribute.
II. Fill in the blanks
1. CSS stands for ____________________________.
2. CSS allows us to control the ________________, ________________, and ________________ of HTML elements.
3. We can specify the colour of text using the ________________ property in CSS.
4. The ________________ selector selects elements based on their unique ID attribute.
III. Answer the following questions
1. Define CSS
2. Write down the CSS syntax
3. What are some text properties of CSS?
4. What are CSS selectors?

Imagine if websites were like plain, black-and-white books without any pictures or colourful pages. That’s what it would be like without CSS! CSS makes websites look nice and organized. Think about how this would change the way you see and use the internet. How might it affect the way you find information or enjoy your favourite websites? Let’s chat about the colourful and stylish world CSS brings to our online lives!

Style Chef Challenge: Use CSS to spice up a ‘Recipe Webpage’. Choose colours, change fonts, and arrange things neatly to make your recipe page look as tasty as your favourite dish! Follow these steps: pick fun colours, try different fonts, make sure everything looks organized, add pictures of your recipe.


By the end of this chapter, you will be able to,
• Describe the components of the CSS Box Model
• Use CSS Box Model properties to style and structure webpage elements
• Examine how changes in Box Model properties impact the layout and design of a webpage
Cascading Style Sheet (CSS), the most used styling language for HTML, has many properties. By far you have explored all the basic properties of CSS and how to implement them in HTML tags. In this chapter, you will extend your CSS learning beyond basics, and explore the famous model used in web designing, CSS BOX MODEL. To understand this model, you have to understand the different ways of displaying the content of a webpage.
Let us get started!
The CSS Box Model is a concept used in web design and development to understand how elements on a webpage are structured and how they interact. Imagine that each element on a webpage, such as a paragraph, an image, or a heading, is contained within an invisible box. This box has different parts or layers, which together make up the CSS Box Model. In this model, each element is considered as a separate box. The figure 9.1 illustrates the Box Model of a particular element.
Let’s break down the BOX model into four main components:
1. Content
The content is the actual text, image, or other media that is displayed inside the element. For example, if you have a paragraph element, the content would be the text within the paragraph.
2. Padding
Padding is the space between the content and the border of the box. It creates a buffer zone around the content, giving it some breathing room. Padding can be added to the top, right, bottom, and left sides of the box, and it can be adjusted to increase or decrease the space.
9.3:
3. Border
The border is a line or outline that surrounds the padding and content of the box. It defines the boundary of the element. Borders can have different styles, colours, and thicknesses. You can think of it as a frame around the content.
9.4:
4. Margin
The margin is the space outside the border, creating a gap between the element and other elements on the webpage. It acts as a buffer zone between elements, preventing them from being too close to each other. Similar to padding, margins can also be adjusted to increase or decrease the space.
Figure 9.5: The margin in a BOX Model
Now let us use some tags and see how Box Model is useful in HTML web designing. HTML Code without Styling: In this code, simple headings and paragraph tags are used.
<body>
<h3>My Favourite Foods</h3>
<p>I am a big food lover. I have many favourite dishes. I love chinese and italian foods.</p>
<h3>My Favourite Hobbies</h3>
<p>I love to play basketball. When I get free time, reading is my favourite work to do.</p> </body>
Output: This is how the p tag and h3 tag content is displayed.
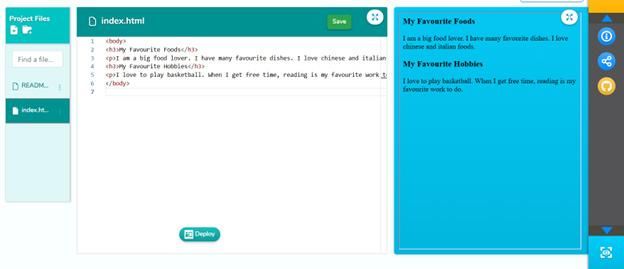
Now let us use a class to apply the box model properties to every element.
HTML Code with Class Selectors:
<div class = “container”>
<h3>My Favourite Foods</h3>
<p>I am a big food lover. I have many favourite dishes. I love chinese and italian foods.</p>
</div>
<div class = “container”>
<h3>My Favourite Hobbies</h3>
<p>I love to play basketball. When I get free time, reading is my favourite work to do.</p>
</div>
HTML Code with ID Selectors:
<div class = “container”>
<h3>My Favourite Foods</h3>
<p id = “first”>I am a big food lover. I have many favourite dishes. I love chinese and italian foods.</p>
</div>
<div class = “container”>
<h3>My Favourite Hobbies</h3>
<p id = “second”>I love to play basketball. When I get free time, reading is my favourite work to do.</p>
</div>
Now let’s explore some CSS properties used in the Box Model.
9.3.1
The background-color property is used to set the background color of an element. Example: The background for my favourite foods and my favourite hobbies is set to burlywood.
Code: <style> .container{ background-color: burlywood; } </style>
Output:
My Favourite Foods
I am a big food lover. I have many favourite dishes. I love chinese and italian foods.
My Favourite Hobbies
I love to play basketball. When I get free time, reading is my favourite work to do.
9.3.2 Border
The border property adds a line around the element. You can specify the thickness, style, and colour of the border.A border of colour red is added around each div container.
Code: <style> .container{ background-color: burlywood; border: 3px solid red; }
</style>
Output:
My Favourite Foods
I am a big food lover. I have many favourite dishes. I love chinese and italian foods.
My Favourite Hobbies
I love to play basketball. When I get free time, reading is my favourite work to do.
9.7: Output of CSS border
9.3.3 Padding
The padding property creates space between the content and the border. A gap of value 9 pixels is added between the content of an element and its border. A space and distance between the stuff inside and the border is inserted, making the inside part of the element look different from the border.
Code: .container{ background-color: burlywood; border: 3px solid red; padding: 9px; }
Output:
My Favourite Foods
I am a big food lover. I have many favourite dishes. I love chinese and italian foods.
My Favourite Hobbies
I love to play basketball. When I get free time, reading is my favourite work to do.
9.3.4 Margin
The margin property creates space outside the element’s border. A margin of 34 px is added, creating a space outside the element’s border. It creates space between the element and adjacent elements.
Code: .container{ background-color: burlywood; border: 3px solid red; padding: 9px; margin: 34px; } Output:
My Favourite Foods
I am a big food lover. I have many favourite dishes. I love chinese and italian foods.
My Favourite Hobbies
I love to play basketball. When I get free time, reading is my favourite work to do.
Padding can be done from all the possible sides, that is top, right, bottom, and left. Let us see the differences in the output when these types of paddings are used.
9.3.5 Border Radius
In CSS, the border-radius property is used to add rounded corners to elements on a webpage.
Code: .container{
background-color: burlywood;
border: 3px solid red;
padding: 9px;
margin: 34px;
border-radius: 34px; }
The width property determines how wide an element should be. It specifies the horizontal size of the element. You can think of it as how much space an element takes up from left to right on the webpage. Width is usually measured in pixels (px), but it can also be specified in other units like percentages (%), inches (in), or centimetres (cm).
The height property determines how tall an element should be. It specifies the vertical size of the element. You can think of it as how much space an element takes up from top to bottom on the webpage.
Similar to width, height is also usually measured in pixels (px), but it can be specified in other units as well.
Code: .container{
background-color: burlywood; border: 3px solid red; padding: 9px;
margin: 34px;
border-radius: 34px;
width: 120px; }
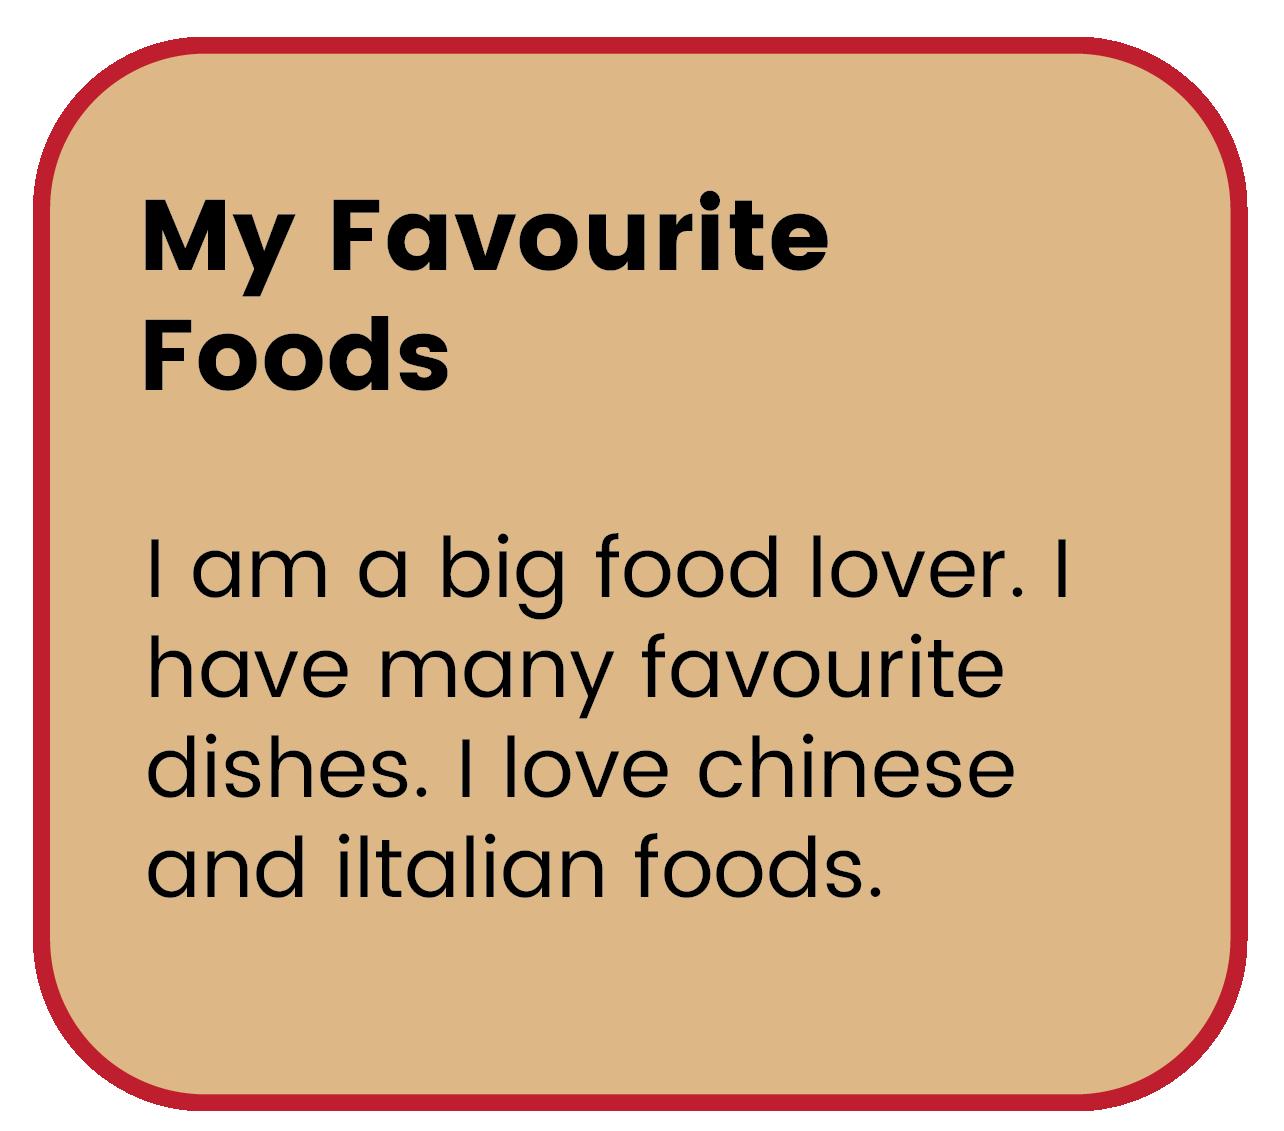
I love to play basketball. When I get free time, reading is my favourite work to do.
Above output has a rounded corner and the width has been decreased. By setting the width and height properties, web designers and developers can control the size of elements such as images, divs, paragraphs, and more. This allows them to create layouts and designs that are visually pleasing and well-structured. In your next lab session, you will practice working with the CSS Box Model, apply all the properties that apply to this model, and observe how web developers utilise the concept of the CSS Box model in creating websites.

Key Terms
• CSS Box Model - The CSS Box Model is a model used in web design and development to understand how elements on a webpage are structured and how they interact.
• Content - The content in the box model is the actual text, image, or other media that is displayed inside the element.
• Padding - Padding in the box model is the space between the content and the border of the box.
• Border - The border in the box model is a line or outline that surrounds the padding and content of the box.
• Margin - The margin in the box model is the space outside the border, creating a gap between the element and other elements on the webpage.

• CSS properties allow us to control the appearance, layout, and positioning of elements on a webpage.
• This box has different parts or layers, which together make up the CSS Box Model.
• In CSS, width and height are properties used to define the size of an element on a webpage.
• The border-radius property is used to add rounded corners to elements on a webpage.
• Padding and margin are properties used to control the spacing and positioning of elements on a webpage.
• The display property determines the behaviour and visibility of an element.

1. The“font-size”property in CSS is used to adjust the _______________ of the text.
2. The “background-color” property in CSS is used to change the _______________ colour of an element.
3. CSS stands for _______________.
4. The “padding” property in CSS controls the space between the content and the _______________ of an element.
5. The “display” property in CSS determines how an element is _______________ on a webpage.
1. The“color”property in CSS is used to change the background color of an element.
2. The “font-size” property in CSS is used to adjust the size of the text.
3. The “text-align” property in CSS is used to control the alignment of an element’s border.
4. The “float” property in CSS is used to control how an element flows around other elements.
5. The “background-image” property in CSS is used to add a border around an element.
III. Answer the following
1. Define CSS box model
2. Can you give examples of CSS properties and their usage?
3. How do we select elements to apply CSS styles to?
4. What are CSS properties and values?
5. How do we apply CSS to HTML documents?

Choose a theme that transports your webpage to a historical era or a futuristic world. Imagine how the Box Model can contribute to the ambiance of your chosen theme.

Create an adventure-themed webpage using CSS Box Model. Choose a theme, structure content with padding, add creative borders, and use margins for spacing. Optionally, enhance with background ambiance. Present to the class, explaining your adventure theme and CSS choices.

By the end of this chapter, you will be able to,
• Introduce JavaScript
• Describe the key concepts of JavaScript
• Create a form using JavaScript
Imagine a situation where you want to register yourself for a sports competition conducted by one of the sports academies. You will visit their website and navigate to the page where the registration can be done. Isn’t it?


Figure 10.1: A Registration form
You will see the input area of various fields, such as name, email address, phone number, and so on, and the button to register or create an account, designed and created in an appropriate way. That is what HTML and CSS do to create forms and web pages.
However, what happens if the input field does not allow you to enter your name or
other details or the register button does not work?
Despite having an appropriate form, the form would be useless as it is not interactive and does not accept user inputs.
So, it is important to create a webpage that contains components to interact with users. HTML and CSS are used to create the structure and design of the webpage. To make it interactive, the programming language, known as JavaScript, is used.
In this chapter, you will learn the basics of JavaScript programming language and explore how this language helps to create interactive web pages.
JavaScript is a popular programming language primarily used for building interactive and dynamic web pages. It’s often referred to as “JS” for short. JavaScript allows you to add interactivity, perform actions, and manipulate content on web pages in response to user interactions.

Figure 10.2: JavaScript
With JavaScript, you can create games, create buttons to do different things when you click on them, show or hide information, and even create cool animations. It’s like giving instructions to the computer on how we want things to behave and look on a website.
JavaScript can be implemented using JavaScript statements that are placed within the <Script> ....... </Script> HTML tags in a web page. You can place the <script> tags containing your JavaScript anywhere within the webpage but, normally recommended that you should keep it within the <head> tag.
To use JavaScript, one must learn some basic concepts that will help you to create JavaScript effectively. Let us learn one by one.
A variable is like a box or a container that can hold different values. Variables are used to store and manage information in a program. For example, a glass that can hold both water as well as juice for you.
Variables in JavaScript can be declared using the let keyword. It is widely used to declare variables with block-level scope, making it suitable for modern programming practices.
For example, a variable ‘message’ is created using the ‘let’ keyword. Using ‘console. log()’ function, the message variable is printed.
Code:
let message = “Hello, World!” ; console.log(message);
Output:

In JavaScript, event handling refers to the process of reacting to browser events, such as user input or modifications to the status of a webpage. Events can be anything from mouse movements to form submissions to button clicks to key presses and more. JavaScript offers a method to handle such events, allowing programmers to specify certain actions or behaviours in reaction to user input.
Let us try to understand the event handling through a code.
Code:
<!-- HTML -->
<!DOCTYPE html>
<html lang= “en ”>
<head>
<meta charset= “ UTF-8”>
<meta name= “ viewport” content=“width=device-width, initialscale=1.0”>
<title>Event Handling Example</title>
</head>
<body>
<button onclick=“ showAlert()” >Click Me</button>
<script> // JavaScript function showAlert() { alert(“Button Clicked!”); }
</script> </body>
</html> Output:
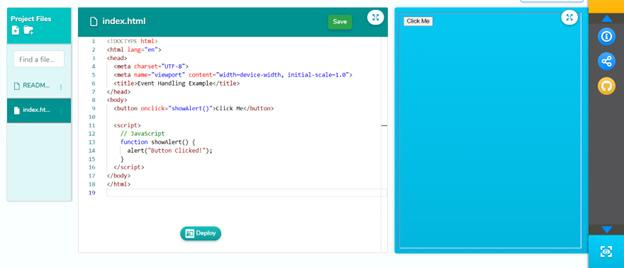
Alert message

Figure 10.4: Output to show alert message
Explanation: When you click the ‘Click Me’ button, the showAlert() function is triggered, and it displays a pop-up alert saying “Button Clicked!”. This clicking a button is known as event.
DOM (Document Object Model) in JavaScript is like a map or a way of representing a web page so that your code can interact with it. Imagine your web page as a document, and the DOM is a structured model that allows you to access, change, and manipulate different parts of that document.
In simpler terms, the DOM is like a bridge that connects web pages to programming languages like JavaScript. It allows developers to interact with and change the content and structure of a webpage while it is being viewed.
Let us see an example program to understand this better.
Code:
<!-- HTML -->
<!DOCTYPE html>
<html lang=“ en ”>
<head>
<meta charset=“UTF-8”>
<meta name=“viewport” content=“width=device-width, initialscale=1.0”>
<title>DOM Manipulation Example</title>
</head>
<body>
<p id=“demo”>Initial Text</p>
<button onclick=“changeText()”>Change Text</button>
<script> // JavaScript function changeText() { document.getElementById(“demo”).innerHTML = “New Text!” ; }
</script> </body>
</html>
Output:
Before clicking the change text button.

Figure 10.5: Output before clicking the change text button. After clicking the change text button.

Figure 10.6: Output After clicking the change text button.
Explanation: In the given example, when the button is clicked, it triggers a JavaScript function that changes the text content of the paragraph as shown in figure 10.6. This is a basic example of how the Document Object Model (DOM) can be manipulated using JavaScript to dynamically update the content of a webpage.
10.1.4 Conditional statements
In JavaScript, conditional statements are used to decide what to do with your code. They let you run distinct code blocks according on whether a given condition turns out to be true or false. The if statement is the most used type of conditional statement. Example: Let’s say you want to display a message based on the time of day.
Code:
// Get the current hour var currentHour = new Date().getHours();
// Check the time of day and display a message accordingly if (currentHour < 12) { console.log(“Good morning!”);
} else if (currentHour >= 12 && currentHour < 18) { console.log(“Good afternoon!”);
} else {
console.log(“Good evening!”);
Explanation: The output for this code would depend on the current time when the code is executed. The code determines the time of day based on the current hour and prints a corresponding message. Let’s break down the possible outputs:
• If the current hour is before 12 (noon), it will log ‘Good morning!’.
• If the current hour is between 12 (noon) and 18 (6 PM), it will log ‘Good afternoon!’.
• If the current hour is 18 or later, it will log ‘Good evening!’.
Output: If you run this code at 10 AM, the output might be:

These are foundational JavaScript concepts that enable you to create dynamic and interactive web pages. You can use these concepts to build a wide range of web applications, from simple animations and form validation to complex web services and interactive games.

Think and Answer
You have a web page with a button, and you want to show an alert when the button is clicked. Which JavaScript concept would you use?
A) Variables
B) Event Handling
C) DOM Manipulation
D) Conditional Statements
10.2 Creating a form using JavaScript
Now that you have learned about the key concepts of JavaScript, let’s try and create an interactive form using HTML, CSS and JavaScript. Follow the given steps to create the form.
Step 1: Create Files
• Open a text editor like Notepad. Type the provided HTML code into a new file and save it with an .html extension (e.g., index.html).
• Type the provided CSS code into another new file and save it with a .css extension (e.g., styles.css).
• Type the provided JavaScript code into another new file and save it with a .js extension (e.g., script.js).
Step 2: Writing HTML, CSS, JavaScript codes a. HTML Code
<!DOCTYPE html>
<html lang=“ en ”> <head>
<title>Grade 6 Application Form</title>
<link rel=“stylesheet” href= “styles.css”> </head> <body>
<div class=“container”>
<h1>Grade 6 Application Form</h1>
<form id=“applicationForm”>
<!-- Form fields -->
<label for=“fullName”>Full Name:</label>
<input type=“text” id=“fullName” required><br><br>
<label for=“ age ”>Age:</label>
<input type= “number” id=“ age ” min=“10” max= “12” required><br><br>
<label for=“email”>Email:</label>
<input type=“email” id=“email” required><br><br>
<label for=“parentName”>Parent’s Name:</label>
<input type= “text” id=“parentName” required><br><br>
<!-- Submit button -->
<input type=“submit” value=“Submit”> </form> </div>
<!-- Include the JavaScript file --> <script src=“script.js”></script> </body> </html>
Explanation: The HTML file sets up a form for a Grade 6 application with fields for full name, age, email, and parent’s name.Styling is linked from an external CSS file (styles.css), and a JavaScript file (script.js) is included at the end of the body.
b. CSS Code
/* Styling for the application form */ body {
font-family: Arial, sans-serif; } .container { max-width: 600px; margin: 0 auto; padding: 20px; background-color: #f9f9f9; border-radius: 8px; box-shadow: 0 4px 8px rgba(0, 0, 0, 0.1); } label { font-weight: bold; } input {
/* Styling for input fields */ width: 100%; padding: 8px;
margin-bottom: 10px; border: 1px solid #ccc; border-radius: 4px; box-sizing: border-box; }
input[type=“submit”] {
/* Styling for submit button */ background-color: #4caf50; color: white; border: none; border-radius: 4px; cursor: pointer; font-size: 16px; }
input[type=“submit”]:hover {
/* Styling for submit button on hover */ background-color: #45a049; }
Explanation: Basic styling is applied to the form and its elements for a clean and organised appearance.
c. JavaScript Code
// Add a submit event listener to the form document.getElementById(“applicationForm”). addEventListener(“submit”, function(event) { // Prevent the default form submission behavior event.preventDefault();
// Retrieve values from form fields
var fullName = document.getElementById(“fullName”).value; var age = document.getElementById(“ age ”).value; var email = document.getElementById(“email”).value; var parentName = document.getElementById(“parentName”). value;
// Display an alert with the submitted information alert(“Application submitted successfully!\n\nName: ” + fullName + “\nAge: ” + age + “\nEmail: ” + email + “\nParent’s Name: ” + parentName);
// You can add code here to send the form data to a server or perform any other desired action. });
Explanation: The JavaScript file (script.js) adds an event listener to the form. When the form is submitted, the function is executed. The function prevents the default form submission “behavior” using event.preventDefault(). It then retrieves the values entered in the form fields. An alert is shown with the submitted information. You can customize this part to send the form data to a server or perform any other action.
Step 3: Organise Files
i. Place all three files (index.html, styles.css, script.js) in the same directory.
ii. Open HTML File in a Browser
iii. Double-click on the index.html file. This will open the HTML file in your default web browser.
iv. The grade 6 form will be displayed as shown in figure 10.7
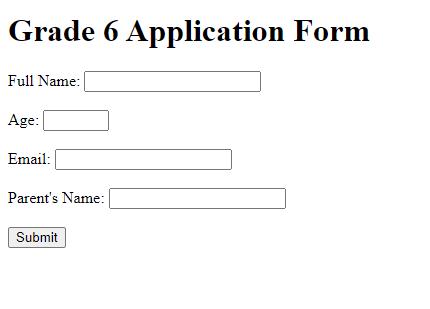
Figure 10.7: Output with input fields in application form
Step 4: Interact with the form
i. Fill in the form fields (Full Name, Age, Email, Parent’s Name)
ii. Click the “Submit” button
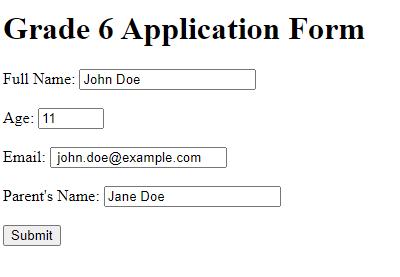
10.8: Entering the details in input field

Key Terms
JavaScript- JavaScript allows you to add interactivity, perform actions, and manipulate content on web pages in response to user interactions
Event handling - Event handling refers to the process of reacting to browser events, such as user input or modifications to the status of a webpage.
DOM - DOM (Document Object Model) in JavaScript is like a map or a way of representing a web page so that your code can interact with it.

• JavaScript is a popular programming language primarily used for building interactive and dynamic web pages.
• Variables are containers for storing data values. You can create a variable using the let keyword.
• Event handling refers to the process of reacting to browser events, such as user input or modifications to the status of a webpage.
• DOM (Document Object Model) in JavaScript is like a map or a way of representing a web page so that your code can interact with it.
• Conditional statements are used to decide what to do with your code.

I. Choose the correct answer
1. What is JavaScript primarily used for?
a. Database management
b. Building interactive web pages
c. Graphic design
d. System administration
2. Which keyword is used to declare variables in JavaScript?
a. var
b. variable
c. let
d. const
3. What does DOM stand for in JavaScript?
a. Document Object Model
b. Data Object Management
c. Dynamic Operation Module
d. Document Order Mechanism
4. In JavaScript, what is event handling used for?
a. Creating graphics
b. Database queries
c. Reacting to browser events
d. File manipulation
5. Which method is used to change the text content of an HTML element in JavaScript?
a. changeContent()
b. modifyText()
c. adjustHTML()
d. innerHTML
II. Fill in the Blanks:
1. Variables are like __________ that can hold different values.
2. JavaScript is often referred to as ___for short.
3. Event handling in JavaScript involves reacting to browser __________.
4. The_________ in HTML is used to embed JavaScript code.
5. ______________________allows you to access, change, and manipulate different parts of the document.
III. Answer the following questions
1. What is the primary purpose of JavaScript in web development?
2. How are variables declared in JavaScript, and what is their role?
3. Explain the concept of event handling in JavaScript with an example.
4. How does DOM (Document Object Model) manipulation work in JavaScript?

How can you creatively use JavaScript to make a simple interactive quiz on your favorite subject? Think about asking questions, receiving answers, and providing feedback to engage your classmates in a fun learning experience.


By the end of this chapter, you will be able to,
• Describe Responsive Design
• Summarise the key features of Responsive Design
• Use the features to develop a Responsive webpage
Did you ever tried to view your webapp or webpage that you designed on mobile or tablet? Did you get the proper view of the webapp?
How the webpage that is designed for laptop or desktop fit for mobile view? There comes responsive web design.
Think about having a website that can adjust itself to look great on any screen, whether it’s a big computer screen or a small phone screen. That’s what responsive design is all about.
Figure 11.1: Responsive design
In this chapter, you’ll understand how responsive design helps us have a better experience when using websites on different devices.
Responsive design ensures websites look and function well on different devices
and screen sizes by using flexible layouts and CSS media queries. This is crucial because people use different devices to surf the web, and websites must adjust to these devices to give users the best experience.
Figure 11.2: Web page in various devices
Responsive web design uses things like:
• Flexible Layouts: The content and images resize to fit the screen.
• Media Queries: These are special rules that tell the website how to change based on the size of the device.
• Images That Resize: Images shrink or grow based on the screen size, so they don’t break the layout.
Web developers make use of the following elements when they create a web page:
• Fluid Grids: Designers use relative units like percentages instead of fixed units like pixels to create flexible grids that can adapt to different screen sizes.
Figure 11.3: Fluid grids adapting to different screen size
• Flexible Images: Images are designed to scale and adjust proportionally based on the screen width, ensuring they don’t break the layout or appear too large or small.
Figure 11.4: Flexible images in different screen sizes
• Media Queries: Media queries are techniques used to apply specific styles or layout changes based on the device’s characteristics, such as screen width, height, orientation, and resolution.
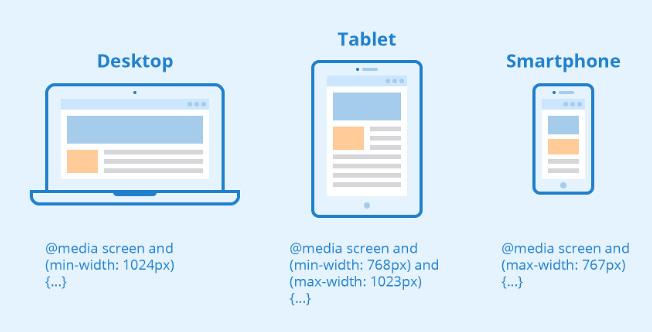
Figure 11.5: Media Queries to apply style in various screen sizes
• Viewport Meta Tag: Viewport means the area in a webpage that is visible to users. This HTML meta tag controls the viewport’s initial scale and width, helping to optimise content for different devices.
Figure 11.6: The visible area of webpage content in different screen sizes
• Mobile-First Approach: Designing for mobile devices first and then progressively enhancing the layout and features for larger screens, ensuring a
seamless experience across all devices.
SEO stands for Search Engine Optimization. It is the paractice of optimizing a website or online conent to improve its visibility and ranking in search engine results pages
• Breakpoints: Breakpoints are the points in a webpage where developers change the design and layout of the content to accommodate different screen sizes. The web content responds at these points to change the viewport area according to the device screen.
Figure 11.7: Fluid grids adapting to different screen size
• Content Prioritisation: Content may be rearranged or resized based on the device’s screen size, prioritising the most important information for smaller screens.
• Touch-Friendly Design: Elements are designed with touch interactions in mind, making buttons and links large enough to tap easily.
• Performance Optimisation: Responsive design often involves optimising images and code to ensure fast loading times on all devices.
Responsive design helps create a consistent user experience regardless of the device being used, which is essential in today’s multi-device and multi-screen world. It is now understood that every web developer creates web pages that are responsive in nature. If you were a web developer, what would you do in certain situations? Think and answer the activities given below.

Think and Answer
You want to show a drawing on your website, but you know that some people might visit your website using slow internet connections. How can responsive design help ensure your website loads quickly for these visitors?
Imagine you are using a tablet to access a website. How does responsive design help you have a better experience compared to using the same website on a computer?
You can understand responsive design better if you learn about its methods. Let us apply the elements of responsive design and understand the code behind it. HTML document structure: <!DOCTYPE html> <html> <head> </head> <body> </body> </html>

Explain the purpose of the html tags used for HTML document structure in the space provided.

1. Inside the <head> tag Code:
1. <title>My Responsive Webpage</title>
2. <meta name=“viewport” content=“width=device-width, initial-scale=1”> 3. <style>
4. body { 5. font-family: Arial, sans-serif; 6. text-align: center; 7. }
8.
9. header {
10. background-color: #3498db; 11. color: white;
12. padding: 20px; 13. }
14.
15. container { 16. display: flex; 17. flex-direction: column; 18. align-items: center; 19. padding: 20px; 20. }
21.
22. #photo { 23. max-width: 200px; 24. height: 200px; 25. }
26.
27. @media (min-width: 768px) {
28. header {
29. font-size: 24px; 30. }
31. }
32. </style>
Explanation:
• Line 1: The title tag is used to give the name of a webpage. It tells us what the webpage is about. You can see this name on the tab at the top when you open a webpage in a web browser where the HTML code works. The output is shown in Figure 11.8.

Figure 11.8: Output of title tag
• Line 2: The meta tag helps decide how a webpage looks on mobile devices. The developers use a mobile-first approach, meaning they design for small screens first, and then adapt to bigger screens. Setting the initial scale to one makes sure the content isn’t too zoomed in or out, so it looks good on all devices.
• Line 4 - 7: In the style tag, we use the body selector to pick how the words look and where they are on the webpage. We choose Arial and sans-serif for the way
the letters look, and we make sure the text is in the middle of the webpage by setting it to centre alignment.
• Line 9 - 13: The header selector makes the background of the header a nice blue colour. The hexadecimal value (#3498db) represents that specific shade of blue. The text colour is set to white, making it easy to read. The padding, which is like adding some space around the box, is set to 20 pixels to make it look just right.
• Line 15 - 20: The class container is used to style up the content inside the div tag. The display property is used and set to value flex. This ensures that the content gets dynamically arranged based on available spaces. The direction of the flex is given as the centre to stack the content vertically. Moreover, the elements inside the container are aligned in the centre of the webpage.
• Line 22 - 25: The width and height property of the image used in the webpage is set to 200 px. This is done by using an id selector (#photo).
• Line 27 - 31: The media query rule is used to apply all the styles on a screen width of 768 pixels or more. The font size of the header gets adjusted when the screen size gets bigger.
2. Inside the <body> Tag Code:
<body> <header>
<h1>Hi, I’m Asha Gupta.</h1> </header>
<div class= “container”>
<img id=“photo” src= “my_photo.jpg” alt=“Your Photo”>
<p>
I am a grade 6 student interested in web design and coding. This is my responsive webpage to introduce myself. I love learning and creating new things!
</p> </div> </body> </html>

Explain the html tags used inside body tag briefly in the space provided.

The html tags are executed and run on a web browser in three different devices. Figure 11.9 is the view on a laptop screen. Figure 11.10 is that of a tablet screen. Figure 11.11 is that of a mobile screen.

You are accessing a website on your smartphone, and the text appears too small to read comfortably. How does responsive design address this issue?
You have a website with a menu that has many options, which looks great on a computer screen. How does responsive design change the menu’s appearance when viewed on a smartphone?
Exploring the world of responsive design and learning how it helps websites and apps look good and work well on different devices. We discovered that responsive design uses flexible layouts, media queries, responsive images, touch-friendly buttons, hidden menus, and font adjustments to make sure everything fits nicely on screens of all sizes.

Key Terms
Responsive Design - Responsive Design means making websites and apps, so they appear and function nicely on various gadgets, such as computers, tablets, and smartphones.

• Responsive Design is a way of designing websites and applications to make them look good and work well on different devices, like computers, tablets, and smartphones.
• Responsive Design uses special techniques to adjust the layout, font size, and images on a website, so it fits nicely on any device.
• By using these techniques, web designers can ensure that their websites are accessible and user-friendly for everyone, regardless of the device they’re using.

I. Fill in the blanks
1. Responsive design is all about making websites and apps ___________ and work well on different devices.
2. Media queries are special instructions that tell the website how to change its ___________ based on the device it’s being viewed on.
3. In responsive design, images can be made smaller or replaced with simpler versions on smaller screens to help the webpage load ___________.
4. A ________in responsive design means that the different parts of a webpage can adjust and rearrange themselves based on the size of the screen.
II. Answer the following questions
1. What is responsive design?
2. How does responsive design help a webpage?
3. What are the advantages of responsive design?
