7 minute read
HER MAJESTY’S HORSE


APPLIQUÉ PROJECT HER M A J EST Y ’S HOR SE
BEHIND THE QUILT
A ROYAL WIN!
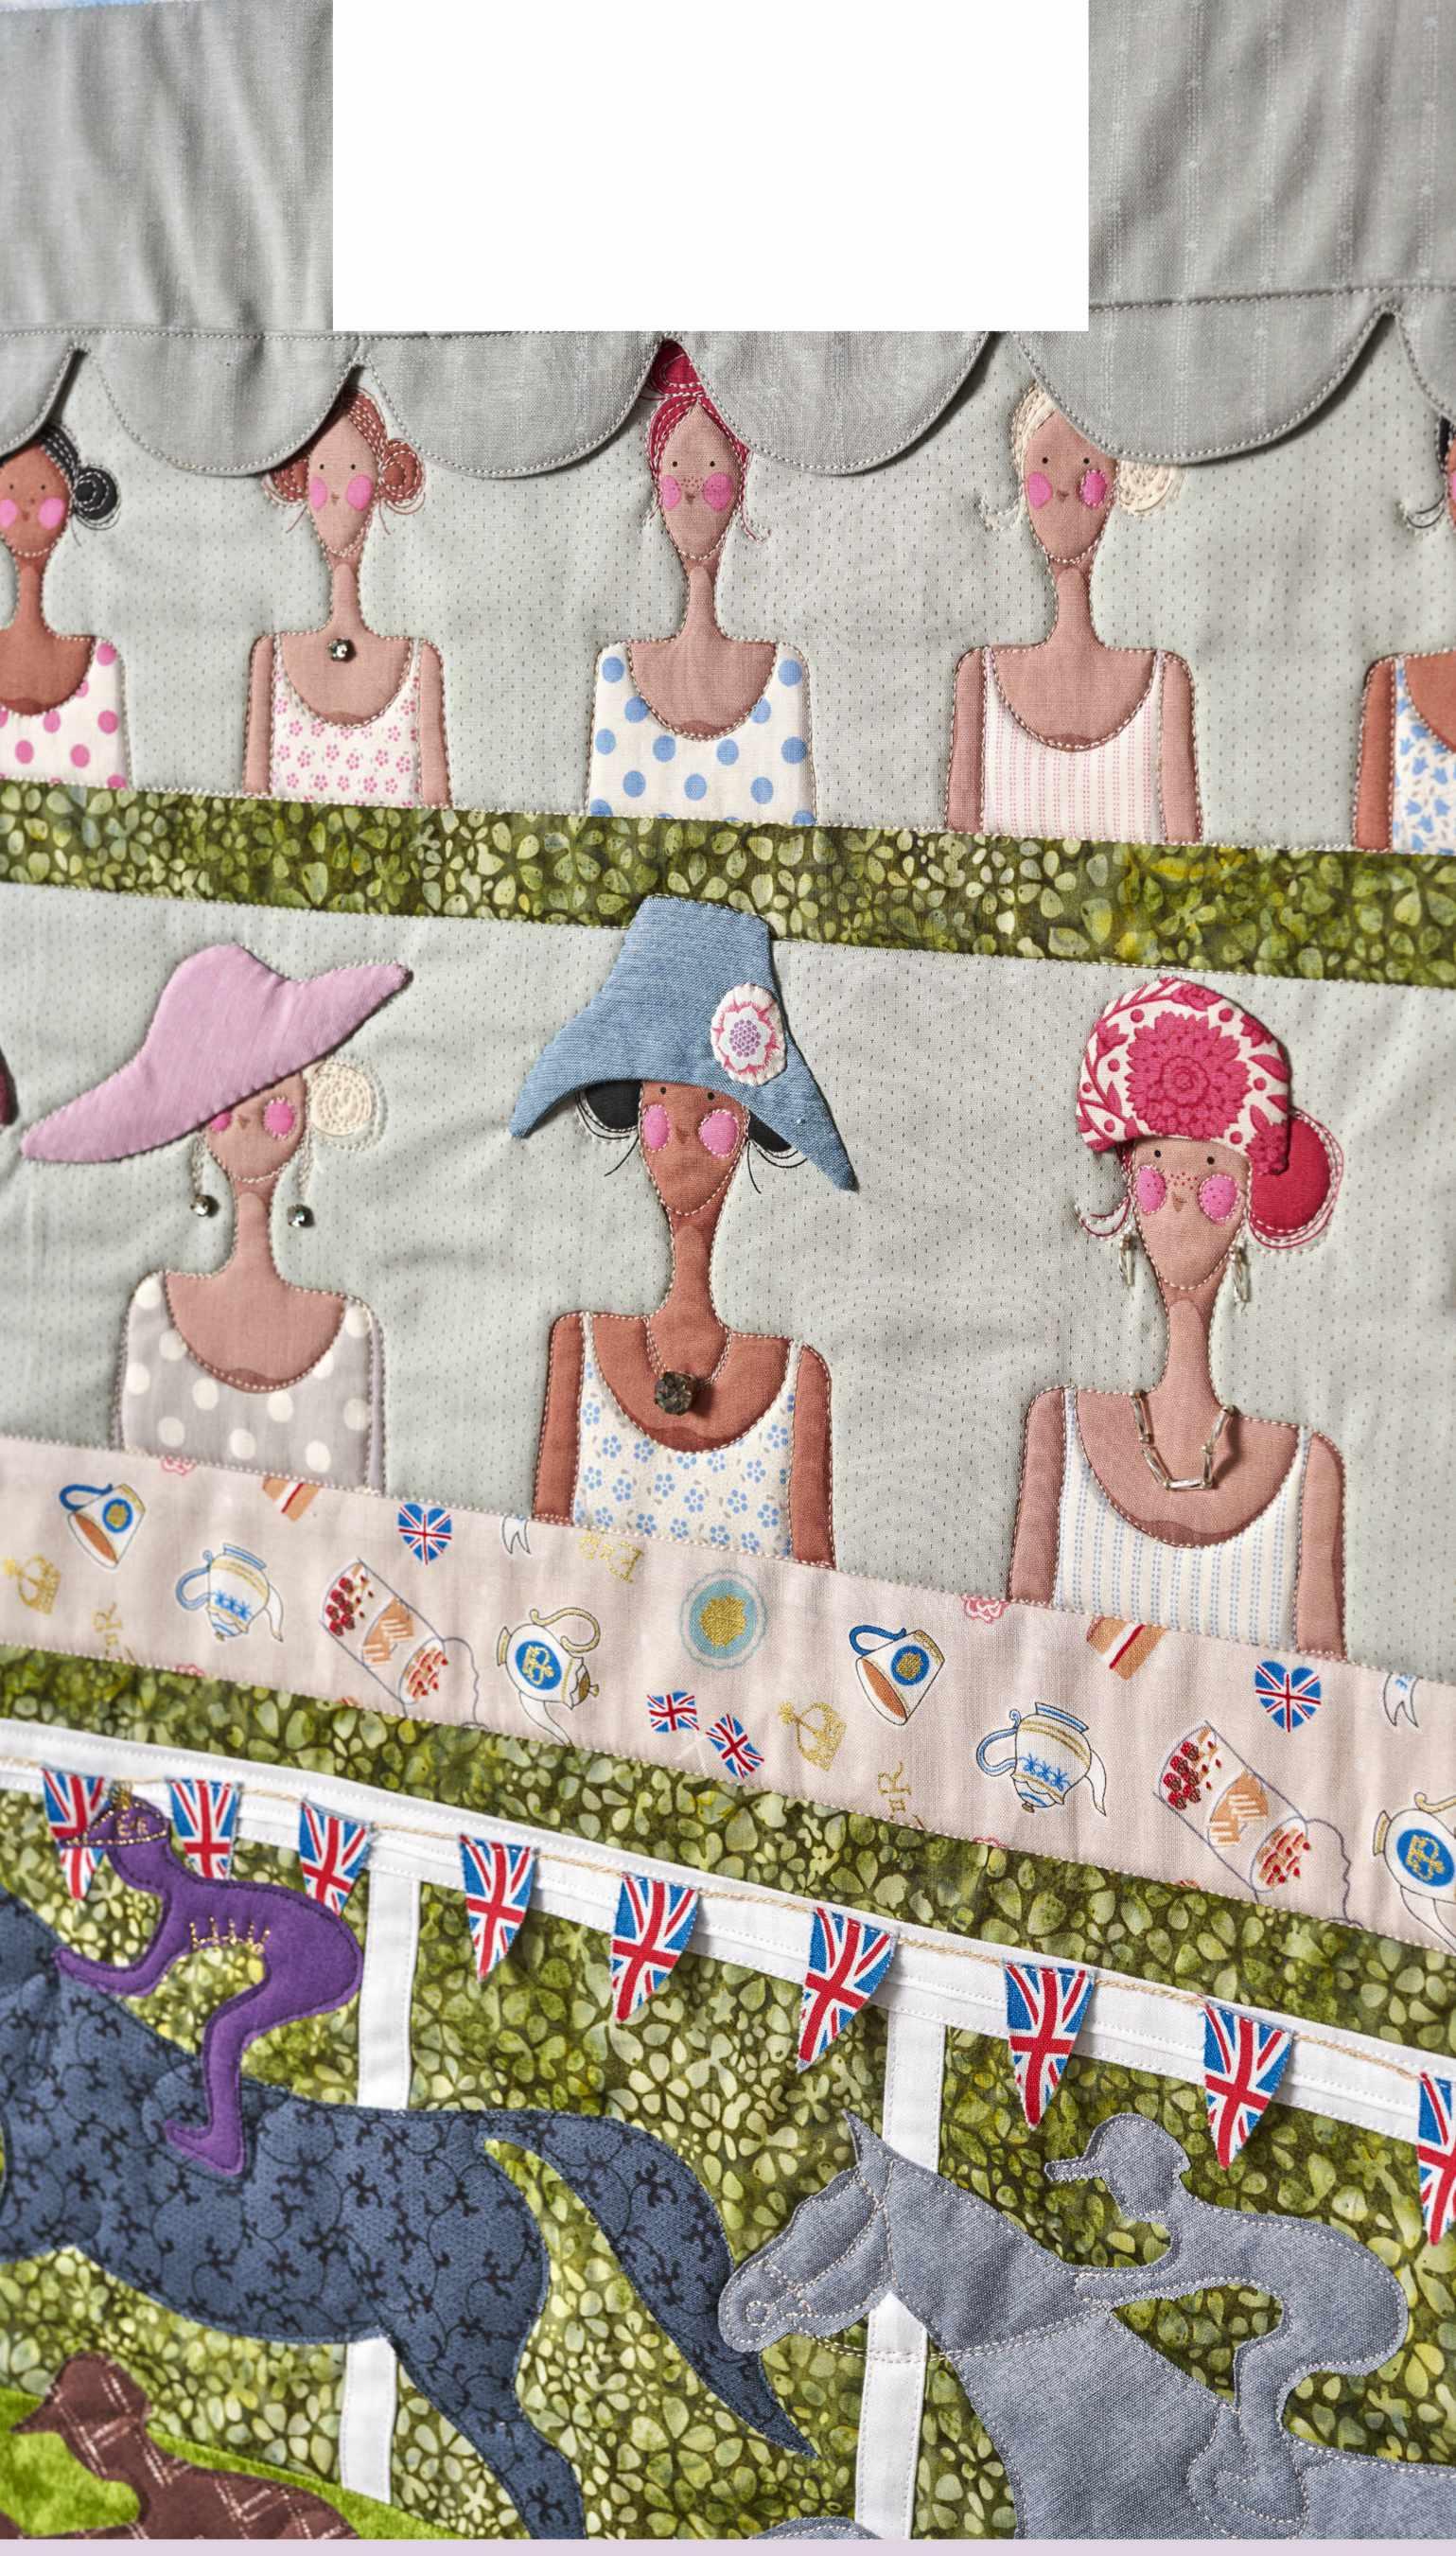
“This is a fun quilt made using the Tilda Cotton Beach Me and My Friends Panel to celebrate the Queens Platinum Jubilee! It is easy to make, and, in this instance, I have used a bonding method for the appliqué, but you could use hand appliqué. The printed ladies work so well; I have just dressed them up with the hats and the odd jewel! The Queen is a remarkable and wonderful lady and has such a love and way with her horses. The Platinum Jubilee was certainly a celebration to remember.” – Jo Colwill
You will need
n Blue fabric (sky) – 231/2in x 6in n Grey stripe fabric (marquee) – 231/2in x 7in n Green print (hedge) – 231/2in x 11/2in n Green print (hedge) – 231/2in x 71/2in n Larger Tilda Me and My Friends
Panel – 231/2in x 51/2in strip n Smaller Tilda Me and My Friends
Panel – 231/2in x 41/2in strip n Teacup print fabric – 231/2in x 21/2in n W hite fabric (rails) – Two (2) 1in x
WOF strips n Green fabric (grass) – 231/2in x 91/2in n Various scraps (ladies’ hats) – Five (5) 6in squares n Purple fabric (Queen’s jockey) –
One (1) 6in square n Union Jack fabric (bunting and flags) – One (1) fat eighth
Assembling the wall-hanging
1Lay the grey stripe marquee fabric right side up and fold up 2in, RST, at the bottom. Using the template, draw on eight (8) scallop shapes, and mark line A (Fig 1) – it will help in step 2. Stitch on the

n Various colour fabrics (horses) – Four (4) 16in squares or fat quarters n Bondaweb – 20in n Perlé thread (bunting) n Backing – 7/8yd n Batting – 30in x 42in n Binding* – 1/4yd n 1/2in bias maker n Various beads for ladies jeweller y
Finished size
n 23in x 35in approx.
Notes
n *Jo used two (2) colours for her binding, blue for the top half and green for the bottom half. n Read all instructions before beginning. n RST = right side(s) together. n RS = right side(s). n WOF = width of fabric. n Assume a WOF of approx. 42in.
line using a small stitch length (1.5 should do). Cut out adding an 1/8in seam, clipping into the dip (Fig 2). Now turn it RS out and press gently. Lay the scallop RS down so that you can see the 2in section from step 1. Fold the scallop edge over on line A (Fig 3). Stitch 1/8in in from this folded edge making a small pin tuck – this creates a detail for the marquee top (Fig 4).
2Join all the strips, as in the picture, to make the background, starting with the sky but leave the 91/2in x 231/2in grass strip at the bottom unattached, as you enclose the rails between it and the hedge
Line A


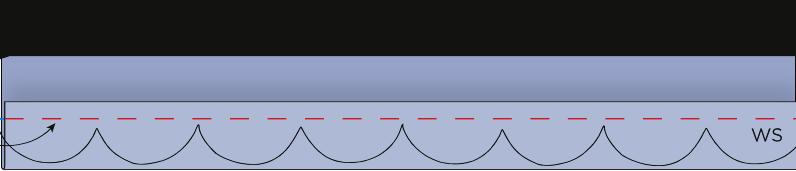
1/2in mark


Fig 1

Fig 3


WS
RS RS
WS 2in Line A
Fig 2
Fig 4
RS
✁WS
RS
strip. W here you have folded up the scallops, you should have around 1/2in flap (Fig 5) (where line A is marked) to make a seam with the top of the ladies’ heads. Jo let the scallops come down over the smaller ladies to avoid making too many hats, but you could give them hats as well if you have time.
1/2in for seam
Fig 5
3Take the two (2) white strips of fabric and use a 1/2in bias maker to make the rails. Cut two (2) 231/2in lengths for the cross rail. Cut four (4) equal lengths of approx. 6in for the posts. Place the posts about 4in apart on the 71/2in x 231/2in hedge strip and stitch on with white cotton on the machine – Jo used her 1/4in foot and kept close to the edge. Now take one (1) cross rail and sew it on top of the posts. Place the second rail about 1/4in higher on top to make a sort of double rail.
4You can now attach the bottom piece of grass for the horses.
5Using the Union Jack fabric, iron a piece of Bondaweb to the back, draw approximately fourteen (14) bunting diamonds. Cut these out as well as three (3) double square flags. Lay a square flag RS down, above the top of the marquee and using a triple stitch as the flag pole, sew down the fold of the flag to secure, then fold over and iron the flag together. Repeat with the other square flags so they fly loosely.
6Once the bunting diamonds are cut out, take off the backing paper and fold them over a piece of Perlé thread or fine twine, approximately 1in apart, creating tiny bunting. Iron and then stitch to the cross rail to secure using an ordinar y small Straight Stitch – if you go slowly down the middle of the twine, it’s easy – you need it to look like it is blowing in the wind.

7Using a window or a light box, trace two (2) medium horses and one (1) big horse – including their jockeys – all in one (1) colour on to the Bondaweb. Cut out roughly and iron to the back of the horse fabrics. For the fourth horse, just trace one (1) big horse and make a separate purple jockey – this is the Queen’s horse. Jo also traced one (1) complete jockey in purple and ironed him to the back of the purple fabric. Cut them all out with sharp scissors, peel off the backing paper and iron in place. Stitch around the edge with a small 1.5 stitch length to secure. You can embellish the purple jockey with a touch of gold thread and a gold tassel on the hat.
✁SLIT
RS WS
Fig 6
9You are now ready to lay the little quilt on cotton wadding and backing. For the quilting, Jo used a decorative stitch for the top of the marquee and then stitched all along the ditch with straight seams. Outline the ladies and stitch some details on their hats – you could even add a little text or add little beads to their necklaces.
10 Quilt around the horses and add their reins.
8Make five (5) hats using the templates by laying the fabrics right sides together, drawing around the template and stitching all around on the line. Cut around the shapes adding an 1/8in seam allowance, then make a small slit in the middle of the back to turn RS out (Fig 6). Press and hand appliqué down on the ladies’ heads, slightly loosely to accentuate a three-dimensional feel. You can embellish with a little gathered flower if you wish. 11 Once you have finished quilting, you are ready to bind and put a hanging sleeve on the back.
12For the binding, cut three (3) 21/2in x WOF strips. Remove the selvedge and join into one continuous length. Fold in half, wrong sides together along the long length and use to bind the quilt. In this particular instance, Jo used two (2) colours blue for the top and green for the base.

Meet the designer
Jo Colwill is the founder and owner of Cowslip Workshops, a haven for quilters based in the south west of England. She teaches patchwork classes and hosts exhibitions at Cowslip’s workshop space, and has written several books showcasing projects that feature the heritage, nostalgia and tradition of quilting. www.cowslipworkshops.co.uk Cowslip Workshops @cowslipworkshops
What a gorgeous scene Jo’s design makes! Plus, it is not just for the Jubilee, but makes a lovely summertime design too!


