28 minute read
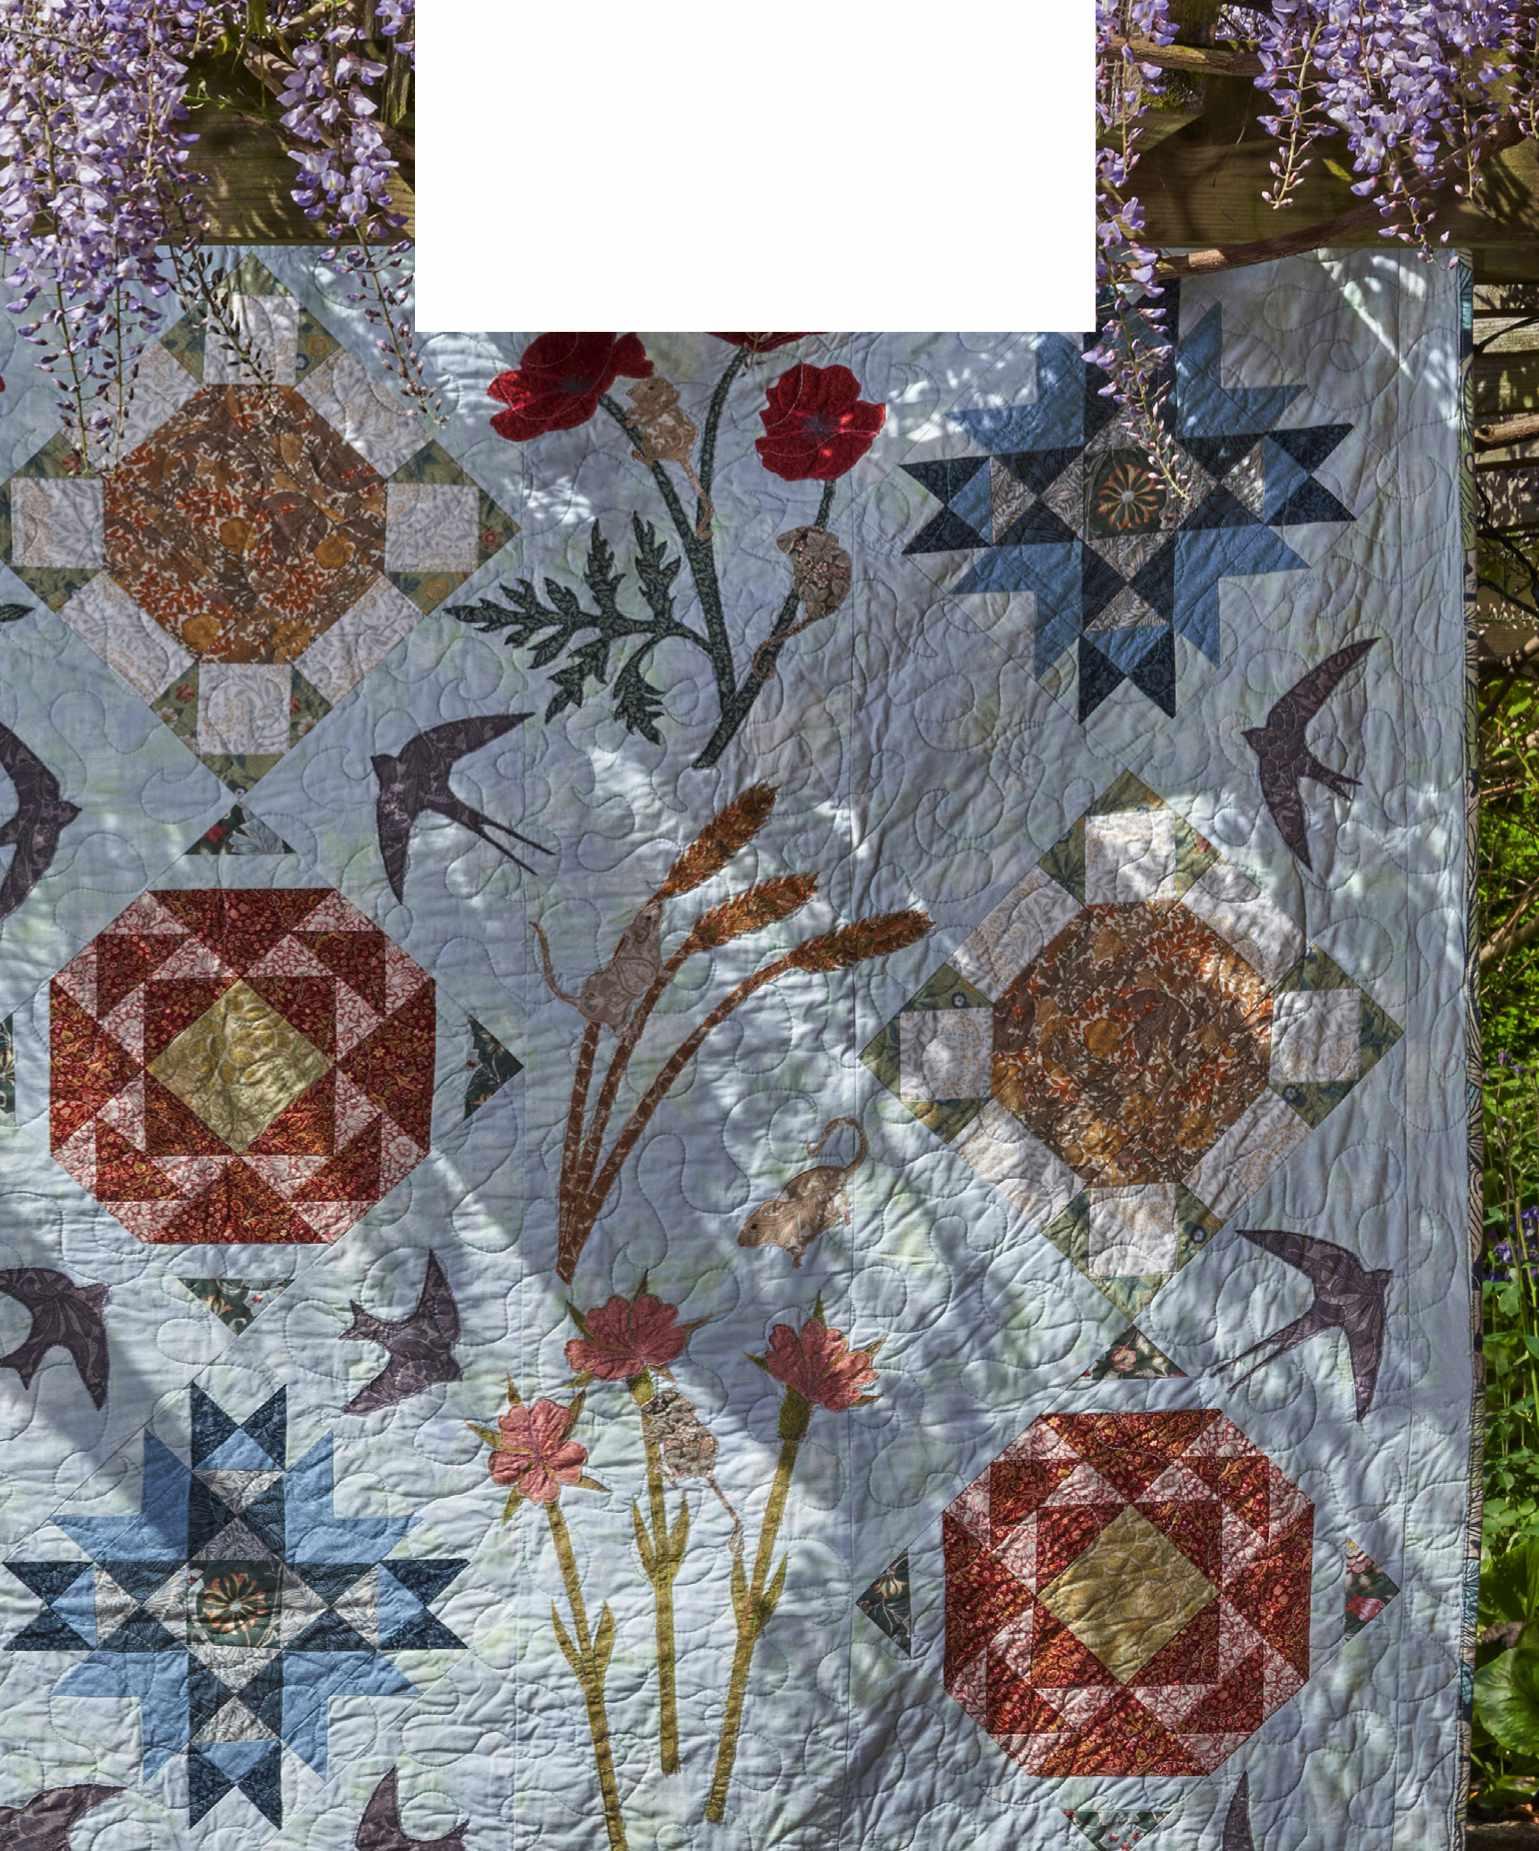
HARVEST HAZE


APPLIQUÉ PROJECT H A RV EST H A ZE
BEHIND THE QUILT
CREATURE COMFORTS
“For the fourth quilt in my Morris Seasons series, I was inspired by those hot, clear, calm summer days we (occasionally!) get in Britain, when the fields are full of wildflowers and ripening grains, and the skies are full of wheeling swifts, swallows and house martins. On these serene days, hidden from sight in the fields, tiny acrobatic har vest mice are busy building up their stores for the coming autumn. I love the idea that they’re in there making tiny-but- daring raids long before the combine har vesters can come and clear the field!
“This summer design has simpler piecing but more complex appliqué than the autumn, winter and spring quilts in the series. Each Morris Seasons quilt has been based around a different structure of block: The Grape Thieves used five-patch blocks, Softly Falling Snow used hexagons and Signs of Spring used basket blocks. For this quilt, I couldn’t find traditional NinePatch blocks just right for the flowers, so I adapted and modified some instead. The Rolling Stone block was the basis for my Daisy, Wyoming Valley became my Cornflower and Joseph’s Coat turned into my Rose block. Perhaps these new blocks will go into the vocabular y of quilt designers and makers of the future.
“I’ve combined a selection of William Morris prints in a rich but muted colour palette with an almost-plain background in a sky blue. My Morris prints were taken from more than one collection and the background is a Moda Grunge blender. Don’t worr y if you can’t get exactly the same prints! Look for stronger hues blended with grey or earth tones as, in summer, colours (including greens) lose the freshness and clarity of spring and look more dusty and muted in the strong sunlight!” – Fi Bowman
You will need
n Sky-blue tone-on-tone or solid (background) – 41/2yds n Gold print (daisy centres) – 1/2yd n Cream print (daisy petals) – 1/2yd n Yellow-green print (rose centres) –
One (1) fat eighth n Light-green print (daisy leaves) – 3/8yd n Medium-green print (rose leaves & cornflower centres) – One (1) fat quarter n Pale-blue print (cornflower petals) – One (1) fat quarter n Light-blue print (cornflower petals) – 1/2yd n Dark-blue print (cornflower petals) – Two (2) fat quarters n Light-pink print (rose petals) – 3/8yd n Red print (rose petals & appliqué poppies) – 5/8yd n Dark-green print (corncockle stems, sepals & calyxes, poppy stems & leaves) – 1yd n Medium-pink print (corncockle flowers) – One (1) fat eighth n W heat print (wheat stems & ears) – One (1) 1 fat quarter
Cutting out
1From the background fabric, cut an 89in length – with the fabric folded (as it comes off the bolt) measure 89in along the selvedges. Fold back the remainder, bringing the folded edges (as it comes off the bolt) together. Cut along the perpendicular fold at the 89in length. Set aside the remainder fabric for step 2. Open out, then refold the 89in length so the selvedges are at both edges. Fold twice to make four (4) layers. The folded fabric should be around 42in- 44in wide x 22in deep. Trim off the first selvedge to give a straight edge. From this edge, cut the following: n Two (2) 101/2in x 89in strips (alternate plain strips). n Four (4) 21/2in x 89in strips (borders). n One (1) 10in x 89in strip, subcut into six (6) 10in squares (end setting triangles), leaving you with one (1) 10in x 29in piece. From this leftover piece, cut two (2) 5in x 29in strips and subcut into eight
n Taupe print (har vest mice) – Two (2) fat quarters n Charcoal/Grey prints (swallows, swifts & house martins) – 1/2yd n Fusible web – 5yds n Teflon pressing sheet /baking liner n Batting – 97in x 83in n Fabric for backing – 51/3yds n Fabric for binding – 2/3yd (or piece it from leftovers)
Finished size
n Quilt: 89in x 75in approx. n Blocks: 12in x 12in
Notes
n WOF = width of fabric, approx. 42in. n WOFQ = width of fat quarter, from selvedge to centre, approx. 21in. n HST = half-square triangle. n RST = right side(s) together n QST = quarter-square triangle. n FG = flying geese. n SIS = square-in-a-square.
(8) 5in squares (rose).
2From the remaining background fabric, cut the following: n Three (3) 20in x WOF strips, subcut into six (6) 20in squares (side setting triangles). n One (1) 6in x WOF strip, subcut into five (5) 6in squares (cornflower). n One (1) 51/2in x WOF strip, subcut into five (5) 51/2in squares (cornflower).
3From the gold fabric (daisy centre), cut the following: n One (1) 41/2in x WOF strip, subcut into six (6) 41/2in squares. n One (1) 31/4in x WOF strip, subcut into twelve (12) 31/4in squares. n Three (3) 21/2in x WOF strips.
4From the cream fabric (daisy petals), cut the following: n Two (2) 31/4in x WOF strips, subcut into twenty-four (24) 31/4in squares. n Three (3) 21/2in x WOF strips. 5From the yellow-green fabric (rose centre), cut four (4) 41/2in squares.
6From the light-green fabric (daisy leaves), cut three (3) 31/4in x WOF strips, subcut into thirty-six (36) 31/4in squares.
7From the medium-green fabric, cut the following: n One (1) 31/4in x WOFQ strip, subcut into five (5) 31/4in squares (cornflower centre). n Three (3) 3in x WOFQ strips, subcut into sixteen (16) 3in squares (rose leaves).
8From the pale blue fabric (cornflower petals), cut the following: n Two (2) 31/4in x WOFQ strips, subcut into ten (10) 31/4in squares. n Two (2) 3in x WOFQ strips, subcut into ten (10) 3in squares.
9From the light-blue fabric (cornflower petals), cut the following: n One (1) 51/2in x WOF strip, subcut into five (5) 51/2in squares and four (4) 3in squares. n Three (3) 3in x WOF strips, subcut into thirty (30) 3in squares.
10 From the dark-blue fabric (cornflower petals), cut the following: n Two (2) 6in x WOFQ strips, subcut into five (5) 6in squares and four (4) 3in squares. n Three (3) 3in x WOFQ strips, subcut into twenty (20) 3in squares.
11From the light-pink fabric (rose petals), cut three (3) 3in x WOF strips, subcut into thirtytwo (32) 3in squares.
12From the red fabric (rose), cut the following: n Two (2) 51/2in x WOF strips, subcut into eight (8) 51/2in squares and seven (7) 5in squares. Eight (8) 5in squares are needed in total, so cut one (1) more from the red fabric and keep the rest for appliqué.
13Cut the backing fabric into two (2) equal lengths and the binding fabric into nine (9) 21/2in x WOF strips.
Cutting out for the appliqué
Fi recommends using a fused, raw-edge technique with either free machining or hand stitching. Prepare your pieces before you start to appliqué – using a window or light box, trace the shapes onto the paper side of the fusible web, and label each (e.g. L1-R for Leaf 1 reversed) to make it easier to sort them later. Fi traced the tiny sepals and calyxes in groups for easier handling.
Roughly cut the traced shapes (or groups of small shapes) out with 1/4in to 1/2in extra around the edges. Using a dr y iron, press the fusible web pieces to the wrong side of the 16From the medium-pink fabric, cut one (1) A, B and C corncockle flowers and one (1) reversed A, B and C corncockle flowers.
17From the wheat fabric, cut the following: n Six (6) wheat stalks. n Six (6) reversed wheat stalks. n Six (6) wheat ears. n Six (6) reversed wheat ears.
18From the taupe fabric, cut the following: n Two (2) curious mice. n Two (2) reversed curious mice. n Two (2) sleepy mice. n Two (2) reversed sleepy mice. n Three (3) playful mice. n Three (3) reversed playful mice. n Three (3) climbing mice. n Three (3) reversed climbing mice.
19From the charcoal or grey fabric, cut the following: n Two (2) house martins. n Two (2) reversed house martins. n Three (3) swifts. n Three (3) reversed swifts. n Three (3) swallows. n Three (3) reversed swallows.
fabric, holding the iron in place for 10 seconds to allow the adhesive to fuse. Let cool, then cut the pieces out directly on the lines. The mice tails and poppy leaves have some quite narrow and cur v y sections, so Fi used sharp embroider y scissors for those bits but handle them carefully. After cutting out, you could sort your pieces into labelled clear bags to keep them together while piecing the top. See the step-by-step instructions for notes on stitching the appliqué.
14From the dark-green fabric, cut the following: n Six (6) poppy stems. n Six (6) reversed poppy stems. n Two (2) poppy leaves. n Two (2) reversed poppy leaves. n Three (3) corncockle stems. n Three (3) reversed corncockle stems. n One (1) A and B corncockle calyx. n One (1) reversed A and B corncockle calyx. n Five (5) A and B corncockle sepals. n Five (5) reversed A and B corncockle sepals. n Four (4) C corncockle sepals. n Four (4) reversed C corncockle sepals.
15From the red fabric, cut two (2) A, B and C poppies and two (2) reversed A, B and C poppies.
Piecing the blocks
Use a scant 1/4in seam unless instructed other wise. You are
making the units for all the blocks at the same time.
12in Daisy block – make six (6)
20Unit 1 (two-patch): Take the three (3) 21/2in cream x WOF strips and three (3) 21/2in x WOF gold strips. Sew them together in pairs along the long edges to make three (3) double-strip panels. Press seams to the gold strips (Fig 1).
Fig 1
21Cut each panel into 41/2in segments to make twenty-four (24) segments. Set aside.
22Unit 2 (square-in-a-square): Take thirty-six (36) 31/4in light-green squares and twelve (12) 31/4in gold squares. Cut them in half diagonally once to make twenty-four (24) gold triangles and seventy-two (72) light-green triangles (Fig 2).
Making square-in-a-square units
Stitch triangles to opposite sides of the centre square with a scant 1/4in seam. Press with the grain of the fabric taking care not to stretch bias edges. Stitch triangles to the other two (2) sides and press. Before progressing, trim/ square the block up to the given size (measuring from the centre of the block to the edge). If your piecing and pressing is accurate, each time you should be aiming to trim the new edge to 1/4in from the points of the last round so that your new seam will clear them when you stitch it.
28Stitch the rows together. Blocks should measure 121/2in square. Make six (6) blocks.
25Add two (2) more light-green triangles to the remaining sides. Press seams towards the triangles and trim/square up the units to 41/2in. For this unit, the points will probably ‘float’ slightly more than 1/4in from the edges; this is correct. You will have twenty-four (24) SIS units (Fig 4). TRIM ALL SIDES
Fig 2
23Now take all twenty-four (24) 31/4in cream squares. Stitch the long edge of a gold triangle to one side. Press seam towards the triangle, pressing with the grain of the fabric rather than perpendicular to the seams to avoid stretching and distortion (Fig 3).
Fig 3
24 Repeat step 23 with a lightgreen triangle on the opposite side.
Fig 4
26Lay out a row of unit 2/unit 1/ unit 2. Rotate unit 2 so that the gold patches are next to each other (Fig 5). Stitch this set together and press seams towards unit 1. Repeat to make twelve (12) sets of these units.
27Take six (6) 41/2in squares of gold and lay them out with the remaining twelve (12) unit 1s. Rotate unit 1 so that the gold patches are next to each other. Stitch together and press seams towards unit 1 again (Fig 5).
Fig 5
Make 6

Making f lying geese units four (4) at a time
Use one (1) large square and four (4) small squares. On the small squares, mark a line diagonally once. Lay two (2) small squares, RST, on opposite diagonal corners of the large square, aligning each small square with the edges of the large square – they will overlap in the centre! Make sure the marked lines are diagonal across the square. Stitch a scant 1/4in from this line on both sides. Cut apart on the line. Press seams towards the small triangles. Now lay a small square on the centre part of each of the pressed units, aligning the corners again. Stitch a scant 1/4in from this line on both sides. Cut apart on the line. Press seams towards the small triangles. Trim and square up units if necessar y. so that the light-green corners are at the outside and the units mirror each other. Stitch together and press seams towards unit 4.
34Take the four (4) 41/2in yellow-green squares and lay them out with the remaining eight (8) unit 3s. Checking placement (Fig 9), stitch together and press seams towards yellow-green.
35Stitch the rows together. Blocks should measure 121/2in square. Make four (4) blocks.
12in Rose block – make four (4)
29Unit 3 (double flying geese): Take the eight (8) 51/2in red squares and the thirty-two (32) 3in light-pink squares and make FG units four (4) at a time (see technique above). You will have thirty-two (32) FG units. Press and trim to 21/2in x 41/2in.
30Stitch the units together in pairs. Press seams towards red, away from the centre point (Fig 6). Make sixteen (16) units and set aside.
Make 32
Fig 6
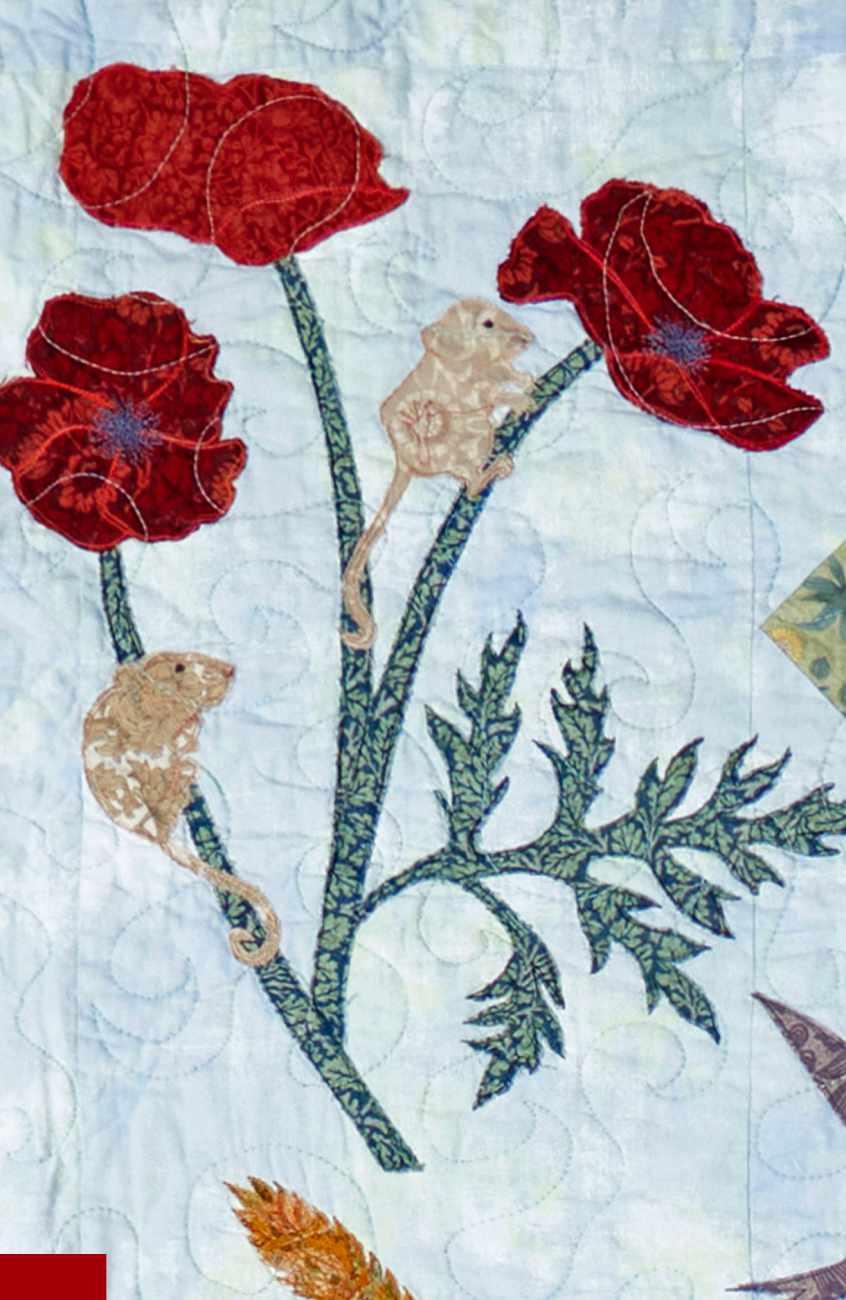
Make 16
31Unit 4 (leaf corners): Take the eight (8) 5in red squares and the eight (8) 5in background squares and make HST units two (2) at a time (see technique right). Press seams towards red. You will have sixteen (16) HSTs. Square up to 41/2in, as in Fig 7. 33Lay out the units as shown in Fig 9, in eight (8) rows of unit 4/unit 3/unit 4. Rotate unit 4
32Now take the sixteen (16) 3in medium-green squares and checking placement, use the covered corners method (see technique opposite) add one (1) to each HST from step 31. Trim off the corner 1/4in outside the stitched line. Flip the medium-green corner triangle out and press seam towards it (Fig 8).
Fig 8
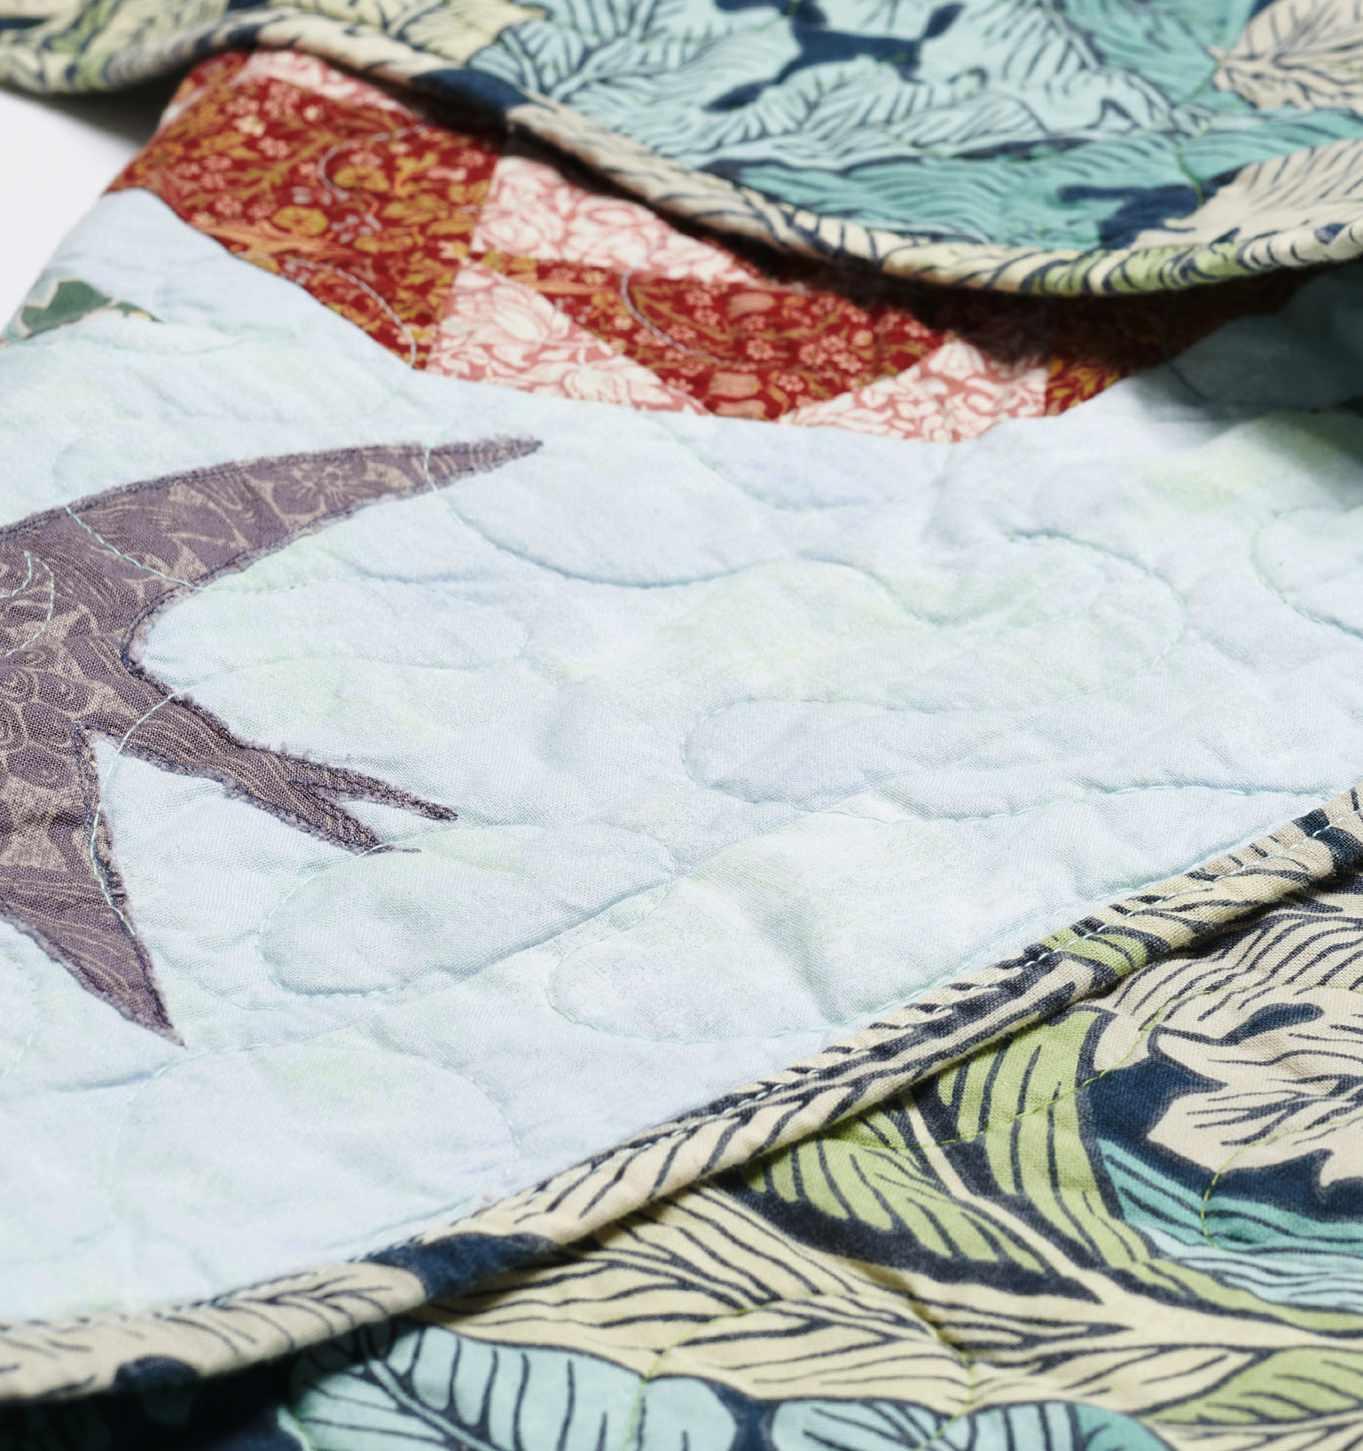
Fig 9 Make 4
12in Cornflower block – make (5)
36Unit 5 (centre square-in-asquare): Take the ten (10) 31/4in pale-blue squares and cut them in half diagonally once to make triangles. You will have twenty (20) pale-blue triangles.
37Take five (5) 31/4in squares of medium-green and make SIS units by adding the pale-blue triangles to all four (4) sides of the medium-green squares. Press seams
Take two (2) squares and align them RST. On the lighter fabric square, mark a line diagonally once. Stitch a scant 1/4in from this line on both sides. Cut apart on the line. Press seam towards the darker fabric, then trim and square up units if necessar y.
towards the triangles. Square up the units to 41/2in. Remember, the points will probably ‘float’ slightly more than 1/4in from the edges. Make five (5) units (Fig 10). Set aside.
Take two (2) squares and align them RST. On the lighter fabric square, mark a line diagonally in each direction. Stitch a scant 1/4in from these line on both sides. Cut apart through the centre both horizontally and vertically, then cut apart on the lines. Press seam towards the darker fabric and trim and square up units if necessar y.
Fig 10 Make 5
38 Unit 6 (double flying geese): Take the five (5) 51/2in lightblue squares and the twenty (20) 3in dark-blue squares and make FG units four (4) at a time (as in step 29). Make twenty (20) light-blue/ dark-blue FG units (Fig 11). Press and trim/square up to 21/2in x 41/2in.
Fig 12
Make 20
40Stitch the units together in pairs as in Fig 13 to make double FG units. Press seams towards light-blue, away from the centre point. Make twenty (20) units and set aside. blue squares and make HST units two (2) at a time (see techniques). Make twenty (20) light-blue/paleblue HST units; press and square up to 21/2in x 21/2in.
42Take the five (5) 6in darkblue squares and the five (5) 6in background squares and make HST units eight (8) at a time (see technique above). Make forty (40) dark-blue/background HST units; press and square up to 21/2in x 21/2in, as in Fig 14.
Fig 11 Make 20
39Repeat step 38 with the five (5) 51/2in background squares and the twenty (20) 3in light-blue squares. Make twenty background/ light-blue FG units (Fig 12). Press and trim to 21/2in x 41/2in.
Fig 13
Make 20
Make 20 Make 20
Covered corners
Take one (1) large square and a small square for each corner you want to cover. On the small squares, mark a line diagonally once. With RST, lay one small square on a corner of the large square, aligning its edges with the edges of the large square. Make sure the marked line cuts across the corner. Stitch directly on the marked line (for some patterns you may be stitching a scant 1/4in from the line – it will depend on the size and shape of the finished unit.) Trim the corner off 1/4in from the seam, then flip the corner out and press. Repeat for other corners as required. Press carefully and square up the unit if necessar y. 41Unit 7 (corner): Take the ten (10) remaining 3in light-blue Fig 14 squares and the ten (10) 3in pale- 43Take the light-blue/paleblue HST units from step 41 and pair each with a dark-blue/ background HST unit from step 42 as shown. Check the placement and stitch together, pressing seams towards dark-blue (Fig 15).
Fig 15 Make 20
Stitch Cut 44Now take the remaining twenty (20) dark-blue/ background HST units from step 42 and pair each with a 21/2in background square, as shown in
Fig 16. Again, check placement and stitch together. Press seams towards the dark-blue.
Fig 16
Make 20
45Stitch the units from steps 43 and 44 together in pairs as a four-patch. Press seams towards the background square (Fig 17). Make twenty (20).
46Lay out the units as shown in Fig 18, in ten (10) rows of unit 7/unit 6/unit 7. Rotate unit 7 so that the pale-blue corners are against the dark-blue patches of unit 6 and the units mirror each other. Stitch together and press seams towards unit 6. 48Stitch the rows together. Blocks should measure 121/2in square. Make five (5) blocks.
Fig 17
Make 20
Fig 18 Make 5
47Take the remaining ten (10) of unit 6 and lay them out with the five (5) of unit 5. Rotate unit 6 so that the dark-blue patches are next to the central unit 5.
Constructing the quilt top
Setting the blocks on point
49Take the six (6) 20in background squares and cut them in half diagonally twice to make twenty-four (24) side setting triangles.
50Take the six (6) 10in background squares and cut them in half diagonally once to make twelve (12) end setting triangles.
51Checking placement (Fig 19), stitch two (2) side triangles on opposite sides of all the Rose blocks, four (4) of the Daisy blocks, and one (1) Cornflower block. To do this, align the right-angle edges of the triangles with the edges of the blocks. Press all seams away from the blocks. The edges will overlap a bit, but don’t trim them yet.
Fig 19
Setting blocks on point
Check that you have the correct triangles for each part – side setting triangles (A) are quarter-square triangles (i.e. with the straight grain on the long side) while end setting triangles (B) are half-square triangles (i.e. with the straight grain on the short sides). Stitch two (2) end triangles to two (2) adjacent sides of each block that will be at the end of the row, then add a side triangle to each; make sure they are all oriented the same way. Stitch two (2) side triangles to opposite sides of each block that will be in the middle of a row, making sure they are all oriented the same way. Press all seams away from the blocks. Rotate the end and middle blocks to form the row. Butt /match seams at the points and stitch together.
B A End block Middle block
52 Add end triangles to the remaining four (4) Cornflower and two (2) Daisy blocks, as shown in Fig 20. Again, be sure to align the triangles correctly. Press all seams away from the blocks. Don’t trim yet.
Stitching the rows together & adding borders
56Fold a 101/2in background strip in half crosswise and finger press or mark the centre of the strip. Pin the strip, RST, to the right of one side column, matching the centre mark with the point of the centre block. Repeat, but pin this strip to the left of the other side column. The plain strips will be slightly longer. Stitch and press seams towards the background strips.
57Now finger press/mark the other edge of the alternate strips in line with each of the other block points. This will help you align all your ‘floating’ blocks horizontally.
58Pin a side column/alternate strip to one side of the central column, aligning your marks with the points of the blocks in the central column. Ease to fit if necessar y. Stitch and press seams towards the plain strip. Repeat with the other side column/alternate strip on the other side of the centre column.
59 Trim the top and bottom edges straight across 1/4in from the block points. If you need to adjust for uneven blocks, allow a bit extra rather than cutting off points.
60Measure the quilt length through the centre and cut two (2) of the 21/2in x 89in border strips to this length. Fold them in half crosswise to mark the centre, then pin them to the sides of the quilt, matching the mark with the point of the centre column and easing to fit if necessar y. Stitch and press seams towards the borders.
61Repeat step 60 for the top and bottom borders, measuring the quilt width through the centre and cutting the remaining two (2) border strips to this length. Pin, stitch, and press.
Make 2
Fig 20
Make 1
53Lay out both side columns in this order, rotating blocks as necessar y: Cornflower/Daisy/Rose/ Daisy/Cornflower (Fig 20). Pin them together, matching the seams at the points, and stitch together. You may find it easier to either press these seams open or change the direction of pressing at the centre point.
54Repeat step 53 for the central column, with the remaining blocks in this order: Daisy/Rose/ Cornflower/Rose/Daisy (Fig 20). Press.
55Trim the long raw-edges of the columns by laying the longest ruler you have along the raw edges 1/4in away from the block points. Tr y to connect at least two (2) points at once to keep it as straight as possible. Leave the top and bottom short edges for now.
Appliqué
Even if you haven’t done a lot of free machining, why not give it a go? Use a straight stitch and darning foot and drop your feed dogs. Practice on scrap fabric to get used to moving the fabric in all directions and remember that the fabric only moves when you do. Go round each shape a couple of times (or even three) for a loose, sketchy look that makes any wobbles into features rather than mistakes! Don’t tr y to stitch directly on top of your previous line and don’t worr y if it’s not perfect. As an embroiderer, Fi likes to see her stitching, so often uses contrasting threads, but if you prefer it to be less visible, choose a neutral thread or something matching. For this quilt, Fi used a lot of subtly variegated threads.
It’s up to you whether you simply outline the appliqué shapes to hold them in place or add additional stitching inside them for extra detail. For this quilt, some of the shapes like the poppies and corncockles can really be enhanced by a bit of extra stitch, so the templates give suggestions for that in dotted lines as well as the solid cutting lines.
Working appliqué on the whole quilt top rather than individual blocks also means you must be more careful about the order in which you work and how you handle the top in progress, so bear in mind the following: n Work the appliqué in batches in the order listed, fusing and stitching down each batch before moving on to the next; don’t tr y to fuse ever ything in place and then stitch it all down – the handling and manipulation will loosen and fray pieces. n If you have trouble peeling off the paper backing, allow it to cool, then score it with a pin across the middle so you can fold it back and peel from there instead of the edge. n Use the seams of the columns and blocks as well as points to help you align pieces horizontally and vertically before fusing; a long ruler helps, especially if you are working flat on a table and can’t stand back to see from a distance. n W hen free machine stitching, you
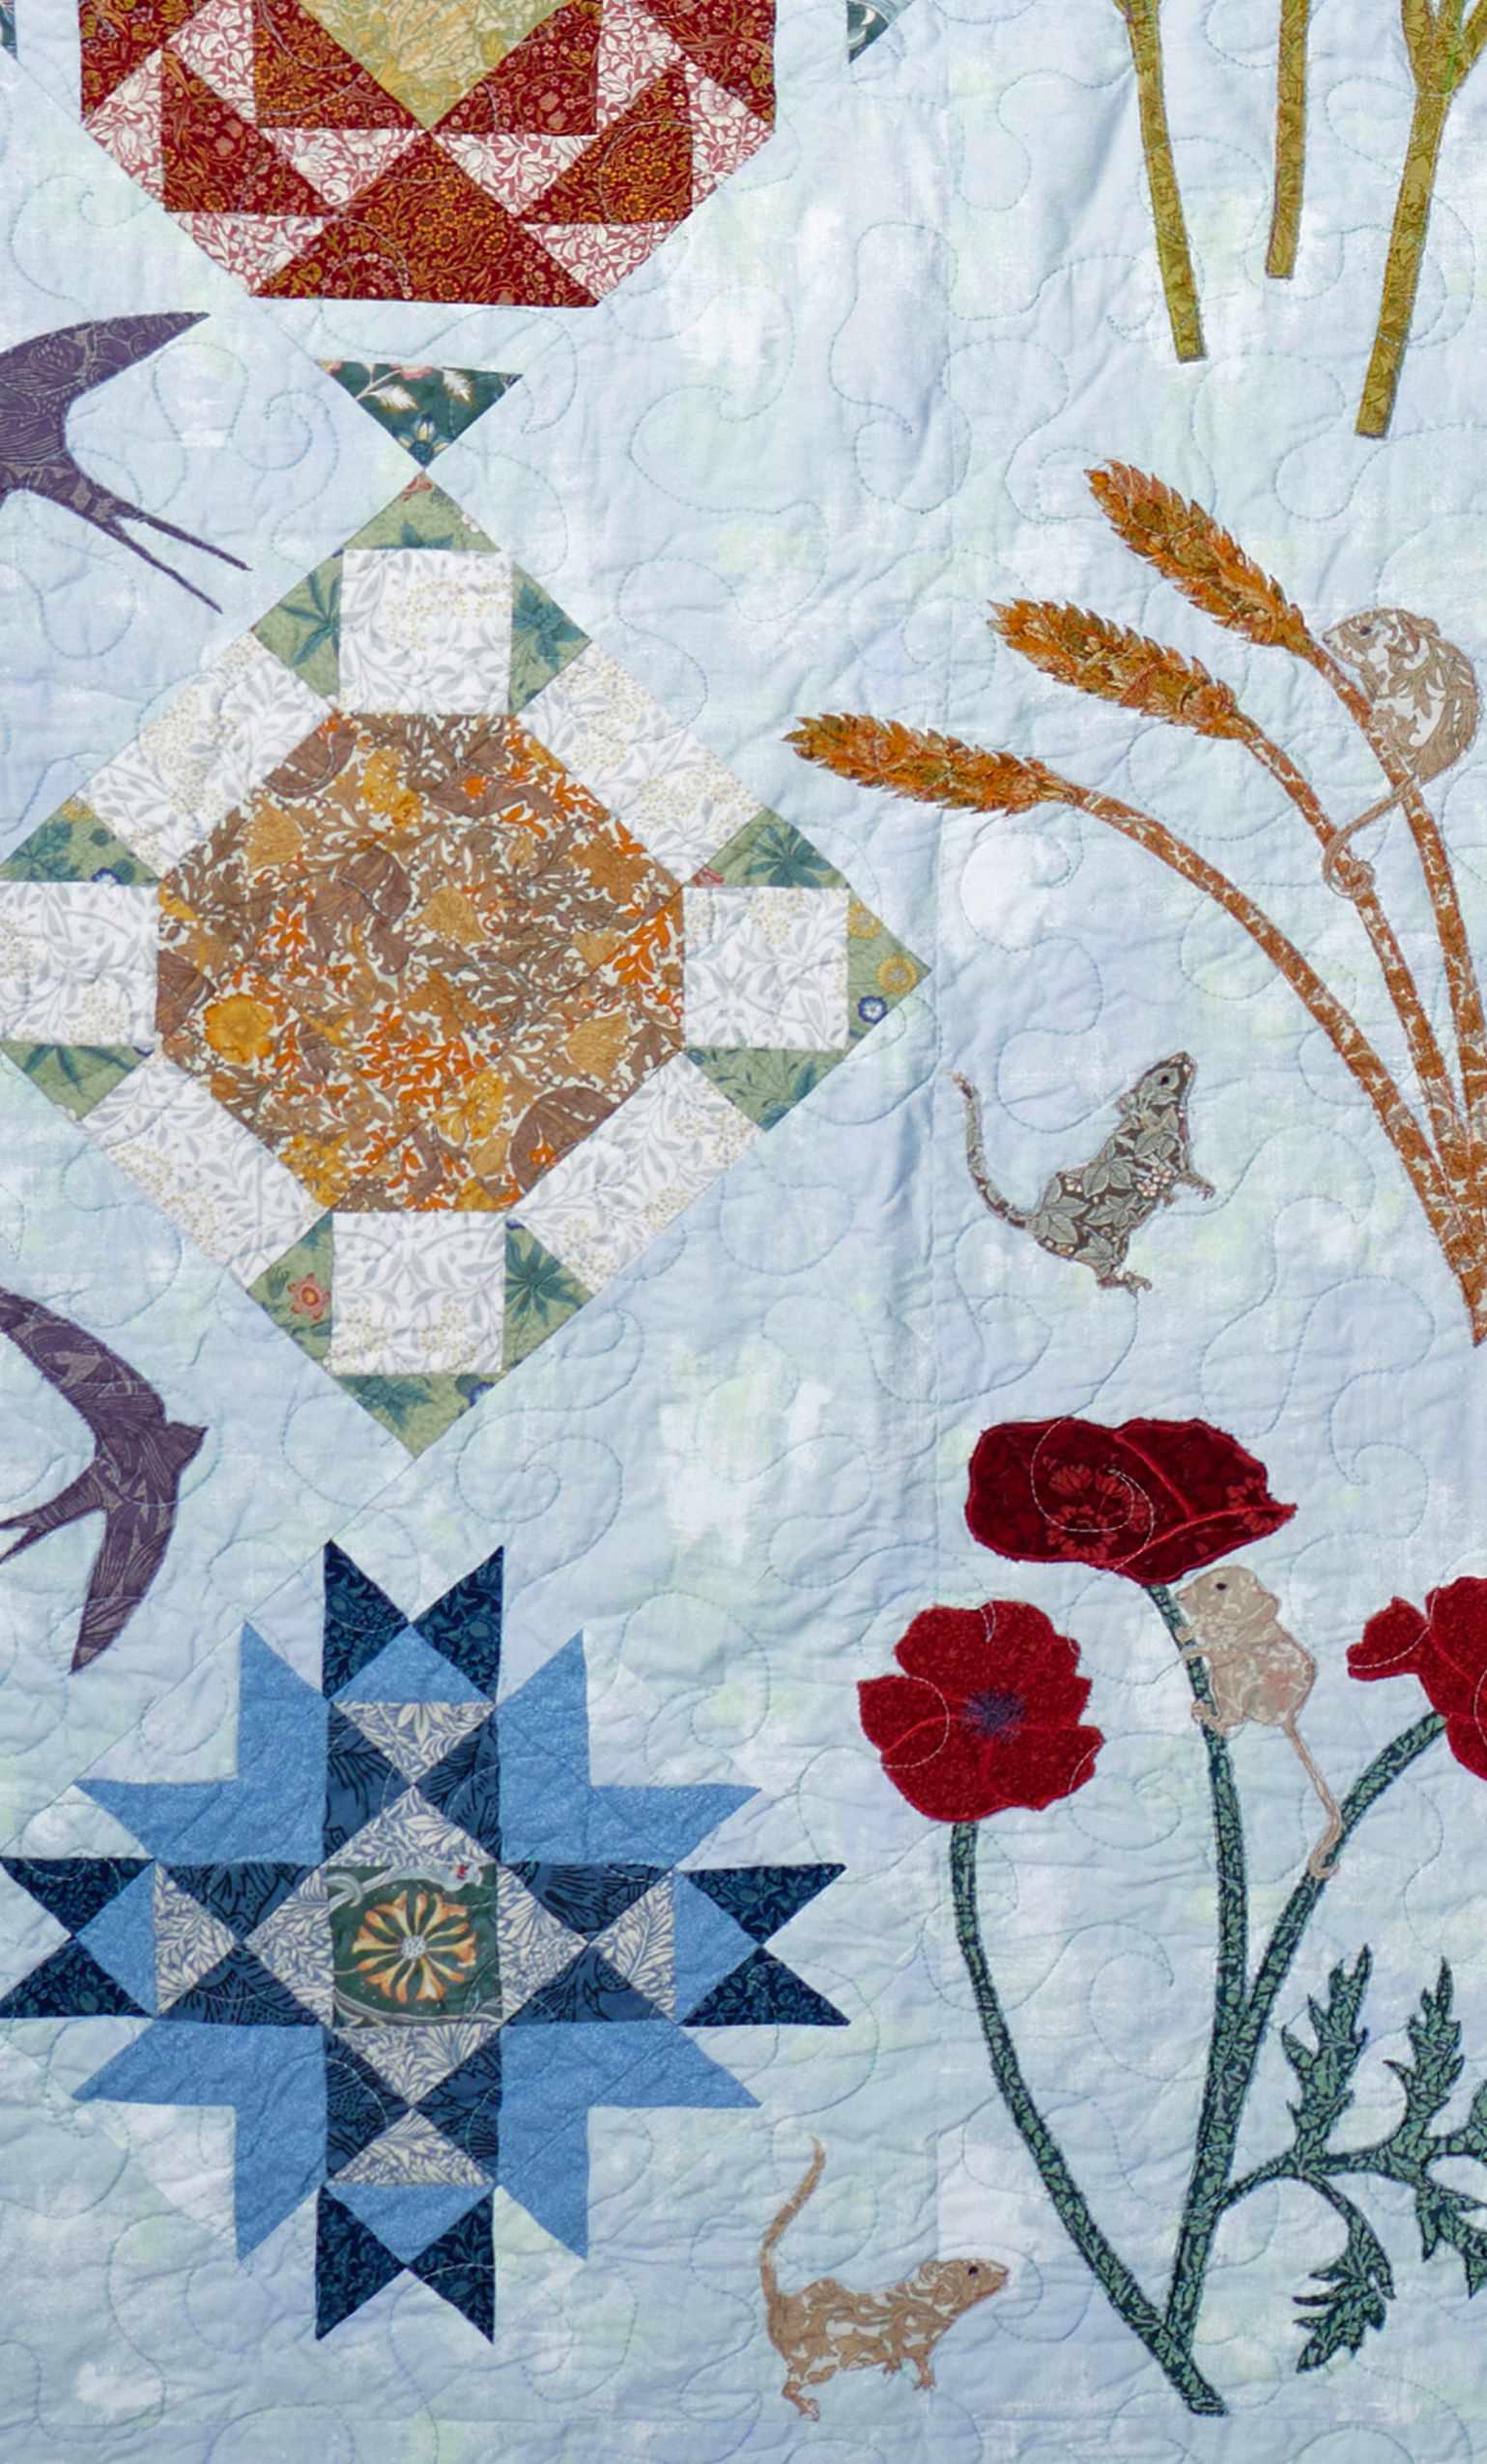
don’t need to turn the top – you can stitch in any direction – so keep the bulk of the top off to the left out of the way when you can. n There’s also no need to backstitch/ lockstitch and cut the threads ever y time you move from one stitch section to the next – just lift the needle and ‘jump’ to the next piece and start stitching. n For ver y long or sharp points, stitch close to the raw edge and right off the point onto the background; this will minimize fraying and retain a sharp point even after you wash the quilt. n Once you finish each batch of stitching down, finish the loose threads: snip between the thread joins on the front, then flip over and use the bobbin threads to pull the top threads through to the back; tie off those that are long enough and leave the ones that are too short to tie alone. Any top threads that won’t come through to the back with a gentle tug have already been stitched over and they’re not going anywhere – snip them close to the surface of the quilt and move on; you don’t need that kind of negativity in your life. 62Start the appliqué with the stalks of wheat. On the right-hand plain strip, arrange the groups of three (3) stalks in line with the Daisy blocks, angling the stalks so they lean to the left towards the Daisies. W hen you’re happy with the layout, fuse them in place with a damp cloth or steam, then stitch them down. Repeat with the mirrored stalks on the right plain strip, place them symmetrically (don’t worr y if it’s not exact!) Stitch in place, press and finish all your threads.
63Next, place the wheat ears on the ends of the stalks, again giving them varied angles for a more natural look and allowing them to cross over the seams towards the Daisies. You can move them up or down to var y the finished length of the stalks too. Fuse in place and stitch down. To create the illusion of the individual grains, Fi stitched a scale pattern through the middle of the wheat ears, but you could also stitch a small diagonal grid for a similar effect.

64Place the corncockle stems, mixing them up with their reversed partners and angling them so they don’t look too regimented. Fuse, stitch, press and finish threads.
65The pieces of the corncockle flowers, sepals and calyx are fused together before they go onto the quilt. Place a Teflon pressing sheet, baking tray liner or piece of baking paper on your ironing surface, then lay the calyx and the corresponding number of sepals on it. (It doesn’t matter which sepals go where, just mix them up a bit for variety!) Peel the paper off the corresponding flower and place on top of the calyx and sepal, glue side down. Press to fuse the layers together. Now remove the remaining backing papers and place your combined corncockle blooms on their stems, mirroring the two sides of the quilt. Fuse and then stitch all around the outside of the shapes, including right off the ends of the sharp sepals so they don’t fray (Fig 21). Fi stitched the calyxes and sepals with the same thread as the stems; corncockle calyxes are quite hair y, so lots of spiky stitching was added to suggest that. You can use a different colour for the flower petals and stitch into the centre of the appliqué to define the separate petals. Fi used yet another colour to add the veins radiating from the centre. Press, and finish the threads.
66Time for the poppies (Fig 22). Start by placing the poppy stems; both sets of poppies have their base and tops at the same level as the base and tops of the corresponding cornflower blocks. You’ll need to overlap and use the reversed pieces as necessar y to get a pleasing arrangement. Use the poppy flower heads to help you work out where the stems need to be. W hen you’re happy, fuse and stitch them down. Finish the threads.
67The poppy leaves are complex shapes that need careful handling, so take your time and work on a flat surface to make sure ever ything fits where you want it to before you fuse them! Fuse, stitch, press and finish threads.
68The poppy heads really do benefit from a little extra stitching for definition. Arrange them so the two (2) sides of the
Fig 22
quilt are mirrored; you will need to overlap the stems to get them in the right place. Fuse and then stitch them down, either just around the outline, or with some stitching into the centre to define the petals (see the template for suggested lines). With poppies A and B, you can see into the centre of the flower, so Fi used a freehand starburst of darker stitching to suggest the centre where the seeds will form. Poppy C is viewed from the side, so the centre isn’t visible.
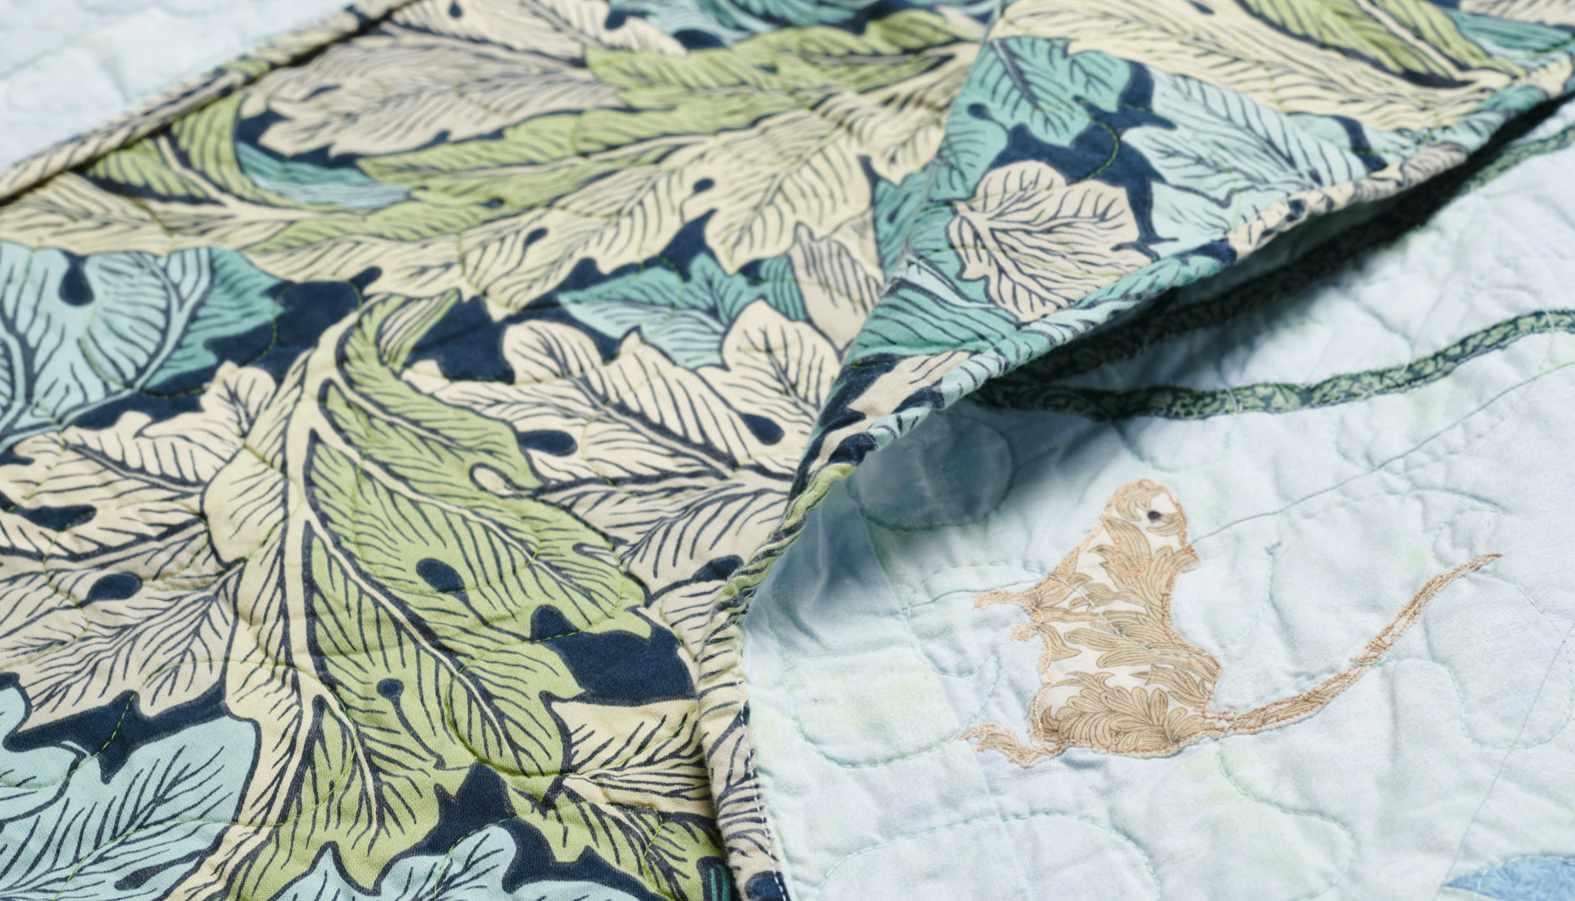
69W hen placing the har vest mice, bear in mind that they are incredible acrobats with prehensile tails that they use as an extra limb for gripping. As you remove the paper and manipulate the pieces, do handle carefully as those tails are quite fragile! Place the mice: n Top poppies: climbing mouse and sleepy mouse n Top wheat: playful mouse and curious mouse n Corncockles: climbing mouse n Bottom wheat: sleepy mouse and playful mouse n Bottom poppies: climbing mouse, playful mouse, and curious mouse
70Fuse the har vest mice and stitch them down, adding extra stitches to suggest ears, mouths, and limbs if you like. Fi added the eyes later with a Sharpie pen — it looks quite stark when you mark it, but after a wash, the mark softens to permanent charcoal grey. Test on your fabric first!
71For the birds, the house martins are circling the central cornflower block and the swallows and swifts are distributed across the rest of the quilt. Look closely at the bird shapes and you’ll see that each has one wing with a defined bump in it; this is their uppermost shoulder joint, so that’s the ‘up’ side of each! Place them so they are at varied angles and directions like a flock wheeling in the summer sky. Fuse and stitch the birds in the centre column first, before moving on to the outside edges. The tails are long and pointed so stitch close to the rawedge and right off the ends to keep those sharp points.
72W hen you’ve finished all the appliqué, give the top a good press.
73Remove the selvedges from the backing pieces. Sew them together along the longest sides using a 1/2in seam allowance and press the seam open. 74Fi quilted a freehand, swirling meander with waves that she says makes her think of wind and moving air using a ver y pale, variegated green/blue thread that blended nicely with the background.
75Stitch the strips of binding fabric together end-to-end, either with a straight or angled seam. Fold the pieced binding in half lengthwise and use to bind by hand or machine.

Meet the designer
Fi (rhymes with ‘me’) is a designer, maker and artist who’s been making things with fabric, needle and thread since childhood. She designed and made her first quilt to take to university in 1986 and has had designs featured in books and magazines. She recently launched Hobgoblin Cottage Designs to make her patterns available to a wider audience. When she’s not designing she can be found sketchbooking, embroidering, gardening and changing her hair colour. www.fibowman.com @ fibowman


