Pedal cable replacement - Standard 3 pedal platform

Page 1


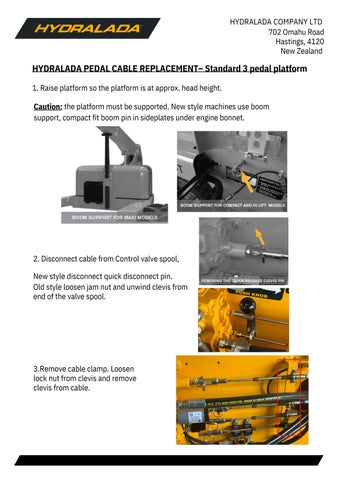
HYDRALADA PEDAL CABLE REPLACEMENT– Standard 3 pedal platform

1 Raise platform so the platform is at approx head height

Caution: the platform must be supported. New style machines use boom support, compact fit boom pin in sideplates under engine bonnet

2. Disconnect cable from Control valve spool, New style disconnect quick disconnect pin. Old style loosen jam nut and unwind clevis from end of the valve spool.

3.Remove cable clamp. Loosen lock nut from clevis and remove clevis from cable

4.Under platform, remove cable guard, Remove cable clamp from affected cable. Remove lock washer from pin, disconnect clevis from pedal by remove pin, remove clevis from cable. Inspect clevis, pedal pin and bush, replace if worn. New bushes must be reamed on fitment.

Installation of new cable

5.Connect new cable to the chassis end of old cable, while pulling the old cable out from the platform end, route new cable into position. Note, if all the cables are being removed, note the routing of the cables under the chassis and the main boom pivot pin area.

6.Remove clevis from old cable platform end, inspect, if holes are worn or corroded, replace clevis. Fit Clevis to cable ends, set to approx. mid way on threads. Do not tighten jam nuts.

7.Secure cables with cable clamps. Size cable by adjusting the clevis to match the holes on the control valve and the pedal. Align pedal to sit level. If excessive threads showing on one end of cable readjust in cable clamps.

8.Once adjusted, lock jam nuts on clevis ends, fit pedal pin and lock tab.

Pedal Stops

These are necessary to avoid over loading the control cable when the valve reaches the end of its travel. These stops also ensure that the operators body weight is never supported by the cables.

Tools required 2x 9/16" Spanner

Pedal Stop Adjustment - Drive Wheels

Loosen lock nut on pedal stop (9/16” spanner) and wind in pedal stop bolt. Move the pedal to full travel in one direction so the valve spool reaches the end of its travel.

Note: Use a wooden block or a hammer handle to lever the pedal.

Set the pedal stop until it contacts the platform floor. Wind out a further half turn. While holding the pedal stop re-tighten the lock nut. Repeat process for other direction.

Pedal Stop Adjustment - Boom Lift

The lift or front stop on the pedal is the same as above step. The rear stop sets the lowering speed of the platform. Set the pedal stop so the boom is just starting to lower as the stop hits the floor.

The platform lower speed will increase with weight of the operator in the platform. Caution: Setting the speed to high will cause the platform to judder when lowering.

Turn static files into dynamic content formats.

Create a flipbook
Issuu converts static files into: digital portfolios, online yearbooks, online catalogs, digital photo albums and more. Sign up and create your flipbook.