CHROME RIVER USER MANUAL
Introduction
The University is required to ensure that all travel and entertainment expense reimbursements comply with the IRS’s “accountable plan” requirements. Compliance ensures that such reimbursements are not taxed to the employee as additional income.
Chrome River provides an online system to process employee travel and expense reimbursements. The system replaces hard copy requisition forms for Travel & Expense Reports and Travel and Cash Advance Requests.
Chrome River provides many benefits to Hofstra employees:
• Chrome River provides a fully electronic solution for expense reimbursement.
o Receipts can be emailed, uploaded, or sent from computers or phones; employees will no longer be required to submit original paper receipts.
o The system provides integrated per diem rates, international exchange rates, and a mileage calculator, allowing travelers to quickly enter expenses without reference to external websites.
• Reimbursement requests shall be submitted electronically and automatically routed to the appropriate approvers (by email).
o Approvers will include immediate supervisor and the individual with budget authority for the organization code charged.
o Upon approval, the request will be processed through Accounts Payable.
• Employees will be able to track the status of their request through the Chrome River portal at any time.
• The system simplifies the process for approvers.
o Several audit tools are built into flag potential compliance issues
o The request is directed to each approver by email wh ich includes a link to the employees request in Chrome River, along with attached receipts, statement of business purposes, and any explanations provided by the submitter
Important Notes
With the implementation of Chrome River comes some important changes to the University’s policies for employee reimbursement
• Upon implementation, all employee travel expense reimbursements shall be submitted via the Chrome River system.
• Reimbursement for meals, while traveling overnight on University business, will be paid at the prevailing per diem rate.
• Approval routes will be automatically assigned in the system The approval routing will include both the supervisor of the employee (as identified by Human Resources) and the budget manager for any charged expense. For a given expense report, the supervisor, budget manager and check threshold approver will be required to approve the report prior to payment processing.
• Cash advances, where authorized, will be processed through Chrome River.
CHROME RIVER USER MANUAL
Important Contacts
Use of Chrome River/University Reimbursement Policies
Nancy Pineros, Director, Accounts Payable ext. 36850; Nancy.pineros@hofstra.edu
Stephanie Infante, Associate Controller ext. 36843; Stephanie.D.Infante@hofstra.edu
Eileen Biundo, Controller ext. 36879; Eileen.Biundo@hofstra.edu
Budget Funding
David Malanga, Budget Director ext. 36851; David.C.Malanga@hofstra.edu
Technical Assistance
Isabella Aloysius ext. 36285; Isabella.aloysius@hofstra.edu
CHROME RIVER USER MANUAL
Chrome River Quick Start Guide
Prior to your initial use of Chrome River, we encourage you to review the Chrome River Quick Start Guide, which can be found at the following link:

https://help.chromeriver.com
At the Chrome River home page noted above, click the “Get Started” button to view the Chrome River Quick Start Guide, which provides an overview for login, use of the mobile app, creation and submission of an Expense Report, receipt imaging, transaction viewing, and approval process. In addition to the Quick Start Guide there are various tutorials available for reference under “System Basics” and “Expense” on Chrome River home page. See screen prints below for tutorials that are available.
CHROME RIVER USER MANUAL


CHROME RIVER USER MANUAL
Logging into Chrome River

To access Chrome River on your computer, visit https://my.hofstra.edu (Hofstra University Portal) or click on MyHofstra on the Hofstra.edu webpage.
1. Login using your Hofstra University credentials
2. Go to MY APPS (found top right-hand corner of MyHofstra portal
3. Select Chrome River icon (see below) Chrome River has been set up with a single sign-on. As a result, you will not need to enter your username or password again it will be automatic once you log onto the University portal

Access to Chrome River is also available through the Chrome River APP on your phone. See instructions on page 16.
If you have any difficulty accessing the site, please contact ITS Service Desk (i.e., Help Desk) at 516-463-7777 or send email to ITS Service Desk (help@hofstra.edu)
Default Email APP Requirements for Processing Approvals via Email in Chrome River
To approve employee reimbursements processed in Chrome River via email, each employee who is an approver must follow the below steps:
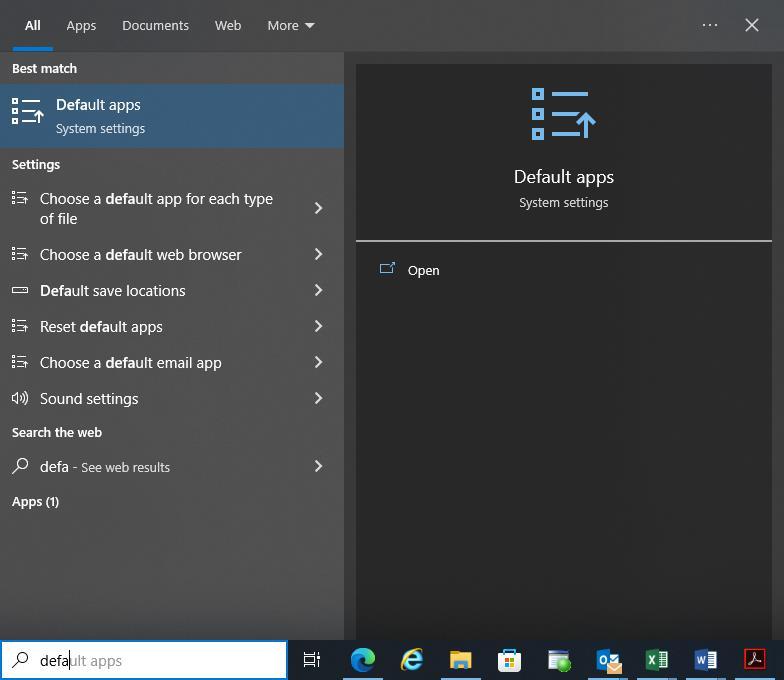
1. Confirm the default email APP is set to Microsoft Outlook. To do this go to Windows Navigation bar on the bottom left of your screen and type Default.
CHROME RIVER USER MANUAL
2. The below screen will appear
3. Click Default apps
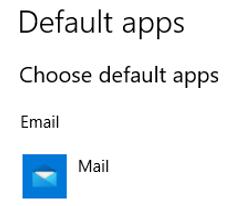
Most Hofstra University employees are set up with Mail as the default.
4. Click Mail and the screen below will appear
5. Click “Outlook 2016” or “Microsoft Outlook” (depends on version windows for the PC) .
Note: If Outlook 2016 (or Microsoft Outlook) is already your default – no action is required

CHROME RIVER USER MANUAL
Chrome River Home Screen Navigation
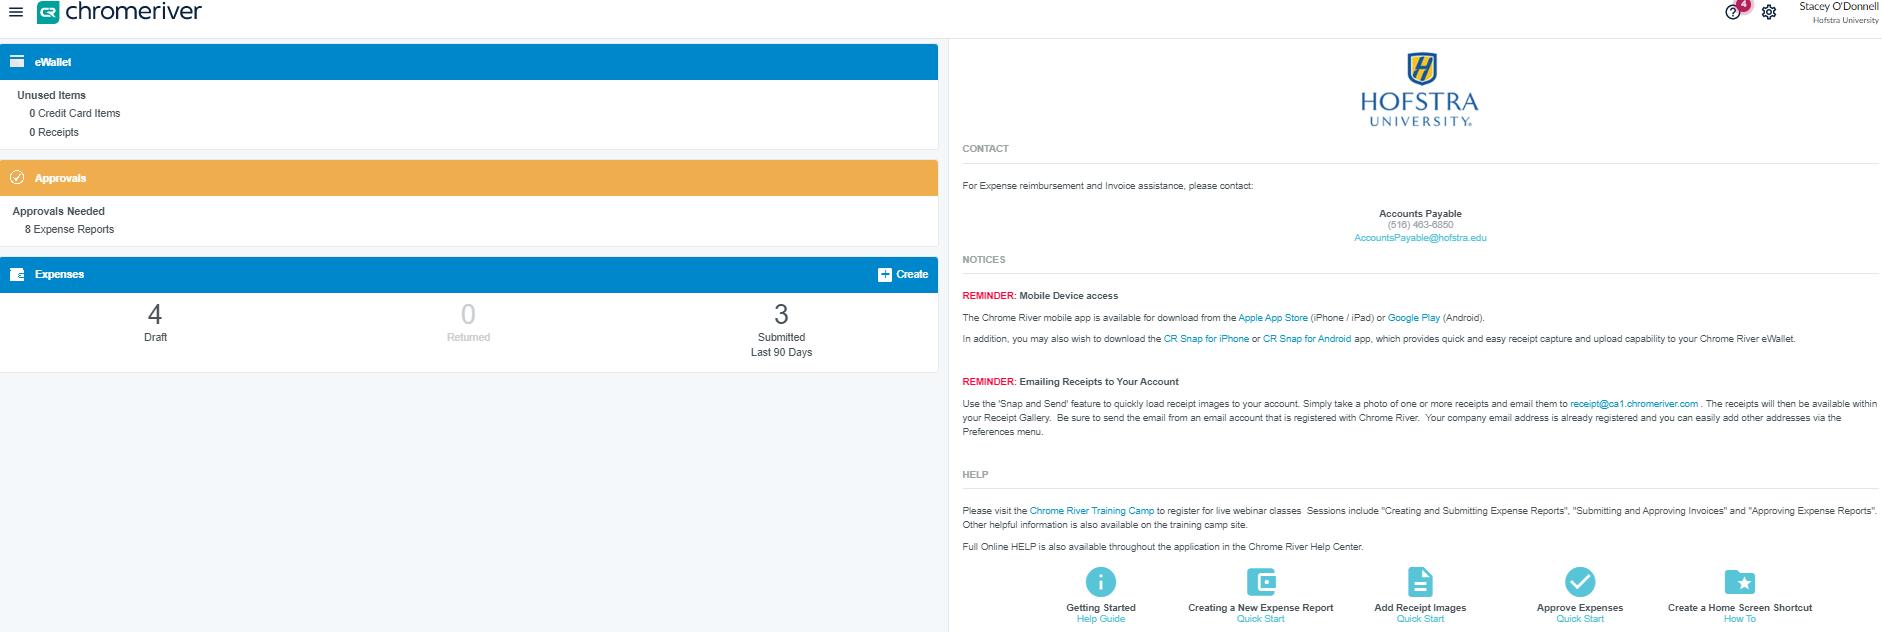
Once logged in, you will arrive at the Chrome River home screen. At the top of the screen, you will find the Navigation Bar, which contains the menu button in the upper left-hand corner The left side of the screen contains your Dashboard. The right side of the screen contains General Information for employees, including contacts, important notes, and links to training materials.
CHROME RIVER USER MANUAL
Navigation Bar
The Navigation Bar remains at the top of your screen while logged into Chrome River and provides quick access to several helpful functions.
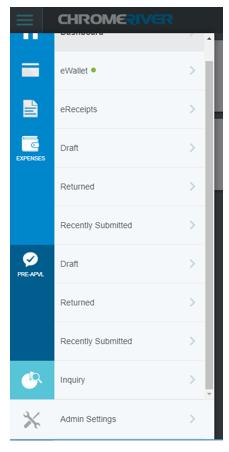
Menu Button – Clicking on the Menu Button will expand a menu offering access to the following: Please note menu options may vary based on access level.

• Dashboard
• eWallet
• eReceipts
• Draft (expense report)
• Returned (expense report)
• Recently submitted (expense report)
• Inquiry (Expense Management)
User Icon – Clicking the user icon (your name in the upper right-hand corner as indicated below) will expand a menu that provides access to account settings and Logout. Additionally, if another user has provided you delegate access to their account, the delegator’s name will also appear. You will be able to log into the delegator’s account through this icon.
Clicking on the Question Mark Symbol will expand a menu that provides access to help resources and Chrome River user guides.

CHROME RIVER USER MANUAL
Dashboard
The Dashboard on the left side of the home screen provides quick access to the employee’s expense reports and any reports awaiting approval, if applicable.

eWallet – Uploaded receipts not yet attached to an Expense Report will be maintained here until they are attached to an Expense Report
Approvals – Reports pending your approvals as a supervisors or budget manager will be listed. Employees who are not approvers will not see this box. Once an approver has approved all reports in their queue, this box will disappear.
Expenses – Employees can access their own draft Expense Reports, any Expense Reports returned from an approver for updates/corrections, and any Expense Reports submitted in the last 90 days.
• Reports submitted more than 90 days ago can be accessed through Chrome River’s Inquiry functionality.
+ Create button – Clicking the Create button found in the Expenses bar will start the process for creation of an Expense Report. You will need to provide Report Name, start and end dates, business purpose, report type, travel type and other information as described more fully below.
CHROME RIVER USER MANUAL
System Setup
While Chrome River has been configured to offer an easy, intuitive experience for employees using the system, there are some actions new employees may want to take to further improve their experience.

Email address
All employees are set up in the system using their hofstra.edu email address. Any receipts forwarded into the Chrome River system from an employee’s hofstra.edu address will automatically appear in that user’s eWallet.
The University strongly encourages use of the employees Hofstra.edu email address. However, some users may want to submit emailed receipts from a personal Email Address. Accordingly, you can link a personal email address to your account.
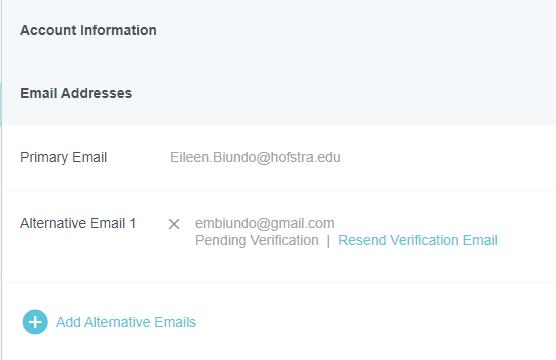
To add an alternate personal email, Click the User Icon (your name in the right top corner of the Navigation bar) and then click Account Settings. The screen below will appear.
Click Alternate Emails and add your personal email.
CHROME RIVER USER MANUAL
Enter your personal email address and click Add. You will receive a message indicating that a verification email has been sent to your hofstra.edu email address. Follow the link in the email to verify the additional email address.
NOTE:
Please ensure that you review your personal email address you entered to confirm it is accurate and correct prior to clicking “Add”. If you would like to use a personal email address, once you add it, we encourage you to test it to ensure you can view your receipts sent from the personal email address to ensure prop er setup.
To remove an alternative email, simply click the X next to the listed email address and confirm by clicking Delete. To edit the email address, click the pencil, make your edit and click save.
To Add a Delegate to Create Expense Reimbursements on Your Behalf
If you would like to permit another employee access to your account to create expense reports on your behalf, you will need to add them as a delegate. Giving another employee delegate access will allow them to access your Home Screen, Settings, and Inquiry reports. Delegates may not submit an expense report on your behalf. Expense reports must be approved and submitted by the employee being reimbursed.
Please Note - Delegates may only create an expense report on behalf of another University employee . They may not submit the report on behalf of another employee
Expense reports must be approved and submitted by the employee requesting reimbursement.
HOFSTRA UNIVERSITY
CHROME RIVER USER MANUAL
To add a delegate, click on the User Icon then Account Settings


• Click Delegate Settings, click + Add New Delegates.
Begin typing the employees’ name and it will appear in the dropdown menu. Click on the delegates’ name.
You may remove delegate access at any point by simply clicking the X next to the delegate’s name.
CHROME RIVER USER MANUAL
Download the Chrome River SNAP APP for IOS & Android
Before creating an expense report, it is important to note how to upload and manage receipts.
Employees and their delegates have two options for uploading receipts to Chrome River Each is detailed below.
The University strongly encourages use of the Chrome River SNAP APP , as it allows employees to take a picture of a receipt as soon as it is received. This is very useful for employees, ensuring they will have the proper documentation for reimbursement and avoid lost receipts.
The Chrome River SNAP APP allows employees to upload receipts immediately upon incurring an expense. Receipts shall be automatically uploaded to the user’s Receipt Gallery for use in Chrome River. The APP provides access to entering additional information such as receipt amount and purpose of the expense.
To download the Chrome River SNAP APP on your mobile phone:
o iPhone Users: Go to your “App Store” and search for “Chrome River SNAP” application. It is free to download.

o Android Users: Go to “Play Store” and search for “Chrome River SNAP” application. It is free to download.
Chrome River SNAP APP
Once you have installed the SNAP APP, open it, and you will be asked to enter the primary email address used on your Chrome River account, which is your hofstra.edu address. Enter and tap Get Started

Enter your email address - an email with a verification code will be sent to this address. Enter the code in the APP and tap Verify. Note: you must provide the APP access to your camera.


CHROME RIVER USER MANUAL
Uploading and Managing Receipts using the SNAP APP
• Uploading using the SNAP APP
o Open the APP and your camera will be ready to snap a picture of your receipt . Once you do so, you will be given the opportunity to add more information and/or upload the receipt.
o All receipts captured through SNAP will be available to you in the Receipt Gallery, which can be accessed through the eWallet. In the eWallet, click receipts then click Receipt Gallery for a copy of your uploaded receipt.
• Manual upload from documents scanned and saved to your computer. See instructions further below. (link)
Creating an Expense Report (previously used a Hofstra Check Requisition or Travel Expense Report)
Please Note: In Chrome River, an Expense Report is NOT the same as an Expense Form.
• An Expense Report is like the University’s current Check Request Form used to process reimbursements. It allows you to group and organize expenses quickly.
o An Expense Form is required for each receipt or expense item. An Expense Form can be created for each event, or events can be combined into a single report.
• One Expense Report consists of one or more Expense Forms.
o An Expense Form is required for each receipt or expense (mileage, per diem).
Receipt →Expense Form(s)→Expense Report
Receipts must be added to each Expense Form using one of the following methods.
1. Uploading receipt images to Receipt Gallery in Chrome River by email (see instructions on page 22)
2. Accessing receipt images previously uploaded using the Chrome River App (“CR SNAP”) (see instructions on page 16)
3. Attach receipts directly from your desktop (see instructions on page 23).
Chrome River Expense Reports will be used for travel reimbursements, non-travel reimbursements, cash advance issuance, and cash advance settlements.
To create an Expense Report, the following steps must be taken. Each step will be discussed in further detail below.
RIVER USER MANUAL
o On the Expenses Header on the Dashboard Click +Create to open a new Expense Report

The Expense Report will open as shown below. See below description for each field required
The following fields will be displayed on the Expense Report:
• Report Name – Enter a detail description, unique report name (i.e., Ellucian Conference in Chicago 10/28/22-10/31/2022)
• Start Date – Enter the start date of trip
• End Date – Enter the end date of trip
Note: Start and End dates are important because all receipts must be dated within these dates
• Business Purpose – As required by the IRS and University policy, provide a detailed explanation of the business purpose for the expense submitted, including who, what, where, and why, as appropriate. The Business Purpose entered on the Main Expense Report form (i.e., the basic Check Requisition). For each itemized expense you will be able to populate a more detailed business purpose. As required by the IRS and University policy on “Business Travel & Entertainment”, the Statement of Business Purpose should include the nature of the business, the individuals participating, and everyone’s business affiliation.
CHROME RIVER USER MANUAL
• Report Type – Select the Report Type. It is essential to select the correct Report Type to ensure proper review and approval routing, and proper use of budget codes (preprogrammed for your convenience). Should you have any questions regarding the Report Type, please contact the Budget Office.
o Athletic Team Travel
o Business Meals
o Business Travel
o Cash Advance Issuance
o Cash Advance Settlement
o Conferences/ Professional Development
o Faculty Travel
o Recruiting
o Other
• Travel (Expense)Type –
o Select Domestic or International
o Is this an expense for a grant or designated fund? – Select yes or no
After completing this section of the Expense Report, click Save at the top right of the screen
A new screen will appear to allow you to Add Expenses. A unique Chrome River Expense Report number will also be assigned and will appear at the bottom left-hand corner of the screen.

CHROME RIVER USER MANUAL
Step 2 - Adding Expenses
After completing the Expense Report header, the Add Expenses screen should appear (If it does not, click the + button at the top of the report summary to the left.)
The Add Expenses screen provides three methods to add expenses:


• Expenses can be added manually through the Create New button,
• Expenses can be added from the eWallet, or
• Expenses can be added from the Receipt Gallery
A green dot next to an expense category in the eWallet (cash advance/offline) or Receipt Gallery indicates there are unused items or receipts available for use.
CHROME RIVER USER MANUAL
Create New Expense
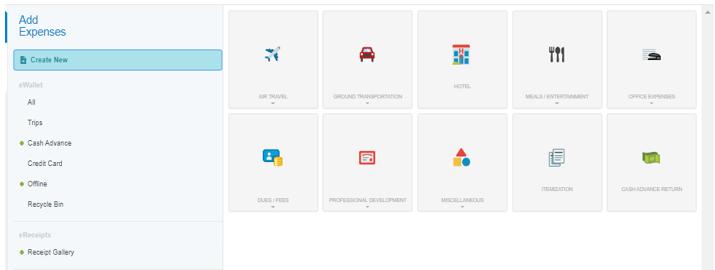
Selecting the Create New link allows the user to manually add direct expenses to the Expense Report using tiles. After clicking the link, you will be presented with an expense tile mosaic, as shown below.


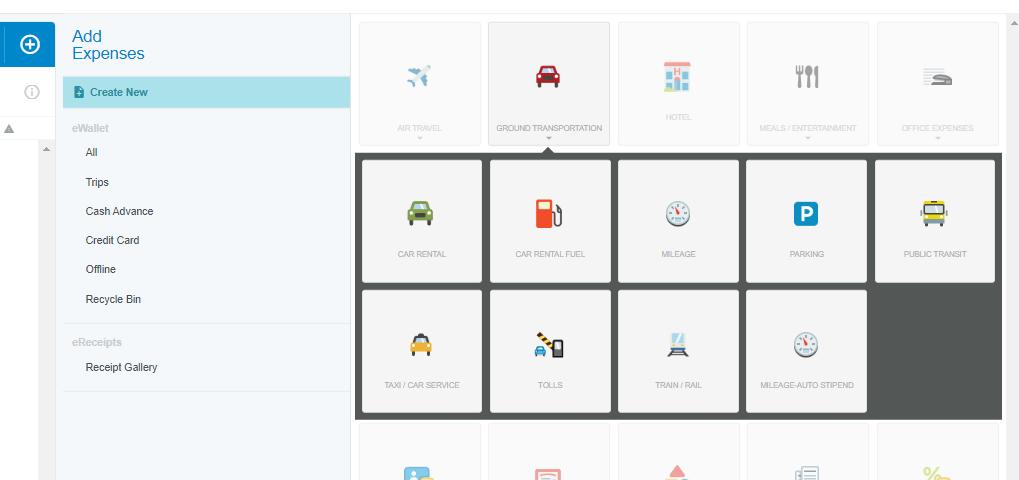
Note: Any tile with a small down arrow at the bottom is a parent tile with additional “child” tiles nested under it. Clicking on the parent tile will display the children tiles (see example below) For example, Ground Transportation is a parent tile, with several tiles options to select.
Click the appropriate tile for the expense you are adding. Each tile is mapped to a budget account expense code. The tile selected will correspond with the account code that is recorded in Banner.
NOTE: A parent tile cannot be added to an Expense Report, but any tiles within the category may be.
CHROME RIVER USER MANUAL
After selecting the expense tile, you will be asked to complete the corresponding Expense Form Each expense tile has a corresponding Expense Form. The Expense Form collects information relating to the expense and will vary depending on the tile selected.
The form will require specific information that will be used by Chrome River to process expenses and may be used to perform behind the scenes calculations.
Date
When manually adding a receipt, the date will default to the current day’s date. You will need to update using the receipt date.
Amount Spent
Manually enter the amount spent.
Business Purpose
Each expense on an Expense Report requires a clear and detailed business purpose.
• A business purpose must document the expense as necessary, reasonable, and an appropriate expense for the University.
• The Expense Report business purpose carries over to each individual Expense form However, you may edit the business purpose for specific expenses to add clarity.
Merchant (if applicable)
You will be asked to populate the Merchant. The Merchant is the vendor that the employee paid the expense to. If the employee stayed at the Hilton Atlanta, then the Merchant would be “Hilton Atlanta”.
Fund/Org
Chrome River has been set up to default to each employee’s home Fund/Org department. You will have the option to change the Fund/Org easily through a drop-down menu.
Attendees (if applicable)
You will be asked to add attendees and indicate if they are internal, a Hofstra employee, or external. Y ou will be able to add attendees by typing the name of the individual. For internal attendees, a drop menu will provide a list of University employees and their title as you start typing. For external attendees, you will be prompted to add their name, title, and company.
Receipts (Attachments)
Except for a few expense types, including mileage and per diems, you will be required to attach receipt in the section indicating Attachments. Receipts can be attached from your Receipt Gallery or uploaded from your computer by clicking the Upload button on the top right-hand corner under the Receipt Gallery.

CHROME RIVER USER MANUAL
Note: Chrome River uses optical character recognition (OCR) which attempts to extract data from the receipt image and populate into the expense form where applicable. To ensure timely processing of your request, it is essential that you verify the accuracy of any data that auto-fills from a receipt image and make corrections where appropriate.
Alternative Ways to Upload Receipts to Receipt Gallery
Emailing Receipts to Receipt Gallery
To email a receipt to your Receipt Gallery, simply attach the images or files to an email message and send the message to receipt@ca1.chromeriver.com

Please note that once you have emailed the receipts, you will receive a confirmation email once the receipt is received by Chrome River and available for use in Chrome River. This may take a few minutes.
While your Hofstra email account has been set up, if you are sending the message from a personal email address, please ensure that you have set up the email as an Alternative Email in your Personal Settings.
• Please note the University highly encourages the use of Hofstra email rather than a personal email address. For more information, see Add an Alternate Email.
If you enter the expense amount in the subject line of the email, that amount will populate in the Spent field for the expense in Chrome River. Additionally, you can enter a description of the receipt in the body of the email, and it will be added to the Description field.
If you are serving as a delegate for another employee and need to submit a receipt for that employee, you will need to enter the expense owner’s email address in the subject line of the email to have it show up in their Receipt Gallery and eWallet.
HOFSTRA UNIVERSITY
CHROME RIVER USER MANUAL
The emailed images will appear in the Receipt Gallery and the Offline section of the eWallet.
Each receipt image will appear as its own item, complete with the corresponding information about the expense.
Upload from a Computer
In some cases, you may have a scanned or digital receipt saved to your computer. You may upload these receipts to your Receipt Gallery or directly to the Expense Form.
To upload to the Receipt Gallery, select the Receipt Gallery and click the Upload button in the top right corner.


CHROME RIVER USER MANUAL
Once you have clicked Upload, you need to navigate to the location of the file on your computer and click Open. The receipt will now appear in your Receipt Gallery.

To upload directly to an Expense Form, scroll to the bottom of the Expense Form to the Attachments section. You can either drag the receipt directly from your desktop to this section or click the Add Attachments button and select Upload Attachments Navigate to the file on your computer and click Open The receipt is now attached to the expense line.

CHROME RIVER USER MANUAL
Receipt Gallery
The Receipt Gallery contains all receipt images uploaded directly to Chrome River by email, scan, or the Chrome River SNAP APP or CR APP.
• To add a receipt from the Receipt Gallery to a report, click the checkbox for that item and click Add. Do not click directly on image, as it will not attach unless you click the check box.

• To delete a receipt from the Receipt Gallery, click the checkbox for that item and click Delete
• To upload additional receipts to the Receipt Gallery from your computer, click the Upload button, navigate to the file location where the receipt is stored, select the file, and click Open
Receipt Capture Tips
For a better experience with submitting receipts, consider the following tips:
• Place receipt on a white background
• When photographing multiple receipts, position them all in the same direction.
• Leave a gap of at least 1.5 inches between receipts.
• Make sure no other objects are visible in the photo.
• Do not use flash.
• If given an option to select the image size, select the size closest to 500 KB.
CHROME RIVER USER MANUAL
Removing a Receipt from an Expense Report
If you have added a receipt to an Expense Report but would like to remove the receipt, select the appropriate receipt from under the Attachments section in either the Expense Report header or individual expense line (Expense Form).

The selected receipt will now be displayed on the left side of the screen. • Click on the Delete Icon (paperclip with red X symbol) in the top left corner, and the receipt will be removed from your report.

CHROME RIVER USER MANUAL
Special Expense Types
Some expense types have Expense Forms that require additional information or have different functionality, as explained below.
Hotel Expenses
In addition to room charges, hotel bills frequently include charges for items such as parking or meals. You do not need to create an individual expense for each night of hotel stay (i.e., you can create one Hotel
Lodging Expense Form). To make the process of reporting these quick and simple, the Hotel expense tile will require you to itemize the charges on your bill.
Note: Any personal non-reimbursable charges on your hotel invoice should be deducted and excluded from the Spent amount entered on the header. Only business expenses should be included on the Expense Form.
After completing the Hotel expense form tile header, click the Itemize button in the top right corner.

The Hotel Tile will display a mosaic with a variety of hotel expense types for you to itemize the total hotel expenses. The total amount of the bill entered on the header appears in the top right corner under TOTAL AMOUNT. The amount remaining to be itemized appears in red under REMAINING. The reimbursement must be fully itemized to submit.

CHROME RIVER USER MANUAL
If your hotel bill has recurring charges that are the same amount for each night of your stay, you may use the Recurring tile to enter those expenses. This will allow you to enter recurring costs like lodging, taxes, or parking once, then select the total number of nights to have the charges automatically totaled. An added benefit to using the recurring tile is that you can enter the lodging, taxes/fees, parking, etc. all on one screen, rather than entering them on individual expense tiles.

On the Recurring tile, enter the Check-In and Check-Out dates and the daily amounts for Lodging (including lodging taxes and fees), Parking, and/or other fees. Click Save, and the expenses will be added to your report.
If your hotel expenses did not stay the same or you would like to itemize individually, do so by tapping the appropriate expense tile. For example, to add the cost of lodging (including lodging taxes and fees) click the Hotel – Lodging/Taxes tile.

CHROME RIVER USER MANUAL
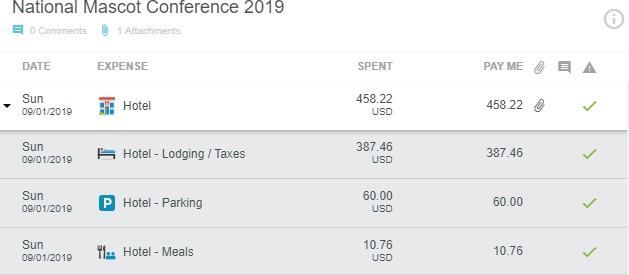
The hotel expense will be added to the report summary on the left side of the screen and the Add Itemization page will again display on the right. The remaining amount to be itemized will be displayed in the upper right corner. If you have additional expenses on the bill beyond lodging, continue itemizing these expenses using the other available expense tiles until the bill has been fully itemized and the remaining amount equals zero.

Once all expenses have been itemized, the Add Itemization window will disappear, and all itemized expenses will now appear on your report.
CHROME RIVER USER MANUAL
Per Diem Expenses
As specified in the University’s Travel Policy, which has been recently updated, all overnight travelers will be reimbursed at the per diem rate for travel meals using established federal guidelines which have been programmed by city. (See the University’s policy for additional details on per diem).
Per diem will be claimed using Chrome River’s Per Diem Wizard. Under the Meals/Entertainment tile of the expense mosaic, select Meals – Per Diem Wizard

HOFSTRA UNIVERSITY
CHROME RIVER USER MANUAL
• Enter the Start Date and End Date - the number of Days will be calculated automatically.
• Enter the Business Purpose – a business purpose must document the expense as necessary, reasonable, and an appropriate expense for the University
• Enter the Location of your travel - Begin typing and select the appropriate location of your travel.
Click once you have completed entering required information.
Once you complete the Per Diem Wizard Expense Form, you must click button on bottom right of the form, ADD TO PREVIEW

CHROME RIVER USER MANUAL
The following screen appears on the right side.
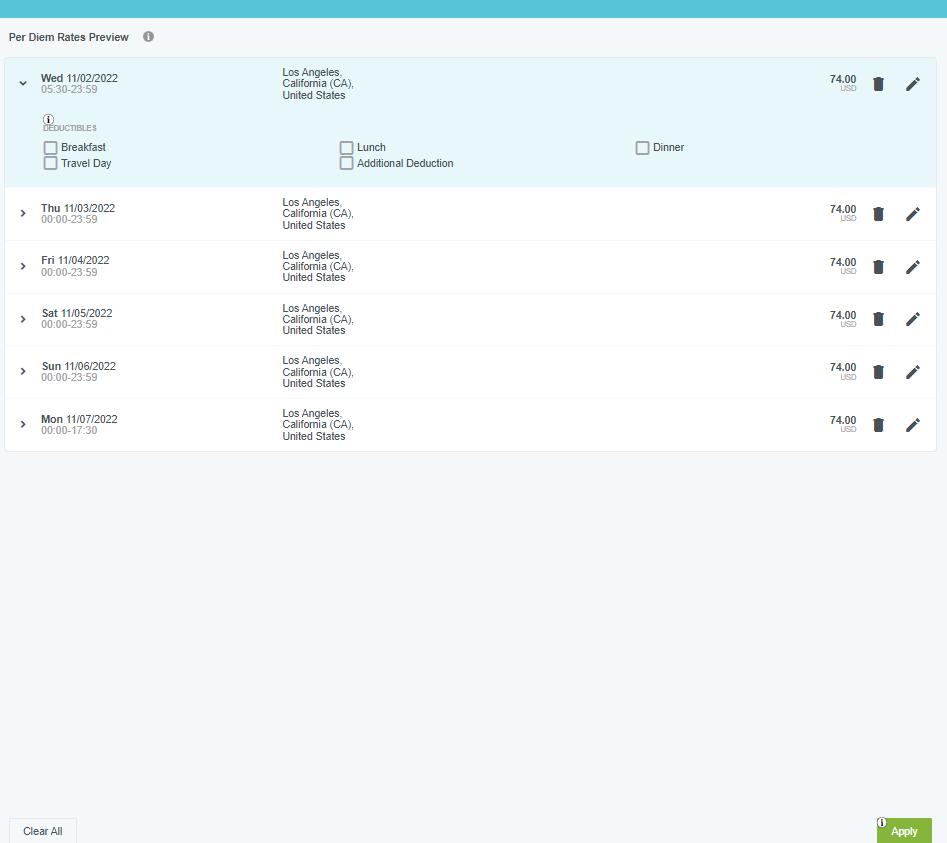
In accordance with University policy, travelers may claim a per diem meal only for meals not otherwise provided during travel. If a meal is included in a conference, paid for by another colleague, vendor or other third party, or when traveling on a partial day, the full per diem may not be claimed.
To reduce a daily per diem, click on the appropriate entry and click the checkbox to indicate any meals that should not be reimbursed. When meals are marked in the Deductibles section, the system will automatically reduce the per diem to the appropriate amount per the University’s Travel Policy.


CHROME RIVER USER MANUAL
On days of travel, you must select the travel day box and the system will automatically calculate the correct per diem rate.

CHROME RIVER USER MANUAL
When finished entering meal deductions (e.g., conference provided, colleague treated, etc.), click Apply button in the bottom right corner.

Mileage Expenses – Personal Vehicle
Employees requesting reimbursement for business use of their personal vehicle for travel shall use the Mileage expense tile (located under Ground Transportation).
CHROME RIVER USER MANUAL
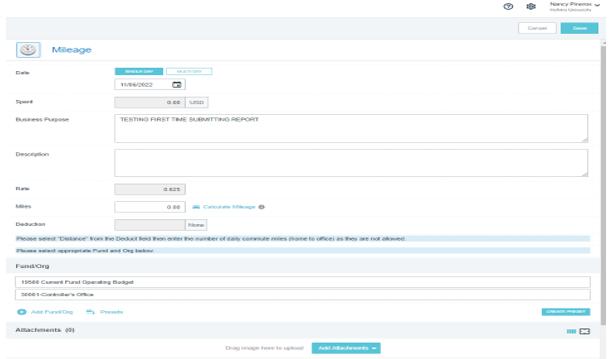
On the Mileage Expense Form, enter the date of travel (or the first day of travel for multiday trips) in the Transaction Date field, as well as a Business Purpose. Skip the description field at this point, as it will automatically be populated with the travel destinations after entering the Calculate Mileage information.
Next, select the Calculate Mileage link to access the integrated Google Maps functionality. • Calculating mileage is required to receive mileage reimbursement.
CHROME RIVER USER MANUAL
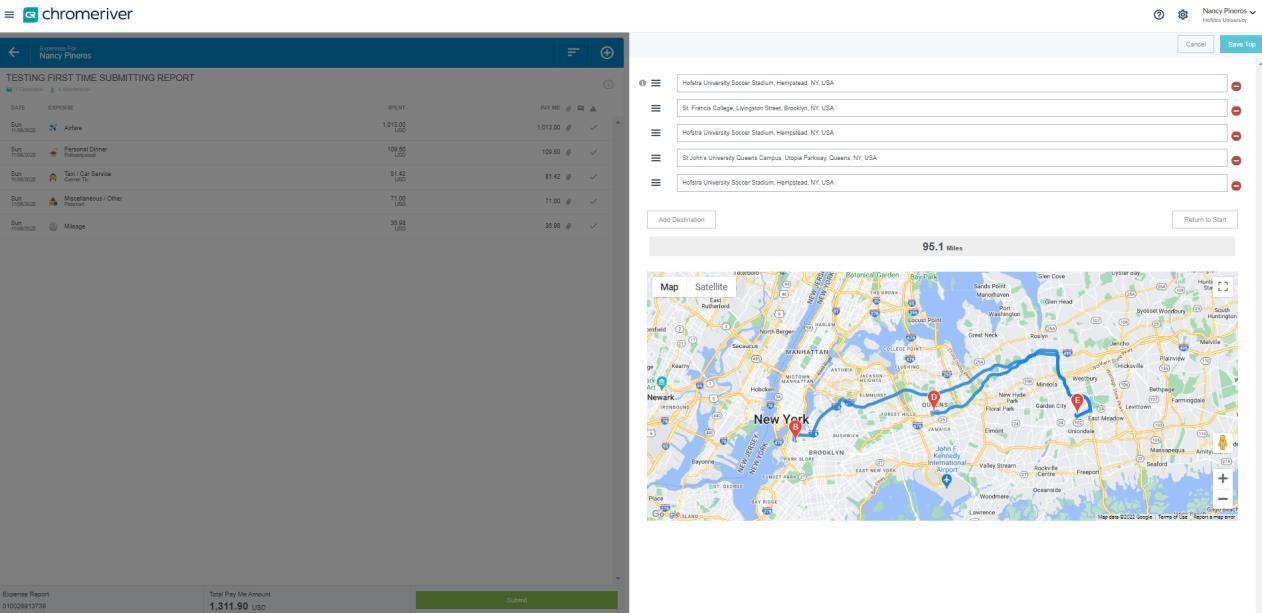
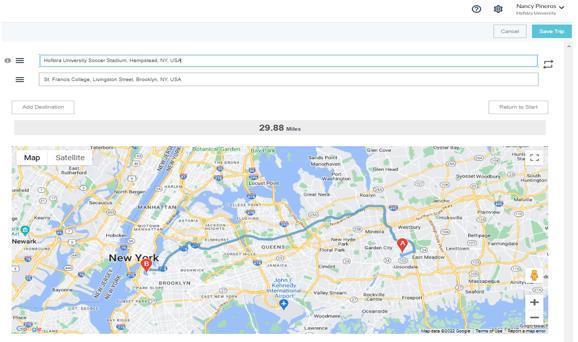
Begin entering a location name or specific address for start and end destinations.
• For trips with multiple stops, click Add Destination to add an additional destination.
Clicking Return to Start will add the first location as a new destination at the bottom of the list for roundtrip travel.
The distance and map will now reflect your route. This feature uses Google Maps and has similar functionality, including zoom controls and the ability to manually adjust the route to reflect alternate routes. Once satisfied with your route entry, click Save Trip to return to the Mileage entry screen.
CHROME RIVER USER MANUAL
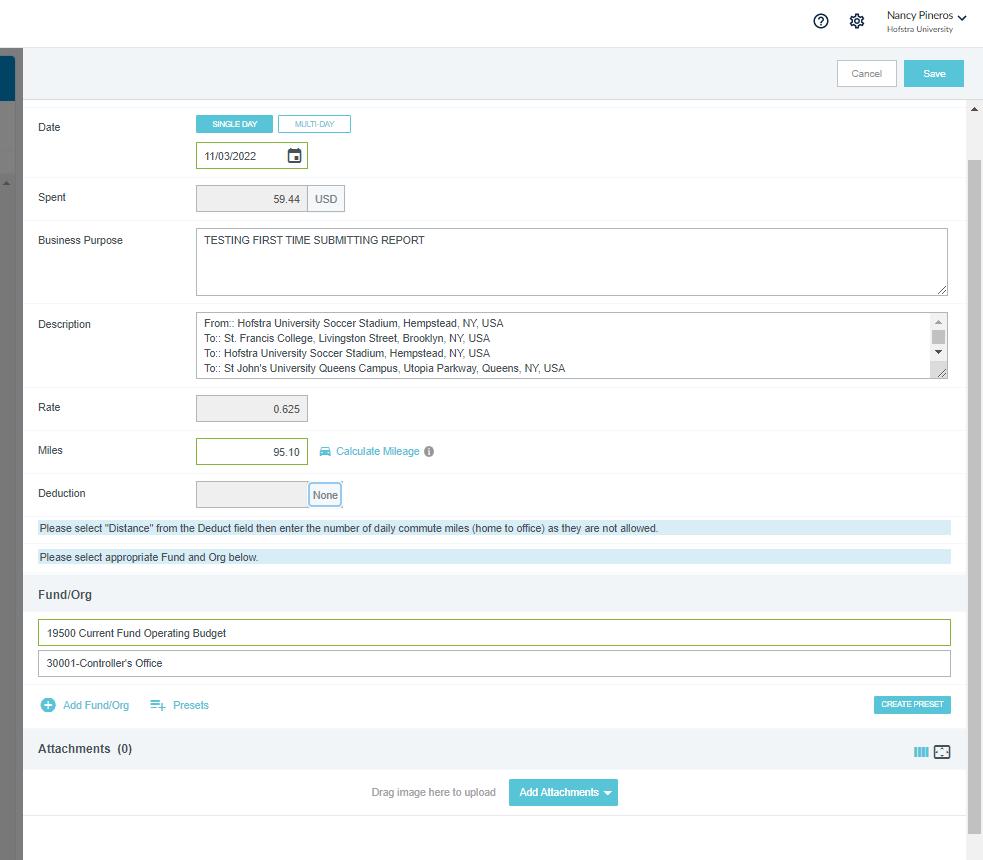
The Spent and Miles fields have now been calculated and populated, and the Description includes the destination addresses entered.
You will have the option to enter deductions for personal mileage (i.e., regular commuting miles, etc.), if applicable If there is no personal mileage in the miles presented, click None

CHROME RIVER USER MANUAL
Mileage Expenses – Employees with Vehicle Stipend
Employees receiving vehicle stipends will be reimbursed for gas at a rate of $0.15 per business mile. Employees requesting reimbursement for business use of their vehicle for travel shall use the “Mileage - Auto Stipend” expense tile (located under Ground Transportation).
CHROME RIVER USER MANUAL
On the Mileage-Auto Stipend Expense Form, enter the date of travel (or the first day of travel for multiday trips) in the Date field, as well as a Business Purpose. Skip the description field at this point, as it will automatically be populated with the travel destinations after entering the Calculate Mileage information.
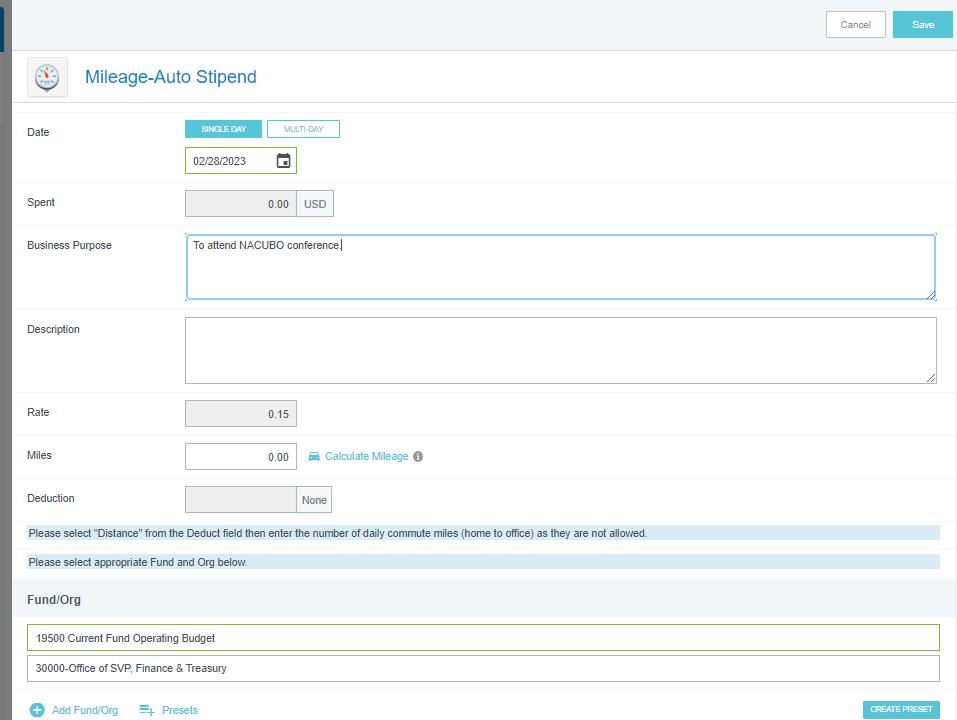
Next, select the Calculate Mileage link to access the integrated Google Maps functionality.
• Calculating mileage is required to receive mileage reimbursement.
CHROME RIVER USER MANUAL
Begin entering a location name or specific address for start and end destinations.
• For trips with multiple stops, click Add Destination to add an additional destination.
Clicking Return to Start will add the first location as a new destination at the bottom of the list for roundtrip travel.
The distance and map will now reflect your route. This feature uses Google Maps and has similar functionality, including zoom controls and the ability to manually adjust the route to reflect alternate routes. Once satisfied with your route entry, click Save Trip to return to the Mileage entry screen.


CHROME RIVER USER MANUAL
The Spent and Miles fields have now been calculated and populated, and the Description includes the destination addresses entered.
You will have the option to enter deductions for personal mileage (i.e., regular commuting miles, etc.), if applicable. If there is no personal mileage in the miles presented, click None.


CHROME RIVER USER MANUAL
Expenses with Guests
On certain expense tiles, such as Business Meals (found under Meals/ Entertainment mosaic parent tile), Chrome River will require you to provide a list or description of any guests in attendance.
For most meals, you will add the list of guests using the Attendees Widget The Attendees Widget, located under the Attendee section of the Expense Form, allows you to add both internal guests and external guests.
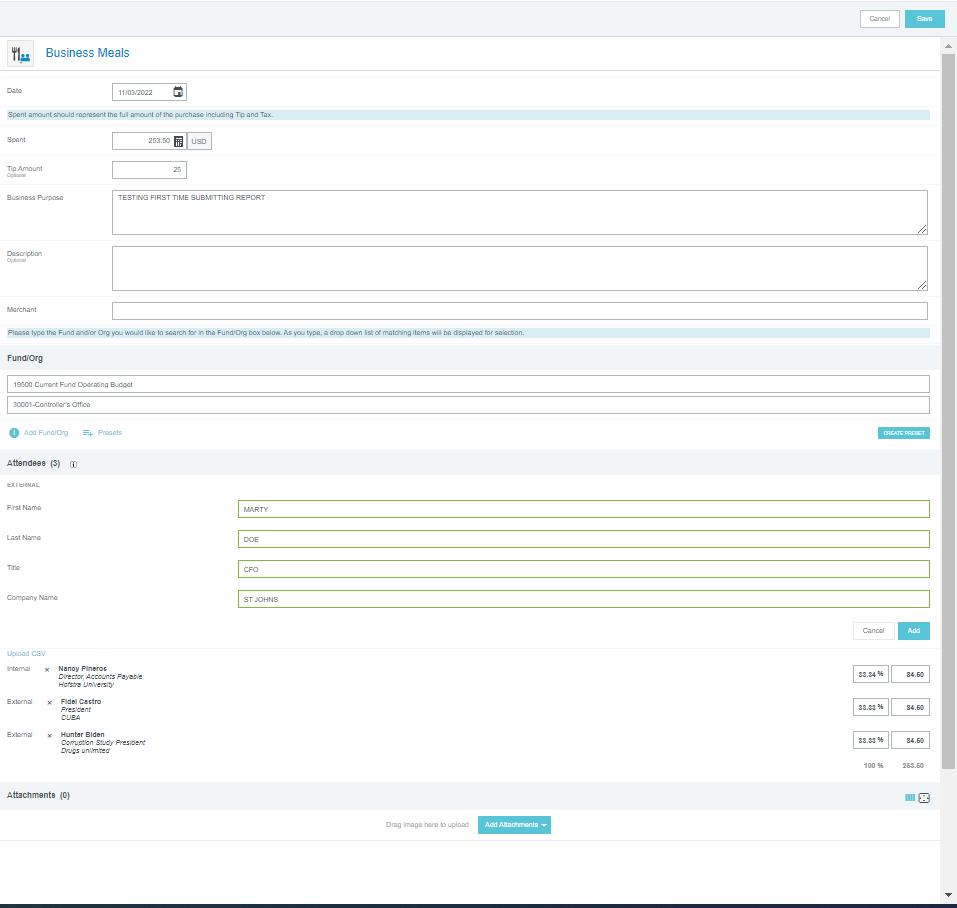
• To add internal guests, tap inside the Add Attendees field and begin typing a name. A list of possible guests will appear. Click the desired name to add.
This button has two options “Internal” and “External”. Make selection based on the guest data. You will need to enter first and last name, title, and company. If you choose external button, you must then put your cursor in the box to the right and click, this will bring up any names you previously entered or will allow you to Add New External Attendees.

CHROME RIVER USER MANUAL
To add external guests, change the selection box next to the Add Attendees field to External. If the external guest has previously been entered in the system, you can search similar to internal guests and select the name to add it. Otherwise, you will click the + Add New External Attendees link. All attendees’ business affiliation will need to be reported.


You will enter the First Name, Last Name, Title, and Company Name. Once you have entered all available and appropriate information, click Add.
If you are adding a large list of attendees (i.e., team listing), alternatively you can add a general “external attendee” and reference attached list and add complete list as an attachment. See screen prints below.
Note - The system will automatically split the total cost of the bill evenly between the number of guests added. You can leave this as it is, as you are not required to individually itemize by guest.
CHROME RIVER USER MANUAL
Itemizing Receipts (Splitting expenses between multiple accounts)
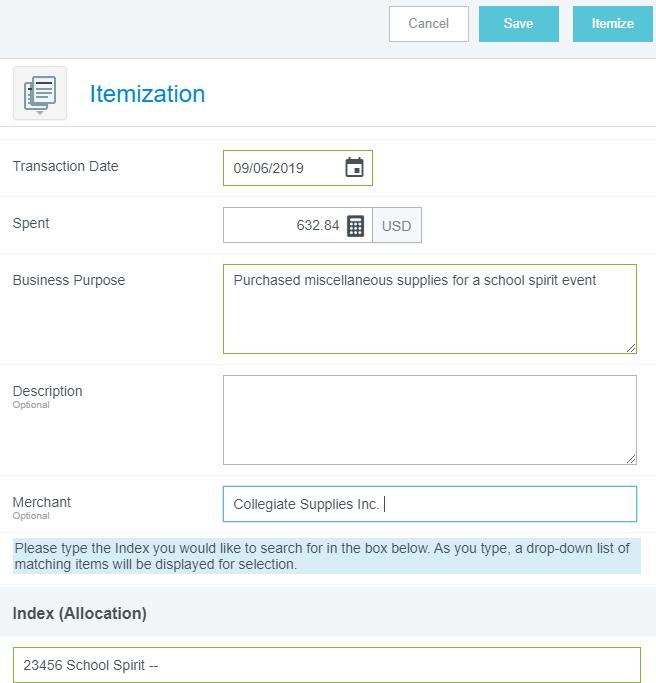
When a single receipt has expenses that need to be charged to different expense tiles (i.e., budget account codes), the Itemization expense tile should be used.
Enter the expense information with the Transaction Date, Amount Spent, Business Purpose, Description (Optional), and Merchant. The receipt will get attached to the screen where you elect to “Itemize”. See screen print below.
After completing the header and attaching your receipt, click the Itemize expenses button in the upper right corner of the form. The itemize button will bring you to tile selections for the you would like to itemize. You will not need to add receipts at the specific itemized expense screen.
CHROME RIVER USER MANUAL
The Add Itemization screen will appear. The total amount of the receipt entered on the header appears in the top right corner under Total Amount. The amount remaining to be itemized appears in red under Remaining.

• Select the appropriate expense tile for the first item. The corresponding expense form will open.
• Enter all appropriate fields, confirm the selected receipt is correct.
• When finished, click the Save button located in the upper right corner of the form.

The Add Itemization screen will appear again. The Remaining amount will be updated to account for the first expense added. Select the proper expense tile for the next item, and the corresponding expense form will open. Continue adding expenses until the bill has been fully itemized and the Remaining amount equals zero.
Once all expenses have been itemized, the Add Itemization window will disappear, and the itemized expenses will now appear on your report.
CHROME RIVER USER MANUAL
Compliance Warnings
The Chrome River systems comes with several built-in audit tools to ensure compliance with IRS regulations and University policy. To ensure timely processing of reimbursement requests, it is essential that all compliance warnings be addressed. Should you have any questions in this regard, you may contact the Director of Accounts Payable at extension 36850
A Compliance Warning indicates additional information is required before an expense can be submitted for approval and processing. Compliance warnings may be encountered when saving an Expense Form or when submitting an entire Expense Report for approval. Any line items in an expense report with a compliance warning will be noted with the yellow circle icon in the report summary to the left.
• Click the yellow circle icon and respond to the warning by either modifying the data (if there is an error) or replying to explain the warning.
• To reply to the warning, click into the Add response area under the message and enter your reply.
• Tap Post to update and close the compliance warning message.
Failure to address a Warning for an Expense Form will automatically create a violation at the Expense Report level and will prevent processing of the reimbursement request.


CHROME RIVER USER MANUAL
Compliance Violations
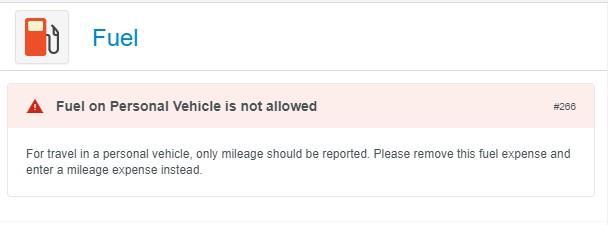
A Compliance Violation indicates the expense cannot be submitted for approval and payment A compliance violation may be encountered when saving a line item or submitting an entire Expense Report for approval.
Expense Forms with compliance violations will have a red triangle icon in the report summary to the left.
Additionally, unresolved Compliance Violations will deactivate (grey out) the Submit button. All violations will need to be resolved before the reimbursement request can be submitted.

CHROME RIVER USER MANUAL
Submitting an Expense Report
Once you have added all your expenses, attached all appropriate receipts, and resolved or responded to any Compliance Warnings or Violations, you are ready to submit your report for review and approval. Click on the green Submit button at the bottom of the report summary.
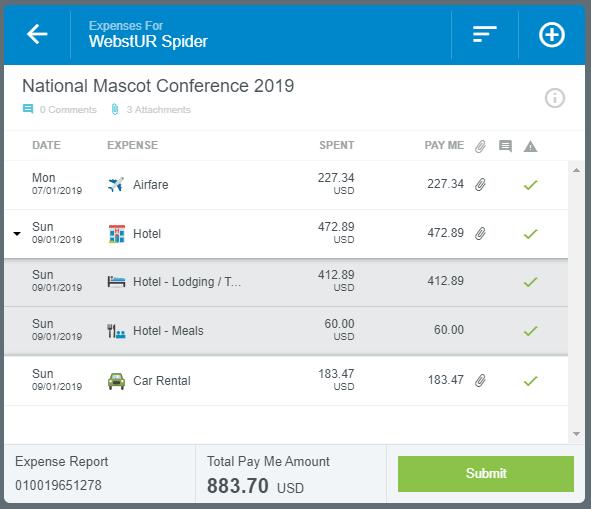
Submit Confirmation will appear at the top right of the screen. You will be given two choices:
• Click Cancel to return to the report and make any changes before submitting for approval.
• Click Submit to submit the expense report to the approval workflow.
Please note that at this screen, you can also create a PDF of your expense report, including all attachments and receipts. Just click on “PDF” before you click submit.

CHROME RIVER USER MANUAL
After you click on “PDF”, you will have the options listed below. Click on preferred option and the PDF will open will all related data. This can be saved from the screen to your computer and/or printed.

CHROME RIVER USER MANUAL
Create an Expense Report as a Delegate
If you are creating a report for someone other than yourself, you will need to be set up as a delegate by the employee. For more information on setting up a delegate, see Add a Delegate (page 14) When you have been authorized to work as another’s delegate, you will need to switch over to their account to create and edit their receipts and reports.
• Click on the User Icon in the top right corner of the Navigation Bar (with your name) and you will see a list of employees for whom you’re authorized to serve as a delegate. The numbers to the right of their name will show the number of unused expense transactions (including uploaded receipts and cash advances). The employee’s dashboard will appear and show the total number of drafts (unsubmitted) and submitted reports.
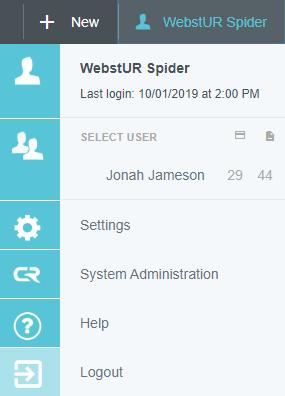
• Clicking on their name will take you into their account where you can do the following:

1. Create Expense Report
2. Edit Expense Report
3. Attach receipts / attachments to Expense Reports
4. Add receipts to gallery by sending an email to receipt@ca1.chromeriver.com, see Email to Receipt Gallery (page 23).
Delegates MAY NEVER SUBMIT Expense Reports for another employee. Each Expense Report must be approved and submitted by the employee requesting the reimbursement.
Once you have completed the creation of the Expense Report for another, you can return to your account by taping the User Icon again and selecting your name.
CHROME RIVER USER MANUAL
Report Tracking
Employees can track the status of any previously submitted Expense Reports at any time. From the Dashboard, select the Submitted Report link.

From the list of submitted reports, click on the desired Expense Report to preview it. Then tap Tracking in the preview.

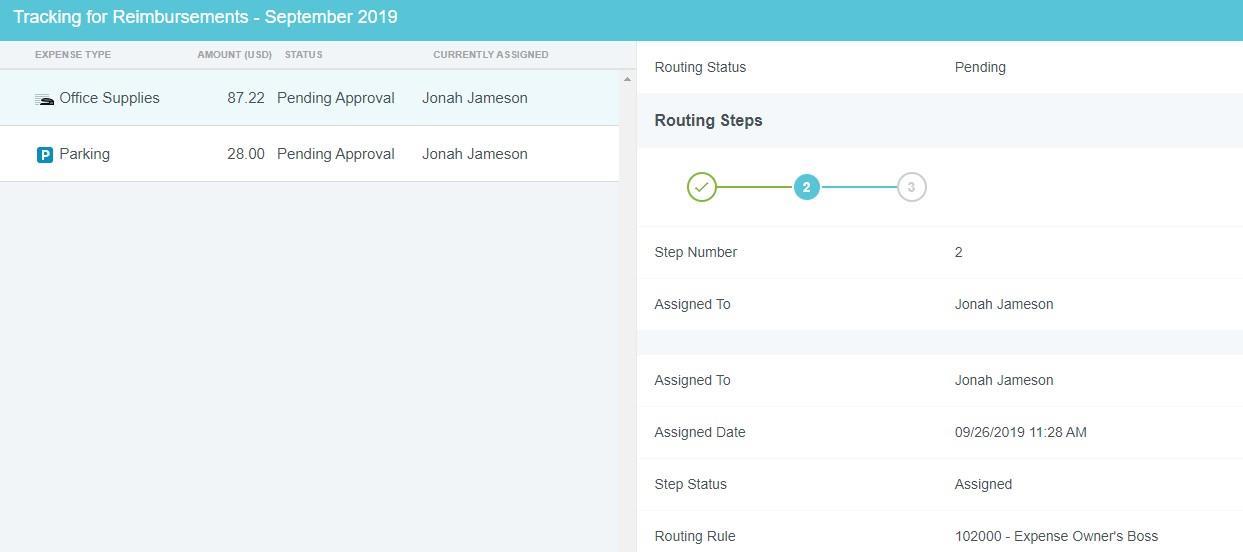
Once you have selected the Expense Report, you will see a list of every item on the report and its status. (For Hotel or Itemized expenses, tap the arrow on the left to view the status of each itemized item.) The following status options will be indicated:
• Pending: Expense has been submitted and is awaiting approval
• Returned: Approver has sent the expense back to the expense owner for adjustment
• Approved: Expense has been approved but has not yet been exported for processing.
• Exported: Approved Expense Report has been exported to Banner and will be processed.
CHROME RIVER USER MANUAL
Tap an expense item to see where it is in the approval process, including the approver to whom it is currently assigned, the date, and the system rule that triggered the assignment. Tapping each circle under Routing Steps will show you complete details for that step.
Recall a Report
All line items must be in Pending approval status to recall an Expense Report. You may recall a report to Draft status if none of the line items have been fully approved.
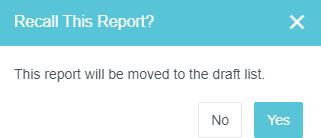
In the submitted Expense Reports list, tap Recall in the preview.

You will be asked to verify that you wish to send the report back to the Draft Expense Reports list. Tap Yes.
Following your action to recall the report, the report will appear in your Draft Expense Reports list, pending your updates or changes. When the report is resubmitted, all approvers will need to reapprove the Expense Report.
CHROME RIVER USER MANUAL
Returned Reports

An approver may return one or more line items on an Expense Report to the expense owner during the approval process. The report will appear in the Returned Expense section on your dashboard. You will also receive email notification that an expense item has been returned together with a summary and explanation of any issue

You may double click the returned report to open it. The returned line item(s) will be highlighted in light yellow. Approver notes that apply to the entire report can be accessed by clicking the Comments link in the header. If the approver left a note on a specific line item, it will be indicated by a blue note icon.
Returned line items can be edited. Click on the returned line item and then tap Edit in the preview. If the approver has asked you to remove an expense, click Delete in the expense item’s preview or inside the line item to remove it.

CHROME RIVER USER MANUAL
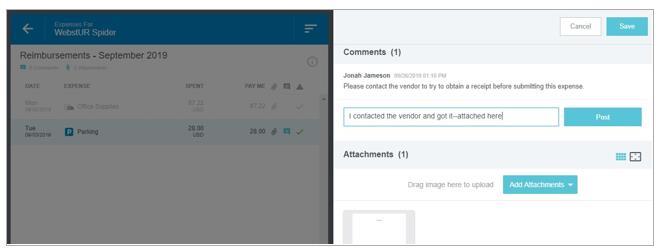
You will need to view Comments from the approver and reply or make the necessary changes. You may reply to comments via the box below. Tap Post to add it to the report. Make any necessary changes to the line item and click Save
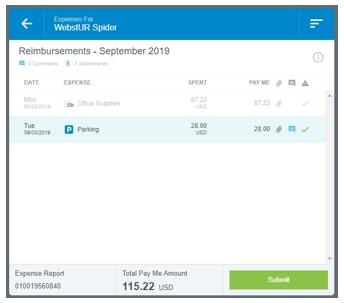
When all changes have been made, click Submit to resubmit the line item(s) for approval.
CHROME RIVER USER MANUAL
In the Submit Confirmation window, click Submit
Approvals
Chrome River will automatically route reports to the appropriate approvers based on system rules and assignments. Your immediate supervisor and the budget manager for the account charged will be required to approve the reimbursement request. Additional approvals may be required for gifts or grants. Approvers will receive an email notification that there is an expense report in their queue for approval. Approvers have two methods available to approve the report – approval via Email or approval in the Chrome River Application.
Approval via Email
Chrome River will email Expense Reports to the approver. Approvers can approve all expenses for payment or return all expenses to the expense owner with questions or comments from within the email.

• Approving or returning only specific line items within a report requires the approver to log into the Chrome River application, which can be done through the link at the bottom of the email.
Approvers receive an email with details of the report, including the ability to view receipts associated with each expense. At the bottom of the email, approvers can view an expense summary and will also see ACCEPT and RETURN buttons.
CHROME RIVER USER MANUAL

Note: At the bottom of the report, click the VIEW RECEIPTS link to view a PDF of all receipts attached to the report.
Approvers are required to review all supporting documentation to ensure compliance with University policy and will be asked to attest to their review. To view a receipt for a line item, click the View button next to the Receipts line.


CHROME RIVER USER MANUAL
Any automated compliance issue for line items will be noted with a Compliance Warning flag, as well as an explanation of the compliance issue and a response from the expense owner.


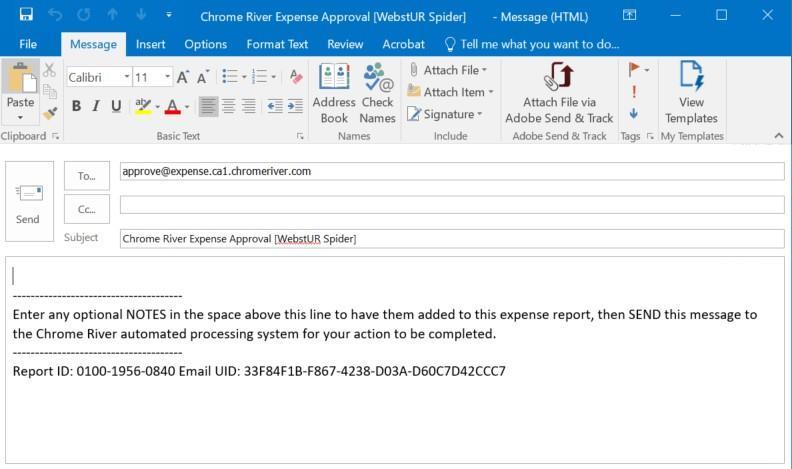
To approve a report by email, click the ACCEPT button - a new email window will open.
Below is the Approver’s confirmation:

• If you have any comments you would like to include in the report, type them into the body of the email before sending, and they will be added to the report. (This is optional.)
• Hit send and the system will be notified of your approval and the report will move forward in the approval queue.
CHROME RIVER USER MANUAL
To return the report, click the RETURN button – a new email window will open.
• Enter an explanation for why you are returning the report in the body of the email.
• Hit send and the system will return the report to the submitter for corrections.
If an approver returns a report, the resubmitted report will route back to the same approver but will not require additional approval from previous approvers (if applicable).
While approvers may return a report from the email, they cannot adjust a report from the email. Instead, they must do so from within the Chrome River application, which is accessible from the link at the bottom of the email.
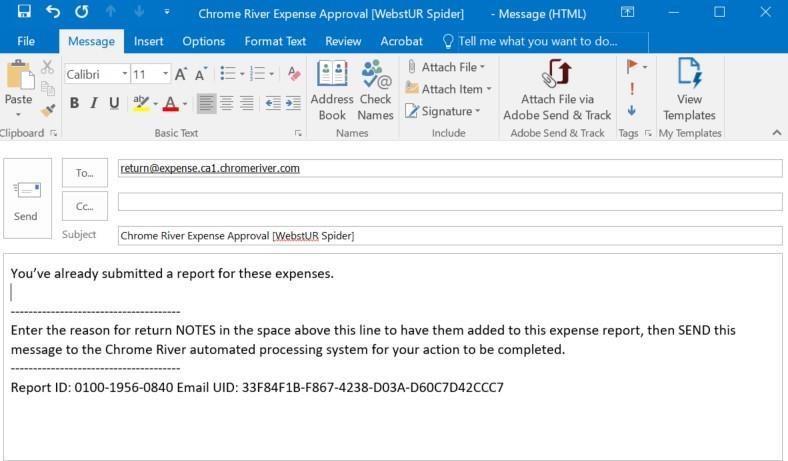
Important Note: If you attempt to approve an expense via email that has already been changed (e.g., the expense owner recalled or resubmitted the report) you will receive an Expense Approval Failure Notification email alerting you to approve via the most recently sent approval email for that report.

CHROME RIVER USER MANUAL
Approval in Chrome River Application
After logging into Chrome River, any approvers with reports pending approval will show up in the yellow box in their Dashboard. The box will display the number of expense reports awaiting approval. Click on Expense Reports to access the respective list of reports.

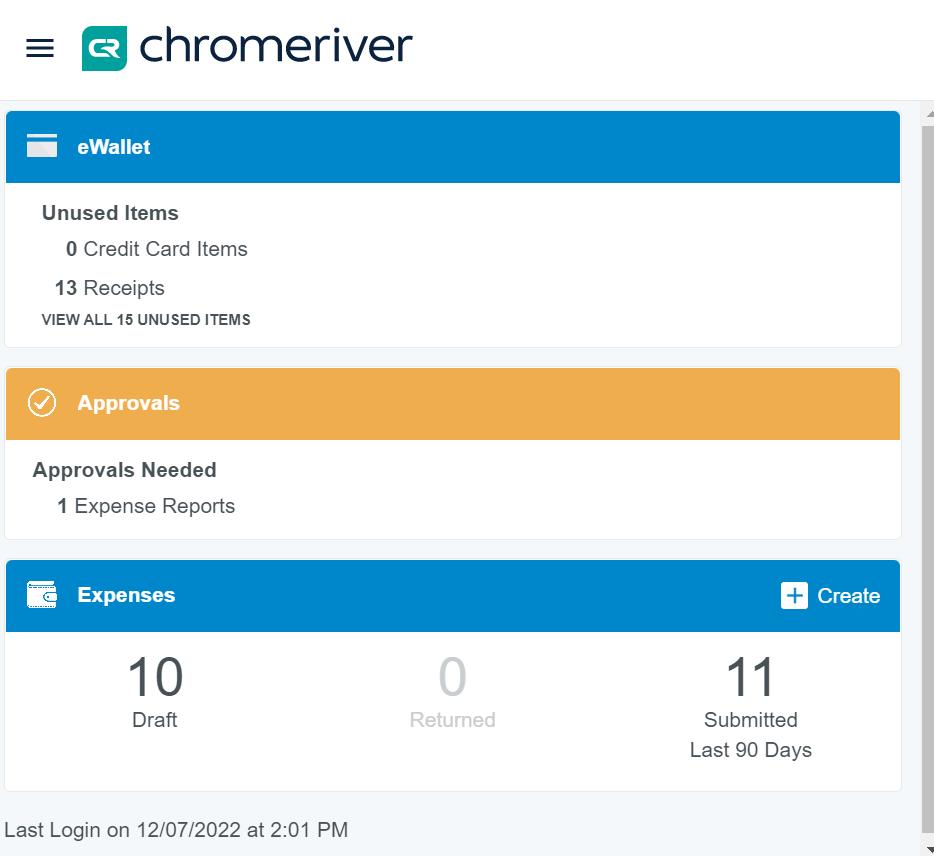
A new screen will open, and you will see reports awaiting your approval.
Sort option
Search option
• From this screen you can Sort the reports by clicking the menu button in the top right corner of the approval panel.
• If there are several reports awaiting approval, you can Search for a specific one by clicking the magnifying glass icon and searching by Expense Owner or Report ID.
Note: Any reports submitted with Compliance Warnings will be noted with a red triangle symbol on the line of the report
CHROME RIVER USER MANUAL
Below is the Approver’s confirmation:
Click on any report in the approval list, and the expense report header will display in the window on the right side of the screen. This will include a summary of the expenses, funding sources, and all receipts attached to the report.
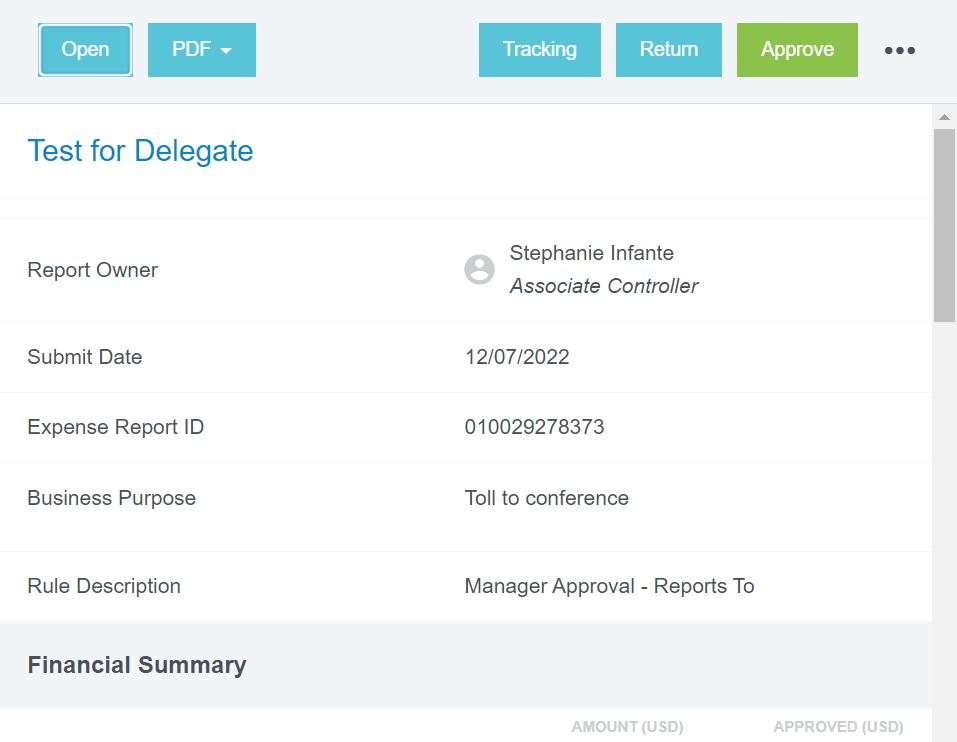

From the report preview window, you can perform the following functions:
• Open – This will open the full report.
• PDF – This will provide several options for printing the report to PDF.
• Tracking – This provides a summary of the tracking of expenses in the report. Based on the index charged, each line on a report can potentially route differently. Click on each expense line to view the tracking information for that item.
CHROME RIVER USER MANUAL
• Return
Return the report to the submitter. The approver will be asked for an explanation and all lines of the report will be rejected. The entire report will be returned to the submitter. If you would like to reject individual line items, you can do so in the full report.
• Approve
This will approve the full report. It is recommended that approvers review the detailed report before approving.
Additionally, you may add comments to the report by entering them in the Comments section of the report summary.
For approvers to properly review an expense report, open the full report by clicking the OPEN button at the top of the report summary. All submitted expenses will now be listed on the left side of the screen.


CHROME RIVER USER MANUAL
To view details of an expense, click on that expense and the details will display on the right side of the screen, including any receipts.
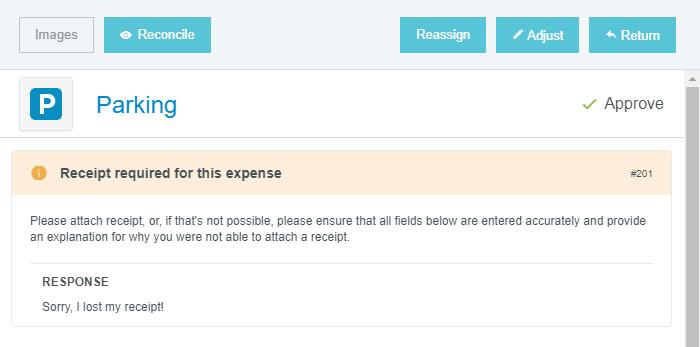
Any expenses submitted with a Compliance Warning will be noted with a red triangle symbol on the line item. If you click on these line items, a warning box will display at the top of the expense summary detailing the compliance violation along with an explanation from the report owner.
As with the Expense Report header, you may also add comments to individual Expense Forms by entering them under the Comments section.

Within an individual Expense Form, approvers have the option to
• Reassign the item to another approver
• Adjust the item
• Return the item to the expense submitter
CHROME RIVER USER MANUAL
Adjust an Expense
The approver has the option to adjust several fields in an expense if changes or updates are required. Click on the Adjust button in the top right corner of the selected expense. Below are items that can be adjusted.
The approver can adjust the following items on an expense:
• Approved amount – approvers can only reduce the amount
• Business purpose
• Allocation
• Comments – approvers can add an additional comment, but they cannot remove comments.
• Attachments – approvers can add additional attachments.

CHROME RIVER USER MANUAL
After making an adjustment, an adjustment note is required by the approver. The approver can also notify the expense owner of the adjustment.
• If you would like to notify expense owner detailing the adjustment, select the Notify Expense Owner box. If you do not want to notify the expense owner, make sure this box is unchecked.

• Click Save to finalize the adjustment.
Add adjustment note
CHROME RIVER USER MANUAL
Return an Expense
Individual expenses can also be returned to the expense owner. Click Return on the selected expense and the following screen will appear.
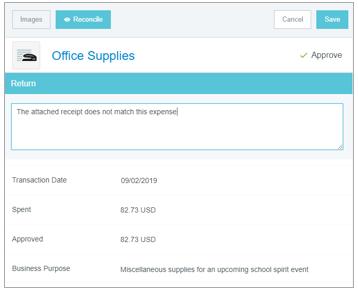
On the next screen the approver is required to enter an explanation of why the expense is being returned. After doing so, click Save. Add

CHROME RIVER USER MANUAL
After indicating the expense or expenses you would like to return, those items selected will be noted with a red return arrow. The expenses that are approved will be noted with the green checkmark.


• Select the Submit button at the bottom of the expense line list to return the expenses noted with the red arrow.
• Select the Return button to return all expense lines in the report to the expense owner.
Click Submit and this line item (and all with green checkmarks) will move forward in approval queue.
Click Submit and this line will be returned to the expense owner.
Important Note:
• If you return a report, there are limited changes the expense owner can make, and they will be unable to add any new expenses to the report.
o Instead, in such circumstances you may prefer to contact the expense owner and ask them to Recall the report. This provides the expense owner with more flexibility for editing the report.

Reconcile
CHROME RIVER USER MANUAL
Each individual expense also has a Reconcile button.

• If you are auditing a report with multiple expense lines, you can click this button to mark lines you have already reviewed.

o The line will now appear with a green circled checkmark next to it on the report summary, but this will have no impact on the processing of the expense.
• To remove this icon, click the Unreconcile button.
Approve a Report
After you have reviewed the report and are ready to approve, click the Submit button at the bottom of the expense report summary.
Note: The approval function within a report is indicated using the Submit button (as opposed to Approved) due to the system needing to recalculate the report in the event there were adjustments made by the approver.
Once the Submit button has been clicked, the submit confirmation screen will appear. Again, click Submit
After clicking submit, a submit confirmation will be displayed.

CHROME RIVER USER MANUAL
Inquiry Function
The Inquiry function allows you and your delegates to perform quick inquiries on your activity by category. These inquiries include items such as expense reports, expense items, delegates, cash advances, pre-approvals, and paid expenses.
To access inquiry reports, tap the Menu Button in the upper left corner of the homepage and click Inquiry
CHROME RIVER USER MANUAL
You are now on the Inquiry menu. Click the Expense header to expand the list of reports available. To run a report, simply click on the title and edit date parameters as needed.

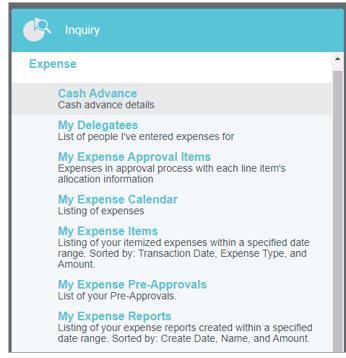
The results will appear in the window on the right. By default, the reports filter results to show the current month. Most reports will provide a date filter in the right corner to adjust the date range displayed.
Any columns with a funnel icon can be filtered based on specified criteria.

CHROME RIVER USER MANUAL
Any columns with the three-dot icon can be used to group results. Simply drag the header name into the blue bar at the top of the report, and the results will be grouped accordingly.
Below is a list of the most helpful inquiries:
My Expense Reports – Provides a list of Expense Reports by total dollar amount. This report only reflects reports currently in process (Draft, Pending Approval, or Returned). Once an expense has been approved and exported to Banner to be paid, it will no longer appear.

My Expense Items – Allows you to view the status (Draft, Pending Approval, Approved, Returned, Exported) of each individual expense under your account. You can also request expense item details along with the associated receipt images for up to 50-line items as a PDF. Simply click Request Images and a link to the PDF will be emailed to your primary email address.
My Delegates – Provides a list of people you serve as a delegate that have unsubmitted expenses.
My Expense Calendar – Shows your expenses in the form of a calendar. You can view the calendar by month with the option to view all or specific expense types. By clicking onto an expense within the calendar, you can view the details of a specific expense.
My Expense Approval Items – Provides approvers a list of expense items, per expense owner, that are their responsibility to approve. The inquiry includes each expense per line item along with the charged index under the Matter column. The status of each expense can be found in the Action column, which will show if an expense is Pending, Returned, or Approved. Once reports are fully approved by all approvers, the expense items will no longer appear in this report.
